
AL500B
OBD-II Scanner & Battery Tester USER MANUAL


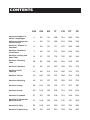
CONTENTS
Manual Support in
Other Languages
Section 3 Using the
Scan Tool
Section 7 Print
Section 11 Update
Section 1 What's in
the Box?
Section 5 Review
Section 9 Help
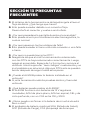
Section 13 FAQ
DE
56
100
56
101
59
104
60
106
67
107
82
108
95
108
98
110
EN
4
45
4
46
6
48
7
50
14
51
28
51
41
52
43
53
ES
112
156
112
157
115
159
116
162
123
162
138
163
151
164
154
166
IT
168
212
168
213
171
215
172
218
179
218
194
219
207
220
210
222
FR
224
268
224
269
227
271
228
274
235
274
250
275
263
276
266
278
280
324
280
325
283
327
284
330
291
330
306
331
319
332
322
334
PT
336
378
336
379
338
381
339
384
346
384
361
385
373
386
376
387
JP
Safety Is Always the
First Priority!
Section 4 Battery
Test
Section 8 Setting
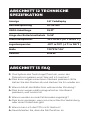
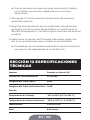
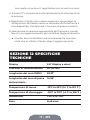
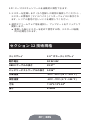
Section 12 Technical
Specication
Section 2 Product
Overviews
Section 6 DTC
Lookup
Section 10 Info
Section 14 Warranty

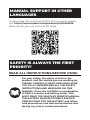
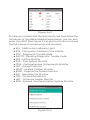
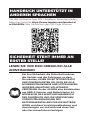
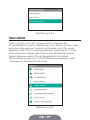
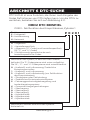
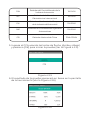
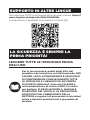
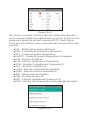
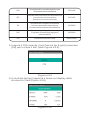
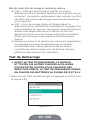
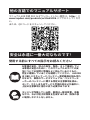
MANUAL SUPPORT IN OTHER
LANGUAGES
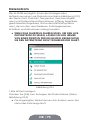
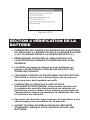
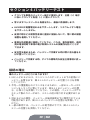
SAFETY IS ALWAYS THE FIRST
PRIORITY!
For your safety, the safety of others, the
product, and the vehicle you are working on,
PLEASE, CAREFULLY READ AND MAKE SURE
YOU FULLY UNDERSTAND ALL THE SAFETY
INSTRUCTIONS AND MESSAGES ON THIS
MANUAL. Given the AL500B is a combination
of OBD-II scanner and battery tester, YOU
MUST READ THE VEHICLE'S SERVICE MANUAL,
THE BATTERY MANUFACTURER’S SPECIFIC
PRECAUTIONS FOR THE BATTERY and follow
said precautions and instructions before and
during any test or service procedure.
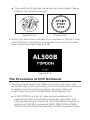
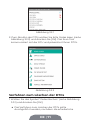
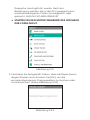
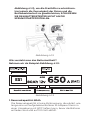
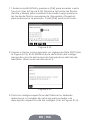
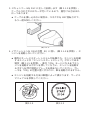
To download the multilingual PDF of the manual, please
visit https://www.topdon.com/products/artilink500b.
Alternatively, you can scan the QR Code.
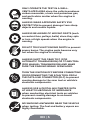
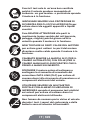
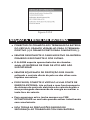
READ ALL INSTRUCTIONS BEFORE USING

EN | 5
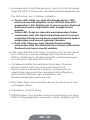
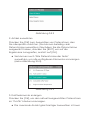
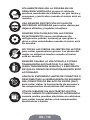
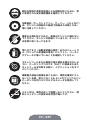
ONLY OPERATE THE TEST IN A WELL-
VENTILATED AREA since the vehicle produces
carbon monoxide, a toxic and poisonous gas,
and particulate matter when the engine is
running.
ALWAYS SHIFT THE GEAR TO P (FOR
AUTOMATIC TRANSMISSION) OR TO NEUTRAL
(FOR MANUAL TRANSMISSION) AND MAKE
SURE THE PARKING BRAKE IS ENGAGED.
ALWAYS BE AWARE OF MOVING PARTS (such
as coolant fans, pulleys, belts) since they spin
or turn at high speeds when the engine is
running.
ALWAYS WEAR APPROVED SAFETY EYE
PROTECTION to prevent damage from sharp
objects and caustic liquids.
TURN THE IGNITION OFF BEFORE CONNECTING
OR DISCONNECTING THE SCAN TOOL FROM
THE DATA LINK CONNECTOR (DLC) to prevent
causing damage to the scan tool or vehicle's
electronic components.
ALWAYS USE A DIGITAL MULTIMETER WITH
AT LEAST 10 MEGOHMS OF IMPEDANCE
when conducting electrical tests on vehicles
to prevent causing damage to on-board
electronic components.
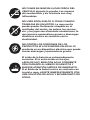
NO SMOKING ANYWHERE NEAR THE VEHICLE
when testing. The fuel and battery vapors are
highly ammable.
DO NOT TOUCH HOT ENGINE PARTS to prevent
severe burns. The engine parts become very
hot when the engine is running.

DO NOT WEAR LOOSE CLOTHING OR JEWELRY
WHEN WORKING ON AN ENGINE. Loose
clothing can easily be caught in the engine's
fan, pulleys, belts, etc. and jewelry is highly
conductive, which causes severe burn or
electric shock if it contacts with electricity.
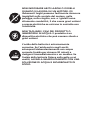
Battery acid is extremely corrosive. If acid gets
into your eyes, FLUSH THEM THOROUGHLY
WITH COLD RUNNING WATER FOR AT LEAST
20 MINUTES AND SEEK MEDICAL ATTENTION
IMMEDIATELY. If battery acid gets on your skin
or clothing, WASH IT IMMEDIATELY WITH A
SOLUTION OF WATER AND BAKING SODA.
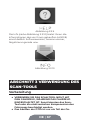
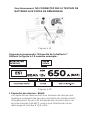
AL500B
Battery Test Cable with Clamps
OBD-II 16-pin Connector Cable
Mini-USB Data Transfer Cable
Carrying Bag
User Manual
Quick User Guide
DO NOT CUT THE PRODUCTS CORDS OR
SUBMERGE THEM IN WATER. The product is
an electrical device that can cause shock and
severe burns.
SECTION 1
WHAT'S IN THE BOX?

EN | 7
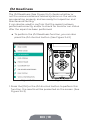
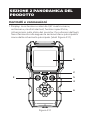
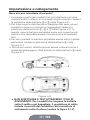
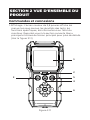
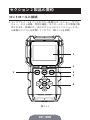
SECTION 2
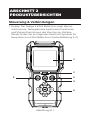
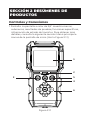
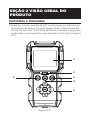
PRODUCT OVERVIEWS
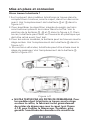
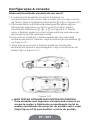
Controls & Connections
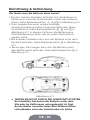
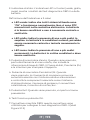
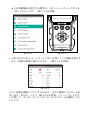
1. Display: The 2.8" colored screen shows menus, submenus,
test results, specic functions, monitor status info. For
further details, please refer to the following section Main
Menu & Home Screen Icons. (See Figure 2.1.1)
Figure 2.1.1
1
2
5
4
6
3

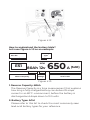
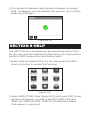
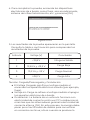
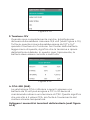
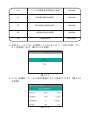
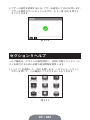
2. Indicator Status: The 3-color (green. yellow, red) LED
indicator shows the OBD-II diagnostic and battery test
results.
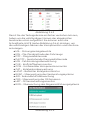
The Denition of 3-Color Indicator
● Green LED: Indicates that all on-board systems are
"OK" operating normally. There is no DTC stored in
the ECU. The battery is in a good condition and no
need to charge or replace it.
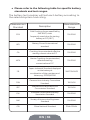
● Yellow LED: Indicates that the pending code(s) are
present. The battery is in a normal condition, might
need to be charged and tested again later.
● Red LED: Indicates that the permanent code(s) are
present. The battery is in a bad condition and needs
to be replaced.
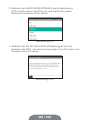
3. Help Shortcut Button: When pressed, it leads you directly
to the Help menu, which includes the basic info of OBD-
II, Datastream, I/M Readiness, and instructions for printing
the report.
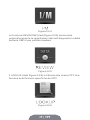
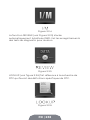
4. I/M Readiness Shortcut Button: When pressed, the scan
tool automatically communicates with the emission-
related system and monitor associated components such
as the fuel system, oxygen sensor, catalyst converter,
misre monitor, etc.
5. Exit Button: When pressed, it brings you back to the
previous menu.
6. Arrow Keys & OK Button.
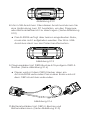
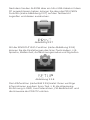
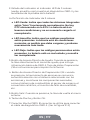
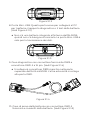
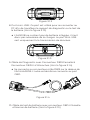
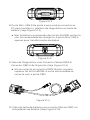
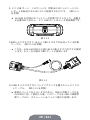
7. DB15 Male Connector: The connector is used to connect
the OBD-II diagnostic cable. (See Figure 2.1.2)
Figure 2.1.2

EN | 9
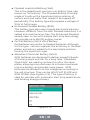
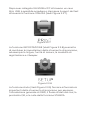
● There is no built-in battery inside the AL500B, so no
need to charge it. The Mini-USB port is only for data
transfer.
8. Mini-USB Port: This port is for you to connect to the PC to
transfer the diagnostic or battery test report. (See Figure
2.1.3)
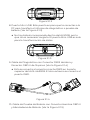
● This connects to the DB15 Male connector at the top of
the ArtiLink500B. The other end connects to the OBD
port.
9. Diagnostic Cable with DB15 Female Connector & 16-pin
OBD-II Connector. (See Figure 2.1.4)
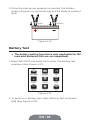
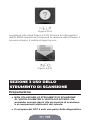
10. Battery Test Cable with OBD-II Female Connector &
Battery Clamps. (See Figure 2.1.5)
● After the OBD-II diagnostic cable is properly connected
to the AL500B, connect this cable to the OBD-
II diagnostic cable, and the clamps to the battery
terminals to test the vehicle battery.
Figure 2.1.3
Figure 2.1.4

Figure 2.2.1
Figure 2.1.5
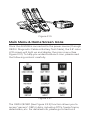
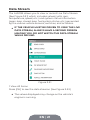
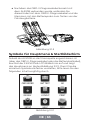
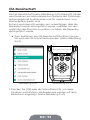
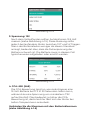
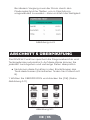
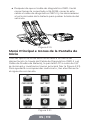
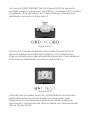
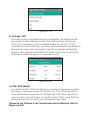
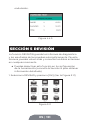
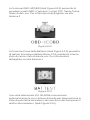
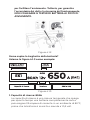
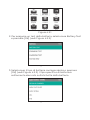
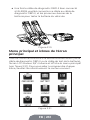
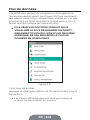
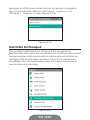
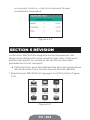
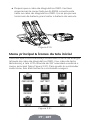
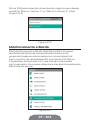
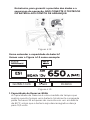
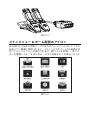
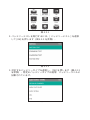
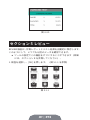
Main Menu & Home Screen Icons
Once the AL500B is connected to the power source (through
OBD-II Diagnostic Cable or Battery Test Cable), the 2.8" color
LCD screen will light up and display the main menu (See
Figure 2.2.1). To help you understand each icon, please read
the following content carefully.
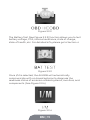
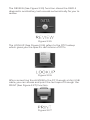
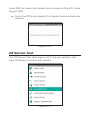
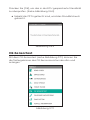
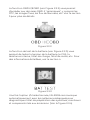
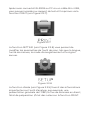
The OBD-II/EOBD (See Figure 2.2.2) function allows you to
access "generic" OBD-II data, including DTCs, freeze frame,
datastream, etc. For detailed info, please go to Section 3

EN | 11
Figure 2.2.2
Figure 2.2.3
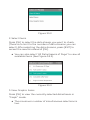
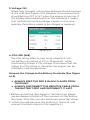
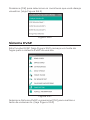
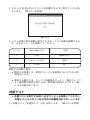
The Battery Test (See Figure 2.2.3) function allows you to test
battery voltage, CCA, internal resistance, state of charge,
state of health, etc. For detailed info, please go to Section 4
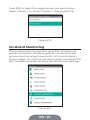
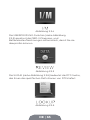
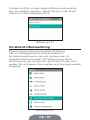
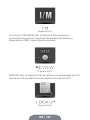
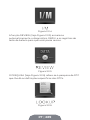
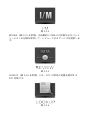
Once I/M is selected, the AL500B will automatically
communicate with on-board systems to diagnose the
readiness status of emission-related systems, monitors, and
components. (See Figure 2.2.4)
Figure 2.2.4

Figure 2.2.7
Figure 2.2.6
Figure 2.2.5
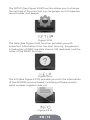
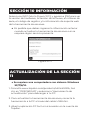
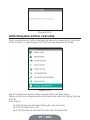
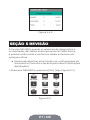
The REVIEW (See Figure 2.2.5) function stores the OBD-II
diagnostic and battery test records automatically for you to
review.
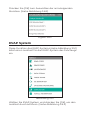
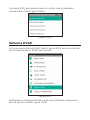
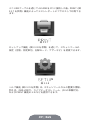
The LOOKUP (See Figure 2.2.6) refers to the DTC lookup
which gives you the specic denitions of DTCs.
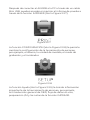
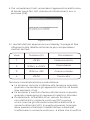
After connecting the AL500B to the PC through a Mini USB
cable, you can access and print the test report through the
PRINT (See Figure 2.2.7) function.

EN | 13
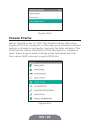
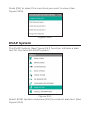
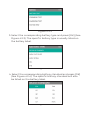
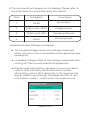
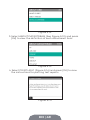
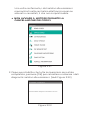
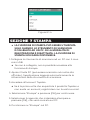
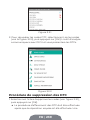
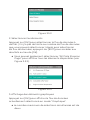
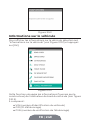
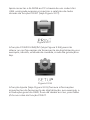
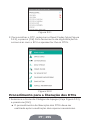
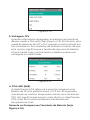
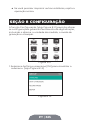
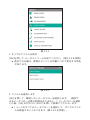
The SETUP (See Figure 2.2.8) function allows you to change
the settings of the scan tool, e.g., language, unit of measure,
record mode, and beeper.
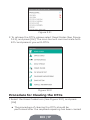
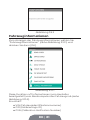
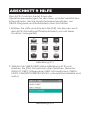
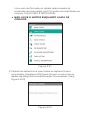
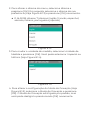
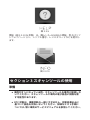
The Help (See Figure 2.2.9) function provides you with
important information from the scan tool, e.g., the general
introduction of OBD, live data stream, I/M readiness, and the
notes of the PRINT function.
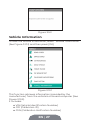
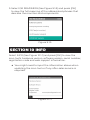
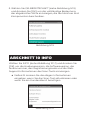
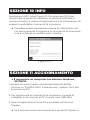
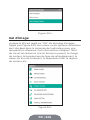
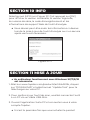
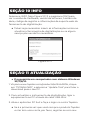
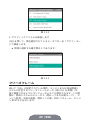
The Info (See Figure 2.2.10) provides you with the information
of the AL500B you purchased, including software version,
serial number, register code, etc.
Figure 2.2.8
Figure 2.2.9
Figure 2.2.10

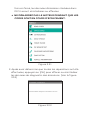
Figure 3.1.1
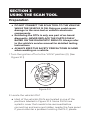
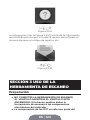
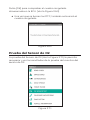
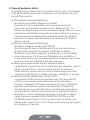
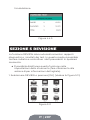
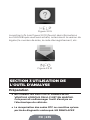
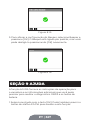
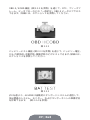
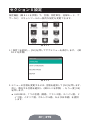
SECTION 3
USING THE SCAN TOOL
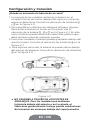
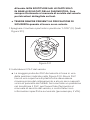
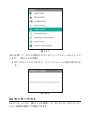
Preparation
● DO NOT CONNECT THE SCAN TOOL TO THE VEHICLE
WHILE THE VEHICLE IS ON. Doing so could cause
damage to the scan tool or vehicle's electronic
components.
● Retrieving the DTCs is only one part of on-board
diagnostic. NEVER REPLACE THE PARTS SOLELY
BASED ON THE DIAGNOSTIC RESULTS. Always refer
to the vehicle's service manual for detailed testing
instructions.
● ALWAYS KEEP THE SAFETY PRECAUTIONS IN MIND
when working on a vehicle.
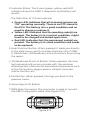
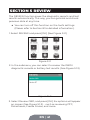
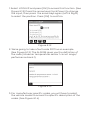
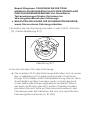
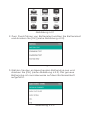
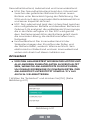
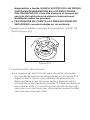
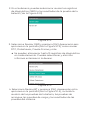
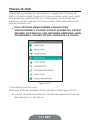
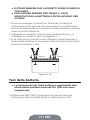
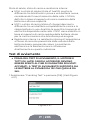
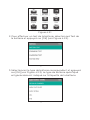
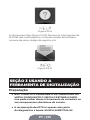
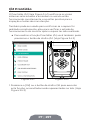
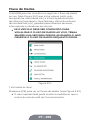
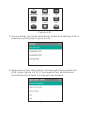
1. Turn the ignition off or to the "LOCK" position (0). (See
Figure 3.1.1)
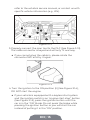
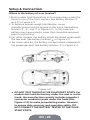
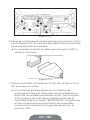
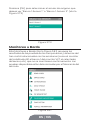
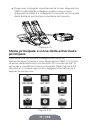
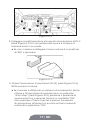
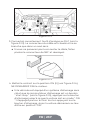
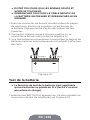
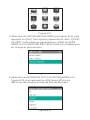
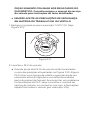
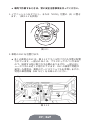
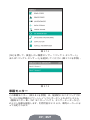
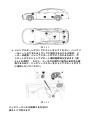
2. Locate the vehicle's DLC
● Most of the vehicle's DLCs are located in one of the
positions labeled in Figure 3.1.2. Some DLCs have
a plastic cover that needs to be removed before
connecting and some are hidden nearby the fuse panel.
If you encounter a problem locating the DLC, please

EN | 15
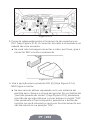
Figure 3.1.2
Figure 3.1.3
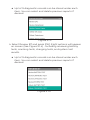
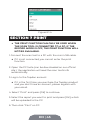
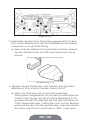
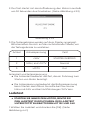
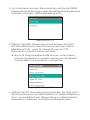
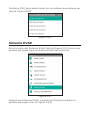
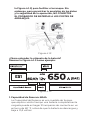
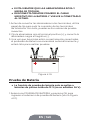
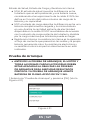
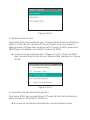
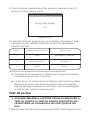
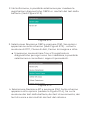
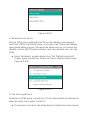
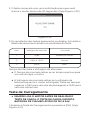
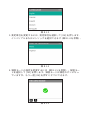
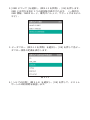
3. Properly connect the scan tool to the DLC (See Figure 3.1.3).
The cable connector is keyed and will only t one way.
● If you cannot plug the cable in, please rotate the
connecter 180° and try it again.
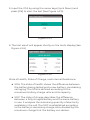
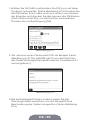
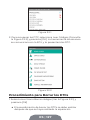
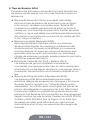
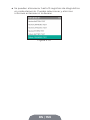
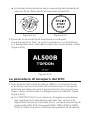
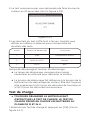
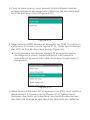
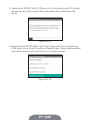
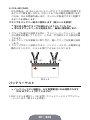
4. Turn the ignition to the ON position (II) (See Figure 3.1.4),
DO NOT start the engine.
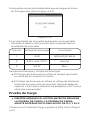
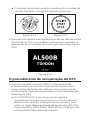
● If your vehicle is equipped with a keyless start system
and the ignition switch is an "engine start-stop" button
(See Figure 3.1.5), press the ignition button until the
car is in the "ON" Mode. Do not press the brake while
pressing the ignition button or you will start the car
instead of putting it in the "ON" position.
refer to the vehicle's service manual, or contact us with
specic vehicle information (e.g., VIN).

● The method of ignition varies by vehicle model. Please
refer to the service manual.
Figure 3.1.4 Figure 3.1.5
Figure 3.1.6
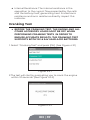
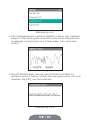
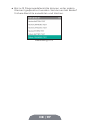
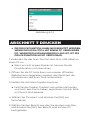
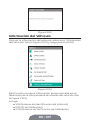
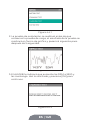
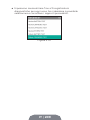
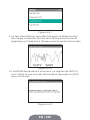
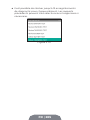
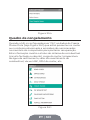
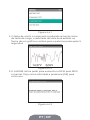
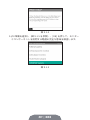
5. When the scan tool is properly connected to the DLC, the
units will start initializing and present you with the main
menu interface. (See Figure 3.1.6)
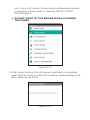
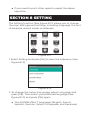
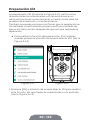
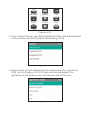
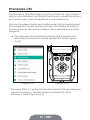
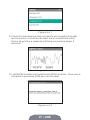
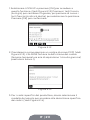
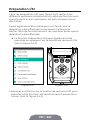
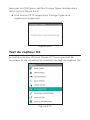
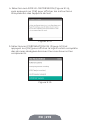
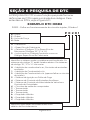
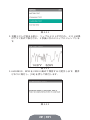
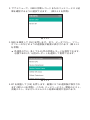
The Procedure of DTC Retrieval
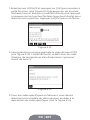
1. Once you've entered the OBD-II function, the scan tool
automatically communicates with the on-board computer
to determine the communication protocol. After it's
conrmed, the link is established. (See Figure 3.2.1)
● A PROTOCOL is a set of rules and procedures for
regulating data transmission between vehicles, and
testing equipment. Here are the ve different types of
protocols (ISO 9141, Keyword 2000, J1850 PWM, J1850
VPW and CAN) that are used by vehicle manufacturers.

EN | 17
Figure 3.2.1
Figure 3.2.2
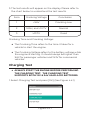
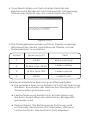
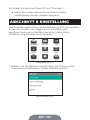
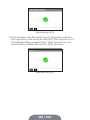
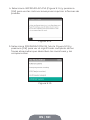
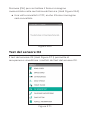
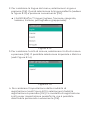
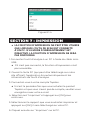
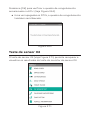
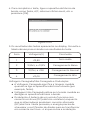
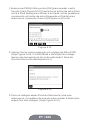
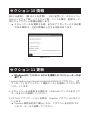
2. To retrieve the DTCs, please select Read Codes (See Figure
3.2.2), and press [OK]. The scan tool will communicate with
ECU and present you with DTCs.
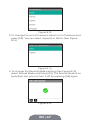
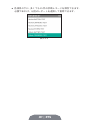
● The procedure of clearing the DTCs should be
performed after the required repairing has been carried
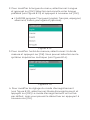
1. Select the Erase Codes Icon (See Figure 3.3.1), and press
[OK]
Procedure for Clearing the DTCs

Figure 3.3.1
Figure 3.3.2
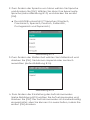
out. Once conrmed, the emission-related data stored
in the ECU will be reset or cleared, WHICH IS NOT
RETRIVEABLE.
● DO NOT START UP THE ENGINE WHILE CLEARING
THE CODES.
2. After determining that all repairs have been completed,
press [OK] to clear or reset the emission-related diagnostic
data. (See Figure 3.3.2)

EN | 19
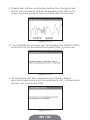
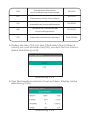
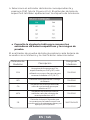
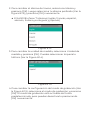
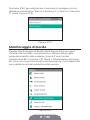
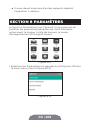
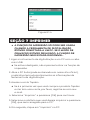
The I/M Readiness (See Figure 3.4.1) checks whether or
not the various emissions-related systems on the vehicle
are operating properly, and are ready for Inspection and
Maintenance testing.
It can also be used to conrm that the repair has been
performed correctly, and/or to check for monitor run status
after the repair has been performed.
● To perform the I/M Readiness function, you can also
press the I/M shortcut button. (See Figure 3.4.2)
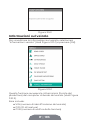
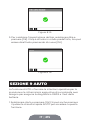
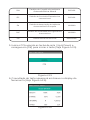
1. Press the [OK] or the I/M shortcut button to perform this
function, the results will be presented on the screen. (See
Figure 3.4.3)
I/M Readiness
Figure 3.4.1 Figure 3.4.2

Figure 3.4.3
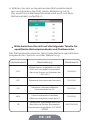
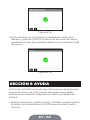
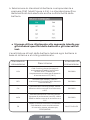
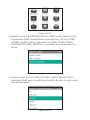
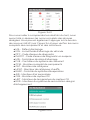
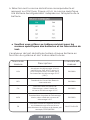
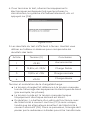
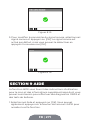
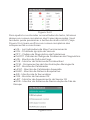
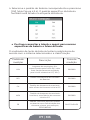
To help you understand the test results, we have listed the
full names of the abbreviated phrases below. You can also
press the HELP (See Figure 3.4.4) shortcut button to check
the full names of components and monitors.
● MIL - Malfunction Indicator Light
● IGN - The Ignition Method of the Vehicle
● DTC - Diagnostic Trouble Code
● Pd DTC -Pending Diagnostic Trouble Code
● MIS - Misre Monitor
● FUE - Fuel System Monitor
● CCM - Comprehensive Components Monitor
● CAT - Catalyst Monitor
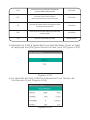
● HCAT - Heated Catalyst Monitor
● EVAP - Evaporative System Monitor
● AIR - Secondary Air Monitor
● O2S - O2 Sensors Monitor
● HRT - 02 Sensor Heater Monitor
● EGR - Exhaust Gas Recirculation System Monitor
Figure 3.4.4
A página está carregando ...
A página está carregando ...
A página está carregando ...
A página está carregando ...
A página está carregando ...
A página está carregando ...
A página está carregando ...
A página está carregando ...
A página está carregando ...
A página está carregando ...
A página está carregando ...
A página está carregando ...
A página está carregando ...
A página está carregando ...
A página está carregando ...
A página está carregando ...
A página está carregando ...
A página está carregando ...
A página está carregando ...
A página está carregando ...
A página está carregando ...
A página está carregando ...
A página está carregando ...
A página está carregando ...
A página está carregando ...
A página está carregando ...
A página está carregando ...
A página está carregando ...
A página está carregando ...
A página está carregando ...
A página está carregando ...
A página está carregando ...
A página está carregando ...
A página está carregando ...
A página está carregando ...
A página está carregando ...
A página está carregando ...
A página está carregando ...
A página está carregando ...
A página está carregando ...
A página está carregando ...
A página está carregando ...
A página está carregando ...
A página está carregando ...
A página está carregando ...
A página está carregando ...
A página está carregando ...
A página está carregando ...
A página está carregando ...
A página está carregando ...
A página está carregando ...
A página está carregando ...
A página está carregando ...
A página está carregando ...
A página está carregando ...
A página está carregando ...
A página está carregando ...
A página está carregando ...
A página está carregando ...
A página está carregando ...
A página está carregando ...
A página está carregando ...
A página está carregando ...
A página está carregando ...
A página está carregando ...
A página está carregando ...
A página está carregando ...
A página está carregando ...
A página está carregando ...
A página está carregando ...
A página está carregando ...
A página está carregando ...
A página está carregando ...
A página está carregando ...
A página está carregando ...
A página está carregando ...
A página está carregando ...
A página está carregando ...
A página está carregando ...
A página está carregando ...
A página está carregando ...
A página está carregando ...
A página está carregando ...
A página está carregando ...
A página está carregando ...
A página está carregando ...
A página está carregando ...
A página está carregando ...
A página está carregando ...
A página está carregando ...
A página está carregando ...
A página está carregando ...
A página está carregando ...
A página está carregando ...
A página está carregando ...
A página está carregando ...
A página está carregando ...
A página está carregando ...
A página está carregando ...
A página está carregando ...
A página está carregando ...
A página está carregando ...
A página está carregando ...
A página está carregando ...
A página está carregando ...
A página está carregando ...
A página está carregando ...
A página está carregando ...
A página está carregando ...
A página está carregando ...
A página está carregando ...
A página está carregando ...
A página está carregando ...
A página está carregando ...
A página está carregando ...
A página está carregando ...
A página está carregando ...
A página está carregando ...
A página está carregando ...
A página está carregando ...
A página está carregando ...
A página está carregando ...
A página está carregando ...
A página está carregando ...
A página está carregando ...
A página está carregando ...
A página está carregando ...
A página está carregando ...
A página está carregando ...
A página está carregando ...
A página está carregando ...
A página está carregando ...
A página está carregando ...
A página está carregando ...
A página está carregando ...
A página está carregando ...
A página está carregando ...
A página está carregando ...
A página está carregando ...
A página está carregando ...
A página está carregando ...
A página está carregando ...
A página está carregando ...
A página está carregando ...
A página está carregando ...
A página está carregando ...
A página está carregando ...
A página está carregando ...
A página está carregando ...
A página está carregando ...
A página está carregando ...
A página está carregando ...
A página está carregando ...
A página está carregando ...
A página está carregando ...
A página está carregando ...
A página está carregando ...
A página está carregando ...
A página está carregando ...
A página está carregando ...
A página está carregando ...
A página está carregando ...
A página está carregando ...
A página está carregando ...
A página está carregando ...
A página está carregando ...
A página está carregando ...
A página está carregando ...
A página está carregando ...
A página está carregando ...
A página está carregando ...
A página está carregando ...
A página está carregando ...
A página está carregando ...
A página está carregando ...
A página está carregando ...
A página está carregando ...
A página está carregando ...
A página está carregando ...
A página está carregando ...
A página está carregando ...
A página está carregando ...
A página está carregando ...
A página está carregando ...
A página está carregando ...
A página está carregando ...
A página está carregando ...
A página está carregando ...
A página está carregando ...
A página está carregando ...
A página está carregando ...
A página está carregando ...
A página está carregando ...
A página está carregando ...
A página está carregando ...
A página está carregando ...
A página está carregando ...
A página está carregando ...
A página está carregando ...
A página está carregando ...
A página está carregando ...
A página está carregando ...
A página está carregando ...
A página está carregando ...
A página está carregando ...
A página está carregando ...
A página está carregando ...
A página está carregando ...
A página está carregando ...
A página está carregando ...
A página está carregando ...
A página está carregando ...
A página está carregando ...
A página está carregando ...
A página está carregando ...
A página está carregando ...
A página está carregando ...
A página está carregando ...
A página está carregando ...
A página está carregando ...
A página está carregando ...
A página está carregando ...
A página está carregando ...
A página está carregando ...
A página está carregando ...
A página está carregando ...
A página está carregando ...
A página está carregando ...
A página está carregando ...
A página está carregando ...
A página está carregando ...
A página está carregando ...
A página está carregando ...
A página está carregando ...
A página está carregando ...
A página está carregando ...
A página está carregando ...
A página está carregando ...
A página está carregando ...
A página está carregando ...
A página está carregando ...
A página está carregando ...
A página está carregando ...
A página está carregando ...
A página está carregando ...
A página está carregando ...
A página está carregando ...
A página está carregando ...
A página está carregando ...
A página está carregando ...
A página está carregando ...
A página está carregando ...
A página está carregando ...
A página está carregando ...
A página está carregando ...
A página está carregando ...
A página está carregando ...
A página está carregando ...
A página está carregando ...
A página está carregando ...
A página está carregando ...
A página está carregando ...
A página está carregando ...
A página está carregando ...
A página está carregando ...
A página está carregando ...
A página está carregando ...
A página está carregando ...
A página está carregando ...
A página está carregando ...
A página está carregando ...
A página está carregando ...
A página está carregando ...
A página está carregando ...
A página está carregando ...
A página está carregando ...
A página está carregando ...
A página está carregando ...
A página está carregando ...
A página está carregando ...
A página está carregando ...
A página está carregando ...
A página está carregando ...
A página está carregando ...
A página está carregando ...
A página está carregando ...
A página está carregando ...
A página está carregando ...
A página está carregando ...
A página está carregando ...
A página está carregando ...
A página está carregando ...
A página está carregando ...
A página está carregando ...
A página está carregando ...
A página está carregando ...
A página está carregando ...
A página está carregando ...
A página está carregando ...
A página está carregando ...
A página está carregando ...
A página está carregando ...
A página está carregando ...
A página está carregando ...
A página está carregando ...
A página está carregando ...
A página está carregando ...
A página está carregando ...
A página está carregando ...
A página está carregando ...
A página está carregando ...
A página está carregando ...
A página está carregando ...
A página está carregando ...
A página está carregando ...
A página está carregando ...
A página está carregando ...
A página está carregando ...
A página está carregando ...
A página está carregando ...
A página está carregando ...
A página está carregando ...
A página está carregando ...
A página está carregando ...
A página está carregando ...
A página está carregando ...
A página está carregando ...
A página está carregando ...
A página está carregando ...
A página está carregando ...
A página está carregando ...
A página está carregando ...
A página está carregando ...
A página está carregando ...
A página está carregando ...
A página está carregando ...
A página está carregando ...
A página está carregando ...
A página está carregando ...
A página está carregando ...
A página está carregando ...
A página está carregando ...
A página está carregando ...
A página está carregando ...
A página está carregando ...
A página está carregando ...
A página está carregando ...
A página está carregando ...
A página está carregando ...
A página está carregando ...
A página está carregando ...
A página está carregando ...
A página está carregando ...
A página está carregando ...
A página está carregando ...
A página está carregando ...
A página está carregando ...
A página está carregando ...
A página está carregando ...
A página está carregando ...
A página está carregando ...
A página está carregando ...
A página está carregando ...
A página está carregando ...
A página está carregando ...
A página está carregando ...
A página está carregando ...
A página está carregando ...
-
 1
1
-
 2
2
-
 3
3
-
 4
4
-
 5
5
-
 6
6
-
 7
7
-
 8
8
-
 9
9
-
 10
10
-
 11
11
-
 12
12
-
 13
13
-
 14
14
-
 15
15
-
 16
16
-
 17
17
-
 18
18
-
 19
19
-
 20
20
-
 21
21
-
 22
22
-
 23
23
-
 24
24
-
 25
25
-
 26
26
-
 27
27
-
 28
28
-
 29
29
-
 30
30
-
 31
31
-
 32
32
-
 33
33
-
 34
34
-
 35
35
-
 36
36
-
 37
37
-
 38
38
-
 39
39
-
 40
40
-
 41
41
-
 42
42
-
 43
43
-
 44
44
-
 45
45
-
 46
46
-
 47
47
-
 48
48
-
 49
49
-
 50
50
-
 51
51
-
 52
52
-
 53
53
-
 54
54
-
 55
55
-
 56
56
-
 57
57
-
 58
58
-
 59
59
-
 60
60
-
 61
61
-
 62
62
-
 63
63
-
 64
64
-
 65
65
-
 66
66
-
 67
67
-
 68
68
-
 69
69
-
 70
70
-
 71
71
-
 72
72
-
 73
73
-
 74
74
-
 75
75
-
 76
76
-
 77
77
-
 78
78
-
 79
79
-
 80
80
-
 81
81
-
 82
82
-
 83
83
-
 84
84
-
 85
85
-
 86
86
-
 87
87
-
 88
88
-
 89
89
-
 90
90
-
 91
91
-
 92
92
-
 93
93
-
 94
94
-
 95
95
-
 96
96
-
 97
97
-
 98
98
-
 99
99
-
 100
100
-
 101
101
-
 102
102
-
 103
103
-
 104
104
-
 105
105
-
 106
106
-
 107
107
-
 108
108
-
 109
109
-
 110
110
-
 111
111
-
 112
112
-
 113
113
-
 114
114
-
 115
115
-
 116
116
-
 117
117
-
 118
118
-
 119
119
-
 120
120
-
 121
121
-
 122
122
-
 123
123
-
 124
124
-
 125
125
-
 126
126
-
 127
127
-
 128
128
-
 129
129
-
 130
130
-
 131
131
-
 132
132
-
 133
133
-
 134
134
-
 135
135
-
 136
136
-
 137
137
-
 138
138
-
 139
139
-
 140
140
-
 141
141
-
 142
142
-
 143
143
-
 144
144
-
 145
145
-
 146
146
-
 147
147
-
 148
148
-
 149
149
-
 150
150
-
 151
151
-
 152
152
-
 153
153
-
 154
154
-
 155
155
-
 156
156
-
 157
157
-
 158
158
-
 159
159
-
 160
160
-
 161
161
-
 162
162
-
 163
163
-
 164
164
-
 165
165
-
 166
166
-
 167
167
-
 168
168
-
 169
169
-
 170
170
-
 171
171
-
 172
172
-
 173
173
-
 174
174
-
 175
175
-
 176
176
-
 177
177
-
 178
178
-
 179
179
-
 180
180
-
 181
181
-
 182
182
-
 183
183
-
 184
184
-
 185
185
-
 186
186
-
 187
187
-
 188
188
-
 189
189
-
 190
190
-
 191
191
-
 192
192
-
 193
193
-
 194
194
-
 195
195
-
 196
196
-
 197
197
-
 198
198
-
 199
199
-
 200
200
-
 201
201
-
 202
202
-
 203
203
-
 204
204
-
 205
205
-
 206
206
-
 207
207
-
 208
208
-
 209
209
-
 210
210
-
 211
211
-
 212
212
-
 213
213
-
 214
214
-
 215
215
-
 216
216
-
 217
217
-
 218
218
-
 219
219
-
 220
220
-
 221
221
-
 222
222
-
 223
223
-
 224
224
-
 225
225
-
 226
226
-
 227
227
-
 228
228
-
 229
229
-
 230
230
-
 231
231
-
 232
232
-
 233
233
-
 234
234
-
 235
235
-
 236
236
-
 237
237
-
 238
238
-
 239
239
-
 240
240
-
 241
241
-
 242
242
-
 243
243
-
 244
244
-
 245
245
-
 246
246
-
 247
247
-
 248
248
-
 249
249
-
 250
250
-
 251
251
-
 252
252
-
 253
253
-
 254
254
-
 255
255
-
 256
256
-
 257
257
-
 258
258
-
 259
259
-
 260
260
-
 261
261
-
 262
262
-
 263
263
-
 264
264
-
 265
265
-
 266
266
-
 267
267
-
 268
268
-
 269
269
-
 270
270
-
 271
271
-
 272
272
-
 273
273
-
 274
274
-
 275
275
-
 276
276
-
 277
277
-
 278
278
-
 279
279
-
 280
280
-
 281
281
-
 282
282
-
 283
283
-
 284
284
-
 285
285
-
 286
286
-
 287
287
-
 288
288
-
 289
289
-
 290
290
-
 291
291
-
 292
292
-
 293
293
-
 294
294
-
 295
295
-
 296
296
-
 297
297
-
 298
298
-
 299
299
-
 300
300
-
 301
301
-
 302
302
-
 303
303
-
 304
304
-
 305
305
-
 306
306
-
 307
307
-
 308
308
-
 309
309
-
 310
310
-
 311
311
-
 312
312
-
 313
313
-
 314
314
-
 315
315
-
 316
316
-
 317
317
-
 318
318
-
 319
319
-
 320
320
-
 321
321
-
 322
322
-
 323
323
-
 324
324
-
 325
325
-
 326
326
-
 327
327
-
 328
328
-
 329
329
-
 330
330
-
 331
331
-
 332
332
-
 333
333
-
 334
334
-
 335
335
-
 336
336
-
 337
337
-
 338
338
-
 339
339
-
 340
340
-
 341
341
-
 342
342
-
 343
343
-
 344
344
-
 345
345
-
 346
346
-
 347
347
-
 348
348
-
 349
349
-
 350
350
-
 351
351
-
 352
352
-
 353
353
-
 354
354
-
 355
355
-
 356
356
-
 357
357
-
 358
358
-
 359
359
-
 360
360
-
 361
361
-
 362
362
-
 363
363
-
 364
364
-
 365
365
-
 366
366
-
 367
367
-
 368
368
-
 369
369
-
 370
370
-
 371
371
-
 372
372
-
 373
373
-
 374
374
-
 375
375
-
 376
376
-
 377
377
-
 378
378
-
 379
379
-
 380
380
-
 381
381
-
 382
382
-
 383
383
-
 384
384
-
 385
385
-
 386
386
-
 387
387
-
 388
388


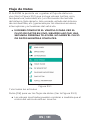
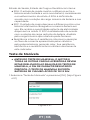
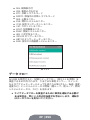
em outros idiomas
- español: Topdon ArtiLink500B Manual de usuario
- français: Topdon ArtiLink500B Manuel utilisateur
- italiano: Topdon ArtiLink500B Manuale utente
- Deutsch: Topdon ArtiLink500B Benutzerhandbuch
- 日本語: Topdon ArtiLink500B ユーザーマニュアル
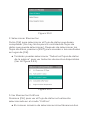
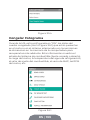
Artigos relacionados
-
Topdon BT20 Manual do usuário
-
Topdon ARTILINK 400 Manual do usuário
-
 Topdon Phoenix Elite Manual do usuário
-
-
Topdon TB6000Pro Manual do usuário
-
-
Topdon Phoenix Lite 2 Manual do usuário
-
Topdon TC001 Manual do usuário
-
Topdon Tornado4000 Manual do usuário


