Topdon Phoenix Lite 2 Manual do usuário

Tipo
Manual do usuário
Phoenix Lite 2
USER MANUAL
Smart Automotive Diagnostic System
86-755-21612590
1-833-629-4832 (North America)
For Services and Support
TEL
EMAIL
WEBSITE
FACEBOOK
TWITTER
SUPPORT@TOPDON.COM
WWW.TOPDON.COM
@TOPDONOFFICIAL
@TOPDONOFFICIAL
Welcome
DE RUEN PL
323745 28593 141 189
323745 28593 141 189
323745 28593 141 189
323745 28593 141 189
423846 28694 142 190
423846 28694 142 190
423947 28795 143 191
524048 28896 144 192
7242
38
42
277
282
37 276
37 275
36 274
12 247
50 290
96
91
326
331
85 325
84 324
83 323
55 295
98
134
139
133
132
131
103
146
182
187
181
180
179
151
194
229
234
228
227
226
199
FR ES PT
About
What Is in the Box
Compatibility
Notice
General Information of OBDII
(On-Board Diagnostics II)
Diagnostic Trouble Codes (DTCs)
Product Descriptions
Warnings
Operation Introduction
FAQ
Warranty
Preparation & Connection
Cautions
Technical Specication
English
3
EN
Welcome
About
Package List
Thank you for purchasing TOPDON's Smart Automotive Diagnostic System Phoenix Lite 2.
Please read and understand this user manual prior to the operation.
TOPDON's Phoenix Lite 2 features comprehensive diagnostic capabilities. The accuracy
of test readings, expanded vehicle coverage, improved speed and an abundance of user-
friendly nature make this diagnostic tablet stand out in its class and give mechanics and
professionals a great deal of help in their diagnostic work.
Phoenix Lite 2
Phoenix MDCI Lite
OBDI Adapter BOX Transfer Line
OBDII Extension Cable
Cigarette Lighter Cable
Type-C to USB Cable
Battery Clamps/Cable Set
Power Adaptor
User Manual
Password Letter
Non-Standard OBDII Adapter*10
Fuse (φ5*20mm)*4
Fuse (φ6*30mm)*2
Compatibility
ISO 9142
ISO 14230
ISO 15765
K/L-Line
Flashing Code
CAN ISO 11898
SAE-J1850 VPW
SAE-J1850 PWM
Highspeed CAN
Middlespeed CAN
Lowspeed and Singlewire CAN
Fault-Tolerant CAN
GM UART
TP 2.0
TP 1.6
UART Echo Byte Protocol
Honda Diag-H Protocol
TOPDON's Phoenix Lite 2 is compatible with the following protocols:
4
Notice
General Information of OBDII (On-Board Diagnostics II)
Diagnostic Trouble Codes (DTCs)
Phoenix Lite 2 may automatically reset while being disturbed by strong static electricity. THIS
IS A NORMAL REACTION.
This user manual is subject to change without written notice.
Read the instruction carefully and use the unit properly before operating. Failure to do so may
cause damage and/or personal injury, which will void the product warranty.
The OBDII system is designed to monitor emission control systems and key engine
components by performing either continuous or periodic tests of specic components and
vehicle conditions, which will offer three pieces of such valuable information:
Whether the Malfunction Indicator Light (MIL) is commanded “on” or “off”;
Which, if any, Diagnostic Trouble Codes (DTCs) are stored;
Readiness Monitor status.
5
EN
Product Descriptions
5 7
6
1
4
23
NO. Name Descriptions
1Power Button
Hold the button for 3 seconds to turn the tablet on, or off.
Hold the button for 10 seconds for a forced restart.
2Type-C Charging Slot
For charging the tablet.
3USB Port
Can be used to charge 5V electronic devices.
4Rear Camera
Snapshot the view ahead of the camera.
58” Touchable Screen
Show test results.
6Loudspeaker
Convert an audio signal into a corresponding sound.
7Adjustable Stand Keep the device standing on the desk, or hang the device on
the steering wheel.
6
NO. Name Descriptions
1Indicator Light
Three LED indicators are provided on each side, and the
prompts are as follows:
Power: Green light indicates power on.
Connect:Blue light means that it has been connected to the
device by bluetooth.
Vehicle: Blue flashing shows that it is communicating with
the vehicle.
2OBD Port
Plug in the diagnostic cable whose OBD 16-pin connector is
linked to the DLC of the vehicle.
2
1
7
EN
Preparation & Connection
1. Turn the ignition off.
2. Locate the vehicle’s DLC port.
3. Plug the TOPDON Phoenix MDCI Lite dongle into the vehicle’s DLC port.
8
4. Turn the ignition on. The engine can be off or running.
5. Hold the power button for 3 seconds to turn the tablet on. (The tablet must be charged.)
The tablet will start initializing and enter the following interface:
6. Language Setting
Select operating language in the following interface:
Note: Don’t connect or disconnect any test equipment with the ignition on or engine running.
9
EN
Choose the time zone of your current location. The system will automatically congure the
time.
The system will automatically search all available Wi-Fi networks. Please connect to the
trusted Wi-Fi accounts.
8. Choose Time Zone
7. Connect Wi-Fi
10
Please read all the terms and conditions of the user agreement carefully. Select “Agree with
above terms”.
You can log in with an available TOPDON account, or register a new account with a valid
e-mail address.
Tap “Next” to log in. The following page will appear:
9. User Agreement
10. Create an Account
11
EN
Input the serial number and activation code to activate and bind the diagnostic MDCI Lite
dongle. Both the serial number and the activation code are available in the “Password
Letter”. The activation procedure is necessary for using the Phoenix Lite 2 properly.
Tap “Activate” to nish the procedure, and get started with Phoenix Lite 2.
After inputting the information required, tap “Register”. The tablet will enter the MDCI Lite
Activation procedure.
11. MDCI Lite Activation
12
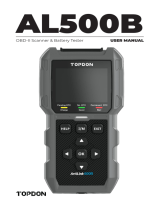
TOPDON's Phoenix Lite 2 features an array of practical functions, including Scan, AutoScan,
Services, Tester, Support, Update, Library, History, Feedback, Coverage List and User Info.
Operation Introduction
TOPDON's Phoenix Lite 2 supports AutoScan and Scan covering OBDII diagnosis, full system
diagnosis for most modern vehicle models worldwide.
Plug the Phoenix MDCI Lite dongle into the vehicle’s DLC port.
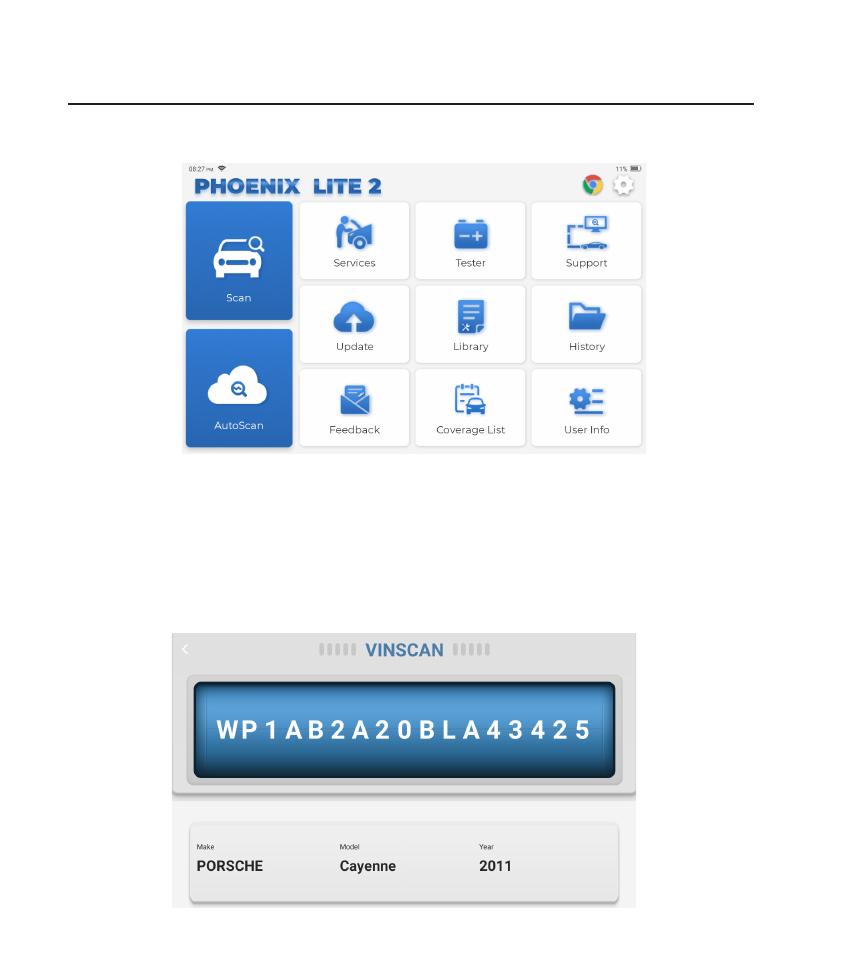
Tap “AutoScan” on the Home Menu after connecting to the vehicle.
The tool will start the AutoScan procedure, and automatically read the vehicle’s VIN
information, as shown below:
1. AutoScan (Intelligent Diagnosis)
13
EN
If Phoenix Lite 2 fails to get access to the vehicle VIN data automatically, tap “Scan” on
the Home Menu. The following page will appear:
Note: If the AutoScan can not identify the vehicle, please try to connect to the network.
Not all cars support the AutoScan function due to auto manufacturers' settings.
2. Scan (Manual Diagnosis)
There are two ways in this module to get access to vehicle diagnostic functions.
2.1 The rst way is using “VINSCAN”.
Tap “VINSCAN”. The following page will appear:
14
2.1.1 Tap “Camera Scan”. The following page will appear
If the VIN barcode cannot be recognized, please tap to manually input the VIN.
After scanning, the following page will appear:
15
EN
2.1.2 Or, tap “Enter VIN”, the following page will appear:
Note: the VIN code in yellow can be modied if it isn’t correct.
You need to input the vehicle’s VIN manually.
Note: VIN characters need to be capital letters A through Z and numbers 1 through
0. However, the letters I, O, and Q won't be used in order to avoid misreading. No
symbols or spaces are allowed in the VIN.
2.2 The second way is manually selecting the vehicle’s make, model, and year.
Tap a corresponding diagnostic software logo on the following page:
Take “Demo” as an example. The following page will appear:
16
Tap "OK", the tablet will automatically navigate to the Show Menu:
2.2.1 Health Report
It enables you to quickly access all the electronic control units of the vehicle
and generate a detailed report about vehicle health. (This function varies
from vehicle to vehicle.)
"Health Report", the system will start scanning Electronic Control Units to
see if there are fault codes and displays the specic results.
17
EN
Click "Report" to generate a vehicle health report.
18
Scan the manually selected vehicle electric control system. Tap “PCM” --- as an
example to demonstrate. The following page shows the selection interface.
Note: This function will be available only when the diagnostic software supports it.
A. Version Information
This function reads the current version information of ECU.
2.2.2 System Scan
This function will automatically scan all systems of the vehicle.
  • Page 1 1
  • Page 2 2
  • Page 3 3
  • Page 4 4
  • Page 5 5
  • Page 6 6
  • Page 7 7
  • Page 8 8
  • Page 9 9
  • Page 10 10
  • Page 11 11
  • Page 12 12
  • Page 13 13
  • Page 14 14
  • Page 15 15
  • Page 16 16
  • Page 17 17
  • Page 18 18
  • Page 19 19
  • Page 20 20
  • Page 21 21
  • Page 22 22
  • Page 23 23
  • Page 24 24
  • Page 25 25
  • Page 26 26
  • Page 27 27
  • Page 28 28
  • Page 29 29
  • Page 30 30
  • Page 31 31
  • Page 32 32
  • Page 33 33
  • Page 34 34
  • Page 35 35
  • Page 36 36
  • Page 37 37
  • Page 38 38
  • Page 39 39
  • Page 40 40
  • Page 41 41
  • Page 42 42
  • Page 43 43
  • Page 44 44
  • Page 45 45
  • Page 46 46
  • Page 47 47
  • Page 48 48
  • Page 49 49
  • Page 50 50
  • Page 51 51
  • Page 52 52
  • Page 53 53
  • Page 54 54
  • Page 55 55
  • Page 56 56
  • Page 57 57
  • Page 58 58
  • Page 59 59
  • Page 60 60
  • Page 61 61
  • Page 62 62
  • Page 63 63
  • Page 64 64
  • Page 65 65
  • Page 66 66
  • Page 67 67
  • Page 68 68
  • Page 69 69
  • Page 70 70
  • Page 71 71
  • Page 72 72
  • Page 73 73
  • Page 74 74
  • Page 75 75
  • Page 76 76
  • Page 77 77
  • Page 78 78
  • Page 79 79
  • Page 80 80
  • Page 81 81
  • Page 82 82
  • Page 83 83
  • Page 84 84
  • Page 85 85
  • Page 86 86
  • Page 87 87
  • Page 88 88
  • Page 89 89
  • Page 90 90
  • Page 91 91
  • Page 92 92
  • Page 93 93
  • Page 94 94
  • Page 95 95
  • Page 96 96
  • Page 97 97
  • Page 98 98
  • Page 99 99
  • Page 100 100
  • Page 101 101
  • Page 102 102
  • Page 103 103
  • Page 104 104
  • Page 105 105
  • Page 106 106
  • Page 107 107
  • Page 108 108
  • Page 109 109
  • Page 110 110
  • Page 111 111
  • Page 112 112
  • Page 113 113
  • Page 114 114
  • Page 115 115
  • Page 116 116
  • Page 117 117
  • Page 118 118
  • Page 119 119
  • Page 120 120
  • Page 121 121
  • Page 122 122
  • Page 123 123
  • Page 124 124
  • Page 125 125
  • Page 126 126
  • Page 127 127
  • Page 128 128
  • Page 129 129
  • Page 130 130
  • Page 131 131
  • Page 132 132
  • Page 133 133
  • Page 134 134
  • Page 135 135
  • Page 136 136
  • Page 137 137
  • Page 138 138
  • Page 139 139
  • Page 140 140
  • Page 141 141
  • Page 142 142
  • Page 143 143
  • Page 144 144
  • Page 145 145
  • Page 146 146
  • Page 147 147
  • Page 148 148
  • Page 149 149
  • Page 150 150
  • Page 151 151
  • Page 152 152
  • Page 153 153
  • Page 154 154
  • Page 155 155
  • Page 156 156
  • Page 157 157
  • Page 158 158
  • Page 159 159
  • Page 160 160
  • Page 161 161
  • Page 162 162
  • Page 163 163
  • Page 164 164
  • Page 165 165
  • Page 166 166
  • Page 167 167
  • Page 168 168
  • Page 169 169
  • Page 170 170
  • Page 171 171
  • Page 172 172
  • Page 173 173
  • Page 174 174
  • Page 175 175
  • Page 176 176
  • Page 177 177
  • Page 178 178
  • Page 179 179
  • Page 180 180
  • Page 181 181
  • Page 182 182
  • Page 183 183
  • Page 184 184
  • Page 185 185
  • Page 186 186
  • Page 187 187
  • Page 188 188
  • Page 189 189
  • Page 190 190
  • Page 191 191
  • Page 192 192
  • Page 193 193
  • Page 194 194
  • Page 195 195
  • Page 196 196
  • Page 197 197
  • Page 198 198
  • Page 199 199
  • Page 200 200
  • Page 201 201
  • Page 202 202
  • Page 203 203
  • Page 204 204
  • Page 205 205
  • Page 206 206
  • Page 207 207
  • Page 208 208
  • Page 209 209
  • Page 210 210
  • Page 211 211
  • Page 212 212
  • Page 213 213
  • Page 214 214
  • Page 215 215
  • Page 216 216
  • Page 217 217
  • Page 218 218
  • Page 219 219
  • Page 220 220
  • Page 221 221
  • Page 222 222
  • Page 223 223
  • Page 224 224
  • Page 225 225
  • Page 226 226
  • Page 227 227
  • Page 228 228
  • Page 229 229
  • Page 230 230
  • Page 231 231
  • Page 232 232
  • Page 233 233
  • Page 234 234
  • Page 235 235
  • Page 236 236
  • Page 237 237
  • Page 238 238
  • Page 239 239
  • Page 240 240
  • Page 241 241
  • Page 242 242
  • Page 243 243
  • Page 244 244
  • Page 245 245
  • Page 246 246
  • Page 247 247
  • Page 248 248
  • Page 249 249
  • Page 250 250
  • Page 251 251
  • Page 252 252
  • Page 253 253
  • Page 254 254
  • Page 255 255
  • Page 256 256
  • Page 257 257
  • Page 258 258
  • Page 259 259
  • Page 260 260
  • Page 261 261
  • Page 262 262
  • Page 263 263
  • Page 264 264
  • Page 265 265
  • Page 266 266
  • Page 267 267
  • Page 268 268
  • Page 269 269
  • Page 270 270
  • Page 271 271
  • Page 272 272
  • Page 273 273
  • Page 274 274
  • Page 275 275
  • Page 276 276
  • Page 277 277
  • Page 278 278
  • Page 279 279
  • Page 280 280
  • Page 281 281
  • Page 282 282
  • Page 283 283
  • Page 284 284
  • Page 285 285
  • Page 286 286
  • Page 287 287
  • Page 288 288
  • Page 289 289
  • Page 290 290
  • Page 291 291
  • Page 292 292
  • Page 293 293
  • Page 294 294
  • Page 295 295
  • Page 296 296
  • Page 297 297
  • Page 298 298
  • Page 299 299
  • Page 300 300
  • Page 301 301
  • Page 302 302
  • Page 303 303
  • Page 304 304
  • Page 305 305
  • Page 306 306
  • Page 307 307
  • Page 308 308
  • Page 309 309
  • Page 310 310
  • Page 311 311
  • Page 312 312
  • Page 313 313
  • Page 314 314
  • Page 315 315
  • Page 316 316
  • Page 317 317
  • Page 318 318
  • Page 319 319
  • Page 320 320
  • Page 321 321
  • Page 322 322
  • Page 323 323
  • Page 324 324
  • Page 325 325
  • Page 326 326
  • Page 327 327
  • Page 328 328
  • Page 329 329
  • Page 330 330
  • Page 331 331
  • Page 332 332
  • Page 333 333

Topdon Phoenix Lite 2 Manual do usuário

Tipo
Manual do usuário