
WIRELESS BATTERY LOAD TESTER USER MANUAL
BT20

CONTENTS
SAFETY IS ALWAYS
THE FIRST
PRIORITY!
SECTION 4 TEST
THROUGH
THE TEST BUTTON
SECTION 2
PRODUCT
OVERVIEW
SECTION 6
FAQ
DE
26
28
28
30
33
34
44
45
45
EN
5
6
7
8
12
13
22
23
23
FR
47
50
50
52
55
56
66
67
67
ES
70
72
72
74
77
78
88
89
89
IT
92
93
94
96
99
100
110
111
111
114
115
116
117
121
122
132
133
133
PT
136
138
138
140
143
144
154
155
155
RU
158
159
160
161
165
166
176
176
177
JP
SECTION 1
WHAT'S IN THE
BOX?
SECTION 5 TEST
THROUGH
THE APP BT20
SECTION 8
WARRANTY
SECTION 3 GETTING
STARTED
SECTION 7
TECHNICAL
SPECIFICATION

For your safety and the safety of others, as well as to
avoid any damage to the product and your vehicle,
carefully read and make sure you fully understand
this manual's safety instructions in its entirety. You
must read the vehicle's service manual, the battery
stated precautions or instructions before and during
any test or service procedure.
ONLY OPERATE TESTS IN A WELL-VENTILATED AREA
since the vehicle produces carbon monoxide (a
toxic, poisonous gas, and particulate matter) when
the engine is running.
ALWAYS BE AWARE OF MOVING PARTS (such as
coolant fans, pulleys, belts) since they spin or turn at
high speeds when the engine is running.
DO NOT TOUCH HOT ENGINE PARTS to prevent
severe burns. The motor parts can get extremely hot
when the engine is running.
TURN THE IGNITION OFF BEFORE CONNECTING OR
DISCONNECTING THE TOOL FROM THE BATTERY
to prevent damage to the tester or the vehicle's
electronic components.
DON'T SMOKE NEAR THE VEHICLE when testing.
ALWAYS WEAR APPROVED SAFETY EYE
PROTECTION to prevent damage from sharp objects
and caustic liquids.
SAFETY IS ALWAYS THE
FIRST PRIORITY!
READ THE INSTRUCTIONS BEFORE USING
ENGLISH
EN I 5

EN I 7
DO NOT WEAR LOOSE CLOTHING OR JEWELRY
WHEN WORKING ON AN ENGINE. Loose clothing can
easily be caught in the engine's fan, pulleys, belts,
etc., and jewelry is highly conductive, which may
cause severe burn or electric shock if it contacts
electricity.
DO NOT CUT THE PRODUCTS CORDS OR SUBMERGE
THEM IN WATER. The product is an electrical device
that can cause shock and severe burns.
WARNING: Battery acid is extremely corrosive. If acid
gets into your eyes, RINSE THEM THOROUGHLY WITH
COLD RUNNING WATER FOR AT LEAST 20 MINUTES
AND SEEK MEDICAL ATTENTION IMMEDIATELY.
If battery acid contacts your skin or clothing, WASH
IT IMMEDIATELY WITH A SOLUTION OF WATER AND
BAKING SODA.
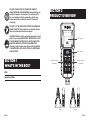
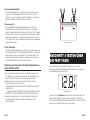
SECTION 1
WHAT'S IN THE BOX?
BT20
Quick User Guide
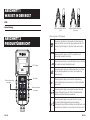
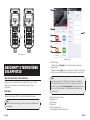
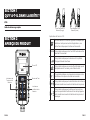
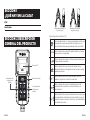
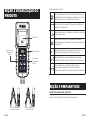
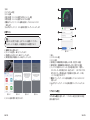
SECTION 2
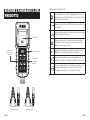
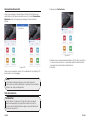
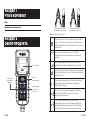
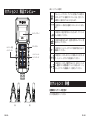
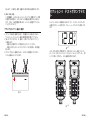
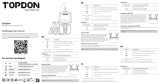
PRODUCT OVERVIEW
EN I 6
BT20BT20
LCD Display
Test Button
Battery Health
Indicators
Positive Battery Clamp
(Red)
Negtive Battery Clamp
(Black)
Battey Voltage
Indicators

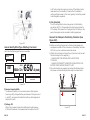
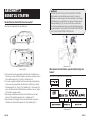
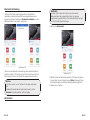
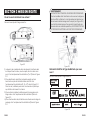
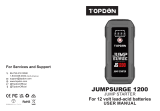
SECTION 3 GETTING STARTED
Where is the battery of a car located?
Let's take the following picture as a reference:
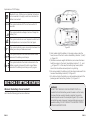
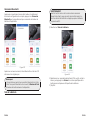
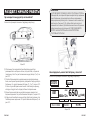
Explanation of LCD Display:
Bluetooth icon. A ashing icon indicates the tester is
not connected to the App; a solid icon indicates the
tester is connected.
This symbol indicates NOT to test twice within 10
seconds.
This symbol indicates voltage is too low. Charge the
battery rst.
This symbol indicates an over temperature. Wait until
the temperature is normal, and then test again.
This symbol indicates a poor connection between the
battery and clamps. Please reconnect.
This symbol indicates the tester reset failed. Please
reconnect the battery and clamps.
This symbol indicates the tester is abnormal or the
battery capacity is beyond the test range. Please
reconnect the battery and clamps, and try again.
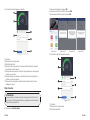
1) Most models hold the battery in the engine bay, under the
hood, in one of the front corners. See battery location ① and ②
in Figure 3.1.1.
2) To balance uneven weight distribution, some manufacturers
hold the engine in the trunk. See battery location ⑤, ⑥, and
⑦ in Figure 3.1.1. In this case, the battery may have a plastic
cover that should be removed prior to any testing.
3) For some models, the battery might be stored underneath the
rear seat. See battery location ④ in Figure 3.1.1.
4) For other vehicles, the battery can be located underneath the
passenger seat. See battery location ③ in Figure 3.1.1.
WARNING:
DO NOT TEST THROUGH THE JUMPSTART POSTS. For
models that hold the battery under the seat or in the trunk,
the manufacturer usually includes jumpstart connector
conductor posts under the hood (see Figure 3.1.2) to make
jumpstarting easier. However, to ensure data accuracy and
operation safety, DO NOT CONNECT THE BATTERY TESTER
TO THE JUMPSTART POSTS.
Figure 3.1.1
EN I 9EN I 8

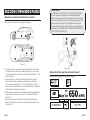
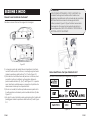
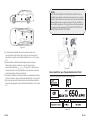
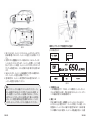
1) Reserve Capacity: 80Ah
The Reserve Capacity is a time measurement that explains
how long a fully-charged battery can deliver a 25 amps current
in an 80°F- environment before the battery is discharged and
drops to 10.5 volts.
2) Voltage: 12V
When fully charged, automotive batteries should measure
at 12.6 volts. However, this measurement should be from 13.7
Figure 3.1.2
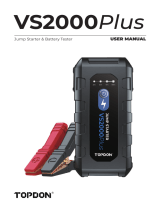
Figure 3.2.1
How to Identify What Type of Battery You Have?
Let's take the following picture as an example:
Manufacturers
Part No.
80Ah 12v
Reserve Capacity CCA in USAVoltage
650A(SAE)
AGM
E51
Battery
Type
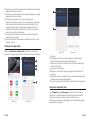
1) Before connecting the clamps to the terminals, please use
sandpaper to polish off the corrosion on the battery terminals.
With this, you can avoid inaccurate test values.
2) Attach the red clamp to the positive (+) terminal, and connect
the black clamp to the negative (-).
• ALWAYS KEEP THE RED & BLACK CLAMPS FROM
TOUCHING.
• ALWAYS DISCONNECT THE NEGATIVE CABLE FROM THE
BATTERY FIRST AND RECONNECT IT LAST.
3) Once the clamps are properly connected, the battery tester
will power on automatically and be ready to conduct tests.
Connect the Clamps to the Battery Terminals (See
Figure 3.3.1)
(Red) (Black)
Figure 3.3.1
to 14.7 volts when the engine is running. If the battery tester
reads less than this standard, it means that the battery's
resting voltage is weak. In this case, typically, the battery needs
to be charged or replaced.
3) CCA: 650A (SAE)
The CCA rating refers to how many amps a 12-volt battery
can deliver at 0°F in 30 seconds while maintaining at least a
7.2V voltage. This means that the higher the CCA rating is, the
easier the engine can be cranked in cold temperatures.
EN I 11EN I 10

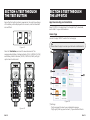
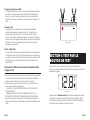
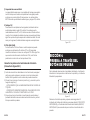
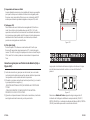
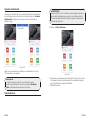
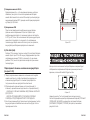
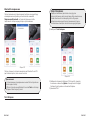
SECTION 4 TEST THROUGH
THE TEST BUTTON
Soon after the battery tester is powered on, the real-time voltage
of the battery will be displayed on the screen, and the Bluetooth
icon will ash.
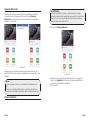
Press the Test Button, and wait for several seconds. The
corresponding Battery Voltage Indicator (FULL / MEDIUM / LOW)
and Battery Health Indicator (GOOD / MEDIUM / BAD) will light
up to show the test result.
Figure 4.1.1
Figure 4.2.1
BT20BT20 BT20BT20
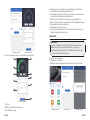
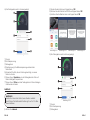
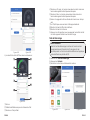
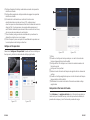
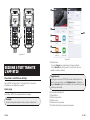
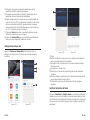
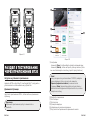
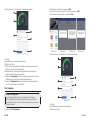
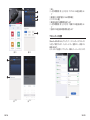
SECTION 5 TEST THROUGH
THE APP BT20
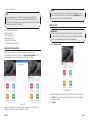
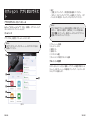
App Downloading and Installation
Home Page
Search "BT20" in the App Store™ or Google Play™, download,
and install it to your mobile device.
Launch the App "BT20" to enter the home page.
① Settings
· Tap [Language] to select your preferred language.
· Tap [Login] to set up your account. (If you would not like to
Tip:
Please allow the App to access your Network and Bluetooth.
Figure 5.2.1
EN I 13EN I 12

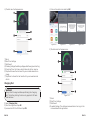
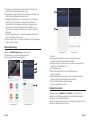
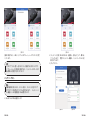
Bluetooth Connection
After connecting the tester to the battery properly and
completing the account setup, tap Connect Bluetooth on the
home page to connect the battery tester to the App.
After a successful connection, the Bluetooth icon on the LCD
display will light up and not ash on and off.
② Bluetooth Connection
③ Battery Test
④ Cranking Test
⑤ Charging Test
⑥ Real-time Voltage
⑦ Test Results by Timeline
Tip:
If you already have a TOPDON account, please directly
log in with it. If you don't have, tap [Register Now] at the
bottom of the [Login] page, register an account with a valid
email address, and then log in.
log in, just skip it.)
Figure 5.3.1
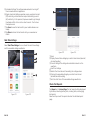
Notes:
1. Only one tester can be connected to the App at a time.
2. Once the Bluetooth is connected, the Test Button on the
battery tester will become unavailable.
WARNING:
Before the test, the engine and all other accessory loads
must be off to ensure accurate results. The battery testing
function only applies to 12V lead-acid batteries.
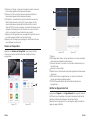
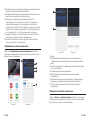
Battery Test
1) Select Battery Test.
2) Select a battery parameter (CCA or Ah), enter the value, and
tap Next. The specic battery standard is normally listed on
the battery label.
3) Tap Test.
Figure 5.4.1
EN I 15EN I 14

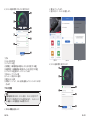
4) The test result will display as below:
Figure 5.4.2 Figure 5.4.3
Figure 5.4.4
① Back
② Reference Tablet for Test Values
③ Real-time Voltage
④ Loaded Voltage: the voltage measured when turning on the
on-board electrical appliances
⑤ Unloaded Voltage: the voltage measured when turning off the
on-board electrical appliances
⑥ Jump to the page of the real-time voltage waveform
⑦ The CCA/Ah you entered at the previous step
⑧ Test result of Battery Status
⑨ Test result of Voltage
⑩ Tap Save to save the test result to your mobile device as an
image
WARNING:
Before the cranking test, the engine and all other accessory
loads must be off in order to ensure accurate results.
The battery testing function only applies to 12V lead-acid
batteries.
Cranking Test
1) Select Cranking Test.
2) Tap Next.
3) Follow the instructions and start the engine.
Figure 5.5.2 Figure 5.5.3Figure 5.5.1
EN I 17EN I 16

WARNING:
Always start the engine before performing the charging
test. The battery testing function only applies to 12V lead-
acid batteries.
Charging Test
4) The test result will appear soon.
Figure 5.5.4
① Back
② Real-Time Voltage
③ Test Result
④ Cranking Voltage: the battery voltage while the engine is starting
⑤ Cranking Time: the time a vehicle takes to start an engine
⑥ Tap Save to save the test result to your mobile device as an
image
⑦ Tap Share to share the test result with your coworkers and
clients
1) Select Charging Test.
2) Start the engine and tap OK.
3) Increase the RPM to 2500 and tap OK.
4) Turn on the electronics and tap OK.
5) The test result will appear soon.
① Back
② Real-Time Voltage
③ Test Result
④ Loaded Voltage: The voltage measured when turning on the
on-board electrical appliances
Figure 5.6.1 Figure 5.6.2 Figure 5.6.3 Figure 5.6.4
Figure 5.6.5
EN I 19EN I 18

⑤ Unloaded Voltage: The voltage measured when turning off
the on-board electrical appliances
⑥ Ripple: A vehicle's battery operates on one-way direct current
(DC) electricity, while alternators output alternating current
(AC) electricity. In this process, the power needs to go through
the diode rectier to turn into a direct current - that's when
the ripple occurs
⑦ Tap Save to save the test result to your mobile device as an
image
⑧ Tap Share to share the test result with your coworkers or
clients
Real-Time Voltage
Select Real-Time Voltage. You can check the real-time voltage
and the recorded voltage waveforms.
Figure 5.7.1 Figure 5.7.2
Figure 5.7.3 Figure 5.7.4
① Back
② Display the real-time voltage by a certain time interval (second/
minute/hour/day)
③ Current Voltage: The voltage at a selected moment on the
waveform
④ Real-Time Voltage
⑤ Selects the time interval of recording the voltage values
⑥ Displays the recorded voltage by a certain time interval
(second/minute/hour/day)
⑦ Sets the start time of the recorded voltage waveforms
Check Test Reports
Tap Report on the Home Page. The test reports will be displayed
by timeline, including battery test, cranking test, and charging
test reports.
Select and tap one of the reports to enter the detailed report
page.
EN I 21EN I 20

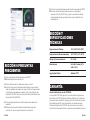
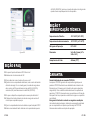
Q: What types of batteries does the BT20 work on?
A: 12V lead-acid batteries.
Q: How to determine whether the battery is good or bad?
A: The larger the battery capacity, the higher the voltage value of
the load test. Generally speaking, the load voltage should be
above 10V for batteries above 50Ah (500CCA); above 9.5V for
batteries above 20Ah (200CCA).
Q: Why does the device get hot after running tests?
A: The device tests the battery by simulating the vehicle load. It
is normal for the device to heat up.
Q: What is the maximum battery capacity supported by BT20?
A: It is not recommended to test batteries with a capacity
greater than 200Ah (2000CCA), because their output current
is too large and may cause the device to overheat.
Figure 5.8.1
SECTION 6 FAQ
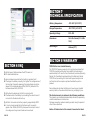
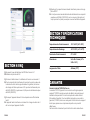
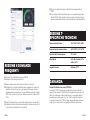
SECTION 7
TECHNICAL SPECIFICATION
Working Temperature
Storage Temperature
Operating Voltage
Dimensions
Cable Length
-10°C~55°C (14°F~131°F)
-20°C~75°C (-4°F~167°F)
DC 5~20V
145 x 52 x 34mm (5.7 x 2.83 x
1.34")
450mm (17.7")
TOPDON One Year Limited Warranty
The TOPDON Company warrants to its original purchaser that
TOPDON products will be free from defects in material and
workmanship for 12 months from the date of purchase (Warranty
Period). For the defects reported during the Warranty Period,
TOPDON will, according to its technical support analysis and
conrmation, either repair or replace the defective part or
product.
Some states do not allow limitations on how long an implied
warranty lasts, so the above limitations may not apply to you.
This limited warranty is void under the following conditions:
The product was misused, disassembled, altered, or repaired by
unauthorized stores or technicians.
Damage caused by careless handling and/or using the product
other than as directed.
Notice: All information in this manual is based on the latest
SECTION 8 WARRANTY
EN I 23EN I 22

information available at the time of publication, and no
warranty can be made for its accuracy or completeness.
TOPDON reserves the right to make changes at any time
without notice.
This device complies with part 15 of the FCC Rules. Operation is
subject to the following two conditions:(1) this device may not
cause harmful interference, and (2) this device must accept any
interference received, including interference that may cause
undesired operation.
Any changes or modications not expressly approved by the
party responsible for compliance could void the user's
authority to operate the equipment.
NOTE: This equipment has been tested and found to comply
with the limits for a Class B digital device, pursuant to part
15 of the FCC Rules. These limits are designed to provide
reasonable protection against harmful interference in a
residential installation. This equipment generates, uses and
can radiate radio frequency energy and, if not installed and
used in accordance with the instructions, may cause harmful
interference to radio communications. However, there is no
guarantee that interference will not occur in a particular
installation. If this equipment does cause harmful interference
to radio or television reception, which can be determined by
turning the equipment off and on, the user is encouraged to
try to correct the interference by one or more of the following
measures:
—Reorient or relocate the receiving antenna.
—Increase the separation between the equipment and receiver.
—Connect the equipment into an outlet on a circuit different
from that to which the receiver is connected.
—Consult the dealer or an experienced radio/TV technician for
help.
FCC ID: 2AVYW-BT20
SECTION 9 FCC WARNINGS
DEUTSCH
EN I 24

Zu Ihrer Sicherheit, der Sicherheit anderer und
um Schäden am Gerät oder Ihrem Fahrzeug zu
vermeiden, lesen Sie die Sicherheitshinweise in
dieser Anleitung sorgfältig durch und stellen Sie
sicher, dass Sie sie vollständig verstanden haben.
Sie müssen das Wartungshandbuch des Fahrzeugs
Batterieherstellers lesen und die angegebenen
Vorsichtsmaßnahmen oder Anweisungen vor
und während eines Test- oder Wartungsvorgangs
beachten.
FÜHREN SIE TESTS NUR IN EINEM GUT BELÜFTETEN
BEREICH DURCH, da das Fahrzeug Kohlenmonoxid
(ein giftiges, giftiges Gas) und Feinstaub erzeugt,
wenn der Motor läuft.
ACHTEN SIE IMMER AUF BEWEGLICHE TEILE
(einschließlich, aber nicht beschränkt auf
Kühlmittelgebläse, Riemenscheiben und Riemen),
da sie sich drehen oder mit hoher Geschwindigkeit
drehen, wenn der Motor läuft.
BERÜHREN SIE HEISSE MOTORTEILE NICHT Die
Motorteile können bei laufendem Motor extrem
heiß werden, das Berühren heißer Teile kann zu
Verbrennungen führen.
SCHALTEN SIE DIE ZÜNDUNG AUS, BEVOR SIE
DAS WERKZEUG AN DIE BATTERIE ANSCHLIESSEN
ODER TRENNEN, um Schäden am Tester oder den
elektronischen Komponenten des Fahrzeugs zu
vermeiden.
RAUCHEN SIE NICHT IN DER NÄHE DES FAHRZEUGS,
wenn der Batterietest läuft. Kraftstoff- und
Batteriedämpfe sind leicht entzündlich.
TRAGEN SIE IMMER ZUGELASSENEN AUGENSCHUTZ,
um Schäden durch scharfe Gegenstände und
ätzende Flüssigkeiten zu vermeiden.
SICHERHEIT STEHT IMMER
AN ERSTER STELLE!
LESEN SIE VOR DEM GEBRAUCH DIE
ANLEITUNG
TRAGEN SIE BEI ARBEITEN AN EINEM MOTOR
KEINE WEITE KLEIDUNG ODER SCHMUCK. Lockere
Kleidung kann sich leicht in Lüfter, Riemenscheiben,
Riemen usw. des Motors verfangen, und Schmuck ist
hochgradig leitfähig, was bei Kontakt mit Elektrizität
schwere Verbrennungen oder Stromschläge
verursachen kann.
SCHNEIDEN SIE DIE KABEL NICHT DURCH UND
TAUCHEN SIE SIE NICHT IN WASSER. Dieses Produkt
ist ein elektrisches Gerät, das einen elektrischen
Schlag und schwere Verbrennungen verursachen
kann.
WARNUNG: Batteriesäure ist extrem ätzend. Falls
Säure in Ihre Augen gelangt, SPÜLEN SIE DIE AUGEN
GRÜNDLICH FÜR MINDESTENS 20 MINUTEN MIT
KALTEM WASSER AUS UND SUCHEN SIE SOFORT
EINEN ARZT AUF. Wenn Batteriesäure mit Ihrer Haut
oder Kleidung in Kontakt kommt, WASCHEN SIE
SIE SOFORT MIT EINER LÖSUNG AUS WASSER UND
BACKSODA.
DE I 27DE I 26

ABSCHNITT 1
WAS IST IN DER BOX?
BT20
Kurzanleitung
ABSCHNITT 2
PRODUKTÜBERSICHT
BT20BT20
LCD-Display
Test-Taste
Batteriezustand-
Anzeigen
Batteriespannung-
Anzeigen
Positive Batterieklemme
(Rot)
Negative Batterieklemme
(Schwarz)
Erklärung des LCD-Displays:
Bluetooth-Symbol. Ein blinkendes Symbol zeigt an,
dass der Tester nicht mit der App verbunden ist; Ein
solides Symbol zeigt an, dass der Tester verbunden
ist.
Dieses Symbol zeigt an, NICHT innerhalb von 10
Sekunden zweimal zu testen.
Dieses Symbol zeigt an, dass die Spannung zu niedrig
ist. Laden Sie zuerst die Batterie auf.
Dieses Symbol zeigt eine Übertemperatur an. Warten
Sie, bis die Temperatur normal ist, und testen Sie
dann erneut.
Dieses Symbol zeigt eine schlechte Verbindung
zwischen Batterie und Klemmen an. Bitte verbinden
Sie erneut.
Dieses Symbol zeigt an, dass das Zurücksetzen des
Testers fehlgeschlagen ist. Bitte schließen Sie die
Batterie und die Klemmen wieder an.
Dieses Symbol zeigt an, dass der Tester anormal
ist oder die Batteriekapazität außerhalb des
Testbereichs liegt. Bitte schließen Sie die Batterie und
die Klemmen wieder an und versuchen Sie es erneut.
DE I 29DE I 28

ABSCHNITT 3
BEREIT ZU STARTEN
Nehmen wir folgendes Foto als Referenz:
1) Bei meisten Fahrzeugmodellen bendet sich die Batterie im
Motorraum unter der Motorhaube in einer der vorderen Ecken.
Siehe Batterieposition ① und ② in Abbildung 3.1.1.
2) Um eine ungleichmäßige Gewichtsverteilung auszugleichen,
verstauen einige Hersteller die Batterie im Kofferraum. Siehe
Batterieposition ⑤, ⑥ und ⑦ in Abbildung 3.1.1. In diesem Fall
kann die Batterie eine Plastikabdeckung haben, die vor jedem
Test entfernt werden sollte.
3) Bei einigen Modellen bendet sich die Batterie unter dem
Rücksitz. Siehe Batterieposition ④ in Abbildung 3.1.1.
4) Bei anderen Fahrzeugen nden Sie die Batterie unter dem
Beifahrersitz. Siehe Batterieposition ③ in Abbildung 3.1.1.
WARNING:
TESTEN SIE NICHT DURCH DIE JUMPSTART-PFOSTEN.
Bei Modellen, die die Batterie unter dem Sitz oder im
Kofferraum unterbringen, fügt der Hersteller in der Regel
Starthilfestecker-Leiterpfosten unter der Motorhaube ein
(siehe Abbildung 3.1.2), um die Starthilfe zu erleichtern.
Um die Genauigkeit der Daten und die Betriebssicherheit
zu gewährleisten, SCHLIESSEN SIE DEN BATTERIETESTER
NICHT AN DIE JUMPSTART-PFOSTEN AN.
Abbildung 3.1.1
Abbildung 3.2.1
Wie können Sie feststellen, welchen Batterietyp Sie
haben?
Nehmen wir folgendes Foto als Referenz:
Abbildung 3.1.2
DE I 31DE I 30

1) Reservekapazität: 80Ah
Die Reservekapazität ist eine Zeitmessung, die erklärt, wie
lange eine voll aufgeladene Batterie einen Strom von 25
Ampere in einer Umgebung mit 80 °F liefern kann, bevor die
Batterie entladen wird und auf 10,5 Volt abfällt.
2) Spannung: 12 V
Wenn die Batterie vollständig aufgeladen ist, sollten die
Autobatterien bei 12,6 Volt messen. Diese Messung sollte
jedoch bei laufendem Motor zwischen 13,7 und 14,7 Volt liegen.
Wenn der Batterietester weniger als diesen Standard anzeigt,
bedeutet dies, dass die Ruhespannung der Batterie schwach
ist. In diesem Fall muss die Batterie typischerweise aufgeladen
oder ersetzt werden.
3) CCA: 650A (SAE)
Die CCA-Bewertung bezieht sich darauf, wie viele Ampere eine
12-Volt-Batterie bei 0 °F in 30 Sekunden liefern kann, während
sie eine Spannung von mindestens 7,2 V aufrechterhält. Das
bedeutet, je höher der CCA-Wert ist, desto leichter lässt sich
der Motor bei kalten Temperaturen ankurbeln.
1) Vor der Verbindung der Klemmen an die Pole benutzen Sie
Schleifpapier, um jegliche Korrosion an den Batteriepolen zu
polieren. Dies hilft, ungenaue Testwerte zu vermeiden.
2) Befestigen Sie die rote Klemme am Pluspol (+) und die
schwarze Klemme am Minuspol (-).
• BERÜHREN SIE DIE ROTEN UND SCHWARZEN KLEMMEN
IMMER NICHT.
• TRENNEN SIE IMMER ZUERST DAS MINUSKABEL VON DER
BATTERIE UND SCHLIESSEN SIE ES ZULETZT WIEDER AN.
3) Sobald Sie die Klemmen richtig anschließen, schaltet sich
der Batterietester automatisch ein und ist bereit, Tests
durchzuführen.
Verbindung der Klemmen mit den Batterieklemmen
(siehe Abbildung 3.3.1)
(Rot) (Schwarz)
Abbildung 3.3.1
ABSCHNITT 4 TESTEN ÜBER
DIE TEST-TASTE
Die Echtzeitspannung der Batterie wird kurz nach dem
Einschalten des Batterietesters auf dem Bildschirm angezeigt
und das Bluetooth-Symbol blinkt.
Drücken Sie die Testtaste und warten Sie einige Sekunden. Die
entsprechende Batteriespannungsanzeige (FULL / MEDIUM /
LOW) und die Batteriezustandsanzeige (GOOD / MEDIUM / BAD)
leuchten auf, um das Testergebnis anzuzeigen.
Abbildung 4.1.1
DE I 33DE I 32

Abbildung 4.2.1
BT20BT20 BT20BT20
ABSCHNITT 5 TESTEN ÜBER
DIE APP BT20
App Herunterladen und Installieren
Startseite
Suchen Sie im App Store™ oder Google Play™ nach „BT20“,
laden Sie es herunter und installieren Sie es auf Ihrem
Mobilgerät.
Starten Sie die App „BT20“, um die Startseite aufzurufen.
Tipp:
Bitte erlauben Sie der App, auf Ihr Netzwerk und Bluetooth
zuzugreifen.
① Einstellungen
- Tippen Sie auf [Sprache], um Ihre bevorzugte Sprache
auszuwählen.
- Tippen Sie auf [Login], um Ihr Konto einzurichten. (Wenn Sie
sich nicht anmelden möchten, überspringen Sie es einfach.)"
Abbildung 5.2.1
Tipp:
Wenn Sie bereits ein TOPDON-Konto haben, melden Sie
sich bitte direkt damit an. Falls nicht, tippen Sie unten auf
der Seite [Login] auf [Jetzt registrieren], registrieren Sie ein
Konto mit einer gültigen E-Mail-Adresse und melden Sie
sich dann an.
② Bluetooth-Verbindung
③ Batterietest
④ Anlasstest
⑤ Ladetest
⑥ Echtzeitspannung
⑦ Testergebnisse nach Zeitachse
DE I 35DE I 34

Bluetooth-Verbindung
Nachdem der Tester ordnungsgemäß mit der Batterie
verbunden und die Kontoeinrichtung abgeschlossen wird,
tippen Sie auf der Startseite auf Bluetooth verbinden, um den
Batterietester mit der App zu verbinden.
Nach einer erfolgreichen Verbindung leuchtet das Bluetooth-
Symbol auf dem LCD-Display auf und blinkt nicht ein und aus.
Dann können Sie mit der Durchführung eines Tests starten.
Abbildung 5.3.1
Notizen:
1. Es kann immer nur ein Tester mit der App verbunden
sein.
2. Sobald Sie das Bluetooth verbunden haben, ist die
Testtaste am Batterietester nicht verfügbar.
WARNUNG:
Vor dem Test müssen der Motor und alle anderen
Nebenverbraucher ausgeschaltet sein, um genaue
Ergebnisse zu gewährleisten. Die Batterietestfunktion gilt
nur für 12-V-Blei-Säure-Batterien.
Batterietest
1) Wählen Sie Batterietest.
2) Wählen Sie einen Batterieparameter (CCA oder Ah), geben
Sie den Wert ein und tippen Sie auf Weiter. Der spezische
Batteriestandard wird auf dem Batterieetikett aufgeführt.
3) Tippen Sie auf Testen.
Abbildung 5.4.1
DE I 37DE I 36

4) Das Testergebnis wird in Kürze wie folgt angezeigt.
Abbildung 5.4.2 Abbildung 5.4.3
Abbildung 5.4.4
① Zurück
② Referenztablette für Testwerte
③ Echtzeitspannung
④ Ladespannung: Die Spannung, die beim Einschalten der
elektrischen Bordgeräte gemessen wird
⑤ Leerlaufspannung: Die Spannung, die beim Ausschalten der
elektrischen Bordgeräte gemessen wird
⑥ Wechselt zur Seite der Echtzeit-Spannungswellenform
⑦ Die CCA/Ah, die Sie im vorherigen Schritt eingegeben haben
⑧ Testergebnis des Batteriestatus
⑨ Testergebnis der Spannung
⑩ Tippen Sie auf Speichern, um das Testergebnis als Foto auf
Ihrem Mobilgerät zu speichern
WARNUNG:
Vor dem Anlasstest müssen der Motor und alle anderen
Nebenverbraucher ausgeschaltet sein, um genaue
Ergebnisse zu gewährleisten. Die Batterietestfunktion gilt
nur für 12-V-Blei-Säure-Batterien.
Anlasstest
1) Wählen Sie Anlasstest.
2) Tippen Sie auf Weiter.
3) Befolgen Sie die Anweisungen und starten Sie den Motor.
Abbildung 5.5.2 Abbildung 5.5.3Abbildung 5.5.1
DE I 39DE I 38
A página está carregando...
A página está carregando...
A página está carregando...
A página está carregando...
A página está carregando...
A página está carregando...
A página está carregando...
A página está carregando...
A página está carregando...
A página está carregando...
A página está carregando...
A página está carregando...
A página está carregando...
A página está carregando...
A página está carregando...
A página está carregando...
A página está carregando...
A página está carregando...
A página está carregando...
A página está carregando...
A página está carregando...
A página está carregando...
A página está carregando...
A página está carregando...
A página está carregando...
A página está carregando...
A página está carregando...
A página está carregando...
A página está carregando...
A página está carregando...
A página está carregando...
A página está carregando...
A página está carregando...
A página está carregando...
A página está carregando...
A página está carregando...
A página está carregando...
A página está carregando...
A página está carregando...
A página está carregando...
A página está carregando...
A página está carregando...
A página está carregando...
A página está carregando...
A página está carregando...
A página está carregando...
A página está carregando...
A página está carregando...
A página está carregando...
A página está carregando...
A página está carregando...
A página está carregando...
A página está carregando...
A página está carregando...
A página está carregando...
A página está carregando...
A página está carregando...
A página está carregando...
A página está carregando...
A página está carregando...
A página está carregando...
A página está carregando...
A página está carregando...
A página está carregando...
A página está carregando...
A página está carregando...
A página está carregando...
A página está carregando...
A página está carregando...
A página está carregando...
-
 1
1
-
 2
2
-
 3
3
-
 4
4
-
 5
5
-
 6
6
-
 7
7
-
 8
8
-
 9
9
-
 10
10
-
 11
11
-
 12
12
-
 13
13
-
 14
14
-
 15
15
-
 16
16
-
 17
17
-
 18
18
-
 19
19
-
 20
20
-
 21
21
-
 22
22
-
 23
23
-
 24
24
-
 25
25
-
 26
26
-
 27
27
-
 28
28
-
 29
29
-
 30
30
-
 31
31
-
 32
32
-
 33
33
-
 34
34
-
 35
35
-
 36
36
-
 37
37
-
 38
38
-
 39
39
-
 40
40
-
 41
41
-
 42
42
-
 43
43
-
 44
44
-
 45
45
-
 46
46
-
 47
47
-
 48
48
-
 49
49
-
 50
50
-
 51
51
-
 52
52
-
 53
53
-
 54
54
-
 55
55
-
 56
56
-
 57
57
-
 58
58
-
 59
59
-
 60
60
-
 61
61
-
 62
62
-
 63
63
-
 64
64
-
 65
65
-
 66
66
-
 67
67
-
 68
68
-
 69
69
-
 70
70
-
 71
71
-
 72
72
-
 73
73
-
 74
74
-
 75
75
-
 76
76
-
 77
77
-
 78
78
-
 79
79
-
 80
80
-
 81
81
-
 82
82
-
 83
83
-
 84
84
-
 85
85
-
 86
86
-
 87
87
-
 88
88
-
 89
89
-
 90
90


em outras línguas
- español: Topdon BT20 Manual de usuario
- français: Topdon BT20 Manuel utilisateur
- italiano: Topdon BT20 Manuale utente
- Deutsch: Topdon BT20 Benutzerhandbuch
- 日本語: Topdon BT20 ユーザーマニュアル
Artigos relacionados
-
Topdon BT20 Manual do usuário
-
 Topdon BTMOBILE PRO Manual do usuário
-
 Topdon BTMOBILE PRO Manual do usuário
-
Topdon BTMOBILE lite Manual do usuário
-
-
 Topdon BT100W Guia rápido
-
 Topdon VS2000 Manual do usuário
-
 Topdon JUMPSURGE1200 Manual do usuário
-
 Topdon VS2000Plus Manual do usuário
-
 Topdon ArtiLink500B Manual do usuário


Outros documentos
-
 BS BATTERY BST1000 Lead Acid and Lithium Battery Tester Manual do usuário
-
Beta 1498TB/12-24 Instruções de operação
-
USAG 890K Manual do usuário
-
Facom BAT.TEST Manual do usuário
-
Bahco BBT Series Manual do usuário
-
Schumacher BT453 Manual do proprietário
-
-
