Topdon TB6000Pro Manual do usuário
- Categoria
- Carregadores de bateria
- Tipo
- Manual do usuário

USER MANUALBattery Tester & Battery Charger


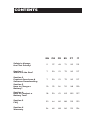
CONTENTS
Safety Is Always
the First Priority!
Section 4
How to Conduct a
Battery Test?
Section 2
Product Overviews &
Software Downloading
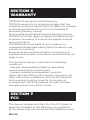
Section 6
Warranty
DE
27
39
29
46
29
44
32
EN
5
18
7
24
7
22
10
FR
49
61
51
68
51
66
54
ES
71
83
73
90
73
88
76
IT
115
127
117
134
117
132
120
93
105
95
112
95
110
98
PT
Section 1
What's in the Box?
Section 5
FAQ
Section 3
How to Charge a
Battery?

ENGLISH

EN I 5
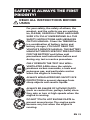
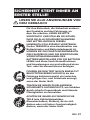
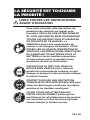
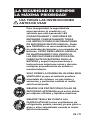
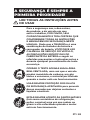
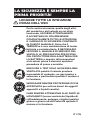
SAFETY IS ALWAYS THE FIRST
PRIORITY!
For your safety, the safety of others, the
product, and the vehicle you are working
on, PLEASE, CAREFULLY READ AND MAKE
SURE YOU FULLY UNDERSTAND ALL THE
SAFETY INSTRUCTIONS AND MESSAGES
ON THIS MANUAL. Given the TB6000Pro
is a combination of battery tester and
battery charger, YOU MUST READ THE
VEHICLE'S SERVICE MANUAL, THE BATTERY
MANUFACTURER’S SPECIFIC PRECAUTIONS
FOR THE BATTERY and follow said
precautions and instructions before and
during any test or service procedure.
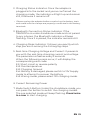
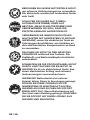
READ ALL INSTRUCTIONS BEFORE
USING
ONLY OPERATE THE TEST IN A WELL-
VENTILATED AREA since the vehicle
produces carbon monoxide, a toxic and
poisonous gas, and particulate matter
when the engine is running.
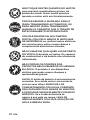
ALWAYS BE AWARE OF MOVING PARTS
(such as coolant fans, pulleys, belts) since
they spin or turn at high speeds when the
engine is running.
ALWAYS WEAR APPROVED SAFETY EYE
PROTECTION to prevent damage from
sharp objects and caustic liquids.
DO NOT TOUCH HOT ENGINE PARTS to
prevent severe burns. The engine parts
become very hot when the engine is
running.

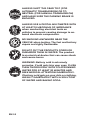
EN I 6
ALWAYS SHIFT THE GEAR TO P (FOR
AUTOMATIC TRANSMISSION) OR TO
NEUTRAL (FOR MANUAL TRANSMISSION)
AND MAKE SURE THE PARKING BRAKE IS
ENGAGED.
ALWAYS USE A DIGITAL MULTIMETER WITH
AT LEAST 10 MEGOHMS OF IMPEDANCE
when conducting electrical tests on
vehicles to prevent causing damage to on-
board electronic components.
NO SMOKING ANYWHERE NEAR THE
VEHICLE when testing. The fuel and battery
vapors are highly ammable.
DO NOT CUT THE PRODUCTS CORDS OR
SUBMERGE THEM IN WATER. The product
is an electrical device that can cause shock
and severe burns.
WARNING: Battery acid is extremely
corrosive. If acid gets into your eyes, FLUSH
THEM THOROUGHLY WITH COLD RUNNING
WATER FOR AT LEAST 20 MINUTES AND
SEEK MEDICAL ATTENTION IMMEDIATELY.
If battery acid gets on your skin or clothing,
WASH IT IMMEDIATELY WITH A SOLUTION
OF WATER AND BAKING SODA.

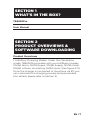
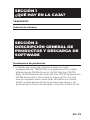
SECTION 1
WHAT'S IN THE BOX?
SECTION 2
PRODUCT OVERVIEWS &
SOFTWARE DOWNLOADING
TB6000Pro
User Manual
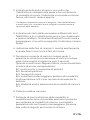
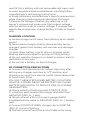
1. 6 Battery Charging Modes: Under the standalone
mode, TB6000Pro provides with you 6 different modes
12V/6A Norm, 12V/1A Repair, 12V/6A Supply, 12V/3A Small,
12V/6A Lithium-ion battery, 6V/3A Norm. (See gure 2.1.1)
Once the charger is connected to the phone via BT, you
can customize the charging process and parameters.
(For details, please refer to Section 3)
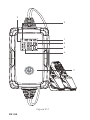
Product Overviews
EN I 7

Figure 2.1.1
7
6
5
1
2
3
4
EN I 8

2. Charging Status Indicator: Once the adapter is
plugged into the socket and you've conrmed the
charging mode, the indicator will light up and remain
still, otherwise it remains off.
3. Bluetooth Connection Status Indicator: If the
TB6000Pro is under standalone mode and not paired
to any phones, the Bluetooth indicator will keep
ashing. Once it is paired, the indicator remains still.
4. Charging Steps Indicator: It shows you exactly which
step you are in among the 9 charging steps.
5. Real-time Charging Voltage and Current: It presents
you with the real-time charging current and voltage.
The parameter refreshes every 2 seconds.
When the following errors occur, it will display the
corresponding error code:
Er1: Short circuit or reverse polarity
Er2: Overtemperature
Er3: Charging timeout
Er4: Battery is damaged, please switch to 12V Supply
mode to attempt to recover the battery.
Er5: Wrong mode, please select 12V charging mode.
6. Current Remaining Power
7. Mode Switch Button: Under the standalone mode, you
can press the button to switch the charging modes.
The pre-selected mode will keep ashing. Press twice
in a row to start charging.
· Please unplug the adapter before conducting the battery tests
and make sure the clamps are properly connected to the battery
terminals.
EN I 9

• Please turn on the Bluetooth before setting up the
connection.
• YOU CAN ONLY SET UP THE BLUETOOTH IN THE
TB6000Pro APP
How to Download and Connect the TB6000Pro to
Your Phone?
1. For the iPhone, please go to the AppStore and search
TB6000Pro.
2. For the Android, please go to the GooglePlay and
search TB6000Pro.
3. To connect your phone with TB6000Pro via Bluetooth
requires you to turn it on in Settings.
4. Or you can turn on the Bluetooth in Control Center or
Notication Panel.
5. Open the TB6000Pro APP and tap the Bluetooth icon
to establish connection with the unit.
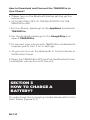
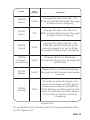
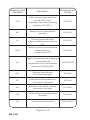
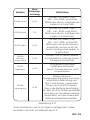
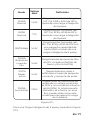
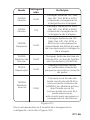
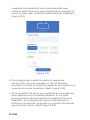
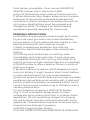
To understand the 6 charging modes please refer to the
chart below (Figure 3.1.1)
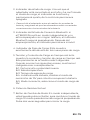
SECTION 3
HOW TO CHARGE A
BATTERY?
EN I 10

Charge 12V Wet, Gel, MF, Cal,
EFB, and AGM batteries through
9-step smart charging.
Charge 6V Wet, Gel, MF, Cal,
EFB, and AGM batteries through
9-step smart charging.
Charge 12V li-ion batteries,
including lithium iron phosphate
(LiFePO4).
Provide an output supply of a
constant voltage of 13.5V and a
maximum current of 6A(81W).
If the battery is damaged or Er4
error is reported, you can select
this mode to recover battery
charging.
Repair old or sulfated batteries
through small current and pulse
current.
Charge 12V Wet, Gel, MF, Cal,
EFB, and AGM batteries with
a small capacity of up to 50Ah
through 9-step smart charging.
Mode
12V/6A
Norm
6V/3A
Norm
12V/3A
Small
12V/6A
Lithium-
ion Battery
12V/1A
Repair
12V/6A
Supply
14.2V
7.1V
14.2V
14.6V
14.2V
13.5V
Max.
Voltage Denition
Figure 3.1.1
EN I 11
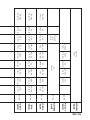
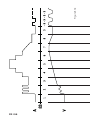
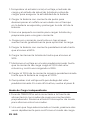
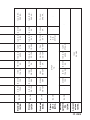
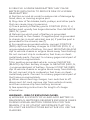
To understand the 9-Step Smart Charging please refer
to the gure 3.1.2

Figure 3.1.2
EN I 12

12V/6A
NORM >2A OK
>2A OK
2-10.2V
1.5-3A
10.2-11.8V
1.5A
11.8V
1.5-4.5A
11.8-13.5V
6A
13.5-14.0V
4.5-3A
14.0V
3-1.5A
14.0-14.2V
0.8A
14.2-12.8V
0A
14.2-12.8V..
0A-0.8A...
14.2-12.8V..
0A-0.4A...
7.1-6.4V..
0A-0.4A...
-
-
12V/3A
SMALL
>2A OK
2-10.2V
0.8-1.5A
10.2-11.8V
0.8A
11.8V
0.8-2.3A
11.8-13.5V
3A
13.5-14.0V
2.3-1.5A
14.0V
1.5-0.8A
14.0-14.2V
0.4A
14.2-12.8V
0A
6V/3A
NORM
>2A OK
2-5.1V
0.8-1.5A
-
5.1-5.9V
0.8A
2-10.6V
1.5A
5.9V
0.8-2.3A
10.6V
1.5-4.5A
5.9-6.8V
3A
10.6-13.9V
6A
6.8-7.0V
2.3-1.5A
13.9-14.6V
4.5-3A
7.0V
1.5-0.8A
14.6V
0.75A-0A
7.0-7.1V
0.4A
7.1-6.4V
0A
12V/1A
REPAIR
>2A OK
2-14.2V
1A
14.2V
0-1A
2h Max
-
12V/6A
LITHIUM
12V/6A
SUPPLY
13.5V
6A MAX
EN I 13

Standalone Charing Mode
1. When TB6000Pro is connected to the power supply,
the charging modes will keep ashing. Press the Mode
Switch Button to toggle between the modes.
2. Once you've selected the mode, press twice quickly to
conrm the charging mode.
3. After the conrmation, it will automatically start the
charging process from step one.
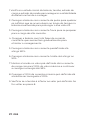
1. Check the battery’s initial state, voltage, state of
charging and state of health to ensure the stability of
the battery before charging.
2. Charge the battery with pulse current to breakdown
the sulfates that have built up over time in the aging
battery to extend life.
3. Charge the battery with low current to prepare for the
high-current charging.
4. Charge the battery with three stages of constant
current that gradually rise to optimize charging.
5. Charge the battery with preset current until it reaches
80%.
6. Trickle charge the battery until it reaches 90%.
7. Remain the voltage at preset value until the charging
current drops to 12.5% of the maximum value and
keep charging the power to 95%.
8. Charge at 12.5% of the preset maximum current until
the battery is charged to 100%.
9. Check if the voltage is lower than preset value. If it is
turn back to step 8.
EN I 14

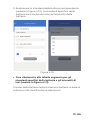
Bluetooth Charging Mode
1. Once you've conrmed the preparation steps are done,
plug the adapter into a wall outlet and attach the
clamps to the battery terminals.
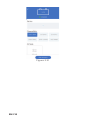
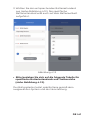
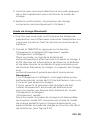
2. Open the TB6000Pro, tap the Smart Charging/Quick
Charging.
Smart Charging:
Under this mode, battery test is automatically
performed before and after charging. Simply enter
basic battery information and select the desired
charging mode, then tap Start charging. A charging
report will be automatically generated during the
process.
Note:
1. Smart Charging is only applicable for 12V lead-acid
batteries (Li-ion or 6V batteries are not supported).
2. To ensure accuracy of test results, only use the
battery clamps to connect to the battery terminals
under Smart Charging mode.
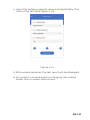
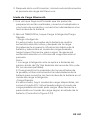
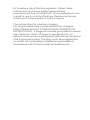
Quick Charging:
Under this mode, 6 charging modes are available, as
well as DIY Mode. You can choose the preset charging
mode to charge directly, or customize the charging
mode according to the condition of the battery. (See
gure 3.3.1)
EN I 15

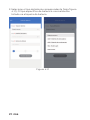
Figure 3.3.1
EN I 16

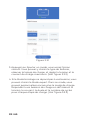
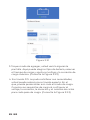
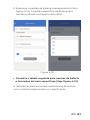
Figure 3.3.2 Figure 3.3.3
3. Tap add mode, you will see the following screen. Here
you can choose the battery type, reserve charging
time, and adjust the maximum charging voltage and
current. (See gure 3.3.2)
4. If the DIY Mode couldn't meet your needs, you can
select the Expert Mode. In which, you can customize
the charging mode even further. Meet your charging
requirements by setting the voltage, current, duration
and number of cycles for each charging step. (See
gure 3.3.3)
EN I 17

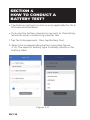
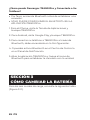
SECTION 4
HOW TO CONDUCT A
BATTERY TEST?
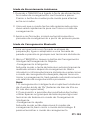
• The battery testing function is only applicable for 6V &
12V lead-acid batteries.
• Only use the battery clamps to connect to the battery
terminals when conducting a batter test.
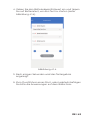
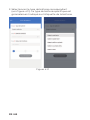
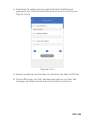
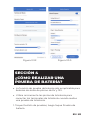
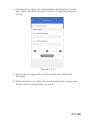
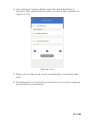
1. Tap Test Management, then tap Battery Test.
2. Select the corresponding battery type (See gure
4.1.1). The specic battery type is usually listed on the
battery label.
Figure 4.1.1
EN I 18

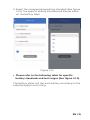
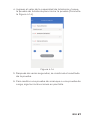
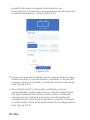
3. Select the corresponding battery standard (See gure
4.1.2). The specic battery standard will also be listed
on the battery label.
EN I 19
Figure 4.1.2
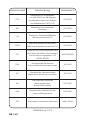
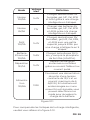
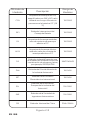
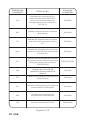
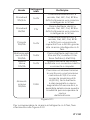
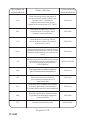
• Please refer to the following table for specic
battery standards and test ranges (See gure 4.1.3).
The battery tester will test each battery according to the
selected system and rating.

Figure 4.1.3
Measurement
Standard
Measurement
Range
Description
Cold Cranking Amps, specied
by SAE & BCI, most
frequently used value for starting
battery at 0°F(-18°C)
Battery Council International
standard
Cranking Amps standard,
effective starting current value at
0°C
Marine Cranking Amps standard,
effective starting
current value at 0°C
Japan Industrial Standard, displayed
on the battery as
combination of the numbers and
letters, e.g., 55D23,80D26
100-2000
100-2000
100-2000
100-2000
26A17-245H52
CCA
BCI
CA
MCA
JIS
German Auto Industry
Committee Standard
International Electrotechnical
Commission Standard
European Automobile Industry
Association Standard
Society of Automotive Engineers
Standard
China National Standard
100-1400
100-1400
100-2000
100-2000
30Ah-220Ah
DIN
IEC
EN
SAE
GB
EN I 20
A página está carregando...
A página está carregando...
A página está carregando...
A página está carregando...
A página está carregando...
A página está carregando...
A página está carregando...
A página está carregando...
A página está carregando...
A página está carregando...
A página está carregando...
A página está carregando...
A página está carregando...
A página está carregando...
A página está carregando...
A página está carregando...
A página está carregando...
A página está carregando...
A página está carregando...
A página está carregando...
A página está carregando...
A página está carregando...
A página está carregando...
A página está carregando...
A página está carregando...
A página está carregando...
A página está carregando...
A página está carregando...
A página está carregando...
A página está carregando...
A página está carregando...
A página está carregando...
A página está carregando...
A página está carregando...
A página está carregando...
A página está carregando...
A página está carregando...
A página está carregando...
A página está carregando...
A página está carregando...
A página está carregando...
A página está carregando...
A página está carregando...
A página está carregando...
A página está carregando...
A página está carregando...
A página está carregando...
A página está carregando...
A página está carregando...
A página está carregando...
A página está carregando...
A página está carregando...
A página está carregando...
A página está carregando...
A página está carregando...
A página está carregando...
A página está carregando...
A página está carregando...
A página está carregando...
A página está carregando...
A página está carregando...
A página está carregando...
A página está carregando...
A página está carregando...
A página está carregando...
A página está carregando...
A página está carregando...
A página está carregando...
A página está carregando...
A página está carregando...
A página está carregando...
A página está carregando...
A página está carregando...
A página está carregando...
A página está carregando...
A página está carregando...
A página está carregando...
A página está carregando...
A página está carregando...
A página está carregando...
A página está carregando...
A página está carregando...
A página está carregando...
A página está carregando...
A página está carregando...
A página está carregando...
A página está carregando...
A página está carregando...
A página está carregando...
A página está carregando...
A página está carregando...
A página está carregando...
A página está carregando...
A página está carregando...
A página está carregando...
A página está carregando...
A página está carregando...
A página está carregando...
A página está carregando...
A página está carregando...
A página está carregando...
A página está carregando...
A página está carregando...
A página está carregando...
A página está carregando...
A página está carregando...
A página está carregando...
A página está carregando...
A página está carregando...
A página está carregando...
A página está carregando...
A página está carregando...
A página está carregando...
A página está carregando...
A página está carregando...
A página está carregando...
A página está carregando...
A página está carregando...
A página está carregando...
A página está carregando...
A página está carregando...
A página está carregando...
-
 1
1
-
 2
2
-
 3
3
-
 4
4
-
 5
5
-
 6
6
-
 7
7
-
 8
8
-
 9
9
-
 10
10
-
 11
11
-
 12
12
-
 13
13
-
 14
14
-
 15
15
-
 16
16
-
 17
17
-
 18
18
-
 19
19
-
 20
20
-
 21
21
-
 22
22
-
 23
23
-
 24
24
-
 25
25
-
 26
26
-
 27
27
-
 28
28
-
 29
29
-
 30
30
-
 31
31
-
 32
32
-
 33
33
-
 34
34
-
 35
35
-
 36
36
-
 37
37
-
 38
38
-
 39
39
-
 40
40
-
 41
41
-
 42
42
-
 43
43
-
 44
44
-
 45
45
-
 46
46
-
 47
47
-
 48
48
-
 49
49
-
 50
50
-
 51
51
-
 52
52
-
 53
53
-
 54
54
-
 55
55
-
 56
56
-
 57
57
-
 58
58
-
 59
59
-
 60
60
-
 61
61
-
 62
62
-
 63
63
-
 64
64
-
 65
65
-
 66
66
-
 67
67
-
 68
68
-
 69
69
-
 70
70
-
 71
71
-
 72
72
-
 73
73
-
 74
74
-
 75
75
-
 76
76
-
 77
77
-
 78
78
-
 79
79
-
 80
80
-
 81
81
-
 82
82
-
 83
83
-
 84
84
-
 85
85
-
 86
86
-
 87
87
-
 88
88
-
 89
89
-
 90
90
-
 91
91
-
 92
92
-
 93
93
-
 94
94
-
 95
95
-
 96
96
-
 97
97
-
 98
98
-
 99
99
-
 100
100
-
 101
101
-
 102
102
-
 103
103
-
 104
104
-
 105
105
-
 106
106
-
 107
107
-
 108
108
-
 109
109
-
 110
110
-
 111
111
-
 112
112
-
 113
113
-
 114
114
-
 115
115
-
 116
116
-
 117
117
-
 118
118
-
 119
119
-
 120
120
-
 121
121
-
 122
122
-
 123
123
-
 124
124
-
 125
125
-
 126
126
-
 127
127
-
 128
128
-
 129
129
-
 130
130
-
 131
131
-
 132
132
-
 133
133
-
 134
134
-
 135
135
-
 136
136
-
 137
137
-
 138
138
-
 139
139
-
 140
140
-
 141
141
-
 142
142


Topdon TB6000Pro Manual do usuário
- Categoria
- Carregadores de bateria
- Tipo
- Manual do usuário
em outras línguas
- español: Topdon TB6000Pro Manual de usuario
- français: Topdon TB6000Pro Manuel utilisateur
- italiano: Topdon TB6000Pro Manuale utente
- Deutsch: Topdon TB6000Pro Benutzerhandbuch
Artigos relacionados
-
Topdon TB6000Pro Manual do usuário
-
Topdon Tornado4000 Manual do usuário
-
Topdon TB8000 Manual do usuário
-
Topdon BT20 Manual do usuário
-
 Topdon BTMOBILE PRO Manual do usuário
-
Topdon BTMOBILE lite Manual do usuário
-
-
Topdon BT300P Manual do usuário
-
 Topdon BT200 Manual do usuário
-
 Topdon VS2000 Manual do usuário


Outros documentos
-
Tecmate TM-500 OptiMate DC-DC Manual do proprietário
-
-
Tecmate OptiMATE Lithium TM294 Manual do proprietário
-
-
-
Expert E200407 Manual do usuário
-
KTM A61029974144 Manual do proprietário
-
Victron energy Smart BatteryProtect 12-24V Manual do usuário
-
-
Beta 1498/16A Instruções de operação