De Dietrich DOV400XE1 Manual do proprietário
- Categoria
- Microondas
- Tipo
- Manual do proprietário

Le guide d’utilisation de votre four
Using your oven
Bedienungsanleitung Dampfgarer
Gebruiksaanwijzing stoomoven
B
etjeningsvejledning til ovnen
Instrucciones de uso de su horno
O
guia de utilização do seu forno
DOV400*
DE
GB
DK
ES
FR
NL
PT
99631516_ML_A.qxd 13/12/04 16:13 Page 1
A página está carregando ...
A página está carregando ...
A página está carregando ...

5
FR
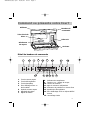
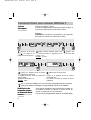
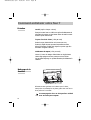
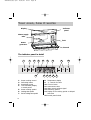
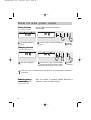
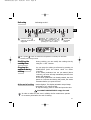
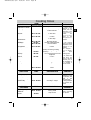
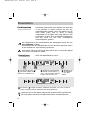
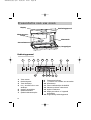
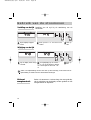
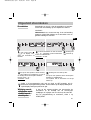
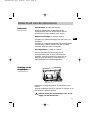
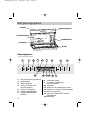
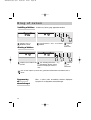
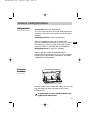
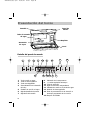
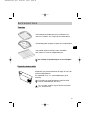
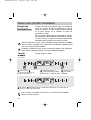
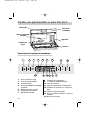
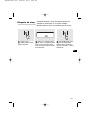
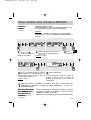
Comment se présente votre four?
Bandeau de
commande
Réservoir
Afficheur
Générateur
de vapeur
1. Touche cuisson vapeur
2. Touche décongélation
3. Touche Start/Stop
4. Zone affichage heure ou
durée sablier
5. Symbole cuisson vapeur
6. Sigle durée de cuisson
7. Sigle fin de cuisson
1 2 3
5
12
13
8
15
9
10
Tube d’arrivée
d’eau
4
14
11
6
7
8. Indication de température
9. Touches +ou - réglage du temps
10. Touche de sélection
11. Sigle du minuteur indépendant
12. Indicateur de problème sur circuit d’eau
13. Symbole de décongélation
14. Zone d’affichage durée ou départ différé
cuisson
15. Verrouillage clavier
Détail du bandeau de commande
Goulotte
99631516_ML_A.qxd 13/12/04 16:13 Page 5
A página está carregando ...
A página está carregando ...

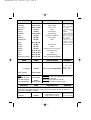
8
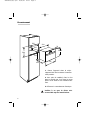
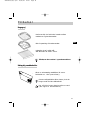
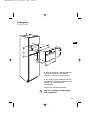
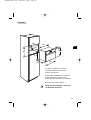
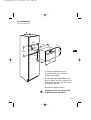
Encastrement
380
560
50
386,5
20
595
405
544
378
550
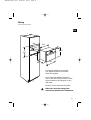
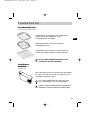
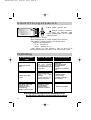
1. Placez l’appareil dans la niche.
L’appareil doit être horizontal. Contrôlez
cette position.
2. Pour plus de stabilité, fixez le four
dans le meuble par 2 vis dans les trous
prévus à cet effet sur les montants laté-
raux.
3. Effectuez le raccordement électrique.
Veillez à ce que la fiche soit
accessible après installation.
99631516_ML_A.qxd 13/12/04 16:13 Page 8
A página está carregando ...

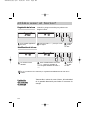
10
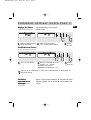
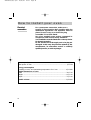
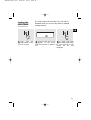
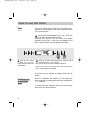
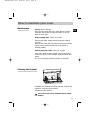
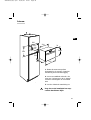
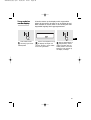
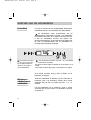
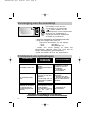
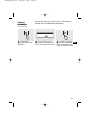
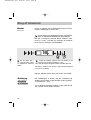
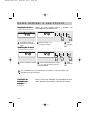
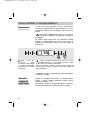
Un verrouillage de l’afficheur est possible. Celui-ci ne
peut être activé que hors cuisson en mode heure ou en
mode cuisson différée
Verrouillage
afficheur
Appuyez sur la tou-
che START/STOP
pendant quelques
secondes.
Un bip retentit et une “clé”
apparaît sur l’écran. A par-
tir de ce moment, aucune tou-
che n’est active.
Pour déverrouiller,
appuyez sur la touche
START/STOP pendant
quelques secondes, un bip
retentit et la clé disparaît.
1
2
3
99631516_ML_A.qxd 13/12/04 16:13 Page 10
A página está carregando ...
A página está carregando ...
A página está carregando ...
A página está carregando ...
A página está carregando ...

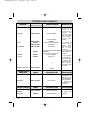
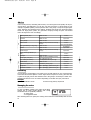
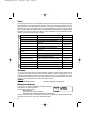
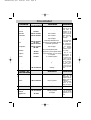
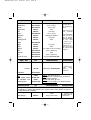
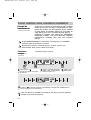
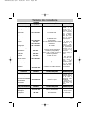
16
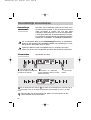
Artichauts (Petits)
TEMPS
Quelle que soit la quantité
Asperges
Brocolis
Carottes
Céleri-rave
Citrouille
Champignons
Courgettes
Crosnes
Epinards
Endives
Fenouil
Haricots verts
Navets
Petits pois frais
Pommes de terre
40 à 45 min .
35 à 40 min.
18 min.
20 à 22 min.
25 à 30 min.
15 à 20 min.
15 min.
10 à 15 min.
20 min.
20 min.
35 min
30 min.
22 min.
30 à 35 min.
15 à 20 min.
20 à 25 min.
25 min.
40 à 45 min.
posés à l’envers dans le plat
pour les pointes, réduire le temps
en petits bouquets
en fines rondelles
en fines tranches
en cubes
en rondelles
trognon ôté et coupées en 2
dans la longueur
coupés en 2
en cubes
Poireaux
25 min.
coupés en 2
coupées en rondelles
entières
• Ces temps sont
fonction de la
nature, de la
grosseur et de la
fraîcheur des
légumes. Suivez
les indications
figurant dans la
colonne
«prépa-
rations»
.
• Le temps de
cuisson reste le
même quelle
que soit la quan-
tité à cuire.
Exemple :
1 ou 4 artichauts
même temps de
cuisson .
• Pour contrôler
le degré de cuis-
son piquez dans
la partie la plus
épaisse du légu-
me; s’il est cuit,
il n’y aura pas de
résistance.
(frais) remuer en cours de cuisson
(surgelés) ” ”
/
Choux
30 à 35 min.
22 min.
30 à 35 min.
Bruxelles
Fleurs en petits bouquets
Vert émincés
en fines lamelles
LEGUMES
PREPARATIONS
REMARQUES
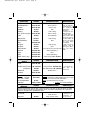
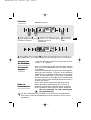
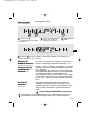
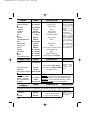
Coquilles St Jacques
TEMPS
Moules/Bigorneaux
Crabes/Tourteaux
Homards
Langoustines
10 à 12 min.
20 à 25 min.
25 min.
30 à 35 min.
12 à 15 min.
avec aromates
avec aromates
/
selon le poids
/
• Disposez les
coquillages sur la
grille du plat en
verre,ajoutez her-
bes aromatiques.
• Déposez les
crustacés sur un
lit d’algues.
COQUILLAGES
CRUSTACES
PREPARATIONS
REMARQUES
Pommes/poires/
pêches
TEMPS
Compote
Crèmes
10 à 15 min.
25 min.
10 min.
entières, épluchées
fruits en lamelles
en ramequins
• Temps selon
maturité.
FRUITS-CREMES
PREPARATIONS
REMARQUES
Tableau de cuisson
99631516_ML_A.qxd 13/12/04 16:14 Page 16

17
Brochet
TEMPS
Cabillaud/Colin
Dorade
Haddock
Hareng
Lieu (noir & jaune)
Lotte
Maquereau
Merlan/Morue
Raie
25 à 30 min.
13 à 15 min.
20 à 25 min.
15 min.
20 min.
15 à 20 min.
15 min.
20 min.
15 min.
25 à 30 min.
entier (1kg)
darnes (180 g)*
entière (1kg)
filets
entier (200g)
darnes (180 g)
entier (250g)
• *Darnes: tran-
ches de poissons
rondes de 2 à 3
cm d’épaisseur
(180/200g) par
personne.
• Exigez des pro-
duits très frais.
• Posez des pois-
sons entiers dans
le plat tel quel ou
sur des feuilles de
laurier, de fenouil
ou autre herbe
aromatique.
• Dès la fin de la
cuisson, ôtez la
peau qui se décol-
lera très facile-
ment.
selon épaisseur
filets
POISSONS
PREPARATIONS
REMARQUES
Rougets
Rougets
Saumonette
Saumon
Soles
Thon
Truite
entière (1kg)
15 min.
10 min.
20 min.
15 à 20 min.
10 à 12 min.
20 à 25 min.
20 à 25 min.
entier (200g)
filets
gros tronçons (6 à 10cm de long)
darnes (180/200 g)
darnes (180/200 g)
entière (200g)
13 à 15 min.
filets
Boeuf
TEMPS
Porc
(filets mignon)
Volaille
(blancs,filets)
(Paupiettes)
Saucisses
15 à 30 min.
25 min.
20 à 25 min.
25 min.
20 min.
Rôti
800 gr.:
55 à 60 min.
Cuisses poulet: 35 à 40 min.
Rôti dindonneau: 50 à 60 min.
Morteau 400 g
• Puis dorez au
gril dans un
autre plat.
VIANDES /
OEUFS
PREPARATIONS
REMARQUES
Boudins
10 à 15 min.
Déposez directement dans un plat, recouvrez d’eau ou de lait. En effet la vapeur ne suffit
pas pour saturer ces aliments qui gonflent. Posez une feuille d’aluminium sur le plat pour
éviter les retombées des gouttelettes d’eau.
TEMPS
• Egrenez à la
fourchette en
fin de cuisson.
RIZ, PÂTES
SEMOULE
PREPARATIONS
REMARQUES
Riz au lait
30 min.
100g de riz lavé-20cl de lait-2 c. à
soupe de sucre
Semoule
20 min.
200g (1/4 litre d’eau)
7 min.
5 à 6 min.
8 min.
Coque
: posé directement sur la grille.
Mol
let: posé directement sur la grille.
A
u plat: cassé dans un plat individuel posé sur la grille
et recouvert d’un film alimentaire.
Oeufs
à partir d’oeufs
très frais conser-
vés à température
ambiante.
10 à 12 min.
Dur
/ Cocotte: voir recettes détaillées.
FR
99631516_ML_A.qxd 13/12/04 16:14 Page 17
A página está carregando ...
A página está carregando ...
A página está carregando ...

21
GB
List of contents
Introduction p.22
Steam cooking
General remarks p.23
Your oven, how it works p.24
Accessories p.25
How to install your oven
Electrical connection p.26
Fitting p.27
How to use your oven
Setting the time p.28-29
Cooking immediately p.30-31
Managing the water p.32
Delayed cooking p.33
The timer p.34
Cooking times p.35-36
How to maintain your oven p.37
Changing the light bulb? p.38
Troubleshooting ? p.38
99631516_ML_A.qxd 13/12/04 16:14 Page 21
A página está carregando ...
A página está carregando ...

24
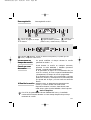
Your oven, how it works
Indicator
panel
Tank
Display
Steam
generator
1. Steam cooking control
2. Defrosting button
3. Start/Stop control
4. Time and delay display
or timed period
5. Steam cooking symbol
6. Cooking time symbol
7. End of cooking time symbol
13
8
15
Water supply
tube
11
6
7
8. Temperature display
9. +/- controls for timer
10. Selector button
11. Autonomous timer
12. Water circuit problem signal
13. Defrosting symbol
14. Display of the cooking period or delayed
start time
15. Control panel locked
The indicator panel in detail
Channel
1 2 3
5
12
9
4
14
10
99631516_ML_A.qxd 13/12/04 16:14 Page 24

25
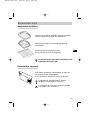
Tank for the independent water supply of your oven.
It can hold about 1 litre (maximum level).
Perforated cooking tray to avoid contact between
foods and cooking water.
Condensation collection tray.
Movable stainless steel grill: must always be used in
the oven.
Accessories
Dishes can be washed in your washing
machine.
Removable
tank
Tin ware
Use of water that is low in calcium will make
cleaning your oven easier.
The use of distilled water is forbidden (not
suitable for food use).
GB
99631516_ML_A.qxd 13/12/04 16:14 Page 25
A página está carregando ...

27
GB
Fitting
380
560
50
386,5
20
595
405
544
378
550
1. Place the appliance in the hole.
The appliance must be horizontal.
Check this position.
2. For improved stability, attach the
oven to the unit using 2 screws, via the
holes provided for this purpose on the
side posts.
3. Carry out the electrical connection.
Make sure that the rating plate
remains accessible after installation.
99631516_ML_A.qxd 13/12/04 16:14 Page 27

28
How to use your oven
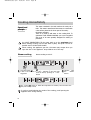
Setting the time
The first time the oven is turned on:
Set the time.
The display flashes on
12.00.
Use the + and - buttons to adjust the
time.
If the time set is not validated by the SET button, it is automatically recorded after
one minute.
1
2
Validate
with SET.
Changing the time
The time is displayed.
Press on the + and - buttons simulta-
neously until the time starts to flash.
Adjust the time using the + and -button.
Validate
with SET
After one minute of inactivity, display brightness is
reduced, in order to reduce energy.
Reducing energy
consumption
3
1
2
3
99631516_ML_A.qxd 13/12/04 16:14 Page 28
A página está carregando ...
A página está carregando ...
A página está carregando ...
A página está carregando ...
A página está carregando ...
A página está carregando ...

35
GB
Artichokes (Small)
TIME
Whatever the quantity
Asparagus
Broccoli
Carrots
Celeriac
Pumpkin
Mushrooms
Courgettes
Chinese artichokes
Spinach
Chicory
Fennel
Green beans
Turnips
Fresh peas
Potatoes
40 to 45 min .
35 to 40 min.
18 min.
20 to 22 min.
25 to 30 min.
15 to 20 min.
15 min.
10 to 15 min.
20 min.
20 min.
35 min
30 min.
22 min.
30 to 35 min.
15 to 20 min.
20 to 25 min.
25 min.
40 to 45 min.
placed upside down in the dish
for the tips, reduce the cooking time
in little flowerets
in fine slices
in fine slices
in cubes
in slices
core removed and cut in two
lengthwise
cut in 2
cubed
Leeks
25 min.
cut in 2
sliced
whole
• These times
depend on the
nature, size and
freshness of the
vegetables.
Follow the
instructions
given in the
"Preparation"
column.
• The cooking
time is the same
regardless of the
quantity to be
cooked.
For example :
1 or 4 articho-
kes, same
cooking time.
• To check how
well done the
food is, test the
thickest part of
the vegetable; if
it is cooked, it
will not resist.
(fresh) stir during cooking
(frozen) “ “ “
/
Cabbage
30 to 35 min.
22 min.
30 to 35 min.
Brussels sprouts
Flowers in little bunches
Green shredded
in fine strips
VEGETABLES
PREPARATION
REMARKS
Scallops
TIME
Mussels/Whelks
Crabs/Lobster/
Dublin Bay
Prawns
10 to 12 min.
20 to 25 min.
25 min.
30 to 35 min.
12 to 15 min.
with aromatic herbs
with aromatic herbs
/
according to weight
/
• Arrange the
shellfish on a grill
or glass dish, and
add a few
aromatic herbs
• Arrange seafood
on a bed of sea-
weed.
SHELLFISH
PREPARATION
REMARKS
Apples/ pears/
peaches
TIME
puree
Custards
10 to 15 min.
25 min.
10 min.
whole, peeled
strips of fruit
in ramekins
Time according
to ripeness
FRUITS
CUSTARDS
PREPARATION
REMARKS
Cooking times
99631516_ML_A.qxd 13/12/04 16:14 Page 35

36
Pike
TIME
Cod/hake
Sea bream
Haddock
Herring
Monkfish
Lotte
Mackerel
Whiting/cod
Skate
25 to 30 min.
13 to 15 min.
20 to 25 min.
15 min.
20 min.
15 to 20 min.
15 min.
20 min.
15 min.
25 to 30 min.
whole (1kg)
steaks (180g)*
whole (1kg)
fillets
whole (200g)
steaks (180 g)
whole (250g)
• *Steaks :slices of
fish 2 or 3 cm
thick (180/200g)
per person.
• Always insist on
very fresh
products
• Place whole fish
directly into the
dish or on bay lea-
ves, fennel or
other herbs.
• At the end of
cooking, remove
the skin which will
come away easily.
according to thickness
fillets
FISH
PREPARATION
REMARKS
Mullet
Mullets
Dogfish
Salmon
Sole
Tuna
Whole trout (1kg)
15 min.
10 min.
20 min.
15 to 20 min.
10 to 12 min.
20 to 25 min.
20 to 25 min.
whole (200g)
fillets
thick slice (6 to 10 cm long)
steaks (180/200 g)
steaks (180/200 g)
whole (200g)
13 to 15 min.
fillets
Beef
TIME
Pork (filet mignon)
Poultry(breast, fillet)
(Paupiettes)
Sausages
15 to 30 min.
25 min.
20 to 25 min.
25 min.
20 min.
Joint
800 gr.:
55 to 60 min.
Chicken drumsticks
:
35 to 40 min.
Turkey roast joint : 50 to 60 min.
Morteau 400 g piece
• The brown
under grill in
another dish.
MEATS/
EGGS
PREPARATION
REMARKS
Black pudding
10 to 15 min.
Place directly in a dish, covered with water or milk. The steam is not sufficiently wet to
saturate these foodstuffs that swell. Place a sheet of aluminium foil over the dish to pro-
tect it from the droplets of water.
TIME
•Separate grains
with a fork at the
end of the cooking.
RICE, PASTA
COUCOUS
PREPARATION
REMARKS
Rice pudding
30 min.
100g of washed rice - 20 cl of milk -
2 dessertspoons of sugar
Couscous
20 min.
200g (1/4 litre of water)
7 min.
5 to 6 min.
8 min.
Boiled eggs : Place directly on the grill.
S
oft-boiled: Place directly on the grill.
Fried eggs
: broken in an individual dish on the grill
and cover with cling film
Eggs
eggs that are very
fresh and stored at
room temperature
10 to 12 min.
Hard / Cocotte see detailed recipes.
99631516_ML_A.qxd 13/12/04 16:14 Page 36
A página está carregando ...

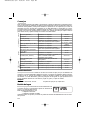
38
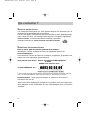
Troubleshooting
WHAT SHOULD
YOU DO?
POSSIBLE
CAUSES
The display panel is
not lit up.
The light doesn't
work.
Water or steam
leaking from the door
during cooking.
A fault in the oven
electrical supply.
Electric card out of
order.
- Check that the tank
has been pushed in
completely.
- Contact the After-
Sales Service.
- Change the bulb.
- Switch the oven on
at the mains.
- Change the fuse.
The bulb needs
replacing.
The oven is not
switched on at the
mains.
The fuse has blown.
The door is not shut
correctly.
The door seal is
faulty.
- Contact the After-
Sales Service.
IF YOU REALIZE
THAT
In all cases, if you are unable to solve the problem yourself,
please contact the After-Sales Service without delay.
Changing the light bulb ?
- Turn the cover slightly anti-clockwise (left).
- Unscrew the bulb the same way.
The bulb is a :
- 25 W - 220/240 V
- Type E14 suitable up to 300ºC
- Change the bulb and reassemble the unit
making sure the seals are positioned correctly.
- Switch the oven back on at the mains.
The bulb is by the far right
corner.
Always switch the oven off at
the mains before
changing the bulb in order to safe-
guard against electric shocks.
99631516_ML_A.qxd 13/12/04 16:14 Page 38

39
DE
Inhalt
Vorwort S.40
Dampfgaren
Allgemeines S.41
Gerätebeschreibung S.42
Zubehör S.43
Anschluss S.44
Einbau S.45
Inbetriebnahme S.46
Uhrzeit einstellen S.46
Uhrzeit ändern S.46
Automatische Begrenzung
des Energieverbrauches S.46
Inbetriebnahmesperre S.47
Einschalten
Funktionsprinzip S.48
Dampfgaren S.48
Auftauen S.49
Garzeit ändern S.49
Abschalten des Geräts bei laufendem Garen S.49
Garzeitende S.49
Wasserversorgung S.50
Garzeitende programmieren S.51
Zeitgeber S.52
Kochtabellen S.53-54
Reinigungshinweise S.55
Glühlampe auswechseln S.56
Was tun bei Betriebsanomalien? S.56
99631516_ML_A.qxd 13/12/04 16:14 Page 39
A página está carregando ...
A página está carregando ...

42
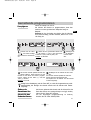
Gerätebeschreibung
Aufbau der
Bedienblende
Wasserbehälter
Anzeige
Dampfgenerator
1. Taste für Dampfgaren
2. Taste für Auftauen
3. Taste für Ein-/Ausschalten
4. Anzeige der Uhrzeit oder der
eingestellten Garzeit
5. Symbol für Dampfgaren
6. Symbol für Garzeit
7. Symbol für Garen
1 2 3
5
12
13
8
15
9
10
Wasserschlauch
4
14
11
6
7
8. Temperaturanzeige
9. Tasten + und - zum Einstellen der Garzeit
10. Wahltaste
11. Symbol für getrennten Zeitgeber
12. Warnanzeige für Probleme beim Wasserkreislauf
13. Symbol für Auftauen
14. Anzeige der eingestellten Garzeit (direkter
oder verzögerter Programmstart)
15. Tastenverriegelung
Aufbau der Bedienblende
Wasserrinne
99631516_ML_A.qxd 13/12/04 16:14 Page 42
A página está carregando ...
A página está carregando ...

45
DE
Einbau
380
560
50
386,5
20
595
405
544
378
550
1. Positionieren Sie das Gerät im
Möbel.
Das Gerät muß horizontal aufgestellt
sein. Ausrichtung überprüfen !
2. Für eine größere Stabilität müssen
Sie den Dampfgarer mit 2 Schrauben in
den für diesen Zweck in den
Seitenverstrebungen vorgesehenen
Löchern im Möbel befestigen.
3. Gerät anschließen.
Darauf achten, dass der Stecker
nach dem Einbau zugänglich bleibt.
99631516_ML_A.qxd 13/12/04 16:14 Page 45
A página está carregando ...
A página está carregando ...
A página está carregando ...
A página está carregando ...
A página está carregando ...
A página está carregando ...
A página está carregando ...

53
Artischocken (klein)
ZEIT
bei beliebiger Menge
Spargel
Broccoli
Karotten
Sellerieknollen
Kürbis
Champignons
Zucchini
Artischocken (groß)
Spinat
Chicorée
Fenchel
grüne Bohnen
weiße Rüben
Erbsen
Kartoffeln
40 bis 45 Min.
35 bis 40 Min.
18 Min.
20 bis 22 Min.
25 bis 30 Min.
15 bis 20 Min.
15 Min.
10 bis 15 Min.
20 Min.
20 Min.
35 Min.
30 Min.
22 Min.
30 bis 35 Min.
15 bis 20 Min.
20 bis 25 Min.
25 Min.
40 bis 45 Min.
mit dem Stiel nach oben einlegen
bei Spargelspitzen Zeit verkürzen
in kleine Bündel zerteilt
in feinen Scheiben
in feinen Scheiben
in Würfeln
in Scheiben
Stumpf ausgeschnitten
und in 2 geteilt
in 2 geteilt
in Würfeln
Lauch
25 Min.
in 2 geteilt
in Scheiben ganz
• Die Garzeit
richtet sich nach
Art, Größe und
Frische der
Gemüse. Bitte
beachten Sie
dazu auch die
Angaben in der
Spalte
"Zubereitung".
• Die Garzeit ist
bei beliebiger
Menge immer
dieselbe, z.B.
gleichgültig, ob
sie 1 oder 4
Artischocken
garen wollen.
• Um zu prüfen,
ob das Gemüse
gar ist, stechen
Sie in an der
dicksten Stelle
eine Gabel oder
ein Messer
hinein.
(frisch) beim Garen umrühren
(tiefgefroren) beim Garen umrühren
/
Kohl
30 bis 35 Min.
22 Min.
30 bis 35 Min.
Rosenkohl
Blumenkohl in kleine Bündel zerteilt
Grünkohl zerschnitten
in feinen Scheiben
GEMÜSE
ZUBEREITUNG
HINWEISE
Jakobsmuscheln
ZEIT
bei beliebiger Menge
Miesmuscheln
Krebse
Hummer
Seeschnecken
10 bis 12 Min.
20 bis 25 Min.
25 Min.
30 bis 35 Min.
12 bis 15 Min.
mit aromatischen Kräutern
mit aromatischen Kräutern
/
je nach Gewicht
/
• Legen Sie
Muscheln u.ä. auf
den Grill der
Glasplatte und
legen Sie aromatis-
che Kräuter hinzu.
• Legen Sie
Krustentiere auf
ein Bett aus Algen.
MUSCHELN
KRUSTENTIERE
ZUBEREITUNG
HINWEISE
Äpfel, Birnen,
Pfirsiche
ZEIT
bei beliebiger Menge
Kompott
Cremespeisen
10 bis 15 Min.
25 Min.
10 Min.
ganz, geschält
Früchte in Scheiben
in Schälchen abgefüllt
• Garzeit je nach
Reife der
Früchte.
FRÜCHTE -
CREMESPEISEN
ZUBEREITUNG
HINWEISE
Kochtabellen
DE
99631516_ML_A.qxd 13/12/04 16:15 Page 53
A página está carregando ...
A página está carregando ...
A página está carregando ...

57
NL
Inhoud
Inleiding p.58
Stoomkoken
Algemene informatie p.59
Presentatie van uw oven p.60
Toebehoren p.61
Installatie van de stoomoven
Elektrische aansluiting p.62
Inbouw p.63
Gebruik van de stoomoven
Instelling van de tijd p. 64-65
Onmiddellijk stoomkoken p. 66-67
Watertoevoer p.68
Uitgesteld stoomkoken p.69
Gebruik van de schakelklok p.70
Stoomtabel p. 71-72
Onderhoud van de stoomoven p.73
Vervanging van de ovenlamp p.74
Problemen en oplossingen p.74
99631516_ML_A.qxd 13/12/04 16:15 Page 57
A página está carregando ...
A página está carregando ...

60
Presentatie van uw oven
Bedieningspaneel
Watertank
Display
Stoomelement
1. Toets stomen
2. Ontdooiingtoets
3. Toets Start/Stop
4. Uur / stoomduur duur met
zandloper
5. Symbool stoomkoken
6. Symbool stoomduur
7. Symbool einde stoomcyclus
1 2 3
5
12
13
8
15
9
10
Watertoevoer-
buisje
4
14
11
6
7
8. Temperatuurindicator
9. +/- toetsen voor instellen van stoomduur
10. Selectietoets
11. Teken onafhankelijke schakelklok
12. Indicator probleem watercircuit
13. Symbool ontdooien
14. Display stoomduur of uitgesteld
stoomkoken
15. Vergrendeling bedieningspaneel
Bedieningspaneel
Druppelgoot
99631516_ML_A.qxd 13/12/04 16:15 Page 60
A página está carregando ...
A página está carregando ...
A página está carregando ...
A página está carregando ...
A página está carregando ...
A página está carregando ...
A página está carregando ...
A página está carregando ...
A página está carregando ...
A página está carregando ...
A página está carregando ...
A página está carregando ...
A página está carregando ...
A página está carregando ...
A página está carregando ...
A página está carregando ...
A página está carregando ...
A página está carregando ...
A página está carregando ...
A página está carregando ...
A página está carregando ...
A página está carregando ...
A página está carregando ...
A página está carregando ...
A página está carregando ...
A página está carregando ...
A página está carregando ...
A página está carregando ...
A página está carregando ...
A página está carregando ...
A página está carregando ...
A página está carregando ...
A página está carregando ...
A página está carregando ...
A página está carregando ...
A página está carregando ...
A página está carregando ...
A página está carregando ...
A página está carregando ...
A página está carregando ...
A página está carregando ...
A página está carregando ...
A página está carregando ...
A página está carregando ...
A página está carregando ...
A página está carregando ...
A página está carregando ...
A página está carregando ...
A página está carregando ...
A página está carregando ...
A página está carregando ...
A página está carregando ...
A página está carregando ...
A página está carregando ...
A página está carregando ...
A página está carregando ...
A página está carregando ...
A página está carregando ...
A página está carregando ...
A página está carregando ...
A página está carregando ...
A página está carregando ...
A página está carregando ...
A página está carregando ...
A página está carregando ...
A página está carregando ...
A página está carregando ...
A página está carregando ...
-
 1
1
-
 2
2
-
 3
3
-
 4
4
-
 5
5
-
 6
6
-
 7
7
-
 8
8
-
 9
9
-
 10
10
-
 11
11
-
 12
12
-
 13
13
-
 14
14
-
 15
15
-
 16
16
-
 17
17
-
 18
18
-
 19
19
-
 20
20
-
 21
21
-
 22
22
-
 23
23
-
 24
24
-
 25
25
-
 26
26
-
 27
27
-
 28
28
-
 29
29
-
 30
30
-
 31
31
-
 32
32
-
 33
33
-
 34
34
-
 35
35
-
 36
36
-
 37
37
-
 38
38
-
 39
39
-
 40
40
-
 41
41
-
 42
42
-
 43
43
-
 44
44
-
 45
45
-
 46
46
-
 47
47
-
 48
48
-
 49
49
-
 50
50
-
 51
51
-
 52
52
-
 53
53
-
 54
54
-
 55
55
-
 56
56
-
 57
57
-
 58
58
-
 59
59
-
 60
60
-
 61
61
-
 62
62
-
 63
63
-
 64
64
-
 65
65
-
 66
66
-
 67
67
-
 68
68
-
 69
69
-
 70
70
-
 71
71
-
 72
72
-
 73
73
-
 74
74
-
 75
75
-
 76
76
-
 77
77
-
 78
78
-
 79
79
-
 80
80
-
 81
81
-
 82
82
-
 83
83
-
 84
84
-
 85
85
-
 86
86
-
 87
87
-
 88
88
-
 89
89
-
 90
90
-
 91
91
-
 92
92
-
 93
93
-
 94
94
-
 95
95
-
 96
96
-
 97
97
-
 98
98
-
 99
99
-
 100
100
-
 101
101
-
 102
102
-
 103
103
-
 104
104
-
 105
105
-
 106
106
-
 107
107
-
 108
108
-
 109
109
-
 110
110
-
 111
111
-
 112
112
-
 113
113
-
 114
114
-
 115
115
-
 116
116
-
 117
117
-
 118
118
-
 119
119
-
 120
120
-
 121
121
-
 122
122
-
 123
123
-
 124
124
-
 125
125
-
 126
126
-
 127
127
-
 128
128


De Dietrich DOV400XE1 Manual do proprietário
- Categoria
- Microondas
- Tipo
- Manual do proprietário
em outros idiomas
- español: De Dietrich DOV400XE1 El manual del propietario
- français: De Dietrich DOV400XE1 Le manuel du propriétaire
- English: De Dietrich DOV400XE1 Owner's manual
- Nederlands: De Dietrich DOV400XE1 de handleiding
- Deutsch: De Dietrich DOV400XE1 Bedienungsanleitung
- dansk: De Dietrich DOV400XE1 Brugervejledning
Artigos relacionados
-
 De Dietrich DOV499 Series Manual do proprietário
-
 De Dietrich DOV499XE1 Manual do proprietário
-
De Dietrich FV1040X Manual do proprietário
-
 De Dietrich DOV737X Manual do proprietário
-
 De Dietrich DOV300XE1 Manual do proprietário
-
 De Dietrich DOV300XE1 Manual do proprietário
-
 De Dietrich 6HV-585BTCX Manual do proprietário
-
 De Dietrich 6HV-585ATCX Manual do proprietário


Outros documentos
-
Brandt FV800XS1 Manual do proprietário
-
Fagor 5HV-440X Manual do proprietário
-
-
-
-
Barazza 1FVCFY Instruções de operação
-
Tristar OV-2910 Manual do proprietário
-
Brandt UMP404E1 Manual do proprietário
-
Clatronic DG 2844 Manual do proprietário
-