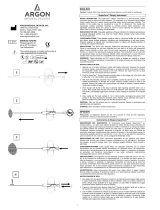
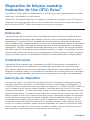
Hologic Eviva Stereotactic Guided Breast Biopsy System Handpiece Instruções de operação
- Tipo
- Instruções de operação

Instructions For
U
se
G
ebruiksaanwijzing
Mode d’em
p
loi
Bedienun
g
sanleitun
g
I
struz
i
on
i
per
l’
uso
Instru
ç
ões de Utiliza
ç
ão
I
nstrucc
i
ones
d
e uso
S
tereotactic
G
uided Breast Biops
y
Sy
stem


1 English
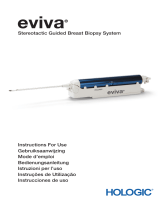
Eviva® Breast Biopsy Device
Instructions for Use (IFU)
Please read all information carefully. Failure to properly follow the instructions may lead to
unintended consequences.
Important: This package insert is designed to provide instructions for clinical use (IFU) for
the Eviva breast biopsy device to be used with the ATEC® breast biopsy and excision system
console. It is not a reference to surgical techniques.
Indications
The Eviva breast biopsy device is indicated to provide breast tissue samples for diagnostic
sampling of breast abnormalities under stereotactic breast biopsy guidance. The Eviva
device is intended to provide breast tissue for histologic examination with partial or complete
removal of the imaged abnormality. The extent of histologic abnormality cannot be reliably
determined from its mammographic appearance. Therefore, the extent of removal of the
imaged evidence of an abnormality does not predict the extent of removal of histologic
abnormality, e.g., malignancy. When the sampled abnormality is not histologically benign, it
is essential that the tissue margins be examined for completeness of removal using standard
surgical procedure.
Contraindications
The Eviva device is for diagnostic use only and is NOT indicated for therapeutic use. The
Eviva device is contraindicated for those patients who, based on physician’s judgment,
may be at increased risk or develop complications associated with core removal or biopsy.
Patients receiving anticoagulant therapy or who may have bleeding disorders may be at
increased risk of procedural complications.
Device Description
The Eviva device is a vacuum-assisted biopsy device which is used to remove breast tissue
in a minimally invasive manner using stereotactic imaging. The Eviva device is designed for
biopsy and diagnosis only. The device is NOT intended to be used outside the standards,
specifications and limitations as outlined in this IFU and other related materials. The device
is for single patient use and the entire device is fully disposable. The device primarily
consists of a hollow needle with a side aperture and a sharpened inner cannula that rotates
at high speeds and extends across the aperture to acquire targeted tissue. Throughout this
process, vacuum is created inside the device to assist in pulling tissue into the aperture.
Saline is supplied through the device to lavage the cavity and deliver tissue to the tissue
filter. An introducer system, specifically designed for use with the Eviva device, is included
with the device. This introducer system maintains access to the targeted area of interest and
allows for deployment of a biopsy site marker.

2English
Refer to the “ATEC Breast Biopsy and Excision System Operator’s Manual” for detailed
console instructions.
Device Preparation – Firing or Non-ring Device (all
steps to be performed per standard interventional
technique)
1. Assemble canister, place in the canister holder on the top of the console and connect
vacuum-line assembly from console to the top port of canister lid. Ensure canister lid
and large port cap are secure and sealed to avoid vacuum leaks.
WARNING: Before use, inspect the protective packaging and needle to verify that
neither has been damaged during shipment. If it appears that the packaging or needle
has been compromised, do not use the needle.
2. Place device package on console workspace.
3. Open package. Leave protective sheath on the device tip.
4. Open the saline bag, remove cap, spike saline bag and place the bag on the hook on
the side of the console. Place saline line through pinch valve.
5. Connect tubing set to console and canister. Attach red sleeve to red device receptacle
on console, black sleeve to black device receptacle on console and blue vacuum
into the “Vacuum” port on the canister lid. For more detailed console connection
instructions, please refer to the “ATEC Breast Biopsy and Excision System Operator’s
Manual.”
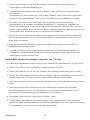
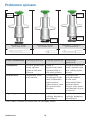
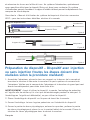
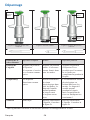
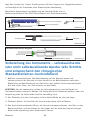
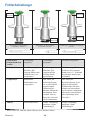
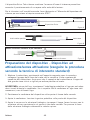
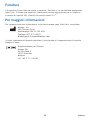
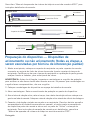
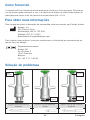
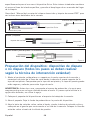
Figure A
Figure B
Figure C
Eviva Image
Stylet & Adapter
Remote Valve: Pre-re Position
Thumb Wheel
Eviva Device
Introducer
Adapter
Stylet Bracket
Green Button
Remote Valve

3 English
6. Power console on (console will default to “Biopsy” mode).
7. Ensure device is in post-fire position by confirming the green button on the
remote valve is fully depressed (firing device only).
8. Select “Setup” to prime device (saline visible in aperture) and confirm adequate
vacuum is achieved (“Vacuum Ready” light should be illuminated green). If
ample vacuum is not achieved, the “Vacuum Ready” light will flash. If the light
flashes, refer to the Troubleshooting section of this IFU and/or the Troubleshooting
section of the “ATEC Breast Biopsy and Excision System Operator’s Manual.”
9. Select “Test” and ensure one diagnostic biopsy cycle is completed (console
automatically switches to “Biopsy” after passing the “Test” cycle). If the
“Return to Setup” or “Retest Handpiece” lights illuminate, then refer to the
Troubleshooting section of this IFU and/or the “ATEC Breast Biopsy and Excision
System Operator’s Manual.”
10. Depress the white button on the remote valve to place the device in the pre-fire
position. Refer to Figure C. Then, depress the green button on the remote valve
to ensure that the outer cannula travels to the post-fire position.
11. Attach adapter and needle guide to the stage of the imaging system. Some
imaging systems require input dimensions for the Eviva device. In these cases,
refer to the documentation included with the adapter for your system.
Performing a Biopsy (all steps to be performed
per standard intervential technique)
1. Identify targeted area.
2. Prepare the site as required.
Firing Device (20mm or 12mm aperture)
a. Carefully remove the device from tray.
b. Remove protective sheath from the device.
c. Remove introducer from tray and carefully assemble introducer onto device,
(refer to Figure A).
d. Confirm the console is in “Biopsy” mode, prior to manipulation of the remote
valve.
Note: If console is not in the “Biopsy” mode, then the device may not function
appropriately when attempting to place it in the “pre-fired” position.

4English
e. Set the device to the pre-fire position by depressing the white button on the remote
valve, (refer to Figure C). Note: When the Eviva device is in the pre-fire position,
the ATEC console must be powered on and in “Biopsy” mode to prevent migration
of device to the post-fire biopsy position.
f. Slide device/introducer onto the adapter until it locks into place with an audible
click when the device is securely engaged it will no longer slide on the adapter.
g. Advance the device to the desired pre-fire coordinates provided by the imaging
system.
h. Fire the outer cannula by fully depressing the green button of the remote valve.
This will advance the outer cannula by the stroke noted on the product label.
Non-ring Device (12mm aperture)
a. Remove disposable stylet from tray and remove protective sheath from the stylet.
b. Place stylet into the stylet bracket, (refer to Figure B).
c. Remove introducer from tray and carefully assemble introducer onto stylet.
d. Slide stylet bracket assembly onto the adapter. Advance the stylet bracket forward
until the bracket and introducer lock into place with an audible click.
e. Advance to the desired coordinates provided by the imaging system.
f. While depressing the button on the back of the stylet bracket, remove the stylet
bracket assembly from the patient and slide off the adapter. Introducer will remain
connected to adapter and in the patient.
g. Confirm the console is in “Biopsy” mode.
h. Slide the device onto the adapter while guiding the blunt needle into the introducer
until it locks into place with an audible click. When the device is securely engaged
it will no longer slide on the adapter.
3. To administer preferred anesthetic, attach 10cc needleless syringe of anesthetic
to Y-valve. To initiate automatic delivery of anesthetic, inject 1-2cc of anesthetic
manually. Note: The device will not allow Y-valve injections when in the pre-
fire position. Attempting to inject in the pre-fire position may result in device
malfunction.
4. To begin tissue acquisition, press down on the footswitch and hold in the depressed
position throughout the biopsy procedure. Removing your foot from the footswitch
will inactivate or stop the device after completing the current cycle.

5 English
5. To rotate the aperture on the outer cannula of the device, turn the rear thumbwheel
(refer to Figure A). Turn the thumbwheel from one position to the next desired
position as the console beeps until the desired target area has been sampled. The
numbers in the window on the device and the line on the thumbwheel indicate
position of the aperture.
6. Select “Lavage” mode to irrigate and aspirate the cavity and clear device of tissue.
(It is not necessary to depress the footswitch.)
7. To vacuum cavity, disconnect luer lock of Y-valve to open saline line to atmosphere
resulting in constant aspiration to the biopsy cavity.
8. Disconnect filter chamber to remove tissue cores from tissue filter. Note: If blood loss
from patient is noted, then the device can be placed in the biopsy mode. This closes
the aperture and prevents any fluid loss from the biopsy cavity.
9. Place console in “Biopsy” mode in order to close the aperture prior to removal of
device from biopsy cavity.
10. Remove device from adapter by lifting rear latch and sliding the device back and
free of the introducer. Introducer will remain connected to adapter and in the
patient.
11. Power console off.
12. For deployment of the biopsy site marker, refer to the appropriate Instructions for
Use (IFU).
13. Remove introducer from adapter by pinching tabs and sliding back and free of the
adapter.
14. Appropriately dispose of all used and unused biopsy items.
15. Properly clean and disinfect adapter as necessary.
Warnings and Precautions
• Observe caution when attaching sharp devices to the adapter.
• When the Eviva device is in the pre-fire position, the ATEC console must be powered
on and in “Biopsy” mode to prevent migration of device to the post-fire biopsy
position. The Eviva device must be in the post-fire position, to perform “Setup”,
“Test”, “Biopsy”, “Lavage” or “Manual Aspiration”.
• Do not cut tubing between device and remote valve in order to avoid
inadvertent firing. This is indicated by the following symbol:

6English
• As with any medical procedure, please ensure that users wear appropriate personal
protective equipment to guard against potential contact with bodily fluids.
• The Eviva device is not recommended for use with MRI and ultrasound.
• The Eviva device biopsy procedure should be performed only by persons having
adequate training and familiarity with this procedure. Consult medical literature
relative to techniques, complications and hazards prior to performance of any
minimally invasive procedure.
• The Eviva device should be used only by physicians trained in percutaneous biopsy
procedures. The Eviva breast biopsy device is not recommended for use with MRI.
• Caution: Federal (USA) law restricts this device to sale by or on the order
of a physician.
• Sound professional judgment should be used when the Eviva device is used on
patients with breast implants.
• Avoid operator or instrument contact with the sheathed needle portion of the Eviva
device.
• Minimally invasive instruments and accessories manufactured or distributed by
companies not authorized by Hologic, Inc. may not be compatible with the Eviva
device. Use of such products may lead to unanticipated results and possible injury to
the user or patient.
• Instruments or devices which come into contact with bodily fluids may require special
disposal handling to prevent biological contamination.
• Dispose of all opened instruments whether used or unused.
• Do not resterilize and/or reuse the Eviva device and/or introducer. Resterilization and/
or reuse may compromise the integrity of the instrument. This may lead to potential
risks of failure of the device to perform as intended and/or cross-contamination
associated with using inadequately cleaned and sterilized devices.
• A complete and comprehensive preoperative medical history and physical
examination are suggested. Radiographic evaluation and laboratory tests may be
included.

7 English
How Supplied
The Eviva device is supplied sterile for single patient use. Discard into an appropriate
container after use. The biopsy device is sterilized by gamma radiation to sterility
assurance level (SAL) 10-6.
For More Information
For technical support or reorder information in the United States, please contact:
Hologic, Inc.
250 Campus Drive
Marlborough, MA 01752 USA
Phone: 877-371-4372
International customers, contact your distributor or local Hologic Sales Representative:
European Representative
Hologic BV
Da Vincilaan 5
1930 Zaventem
Belgium
Tel: +32 2 711 46 80
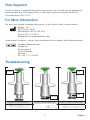
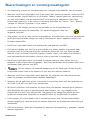
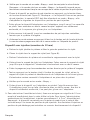
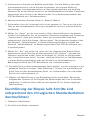
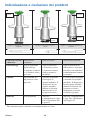
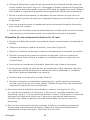
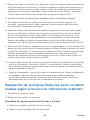
Troubleshooting
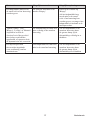
Figure D Fully Fired Position Figure E Fully Armed Position Figure F Partially Fired Position
No Gap
No Gap
Gap
Gap

8English
$&
#$
0''4$-! 0''4-(! -/$''4$-!
#$ 1HHGOHLQ¿UHG
+*.$/$*)+!-/0-!
2$''*+!)) '*.!
.$)/!) !
!! '!$)-(!
+*.$/$*)+!-/0-!
2$''-!($)'*.! $)
''(* !.
1HHGOHLQ¿UHG
+*.$/$*)+!-/0-!
(4)*/"0''4'*.!
0-$)#$*+.4
'!$ # !1$!"0)/$*)..
$)/!) !
1RVDOLQHÀRZLQ
''(* !.!1$!
.*0) .)*-('
0-$)#$*+.40/
0)'!/*,0$-!
/$..0!
6DOLQHÀRZLVQRUPDO
$)''(* !.!1$!
.*0) .)*-('
0-$)#$*+.40/
,0$-!.$) !,0/!
*-)*/$..0!
' */++'$'! )XOO\¿UHWKHQHHGOH
!!$#0-!
)XOO\¿UHWKHQHHGOH
!!$#0-!
* May also lead to failures during setup and test.
%" ##%# ##'
'HYLFHZLOOQRWDVVXPHWKH
SUH¿UHRUSRVW¿UHSRVLWLRQ
*).*'!$.)*/$)D$*+.4E
(* !
-!..D$*+.4E*)*).*'!
" !1$!2$''./$'')*/+-!
¿UHSRVW¿UHUHSODFHWKH
GHYLFHDQGUHSHDWWKHVHWXS
+-*! 0-!
'XULQJ³6HWXS´³7HVW´
³%LRSV\´³/DYDJH´RU
³0DQXDO$VSLUDWLRQ´ÀXLG
DQGRUWLVVXHLVQRWEHLQJ
SXOOHGWRWKHWLVVXH¿OWHURU
+!-/0-!$.)*/*+!)$)#*-
'*.$)#.!3+!/!
!(*/!1'1!$.)*/$)"0''
SRVW¿UHGSRVLWLRQ
3ODFHGHYLFHLQSRVW¿UH
+*.$/$*)4"0''4 !+-!..$)#
#-!!)0//*)*)-!(*/!1'1!
)'!/* !+-!...4-$)#!/*
DGPLQLVWHUDQHVWKHWLF
'HYLFHLVQRWLQSRVW¿UH
+*.$/$*)
3ODFHGHYLFHLQSRVW¿UH
+*.$/$*)4 !+-!..$)##-!!)
0//*)*)-!(*/!1'1!

9 Nederlands
Eviva® borstbiopsiehulpmiddel
Gebruiksaanwijzing
Lees alle informatie zorgvuldig door. Het niet opvolgen van de instructies kan onbedoelde
gevolgen hebben.
Belangrijk: deze bijsluiter is bedoeld als gebruiksaanwijzing voor klinisch gebruik van het Eviva
borstbiopsiehulpmiddel voor gebruik met de console van het ATEC® systeem voor borstbiopsie
en excisie. De bijsluiter is niet geschikt als referentiemateriaal voor chirurgische technieken.
Indicaties
Het Eviva borstbiopsiehulpmiddel is geïndiceerd voor diagnostische monstername van
borstweefsel bij borstafwijkingen door middel van stereotactische borstbiopsiegeleiding. Het
Eviva hulpmiddel is bestemd om borstweefsel te verkrijgen voor histologisch onderzoek, waarbij
de afwijking onder beeldvorming gedeeltelijk of volledig wordt verwijderd. De omvang van de
histologische afwijking kan niet op betrouwbare wijze worden vastgesteld aan de hand van
het mammogram. Met de hoeveelheid bewijs van een afwijking die onder beeldvorming wordt
verwijderd, kan de omvang van de histologische afwijking, bijvoorbeeld maligniteit, die moet
worden verwijderd derhalve niet worden voorspeld. Als de bemonsterde afwijking niet histologisch
goedaardig is, is het essentieel dat volgens de chirurgische standaardprocedure aan de hand van
de weefselmarges wordt onderzocht of het afwijkende weefsel volledig is verwijderd.
Contra-indicaties
Het Eviva hulpmiddel is uitsluitend bestemd voor diagnostisch gebruik en is NIET
geïndiceerd voor therapeutisch gebruik. Het Eviva hulpmiddel is gecontra-indiceerd voor
patiënten bij wie, op basis van het oordeel van de arts, een verhoogd risico of complicaties
in verband kunnen worden gebracht met bioptverwijdering of biopsie. Bij patiënten die
antistollingstherapie ondergaan of bij wie mogelijk sprake is van bloedingsstoornissen is er
een verhoogd risico op procedurele complicaties.
Beschrijving van het hulpmiddel
Het Eviva hulpmiddel is een vacuüm-ondersteund biopsiehulpmiddel dat wordt gebruikt om
borstweefsel op een minimaal invasieve manier te verwijderen met behulp van stereotactische
beeldvorming. Het Eviva hulpmiddel is uitsluitend bedoeld voor biopsie en diagnose. Het
hulpmiddel is NIET bestemd voor gebruik buiten de normen, specificaties en beperkingen die
in deze gebruiksaanwijzing en ander gerelateerd materiaal worden genoemd. Het hulpmiddel
is bestemd voor gebruik bij één patiënt en het gehele hulpmiddel is volledig wegwerpbaar.
Het hulpmiddel bestaat voornamelijk uit een holle naald met een zij-apertuur en een scherpe
binnencanule die met hoge snelheid ronddraait en over de apertuur schuift om doelweefsel af
te nemen. Gedurende dit proces wordt er een vacuüm gegenereerd in het hulpmiddel zodat
het weefsel eenvoudiger kan worden opgehaald in de apertuur. Er wordt een zoutoplossing door
het hulpmiddel gevoerd om de holte te spoelen en weefsel naar het weefselfilter te brengen.

10Nederlands
Het hulpmiddel wordt geleverd met een inbrengsysteem dat specifiek is ontworpen voor
gebruik met het Eviva hulpmiddel. Dit inbrengsysteem handhaaft toegang tot het beoogde
interessegebied en maakt plaatsing van een biopsieplaatsmarker mogelijk.
Raadpleeg de 'bedienershandleiding van het ATEC systeem voor borstbiopsie en excisie'
voor gedetailleerde instructies voor de console.
Voorbereiding van het hulpmiddel – Hulpmiddel met
of zonder lanceeroptie (alle stappen moeten worden
uitgevoerd volgens de standaard interventietechniek)
1. Zet de opvangbak in elkaar, plaats deze in de opvangbakhouder boven op de console
en sluit de vacuümleidingconstructie van de console aan op de bovenste poort van
het opvangbakdeksel. Zorg ervoor dat het opvangbakdeksel en de dop van de grote
poort goed vastzitten om vacuümlekken te voorkomen.
WAARSCHUWING: voorafgaand aan het gebruik moet u de beschermende verpakking
van de naald en de naald zelf controleren op transportschade. Gebruik de naald niet als
de verpakking of de naald zelf lijkt te zijn aangetast.
2. Plaats de verpakking met het hulpmiddel op het werkblad van de console.
3. Open de verpakking. Laat de beschermhuls op de tip van het hulpmiddel zitten.
4. Open de zak met zoutoplossing, verwijder de dop, prik de zak met zoutoplossing
aan en hang deze aan de haak aan de zijkant van de console. Plaats de leiding voor
zoutoplossing door de afsluitklep.
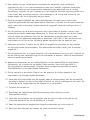
Afbeelding A
Afbeelding B
Afbeelding C
Afbeelding van Eviva
Stilet en adapter
Afstandsklep: stand vóór lancering
Instelwiel
Eviva
hulpmiddel
Inbrenger
Adapter
Stiletbeugel
Groene knop
Afstandsklep

11 Nederlands
5. Sluit de slangenset aan op de console en opvangbak. Bevestig de rode huls
aan de rode aansluitbus voor het hulpmiddel op de console, de zwarte huls
aan de zwarte aansluitbus voor het hulpmiddel op de console en de blauwe
vacuümleiding aan de poort 'Vacuum' op het opvangbakdeksel. Raadpleeg de
'bedienershandleiding van het ATEC systeem voor borstbiopsie en excisie' voor
meer gedetailleerde instructies over aansluiting op de console.
6. Schakel de console in (de console wordt standaard in de modus 'Biopsy' gezet).
7. Zorg ervoor dat het hulpmiddel zich in de stand na lancering bevindt door te
controleren of de groene knop op de afstandsklep volledig is ingedrukt (alleen
voor hulpmiddel met lanceeroptie).
8. Selecteer 'Setup' om het hulpmiddel voor te vullen (zoutoplossing zichtbaar in
apertuur) en controleer of er voldoende vacuüm is bereikt (het lampje 'Vacuum
Ready' moet groen oplichten). Als er onvoldoende vacuüm wordt bereikt, knippert
het lampje 'Vacuum Ready'. Als het lampje knippert, raadpleegt u de sectie
Problemen oplossen in deze gebruiksaanwijzing en/of de sectie Problemen oplossen
van de 'bedienershandleiding van het ATEC systeem voor borstbiopsie en excisie'.
9. Selecteer 'Test' en zorg ervoor dat er één diagnostische biopsiecyclus wordt voltooid
(de console schakelt automatisch naar 'Biopsy' nadat de cyclus 'Test' is geslaagd).
Als de lampjes 'Return to Setup' of 'Retest Handpiece' oplichten, moet u de sectie
Problemen oplossen in deze gebruiksaanwijzing en/of de 'bedienershandleiding van
het ATEC systeem voor borstbiopsie en excisie' raadplegen.
10. Druk de witte knop op de afstandsklep in om het hulpmiddel in de stand vóór
lancering te zetten. Raadpleeg afbeelding C. Druk vervolgens de groene knop op
de afstandsklep in om ervoor te zorgen dat de buitencanule zich naar de stand
na lancering beweegt.
11. Bevestig de adapter en naaldgeleider aan het deel van het beeldvormingssysteem.
Voor sommige beeldvormingssystemen zijn invoerdimensies vereist voor het
Eviva hulpmiddel. In dergelijke gevallen raadpleegt u de documentatie die is
meegeleverd met de adapter voor uw systeem.
Een biopsie uitvoeren (alle stappen moeten worden
uitgevoerd volgens de standaard interventietechniek)
1. Identificeer het doelgebied.
2. Bereid de plaats voor zoals vereist.
Hulpmiddel met lanceeroptie (apertuur van 20 mm of 12 mm)
a. Neem het hulpmiddel voorzichtig uit de tray.
b. Verwijder de beschermhuls van het hulpmiddel.

12Nederlands
c. Neem de inbrenger uit de tray en monteer de inbrenger voorzichtig op het
hulpmiddel (raadpleeg afbeelding A).
d. Controleer of de console in de modus 'Biopsy' staat voordat u de afstandsklep
manipuleert.
Opmerking: als de console niet in de modus 'Biopsy' staat, werkt het hulpmiddel
mogelijk niet goed wanneer u dit in de stand vóór lancering probeert te zetten.
e. Zet het hulpmiddel in de stand vóór lancering door de witte knop op de
afstandsklep in te drukken (raadpleeg afbeelding C). Opmerking: Wanneer het
Eviva hulpmiddel zich in de stand vóór lancering bevindt, moet de ATEC console
worden ingeschakeld en in de modus 'Biopsy' worden gezet om verplaatsing van het
hulpmiddel naar de biopsiestand na lancering te voorkomen.
f. Schuif het hulpmiddel/de inbrenger op de adapter tot dit/deze met een hoorbare
klik wordt vergrendeld. Als het hulpmiddel stevig is vergrendeld, schuift het niet
meer over de adapter.
g. Voer het hulpmiddel op naar de gewenste coördinaten vóór lancering die het
beeldvormingssysteem levert.
h. Lanceer de buitencanule door de groene knop van de afstandsklep volledig in
te drukken. Hierdoor wordt de buitencanule opgevoerd met de slagkracht zoals
weergegeven op het productlabel.
Hulpmiddel zonder lanceeroptie (apertuur van 12 mm)
a. Neem het wegwerpbare stilet uit de tray en verwijder de beschermhuls van het stilet.
b. Plaats het stilet in de stiletbeugel (raadpleeg afbeelding B).
c. Neem de inbrenger uit de tray en monteer de inbrenger voorzichtig op het stilet.
d. Schuif de stiletbeugelconstructie op de adapter. Voer de stiletbeugel naar voren op
tot de beugel en inbrenger met een hoorbare klik worden vergrendeld.
e. Voer de constructie op naar de gewenste coördinaten die het beeldvormingssysteem
levert.
f. Houd de knop aan de achterzijde van de stiletbeugel ingedrukt en verwijder
de stiletbeugelconstructie uit de patiënt en schuif deze van de adapter af. De
inbrenger blijft aangesloten op de adapter en in de patiënt.
g. Controleer of de console in de modus 'Biopsy' staat.
h. Schuif het hulpmiddel op de adapter terwijl u de stompe naald in de inbrenger
geleidt tot deze met een hoorbare klik wordt vergrendeld. Als het hulpmiddel stevig
is vergrendeld, schuift het niet meer over de adapter.

13 Nederlands
3. Voor toediening van het gewenste anestheticum bevestigt u een naaldloze
injectiespuit van 10 ml met anestheticum aan het Y-ventiel. Injecteer handmatig
1-2 ml anestheticum om automatische toediening van anestheticum te starten.
Opmerking: injecties via het Y-ventiel zijn niet mogelijk wanneer het hulpmiddel zich
in de stand vóór lancering bevindt. Het injecteren in de stand vóór lancering kan
ervoor zorgen dat het hulpmiddel onjuist werkt.
4. Druk op de voetschakelaar om met weefselafname te beginnen en houd deze
ingedrukt gedurende de biopsieprocedure. Wanneer u uw voet van de voetschakelaar
haalt, wordt het hulpmiddel uitgeschakeld of stopgezet nadat de huidige cyclus is
voltooid.
5. Om de apertuur op de buitencanule van het hulpmiddel te draaien, draait u het
achterste instelwiel (raadpleeg afbeelding A). Draai het instelwiel van de ene stand
naar de volgende gewenste stand als de console een pieptoon geeft tot er een
monster van het gewenste doelgebied is genomen. De cijfers in het venster op het
hulpmiddel en de lijn op het instelwiel geven de positie van de apertuur aan.
6. Selecteer de modus 'Lavage' om de holte te irrigeren en aspireren en om weefsel
uit het hulpmiddel te verwijderen. (De voetschakelaar hoeft hierbij niet te worden
ingedrukt.)
7. Om de holte vacuüm te zuigen, koppelt u de luer-lockaansluiting van het Y-ventiel los
om de leiding voor zoutoplossing aan de atmosfeer te openen, zodat de biopsieholte
constant wordt geaspireerd.
8. Koppel de filterkamer los om weefselbiopten uit het weefselfilter te verwijderen.
Opmerking: als u merkt dat de patiënt bloed verliest, kan het hulpmiddel in
de biopsiemodus worden gezet. Hierdoor wordt de apertuur gesloten en wordt
vloeistofverlies uit de biopsieholte voorkomen.
9. Zet de console in de modus 'Biopsy' om de apertuur te sluiten voordat u het
hulpmiddel uit de biopsieholte verwijdert.
10. Verwijder het hulpmiddel van de adapter door de vergrendeling aan de achterzijde
omhoog te trekken en het hulpmiddel achteruit en van de inbrenger te schuiven. De
inbrenger blijft aangesloten op de adapter en in de patiënt.
11. Schakel de console uit.
12. Raadpleeg de betreffende gebruiksaanwijzing voor plaatsing van de
biopsieplaatsmarker.
13. Verwijder de inbrenger van de adapter door de lipjes samen te knijpen en de
inbrenger achteruit en van de adapter te schuiven.
14. Voer alle gebruikte en ongebruikte biopsie-onderdelen op juiste wijze af.
15. Reinig en desinfecteer de adapter op juiste wijze zoals nodig.

14Nederlands
Waarschuwingen en voorzorgsmaatregelen
• Ga voorzichtig te werk bij het bevestigen van scherpe hulpmiddelen aan de adapter.
• Wanneer het Eviva hulpmiddel zich in de stand vóór lancering bevindt, moet de ATEC
console worden ingeschakeld en in de modus 'Biopsy' worden gezet om verplaatsing
van het hulpmiddel naar de biopsiestand na lancering te voorkomen. Het Eviva
hulpmiddel moet zich in de stand na lancering bevinden om 'Setup', 'Test', 'Biopsy',
'Lavage' of 'Manual Aspiration' uit te voeren.
• Knip niet in de slangen tussen het hulpmiddel en de afstandsklep om
onbedoelde lancering te voorkomen. Dit wordt aangegeven door het
volgende symbool:
• Zorg ervoor, net als bij alle medische procedures, dat gebruikers de juiste persoonlijke
beschermingsmiddelen dragen om hen te beschermen tegen mogelijk contact met
lichaamsvloeistoffen.
• Het Eviva hulpmiddel wordt niet aanbevolen voor gebruik met MRI.
• De biopsie-ingreep met het Eviva hulpmiddel mag alleen worden uitgevoerd door
personen met de juiste opleiding die voldoende vertrouwd zijn met deze ingreep.
Voordat u een minimaal invasieve ingreep uitvoert, dient u de medische literatuur
over de betreffende technieken, complicaties en gevaren te raadplegen.
• Het Eviva hulpmiddel dient uitsluitend te worden gebruikt door artsen die zijn
opgeleid in percutane biopsie-ingrepen. Het Eviva borstbiopsiehulpmiddel wordt niet
aanbevolen voor gebruik met MRI.
• Let op: volgens de federale wetgeving van de Verenigde Staten mag dit
hulpmiddel alleen door of op voorschrift van een arts worden verkocht.
• Wanneer het Eviva hulpmiddel wordt gebruikt bij patiënten met borstimplantaten,
moet dit gedegen en professioneel worden beoordeeld.
• Voorkom dat de gebruiker of het instrument in aanraking komt met het gedeelte van
de naald in de huls van het Eviva hulpmiddel.
• Minimaal invasieve instrumenten en accessoires die worden vervaardigd of geleverd
door bedrijven die niet zijn geautoriseerd door Hologic, Inc. zijn mogelijk niet
compatibel met het Eviva hulpmiddel. Het gebruik van dergelijke producten kan
leiden tot onvoorziene resultaten en mogelijk letsel bij de gebruiker of patiënt.
• Instrumenten of hulpmiddelen die in aanraking komen met lichaamsvloeistoffen
dienen mogelijk op speciale wijze te worden afgevoerd om biologische besmetting te
voorkomen.
• Alle instrumenten, gebruikt of ongebruikt, waarvan de verpakking is geopend, moeten
worden afgevoerd.

15 Nederlands
• Het Eviva hulpmiddel en/of de inbrenger mogen niet opnieuw worden gesteriliseerd
en/of gebruikt. Door opnieuw steriliseren en/of gebruiken kan de integriteit van het
instrument worden aangetast. Dit kan het mogelijke risico met zich meebrengen dat
het hulpmiddel niet meer werkt zoals bedoeld en/of dat er kruisbesmetting optreedt
vanwege onvoldoende gereinigde en gesteriliseerde hulpmiddelen.
• Het wordt aangeraden voorafgaand aan de ingreep een volledig en uitgebreid
onderzoek van de medische historie en lichamelijk onderzoek te verrichten. Dit kan
röntgenevaluatie en laboratoriumtests omvatten.
Wijze van leveren
Het Eviva hulpmiddel wordt steriel geleverd en is bestemd voor gebruik bij één
patiënt. Gooi het hulpmiddel na gebruik weg in een daarvoor bestemde bak. Het
biopsiehulpmiddel is gesteriliseerd met gammastraling tot een steriliteitswaarborgniveau
(SAL) van 10-6.
Voor meer informatie
Neem voor technische ondersteuning of bestelinformatie in de Verenigde Staten contact
op met:
Hologic, Inc.
250 Campus Drive
Marlborough, MA 01752 VS
Telefoon: 877-371-4372
Klanten in andere landen wordt gevraagd contact op te nemen met hun distributeur of
lokale verkoopvertegenwoordiger van Hologic:
Vertegenwoordiger in de Europese Unie
Hologic BV
Da Vincilaan 5
1930 Zaventem
Belgium
Tel: +32 2 711 46 80

16Nederlands
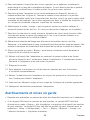
Problemen oplossen
Afbeelding D: volledig
gelanceerde stand Afbeelding E: volledig
geactiveerde stand Afbeelding F: gedeeltelijk
gelanceerde stand
#$#$#! *''! $##!')!!- *''! $##!/$1!!- ! !!'/!'$%&
#!')!!-
! #$ ' $)#!')!!- !
./) +!-/00-
*+!)/!).'0$/)-
EHKRUHQ
' $)
#!/$1!!- !./)
+!-/00-'$%"/$)
''!(* $#!.'*/!)
' $)#!')!!- !
./) +!-/00-.'0$/
)$!/1*''! $#/$% !).
$*+.$!
" 0'+($ !'2!-&/
QDDUEHKRUHQ
*0/*+'*..$)#
./-**(/)$!/$)''!
(* $0'+($ !'
&'$)&/)*-('
WLMGHQVELRSVLHPDDU
&)#!!)2!!".!'
")!(!)
*0/*+'*..$)#
./-**(/)*-('
$)''!(* $
0'+($ !'&'$)&/
)*-('/$% !).
ELRSVLHPDDUQHHPW
*)1*' *!) !*"#!!)
2!!".!'"
! ## $!/1)/*!+..$)# /DQFHHUGHQDDOG
1*''! $# +'!!#
"!!' $)#
/DQFHHUGHQDDOG
1*''! $# +'!!#
"!!' $)#
*Kan tijdens instellen en testen ook tot storingen leiden.
Geen
opening
Geen
opening
Opening
Opening

17 Nederlands
%$ %# "( ! ##
+HWKXOSPLGGHONDQQLHWLQ
!./) 1<<-*")')!-$)#
2*- !)#!5!/
!*).*'!.//)$!/$) !
(* 0.$*+.4
-0&*+ !*).*'!*+
$*+.4
$OVKHWKXOSPLGGHOQRJ
./!! .)$!/$) !./)
1<<-*")')!-$)#&)
ZRUGHQJH]HWYHUYDQJWXKHW
KXOSPLGGHOHQKHUKDDOWXGH
$)./!'+-*! 0-!
7LMGHQV6HWXS7HVW
%LRSV\/DYDJHRI0DQXDO
.+$-/$*)2*- / !
YORHLVWRIHQRIKHWZHHIVHO
QLHWLQKHWZHHIVHO¿OWHU
RSJHKDDOGRIRSHQWHQVOXLW
GHDSHUWXXUQLHWDOVYHUZDFKW
'HDIVWDQGVNOHSEHYLQGW]LFK
)$!/1*''! $#$) !./) )
')!-$)#
=HWKHWKXOSPLGGHOLQGH
./) )')!-$)# **-
!#-*!)!&)*+*+ !
"./) .&'!+1*''! $#$)/!
-0&&!)
!$)%!/$!.+0$/&)
)$!/2*- !)$)#! -0&/
YRRUWRHGLHQLQJYDQKHW
DQHVWKHWLFXP
+HWKXOSPLGGHOEHYLQGW]LFK
)$!/$) !./) )')!-$)#
=HWKHWKXOSPLGGHOLQGH
./) )')!-$)# **-
!#-*!)!&)*+*+ !
"./) .&'!+$)/! -0&&!)

18Nederlands
Bewust leeg gelaten
A página está carregando...
A página está carregando...
A página está carregando...
A página está carregando...
A página está carregando...
A página está carregando...
A página está carregando...
A página está carregando...
A página está carregando...
A página está carregando...
A página está carregando...
A página está carregando...
A página está carregando...
A página está carregando...
A página está carregando...
A página está carregando...
A página está carregando...
A página está carregando...
A página está carregando...
A página está carregando...
A página está carregando...
A página está carregando...
A página está carregando...
A página está carregando...
A página está carregando...
A página está carregando...
A página está carregando...
A página está carregando...
A página está carregando...
A página está carregando...
A página está carregando...
A página está carregando...
A página está carregando...
A página está carregando...
A página está carregando...
A página está carregando...
A página está carregando...
A página está carregando...
A página está carregando...
A página está carregando...
A página está carregando...
A página está carregando...
A página está carregando...
A página está carregando...
A página está carregando...
A página está carregando...
A página está carregando...
A página está carregando...
A página está carregando...
A página está carregando...
A página está carregando...
A página está carregando...
A página está carregando...
A página está carregando...
A página está carregando...
A página está carregando...
A página está carregando...
A página está carregando...
A página está carregando...
A página está carregando...
-
 1
1
-
 2
2
-
 3
3
-
 4
4
-
 5
5
-
 6
6
-
 7
7
-
 8
8
-
 9
9
-
 10
10
-
 11
11
-
 12
12
-
 13
13
-
 14
14
-
 15
15
-
 16
16
-
 17
17
-
 18
18
-
 19
19
-
 20
20
-
 21
21
-
 22
22
-
 23
23
-
 24
24
-
 25
25
-
 26
26
-
 27
27
-
 28
28
-
 29
29
-
 30
30
-
 31
31
-
 32
32
-
 33
33
-
 34
34
-
 35
35
-
 36
36
-
 37
37
-
 38
38
-
 39
39
-
 40
40
-
 41
41
-
 42
42
-
 43
43
-
 44
44
-
 45
45
-
 46
46
-
 47
47
-
 48
48
-
 49
49
-
 50
50
-
 51
51
-
 52
52
-
 53
53
-
 54
54
-
 55
55
-
 56
56
-
 57
57
-
 58
58
-
 59
59
-
 60
60
-
 61
61
-
 62
62
-
 63
63
-
 64
64
-
 65
65
-
 66
66
-
 67
67
-
 68
68
-
 69
69
-
 70
70
-
 71
71
-
 72
72
-
 73
73
-
 74
74
-
 75
75
-
 76
76
-
 77
77
-
 78
78
-
 79
79
-
 80
80


Hologic Eviva Stereotactic Guided Breast Biopsy System Handpiece Instruções de operação
- Tipo
- Instruções de operação
em outras línguas
- español: Hologic Eviva Stereotactic Guided Breast Biopsy System Handpiece Instrucciones de operación
- français: Hologic Eviva Stereotactic Guided Breast Biopsy System Handpiece Mode d'emploi
- italiano: Hologic Eviva Stereotactic Guided Breast Biopsy System Handpiece Istruzioni per l'uso
- Nederlands: Hologic Eviva Stereotactic Guided Breast Biopsy System Handpiece Handleiding
- Deutsch: Hologic Eviva Stereotactic Guided Breast Biopsy System Handpiece Bedienungsanleitung
Artigos relacionados
-
 Hologic Eviva Stereotactic Guided Breast Biopsy System Instruções de operação
-
 Hologic Brevera Breast Biopsy System Biopsy Needle Instruções de operação
-
 Hologic ATEC Breast Biopsy and Excision System Ultrasound Introducer Instruções de operação
-
 Hologic TriMark Instruções de operação
-
 Hologic ATEC TriMark Biopsy Site Identification System Instruções de operação
-
 Hologic TriMark Instruções de operação
-
 Hologic ATEC Breast Biopsy and Excision System Introducer Localization System Instruções de operação
-
 Hologic ATEC Handpiece Instruções de operação
-
 Hologic Celero Instruções de operação
-
 Hologic Celero Instruções de operação