Hologic ATEC Breast Biopsy and Excision System Ultrasound Introducer Instruções de operação
- Categoria
- Acessórios para fazer café
- Tipo
- Instruções de operação

Instructions For Use
Gebruiksaanwijzing
Mode d’emploi
Bedienungsanleitung
Istruzioni per l’uso
Instruções de Utilização
Instrucciones de uso
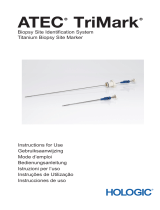
Breast Biopsy and Excision System
Ultrasound Introducer


1 English
ATEC® Ultrasound Introducer
Instructions for Use
Please read all information carefully. Failure to properly follow the instructions may lead to
unintended consequences.
Important: This package insert is designed to provide instructions for use (IFU) for the ATEC®
ultrasound introducer. It is not a reference to surgical techniques.
Indications
The ATEC ultrasound introducer is indicated to be used as an aspiration needle and/or as an
introducer with another biopsy needle in percutaneous biopsies of the breast for diagnostic
purposes only.
Contraindications
Sound professional judgement should be used used when performing biopsies on patients
who are using anticoagulant therapy and/or patients with known hemophilia problems.
Device Description
The ATEC ultrasound introducer is for use in conjunction with the ATEC Breast Biopsy and
Excision System to obtain percutaneous core biopsy samples from soft tissue. The ATEC
ultrasound introducer is designed specifically for use with the 9cm and 12cm length, 20mm
aperture ATEC breast biopsy devices. The ATEC ultrasound introducer is a sterile single-use
system of devices comprised of a stylet with an echogenic aperture and introducer. The ATEC
ultrasound introducer provides single insertion access to the targeted area of interest and
assists in deploying the appropriate biopsy site marker.

2English
Device Preparation
(All steps to be performed per standard interventional technique)
1. Standard aseptic patient preparation should be employed prior to the use of the
ATEC ultrasound introducer.
2. Prior to use of the ATEC ultrasound introducer, inspect the packaging and device to
verify that neither has been damaged during shipment. If it appears that the packaging
has been compromised, do not use the device.
3. Carefully remove the ATEC ultrasound introducer from its protective packaging and
remove its protective sheath.
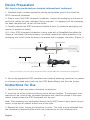
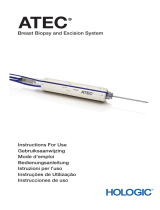
4. If a 9cm ATEC ultrasound introducer is being used with a CeleroMark,SecurMark for
Celero, or SecurMark Ultrasound biopsy site marker, remove the spacer provided in the
packaging and install it onto the biopsy site marker until it engages into place. (Figure 1)
5. Set-up the appropriate ATEC handpiece per standard operating procedures to perform
an ultrasound-guided biopsy utilizing the ATEC Breast Biopsy and Excision System.
Instructions for Use
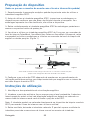
1. Identify the target area under ultrasound visualization.
2. Insert the tip of the stylet and advance to the desired location. The echogenic side
aperture will be visible under ultrasound-guidance and should be placed in the same
area of interest where the ATEC handpiece will be used.
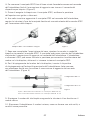
Note: The Introducer may be attached directly to the ATEC breast biopsy device to gain
access to the area of interest without use of the stylet.
3. Remove the stylet, leaving the introducer in place. The stylet may be detached from
the introducer by depressing the thumb latch mechanism on the introducer hub.
Spacer Marker Device
Thumb Latch
Introducer Set Luer Feature* Figure 1
*Note: A luer taper or luer lock syringe may be attached to provide additional fluid and/or pain management.

3 English
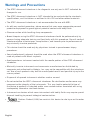
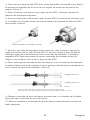
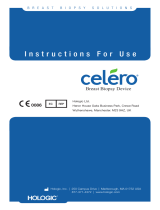
4. Advance the ATEC handpiece to the targeted area by sliding it into the introducer
hub until the thumb latch engages the biopsy device hub. (Figure 2)
5. Prior to performing a biopsy using the ATEC handpiece, verify aperture position
using ultrasound-guidance.
6. Once the ATEC handpiece is inserted into the introducer hub and latched,
follow the instructions for handpiece use in the ATEC Console Operator’s Manual to
perform the biopsy.
7. Once core acquisition has been completed, return the console to biopsy mode and
remove the ATEC handpiece. The handpiece may be detached from the introducer
by depressing the latch mechanism on the introducer hub. The ATEC ultrasound
introducer can be left in place for biopsy site marker placement, otherwise remove it
with the ATEC handpiece.
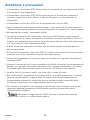
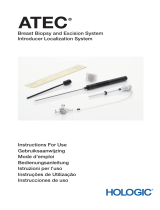
8. For biopsy site marker deployment, insert the deployment device into the
proximal end of the introducer and carefully advance the deployment device until it
engages the introducer hub thumb latch. (Figure 3)
9. Deploy the biopsy site marker per the instructions for use provided with the
biopsy site marker.
10. Remove the introducer and biopsy site marker as a unit and properly dispose of
them.
ATEC handpiece with introducer attached Figure 2
9cm Conguration
12cm Conguration
Figure 3

4English
Warnings and Precautions
• The ATEC ultrasound introducer is for diagnostic use only and is NOT indicated for
therapeutic use.
• The ATEC ultrasound introducer is NOT intended to be used outside the standards,
specifications, and limitations as outlined in this IFU and other related materials.
• The ATEC ultrasound introducer is not recommended for use with MRI.
• As with any medical procedure, please ensure that users wear appropriate personal
protective equipment to guard against potential contact with body fluids.
• Observe caution while handling sharp components.
• Breast biopsies using the ATEC ultrasound introducer should be performed only by
persons having adequate training and familiarity with this procedure. Consult medical
literature relative to techniques, complications, and hazards prior to performance of
any minimally invasive procedure.
• This device should be used only by physicians trained in percutaneous biopsy
procedures.
• Sound professional judgment should be used when the ATEC ultrasound introducer is
used on patients with breast implants.
• Avoid operator or instrument contact with the needle portion of the ATEC ultrasound
introducer.
• Minimally invasive instruments and accessories manufactured or distributed by
companies not authorized by Hologic, Inc. may not be compatible with the introducer
set. Use of such products may lead to unanticipated results and possible injury to the
user or patient.
• Dispose of all opened instruments whether used or unused.
• Do not resterilize the ATEC ultrasound introducer. Re-sterilization and/or reuse may
compromise the integrity of the instruments. This may lead to potential failure of
the device to perform as intended and/or cross-contamination associated with using
inadequately cleaned or sterilized devices.
• Instruments or devices which come into contact with bodily fluids may require special
disposal handling to prevent biological contamination.
• Caution: Federal (USA) law restricts this device to sale by or on the order
of a physician.

5 English
How Supplied
The ATEC ultrasound introducer is sterilized by gamma radiation and supplied sterile
and packaged for single patient use. Discard into an appropriate container after use.
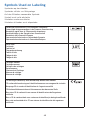
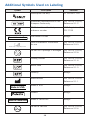
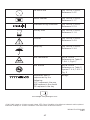
As Identified on Labels:
Number of Devices Enclosed.
YYYY-MM-DD Expiration date is represented by the following:
YYYY represents the year
MM represents the month
DD represents the day
For More Information
For technical support or reorder information in the United States, please contact:
Hologic, Inc.
250 Campus Drive
Marlborough, MA 01752 USA
Phone: 877-371-4372
International customers, contact your distributor or local Hologic Sales Representative:
European Representative
Hologic BV
Da Vincilaan 5
1930 Zaventem
Belgium
Tel: +32 2 711 46 80

6English
This page is intentionally left blank

ATEC® echograsche inbrenger
Gebruiksaanwijzing
Lees alle informatie zorgvuldig door. Het niet opvolgen van de instructies kan onbedoelde
gevolgen hebben.
Belangrijk: deze bijsluiter is bedoeld als gebruiksaanwijzing voor de ATEC® echografische
inbrenger. De bijsluiter is niet geschikt als referentiemateriaal voor chirurgische technieken.
Indicaties
De ATEC echografische inbrenger is uitsluitend bestemd voor gebruik als aspiratienaald en/
of als inbrenger met een andere biopsienaald bij percutane biopsieën van de borst voor
diagnostische doeleinden.
Contra-indicaties
Wanneer een biopsie wordt gedaan bij een patiënt die anticoagulantia gebruikt en/of van
wie bekend is dat zij hemofilieproblemen heeft, moet de situatie gedegen en professioneel
worden beoordeeld.
Beschrijving van het hulpmiddel
De ATEC echografische inbrenger is bestemd voor gebruik in combinatie met het ATEC-
systeem voor borstbiopsieën en excisie voor het verkrijgen van percutane kernbiopsiemonsters
van weke delen. De ATEC echografische inbrenger is specifiek bedoeld voor gebruik met de
ATEC-borstbiopsiehulpmiddelen met een lengte van 9 of 12 cm en een apertuur van 20 mm.
De ATEC echografische inbrenger is een steriel hulpmiddelsysteem voor eenmalig gebruik dat
bestaat uit een stilet met een echogene apertuur en een inbrenger. De ATEC echografische
inbrenger biedt met een enkele ingang toegang tot het beoogde interessegebied en biedt
ondersteuning bij het plaatsen van de juiste biopsieplaatsmarker.
7 Nederlands7

8Nederlands
Voorbereiding van het hulpmiddel
(alle stappen moeten worden uitgevoerd volgens de
standaardinterventietechniek)
1. Voordat de ATEC echografische inbrenger wordt gebruikt, moet een standaard,
aseptische patiëntvoorbereiding worden uitgevoerd.
2. Voordat u de ATEC echografische inbrenger gebruikt, moet u de verpakking en
het hulpmiddel controleren op transportschade. Gebruik het hulpmiddel niet als de
verpakking lijkt te zijn aangetast.
3. Neem de ATEC echografische inbrenger voorzichtig uit de beschermende verpakking en
verwijder de beschermhuls.
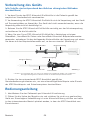
4. Bij gebruik van een ATEC echografische inbrenger van 9 cm met een
CeleroMark, SecurMark for Celero-biopsieplaatsmarker of SecurMark echografische
biopsieplaatsmarker verwijdert u het afstandsstuk dat in de verpakking is meegeleverd en
installeert dit op de biopsieplaatsmarker tot het op de plaats vastgrijpt. (Afbeelding 1)
5. Stel het juiste ATEC-handstuk in volgens de standaardbedrijfsprocedures voor het
uitvoeren van een echografisch geleide biopsie met behulp van het ATEC-systeem voor
borstbiopsieën en excisie.
Gebruiksaanwijzing
1. Identificeer het doelgebied onder echografische visualisatie.
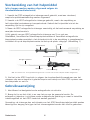
2. Breng de tip van het stilet in en voer het op naar de gewenste locatie. De
echogene zij-apertuur is zichtbaar onder echografische geleiding en moet in hetzelfde
interessegebied als het ATEC-handstuk worden geplaatst.
Opmerking: de inbrenger kan rechtstreeks aan het ATEC-borstbiopsiehulpmiddel worden
bevestigd om toegang te krijgen tot het interessegebied zonder het stilet te gebruiken.
Afstandsstuk Marker
Afbeelding 1
*NB: Voor extra vocht- en/of pijnbeheersing kan een conische luer of luer-lockspuit worden aangesloten.
Duimvergrendeling
Inbrengset Luer-aansluiting*
Echogene apertuur

9 Nederlands
3. Verwijder het stilet en laat de inbrenger op zijn plaats. Het stilet kan van de
inbrenger worden afgenomen door het duimvergrendelingsmechanisme op het
aanzetstuk van de inbrenger in te drukken.
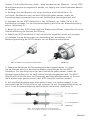
4. Voer het ATEC-handstuk op naar het interessegebied door dit in het aanzetstuk
van de inbrenger te schuiven tot de duimvergrendeling op het aanzetstuk van het
biopsiehulpmiddel aangrijpt. (Afbeelding 2)
5. Voordat u een biopsie uitvoert met het ATEC-handstuk, moet u de positie van de
apertuur controleren met behulp van echografische geleiding.
6. Zodra het ATEC-handstuk in het aanzetstuk van de inbrenger is ingebracht en
is vergrendeld, volgt u de aanwijzingen voor het gebruik van het handstuk in de
gebruikershandleiding van de ATEC-console voor het uitvoeren van de biopsie.
7. Zodra de kernbiopsie is voltooid, zet u de console weer in de biopsiemodus
en verwijdert het ATEC-handstuk. Het handstuk kan van de inbrenger worden
afgenomen door het vergrendelmechanisme op het aanzetstuk van de inbrenger
in te drukken. De ATEC echografische inbrenger kan op zijn plaats worden gelaten
voor plaatsing van biopsieplaatsmarkers. Anders verwijdert u deze tegelijk met het
ATEC-handstuk.
8. Voor plaatsing van biopsieplaatsmarkers, brengt u het plaatsingshulpmiddel in het
proximale uiteinde van de inbrenger in en voert het plaatsingshulpmiddel voorzichtig
op tot het op de duimvergrendeling van het aanzetstuk van de inbrenger aangrijpt.
(Afbeelding 3)
ATEC-handstuk met aangesloten inbrenger Afbeelding 2
9cm-conguratie
12cm-conguratie
Afbeelding 3
Boven: Het afstandsstuk wordt gebruikt met het ATEC-handstuk van 9 cm.
Onder: Met het ATEC-handstuk van 12 cm wordt geen afstandsstuk gebruikt.

10Nederlands
9. Plaats de biopsieplaatsmarker volgens de gebruiksaanwijzing die bij de
biopsieplaatsmarker is meegeleverd.
10. Verwijder de inbrenger en biopsieplaatsmarker als één geheel en voer ze op de juiste
wijze af.
Waarschuwingen en voorzorgsmaatregelen
• De ATEC echografische inbrenger is uitsluitend bestemd voor diagnostisch gebruik en
is NIET geïndiceerd voor therapeutisch gebruik.
• De ATEC echografische inbrenger is NIET bestemd voor gebruik buiten de normen,
specificaties en beperkingen die in deze gebruiksaanwijzing en ander gerelateerd
materiaal worden genoemd.
• De ATEC echografische inbrenger wordt niet aanbevolen voor gebruik met MRI.
• Zorg er zoals bij elke medische ingreep voor dat gebruikers geschikte beschermende
kleding dragen ter bescherming tegen mogelijk contact met lichaamsvloeistoffen.
• Wees voorzichtig wanneer u scherpe onderdelen hanteert.
• Bostbiopsieën met gebruik van de ATEC echografische inbrenger dienen uitsluitend
te worden uitgevoerd door personen met de juiste opleiding die voldoende vertrouwd
zijn met deze ingreep. Voordat u een minimaal invasieve ingreep uitvoert, dient u
de medische literatuur over de betreffende technieken, complicaties en gevaren te
raadplegen.
• Dit hulpmiddel dient uitsluitend te worden gebruikt door artsen die zijn opgeleid in
percutane biopsie-ingrepen.
• Wanneer de ATEC echografische inbrenger wordt gebruikt bij patiënten met
borstimplantaten, moet dit gedegen en professioneel worden beoordeeld.
• Voorkom dat de gebruiker of een instrument in aanraking komt met het naaldgedeelte
van de ATEC echografische inbrenger.
• Minimaal invasieve instrumenten en accessoires die worden vervaardigd of geleverd
door bedrijven die niet zijn geautoriseerd door Hologic, Inc. zijn mogelijk niet
compatibel met de inbrengset. Het gebruik van dergelijke producten kan leiden tot
onvoorziene resultaten en mogelijk letsel bij de gebruiker of patiënt.
• Alle instrumenten, gebruikt of ongebruikt, waarvan de verpakking is geopend, moeten
worden afgevoerd.
• De ATEC echografische inbrenger mag niet opnieuw worden gesteriliseerd. Door
opnieuw steriliseren en/of gebruiken kan de integriteit van de instrumenten worden
aangetast. Dit kan ertoe leiden dat het hulpmiddel niet meer werkt zoals bedoeld en/
of dat er kruisbesmetting optreedt vanwege onvoldoende gereinigde of gesteriliseerde
hulpmiddelen.

11 Nederlands
• Instrumenten of hulpmiddelen die in aanraking komen met lichaamsvloeistoffen
dienen mogelijk op speciale wijze te worden afgevoerd om biologische besmetting
te voorkomen.
• Let op: Volgens de federale wetgeving van de Verenigde Staten mag dit
hulpmiddel alleen door of op voorschrift van een arts worden verkocht.
Wijze van leveren
De ATEC echografische inbrenger is met gammastraling gesteriliseerd en is verpakt
voor gebruik bij één patiënt. Gooi het hulpmiddel na gebruik weg in een daarvoor
bestemde bak.
Zoals aangegeven op labels:
Aantal geleverde hulpmiddelen.
YYYY-MM-DD De uiterste gebruiksdatum wordt als volgt aangeduid:
YYYY duidt het jaar aan
MM duidt de maand aan
DD duidt de dag aan
Voor meer informatie
Neem voor technische ondersteuning of bestelinformatie in de Verenigde Staten contact
op met:
Hologic, Inc.
250 Campus Drive
Marlborough, MA 01752 USA
Telefoon: 877-371-4372
Klanten in andere landen wordt gevraagd contact op te nemen met hun distributeur of
lokale verkoopvertegenwoordiger van Hologic:
Vertegenwoordiger in de Europese Unie
Hologic BV
Da Vincilaan 5
1930 Zaventem
Belgium
Telefoon: +32 2 711 46 80

12Nederlands
Deze pagina is bewust leeg gelaten

13 Français
Introducteur par échographie ATEC®
Instructions d’utilisation
Veuillez lire attentivement l’ensemble des informations. Le non-respect des instructions
peut entraîner des conséquences non intentionnelles.
Important : Cette notice d’utilisation est destinée à fournir des instructions d’utilisation
pour l’introducteur par échographie ATEC®. Elle ne doit pas être utilisée comme
document de référence pour les techniques chirurgicales.
Indications
L’introducteur par échographie ATEC est destiné à servir d’aiguille d’aspiration et/ou
d’introducteur avec une autre aiguille de biopsie lors de biopsies percutanées du sein à
des fins exclusives de diagnostic.
Contre-indications
Une attention professionnelle particulière doit être observée lors de biopsies réalisées
chez les patientes sous anticoagulothérapie et/ou présentant des problèmes de
saignement connus.
Description du dispositif
L’introducteur par échographie ATEC doit être utilisé en association avec le système
d’excision et de biopsie mammaire ATEC afin d’obtenir des échantillons de biopsie
percutanée au trocart à partir des tissus mous. L’introducteur par échographie ATEC
est spécialement conçu pour être utilisé avec les dispositifs de biopsie mammaire
ATEC à ouverture de 20 mm et d’une longueur de 9 cm et 12 cm. L’introducteur
par échographie ATEC est un système stérile à usage unique composé d’un stylet
doté d’une ouverture échogène et de l’introducteur. L’introducteur par échographie
ATEC offre un accès unique à la région d’intérêt voulue pour l’insertion et aide au
déploiement du marqueur de site de biopsie adéquat.

14Français
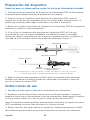
Préparation du dispositif
(étapes à réaliser conformément à la procédure standard)
1. Une préparation aseptique standard de la patiente doit être effectuée avant d’utiliser l’introducteur par
échographie ATEC.
2. Avant d’utiliser l’introducteur par échographie ATEC, inspectez l’emballage et le dispositif an de vérier
qu’ils n’ont pas été endommagés pendant le transport. Si l’emballage est détérioré, n’utilisez pas
le dispositif.
3. Retirez délicatement l’introducteur par échographie ATEC de son emballage de protection, puis de sa
gaine protectrice.
4. Si un introducteur par échographie ATEC de 9 cm est utilisé avec un marqueur de site de biopsie
CeleroMark, SecurMark for Celero ou SecurMark Ultrasound, retirez l’espaceur fourni dans l’emballage et
installez-le sur le marqueur de site de biopsie jusqu’à ce qu’il s’enclenche. (Figure 1)
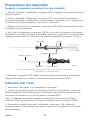
5. Installez la pièce à main ATEC appropriée, conformément aux procédures standard, pour réaliser une
biopsie échoguidée utilisant le système d’excision et de biopsie mammaire ATEC.
Instructions d’utilisation
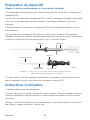
1. Identiez la région voulue sous échographie.
2. Insérez la pointe du stylet et faites-la progresser jusqu’au site voulu. TL’ouverture échogène latérale est
visible sous échoguidage et doit être placée dans la région d’intérêt dans laquelle la pièce à main ATEC
sera utilisée.
Remarque : L’introducteur peut être mis en place directement sur le dispositif de biopsie mammaire ATEC
pour accéder à la région d’intérêt sans l’aide du stylet.
Espaceur Marqueur
*Remarque : un collet Luer ou une seringue Luer-Lock peut permettre de mieux
gérer l’administration des fluides et/ou la douleur.
Figure 1
Clenche
Ensemble
d’introducteur Fonction Luer*
Ouverture échogène

15 Français
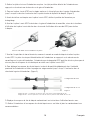
3. Retirez le stylet en laissant l’introducteur en place. Le stylet peut être détaché de l’introducteur en
appuyant sur le mécanisme de clenche sur la gaine d’introduction.
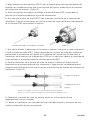
4. Poussez la pièce à main ATEC vers la région voulue en la faisant glisser dans la gaine d’introduction
jusqu’à ce que la clenche s’enclenche dans la partie évasée du dispositif de biopsie. (Figure 2)
5. Avant de réaliser une biopsie avec la pièce à main ATEC, vériez la position de l’ouverture par
échoguidage.
6. Une fois la pièce à main ATEC insérée dans la gaine d’introduction et verrouillée, suivez les instructions
d’utilisation de la pièce à main décrites dans le manuel d’utilisation de la console ATEC pour réaliser
la biopsie.
7. Une fois l’acquisition du trocart terminée, ramenez la console en mode de biopsie et retirez la pièce
à main ATEC. La pièce à main peut être détachée de l’introducteur en appuyant sur le mécanisme de
verrouillage sur la gaine d’introduction. L’introducteur par échographie ATEC peut être laissé en place pour la
mise en place du marqueur du site de biopsie ou retiré avec la pièce à main ATEC.
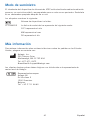
8. Pour déployer le marqueur de site de biopsie, insérez le dispositif de déploiement dans l’extrémité
proximale de l’introducteur et faites-le progresser soigneusement jusqu’à ce qu’il s’enclenche dans la
clenche de la gaine d’introduction. (Figure 3)
9. Déployez le marqueur de site de biopsie conformément aux instructions d’utilisation fournies avec.
10. Retirez l’introducteur et le marqueur de site de biopsie en un seul bloc et jetez-les conformément aux
recommandations.
Pièce à main ATEC avec introducteur en place Figure 2
Conguration de 9 cm
Conguration de 12 cm
Figure 3
Image du haut : l’espaceur est utilisé avec une pièce à main ATEC de 9 cm.
Image du bas : aucun espaceur n’est utilisé avec la pièce à main ATEC de 12 cm.

16Français
Avertissements et mises en garde
• L’introducteur par échographie ATEC doit uniquement être utilisé à des ns diagnostiques et n’est PAS
indiqué pour une utilisation thérapeutique.
• L’introducteur par échographie ATEC n’est PAS conçu pour une utilisation non conforme aux normes, aux
spécications et aux limites décrites dans les présentes instructions d’utilisation et leur documentation
associée.
• L’introducteur par échographie ATEC n’est pas recommandé pour être utilisé avec l’IRM.
• Comme pour toute procédure médicale, assurez-vous que les utilisateurs portent des équipements de
protection individuelle adaptés pour éviter tout contact avec des uides corporels.
• Faites preuve de prudence lors de la manipulation de composants contondants.
• Une biopsie mammaire utilisant l’introducteur par échographie ATEC doit être exclusivement effectuée par
des personnes parfaitement formées et familiarisées à cette procédure. Consultez la littérature médicale
relative aux techniques, complications et risques avant d’effectuer une procédure très peu invasive.
• Ce dispositif doit exclusivement être utilisé par des médecins formés aux procédures de biopsie
percutanée.
• Une attention professionnelle particulière doit être observée en cas d’utilisation de l’introducteur par
échographie ATEC chez les patientes avec implants mammaires.
• Évitez tout contact entre l’opérateur ou entre l’instrument et la partie comportant l’aiguille de l’introducteur
par échographie ATEC.
• Les instruments et les accessoires très peu invasifs fabriqués ou distribués par des sociétés non agréées
par Hologic, Inc. peuvent s’avérer incompatibles avec l’ensemble d’introducteur. L’utilisation de ces
produits peut entraîner des résultats imprévus et provoquer des lésions chez l’utilisateur ou la patiente.
• Jetez tous les instruments ouverts, qu’ils aient été utilisés ou non.
• L’introducteur par échographie ATEC ne doit pas être restérilisé. La restérilisation et/ou la réutilisation
risquent de compromettre l’intégrité des instruments. Cela peut entraîner un fonctionnement du dispositif
non conforme aux attentes et/ou entraîner une contamination croisée due à l’utilisation de dispositifs
nettoyés ou stérilisés de manière incorrecte.
• Les instruments ou les dispositifs en contact avec des uides corporels peuvent nécessiter une procédure
particulière d’élimination pour éviter toute contamination biologique.
• Mise en garde : Selon la loi fédérale (États-Unis), la vente de ce dispositif est limitée à la
vente par un médecin ou sur prescription médicale.

17 Français
Conditionnement
L’introducteur par échographie ATEC est stérilisé par rayonnement gamma et est fourni stérile et emballé
pour un usage unique. Jetez-le dans un récipient approprié après utilisation.
Informations données sur les étiquettes :
Nombre de dispositifs inclus.
YYYY-MM-DD La date de péremption est représentée par les éléments suivants :
YYYY représente l’année
MM représente le mois
DD représente le jour
Pour plus d’informations
Pour toute assistance technique ou pour obtenir des informations relatives au
réapprovisionnement aux États-Unis, contacter :
Hologic, Inc.
250 Campus Drive
Marlborough, MA 01752 USA
Tél. : 877-371-4372
Les clients internationaux doivent contacter leur distributeur ou représentant
commercial d’Hologic local :
Représentant européen
Hologic BV
Da Vincilaan 5
1930 Zaventem
Belgium
Tél. : +32 2 711 46 80

18Français
Page intentionnellement vierge
A página está carregando...
A página está carregando...
A página está carregando...
A página está carregando...
A página está carregando...
A página está carregando...
A página está carregando...
A página está carregando...
A página está carregando...
A página está carregando...
A página está carregando...
A página está carregando...
A página está carregando...
A página está carregando...
A página está carregando...
A página está carregando...
A página está carregando...
A página está carregando...
A página está carregando...
A página está carregando...
A página está carregando...
A página está carregando...
A página está carregando...
A página está carregando...
A página está carregando...
A página está carregando...
A página está carregando...
A página está carregando...
A página está carregando...
A página está carregando...
A página está carregando...
A página está carregando...
-
 1
1
-
 2
2
-
 3
3
-
 4
4
-
 5
5
-
 6
6
-
 7
7
-
 8
8
-
 9
9
-
 10
10
-
 11
11
-
 12
12
-
 13
13
-
 14
14
-
 15
15
-
 16
16
-
 17
17
-
 18
18
-
 19
19
-
 20
20
-
 21
21
-
 22
22
-
 23
23
-
 24
24
-
 25
25
-
 26
26
-
 27
27
-
 28
28
-
 29
29
-
 30
30
-
 31
31
-
 32
32
-
 33
33
-
 34
34
-
 35
35
-
 36
36
-
 37
37
-
 38
38
-
 39
39
-
 40
40
-
 41
41
-
 42
42
-
 43
43
-
 44
44
-
 45
45
-
 46
46
-
 47
47
-
 48
48
-
 49
49
-
 50
50
-
 51
51
-
 52
52


Hologic ATEC Breast Biopsy and Excision System Ultrasound Introducer Instruções de operação
- Categoria
- Acessórios para fazer café
- Tipo
- Instruções de operação
em outras línguas
- español: Hologic ATEC Breast Biopsy and Excision System Ultrasound Introducer Instrucciones de operación
- français: Hologic ATEC Breast Biopsy and Excision System Ultrasound Introducer Mode d'emploi
- italiano: Hologic ATEC Breast Biopsy and Excision System Ultrasound Introducer Istruzioni per l'uso
- Nederlands: Hologic ATEC Breast Biopsy and Excision System Ultrasound Introducer Handleiding
- Deutsch: Hologic ATEC Breast Biopsy and Excision System Ultrasound Introducer Bedienungsanleitung
Artigos relacionados
-
 Hologic SecurMark Instruções de operação
-
 Hologic ATEC Handpiece Instruções de operação
-
 Hologic Celero Instruções de operação
-
 Hologic ATEC Breast Biopsy and Excision System Introducer Localization System Instruções de operação
-
 Hologic TriMark Instruções de operação
-
 Hologic ATEC TriMark Biopsy Site Identification System Instruções de operação
-
 Hologic CeleroMark Instruções de operação
-
 Hologic SecurMark Instruções de operação
-
 Hologic TriMark Instruções de operação
-
 Hologic Eviva Stereotactic Guided Breast Biopsy System Instruções de operação


