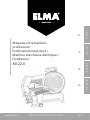
Elma profesional Ø 220 mm Manual do proprietário
- Categoria
- Fatiadores
- Tipo
- Manual do proprietário

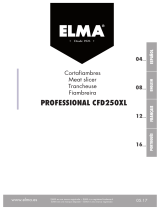
Máquina corta ambres
profesional /
Professional meat slicer /
Machine trancheuse électrique /
Fiambreira /
80.22.0
02...
10...
18...
26...
ESPAÑOLENGLISHFRANÇAISPORTUGUÊS
www.elma.es
03.19
ELMA es una marca registrada ~ ELMA is a registered trademark
ELMA est une marque déposée ~ ELMA é uma marca registrada

2

3
Español
2.2. Consejos de uso
- Mantén las manos y otras partes del cuerpo alejadas de la cuchilla y otros
elementos móviles de la máquina.
- No utilices el aparato si el cable o el enchufe están dañados o si detectas alguna
anomalía. En tal caso, ponte en contacto con el distribuidor donde adquiriste
el producto.
- En caso de mal funcionamiento del aparato o en caso de emergencia, procede a
apagar el interruptor de la máquina y a desenchufarla.
- Apaga el aparato mediante el interruptor y desenchúfalo cuando no vaya a ser
utilizado.
- Comprueba regularmente el nivel de alado de la cuchilla circular del aparato,
así como el deslizamiento del carro.
RECUERDA
FUNCIÓN DE LA MÁQUINA CORTA FIAMBRES
Este aparato está diseñado para el corte de carne, embutidos, quesos y otros
alimentos. No está autorizado su uso para procesos diferentes a los indicados
por el fabricante.
CONDICIONES DE LA INSTALACIÓN
La máquina debe ser instalada en una supercie de trabajo rme y estable, con la
resistencia suciente para soportar el peso de la máquina y el alimento a procesar.
- No sumergir jamás la máquina en agua u otros líquidos. De lo contrario, existe
peligro de muerte por descarga eléctrica.

4
03. INSTRUCCIONES DE USO
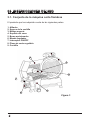
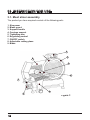
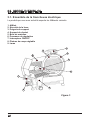
3.1. Conjunto de la máquina corta ambres
Figura 1.
4
7
6
8
El producto que has adquirido consta de las siguientes partes:
1. Alador
2. Seguro de la cuchilla
3. Mango soporte
4. Soporte del carro
5. Brazo aprisionador
6. Mando regulador
7. Interruptor ON/OFF
8. Plano de corte regulable
9. Cuchilla
3
5

5
Español
1. Adapta el espesor de corte que quieras realizar girando el Mando regulador (6).
Girando este mando desplazarás en profundidad el Plano de corte regulable (8).
2. Deposita el alimento que vayas a procesar sobre el Soporte del carro (4) y
asegúralo bajando el Brazo aprisionador (5) de alimentos.
3. Procede a encender el aparato accionando el Interruptor (7) en posición “ON”.
4. Antes de empezar a procesar alimentos, comprueba que la Cuchilla (9) gira
suavemente y en el sentido de giro que marca la echa dispuesta sobre la máquina.
5. Para proceder al corte del alimento, desplaza suavemente el Carro (4) de
izquierda a derecha con un movimiento contínuo. Empuja el carro con la ayuda del
Mango soporte (3).
6. Una vez hayas terminado de cortar la cantidad de alimento deseado, coloca el
Mando regulador (6) en su posición “0” y apaga el aparato poniendo el Interruptor
(7) en posición “OFF”.
7. Cuando la Cuchilla (9) haya parado completamente, procede a retirar el alimento.
8. Una vez nalizado el proceso, limpia el aparato tal y como se muestra en la
sección 4. Limpieza.
3.2. Montaje y utilización
04. LIMPIEZA
4.1. Limpieza de la máquina
1. Apaga la máquina accionando el botón “OFF” del Interruptor (7).
Asegúrate de poner el Regulador de Corte (8) en la posición 0 para evitar cualquier
tipo de corte.
2. Limpiar con jabón neutro, tanto la Cuchilla (9) como el Carro (4) y sus
mecanismos, con el objetivo de garantizar la higiene y una correcta conservación
del aparato.
3. Seca con un paño limpio la máquina una vez haya sido aclarada.
4.2. Limpieza de la Cuchilla
1. Apaga la máquina accionando el botón “OFF” del Interruptor (7). Asegúrate de
poner el Regulador de Corte (8) en la posición “0” para evitar cualquier tipo de
corte.
2. Limpiar con jabón neutro, tanto la Cuchilla (9) como el Carro (4) y sus mecanis-
mos, con el objetivo de garantizar la higiene y una correcta conservación.
3. Seca con un paño limpio la máquina una vez haya sido aclarada.
AVISO
Nunca acciones la máquina cuando se encuentre sumergida o se encuentre
todavía húmeda.

6
05. MANTENIMIENTO Y
ADVERTENCIAS
5.1.1. MANTENIMIENTO DE LA CUCHILLA
- Limpia la hoja con un paño seco al nal de cada uso.
- Aplica una capa de aceite de cocina en la orilla de la Cuchilla (Figura 1.9) con un
paño limpio y seco.
- Ala la hoja con frecuencia tal y como se muestra en el apartado 6. Alado de
la Cuchilla.
5.1.2. LUBRICACIÓN DE LA GUÍA
- Empuja el Soporte del carro (Figura 1.4.) hacia un lado y limpia las manchas de
grasa de la guía con un paño seco.
- Pon lubricante en la guía de la supercie y espárcelo con un paño.
- Se recomienda realizar esta operación semanalmente.
5.1.3. LUBRICACIÓN DEL EJE DEL MANGO SOPORTE
- Limpia el eje del Mango soporte (Figura 1.3) con un paño seco.
- Pon lubricante en las dos partes del eje y tira del mango hacia arriba y abajo para
repartir el lubricante homogéneamente.
- Se recomienda realizar esta operación semanalmente.
5.1.4. LUBRICACIÓN DEL AFILADOR
- Limpia el eje del alador y pon lubricante en ambas partes del eje.
5.1.5. LUBRICACIÓN DEL PLANO DE CORTE REGULABLE
- Gira el mando regulador (Figura 1.6) hasta que el Plano de corte regulable
(Figura 1.8) alcance su máxima apertura.
- Pon lubricante en ambas partes del eje
- Gira y desliza el eje hasta que se reparta el lubricante homogéneamente.
5.1. Mantenimiento de los componentes de la máquina
5.2. Mantenimiento del conjunto de la corta ambres
5.2.1. NORMAS DE MANTENIMIENTO
Para la limpieza y mantenimiento de la máquina o reposición de piezas, es
necesario desenchufar la máquina.
5.2.2. INFORMACIÓN
Para cualquier tipo de mantenimiento, revisión o reparación contactar con
Udom S.L. o con el distribuidor donde adquirirste el producto.

7
Español
5.2.3. REPUESTOS Y RECAMBIOS
Sólo pueden usarse REPUESTOS ORIGINALES que sean autorizados y
aprobados por Udom S.L. Se recomienda que los componentes o piezas
deteriorados se reemplacen de inmediato para garantizar un mejor funcionamiento,
ahorro de energía, e incluso la prevención de averías mayores en el aparato.
5.2.4. ALMACENAMIENTO
Es importante que la corta ambres se almacene en un lugar seco y fresco, alejado
de productos químicos agresivos o fuentes de calor.
5.2.5. PETICIÓN DE ASISTENCIA
Las peticiones de asistencia técnica deben de hacerse después de un cuidadoso
análisis (detección de averías y posibles causas). En el caso de una petición por
escrito, aconsejamos que se especique los siguientes términos: Tipo de máqui-
na, Número de referencia, Descripción detallada de la avería, Tipo de pruebas
que se han realizado y Ajustes realizados y sus efectos.
06. AFILADO DE LA CUCHILLA
El resultado de una Cuchilla (Figura 1.9) bien alada es un grosor de la loncha
regular y homogéneo. Para ello, se recomienda alar la cuchilla periódicamente:
1. Aségurate de que la máquina se encuentra desenchufada y el Interruptor (Figura
1.7) en posición “OFF”.
2. Limpia la cuchilla tal y como se muestra en el punto 4.2. Limpieza de la cuchilla.
3. Saca el set alador y ensámblalo en la máquina. Lubrica su eje para garantizar
un correcto ajuste en el agujero de ensamblaje, siguiendo las instrucciones del
punto 5.1.4. Lubricación del alador.
4 . Respeta la posición de ensamblaje del set alador, en caso de realizarlo al revés
la chapa del alador hará tope con el protector de la cuchilla impidiendo su correcto
ensamblaje.
5. Aprieta los botones de goma que sobresalen por la parte posterior y anterior del
set para regular el contacto que realizan las piedras con el lo de la cuchilla.
6. Conecta el enchufe de la máquina y pon el aparato en marcha. A continuación,
aprieta los botones para que las piedras hagan contacto con el lo y déjalas actuar
durante 30 segundos. Pasado este tiempo, detén la máquina y comprueba si la
cuchilla está alada correctamente. En caso de no estar lo sucientemente alada,
déjala funcionar durante 5 segundos más y procede a la comprobación.
7. Una vez hayas obtenido el alado correcto de la Cuchilla (Figura 1.9), desmonta
el set de alado de la máquina.

8
Udom S.L. declara que el producto con referencia 80.22.0 y descripción
“Máquina corta ambres” cumple con los requisitos del marcado CE.
8. Vuelve a limpiar la Cuchilla y los restos de metal que hayan podido desprenderse
durante el proceso de la máquina.
9. Mantén las piedras de alar limpias para asegurar su correcto funcionamiento.
10. Usa gafas de seguridad para realizar esta operación. Se evitarán posibles
daños en los ojos generados por la emisión de partículas durante el alado.
ATENCIÓN
Durante el proceso de alado se desprenden partículas metálicas incandescentes.
Proteje tus manos y mantén la máquina alejada de productos inamables durante
el alado.
07. DECLARACIÓN DE CONFORMIDAD

9
Español
08. RECICLAJE DE APARATOS
ELÉCTRICOS Y ELECTRÓNICOS
PROTEGE EL MEDIO AMBIENTE
El símbolo de la eliminación de residuos de máquinas eléctricas y electrónicas por
parte de usuarios domésticos de la Unión Europea en el producto o en el embalaje,
indica que no se puede desechar el producto junto con los residuos domésticos.
Por el contrario, sÍ se debe eliminar este tipo de residuo, es responsabilidad
del usuario entregarlo en un punto de recogida designado para el reciclado de
máquinas electrónicas y eléctricas. El reciclaje y la recolección por separado de
estos residuos en el momento de la eliminación ayudará a preservar los recursos
naturales y a garantizar que el reciclaje proteja nuestra salud y el medio ambiente.
Si deseas información adicional sobre los lugares donde puedes depositar estas
máquinas para su reciclado, ponte en contacto con las autoridades locales de tu
ciudad, con el servicio de gestión de residuos domésticos o con la tienda donde
adquiriste el producto.
Cuando desees desechar la máquina en un futuro, llévalo a
un centro de recogida para el reciclaje de piezas electrónicas.
Puedes prevenir el riesgo de accidentes en los niños separando
la clavija de red antes de reciclar el aparato, ya que esto lo hace
inservible. Retira asimismo las piezas con bordes cortantes
(cuchillas…) para proteger a los niños.

10
01. DESCRIPTION
The Elma 80.22.0 professional meat slicer is designed to slice meat with a precise
cut. Its design facilitates the slicing process for the user, while ensuring a high level
of safety. It incorporates easy-to-clean materials, which oer a high resistance and
durability.
Its technical features makes it recommendable for heavy use in hotels, restaurants
or in the home.
1.1. Technical specications
02. BEFORE USE
- Read this instruction sheet carefully every time you use the machine.
- Keep this instruction sheet for future reference.
- Check that the machine is in good condition, paying special attention to the moving
parts. If you detect any anomaly, please contact the distributor where you acquired
the product.
- Before connecting the machine to the power supply check that the voltage
indicated is the same as that of your local network.
- Check that the machine’s blade rotates in the direction indicated by the rotation
mark. If you detect any anomaly, contact the distributor where you acquired the
product.
- Never leave the appliance unattended when it is operating.
- Unplug the appliance after every use. To do so, pull out the plug or connector. This
will avoid possible damage to the electric cable.
- Keep the appliance out of reach of children.
- Never submerge the machine in water or other liquids. If you do, there is a danger
of death by electrical shock.
Professional mear slicer 80.22.0
Voltage 220-230 V
Frequency 50-60 Hz
Power rating 120 W
Variable cut thickness 0 – 12 mm
Blade diameter 220 mm
Weight 15.2 Kg
Dimensions 52x47x39 cm
2.1. General tips

English
11
2.1. Tips for use
- Keep your hands and other parts of your body away from the blade and other
moving parts of the machine.
- Do not use the appliance if the cable or socket is damaged or if you detect any
anomaly. Should this occur, contact the distributor where you acquired the product.
- In the event the appliance malfunctions or in case of emergency, turn o the
machine with the switch and unplug it.
- Turn o the appliance using the switch and unplug it if is not going to be used.
- Regularly check the sharpness of the appliance’s circular blade, and that the
carriage slides properly.
REMEMBER
FUNCTION OF THE PROFESSIONAL MEAT SLICER
This appliance is designed to cut meat, cold cuts, cheeses and other foods.
It is not approved for any use other than those specied by the manufacturer.
INSTALLATION CONDITIONS
The machine must be installed on a rm and stable work surface, strong enough to
bear the weight of the machine and the foods to process.

12
03. INSTRUCTION FOR USE
The product you have acquired consists of the following parts:
1. Sharpener
2. Blade guard
3. Support handle
4. Carriage support
5. Tightening arm
6. Regulating control
7. ON/OFF switch
8. Adjustable cutting plane
9. Blade
3.1. Meat slicer assembly
Figure 1.
4
7
6
8
3
5
2
1

English
13
Figure 1.
1. Adjust the thickness of the cut you wish to make by turning the regulating control
(6). Turning this control changes the depth of the adjustable cutting plane (8).
2. Place the food you are going to process on the carriage support (4) and secure it
by lowering the tightening arm (5) of the foods.
3. Switch the appliance on by putting the switch (7) in the “ON” position.
4. Before starting to process foods, check that the blade (9) turns gently and in the
direction of the arrow marked on the machine.
5. To cut the food, gently move the carriage (4) from left to right with a continuous
movement. Push the carriage with the help of the support handle (3).
6. Once you have nished cutting the amount of food desired, place the regulating
control (6) in position “0” and turn o the appliance by putting the switch (7) in the
“OFF” position.
7. When the blade (9) has stopped completely, remove the food.
8. Once you have nished the process, clean the appliance as shown in section
4. Cleaning.
3.2. Assembly and use
04. CLEANING
4.1. Cleaning the machine
1. Turn o the machine by pressing the “OFF” button of Switch (7). Ensure you put
the cut regulator (8) in the position “0” to avoid accidental cutting.
2. Clean both the blade (9) and the carriage (4) and their mechanisms with neutral
soap, to guarantee hygiene and proper conservation of the appliance.
3. Rinse the machine and dry it with a clean cloth.
4.2. Cleaning the blade
1. Wear safety gloves when handling the blade (9).
2. Remove the blade by turning the rear lever that secures the blade to the
appliance.
3. Do not touch the sharp edge.
4. Once it is clean, replace it in the machine using the lever.
WARNING
Never operate the machine when it is submerged or still damp.

14
05. MANTEINANCE AND WARNINGS

English
15
5.2.3. REPLACEMENT PARTS
Only ORIGINAL REPLACEMENT PARTS authorised and approved by Udom S.L.
may be used. We recommend that damaged components or parts be replaced
immediately to guarantee better operation, energy savings and even the prevention
of more serious breakdowns in the device.
5.2.4. STORAGE
It is important to store the meat slicer in a cool, dry place, away from aggressive
chemical products or sources of heat.
5.2.5. REQUEST FOR SUPPORT
Requests for technical support must be made after careful analysis (detection of
breakdowns and possible causes). In the event of a written request, we advise you
specify the following terms: Machine type, Reference number, Detailed descrip-
tion of the fault, Tests you have carried out and Adjustments made and their
eects.
06. SHARPENING THE BLADE
The result of a well sharpened blade (Figure 1.9) is a regular, even slice thickness.
To achieve this, we recommend you sharpen the blade periodically:
1. Ensure the machine is unplugged and the Switch (Figure 1.7) in the “OFF “
position.
2. Clean the blade as shown in point 4.2. Cleaning the blade.
3. Take out the sharpener set and assemble it on the machine. Lubricate the shaft to
guarantee correct t in the assembly holes, following the instructions in point 5.1.4.
Lubricating the sharpener.
4. Observe the assembly position of the sharpener set; if you assemble it the wrong
way, the plate of the sharpener will touch the blade guard, preventing it being
assembled properly.
5. Press the rubber buttons that protrude at the back and front of the set to regulate
the contact the stones make with the blade.
6. Plug the machine in and start the appliance up. Then, press the buttons so the
stones make contact with the blade and let them work for 30 seconds. After this
time, stop the machine and check the blade has been sharpened correctly. If it is not
sharp enough, let it work 5 seconds longer and check it again.
7. Once the blade (Figure 1.9) has been sharpened correctly, remove the sharpe-
ning set from the machine.

16
UDOM S.L. declares that the product with reference 80.22.0 and description “Pro-
fessional meat slicer” complies with the CE mark requirements.
8. Clean the blade again, and remove any metal debris that may have come from
the machine during the process.
9 Keep the sharpening stones clean to ensure they work properly.
10. Wear safety goggles to carry out this operation. You will avoid possible damage
to your eyes due to ying particles while sharpening.
ATTENTION
During the sharpening process incandescent metallic particles will be given o.
Protect your hands and keep the machine away from inammable products while
sharpening.
07. DECLARATION OF CONFORMITY

English
17
PROTECT THE ENVIRONMENT
The symbol for electric and electronic machine waste disposal by domestic users
in the European Union on the product or its packaging indicates that the product
may not be disposed of together with other domestic wastes. If this type of waste
must be disposed of, it is the user ’s responsibility to take it to a collection point
designated for recycling electric and electronic machines. Recycling and separate
collection of these wastes at the time of disposal will help to preserve natural
resources and guarantee that recycling protects the health and the environment. If
you would like further information about the places where these machines can be
taken for recycling, please contact the local authorities in your city, a domestic waste
management service or the store where you purchased the product.
When the machine is disposed of in the future, take it to a
collection point for recycling electronic parts.
To prevent the risk of accidents to children, remove the plug
from the power cable before the machine is recycled, as this is
irreversible.
Also remove parts with sharp edges (blades, etc.) to protect
children.
08. RECYCLING OF ELECTRIC AND
ELECTRONIC
DEVISES

18
01. DESCRIPTION
La machine trancheuse électrique 80.22.0 Elma est conçue pour trancher des ali-
ments avec une coupe précise. Sa conception simplie l’exécution de tranches de
la part de l’utilisateur tout en garantissant un niveau de sécurité avancé. Elle est
composée de matériaux qui se nettoient facilement, elle est très robuste et durera
longtemps.
De par ses prestations techniques, elle est recommandée pour un usage intensif
dans les hôtels, les restaurants ou chez soi.
1.1. Caractéristiques techniques
02. AVANT LA MISE EN ROUTE
- Lisez attentivement cette feuille d’instructions à chaque utilisation de la machine.
- Conservez cette feuille d’instructions pour la consulter à l’avenir.
- Vériez que la machine se trouve dans de bonnes conditions, en faisant
particulièrement attention aux parties détachables. Si vous détectez une anomalie
quelconque, contactez le revendeur où vous avez acheté le produit.
- Avant de brancher la machine au réseau électrique, vériez que le voltage indiqué
correspond au voltage du réseau électrique local.
- Vériez que la lame de la machine tourne dans le sens indiqué par la èche de
rotation. Si le sens de rotation s’avère incorrect, contactez le revendeur où vous
avez acheté le produit.
- Ne laissez jamais l’appareil sans surveillance lorsqu’il est branché.
-Débranchez l’appareil après chaque utilisation. Pour cela, retirez la che ou le
connecteur. De cette manière, vous éviterez d’endommager le câble électrique.
- Conservez l’appareil hors de portée des enfants.
- Ne jamais plonger la machine dans de l’eau ou d’autres liquides. Eectuer cette
opération vous expose à un danger de mort par électrocution.
Machine transcheuse électrique
80.22.0
Voltage 220-230 V
Fréquence 50-60 Hz
Puissance 120 W
Épaisseur de coupe variable 0 – 12 mm
Diamètre de la lame 220 mm
Poids 15.2 Kg
Dimensions 52x47x39 cm
2.1. Conseils généraux

19
Français
2.2. Conseils pour son utilisation
- Garder les mains ou tout autre partie du corps éloignées de la lame ainsi que des
autres parties mobiles de la machine.
- N’utilisez pas la machine si le câble ou la prise sont endommagés ou si vous
remarquez une anomalie quelconque. Le cas échéant, contactez le revendeur où
vous avez acheté le produit.
- En cas de mauvais fonctionnement de la machine ou en cas d’urgence, éteignez
l’interrupteur et débranchez la machine.
- Éteignez l’appareil par l’intermédiaire de l’interrupteur et débranchez-le lorsque
vous ne l’utilisez pas.
- Vériez régulièrement le degré d’aûtage de la lame circulaire de l’appareil, ainsi
que le glissement du chariot.
RAPPEL
FONCTION DE LA MACHINE TRANCHEUSE ÉLECTRIQUE
Cet appareil est conçu pour trancher la viande, la charcuterie, les fromages, entre
autre aliments. Les usages autres que ceux indiqués par le fabricant ne sont
pas autorisés.
CONDITIONS D’INSTALLATION
La machine doit être installée sur une surface de travail stable et ferme, d’une
résistance susante pour supporter le poids de la machine et de l’aliment à traiter.

20
03. MODE D’EMPLOI
Le produit que vous avez acheté comporte les éléments suivants:
1. Aloir
2. Sécurité de la lame
3. Poignée de support
4. Support de chariot
5. Bras de maintien
6. Pommeau de régulation
7. Interrupteur ON/OFF
8. Plateau de coupe réglable
9. Lame
3.1. Ensemble de la trancheuse électrique
Figure 1.
4
7
6
8
3
5
2
1
9
A página está carregando...
A página está carregando...
A página está carregando...
A página está carregando...
A página está carregando...
A página está carregando...
A página está carregando...
A página está carregando...
A página está carregando...
A página está carregando...
A página está carregando...
A página está carregando...
A página está carregando...
A página está carregando...
A página está carregando...
A página está carregando...
A página está carregando...
A página está carregando...
A página está carregando...
A página está carregando...
-
 1
1
-
 2
2
-
 3
3
-
 4
4
-
 5
5
-
 6
6
-
 7
7
-
 8
8
-
 9
9
-
 10
10
-
 11
11
-
 12
12
-
 13
13
-
 14
14
-
 15
15
-
 16
16
-
 17
17
-
 18
18
-
 19
19
-
 20
20
-
 21
21
-
 22
22
-
 23
23
-
 24
24
-
 25
25
-
 26
26
-
 27
27
-
 28
28
-
 29
29
-
 30
30
-
 31
31
-
 32
32
-
 33
33
-
 34
34
-
 35
35
-
 36
36
-
 37
37
-
 38
38
-
 39
39
-
 40
40


Elma profesional Ø 220 mm Manual do proprietário
- Categoria
- Fatiadores
- Tipo
- Manual do proprietário
em outras línguas
Artigos relacionados
-
 Elma CFD 250 XL Manual do proprietário
-
 Elma premium Ø 220 mm Manual do proprietário
-
 Elma doméstica Ø 190 mm Manual do proprietário
-
 Elma CFD 220 XL Manual do usuário
-
 Elma Cortadora de Fiambres Premium con Dos Cuchillas Ø 220 mm Manual do proprietário
-
 Elma Nº 22 Aries Revolution 1.0 Manual do proprietário
-
 Elma Serie RED c/válvula de aire 8 Kg vertical Manual do proprietário


Outros documentos
-
Berkel RSEGS0U00000N Manual do proprietário
-
Berkel P15-0000FR Guia de usuario
-
Sammic GAE-350 Manual do usuário
-
Berkel HSBGS0U000000 Guia de usuario
-
-
AEG USR400 Manual do usuário
-
Weston 83-0850-W Guia de usuario
-
 Centerline EDGE Slicer Manual do usuário
-
Fagor CF-200 Manual do proprietário
-
ARIETE SL2060 Instruções de operação
