A página está carregando...
A página está carregando...
A página está carregando...
A página está carregando...

Video Kit
5
•
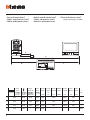
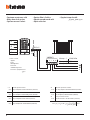
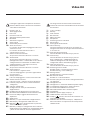
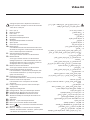
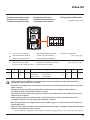
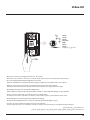
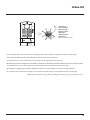
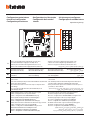
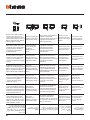
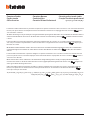
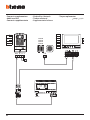
Schema monofamigliare (366711)
•
One-family diagram (366711)
•
Schéma mono-familial (366711)
•
Schema Einfamilienhaus (366711)
•
Esquema monofamiliar (366711)
•
Schema eensgezins (366711)
•
Esquema monofamiliar (366711)
)366711
BUS
PL S+
S-
PS
BUS TK
BUS PI
346830
BUS 2 1
230 Vac
IP30
PRI
PRI 230 V~ 50 - 60 Hz 260 mA
346000
}
BUS
2 - 1
27V 1,2A
CEBEC
N
N
F
N
= –
= –
T = –
S = –
P
= –
–
=
A
ON
OFF
P
= –
= –
= –
= –
M
J2
J1
N
= –
= –
BUS
B
• A Pulsante apertura serratura.
B Chiamata al piano.
S+ S- 18 V; 4 A impulsivi. 250 mA mantenimento (30 max).
• A Door lock pushbutton.
B Floor call.
S+ S- 18 V; 4 A impulsive. 250 mA holding current (30 max).
• A Poussoir d’ouverture serrure.
B Appel à l’étage.
S+ S- 18 V; 4 A impulsifs. 250 mA entretien (30 max).
• A Schalter Türöffner.
B Etagenruf.
S+ S- 18 V; 4 A impulsstrom. 250 mA Haltestrom (30 max).
• A Pulsador de apertura de cerradura.
B Llamada al piso.
S+ S- 18 V; 4 A por impulsos. 250 mA mantenimiento (30 max).
• A Drukknop opening.
B Oproep aan verdieping.
S+ S- 18 V; 4 A impulsief; 250 mA onderhoud (30 max).
• A Botão para abertura do trinco.
B Chamada ao piso.
S+ S- 18 V; 4 A instantâneos. 250 mA continuos (30 max).
A •
B
250418
30
S+ S

6
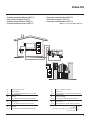
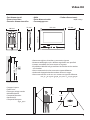
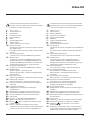
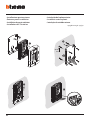
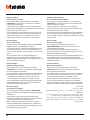
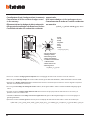
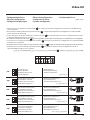
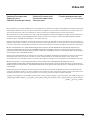
• Schema bifamigliare 1 (366721)
• Two-family diagram 1 (366721)
• Schéma bi-familiale 1 (366721)
• Schema Zweifamilienhaus 1 (366721)
• Esquema bifamiliar 1 (366721)
• Schema tweegezins 1 (366721)
• Esquema bifamiliar 1 (366721)
)3667211
BUS
PL S+
S-
PS
BUS TK
BUS PI
346830
BUS 2 1
230 Vac
IP30
PRI
PRI 230 V~ 50 - 60 Hz 260 mA
346000
}
BUS
2 - 1
27V 1,2A
CEBEC
N
N
F
A
N
= –
= –
T = –
S = –
P
= –
–
=
ON
OFF
ON
OFF
BUS
B
BUS
B
P
= –
= –
= –
= –
M
J2
J1
N
= –
= *1
P
= –
= –
= –
= –
M
J2
J1
N
= –
= –
* • Inserire il configuratore fornito a corredo.
• Connect the configurator supplied as standard.
• Mettre en place le configurateur fourni à cet effet.
• Den mitgelieferten Konfigurator einsetzen.
• Inserte el configurador suministrado.
• Breng de standaard geleverde configurator aan.
• Inserir o configurador fornecido no equipamento base.
• Inserire il configuratore fornito a crredo.
• A Pulsante apertura serratura.
B Chiamata al piano.
S+ S- 18 V; 4 A impulsivi. 250 mA mantenimento (30 max).
• A Door lock pushbutton.
B Floor call.
S+ S- 18 V; 4 A impulsive. 250 mA holding current (30 max).
• A Poussoir d’ouverture serrure.
B Appel à l’étage.
S+ S- 18 V; 4 A impulsifs. 250 mA entretien (30 max).
• A Schalter Türöffner.
B Etagenruf.
S+ S- 18 V; 4 A impulsstrom. 250 mA Haltestrom (30 max).
• A Pulsador de apertura de cerradura.
B Llamada al piso.
S+ S- 18 V; 4 A por impulsos. 250 mA mantenimiento (30 max).
• A Drukknop opening.
B Oproep aan verdieping.
S+ S- 18 V; 4 A impulsief; 250 mA onderhoud (30 max).
• A Botão para abertura do trinco.
B Chamada ao piso.
S+ S- 18 V; 4 A instantâneos. 250 mA continuos (30 max).
A •
B
250418
30
S+ S

Video Kit
7
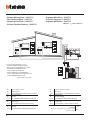
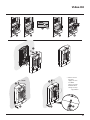
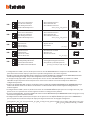
• Schema bifamigliare 2 (366721)
• Two-family diagram 2 (366721)
• Schéma bi-familiale 2 (366721)
•
Schema Zweifamilienhaus 2 (366721)
• Esquema bifamiliar 2 (366721)
• Schema tweegezins 2 (366721)
• Esquema bifamiliar 2 (366721)
)3667212
BUS
PL S+
S-
PS
BUS TK
BUS PI
346830
BUS 2 1
230 Vac
IP30
PRI
PRI 230 V~ 50 - 60 Hz 260 mA
346000
}
BUS
2 - 1
27V 1,2A
CEBEC
N
N
F
A
N
= –
= –
T = –
S = –
P
= –
=
ON
OFF
ON
OFF
BUS
B
BUS
B
P
= –
= –
= –
= –
M
J2
J1
N
= –
= *1
P
= –
= –
= –
= –
M
J2
J1
N
= –
= –
* • Inserire il configuratore fornito a corredo.
• Connect the configurator supplied as standard.
• Mettre en place le configurateur fourni à cet effet.
• Den mitgelieferten Konfigurator einsetzen.
• Inserte el configurador suministrado.
• Breng de standaard geleverde configurator aan.
• Inserir o configurador fornecido no equipamento base.
• Inserire il configuratore fornito a corredo.

8
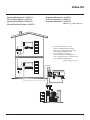
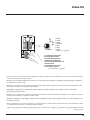
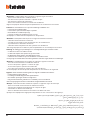
• Opzione serratura a relè
• Relay door lock option
• Option serrure à relais
• Option Relais-Schloss
• Opción cerradura de relé
• Optie relaisslot
• Opção trinco de relê
BUS
PL S+
S-
A
N
= –
= –
T = –
S = –
P
= –
–
=
8 A cosφ = 1
4 A cosφ = 0,7
3 A cosφ = 0,4
24 Vdc; 24 Vac
24 Vac
24 Vac
NO
NC
C
346250 (*)
S-
S+
C
NC
NO
* • Fornito a corredo.
• Supplied.
• Fourni.
• Wird mitgeliefert.
• En dotación.
• Standaard meegeleverd.
• Fornecido no equipamento base.
• A Pulsante apertura serratura.
S+ S- 18 V; 4 A impulsivi. 250 mA mantenimento (30 max).
• A Door lock pushbutton.
S+ S- 18 V; 4 A impulsive. 250 mA holding current (30 max).
• A Poussoir d’ouverture serrure.
S+ S- 18 V; 4 A impulsifs. 250 mA entretien (30 max).
• A Schalter Türöffner.
S+ S- 18 V; 4 A impulsstrom. 250 mA Haltestrom (30 max).
• A Pulsador de apertura de cerradura.
S+ S- 18 V; 4 A por impulsos. 250 mA mantenimiento (30 max).
• A Drukknop opening.
S+ S- 18 V; 4 A impulsief; 250 mA onderhoud (30 max).
• A Botão para abertura do trinco.
S+ S- 18 V; 4 A instantâneos. 250 mA continuos (30 max).
A •
250418
30
S+ S
A página está carregando...

10
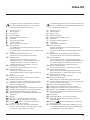
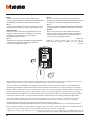
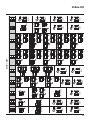
1 - Activação/desactivação do sinal de confirmação da
abertura da fechadura.
2 - Regulação do volume (veja as próxima página).
3 - Indicadores luminosos verde: indicação de porta aberta.
4 - Indicadores luminosos verde: comunicação activa.
5 - Indicador luminoso lampejante Verde: chamada enviada;
Indicador luminoso lampejante Vermelho: sistema cupado.
6 - Alojamento configurador.
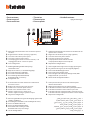
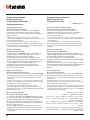
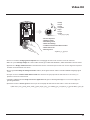
• Posto esterno
• Entrance panel
• Poste extérieur
• Türstation
• Placa exterior
• Externe plaats
• Unidade externa
1 - Habilitación/deshabilitación del tono de confirmación de
apertura de la cerradura.
2 - Regulación del volumen (véase la pág. siguiente).
3 - Led verde: indicación puerta abierta.
4 - Led verde: comunicación activada.
5 - Led parpadenate Verde: llamada enviada;
Led parpadenate Rojo: sistema ocupado.
6 - Alojamiento configuradores.
1 - Enabling/disabling of door lock opening
confirmation tone.
2 - Adjustment volume (see the following page).
3 - Green LED: door open indication.
4 - Green LED: communication active.
5 - Green flashing LED; call forwarded;
Red flashing LED: system busy.
6 - Configurator seat.
1 - Abilitazione/disabilitazione tono conferma apertura
serratura.
2 - Regolazione del volume (vedi pag. seguente).
3 - Led verde: indicazione porta aperta.
4 - Led verde: comunicazione attiva.
5 - Led lampeggiante Verde: chiamata inoltrata; Led
lampeggiante Rosso: sistema occupato.
6 - Sede configuratori.
1 - Aktivierung/Deaktivierung des Bestätigungssignals nach
erfolgter Türöffnung.
2 - Einstellung der Lautstärke (siehe nachfolgende Seiten).
3 - Grüne Led: Meldet offene Tür.
4 - Grüne Led: Kommunikation aktiv.
5 - Grüne blinkende Led: Ruf gesendet;
Rote blinkende Led: System belegt.
6 - Sitz der Konfiguratoren.
1 - Activation/désactivation tonalité de confirmation
ouverture serrure.
2 - Réglage du volume (voir page suivante).
3 - Diode verte: indication porte ouverte.
4 - Diode verte: communication active.
5 - Témoin clignotant vert - appel passé;
Témoin clignotant rouge: système occupé.
6 - Logement configurateurs.
1 - Activering/desactivering toon bevestiging opening slot.
2 - De geluidssterkte regelen (zie de volgende pagina’s).
3 - Groene led: aanduiding open deur.
4 - Groene led: communicatie actief.
5 - Groene knipperende led: oproep doorgestuurd; Rode
knipperende led: systeem bezet.
6 - Plaats van de configuratiemodules.
ON OFF
3
4
5
1
6
2
1
2
3
4
5
6
A página está carregando...

12
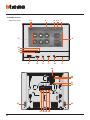
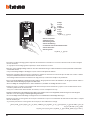
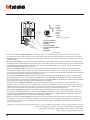
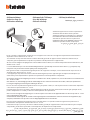
• Posto interno
• Handset
18
21
22
2323
19
20
24252627
1 2 3 4 5 7 6
16
15
14
17
91011
12
139
8
A página está carregando...
A página está carregando...
A página está carregando...
A página está carregando...
A página está carregando...

18
• Unidade interna
18
21
22
2323
19
20
24252627
1 2 3 4 5 7 6
16
15
14
17
91011
12
139
8

Video Kit
19
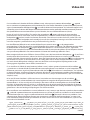
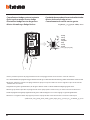
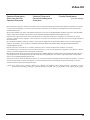
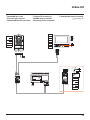
A imagem representa o dispositivo com todas as
funções ativadas. Verifique no manual do instalador
como ativar as funções
1 -
Ecrã 7” (16 : 9)
2 -
Botão de desligar
3 -
Data e hora
4 -
Exclusão da campainha
5 -
Ativação do Estúdio profissional
6 -
Microfone
7 -
Ativação do Respondedor de chamada
8 -
Ações rápidas
9 -
Guias táteis para não videntes
10 -
Botão de ligar:
o acendimento do led verde intermitente indica uma
chamada em chegada o acendimento do led verde fixo
indica a comunicação em andamento
11 -
Autoacendimento e Ciclamento:
ao carregar no botão acende-se o LED vermelho
12 -
Botão Preferido:
ao carregar no botão acende-se o LED vermelho
(Configuração básica = LUZ DAS ESCADAS. Para uma
configuração diferente, roga-se consultar a tabela da
configuração física nas próximas páginas.)
13 -
Botão de abertura da fechadura:
ao carregar no botão acende-se o LED vermelho
14 -
Estado do Respondedor de chamada:
Led vermelho fixo = respondedor de chamadas ativo
Led vermelho intermitente = presença de gravação
(ções) não visionada (s)
15 -
Estado de presença de notas:
Led vermelho intermitente = nova (s) nota (s) não lida (s)
16 -
Estado de exclusão da campainha:
Led vermelho aceso = Campainha de chamada
desativada
17 -
Funções (aparecem apenas os ícones das funções
configuradas)
18 -
Alojamento configurador
19 -
Configurador J1: extrai para alimentação adicional
20 -
Configurador J2: Master/Slave, extrai para Slave
21 -
Microinterruptor ON/OFF de término de trecho
22 -
Tomada mini USB para atualização do Firmware do
dispositivo
23 -
Altifalante
24 -
Bornes (1 - 2) para alimentação adicional
25 -
Bornes para a conexão ao BUS SCS DE 2 FIOS
26 -
Bornes ( ) para a conexão de um botão externo de
chamada no piso
27 -
Bornes (1 - 5M) para a conexão de uma campainha
adicional. Você deverá fazer a conexão – ponto a ponto
- nos bornes das campainhas adicionais
)91671
2
3
4
5
6
7
8
9
10
11
12
13
14
15
16
17
18
J119
J220
21
22
23
2124
25
26
5M127

20
• Installazione posto esterno
• Entrance panel installation
•
Installation du poste extérieur
• Installation der Türstation
•
Instalación de la placa exterior
• Installatie externe plaats
•
Instalação da unidade externa
2
1
3
Ø 5 mm
max
4
5
6
A página está carregando...
A página está carregando...
A página está carregando...

24
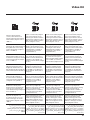
• Programmazione Badge
• Badge programming
• Programmation des badges
• Badge programmieren
• Programación de credenciales
• Badge Programmeren
•
Programação do Crachá
• Badge gestore impianto
Nuovo badge gestore impianto
Per motivi di sicurezza è previsto un badge “Gestore“
programmato direttamente dall’installatore, tramite il
quale è possibile l’accesso alla programmazione degli altri
badge (residenti).
Il posto esterno segnalerà l’avvenuta accettazione o
cancellazione del badge con segnali acustici e visivi dei led
presenti sul posto esterno.
La presentazione di un badge non riconosciuto o un
errore di programmazione, comporta l’interruzione della
programmazione, la segnalazione tramite un beep lungo e
l’accensione LED rosso di occupato.
• Manager master badge
New manager master badge
For safety reasons, a “MASTER” badge is required, directly
programmed by the installer, providing access to the
programming of the other badges (residents).
The entrance panel will notify that the badge has been
accepted or deleted by means of sound notifications, as well
as visual indications using the LEDs on the entrance panel.
The presentation of an unrecognised badge, or a
programming error, will cause the interruption of the
programming procedure, and an extended beep; the red
“busy” LED will also come on.
• Badge master de gestion
Nouveau badge master de gestion
Pour des raisons de sécurité, est prévu un badge “MASTER“
programmé directement par l’installateur, à travers lequel,
il est possible d’accéder à la programmation des autres
(résidents).
Le poste externe signale l’acceptation ou l’élimination du
badge par des signaux sonores et visuels et par l’allumage
des leds présents sur le poste externe.
La présentation d’un badge non reconnu ou une
erreur de programmation provoque l’interruption de la
programmation, l’émission d’un bip prolongé et l’allumage
du LED rouge occupé.
• Master-Verwaltungs-Badge
Neuer Master-Verwaltungs-Badge
Aus Sicherheitsgründen ist ein „MASTER“-Badge vorgesehen,
der direkt vom Installateur programmiert wird. Damit können
die anderen Badges (Bewohner) programmiert werden.
Die Türstation meldet die erfolgte Annahme oder Löschung
des Badges durch akustische und visuelle Led-Signale, die an
derselben vorgesehen sind.
Wenn ein Badge nicht erkannt wird oder ein Fehler bei der
Programmierung aufgetreten ist, wird letztere unterbrochen
und ein langer Piepton erzeugt sowie die rote LED (belegt)
eingeschaltet.
• Credencial maestra de administrador
Nueva credencial maestra de administrador
Por razones de seguridad se prevé una credencial
“maestra” programada directamente por el instalador
mediante la cual es posible programar las demás
credenciales (residentes).
La placa exterior indicará si acepta o cancela unacredencial
con unaseñal acústica y visual de los leds incorporados en
la placa exterior.
La presentación de una credencial no reconocida o un
error de programación interrumpe la programación, que
se señala con un bip largo y la iluminación del LED rojo
ocupado.
• Badge master beheerder
Nieuwe master beheerder badge
Wegens veiligheidsredenen wordt door de installateur een
“Master” badge geprogrammeerd die de programmering van
de andere badges (inwoners) mogelijk maakt.
Het externe punt geeft met behulp van geluids- en
lichtsignalen van de leds op het externe punt aan of de badge
geaccepteerd of gewist is.
Door de presentatie van een niet-herkende badge of een fout
in de programmering wordt de programmering onderbroken,
hoort u een lange pieptoon en gaat de rode Led bezet
branden.
• Crachá master gestor
Novo crachá master gestor
Por razões de segurança é previsto um crachá “MASTER“,
programado directamente pelo instalador, por meio do
qual é possível o acesso à programação dos outros crachás
(residentes).
A unidade externa sinalizará a ocorrida aceitação ou
cancelamento do crachá com sinais acústicos e visuais dos
led presentes na unidade externa.
A apresentação de um crachá não reconhecido ou um erro
de programação, comporta a interrupção da programação,
a sinalização por meio de um beep longo e o acendimento
do LED vermelho de ocupado.

Video Kit
25
• Tenere premuto il pulsante di programmazione fino al lampeggio del LED verde serratura e tono di conferma.
• Press and hold down the programming pushbutton until the green door lock LED starts flashing, and a confirmation sound is heard.
•
Maintenir enfoncée la touche de programmation jusqu’à ce que le LED vert serrure clignote et que la tonalité de
confirmation soit émise.
• Programmierungstaste gedrückt halten, bis die grüne LED des Schlosses blinkt und das Bestätigungssignal ertönt.
• Mantenga apretado el pulsador de programación hasta que parpadea el LED verde y se emite el tono de confirmación.
• Houd de programmeringsknop ingedrukt tot de groene LED slot knippert en u ter bevestiging een geluidssignaal hoort.
• Mantenha carregado o botão de programação até o lampejo do LED verde da fechadura e o tom de confirmação.
•
1 beep
1 beep
1 beep
1 Piepton
1 bip
1 beep
1 beep
≥ 5s
A página está carregando...
A página está carregando...

28
• Cancellazione badge gestore impianto
• Deleting the manager master badge
• Élimination badge master de gestion
• Master-Verwaltungs-Badge löschen
• Cancelación de una credencial maestra de administrador
• Master beheerder badge wissen
• Cancelamento de crachá master gestor
≥ 5s
1 beep
1 beep
1 beep
1 Piepton
1 bip
1 beep
1 beep
• Tenere premuto il pulsante di programmazione fino al lampeggio del LED verde serratura e tono di conferma.
• Press and hold down the programming pushbutton until the green door lock LED starts flashing, and a confirmation sound is heard.
•
Maintenir enfoncée la touche de programmation jusqu’à ce que le LED vert serrure clignote et que la tonalité de
confirmation soit émise.
• Programmierungstaste gedrückt halten, bis die grüne LED des Schlosses blinkt und das Bestätigungssignal ertönt.
• Mantenga apretado el pulsador de programación hasta que parpadea el LED verde y se emite el tono de confirmación.
• Houd de programmeringsknop ingedrukt tot de groene LED slot knippert en u ter bevestiging een geluidssignaal hoort.
• Mantenha carregado o botão de programação até o lampejo do LED verde da fechadura e o tom de confirmação.
•
A página está carregando...

30
• Badge residente
Nuovo badge residente
Per accedere alla programmazione di un badge
“RESIDENTE” è necessario essere in possesso di un
badge gestore impianto.
Il posto esterno segnalerà l’avvenuta accettazione o
cancellazione del badge con segnali acustici e visivi dei
led presenti sul posto esterno.
La presentazione di un badge non riconosciuto o un
errore di programmazione, comporta l’interruzione
della programmazione, la segnalazione tramite un
beep lungo e l’accensione LED rosso di occupato.
• Resident badge
New resident badge
In order to access to the programming of a “RESIDENT”
badge, a system manager badge is required.
The entrance panel will notify that the badge has been
accepted or deleted by means of sound notifications, as
well as visual indications using the LEDs on the entrance
panel.
The presentation of an unrecognised badge, or a
programming error, will cause the interruption of the
programming procedure, and an extended beep; the red
“busy” LED will also come on.
• Badge résident
Nouveau badge résident
Pour accéder à la programmation d’un badge
“RÉSIDENT”, il est nécessaire de disposer d’un badge
master de gestion installation.
Le poste externe signale l’acceptation ou l’élimination
du badge par des signaux sonores et visuels et par
l’allumage des leds présents sur le poste externe.
La présentation d’un badge non reconnu ou une
erreur de programmation provoque l’interruption de
la programmation, l’émission d’un bip prolongé et
l’allumage du LED rouge occupé.
• Bewohner-Badge
Neuer Bewohner-Badge
Um die Programmierung eines Badges „BEWOHNER“
abrufen zu können, ist das Badge des Anlagenbetreibers
erforderlich.
Die Türstation meldet die erfolgte Annahme oder
Löschung des Badges durch akustische und visuelle Led-
Signale, die an derselben vorgesehen sind.
Wenn ein Badge nicht erkannt wird oder ein Fehler
bei der Programmierung aufgetreten ist, wird letztere
unterbrochen und ein langer Piepton erzeugt sowie die
rote LED (belegt) eingeschaltet.
• Credencial de residente
Nueva credencial de residente
Para ingresar a la programación de una credencial
“RESIDENTE”, es necesario poseer una credencial de
administrador del sistema.
La placa exterior indicarási acepta o cancelala
credencial con una señal acústica y visual de los leds
incorporadosen la placa exterior.
La presentación de una credencial no reconocida o un
error de programación interrumpe la programación,
que se señala con un bip largo y la iluminación del LED
rojo ocupado.
• Inwoner badge
Nieuwe inwoner badge
Voor toegang tot de programmering van een
“INWONERBADGE” moet u in het bezit zijn van een
installatiebeheerder badge.
Het externe punt geeft met behulp van geluids- en
lichtsignalen van de leds op het externe punt aan of de
badge geaccepteerd of gewist is.
Door de presentatie van een niet-herkende badge of een
fout in de programmering wordt de programmering
onderbroken, hoort u een lange pieptoon en gaat de rode
Led bezet branden.
• Crachá residente
Novo crachá residente
Para ter acesso à programação de um crachá
“RESIDENTE” é necessário estar em posse de um
crachá gestor da instalação.
A unidade externa sinalizará que interveio a aceitação
ou o cancelamento do crachá com sinais acústicos e
visuais dos leds presentes na unidade externa.
A apresentação de um crachá não reconhecido ou
um erro de programação, comporta a interrupção
da programação, a sinalização por meio de um beep
longo e o acendimento do LED vermelho de ocupado.

Video Kit
31
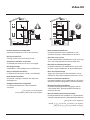
• Avvicinare al lettore il badge gestore impianto fino al lampeggio del LED verde serratura e tono di conferma.
• Move the system manager badge close to the reader until the green door lock LED flashes, and a confirmation sound is heard.
•
Approcher le Badge administrateur installation du lecteur et attendre que le LED vert serrure clignote et qu’une
tonalité de confirmation soit émise.
• Dem Lesegerät das Badge des Anlagenbetreibers nähern, bis die grüne LED des Schlosses blinkt und das Bestätigungssignal
ertönt.
• Acerque al lector la credencial del administrador del sistema hasta que parpadea el LED verde de la cerradura y se
produzca el tono de confirmación.
• Houd de installatiebeheerder badge voor het leesapparaat tot de groene LED slot gaat knipperen en u ter bevestiging een
geluidssignaal hoort.
• Aproxime ao leitor o Crachá gestor da instalação até o lampejo do LED verde da fechadura e o tom de confirmação.
•
1 beep
1 beeps
1 beep
1 Pieptöne
1 bips
1 beep
1 beep
• Gestore impianto
• Manager master
• Master de gestion
• Master Verwaltung
• Credencial maestra de administrador
• Master beheerder
• Master gesto
r
A página está carregando...
A página está carregando...
34
• Cancellazione di tutti i badge residenti in memoria
• Cancellation of all the residents badges saved
in the memory
• Effacement de tous les badges résidents mémorisés
• Alle gespeicherten Badges der Bewohner löschen
• Cancelación de todas las credenciales residentes
memorizadas
• Alle inwonerbadges uit het geheugen wissen
• Cancelamento de todos os crachás residentes
na memória
1 beep
1 beeps
1 beep
1 Pieptöne
1 bips
1 beep
1 beep
• Gestore impianto
• Manager master
• Master de gestion
• Master Verwaltung
• Credencial maestra de
administrador
• Master beheerder
• Master gesto
r
• Avvicinare al lettore il badge gestore impianto fino al lampeggio del LED verde serratura e tono di conferma.
• Move the system manager badge close to the reader until the green door lock LED flashes, and a confirmation sound is heard.
•
Approcher le Badge administrateur installation du lecteur et attendre que le LED vert serrure clignote et qu’une
tonalité de confirmation soit émise.
• Dem Lesegerät das Badge des Anlagenbetreibers nähern, bis die grüne LED des Schlosses blinkt und das Bestätigungssignal
ertönt.
• Acerque al lector la credencial del administrador del sistema hasta que parpadea el LED verde de la cerradura y se
produzca el tono de confirmación.
• Houd de installatiebeheerder badge voor het leesapparaat tot de groene LED slot gaat knipperen en u ter bevestiging een
geluidssignaal hoort.
• Aproxime ao leitor o Crachá gestor da instalação até o lampejo do LED verde da fechadura e o tom de confirmação.
•
A página está carregando...

36
• Reset
Nel caso si avesse la necessità di cancellare tutti i
badge (gestore impianto e residenti) precedentemente
memorizzati è possibile resettare il posto esterno.
• Reset
In order to cancel all the previously saved badges (system
manager and residents) the entrance panel can be reset.
• Réinitialisation
Dans le cas où il serait nécessaire d’éliminer tous les
badges (master de gestion installation et résidents)
précédemment mémorisés, il est possible de
réinitialiser le poste externe.
• Reset
Falls alle zuvor gespeicherten Badges (Anlagenbetreiber
und Bewohner) gelöscht werden sollen, kann die
Türstation zurückgestellt werden.
• Reset
En caso de que fuera necesario cancelar todas las
credenciales memorizadas(administrador del sistema y
residentes), es posible restablecer la placa exterior.
• Reset
U kunt alle badges (installatiebeheerder en inwonerbadges)
uit het geheugen wissen door het externe punt te resetten.
• Rearme
No caso que houvesse a necessidade de cancelar
todos os crachás (gestor da instalação e residentes),
memorizados anteriormente, será possível fazer o
rearme (reset) da unidade externa.
ON
ON
OFF
OFF
•
Togliere il BUS; tenendo premuto il pulsante di programmazione, ridare alimentazione. Mantenere premuto il pulsante di
programmazione fino all’accensione alternata dei LED serratura e connessione + beep lungo.
•
Remove the BUS; press and hold down the programming pushbutton, reconnect the power supply. Press and hold down the
programming pushbutton until the door lock and the connection LEDs start flashing in succession; a long beep is also heard.
•
Retirer le BUS ; rétablir l’alimentation en maintenant enfoncée la touche de programmation. Maintenir enfoncée la
touche de programmation jusqu’à ce que les LEDs serrure et connexion clignotent alternativement + bip long.
•
Den BUS abtrennen, die Programmierungstaste gedrückt halten und wieder Strom geben. Die Programmierungstaste gedrückt
halten, bis die LEDs des Schlosses und der Verbindung abwechselnd aufleuchten und ein langes Bestätigungssignal ertönt.
•
Desconecte el BUS, mantenga apretado el pulsador de programación y vuelva a conectar la alimentación. Mantenga
apretado el pulsador de programaciónhasta el encendido alternado de los LEDS cerradura y conexión + bip largo.
•
Verwijder de BUS, houd de programmeringsknop ingedrukt en heractiveer de voeding.
Houd de programmeringsknop ingedrukt tot de led slot en de LED verbinding gaan knipperen en u een lange pieptoon hoort.
•
Remova o BUS; mantendo carregado o botão de programação, volte a ligar a alimentação. Mantenha carregado o botão de
programação até o acendimento alternado dos LED da fechadura e da conexão + beep longo.
A página está carregando...
A página está carregando...

Video Kit
39
• Configurazione fisica
• Physical configuration
• Configuration physique
• Physische Konfiguration
• Configuración física
• Fysieke configuratie
• Configuração física
• Le funzioni che puoi attribure al tasto Preferiti ( ) in modo fisico (tramite configuratore inserito nella sede MM-(unità))
sono le seguenti:
• The functions that can be attributed to the Preferred key (
) using the physical procedure (configurator inserted in the MM -
(units) socket) are the following:
• Les fonctions qu’il est possible d’attribuer à la touche Favoris (
) en mode physique (à travers le configurateur placé dans
le logement MM-(unité) sont les suivantes :
• Die Funktionen, die der Taste Favoriten (
) physisch zugeordnet werden können (Konfigurator im Sitz MM-(Einheit)) sind folgende:
• Las funciones a las que puede atribuir la tecla Favoritos (
) físicamente (mediante un configurador en el alojamiento MM-
(unidad)) son las siguientes:
• De volgende functies kunnen op fysieke wijze aan de toets Favorieten (
) worden toegekend (met de configuratie in MM-(eenheden)):
• As funções que você pode atribuir ao botão Preferidos (
) em modo físico (por meio de configurador inserido no
alojamento MM [unidade]) são as seguintes:
MM
MM =
0
• Comando Luce Scale
• Staircase Light Control
• Commande Lumières Escaliers
• Steuerung Treppenlicht
• Mando Luz Escaleras
• Bediening traphuisverlichting
• Comando da Luz das Escadas
•
MM =
1
• Comando diretto Serratura del P+1
• Direct control of P+1 Door lock
• Commande directe Serrure du P+1
• Direkte Schlosssteuerung der P+1
• Mando directo Cerradura del P+1
• Directe bediening slot P+1
• Comando direto da Fechadura do P+1
P+1
•
P
+1
MOD=9
P
+1
P
+2
MOD=9
P
+2
P
+1
MOD=5
P
+1
P
+1
2
3
1 32
346210
1
P
+2
MOD=5
P
+2
P
+2
2
3
1 32
346210
1
P
+3
MOD=5
P
+3
P
+3
2
3
1 32
346210
1
P
+3
MOD=9
P
+3
MM =
2
• Comando diretto Serratura del P+2
• Direct control of P+2 Door lock
• Commande directe Serrure du P+2
• Direkte Schlosssteuerung der P+2
• Mando directo Cerradura del P+2
• Directe bediening slot P+2
• Comando direto da Fechadura do P+2
P+2
•
P
+1
MOD=9
P
+1
P
+2
MOD=9
P
+2
P
+1
MOD=5
P
+1
P
+1
2
3
1 32
346210
1
P
+2
MOD=5
P
+2
P
+2
2
3
1 32
346210
1
P
+3
MOD=5
P
+3
P
+3
2
3
1 32
346210
1
P
+3
MOD=9
P
+3
MM =
3
• Comando diretto Serratura del P+3
• Direct control of P+3 Door lock
• Commande directe Serrure du P+3
• Direkte Schlosssteuerung der P+3
• Mando directo Cerradura del P+3
• Directe bediening slot P+3
• Comando direto da Fechadura do P+3
P+3
•
P
+1
MOD=9
P
+1
P
+2
MOD=9
P
+2
P
+1
MOD=5
P
+1
P
+1
2
3
1 32
346210
1
P
+2
MOD=5
P
+2
P
+2
2
3
1 32
346210
1
P
+3
MOD=5
P
+3
P
+3
2
3
1 32
346210
1
P
+3
MOD=9
P
+3
MM =
4
• Autoaccensione diretta del P+1
• P+1 direct auto-switching on
• Auto-allumage direct du P+1
• Direkte Selbstschaltung der P+1
• Autoencendido directo del P+1
• Directe automatische P+1
• Autoacendimento direto do P+1
P+1
•
P
+1
MOD=9
P
+1
P
2
3
1 32
346210
1
P
+2
MOD=9
P
+2
2
3
1 32
346210
1
P
+3
MOD=9
P
+3
2
3
1 32
346210
1
J1 J2 N
P M

40
MM =
5
• Autoaccensione diretta del P+2
• P+2 direct auto-switching on
• Auto-allumage direct du P+2
• Direkte Selbstschaltung der P+2
• Autoencendido directo del P+2
• Directe automatische P+2
• Autoacendimento direto do P+2
P+2
•
P
+1
MOD=9
P
+1
P
2
3
1 32
346210
1
P
+2
MOD=9
P
+2
2
3
1 32
346210
1
P
+3
MOD=9
P
+3
2
3
1 32
346210
1
MM =
6
• Autoaccensione diretta del P+3
• P+3 direct auto-switching on
• Auto-allumage direct du P+3
• Direkte Selbstschaltung der P+3
• Autoencendido directo del P+3
• Directe automatische P+3
• Autoacendimento direto do P+3
P+3
•
P
+1
MOD=9
P
+1
P
2
3
1 32
346210
1
P
+2
MOD=9
P
+2
2
3
1 32
346210
1
P
+3
MOD=9
P
+3
2
3
1 32
346210
1
MM =
7
• Intercom Generale
• General Intercom
• Intercom Général
• Intercom Allgemein
• Intercomunicación General
• Algemene intercom
• Intercom Geral
•
MM =
8
• Intercom su se stesso
• Internal intercom
• Intercom sur soi-même
• Intercom auf sich selbst
• Intercomunicación en sí misma
• Intercom op zich
• Intercom sobre si mesmo
•
MM =
9
• Attivazione/Disattivazione studio professionale
• Enabling/disabling Office function
• Activation/Désactivation Bureau
• Büro-Funktion aktivieren/deaktivieren
• Activación/Desactivación Oficina Profesional
• Activering/Deactivering professionele studio
• Ativação/Desativação do Estúdio profissional
•
J1 J2 N
P M
• Il configuratore fisico MM – (decine) decide quali sono le 4 icone di AZIONI RAPIDE che compaiono sulla HOME PAGE e che
puoi attivare dal touch del display. Ti riportiamo le possibili configurazioni nella tabella seguente.
• The MM - (tenths) physical configurator decides which are the 4 QUICK ACTIONS icons that appear on the HOME PAGE, and can be
activated by touching the display. The possible configurations are shown in the following table.
• Le configurateur physique MM – (dizaines) établit quelles sont les 4 icônes d’ACTIONS RAPIDE qui s’affiche sur la PAGE
D’ACCUEIL et qu’il est possible d’activer depuis l’écran tactile. Dans le tableau suivant sont indiquées les différentes
configurations possibles.
• Der physische Konfigurator MM - (Zehner) entscheidet welche 4 Symbole der SCHNELLFUNKTIONEN auf der HOMEPAGE angezeigt
werden und über den Touchscreen aktiviert werden können. In nachstehender Tabelle sind die möglichen Konfigurationen
zusammengefasst.
• El configurador físico MM – (decenas) decide los 4 iconos de las ACCIONES RÁPIDAS que aparecen en la Página de Inicio y que
puede activar en la pantalla táctil. La tabla siguiente contiene las configuraciones posibles.
• De fysieke configurator MM – (tienden) bepaalt welke 4 iconen van de SNELTOETSEN op de HOMEPAGINA worden weergegeven en op
het touchscreen geactiveerd kunnen worden.
• O configurador físico MM - (dezenas) decide quais são os quatro ícones de AÇÕES RÁPIDAS que aparecem na HOME PAGE e
que você pode ativar mediante o toque do display. De volgende tabel bevat de mogelijke configuraties.
4MM

Video Kit
41
P
+1
MOD=9
P
+1
P
+2
MOD=9
P
+2
P
P
+1
MOD=5
P
+1
P
+1
2
3
1 32
346210
1
P
+2
MOD=5
P
+2
P
+2
2
3
1 32
346210
1
P
+3
MOD=5
P
+3
P
+3
2
3
1 32
346210
1
P
+4
MOD=5
P
+4
P
+4
2
3
1 32
346210
1
1–+ 23 4
P
+3
MOD=9
P
+3
1–+ 23 4
2
3
1 32
346210
1
P
+1
MOD=9
P
+1
P
+2
MOD=9
P
+2
P
P
+1
MOD=5
P
+1
P
+1
2
3
1 32
346210
1
P
+2
MOD=5
P
+2
P
+2
2
3
1 32
346210
1
P
+3
MOD=5
P
+3
P
+3
2
3
1 32
346210
1
P
+4
MOD=5
P
+4
P
+4
2
3
1 32
346210
1
1–+ 23 4
1–+ 23 4
P
+3
MOD=9
P
+3
1–+ 23 4
P
+1
MOD=9
P
+1
P
+2
MOD=9
P
+2
P
P
+1
MOD=5
P
+1
P
+1
2
3
1 32
346210
1
P
+2
MOD=5
P
+2
P
+2
2
3
1 32
346210
1
P
+3
MOD=5
P
+3
P
+3
2
3
1 32
346210
1
P
+4
MOD=5
P
+4
P
+4
2
3
1 32
346210
1
1–+ 23 4
1–+ 23 4
P
+3
MOD=9
P
+3
1–+ 23 4
P
+1
MOD=9
P
+1
P
+2
MOD=9
P
+2
P
P
+1
MOD=5
P
+1
P
+1
2
3
1 32
346210
1
P
+2
MOD=5
P
+2
P
+2
2
3
1 32
346210
1
P
+3
MOD=5
P
+3
P
+3
2
3
1 32
346210
1
P
+4
MOD=5
P
+4
P
+4
2
3
1 32
346210
1
1–+ 23 4
1–+ 23 4
P
+3
MOD=9
P
+3
1–+ 23 4
Attivazione del PE (configurato
con P+1) in modo diretto senza la
chiamata oppure attivazione attuatore
346200/346210 (configurato con P+1
e MOD= 9).
Apertura serratura del PE (configurato
con P+1) in modo diretto senza la
chiamata oppure attivazione attuatore
346200/346210 (configurato con P+1 e
MOD= 5) oppure attivazione attuatore
346230 (configurato con P+1).
Apertura serratura del PE (configurato
con P+2) in modo diretto senza la
chiamata oppure attivazione attuatore
346200/346210 (configurato con P+2 e
MOD=5) oppure attivazione attuatore
346230 (configurato con P+2).
Apertura serratura del PE (configurato
con P+3) in modo diretto senza la
chiamata oppure attivazione attuatore
346200/346210 (configurato con P+3 e
MOD=5) oppure attivazione attuatore
346230 (configurato con P+3).
Activating the EP (configured with P+1)
directly without the call or activating
actuator 346200/346210 (configured
with P+1 and MOD= 9).
Door lock opening of EP (configured
with P+1) directly without the call or
activating the actuator 346200/346210
(configured with P+1 and MOD= 5)
or activating the actuator 346230
(configured with P+1).
Door lock opening of EP (configured
with P+2) directly without the call
or activating the actuator 346200
(configured with P+2 and MOD= 5)
or activating the actuator 346230
(configured with P+2).
Door lock opening of EP (configured
with P+3) directly without the call or
activating the actuator 346200/346210
(configured with P+3 and MOD= 5)
or activating the actuator 346230
(configured with P+3).
Activation du PE (configuré avec P+1)
en mode direct sans l’appel ou activation
actionneur 346200/346210 (configuré
avec P+1 et MOD= 9).
Ouverture serrure du PE (configuré avec
P+1) en mode direct sans l’appel ou
activation actionneur 346200/346210
(configuré avec P+1 et MOD= 5) ou
activation actionneur 346230 (configuré
avec P+1).
Ouverture serrure du PE (configuré avec
P+2) en mode direct sans l’appel ou
activation actionneur 346200 (configuré
avec P+2 et MOD= 5) ou activation
actionneur 346230 (configuré avec P+2).
Ouverture serrure du PE (configuré avec
P+3) en mode direct sans l’appel ou
activation actionneur 346200/346210
(configuré avec P+3 et MOD= 5) ou
activation actionneur 346230 (configuré
avec P+3).
Aktivierung der Türstation (mit P+1
konfiguriert) auf direkte Weise ohne
Ruf oder Aktivierung über den Aktvator
346200/346210 (mit P+1 und MOD= 9).
Türöffnung der Türstation (mit P+1
konfiguriert) oder Aktivierung über
den Aktivator 346200/346210 (mit
P+1 und MOD= 5) oder Aktivierung
über den Aktivator 346230 (mit P+1
konfiguriert).
Türöffnung der Türstation (mit P+2
konfiguriert) oder Aktivierung über
den Aktivator 346200/346210 (mit
P+2 und MOD= 5) oder Aktivierung
über den Aktivator 346230 (mit P+2
konfiguriert).
Türöffnung der Türstation (mit P+3
konfiguriert) oder Aktivierung über
den Aktivator 346200/346210 (mit
P+3 und MOD= 5) oder Aktivierung
über den Aktivator 346230 (mit P+3
konfiguriert).
Activación del PE (configurado con
P+1) en modo directo sin llamada o
activación del actuador 346200/346210
(configurado con P+1 y MOD= 9).
Apertura cerradura del PE (configurado
con P +1) en modo directo sin llamada o
activación del actuador 346200/346210
(configurado con P+1 y MOD= 5)
o activación del actuador 346230
(configurado con P+1).
Apertura cerradura del PE (configurado
con P+2) en modo directo sin llamada o
activación del actuador 346200/346210
(configurado con P+2 y MOD= 5)
o activación del actuador 346230
(configurado con P+2).
Apertura cerradura del PE (configurado
con P+3) en modo directo sin llamada o
activación del actuador 346200/346210
(configurado con P+3 y MOD= 5)
o activación del actuador 346230
(configurado con P+3).
Rechtstreekse activering van het
deurstation (als P+1 geconfigureerd)
zonder oproep of activering van het
toestel 346200/346210 (geconfigureerd
als P+1 en MOD = 9).
Rechtstreekse opening van het deurslot
van het als P+1 geconfigureerde
deurstation, zonder oproep of activering
van het toestel 346200/346210
(geconfigureerd als P+1 en MOD= 5)
of activering van het toestel 346230
(geconfigureerd als P+1).
Rechtstreekse opening van het deurslot
van het als P+2 geconfigureerde
deurstation, zonder oproep of activering
van het toestel 346200/346210
(geconfigureerd als P+2 en MOD= 5)
of activering van het toestel 346230
(geconfigureerd als P+2).
Rechtstreekse opening van het deurslot
van het als P+3 geconfigureerde
deurstation, zonder oproep of activering
van het toestel 346200/346210
(geconfigureerd als P+3 en MOD= 5)
of activering van het toestel 346230
(geconfigureerd als P+3).
Ligação da UE (con figurada com
P+1) de maneira directa sem a cha-
ma da ou então ligação do ac tua dor
346200/346210 (configurado com P+1
e MOD=9).
Abertura da fechadura da UE (configurada
com P+1) de ma nei ra directa sem a
chamada ou então ligação do actuador
346200/346210 (configurado com P+1
e MOD=5) ou então ligação do actuador
346230 (con fi gu ra do com P+1).
Abertura da fechadura da UE (configurada
com P+2) de ma nei ra directa sem a
chamada ou então ligação do actuador
346200/346210 (configurado com P+2
e MOD=5) ou então ligação do actuador
346230 (con fi gu ra do com P+2).
Abertura da fechadura da UE (configurada
com P+3) de ma nei ra directa sem a
chamada ou então ligação do actuador
346200/346210 (configurado com P+3
e MOD=5) ou então ligação do actuador
346230 (con fi gu ra do com P+3).
P+1
346200
P+1346210
.)
P+1
346200
P+1346210
346230
5
.)P+1
P+2
346200
P+2346210
346230
5
.)P+2
P+3
346200
P+3346210
346230
5
.)P+3

42
P
+1
MOD=9
P
+1
P
+2
MOD=9
P
+2
P
P
+1
MOD=5
P
+1
P
+1
2
3
1 32
346210
1
P
+2
MOD=5
P
+2
P
+2
2
3
1 32
346210
1
P
+3
MOD=5
P
+3
P
+3
2
3
1 32
346210
1
P
+4
MOD=5
P
+4
P
+4
2
3
1 32
346210
1
1–+ 23 4
1–+ 23 4
P
+3
MOD=9
P
+3
1–+ 23 4
Apertura serratura del PE (configurato
con P+4) in modo diretto senza la
chiamata oppure attivazione attuatore
346200/346210 (configurato con P+4 e
MOD= 5) oppure attivazione attuatore
346230 (configurato con P+4)
Intercom tra appartamenti
in impianti con interfaccia
da appartamento 346850
Intercom all’interno dell’appartamento
in impianti con interfaccia di
appartamento 346850; oppure intercom
tra appartamenti in impianti senza
interfaccia di appartamento
Intercom su se stesso,
invia la chiamata a tutti
gli apparecchi con uguale
indirizzo
Intercom generale, invia
una chiamata a tutti gli
apparecchi dell’impianto
Door lock opening of EP (configured
with P+4) directly without the call or
activating the actuator 346200/346210
(configured with P+4 and MOD= 5)
or activating the actuator 346230
(configured with P+4)
Intercommunicability
between apartments in
systems with
apartment interface
346850
Intercommunicability inside
an apartment in systems with
apartment interface 346850 or
intercommunicability between
apartments in systems without
apartment interface
Intercom on itself, sends
the call to all the devices
with the same address
General intercom, sends
a call to all the system
devices
Ouverture serrure du PE (configuré avec
P+4) en mode direct sans l’appel ou
activation actionneur 346200/346210
(configuré avec P+4 et MOD= 5) ou
activation actionneur 346230 (configuré
avec P+4)
Intercommunication
entre appartements sur
installations avec interface
d’appartement 346850
Intercommunication à l’intérieur de
l’appartement sur installations avec
interface d’appartement 346850 ou
intercommunication entre appartements
sur installations sans interface
d’appartement
Intercom sur lui-même,
envoie l’appel à tous
les appareils ayant une
adresse identique
Intercom général, envoie
l’appel à tous les appareils
de l’installation
Türöffnung der Türstation (mit P+4
konfiguriert) oder Aktivierung über den
Aktivator 346200/346210 (mit P+4 und
MOD= 5) oder Aktivierung über den
Aktivator 346230 (mit P+4 konfiguriert)
Gegenseitige
Kommunikation zwischen
Wohnungen für Anlagen
mit Wohnungsschnittstelle
346850
Gegenseitige Kommunikation
innerhalb der Wohnung für Anlagen
mit Wohnungsschnittstelle 346850
oder gegenseitige Kommunikation
zwischen Wohnungen für Anlagen ohne
Wohnungsschnittstelle
Intercom mit einseitiger
Funktion: sendet den
Ruf an alle Geräte mit
derselben Adresse
Intercom mit allgemeiner
Funktion: sendet den Ruf
an alle Geräte der Anlage
Apertura cerradura del PE (configurado
con P+4) en modo directo sin llamada o
activación del actuador 346200/346210
(configurado con P+4 y MOD= 5)
o activación del actuador 346230
(configurado con P+4)
Intercomunicación
entre apartamentos en
instalaciones con interfaz
de departamento 346850
Intercomunicación en el
apartamento en instalaciones con
interfaz de apartamento 346850 o
intercomunicación entre apartamentos
en instalaciones sin interfaz de
apartamento
Intercomunicación hacia
los aparatos iguales,
envía la llamada a todos
los aparatos con igual
dirección
Intercomunicación
general, envía una
llamada a todos los
aparatos de la instalación
Rechtstreekse opening van het deurslot van
het als P+4 geconfigureerde deurstation,
zonder oproep of activering van het toestel
346200/346210 (geconfigureerd als P+4
en MOD= 5) of activering van het toestel
346230 (geconfigureerd als P+4).
Intercom tussen
appartementen in
installaties met interface
van appartement 346850
Intercom binnen in het appartement
in installaties met interface van
appartement 346850 ofwel intercom
tussen appartementen in installaties
zonder interface van appartement
Intercom op zichzelf,
verstuurt de oproep
naar alle toestellen met
hetzelfde adres
Algemene Intercom,
verstuurt een oproep naar
alle toestellen van de
installatie
Abertura da fechadura da UE (configurada
com P+4) de maneira directa sem a
chamada ou então ligação do actuador
346200/346210 (configurado com P+4
e MOD= 5) ou então ligação do actuador
346230 (configurado com P+4)
Intercom entre
apartamentos em
instalações com interface
de apartamento 346850
Intercom dentro do apartamento
em instalações com interface de
apartamento 346850 ou então intercom
entre apartamentos em instalações sem
interface de apartamento
Intercomunicador sobre si
mesmo, envia a chamada
a todos os aparelhos com
endereço igual
Intercomunicador geral,
envia uma chamada a
todos os aparelhos da
instalação
P+4
346200
P+4346210
346230
5
.)P+4
.346850
346850
A página está carregando...
A página está carregando...
A página está carregando...
A página está carregando...
A página está carregando...
A página está carregando...
A página está carregando...
A página está carregando...
A página está carregando...
A página está carregando...
-
 1
1
-
 2
2
-
 3
3
-
 4
4
-
 5
5
-
 6
6
-
 7
7
-
 8
8
-
 9
9
-
 10
10
-
 11
11
-
 12
12
-
 13
13
-
 14
14
-
 15
15
-
 16
16
-
 17
17
-
 18
18
-
 19
19
-
 20
20
-
 21
21
-
 22
22
-
 23
23
-
 24
24
-
 25
25
-
 26
26
-
 27
27
-
 28
28
-
 29
29
-
 30
30
-
 31
31
-
 32
32
-
 33
33
-
 34
34
-
 35
35
-
 36
36
-
 37
37
-
 38
38
-
 39
39
-
 40
40
-
 41
41
-
 42
42
-
 43
43
-
 44
44
-
 45
45
-
 46
46
-
 47
47
-
 48
48
-
 49
49
-
 50
50
-
 51
51
-
 52
52


Bticino 365711 Instruções de operação
- Tipo
- Instruções de operação
- Este manual também é adequado para
em outras línguas
- español: Bticino 365711 Instrucciones de operación
- français: Bticino 365711 Mode d'emploi
- italiano: Bticino 365711 Istruzioni per l'uso
- English: Bticino 365711 Operating instructions
- Nederlands: Bticino 365711 Handleiding
- Deutsch: Bticino 365711 Bedienungsanleitung
Artigos relacionados
-
Bticino 365711 Guia de instalação
-
-
-
Bticino 369711 Manual do usuário
-
-
-
Bticino 344643 Instruções de operação
-
-
-
Bticino 351200 Manual do usuário