A página está carregando...
A página está carregando...

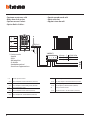
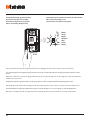
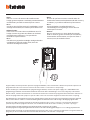
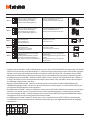
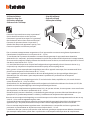
Video Kit
3
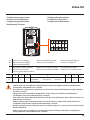
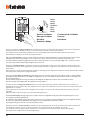
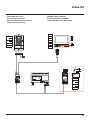
• Vecchio impianto a campanello
Impianto esistente con 3 fili e sola chiamata.
• Old system with bell
Existing system with 3 wires and just call.
• Ancienne installation a sonnette
Installation existante à 3 fils et un seul appel.
• Alte klingelanlage
Vorhandene 3-Leiter Anlage nur mit Ruffunktion.
• Vieja instalación con timbre
Instalación existente con 3 hilos y una llamada.
• Oude deurbelinstallatie
Bestaande 3-aderige installatie met alleen een
oproepfunctie.
• Antiga instalação em campaínha
Instalação existente com 3 fios e somente
chamada.
230 Vac 12 V
230 Vac
}
346 0 0 0
0322 06
IP30
PRI 230V~ 50 - 60Hz 260mA
BUS
2-1
27V 1,2A
PRI
PS
BUS TK
BUS PI
346830
230 Vac 12 V
230 Vac
}
346 0 0 0
0322 06
IP30
PRI 230V~ 50 - 60Hz 260mA
BUS
2-1
27V 1,2A
PRI
PS
BUS TK
BUS PI
346830
230 Vac 12 V
230 Vac
}
346 0 0 0
0322 06
IP30
PRI 230V~ 50 - 60Hz 260mA
BUS
2-1
27V 1,2A
PRI
PS
BUS TK
BUS PI
346830
• Nuovo impianto citofonico
Impianto realizzato senza modifiche ai 2 fili
esistenti: chiamata, videocitofono e serratura.
• New door entry system
System made without modifications to the 2 existing
wires; call, video handset and electric door lock.
• Nouvelle installation phonique
Installation réalisée sans modifications sur les 2 fils
existants: appel, vidéophone, et serrure électrique.
• Neue haustelefonanlage
Anlage ohne Änderungen an den vorhandenen 2 Leiter:
Ruffunktion, Gegensprechanlage und elektrisches Schloss.
• Nueva instalación interfónica
Instalación realizada sin las modificaciones a los 2 hilos
existentes: llamada, videoportero y cerradura eléctrica.
• Nieuwe deurtelefooninstallatie
Installatie aangelegd zonder wijzigingen aan de
2 bestaande aders: oproep, beeldhuistelefoon en
elektrisch deurslot.
• Nova instalação do intercomunicador
Instalação realizada sem modificar os 2 fios existentes:
chamada, intercomunicador vídeo e fechadura eléctrica.
A página está carregando...

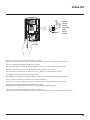
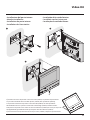
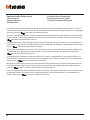
Video Kit
5
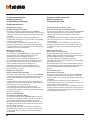
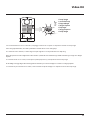
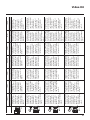
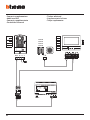
•
Schema monofamigliare (366711)
•
One-family diagram (366711)
•
Schéma mono-familial (366711)
•
Schema Einfamilienhaus (366711)
•
Esquema monofamiliar (366711)
•
Schema eensgezins (366711)
•
Esquema monofamiliar (366711)
BUS
PL S+
S-
PS
BUS TK
BUS PI
346830
BUS 2 1
230 Vac
IP30
PRI
PRI 230 V~ 50 - 60 Hz 260 mA
346000
}
BUS
2 - 1
27V 1,2A
CEBEC
N
N
F
N
= –
= –
T = –
S = –
P
= –
–
=
A
ON
OFF
P
= –
= –
= –
= –
M
J2
J1
N
= –
= –
BUS
B
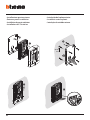
• A Pulsante apertura serratura.
B Chiamata al piano.
S+ S- 18 V; 4 A impulsivi. 250 mA mantenimento (30 Ω max).
• A Door lock pushbutton.
B Floor call.
S+ S- 18 V; 4 A impulsive. 250 mA holding current (30 Ω max).
• A Poussoir d’ouverture serrure.
B Appel à l’étage.
S+ S- 18 V; 4 A impulsifs. 250 mA entretien (30 Ω max).
• A Schalter Türöffner.
B Etagenruf.
S+ S- 18 V; 4 A impulsstrom. 250 mA Haltestrom (30 Ω max).
• A Pulsador de apertura de cerradura.
B Llamada al piso.
S+ S- 18 V; 4 A por impulsos. 250 mA mantenimiento (30 Ω max).
• A Drukknop opening.
B Oproep aan verdieping.
S+ S- 18 V; 4 A impulsief; 250 mA onderhoud (30 Ω max).
• A Botão para abertura do trinco.
B Chamada ao piso.
S+ S- 18 V; 4 A instantâneos. 250 mA continuos (30 Ω max).

6
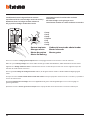
• Schema bifamigliare 1 (366721)
• Two-family diagram 1 (366721)
• Schéma bi-familiale 1 (366721)
• Schema Zweifamilienhaus 1 (366721)
• Esquema bifamiliar 1 (366721)
• Schema tweegezins 1 (366721)
• Esquema bifamiliar 1 (366721)
BUS
PL S+
S-
PS
BUS TK
BUS PI
346830
BUS 2 1
230 Vac
IP30
PRI
PRI 230 V~ 50 - 60 Hz 260 mA
346000
}
BUS
2 - 1
27V 1,2A
CEBEC
N
N
F
A
N
= –
= –
T = –
S = –
P
= –
–
=
ON
OFF
ON
OFF
BUS
B
BUS
B
P
= –
= –
= –
= –
M
J2
J1
N
= –
= *1
P
= –
= –
= –
= –
M
J2
J1
N
= –
= –
* • Inserire il configuratore fornito a corredo.
• Connect the configurator supplied as standard.
• Mettre en place le configurateur fourni à cet effet.
• Den mitgelieferten Konfigurator einsetzen.
• Inserte el configurador suministrado.
• Breng de standaard geleverde configurator aan.
• Inserir o configurador fornecido no equipamento base.
• A Pulsante apertura serratura.
B Chiamata al piano.
S+ S- 18 V; 4 A impulsivi. 250 mA mantenimento (30 Ω max).
• A Door lock pushbutton.
B Floor call.
S+ S- 18 V; 4 A impulsive. 250 mA holding current (30 Ω max).
• A Poussoir d’ouverture serrure.
B Appel à l’étage.
S+ S- 18 V; 4 A impulsifs. 250 mA entretien (30 Ω max).
• A Schalter Türöffner.
B Etagenruf.
S+ S- 18 V; 4 A impulsstrom. 250 mA Haltestrom (30 Ω max).
• A Pulsador de apertura de cerradura.
B Llamada al piso.
S+ S- 18 V; 4 A por impulsos. 250 mA mantenimiento (30 Ω max).
• A Drukknop opening.
B Oproep aan verdieping.
S+ S- 18 V; 4 A impulsief; 250 mA onderhoud (30 Ω max).
• A Botão para abertura do trinco.
B Chamada ao piso.
S+ S- 18 V; 4 A instantâneos. 250 mA continuos (30 Ω max).
A página está carregando...

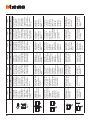
8
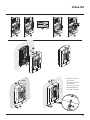
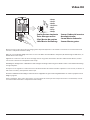
• Opzione serratura a relè
• Relay door lock option
• Option serrure à relais
• Option Relais-Schloss
• Opción cerradura de relé
• Optie relaisslot
• Opção trinco de relê
• A Pulsante apertura serratura.
S+ S- 18 V; 4 A impulsivi. 250 mA mantenimento (30 Ω max).
• A Door lock pushbutton.
S+ S- 18 V; 4 A impulsive. 250 mA holding current (30 Ω max).
• A Poussoir d’ouverture serrure.
S+ S- 18 V; 4 A impulsifs. 250 mA entretien (30 Ω max).
• A Schalter Türöffner.
S+ S- 18 V; 4 A impulsstrom. 250 mA Haltestrom (30 Ω max).
• A Pulsador de apertura de cerradura.
S+ S- 18 V; 4 A por impulsos. 250 mA mantenimiento (30 Ω max).
• A Drukknop opening.
S+ S- 18 V; 4 A impulsief; 250 mA onderhoud (30 Ω max).
• A Botão para abertura do trinco.
S+ S- 18 V; 4 A instantâneos. 250 mA continuos (30 Ω max).
BUS
PL S+
S-
A
N
= –
= –
T = –
S = –
P
= –
–
=
8 A cosφ = 1
4 A cosφ = 0,7
3 A cosφ = 0,4
24 Vdc; 24 Vac
24 Vac
24 Vac
NO
NC
C
346250 (*)
S-
S+
C
NC
NO
* • Fornito a corredo.
• Supplied.
• Fourni.
• Wird mitgeliefert.
• En dotación.
• Standaard meegeleverd.
• Fornecido no equipamento base.

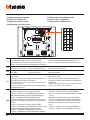
Video Kit
9
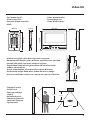
• Altezza consigliata salvo diversa normativa vigente.
• Recommended height, unless different regulations are specified.
• Hauteur conseillée sauf autre norme en vigueur.
• Empfohlene Höhe falls die gesetzlichen Vorschriften nichts
anderes vorschreiben.
• Altura recomendada salvo normativa vigente diferente.
• Aanbevolen hoogte behoudens andere normen in voege.
• Altura aconselhada a não ser se a norma em vigor for diferente.
160 – 165 cm
135–140 cm
• Dati dimensionali
• Dimensional data
• Données dimensionnelles
• Maße
• Datos dimensionales
• Formaatgegevens
• Dados dimensionais
35 mm
106 mm
185 mm
194 mm
162 mm
25 mm
115 cm
50 cm
240 cm
• Campo di ripresa
• Field of view
• Éclairage cadrage
caméra
• Aufnahmebereich
• Campo de filmación
• Campo de filmagem
• Opnameveld

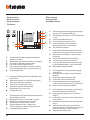
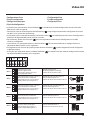
10
1 - Activação/desactivação do sinal de confir-
mação da abertura da fechadura.
2 - Regulação do volume
(*veja as próxima
página).
3 - Indicadores luminosos verde: indicação de
porta aberta.
4 - Indicadores luminosos verde: comunicação
activa.
5 - Indicador luminoso lampejante Verde:
chamada enviada; Indicador luminoso lam-
pejante Vermelho: sistema cupado.
6 - Alojamento configurador.
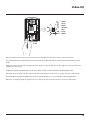
• Posto esterno
• Entrance panel
• Poste extérieur
• Türstation
• Placa exterior
• Externe plaats
• Unidade externa
1 -
Habilitación/deshabilitación del tono de
confirmación de apertura de la cerradura.
2 - Regulación del volumen (*véase la pág.
siguiente).
3 - Led verde: indicación puerta abierta.
4 - Led verde: comunicación activada.
5 - Led parpadenate Verde: llamada enviada;
Led parpadenate Rojo: sistema ocupado.
6 - Alojamiento configuradores.
1 - Enabling/disabling of door lock opening confir-
mation tone.
2 - Adjustment volume (*see the following page).
3 - Green LED: door open indication.
4 - Green LED: communication active.
5 - Green flashing LED; call forwarded;
Red flashing LED: system busy.
6 - Configurator seat.
1 - Abilitazione/disabilitazione tono conferma
apertura serratura.
2 - Regolazione del volume (*vedi pag. seguente).
3 - Led verde: indicazione porta aperta.
4 - Led verde: comunicazione attiva.
5 - Led lampeggiante Verde: chiamata inoltrata;
Led lampeggiante Rosso: sistema occupato.
6 - Sede configuratori.
1 - Aktivierung/Deaktivierung des Bestätigungs-
signals nach erfolgter Türöffnung.
2 -
Einstellung der Lautstärke (*siehe nachfolgende
Seiten).
3 - Grüne Led: Meldet offene Tür.
4 - Grüne Led: Kommunikation aktiv.
5 - Grüne blinkende Led: Ruf gesendet;
Rote blinkende Led: System belegt.
6 - Sitz der Konfiguratoren.
1 - Activation/désactivation tonalité de confirma-
tion ouverture serrure.
2 - Réglage du volume (* voir page suivante).
3 - Diode verte: indication porte ouverte.
4 - Diode verte: communication active.
5 - Témoin clignotant vert - appel passé;
Témoin clignotant rouge: système occupé.
6 - Logement configurateurs.
1 - Activering/desactivering toon bevestiging
opening slot.
2 - De geluidssterkte regelen
(*zie de volgende
pagina’s).
3 - Groene led: aanduiding open deur.
4 - Groene led: communicatie actief.
5 - Groene knipperende led: oproep doorge-
stuurd; Rode knipperende led: systeem bezet.
6 - Plaats van de configuratiemodules.
ON OFF
3
4
5
1
6
2
A página está carregando...

12
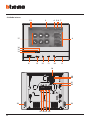
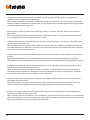
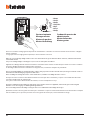
• Posto interno
• Handset
18
21
22
2323
19
20
24252627
1 2 3 4 5 7 6
16
15
14
17
91011
12
139
8
A página está carregando...
A página está carregando...
A página está carregando...
A página está carregando...
A página está carregando...

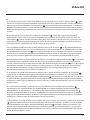
18
• Unidade interna
18
21
22
2323
19
20
24252627
1 2 3 4 5 7 6
16
15
14
17
91011
12
139
8

Video Kit
19
A imagem representa o dispositivo com todas
as funções ativadas.
Verifique no manual do instalador como ativar
as funções
1 -
Ecrã 7” (16 : 9)
2 -
Botão de desligar
3 -
Data e hora
4 -
Exclusão da campainha
5 -
Ativação do Estúdio profissional
6 -
Microfone
7 -
Ativação do Respondedor de chamada
8 -
Ações rápidas
9 -
Guias táteis para não videntes
10 -
Botão de ligar:
o acendimento do led verde intermitente indica
uma chamada em chegada
o acendimento do led verde fixo indica a
comunicação em andamento
11 -
Autoacendimento e Ciclamento:
ao carregar no botão acende-se o LED vermelho
12 -
Botão Preferido:
ao carregar no botão acende-se o LED vermelho
(Configuração básica = LUZ DAS ESCADAS. Para uma
configuração diferente, roga-se consultar a tabela
da configuração física nas próximas páginas.)
13 -
Botão de abertura da fechadura:
ao carregar no botão acende-se o LED vermelho
14 -
Estado do Respondedor de chamada:
Led vermelho fixo = respondedor de chamadas
ativo
Led vermelho intermitente = presença de gravação
(ções) não visionada (s)
15 -
Estado de presença de notas:
Led vermelho intermitente = nova (s) nota (s) não
lida (s)
16 -
Estado de Exclusão de chamada:
Led vermelho aceso = Campainha de chamada
desativada
17 -
Funções (aparecem apenas os ícones das funções
configuradas)
18 -
Alojamento configurador
19 -
Configurador J1: extrai para alimentação adicional
20 -
Configurador J2: Master/Slave, extrai para Slave
21 -
Microinterruptor ON/OFF de término de trecho
22 -
Tomada mini USB para atualização do Firmware do
dispositivo
23 -
Altifalante
24 -
Bornes (1 - 2) para alimentação adicional
25 -
Bornes para a conexão ao BUS SCS DE 2 FIOS
26 -
Bornes ( ) para a conexão de um botão externo
de chamada no piso
27 -
Bornes (1 - 5M) para a conexão de uma campainha
adicional. Você deverá fazer a conexão – ponto a
ponto - nos bornes das campainhas adicionais
A página está carregando...
A página está carregando...

22
• La telecamera non deve essere installata di fronte a grandi sorgenti luminose, oppure in luoghi dove il
soggetto ripreso rimanga molto in controluce.
Nota: Le telecamere con sensore CMOS a colori presentano, in condizioni di scarsa luminosità, una sensibilità
inferiore rispetto alle telecamere in bianco/nero. Si consiglia pertanto, in ambienti poco illuminati di prevedere
una fonte di illuminazione aggiuntiva.
• The camera must not be installed in front of large light sources, or in places where the subject viewed remains in
deep shadow.
Note: in poor lighting conditions cameras with colour CMOS detector are less sensitive than black/white cameras.
An extra lighting source should be added in poorly lit rooms.
• La télécaméra ne doit pas être installée en face de fortes sources lumineuses, ou bien dans des endroits où le
sujet pris reste très à contre-jour.
Nota: les télécaméras avec capteur CMOS couleurs présentent, dans des conditions de faible luminosité, une
sensibilité inférieure aux télécaméras noir/blanc. Il est donc conseillé, dans des milieux peu éclairés, de prévoir
une source de lumière supplémentaire.
• Die Kamera darf nicht vor starken Lichtquellen oder an Orten installiert werden, wo das Subjekt sich im Gegenlicht
befindet.
Bemerkung: Farbkameras mit CMOS-Aufnahmeelement besitzen bei schlechter Beleuchtung eine geringere
Empfindlichkeit als Schwarz/Weiß Kameras. Wir empfehlen daher eine zusätzliche Beleuchtungsquelle vorzusehen.
• La telecámara no debe ser instalada delante de fuentes luminosas grande en lugares en donde el individuo
filmado se encuentre demasiado en contraluz.
Nota: las telecámaras con sensor CMOS en colores presentan, en condiciones de escasa luminosidad, una
sensibilidad inferior respecto a las telecámaras en blanco/negro. Por lo tanto es aconsejable en ambientes
escasamente iluminados prever una fuente de iluminación extra.
• Installeer de camera niet tegenover grote lichtbronnen of op plaatsen waar de opname van het onderwerp door
sterk tegenlicht wordt gestoord.
Opmerking: camera’s met kleuren-CMOS-sensor zijn bij een zwakke verlichting minder gevoelig dan zwart-wit
camera’s. Daarom is het raadzaam om zwak verlichte omgevingen van extra verlichting te voorzien.
• A câmara não deve ser montada diante de fortes fontes de luz, ou então em lugares onde o elemento que
deve ser filmado fique muito em contraluz.
Nota: as câmaras com sensor CMOS em cores apresentam, quando há pouca luminosidade, uma sensibilidade
inferior em relação às câmaras em branco e preto. Portanto, recomenda-se, quando os ambientes forem pouco
iluminados providenciar uma fonte de iluminação adicional.
A página está carregando...

24
• Badge gestore impianto
Nuovo badge gestore impianto
Per motivi di sicurezza è previsto un badge “Gestore“
programmato direttamente dall’installatore, tramite il quale
è possibile l’accesso alla programmazione degli altri badge
(residenti).
Il posto esterno segnalerà l’avvenuta accettazione o
cancellazione del badge con segnali acustici e visivi dei led
presenti sul posto esterno.
La presentazione di un badge non riconosciuto o un
errore di programmazione, comporta l’interruzione della
programmazione, la segnalazione tramite un beep lungo e
l’accensione LED rosso di occupato.
• Manager master badge
New manager master badge
For safety reasons, a “MASTER” badge is required, directly
programmed by the installer, providing access to the
programming of the other badges (residents).
The entrance panel will notify that the badge has been
accepted or deleted by means of sound notifications, as well
as visual indications using the LEDs on the entrance panel.
The presentation of an unrecognised badge, or a
programming error, will cause the interruption of the
programming procedure, and an extended beep; the red
“busy” LED will also come on.
• Badge master de gestion
Nouveau badge master de gestion
Pour des raisons de sécurité, est prévu un badge “MASTER“
programmé directement par l’installateur, à travers lequel,
il est possible d’accéder à la programmation des autres
(résidents).
Le poste externe signale l’acceptation ou l’élimination du
badge par des signaux sonores et visuels et par l’allumage
des leds présents sur le poste externe.
La présentation d’un badge non reconnu ou une
erreur de programmation provoque l’interruption de la
programmation, l’émission d’un bip prolongé et l’allumage
du LED rouge occupé.
• Master-Verwaltungs-Badge
Neuer Master-Verwaltungs-Badge
Aus Sicherheitsgründen ist ein „MASTER“-Badge vorgesehen,
der direkt vom Installateur programmiert wird. Damit können
die anderen Badges (Bewohner) programmiert werden.
Die Türstation meldet die erfolgte Annahme oder Löschung
des Badges durch akustische und visuelle Led-Signale, die an
derselben vorgesehen sind.
Wenn ein Badge nicht erkannt wird oder ein Fehler bei der
Programmierung aufgetreten ist, wird letztere unterbrochen
und ein langer Piepton erzeugt sowie die rote LED (belegt)
eingeschaltet.
• Credencial maestra de administrador
Nueva credencial maestra de administrador
Por razones de seguridad se prevé una credencial “maestra”
programada directamente por el instalador mediante
la cual es posible programar las demás credenciales
(residentes).
La placa exterior indicará si acepta o cancela unacredencial
con unaseñal acústica y visual de los leds incorporados en
la placa exterior.
La presentación de una credencial no reconocida o un
error de programación interrumpe la programación, que
se señala con un bip largo y la iluminación del LED rojo
ocupado.
• Badge master beheerder
Nieuwe master beheerder badge
Wegens veiligheidsredenen wordt door de installateur een
“Master” badge geprogrammeerd die de programmering van
de andere badges (inwoners) mogelijk maakt.
Het externe punt geeft met behulp van geluids- en
lichtsignalen van de leds op het externe punt aan of de badge
geaccepteerd of gewist is.
Door de presentatie van een niet-herkende badge of een fout
in de programmering wordt de programmering onderbroken,
hoort u een lange pieptoon en gaat de rode Led bezet
branden.
• Crachá master gestor
Novo crachá master gestor
Por razões de segurança é previsto um crachá “MASTER“,
programado directamente pelo instalador, por meio do
qual é possível o acesso à programação dos outros crachás
(residentes).
A unidade externa sinalizará a ocorrida aceitação ou
cancelamento do crachá com sinais acústicos e visuais dos
led presentes na unidade externa.
A apresentação de um crachá não reconhecido ou um erro
de programação, comporta a interrupção da programação,
a sinalização por meio de um beep longo e o acendimento
do LED vermelho de ocupado.
• Programmazione Badge
• Badge programming
• Programmation des badges
• Badge programmieren
• Programación de credenciales
• Badge Programmeren
•
Programação do Crachá
A página está carregando...
A página está carregando...
A página está carregando...
A página está carregando...
A página está carregando...

30
• Badge residente
Nuovo badge residente
Per accedere alla programmazione di un badge
“RESIDENTE” è necessario essere in possesso di un
badge gestore impianto.
Il posto esterno segnalerà l’avvenuta accettazione o
cancellazione del badge con segnali acustici e visivi dei
led presenti sul posto esterno.
La presentazione di un badge non riconosciuto o un
errore di programmazione, comporta l’interruzione
della programmazione, la segnalazione tramite un
beep lungo e l’accensione LED rosso di occupato.
• Resident badge
New resident badge
In order to access to the programming of a “RESIDENT”
badge, a system manager badge is required.
The entrance panel will notify that the badge has been
accepted or deleted by means of sound notifications, as
well as visual indications using the LEDs on the entrance
panel.
The presentation of an unrecognised badge, or a
programming error, will cause the interruption of the
programming procedure, and an extended beep; the red
“busy” LED will also come on.
• Badge résident
Nouveau badge résident
Pour accéder à la programmation d’un badge
“RÉSIDENT”, il est nécessaire de disposer d’un badge
master de gestion installation.
Le poste externe signale l’acceptation ou l’élimination
du badge par des signaux sonores et visuels et par
l’allumage des leds présents sur le poste externe.
La présentation d’un badge non reconnu ou une
erreur de programmation provoque l’interruption de
la programmation, l’émission d’un bip prolongé et
l’allumage du LED rouge occupé.
• Bewohner-Badge
Neuer Bewohner-Badge
Um die Programmierung eines Badges „BEWOHNER“
abrufen zu können, ist das Badge des Anlagenbetreibers
erforderlich.
Die Türstation meldet die erfolgte Annahme oder
Löschung des Badges durch akustische und visuelle Led-
Signale, die an derselben vorgesehen sind.
Wenn ein Badge nicht erkannt wird oder ein Fehler
bei der Programmierung aufgetreten ist, wird letztere
unterbrochen und ein langer Piepton erzeugt sowie die
rote LED (belegt) eingeschaltet.
• Credencial de residente
Nueva credencial de residente
Para ingresar a la programación de una credencial
“RESIDENTE”, es necesario poseer una credencial de
administrador del sistema.
La placa exterior indicarási acepta o cancelala
credencial con una señal acústica y visual de los leds
incorporadosen la placa exterior.
La presentación de una credencial no reconocida o un
error de programación interrumpe la programación,
que se señala con un bip largo y la iluminación del LED
rojo ocupado.
• Inwoner badge
Nieuwe inwoner badge
Voor toegang tot de programmering van een
“INWONERBADGE” moet u in het bezit zijn van een
installatiebeheerder badge.
Het externe punt geeft met behulp van geluids- en
lichtsignalen van de leds op het externe punt aan of de
badge geaccepteerd of gewist is.
Door de presentatie van een niet-herkende badge of een
fout in de programmering wordt de programmering
onderbroken, hoort u een lange pieptoon en gaat de rode
Led bezet branden.
• Crachá residente
Novo crachá residente
Para ter acesso à programação de um crachá
“RESIDENTE” é necessário estar em posse de um
crachá gestor da instalação.
A unidade externa sinalizará que interveio a aceitação
ou o cancelamento do crachá com sinais acústicos e
visuais dos leds presentes na unidade externa.
A apresentação de um crachá não reconhecido ou
um erro de programação, comporta a interrupção
da programação, a sinalização por meio de um beep
longo e o acendimento do LED vermelho de ocupado.

Video Kit
31
1 beep
1 beep
1 beep
1 Piepton
1 bip
1 beep
1 beep
Avvicinare al lettore il badge gestore impianto fino al lampeggio del LED verde serratura e tono di conferma.
Move the system manager badge close to the reader until the green door lock LED flashes, and a confirmation sound is heard.
Approcher le Badge administrateur installation du lecteur et attendre que le LED vert serrure clignote et qu’une
tonalité de confirmation soit émise.
Dem Lesegerät das Badge des Anlagenbetreibers nähern, bis die grüne LED des Schlosses blinkt und das Bestätigungssignal
ertönt.
Acerque al lector la credencial del administrador del sistema hasta que parpadea el LED verde de la cerradura y se produzca
el tono de confirmación.
Houd de installatiebeheerder badge voor het leesapparaat tot de groene LED slot gaat knipperen en u ter bevestiging een
geluidssignaal hoort.
Aproxime ao leitor o Crachá gestor da instalação até o lampejo do LED verde da fechadura e o tom de confirmação.
Gestore impianto
Manager master
Master de gestion
Master Verwaltung
Credencial maestra de
administrador
Master beheerder
Master gestor
A página está carregando...
A página está carregando...

34
Cancellazione di tutti i badge residenti in memoria
Cancellation of all the residents badges saved in the memory
Effacement de tous les badges résidents mémorisés
Alle gespeicherten Badges der Bewohner löschen
Cancelación de todas las credenciales residentes
memorizadas
Alle inwonerbadges uit het geheugen wissen
Cancelamento de todos os crachás residentes na memória
1 beep
1 beep
1 beep
1 Piepton
1 bip
1 beep
1 beep
Avvicinare al lettore il badge gestore impianto fino al lampeggio del LED verde serratura e tono di conferma.
Move the system manager badge close to the reader until the green door lock LED flashes, and a confirmation sound is heard.
Approcher le Badge administrateur installation du lecteur et attendre que le LED vert serrure clignote et qu’une
tonalité de confirmation soit émise.
Dem Lesegerät das Badge des Anlagenbetreibers nähern, bis die grüne LED des Schlosses blinkt und das Bestätigungssignal
ertönt.
Acerque al lector la credencial del administrador del sistema hasta que parpadea el LED verde de la cerradura y se produzca
el tono de confirmación.
Houd de installatiebeheerder badge voor het leesapparaat tot de groene LED slot gaat knipperen en u ter bevestiging een
geluidssignaal hoort.
Aproxime ao leitor o Crachá gestor da instalação até o lampejo do LED verde da fechadura e o tom de confirmação.
Gestore impianto
Manager master
Master de gestion
Master Verwaltung
Credencial maestra de administrador
Master beheerder
Master gestor

Video Kit
35
2 beep
2 beeps
2 beep
2 Pieptöne
2 bips
2 beep
2 beep
2 volte Gestore impianto
Twice Manager master
2 fois Master de gestion
2 Mal Master Verwaltung
2 veces Credencial maestra
de administrador
2 maal Master beheerder
2 vezes Master gestor
Riavvicinare per 2 volte consecutive il badge gestore impianto. Quando la cancellazione è avvenuta si accende il LED verde
serratura e il dispositivo emette 2 beep.
Move the system manager badge close twice in succession. When the cancellation is completed, the door lock green LED comes, on
and the device emits 2 beeps.
Approcher à nouveau 2 fois de suite le badge master de gestion installation. Une fois l’effacement obtenu, le LED
vert serrure s’allume et le dispositif émet 2 bips.
Das Badge des Anlagetreibers 2 Mal nähern. Nach erfolgter Löschung leuchtet die grüne LED des Schlosses auf und die Vorrichtung
erzeugt 2 Pieptöne.
Acerque 2 veces seguidas la credencial maestra de administrador del sistema.Cuando se produce la cancelación, se ilumina el
LED verde cerradura y el dispositivo emite 2 bips.
Houd de installatiebeheerder badge 2 maal voor het leesapparaat. De groene LED slot gaat branden en u hoort 2 pieptonen als de
badges zijn gewist.
Voltar a aproximar, por 2 vezes consecutivas, o crachá gestor da instalação. Uma vez que interveio o cancelamento, acende-
se o LED verde da fechadura e o dispositivo emite 2 beep.
A página está carregando...
A página está carregando...
A página está carregando...

Video Kit
39
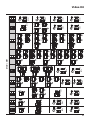
• Configurazione fisica
• Physical configuration
• Configuration physique
• Physische Konfiguration
• Configuración física
• Fysieke configuratie
• Configuração física
• Le funzioni che puoi attribure al tasto Preferiti ( ) in modo fisico (tramite configuratore inserito nella sede
MM-(unità)) sono le seguenti:
• The functions that can be attributed to the Preferred key ( ) using the physical procedure (configurator inserted in
the MM - (units) socket) are the following:
• Les fonctions qu’il est possible d’attribuer à la touche Favoris ( ) en mode physique (à travers le configurateur
placé dans le logement MM-(unité) sont les suivantes :
• Die Funktionen, die der Taste Favoriten ( ) physisch zugeordnet werden können (Konfigurator im Sitz MM-
(Einheit)) sind folgende:
• Las funciones a las que puede atribuir la tecla Favoritos ( ) físicamente (mediante un configurador en el
alojamiento MM-(unidad)) son las siguientes:
• De volgende functies kunnen op fysieke wijze aan de toets Favorieten ( ) worden toegekend (met de configuratie
in MM-(eenheden)):
• As funções que você pode atribuir ao botão Preferidos ( ) em modo físico (por meio de configurador inserido
no alojamento MM [unidade]) são as seguintes:
MM =
0
Comando Luce Scale
Staircase Light Control
Commande Lumières Escaliers
Steuerung Treppenlicht
Mando Luz Escaleras
Bediening traphuisverlichting
Comando da Luz das Escadas
MM =
1
Comando diretto Serratura del P+1
Direct control of P+1 Door lock
Commande directe Serrure du P+1
Direkte Schlosssteuerung der P+1
Mando directo Cerradura del P+1
Directe bediening slot P+1
Comando direto da Fechadura do P+1
P
+1
MOD=9
P
+1
P
+2
MOD=9
P
+2
P
+1
MOD=5
P
+1
P
+1
2
3
1 32
346210
1
P
+2
MOD=5
P
+2
P
+2
2
3
1 32
346210
1
P
+3
MOD=5
P
+3
P
+3
2
3
1 32
346210
1
P
+3
MOD=9
P
+3
MM =
2
Comando diretto Serratura del P+2
Direct control of P+2 Door lock
Commande directe Serrure du P+2
Direkte Schlosssteuerung der P+2
Mando directo Cerradura del P+2
Directe bediening slot P+2
Comando direto da Fechadura do P+2
P
+1
MOD=9
P
+1
P
+2
MOD=9
P
+2
P
+1
MOD=5
P
+1
P
+1
2
3
1 32
346210
1
P
+2
MOD=5
P
+2
P
+2
2
3
1 32
346210
1
P
+3
MOD=5
P
+3
P
+3
2
3
1 32
346210
1
P
+3
MOD=9
P
+3
MM =
3
Comando diretto Serratura del P+3
Direct control of P+3 Door lock
Commande directe Serrure du P+3
Direkte Schlosssteuerung der P+3
Mando directo Cerradura del P+3
Directe bediening slot P+3
Comando direto da Fechadura do P+3
P
+1
MOD=9
P
+1
P
+2
MOD=9
P
+2
P
+1
MOD=5
P
+1
P
+1
2
3
1 32
346210
1
P
+2
MOD=5
P
+2
P
+2
2
3
1 32
346210
1
P
+3
MOD=5
P
+3
P
+3
2
3
1 32
346210
1
P
+3
MOD=9
P
+3
MM =
4
Autoaccensione diretta del P+1
P+1 direct auto-switching on
Auto-allumage direct du P+1
Direkte Selbstschaltung der P+1
Autoencendido directo del P+1
Directe automatische P+1
Autoacendimento direto do P+1
P
+1
MOD=9
P
+1
P
2
3
1 32
346210
1
P
+2
MOD=9
P
+2
2
3
1 32
346210
1
P
+3
MOD=9
P
+3
2
3
1 32
346210
1
J1 J2 N
P M
A página está carregando...

Video Kit
41
Legenda Legend Légende Erläuterung Leyenda Legende Legenda
IT EN FR DE ES NL PT
P
+1
MOD=9
P
+1
P
+2
MOD=9
P
+2
P
P
+1
MOD=5
P
+1
P
+1
2
3
1 32
346210
1
P
+2
MOD=5
P
+2
P
+2
2
3
1 32
346210
1
P
+3
MOD=5
P
+3
P
+3
2
3
1 32
346210
1
P
+4
MOD=5
P
+4
P
+4
2
3
1 32
346210
1
1–+ 23 4
P
+3
MOD=9
P
+3
1–+ 23 4
2
3
1 32
346210
1
Attivazione del PE
(configurato con P+1)
in mo do di ret to sen za
la chia mata op pu re
at tivazione at tua to re
art. 346200/346210
(con fi gu rato con P+1 e
MOD=9).
Activating the EP
(configured with P+1)
directly without the call
or ac ti va ting actuator
Item 346200/346210
(con fi gured with P+1
and MOD=9).
Activation du PE (con fi-
guré avec P+1) en mode
direct sans l’appel ou
activation actionneur
réf. 346200/346210
(configuré avec P+1 et
MOD=9).
Aktivierung der Türstation
(mit P+1 konfiguriert)
auf direkte Weise ohne
Ruf oder Aktivierung
über den Aktivator art.
346200/346210 (mit P+1
und MOD=9).
Activación del PE
(configurado con P+1) en
modo directo sin lla ma da
o activación del actuador
art. 346200/346210
(configurado con P+1 y
MOD=9).
Rechtstreekse activering
van het deur station (als
P+1 ge con fi gu reerd)
zonder oproep of ac ti-
ve ring van het toestel
art. 346200/346210
(ge con fi gureerd als P+1
en MOD = 9).
Ligação da UE (con-
figurada com P+1) de
maneira directa sem
a cha ma da ou então
ligação do ac tua dor
art. 346200/346210
(configurado com P+1 e
MOD=9).
P
+1
MOD=9
P
+1
P
+2
MOD=9
P
+2
P
P
+1
MOD=5
P
+1
P
+1
2
3
1 32
346210
1
P
+2
MOD=5
P
+2
P
+2
2
3
1 32
346210
1
P
+3
MOD=5
P
+3
P
+3
2
3
1 32
346210
1
P
+4
MOD=5
P
+4
P
+4
2
3
1 32
346210
1
1–+ 23 4
1–+ 23 4
P
+3
MOD=9
P
+3
1–+ 23 4
Apertura serratura del PE
(con fi gurato con P+1)
in mo do di retto senza
la chia mata op pu re
at ti va zione attuatore
art.346200/346210
(con figurato con P+1
e MOD=5) op pu re
at ti va zione attuatore
art.346230 (con figurato
con P+1).
Door lock opening of EP
(con figured with P+1)
directly without the call
or activating the actuator
Item 346200/346210
(con figured with
P+1 and MOD=5) or
activating the actuator
Item 346230 (configured
with P+1).
Ouverture serrure du PE
(con fi gu ré avec P+1) en
mode di rect sans l’appel
ou ac ti vation ac tion neur
réf. 346200/346210
(con fi gu ré avec P+1 et
MOD=5) ou ac ti va tion
ac tion neur réf. 346230
(con fi gu ré avec P+1).
Türöffnung der Türstation
(mit P+1 konfiguriert)
oder Aktivierung über
den Aktivator Art.
346200/346210 (mit
P+1 und MOD=5) oder
Aktivierung über den
Aktivator Art. 346230
(mit P+1 konfiguriert).
Apertura cerradura
del PE (con figurado
con P +1) en modo
directo sin llamada o
activación del actuador
art. 346200/346210
(con fi gurado con P+1
y MOD=5) o ac ti vación
del actuador art. 346230
(con fi gu rado con P+1).
Rechtstreekse opening
van het deurslot van het
als P+1 ge con figureerde
deurstation, zonder
oproep of activering
van het to e stel art.
346200/346210 (ge-
con fi gu re erd als P+1 en
MOD=5) of ac ti ve ring
van het toestel art.
346230 (ge con figureerd
als P+1).
Abertura da fechadura
da UE (configurada com
P+1) de ma nei ra directa
sem a chamada ou então
ligação do actuador
art. 346200/346210
(configurado com P+1
e MOD=5) ou então
ligação do actuador art.
346230 (con fi gu ra do
com P+1).
P
+1
MOD=9
P
+1
P
+2
MOD=9
P
+2
P
P
+1
MOD=5
P
+1
P
+1
2
3
1 32
346210
1
P
+2
MOD=5
P
+2
P
+2
2
3
1 32
346210
1
P
+3
MOD=5
P
+3
P
+3
2
3
1 32
346210
1
P
+4
MOD=5
P
+4
P
+4
2
3
1 32
346210
1
1–+ 23 4
1–+ 23 4
P
+3
MOD=9
P
+3
1–+ 23 4
Apertura serratura del PE
(con fi gurato con P+2)
in mo do di retto senza
la chia mata op pu re
at ti va zione attuatore
art.346200/346210
(con figurato con P+2
e MOD=5) op pu re
at ti va zione attuatore
art.346230 (con figurato
con P+2).
Door lock opening of EP
(con figured with P+2)
directly without the call
or activating the actuator
Item 346200 (con figured
with P+2 and MOD=5)
or activating the actuator
Item 346230 (configured
with P+2).
Ouverture serrure du PE
(con fi gu ré avec P+2) en
mode di rect sans l’appel
ou ac ti vation ac tion neur
réf. 346200 (con fi gu ré
avec P+2 et MOD=5)
ou ac ti va tion ac tion neur
réf. 346230 (con fi gu ré
avec P+2).
Türöffnung der Türstation
(mit P+2 konfiguriert)
oder Aktivierung über
den Aktivator Art.
346200/346210 (mit
P+2 und MOD=5) oder
Aktivierung über den
Aktivator Art. 346230
(mit P+2 konfiguriert).
Apertura cerradura del PE
(con figurado con P+2) en
modo di recto sin llamada
o activación del actuador
art. 346200/346210
(con fi gurado con P+2
y MOD=5) o ac ti vación
del actuador art. 346230
(con fi gu rado con P+2).
Rechtstreekse opening
van het deurslot van het
als P+2 ge con figureerde
deurstation, zonder
oproep of activering
van het to e stel art.
346200/346210 (ge-
con fi gu re erd als P+2 en
MOD=5) of ac ti ve ring
van het toestel art.
346230 (ge con figureerd
als P+2).
Abertura da fechadura
da UE (configurada com
P+2) de ma nei ra directa
sem a chamada ou então
ligação do actuador
art. 346200/346210
(configurado com P+2
e MOD=5) ou então
ligação do actuador art.
346230 (con fi gu ra do
com P+2).
P
+1
MOD=9
P
+1
P
+2
MOD=9
P
+2
P
P
+1
MOD=5
P
+1
P
+1
2
3
1 32
346210
1
P
+2
MOD=5
P
+2
P
+2
2
3
1 32
346210
1
P
+3
MOD=5
P
+3
P
+3
2
3
1 32
346210
1
P
+4
MOD=5
P
+4
P
+4
2
3
1 32
346210
1
1–+ 23 4
1–+ 23 4
P
+3
MOD=9
P
+3
1–+ 23 4
Apertura serratura del PE
(con fi gurato con P+3)
in mo do di retto senza
la chia mata op pu re
at ti va zione attuatore
art.346200/346210
(con figurato con P+3
e MOD=5) op pu re
at ti va zione attuatore
art.346230 (con figurato
con P+3).
Door lock opening of EP
(con figured with P+3)
directly without the call
or activating the actuator
Item 346200/346210
(con figured with
P+3 and MOD=5) or
activating the actuator
Item 346230 (configured
with P+3).
Ouverture serrure du PE
(con fi gu ré avec P+3) en
mode di rect sans l’appel
ou ac ti vation ac tion neur
réf. 346200/346210
(con fi gu ré avec P+3 et
MOD=5) ou ac ti va tion
ac tion neur réf. 346230
(con fi gu ré avec P+3).
Türöffnung der Türstation
(mit P+3 konfiguriert)
oder Aktivierung über
den Aktivator Art.
346200/346210 (mit
P+3 und MOD=5) oder
Aktivierung über den
Aktivator Art. 346230
(mit P+3 konfiguriert).
Apertura cerradura del PE
(con figurado con P+3) en
modo di recto sin llamada
o activación del actuador
art. 346200/346210
(con fi gurado con P+3
y MOD=5) o ac ti vación
del actuador art. 346230
(con fi gu rado con P+3).
Rechtstreekse opening
van het deurslot van het
als P+3 ge con figureerde
deurstation, zonder
oproep of activering
van het to e stel art.
346200/346210 (ge-
con fi gu re erd als P+3 en
MOD=5) of ac ti ve ring
van het toestel art.
346230 (ge con figureerd
als P+3).
Abertura da fechadura
da UE (configurada com
P+3) de ma nei ra directa
sem a chamada ou então
ligação do actuador
art. 346200/346210
(configurado com P+3
e MOD=5) ou então
ligação do actuador art.
346230 (con fi gu ra do
com P+3).

42
Legenda Legend Légende Erläuterung Leyenda Legenda Legenda
IT EN FR DE ES NL PT
P
+1
MOD=9
P
+1
P
+2
MOD=9
P
+2
P
P
+1
MOD=5
P
+1
P
+1
2
3
1 32
346210
1
P
+2
MOD=5
P
+2
P
+2
2
3
1 32
346210
1
P
+3
MOD=5
P
+3
P
+3
2
3
1 32
346210
1
P
+4
MOD=5
P
+4
P
+4
2
3
1 32
346210
1
1–+ 23 4
1–+ 23 4
P
+3
MOD=9
P
+3
1–+ 23 4
Apertura serratura
del PE (con fi gurato
con P+4) in mo do
di retto senza la
chia mata op pu re
at ti va zione attuatore
art.346200/346210
(con figurato con P+4
e MOD=5) op pu re
at ti va zione attuatore
art.346230 (con figurato
con P+4).
Door lock opening of
EP (con figured with
P+4) directly without
the call or activating
the actuator Item
346200/346210 (con-
figured with P+4 and
MOD=5) or activating
the actuator Item
346230 (configured
with P+4).
Ouverture serrure du
PE (con fi gu ré avec
P+4) en mode di rect
sans l’appel ou ac-
ti vation ac tion neur
réf. 346200/346210
(con fi gu ré avec P+4 et
MOD=5) ou ac ti va tion
ac tion neur réf. 346230
(con fi gu ré avec P+4).
Türöffnung der
Türstation (mit P+4
konfiguriert) oder
Aktivierung über
den Aktivator Art.
346200/346210 (mit
P+4 und MOD=5) oder
Aktivierung über den
Aktivator Art. 346230
(mit P+4 konfiguriert).
Apertura cerradura
del PE (con figurado
con P+4) en modo
di recto sin llamada o
activación del actuador
art. 346200/346210
(con fi gurado con P+4
y MOD=5) o ac ti vación
del actuador art.
346230 (con fi gu rado
con P+4).
Rechtstreekse opening
van het deurslot van
het als P+4 ge con-
figureerde deurstation,
zonder oproep of
activering van het to e-
stel art. 346200/346210
(ge con fi gu re erd als
P+4 en MOD=5) of ac-
ti ve ring van het toestel
art. 346230 (ge con-
figureerd als P+4).
Abertura da fechadura
da UE (configurada
com P+4) de ma-
nei ra directa sem a
chamada ou então
ligação do actuador
art. 346200/346210
(configurado com P+4
e MOD=5) ou então
ligação do actuador art.
346230 (con fi gu ra do
com P+4).
Intercom tra
appartamenti in
impianti con interfaccia
da appartamento art.
346850.
Intercommunicability
between apartments in
systems with
apartment interface
item 346850.
Intercommunication
entre appartements
sur installations
avec interface
d’appartement réf.
346850.
Gegenseitige
Kommunikation
zwischen Wohnungen
für Anlagen mit
Wohnungsschnittstelle
Art. 346850.
Intercomunicación
entre apartamentos
en instalaciones
con interfaz de
departamento Art.
346850.
Intercom tussen
appartementen
in installaties
met interface van
appartement art.
346850.
Intercom entre
apartamentos
em instalações
com interface de
apartamento art.
346850.
Intercom all’interno
dell’appartamento in
impianti con interfaccia
di appartamento
art.346850;
oppure intercom
tra appartamenti
in impianti senza
interfaccia di
appartamento.
Intercommunicability
inside an apartment
in systems with
apartment interface
item 346850 or
intercommunicability
between apartments
in systems without
apartment interface.
Intercommunication
à l’intérieur de
l’appartement
sur installations
avec interface
d’appartement
réf. 346850 ou
intercommunication
entre appartements
sur installations
sans interface
d’appartement.
Gegenseitige
Kommunikation
innerhalb der Wohnung
für Anlagen mit
Wohnungsschnittstelle
Art. 346850 oder
gegenseitige
Kommunikation
zwischen Wohnungen
für Anlagen ohne
Wohnungsschnittstelle.
Intercomunicación
en el apartamento
en instalaciones
con interfaz de
apartamento
Art. 346850 o
intercomunicación
entre apartamentos
en instalaciones
sin interfaz de
apartamento.
Intercom binnen in
het appartement
in installaties
met interface van
appartement art.
346850 ofwel intercom
tussen appartementen
in installaties
zonder interface van
appartement.
Intercom dentro
do apartamento
em instalações
com interface de
apartamento art.
346850 ou então
intercom entre
apartamentos
em instalações
sem interface de
apartamento.
Intercom su se stesso,
invia la chiamata a
tutti gli apparecchi con
uguale indirizzo
Intercom on itself,
sends the call to all the
devices with the same
address.
Intercom sur lui-même,
envoie l’appel à tous
les appareils ayant une
adresse identique.
Intercom mit einseitiger
Funktion: sendet den
Ruf an alle Geräte mit
derselben Adresse.
Intercomunicación
hacia los aparatos
iguales, envía la
llamada a todos los
aparatos con igual
dirección
Intercom op zichzelf,
verstuurt de oproep
naar alle toestellen met
hetzelfde adres
Intercomunicador
sobre si mesmo, envia
a chamada a todos
os aparelhos com
endereço igual
Intercom generale,
invia una chiamata
a tutti gli apparecchi
dell’impianto
General intercom, sends
a call to all the system
devices
Intercom général,
envoie l’appel à
tous les appareils de
l’installation
Intercom mit
allgemeiner Funktion:
sendet den Ruf an alle
Geräte der Anlage.
Intercomunicación
general, envía una
llamada a todos
los aparatos de la
instalación
Algemene Intercom,
verstuurt een oproep
naar alle toestellen van
de installatie
Intercomunicador geral,
envia uma chamada a
todos os aparelhos da
instalação
A página está carregando...
A página está carregando...
A página está carregando...
A página está carregando...
A página está carregando...
A página está carregando...
A página está carregando...
A página está carregando...
A página está carregando...
A página está carregando...
-
 1
1
-
 2
2
-
 3
3
-
 4
4
-
 5
5
-
 6
6
-
 7
7
-
 8
8
-
 9
9
-
 10
10
-
 11
11
-
 12
12
-
 13
13
-
 14
14
-
 15
15
-
 16
16
-
 17
17
-
 18
18
-
 19
19
-
 20
20
-
 21
21
-
 22
22
-
 23
23
-
 24
24
-
 25
25
-
 26
26
-
 27
27
-
 28
28
-
 29
29
-
 30
30
-
 31
31
-
 32
32
-
 33
33
-
 34
34
-
 35
35
-
 36
36
-
 37
37
-
 38
38
-
 39
39
-
 40
40
-
 41
41
-
 42
42
-
 43
43
-
 44
44
-
 45
45
-
 46
46
-
 47
47
-
 48
48
-
 49
49
-
 50
50
-
 51
51
-
 52
52


Bticino 365711 Guia de instalação
- Tipo
- Guia de instalação
- Este manual também é adequado para
em outras línguas
- español: Bticino 365711 Guía de instalación
- français: Bticino 365711 Guide d'installation
- italiano: Bticino 365711 Guida d'installazione
- English: Bticino 365711 Installation guide
- Nederlands: Bticino 365711 Installatie gids
Artigos relacionados
-
Bticino 365711 Instruções de operação
-
-
-
-
-
-
-
-
-
Bticino 344643 Instruções de operação