Foster KS 60 MF 9 Features List
- Categoria
- Churrascos
- Tipo
- Features List
Este manual também é adequado para

Specifiche tecniche
Feature List
Feuille de Caractéristiques
Datenblatt
Hoja de Características
Характеристики
Gegevensblad
Folha de Caracteristicas
Φύλλο Προδιαγραφών
KS 60 MF 9


2
3
5
7
8
6
9
4
11
10
12
14
13
15
16
17
3
ITALIANO
KS 60 MF 9
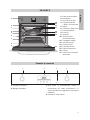
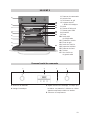
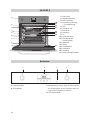
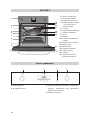
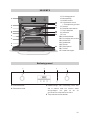
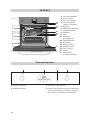
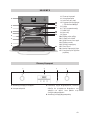
Pannello di comando
1 2 3 4
1 Pannello di comando
2 Guarnizione
3 Resistenza del grill
4 Supporto cromato
+ Guide di scorrimento
5 Griglia
6 Vassoio per pasticceria
7 Vassoio profondo
8 Cerniera
9 Sportello
10 Uscita dell’aria
di raffreddamento
11 Fissaggio al mobile
12 Schermo del grill
13 Uscita dei fumi
14 Lampada laterale
15 Pannello posteriore
16 Ventola
17 Vetro interno di grandi
dimensioni
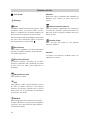
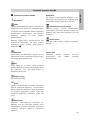
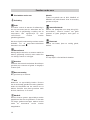
1 Selettore di funzione.
2 Orologio elettronico.
3 Spia pilota di riscaldamento. Indica la
trasmissione del calore all’alimento e si
spegne quando viene raggiunta la temperatura
impostata.
4 Selettore di temperatura.
1

4
Funzioni del forno
Spegnimento del forno
Illuminazione
Turbo
La ventola distribuisce il calore proveniente da
una resistenza situata nella parte posteriore del
forno. Grazie all'uniformità di temperatura
prodotta, consente di cucinare gli alimenti su
due altezze contemporaneamente.
Questa funzione consente anche di scongelare
gli alimenti portando il selettore di temperatura
in posizione
.
Standard
Si utilizza per dolci e torte in cui il calore ricevu-
to deve essere uniforme al fine di ottenere una
consistenza morbida e spugnosa.
Inferiore
Il calore proviene solo dalla parte inferiore del
forno. Adatto per riscaldare piatti o far lievitare
impasti.
Calore superiore
Per riscaldare i piatti.
Grill
Gratinatura e cottura arrosto superficiale.
Consente di dorare lo strato esterno degli
alimenti senza modificarne la parte interna.
Indicato per alimenti come bistecche, costine,
pesce, pane tostato.
MaxiGrill
Consente di gratinare superfici più estese ris-
petto al Grill, oltre a fornire una maggiore poten-
za di gratinatura, per ottenere una doratura più
rapida degli alimenti.
Attenzione
Durante l'uso della funzione Grill, MaxiGrill o
MaxiGrill ventilata, lo sportello deve essere
tenuto chiuso.
Aria calda ventilata intensa
Cottura di torte in teglia con fondo asciutto,
come ad esempio crostate, arrostitura intensa di
grandi arrosti e dipollame di grandi dimensioni
come ad esempio oche e tacchini.
Modo Pizza
Cottura di pane, pizza e torte morbide,
conservazione.
Nota
La lampadina resta accesa con qualsiasi funzio-
ne di cottrua.

5
ITALIANO
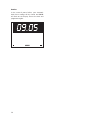
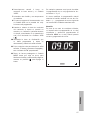
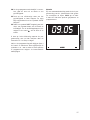
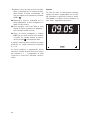
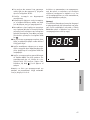
Regolazione dell’orologio elettronico
Al momento di collegare il forno, sul display
dell’orologio lampeggia la parola AUTO e l’indi-
cazione 00:00. Mantenere premuti i simboli
+ e - contemporaneamente, fino a quando viene
emesso un segnale acustico e compare un
punto luminoso lampeggiante tra le cifre
dell’orologio. Dopodiché, toccando i simboli
+ o - si potrà impostare l’orologio. Infine viene
emesso un segnale acustico a conferma del-
l’impostazione dell’ora. Rimane acceso
il simbolo .
Per modificare l’ora in un secondo momento,
seguire le istruzioni di cui sopra.
Funzionamento manuale
Una volta regolato l’orologio, il forno è pronto
per essere utilizzato. Girando le manopole del
forno, selezionare una temperatura e una fun-
zione di cottura.
Per spegnere il formo, girare le manopole in
posizione .
Funzioni dell’orologio elettronico
Allarme acustico: Emette un segnale acustico
allo scadere del tempo, per questa funzione non
è necessario che il forno sia acceso.
Durata della cottura: consente di cuocere per
il tempo impostato, trascorso il quale il forno si
spegnerà automaticamente.
Ora di fine cottura: consente di cuocere fino
a un orario definito, trascorso il quale il forno
si spegnerà automaticamente.
Durata della cottura e fine cottura: consente di
programmare il tempo e l’ora di fine cottura.
Con questa funzione il forno si accenderà auto-
maticamente all’ora necessaria per cuocere per
il tempo impostato (Tempo di cottura) e termi-
nare la cottura in modo automatico all’ora indi-
cata (Fine cottura).
Modifica del tono del timer acustico
1 Toccare i simboli + e - insieme. Lampeggia un
punto luminoso tra le cifre sullo schermo del-
l’orologio.
2 Toccare il simbolo MODE per visualizzare l’in-
dicazione “ton1” sullo schermo dell’orologio.
3 Toccando più volte il simbolo -, è possibile
modificare il tono sonoro del timer.
Programmazione dell’allarme acustico
1 Mantenere premuto il simbolo MODE.
Successivamente lampeggia il simbolo
sullo schermo dell’orologio.
2 Selezionare il tempo dopo il quale si desidera
che l’orologio emetta l’allarme acustico toc-
cando i simboli + oppure -.
3 A questo punto verrà emesso un segnale acu-
stico, appare l’ora attuale e il simbolo
rimane acceso, per indicare che il timer
è programmato.
4 Trascorso il tempo impostato, il forno emette-
rà un allarme acustico e il simbolo lam-
peggerà più rapidamente.
5 Toccare qualsiasi simbolo per silenziare
il segnale acustico. Il simbolo continua
a lampeggiare.
6 Mantenere premuto il simbolo MODE per dis-
attivare la funzione.
È possibile visualizzare in qualsiasi momento
il tempo rimanente, mantenendo premuto il sim-
bolo MODE fino a quando lampeggia simbolo .
A questo punto è possibile modificare il tempo
impostato toccando i simboli + oppure -. Si senti-
rà un segnale acustico a conferma della modifica.
Programmazione del tempo di cottura
1 Mantenere premuto il simbolo MODE fino al
segnale acustico. Dopodiché, toccando nuo-
vamente il simbolo MODE, appare la parola
“dur” sullo schermo dell’orologio.
2 Selezionare il tempo di cottura toccando
i simboli + oppure -.
Comandi del forno

6
3 A questo punto verrà emesso un segnale acu-
stico, appare l’ora attuale e il simbolo “AUTO”
rimane acceso, per indicare che il forno si
spegne automaticamente.
4 Selezionare una funzione e una temperatura
di cottura.
5 Al termine della cottura, il forno si spegne ed
emette un segnale acustico.
6 Toccare qualsiasi simbolo per silenziare
il segnale acustico. Il forno rimane spento
e il simbolo “AUTO” continua a lampeggiare.
7 Mantenere premuto il simbolo MODE fino al
segnale acustico per disattivare la funzione;
infine girare le manopole in posizione per
spegnere il forno.
È possibile visualizzare e modificare in qualsia-
si momento il tempo di cottura restante. A tal
fine, seguire le istruzioni di cui sopra.
Per annullare questa funzione, basta toccare
i simboli + e - insieme.
Programmazione dell’ora di fine cottura
1 Mantenere premuto il simbolo MODE fino al
segnale acustico. Successivamente, toccare il
simbolo MODE, fino a quando non compare la
parola “End” sullo schermo dell’orologio.
2 Selezionare l’ora di fine cottura toccando
i simboli + oppure -.
3 A questo punto verrà emesso un segnale acu-
stico, appare l’ora attuale e il simbolo “AUTO”
rimane acceso, per indicare che il forno si
spegne automaticamente.
4 Selezionare una funzione e una temperatura
di cottura.
5 Raggiunta l’ora di termine della cottura,
il forno si spegne ed emette un segnale acu-
stico.
6 Toccare qualsiasi simbolo per silenziare
il segnale acustico. Il forno rimane spento e il
simbolo “AUTO” continua a lampeggiare.
7 Mantenere premuto il simbolo MODE fino al
segnale acustico per disattivare la funzione;
infine girare le manopole in posizione per
spegnere il forno.
Questa funzione può essere utilizzata anche se
il forno è già in funzione. A tal fine seguire le
istruzioni indicate, a eccezione della numero 4.
È possibile visualizzare in qualsiasi momento
l’ora di fine cottura seguendo l’istruzione Nº1.
Per modificare l’ora di fine cottura è necessario
annullare la funzione, toccando i simboli + e -
insieme, quindi riprogrammarla seguendo
le istruzioni di cui sopra.
Programmazione della durata di cottura
e dell’ora di fine cottura
11 Mantenere premuto il simbolo MODE fino al
segnale acustico. Dopodiché, toccando nuo-
vamente il simbolo MODE, appare la parola
“dur” sullo schermo dell’orologio.
12 Selezionare il tempo di cottura toccando
i simboli + oppure -.
13 Sarà emesso un segnale acustico, sarà
visualizzata l’ora corrente e il simbolo
“AUTO”.
14 Mantenere premuto il simbolo MODE fino al
segnale acustico. Successivamente, toccare
il simbolo MODE, fino a quando non compa-
re “End” sullo schermo dell’orologio.
15 Selezionare l’ora di fine cottura toccando
i simboli + oppure -.
16 Sarà emesso un segnale acustico, sarà
visualizzata l’ora corrente e il simbolo
“AUTO”.
17 Selezionare una funzione e una temperatu-
ra di cottura.
18 Il forno rimane spento, con il simbolo AUTO
sullo schermo dell’orologio. Il forno adesso è
programmato.

7
ITALIANO
È possibile visualizzare in qualsiasi momento la
programmazione dell’orologio seguendo le
istruzioni nº 1 e 4.
Per modificare la programmazione è necessario
annullare la funzione, toccando i simboli + e -
insieme, quindi riprogrammarla seguendo le
istruzioni di cui sopra.
Attenzione
In caso di interruzione dell’alimentazione elet-
trica, la programmazione dell’orologio elettro-
nico sarà cancellata e sull’orologio sarà visua-
lizzata l’indicazione 00:00. Sarà quindi neces-
sario procedere a una nuova regolazione
e programmazione.
19 Quando si raggiunge l’ora di inizio cottura,
il forno si accenderà e resterà in funzione
per il tempo impostato. Sullo schermo del-
l’orologio sono illuminati i simboli AUTO e .
10 Raggiunta l’ora programmata di termine
della cottura, il forno si spegne ed emette un
segnale acustico.
11 Premere qualsiasi tasto per silenziare
il segnale acustico. Il forno rimane spento
e il simbolo “AUTO” continua a lampeggiare.
12 Mantenere premuto il simbolo MODE fino al
segnale acustico per disattivare la funzione;
infine girare le manopole in posizione
per spegnere il forno.

KS 60 MF 9
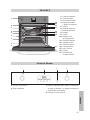
Control Panel
11 Control Panel
12 Oven Seal
13 Grill Element
14 Chrome Support
+ Telescopic Guides
15 Oven Grid
16 Cake Tray
17 Deep Tray
18 Hinge
19 Door
10 Air Outlet
for Cooling
11 Cabinet Mounting
12 Grill Screen
13 Smoke Outlet
14 Side light
15 Back Wall Panel
16 Fan
17 Large Inner
Glass Door
1 Function selector
2 Electronic clock
3 Heating indicator light. Indicates that the
heat is going to the food and it goes out
when the set temperature is reached.
4 Temperature selector
2
3
5
7
8
6
9
4
11
10
12
14
13
15
16
17
1
8
1 2 3 4

9
ENGLISH
Oven Functions
Switch off oven
Lighting
Turbo
The fan distributes the heat produced by an
element located at the rear of the oven. Due to
the uniform heat distribution, it allows roasting
and baking to take place at two heights at the
same time.
This cooking mode allows defrosting of food. To
do this, set the temperature selector to
position.
Conventional
It is used for sponges and cakes where the heat
received must be uniform to achieve a spongy
texture.
Lower element
Heats only from beneath. Suitable for heating
dishes and raising pastry and similar.
Top Heat
To warm plates.
Grill
For preparing dishes with superficial roasting. It
allows the outer layer to be browned without
affecting the inside of the food. Ideal for flat
food, such as steaks, ribs, fish, toast.
MaxiGrill
Allows greater surfaces to be prepared, than
with the grill, together with higher power
reducing the time required for browning of the
food.
Caution
While using the Grill, MaxiGrill or MaxiGrill with
fan, the door must be kept closed.
Intensive hot air convection
Baking large flat cakes with a dry topping (such
as a crumble topping), intensive roasting of large
joints and large poultry such as goose or turkey.
Pizza mode
Baking bread, pizzas and moist cakes, making
preserves.
Note
The pilot light remains on in any cooking
function.

10
Setting the Electronic Clock
When you switch on the oven, you will notice
that the word AUTO will flash on the display
with 00:00. Press the + and – symbols until
you hear a beep and see a dot flashing
between the digits of the clock. Then set the
clock time by pressing on the + or – symbols.
You will hear a beep to confirm that the time
has been set. The symbol will remain lit.
Should you wish to change the time, follow
these instructions again.
Manual Operation
After setting the clock, the oven is ready for
use. Select a cooking temperature and func-
tion by pressing and turning the oven controls.
To turn off the oven, set the controls to .
Electronic Clock Functions
Timer Alarm: An audible signal is produced at
the programmed time, even if the oven is not
being used.
Cooking Time: This function allows you to pro-
gramme cooking time length, after which the
oven will turn off automatically.
Cooking Stop Time: This function allows you to
programme the time for cooking to stop,
after which the oven will turn off automatically.
Cooking Time and Cooking Stop Time: This
function allows both cooking time length and
the stop time to be programmed. The oven
switches on automatically at the set time and
operates for the cooking time it has been pro-
grammed for. It switches itself off automati-
cally at the entered stop time.
Changing the Clock Alarm Tone
1 Press + and - at the same time. You will noti-
ce a dot light up between the + and –
symbols on the clock display.
2 Press MODE and you will see “ton1” light up
on the clock display.
3 The alarm tone can be changed by repea-
tedly pressing on the - symbol.
Programming the Timer Alarm
1 Press on MODE. The symbol will flash on
the clock display.
2 Select the length of time after which you
want the alarm to sound by pressing on
+ or -.
3 The alarm will be confirmed by two conse-
cutive beeps and the display will show the
current time. The symbol will remain lit.
4 At the programmed time, the alarm will
sound and the symbol will begin to flash.
5 Press on any symbol to turn off the alarm.
The symbol will continue to flash.
6 Keep pressing MODE until the function is
switched off.
You can see how much time is left at any time
by pressing MODE until the symbol flas-
hes. You can then change the selected time
by pressing + or -. The beep you hear will con-
firm the new time has been set.
Programming Cooking Time
1 Press MODE until you hear a beep. Press
MODE again and the word “dur” will appear
on the clock display.
2 Select the cooking time by pressing + or -.
3 You will then hear a beep and the present
time and the word “AUTO” will light up to
show that the oven will switch off automati-
cally.
Oven Use

11
4 Select a cooking function and temperature.
5 When the set cooking time is over, the oven
will turn off and an alarm will sound.
6 Press any symbol to turn off the alarm. The
oven will remain off and AUTO will continue
to flash.
7 Keep pressing on MODE until you hear a
beep to show the function is now off. Then
set the controls to to switch off the
oven.
You can see how much time is left and chan-
ge the remaining cooking time. Follow the pre-
vious instructions.
To cancel this function, just press + and - at
the same time.
Programming the Cooking Stop Time
1 Press MODE until you hear a beep. Then
press MODE until the word “End” appears
on the clock display.
2 Select the cooking stop time by pressing
+ or -.
3 You will then hear a beep and the present
time and the word “AUTO” will light up to
show that the oven will switch off automati-
cally.
4 Select a cooking function and temperature.
5 When it is the time for cooking to stop, the
oven will switch off and an alarm will sound.
6 Press any symbol to turn of the alarm. The
oven will remain off and AUTO will continue
to flash.
7 Keep pressing on MODE until you hear a
beep to show the function is now off. Then
set the controls to to switch off the
oven.
You can use this function even if you are coo-
king with the oven. If this is the case, follow
all of the above instructions except No. 4.
You can see the stop cooking time at any time
by following instruction No.1.
Programming Cooking Time and Cooking
Stop Time
11 Press MODE until you hear a beep. If you
press MODE again, the word “dur” will
appear on the clock display.
12 Select the cooking time by pressing + or -.
13 A beep will then sound and the present
time and AUTO will show.
14 Press MODE until you hear a beep. Then
press MODE until the word “End” appears
on the clock display.
15 Select the stop cooking time by pressing
+ or -.
16 A beep will then sound and the present time
and AUTO will show.
17 Select a cooking function and temperature.
18 The oven will remain off with AUTO on the
clock display. The oven is now programmed.
1
9 When it is the time for cooking to start, the
oven will switch on and cooking will conti-
nue for the selected time. The symbols
AUTO and will light up on the clock display.
10 When the programmed time is reach, the
oven will switch itself off and an alarm will
sound.
11 Press any symbol to stop the alarm. The
oven will remain off and AUTO will continue
to flash.
12 Press MODE until you hear a beep in order
to switch off the function. Then set the
controls to to switch off the oven.
You can see the state of the timer at any time
by following instructions 1 and 4.
If you wish to modify the timer setting, you
must cancel the function by pressing + and -
at the same time. Re-programme the oven by
following the instructions given.
ENGLISH

12
Caution
In the event of power failure, your electronic
clock timer settings will be erased and 00:00
will flash on the display. Reset the clock and
programme again.

13
KS 60 MF 9
Panneau frontal de commande
11 Panneau de commande
12 Joint de four
13 Résistance du grill
14 Support chromé
+ Guides télescopique
15 Grille
16 Plateau à Patisserie
17 Plateau pour Rôtis
18 Charnière
19 Porte
10 Sortie d’air
de réfrigération
11 Fixation au meuble
12 Écran du grill
13 Sortie des fumées
14 Ampoules latérales
15 Panneau du fond
16 Turbine
17 Vitre intérieure
de grande taille
1 Sélecteur de fonctions
2 Horloge électronique
3 Voyant lumineux de chauffage. Il indique que
la chaleur est transmise à l'aliment et s'éteint
quand la température choisie est atteinte.
4 Sélecteur de températures
2
3
5
7
8
6
9
4
11
10
12
14
13
15
16
17
1
FRANÇAIS
1 2 3 4

14
Fonctions du four
Arrêt du four
Eclairage
Turbo
La turbine répartit la chaleur qui provient d’une
résistance située à la partie arrière du four.
Grâce à l’uniformité de la chaleur produite, on
peut cuisiner à 2 hauteurs en même temps.
Cette function permet de décongeler doucement
des mets. Pour l’utilisation, réglez le sélecteur
des temperatures sur la position .
Conventionnel
Utiliser pour les gâteaux et les tartes qui doivent
recevoir une chaleur uniforme et pour obtenir
une texture moelleuse.
Résistance inférieure
La chaleur provient seulement de la partie
inférieure. Approprié pour réchauffer des plats
ou faire lever des pâtes pour pâtisseries et
analogues.
Convenction de voûte
Pour chauffer les plats.
Grill
Pour gratiner et rôtir superficiellement. Permet
de dorer la couche extérieure sans affecter
l'intérieur de l'aliment. Indiqué pour les pièces
plates telles que les beefsteaks, les côtelettes,
les poissons, les toasts.
MaxiGrill
Permet de gratiner des surfaces plus grandes
qu'avec le Grill avec une puissance pour gratiner
supérieure, qui permet ainsi de dorer l'aliment
de façon plus rapide.
Attention
Quand on utilise la fonction Grill, MaxiGrill ou
MaxiGrill avec Turbine, la porte doit rester
fermée.
Chaleur tournante intensive
Cuire des biscuits à garnissage sec (recouverts
de pâte par exemple), griller intensément de
gros rôtis et pour les grosses volailles telles que
dindes et oies.
Fonction «Pizza»
Cuire du pain, des pizzas et des gâteaux
moelleux; stériliser.
Attention
La lampe reste allumée pendant toutes les
fonctions de cuisson.

15
FRANÇAIS
Réglage de l’heure sur l’horloge électronique
Lors de la mise en marche du four, vous verrez
le mot AUTO et l’indication 00:00 clignoter sur
l’afficheur de l’horloge. Appuyez simultanément
et de façon prolongée sur les symboles + et -,
vous entendrez alors un bip et vous verrez un
point lumineux clignotant entre les chiffres de
l’horloge. Ensuite, réglez l’heure de l’horloge en
appuyant sur les symboles + ou -. Vous enten-
drez ensuite un bip pour confirmer l’heure sélec-
tionnée. Le symbole restera allumé.
Si vous désirez modifier l'heure, veuillez sui-
vre les instructions précédemment indiquées.
Fonctionnement manuel
Une fois l’horloge réglée, votre four est prêt à
fonctionner. Appuyez et tournez les comman-
des du four pour sélectionner une températu-
re et une fonction de cuisson.
Pour arrêter le four, placez les commandes
sur la position .
Fonctions de l’horloge électronique
Avertisseur : il génère un signal sonore lors-
que la durée sélectionnée est écoulée. Pour
l’utiliser, il n’est pas nécessaire que le four
soit en cours de cuisson.
Durée de cuisson : permet d’ajuster le temps
de cuisson. Lorsque la durée sélectionnée est
écoulée, le four s’éteint automatiquement.
Heure de fin de cuisson : permet d’ajuster le
temps de cuisson jusqu’à une certaine heure.
Lorsque l’heure sélectionnée est atteinte, le
four s’éteint automatiquement.
Durée et fin de cuisson : permet de program-
mer la durée et l’heure de fin de cuisson.
Cette fonction permet une mise en marche
automatique du four pour l’heure choisie, et la
durée de cuisson sélectionnée (Durée). Le
four s’éteint automatiquement à l’heure indi-
quée (fin de cuisson).
Changement de la tonalité de l’avertisseur
de l’horloge
1 Appuyez simultanément sur les symboles +
et -. Vous verrez un point lumineux clignoter
entre les chiffres de l'afficheur de l'horloge.
2 Appuyez sur le symbole MODE et vous
verrez l'indication « ton1 » sur l’afficheur de
l’horloge.
3 En appuyant de manière répétée sur le
symbole -, vous pourrez modifier la tonalité
de l’avertisseur sonore.
Programmation de l’avertisseur
1 Appuyez longtemps sur MODE. Ensuite,
vous verrez le symbole clignoter sur
l’afficheur de l’horloge.
2 Sélectionnez le temps après lequel vous dési-
rez que l’horloge sonne en appuyant + ou -.
3 Vous entendrez alors 1 bip puis l’heure
s’affichera et le symbole restera allumé,
indiquant que l’avertisseur est activé.
4 Une fois écoulé le délai programmé, un si-
gnal sonore se fera entendre et le symbole
se mettra à clignoter.
5 Appuyez sur n’importe quel symbole pour
arrêter le signal sonore. Le symbole con-
tinuera de clignoter.
6 Appuyez longtemps sur le symbole MODE
afin de terminer la fonction.
À tout moment vous pouvez visualiser le
temps restant en appuyant de façon prolon-
gée sur le symbole MODE jusqu'à ce que le
symbole clignote. Vous pouvez alors modi-
fier le temps sélectionné en appuyant sur les
symboles + ou -. Vous entendrez ensuite 1 bip
confirmant la modification .
Fonctionnement du four

16
Programmation de la durée de cuisson
1 Appuyez longtemps sur le symbole MODE jus-
qu’à l’émission d’un bip. Ensuite, en appu-
yant de nouveau sur le symbole MODE, le mot
« dur » apparaît sur l’afficheur de l'horloge.
2 Sélectionnez la durée de cuisson en
appuyant sur + ou -.
3 Après quoi, un bip retentit, l’heure apparaît
et le symbole « AUTO » reste allumé, indi-
quant l’extinction automatique du four.
4 Sélectionnez une fonction et une tempéra-
ture de cuisson.
5 Une fois la durée de cuisson écoulée, le
four s'éteint et un signal sonore retentit.
6 Appuyez sur n’importe quel symbole pour
arrêter le signal sonore. Le four reste éteint
et le symbole « AUTO » continue de clignoter.
7 Appuyez longtemps sur le symbole MODE
jusqu’à l’émission d’un bip pour terminer la
fonction. Ensuite, mettez les commandes
en position pour éteindre le four.
À tout moment, vous pouvez visualiser et
modifier le temps de cuisson restant. Pour ce
faire, veuillez suivre les instructions précé-
demment indiquées.
Si vous désirez annuler cette fonction, il vous
suffit d’appuyer simultanément sur les
symbole + et -.
Programmation de l’heure de fin de cuisson
1 Appuyez longtemps sur le symbole MODE
jusqu’à l’émission d’un bip. Ensuite,
pressez le symbole MODE jusqu’à l’appari-
tion du mot « End » sur l’afficheur de l’horloge.
2 Sélectionnez l’heure de fin de cuisson en
appuyant sur + ou -.
3 Après quoi, un bip retentit, l’heure apparaît
et le symbole « AUTO » reste allumé, indi-
quant l’extinction automatique du four.
4 Sélectionnez une fonction et une tempéra-
ture de cuisson.
5 Une fois arrivé à l’heure de fin de cuisson,
le four s'éteint et un signal sonore retentit.
6 Appuyez sur n’importe quel symbole pour
arrêter le signal sonore. Le four reste éteint
et le symbole « AUTO » continue de clignoter.
7 Appuyez longtemps sur le symbole MODE
jusqu’à l’émission d’un bip pour terminer la
fonction. Ensuite, mettez les commandes
en position pour éteindre le four.
Vous pouvez utiliser cette fonction même en
cours de cuisson. Il suffit alors de suivre ces
mêmes instructions, à l’exception de l’étape 4.
À tout moment, vous pouvez visualiser l’heure
de fin de cuisson en suivant l’instruction nº 1.
Si vous souhaitez modifier l’heure de fin de
cuisson, vous devrez annuler la fonction en
appuyant simultanément sur + et -, et la repro-
grammer en suivant les instructions précé-
demment indiquées.
Programmation de la durée et de la fin de
cuisson
11 Appuyez longtemps sur le symbole MODE
jusqu’à l’émission d’un bip. Ensuite, en
appuyant de nouveau sur le symbole
MODE, le mot « dur » apparaît sur l’affi-
cheur de l'horloge.
12 Sélectionnez la durée de cuisson en ap-
puyant sur + ou -.
13 Après quoi, un bip retentit, l’heure appa-
raît et le symbole « AUTO ».
14 Appuyez longtemps sur le symbole MODE
jusqu’à l’émission d’un bip. Ensuite, ap-
puyez sur le symbole MODE jusqu’à appari-
tion du mot « End » sur l’afficheur de
l’horloge.
15 Sélectionnez l’heure de fin de cuisson en
appuyant sur + ou -.
16 Après quoi, un bip retentit, l’heure appa-
raît et le symbole « AUTO ».
17 Sélectionnez une fonction et une tempéra-
ture de cuisson.
18 Le four reste éteint. Le symbole AUTO
reste affiché sur l’afficheur de l’horloge.
Votre four est programmé.

17
FRANÇAIS
19 Lorsque vous atteindrez l’heure du début
de la cuisson, le four se mettra en marche
et la cuisson se fera durant le temps
sélectionné. Sur l’afficheur de l’horloge,
les symboles AUTO et sont allumés.
10 Une fois arrivé à l’heure de fin de cuisson
programmée, le four s’éteint et un signal
sonore se retentit.
11 Appuyez sur n’importe quel symbole pour
arrêter le signal sonore. Le four reste
éteint et le symbole « AUTO » continue de
clignoter.
12 Appuyez longtemps sur le symbole MODE
jusqu’à l’émission d’un bip pour arrêter la
fonction. Ensuite, mettez les commandes
en position pour éteindre le four.
À tout moment, vous pouvez visualiser la pro-
grammation de votre horloge et suivant les
instructions nº 1 et 4.
Si vous désirez modifier la programmation,
vous devrez annuler la fonction en appuyant
simultanément sur + et -, et la reprogrammer
en suivant les instructions précédemment
indiquées.
Attention
En cas de coupure de courant, toute la pro-
grammation de l’horloge électronique sera
annulée et l’indication 00:00 clignotera sur
l’afficheur de l’horloge. Il vous faudra alors
remettre l’horloge à l’heure et procéder à une
nouvelle programmation.

KS 60 MF 9
Bedienfeld
11 Bedienfeld
12 Backofendichtung
13 Grillwiderstand
14 Verchromte Halterung
+ Teleskopführung
15 Rost
16 Backblech tief
17 Backblech
18 Scharnier
19 Tür
10 Kühlluftaustritt
11 Befestigung am
Einbauschrank
12 Grillblech
13 Abzug
14 Seitenlampen
15 Rückwand
16 Ventilator
17 Große Innenglasscheibe
1 Funktionswähler.
2 Elektronikuhr.
3 Kontrolleuchte Heizen zeigt die Einschaltung
der Heizelemente an und verlischt, wenn die
eingestellte Temperatur erreicht ist.
4 Temperaturwähler.
2
3
5
7
8
6
9
4
11
10
12
14
13
15
16
17
1
18
1 2 3 4

19
DEUTSCH
Backofenfunktionen
Ausschalten des Herds
Beleuchtung
Turbo
Der Lüfter verteilt die von einem an der
Rückseite des Herds angeordneten
Heizwiderstand erzeugte Wärme. Auf Grund der
erzeugten gleichmäßigen Temperatur verteilung
ist ein Garen in 2 Etagen gleichzeitig möglich.
Wenn Sie den Temperaturregler auf null stellen,
können Sie mit dieser Funktion
die
Nahrungsmittel auftauen.
Normal
Verwendung für Kuchen und Tortenböden, bei
denen die Wärmeeinwirkung gleichmäßig sein
muß, damit diese gut aufgehen.
Unterhitze
Es wird nur von der Unterseite Wärme zugeführt.
Geeignet zum Anwärmen von Tellern, zum
Aufgehen von Teigmassen oder für ähnliche
Anwendungen.
Oberhitze
Tellerwärmen.
Grill
Gratinieren und Anbräunen. Gestattet das
Anbräunen der Außenschicht, ohne das Innere
der Nahrungsmittel zu beeinflussen. Geeignet
für flache Stücke wie Beefsteak, Rippchen,
Fisch, Toastbrot.
MaxiGrill
Grillen auf größerer Oberfläche und mit größerer
Leistung als mit dem Grill, hierdurch erfolgt ein
schnelleres Bräunen der Speisen.
Achtung
Bei Benutzung der Funktionen Grill muß die
Herdtür geschlossen sein.
Intensiv-Heißluft
Backen von Blechkuchen mit trockenem Belag
(z. B. Streusel), Intensivbraten von großen
Braten und großem Geflügel wie z. B. Gänse und
Puten.
Pizza-Stufe
Backen von Brot, Pizza und feuchten Kuchen,
Einkochen.
Achtung
Die Beleuchtung ist bei allen Kochfunktionen
eingeschaltet.

20
Einstellen der Uhrzeit der Elektronikuhr
Wenn Sie den Backofen an das Netz
anschließen, blinken auf der Uhr das Wort
AUTO und die Anzeige 00:00. Drücken Sie
gleichzeitig und länger die Symbole + und -,
dann hören Sie einen Piepton und sehen
einen blinkenden Leuchtpunkt zwischen den
Ziffern der Uhr; danach drücken Sie zur
Zeiteinstellung die Symbole + oder –.
Schließlich hören Sie einen Piepton zur
Bestätigung der gewählten Uhrzeit. Das
Symbol bleibt erleuchtet.
Wenn Sie irgendwann die Uhrzeit ändern
wollen, folgen Sie den vorstehend erwähnten
Anleitungen.
Manueller Betrieb
Nach Einstellung der Uhrzeit ist der Backofen
betriebsbereit. Durch Drücken und Drehen der
Bedienknöpfe können Sie Temperatur und
Garfunktionen wählen.
Um den Backofen auszuschalten, drehen Sie
den Knopf auf .
Funktionen der Elektronikuhr
Küchenwecker: Erzeugt ein Signal am Ende
der eingestellten Zeit, unabhängig davon, ob
der Backofen heizt oder nicht.
Garzeit-Dauer: Ermöglicht das Garen während
der gewählten Zeit, danach schaltet sich der
Backofen automatisch aus.
Garzeit-Ende: Ermöglicht die Garung bis zu
einer vorgewählten Zeit; danach schaltet sich
der Backofen automatisch ab.
Garzeit-Dauer und Garzeit-Ende: Ermöglicht
die Einstellung der Dauer und der Endzeit der
Garung. Mit dieser Funktion schaltet sich der
Backofen automatisch zu der passenden
Uhrzeit für die vorgewählte Garzeit (Dauer) ein
und schaltet sich automatisch beim Erreichen
der eingestellten Zeit (Garzeit-Ende) ab.
Ändern des Wecker-Tons
1 Berühren Sie gleichzeitig die Symbole +
und -. Sie sehen einen blinkenden
Leuchtpunkt zwischen den Ziffern der Uhr.
2 Berühren Sie das Symbol MODE und Sie
sehen die Anzeige “ton1” auf der Uhr.
3 Indem Sie das Symbol – wiederholt
berühren, können Sie den Ton des Weckers
ändern.
Programmierung des Weckers
1 Drücken Sie das Symbol MODE längere Zeit.
Danach blinkt das Symbol auf der Uhr.
2 Wählen Sie die Zeitdauer, nach deren Ablauf
der Wecker ertönen soll, indem Sie die
Symbole + oder – drücken.
3 Danach ertönt ein Piepton, die aktuelle
Uhrzeit wird angezeigt und das Symbol
bleibt erleuchtet, um anzuzeigen, dass
der Wecker programmiert ist.
4 Wenn die eingestellte Zeit abgelaufen ist,
ertönt ein Signal und das Symbol fängt
an zu blinken.
5 Berühren Sie irgendein Symbol, um das
Signal abzustellen. Das Symbol blinkt
weiterhin.
6 Drücken Sie längere Zeit das Symbol MODE,
um die Funktion auszuschalten.
Sie können jederzeit die Restzeit sehen,
indem Sie das Symbol MODE lange drücken,
bis das Symbol blinkt. So können Sie
auch die gewählte Zeit ändern, indem Sie
die Symbole + oder – berühren. Danach
hören Sie einen Piepton zur Bestätigung der
Änderung.
Programmierung der Gar-Dauer
1 Drücken Sie so lange das Symbol MODE, bis
ein Piep ertönt. Danach berühren Sie
nochmals das Symbol MODE und das Wort
"dur" erscheint auf der Uhr.
2 Wählen Sie die Gardauer, indem Sie die
Symbole + oder – drücken.
Bedienung des Backofens
A página está carregando ...
A página está carregando ...
A página está carregando ...
A página está carregando ...
A página está carregando ...
A página está carregando ...
A página está carregando ...
A página está carregando ...
A página está carregando ...
A página está carregando ...
A página está carregando ...
A página está carregando ...
A página está carregando ...
A página está carregando ...
A página está carregando ...
A página está carregando ...
A página está carregando ...
A página está carregando ...
A página está carregando ...
A página está carregando ...
A página está carregando ...
A página está carregando ...
A página está carregando ...
A página está carregando ...
A página está carregando ...
A página está carregando ...
A página está carregando ...
A página está carregando ...
-
 1
1
-
 2
2
-
 3
3
-
 4
4
-
 5
5
-
 6
6
-
 7
7
-
 8
8
-
 9
9
-
 10
10
-
 11
11
-
 12
12
-
 13
13
-
 14
14
-
 15
15
-
 16
16
-
 17
17
-
 18
18
-
 19
19
-
 20
20
-
 21
21
-
 22
22
-
 23
23
-
 24
24
-
 25
25
-
 26
26
-
 27
27
-
 28
28
-
 29
29
-
 30
30
-
 31
31
-
 32
32
-
 33
33
-
 34
34
-
 35
35
-
 36
36
-
 37
37
-
 38
38
-
 39
39
-
 40
40
-
 41
41
-
 42
42
-
 43
43
-
 44
44
-
 45
45
-
 46
46
-
 47
47
-
 48
48


Foster KS 60 MF 9 Features List
- Categoria
- Churrascos
- Tipo
- Features List
- Este manual também é adequado para
em outros idiomas
- español: Foster KS 60 MF 9
- français: Foster KS 60 MF 9
- italiano: Foster KS 60 MF 9
- English: Foster KS 60 MF 9
- русский: Foster KS 60 MF 9
- Nederlands: Foster KS 60 MF 9
- Deutsch: Foster KS 60 MF 9
Artigos relacionados
Outros documentos
-
Barazza 1FFYPI Instruções de operação
-
Caple C2100 Manual do usuário
-
-
Baumatic BO920TS - 33701358 Manual do usuário
-
Baumatic BO667TS-DD Manual do usuário
-
-
Whirlpool XC 902 GH DC.3 S Guia de usuario
-
-
Teka HSC 644 C Manual do usuário
-
Gorenje BO73ORAW Manual do usuário