Barazza 1FFYPI Instruções de operação
- Categoria
- Microondas
- Tipo
- Instruções de operação

Specifiche tecniche
Technical Specifications
Hoja de Características
Folha de Características
Fiche de caractéristiques
Datenblatt
Gegevensblad
FEEL 1FFYPI
3172891-000 22/04/15 11:53 Página 1

3172891-000 22/04/15 11:53 Página 2

3
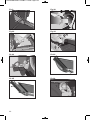
ITALIANO
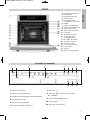
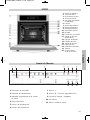
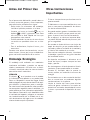
1FFYPI
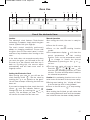
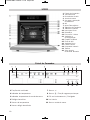
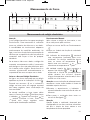
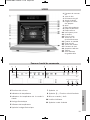
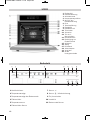
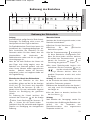
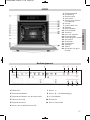
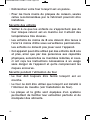
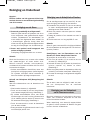
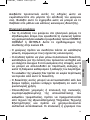
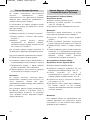
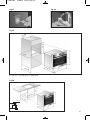
1 Pannello di comando
2 Guarnizione
3 Resistenza del grill
4 Sonda carne
5 Impugnatura per
l'estrazione dei vassoi
6 Griglia
7 Guide di scorrimento
8 Vassoio per pasticceria
9 Vassoio profondo
10 Interruttore sportello
11 Cerniera
12 Sportello a 3 vetri
13 Uscita dell’aria
di raffreddamento
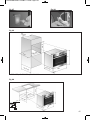
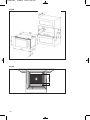
14 Fissaggio al mobile
15 Schermo del grill
16 Uscita dei fumi
17 Pannello posteriore
18 Luci laterali
19 Ventola
20 Vetro interno grande
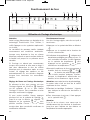
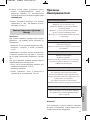
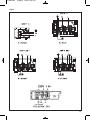
11 Funzioni di cottura
12 Indicatore di temperatura
13 Indicatore di temperatura della sonda carne
14 Orologio elettronico
15 Sensore di temperatura
16 Sensore orologio elettronico
17 Sensore
18 Sensore /Funzione di sicurezza
per i bambini
19 Accensione/Spegnimento
10 Luce interna
11 Sensore sonda carne
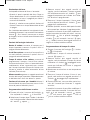
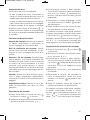
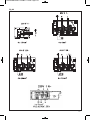
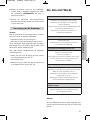
Pannello di comando
1 2 3 4 5 6
7
8
11 10 9
3172891-000 22/04/15 11:53 Página 3

4
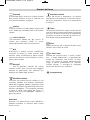
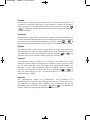
Standard ventilato
Adatto per arrosti e pasticceria. La ventola
distribuisce uniformemente il calore all'interno
del forno riducendo il tempo e la temperatura
di cottura.
Turbo
La ventola distribuisce il calore proveniente da
una resistenza situata nella parte posteriore
del forno. Grazie all'uniformità di temperatura
prodotta, consente di cucinare gli alimenti su
due altezze contemporaneamente.
Pizza
Apposita funzione per la cottura di pizze, torte
salate o dolci ripieni di frutta.
A fuoco lento
Indicata per cucinare carni in salsa, stufati,
ecc... in modo tradizionale, e in generale per
ricette che richiedono una cottura "a fuoco
lento", con tempi di cottura particolarmente
lunghi a bassa temperatura. Per ottenere
risultati ottimali, si consiglia di impiegare
casseruole da forno con coperchio.
Scongelamento
Standard
Si utilizza per dolci e torte in cui il calore ricevuto
deve essere uniforme al fine di ottenere una
consistenza morbida e spugnosa.
Inferiore
Il calore proviene solo dalla parte inferiore del
forno. Adatto per riscaldare piatti o far lievitare
impasti.
Grill e Inferiore
Particolarmente adatta per agli arrosti. Si
utilizza per qualsiasi pezzo di carne,
indipendentemente dalle sue dimensioni.
Grill
Gratinatura e cottura arrosto superficiale.
Consente di dorare lo strato esterno degli
alimenti senza modificarne la parte interna.
Indicato per alimenti come bistecche, costine,
pesce, pane tostato.
Maxigrill
Consente di gratinare superfici più estese
rispetto al Grill, oltre a fornire una maggiore
potenza di gratinatura, per ottenere una
doratura più rapida degli alimenti.
MaxiGrill ventilato
Consente una cottura arrosto uniforme e nel
contempo effettua una doratura superficiale.
Ideale per le grigliate. Adatto in particolar modo
a porzioni di alimenti di grandi dimensioni come
pollame, cacciagione… Si consiglia di collocare
il pezzo di carne sulla griglia del forno e il
vassoio al di sotto, per raccogliere il liquido o i
grassi di cottura.
Attenzione
Durante l'uso della funzione Grill, MaxiGrill o
MaxiGrill ventilata, lo sportello deve essere
tenuto chiuso.
Funzioni del forno
3172891-000 22/04/15 11:53 Página 4

5
ITALIANO
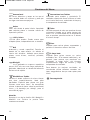
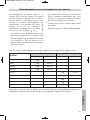
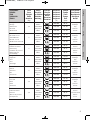
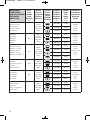
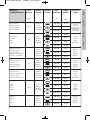
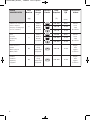
Raccomandazioni per scongelare gli alimenti
La funzione di scongelamento funziona con un
sistema di aria calda su due livelli, il livello HI
per la carne in generale e il livello LO per
pesce, impasti vari e pane. Una volta selezio-
nata la funzione di scongelamento, sul visore
della temperatura è possibile selezionare il
livello HI oppure LO, toccando il sensore e
successivamente i sensori oppure .
• Gli alimenti non dotati di contenitore dovran-
no essere collocati sopra il vassoio del forno
o su un piatto.
• Per scongelare pezzi grandi di carne o pesce,
sistemarli sopra la griglia con un vassoio al
di sotto per raccogliere il liquido.
• La carne e il pesce non hanno bisogno di
essere completamente scongelati per inizia-
re la cottura. Basta che la superficie sia
morbida per poter aggiungere il condimento.
• Una volta scongelati, cucinare sempre gli
alimenti.
• Non ricongelare un alimento scongelato.
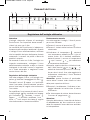
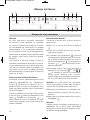
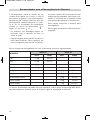
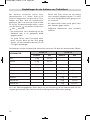
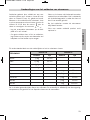
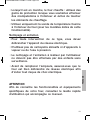
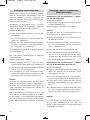
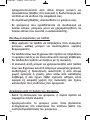
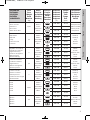
Per i tempi di scongelamento e il livello da selezionare, fare riferimento alla tabella seguente:
I tempi indicati nella tabella sono indicativi e il tempo di scongelamento dipenderà dalla tempera-
tura ambiente, dal peso e dal livello di congelamento dell'alimento.
LIVELLO LO
Peso Tempo Peso Tempo
LIVELLO HI
Pane
1
/
2
Kg
1
/
2
Kg
1
/
2
Kg
1 Kg
35 min
25 min
30 min
40 min
1 Kg
1,5 Kg
1
/
2
Kg
1
/
2
Kg
1 Kg
75 min
90 min
40 min
60 min
120 min
Tor ta
Pesce
Pesce
Pollo
Pollo
Braciola grande
Spezzatino
Spezzatino
ALIMENTO
3172891-000 22/04/15 11:53 Página 5

6
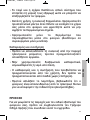
Comandi del forno
Regolazione dell’orologio elettronico
Attenzione
L’orologio elettronico dispone di tecnologia
Touch-Control. Per impostarlo basta toccare i
simboli sul vetro con il dito.
La sensibilità del Touch-Control si adatta con-
tinuamente alle condizioni ambientali. Quando
si collega il forno all'alimentazione, verificare
che la superficie del vetro della parte frontale
contenente i comandi sia pulita e libera da
qualsiasi ostacolo.
Se toccando il vetro con il dito, l'orologio non
risponde correttamente, scollegare il forno
dall'alimentazione elettrica e dopo un istante
ricollegarlo. In tal modo i sensori si regoleran-
no in modo automatico e reagiranno nuova-
mente al tocco del dito.
Regolazione dell'orologio elettronico
Una volta collegato il forno, sull’orologio com-
paiono gli indicatori lampeggianti 12:00 e .
Toccando i sensori oppure si può impo-
stare l’ora esatta; successivamente verranno
emessi due beep di seguito che confermano
l'ora scelta.
Per modificare l’ora, toccare più volte il senso-
re dell’orologio fino a quando non lampeg-
gia l’indicatore . Toccando i sensori
oppure è possibile modificare l’ora.
Infine, verranno emessi due beep di seguito
che confermeranno l’avvenuta modifica.
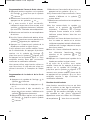
Funzionamento manuale
Una volta regolato l'orologio, il forno è pronto
per essere utilizzato.
1 Toccare il sensore di accensione .
2 Toccare il simbolo della funzione di cottura
selezionata.
3 L’indicatore di temperatura mostrerà
una temperatura predefinita per il tipo di
cottura scelto. Se si desidera modificarla,
basterà toccare il sensore di temperatura
e poi i sensori o per selezionare
la temperatura desiderata.
4 La parte superiore del forno inizierà a riscal-
darsi. Nelle funzioni si
attiverà la funzione di preriscaldamento rapi-
do per alcuni minuti. Una volta raggiunta la
temperatura selezionata, il forno emetterà
un segnale sonoro.
Attenzione: questa funzione di preriscalda-
mento attiva il motore turbo situato sul retro
della parte superiore del forno.
5 Durante il riscaldamento, l’indicatore o lam-
peggia indicando la trasmissione di calore
all’alimento.
6 Per interrompere la cottura, basterà toccare
il sensore di spegnimento .
Attenzione
Al termine della cottura, si noterà che la funzione
di raffreddamento del forno continua a essere
attiva fino a quando l’interno del forno avrà ridot-
to la temperatura.
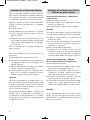
1 2 3 4 5 6
7
8
11 10 9
3172891-000 22/04/15 11:53 Página 6

7
ITALIANO
Illuminazione del forno
La lampadina interna del forno si accende:
–Quando si apre lo sportello del forno. Dopo un
tempo determinato in cui lo sportello del forno
resta aperto, la luce si spegnerà per ridurre il
consumo di elettricità.
–Quando si seleziona una qualsiasi funzione di
cottura. Trascorso un tempo determinato la luce
si spegne.
Se si desidera accendere la luce durante la cot-
tura basterà toccare il sensore dell’illuminazione
interna . Se si tocca il sensore per un tempo
prolungato, la luce resterà accesa durante tutta
la cottura.
Funzioni dell'orologio elettronico
Durata di cottura: consente di cuocere per il
tempo impostato, trascorso il quale il forno si
spegnerà automaticamente.
Ora di fine cottura: consente di cuocere fino a
un orario definito, trascorso il quale il forno si
spegnerà automaticamente.
Tempo di cottura e fine cottura: consente di
programmare il tempo e l'ora di fine cottura.
Con questa funzione il forno si accenderà auto-
maticamente all'ora necessaria per cuocere
per il tempo impostato (Tempo di cottura) e ter-
minare la cottura in modo automatico all'ora
indicata (Fine cottura).
Allarme acustico: genera un segnale acustico al
termine del tempo impostato, indipendentemen-
te dal fatto che il forno sia acceso o spento.
Funzione di sicurezza per i bambini: blocca il
forno evitando che possa essere messo in fun-
zione da parte di bambini piccoli.
Programmazione dell'allarme acustico
1 Toccare più volte il sensore dell’orologio
fino a quando il simbolo si illuminerà.
2 Selezionare il tempo dopo il quale si desidera
che l'orologio emetta l'allarme acustico toccan-
do i sensori oppure .
3 Saranno emessi due segnali acustici di
seguito, sarà visualizzato il tempo restante
fino all'allarme acustico e il simbolo lam-
peggerà lentamente per indicare che l’allar-
me acustico è programmato.
4 Trascorso il tempo impostato, il forno emet-
terà un allarme acustico e il simbolo lam-
peggerà più rapidamente.
5 Toccare qualsiasi sensore della parte frontale
dei comandi per silenziare il segnale acustico.
In qualsiasi momento è possibile modificare il
tempo impostato toccando più volte il sensore
dell’orologio fino a quando lampeggia il
simbolo e poi toccando i sensori oppu-
re . Saranno emessi due segnali acustici di
seguito a conferma della modifica.
Programmazione del tempo di cottura
1 Toccare il sensore dell’orologio , il simbo-
lo si illuminerà.
2 Selezionare il tempo di cottura toccando i
sensori oppure .
3 Saranno emessi due segnali acustici di
seguito, sarà visualizzato il tempo di cottura
rimanente e il simbolo lampeggerà lenta-
mente per indicare che il forno si spegnerà
automaticamente.
4 Selezionare una funzione e una temperatura
di cottura.
5 Trascorso il tempo di cottura, il forno si spe-
gnerà, sarà emesso un segnale acustico e il
simbolo lampeggerà più rapidamente.
6 Toccare qualsiasi sensore della parte fron-
tale dei comandi per bloccare il segnale
acustico.
In qualsiasi momento è possibile modificare il
tempo impostato toccando il sensore dell’oro-
logio e poi toccando i sensori oppure
. Saranno emessi due segnali acustici di
seguito a conferma della modifica.
3172891-000 22/04/15 11:53 Página 7

8
Programmazione dell'ora di fine cottura
1 Toccare più volte il sensore dell’orologio
fino a quando il simbolo si illuminerà.
2 Selezionare l’ora di fine cottura toccando i
sensori oppure .
3 Saranno emessi due beep di seguito, sarà
visualizzato il tempo di cottura rimanente e
il simbolo lampeggerà lentamente per
indicare che il forno si spegnerà automatica-
mente.
4 Selezionare una funzione e una temperatura
di cottura.
5 Raggiunta l’ora impostata il forno si spegne-
rà, sarà emesso un segnale acustico e il
simbolo lampeggerà più rapidamente.
6 Toccare qualsiasi simbolo della parte frontale
dei comandi per bloccare il segnale acustico.
In qualsiasi momento è possibile modificare
l’ora di fine cottura impostata toccando più volte
il sensore dell’orologio fino a quando lam-
peggia il simbolo e poi toccando i sensori
oppure . Saranno emessi due segnali
acustici di seguito a conferma della modifica.
Questa funzione può essere utilizzata anche se
il forno è già in funzione. A tal fine seguire le
istruzioni indicate a eccezione della numero 4.
Programmazione del tempo di cottura
e dell'ora di fine cottura
11 Toccare il sensore dell’orologio , il sim-
bolo si illuminerà.
12 Selezionare il tempo di cottura toccando i
sensori oppure .
13 Saranno emessi due segnali acustici di
seguito, sarà visualizzato il tempo di cottu-
ra rimanente e il simbolo lampeggerà
lentamente.
14 Toccare più volte il sensore dell’orologio
fino a quando il simbolo si illuminerà.
15 Selezionare l’ora di fine cottura toccando i
sensori oppure .
16 Saranno emessi due beep di seguito, sarà
visualizzata l'ora corrente e il simbolo
resterà illuminato.
17 Selezionare una funzione e una temperatu-
ra di cottura. 1
18 Il forno resterà spento e il simbolo
rimarrà illuminato mentre il simbolo
lampeggerà lentamente. L’orologio mostre-
rà l’ora corrente e la luce interna resterà
spenta. Il forno adesso è programmato.
19 Quando si raggiunge l'ora di inizio cottura,
il forno si accenderà e resterà in funzione
per il tempo impostato. Nel display dell’o-
rologio sarà visualizzato il tempo di cottura
rimanente.
10 Raggiunta l’ora impostata il forno si spe-
gnerà, sarà emesso un segnale acustico e
i simboli e lampeggeranno.
11 Toccare qualsiasi sensore della parte fron-
tale dei comandi per bloccare il segnale
acustico.
Se durante la cottura si desidera modificare
l’ora di fine cottura, toccare più volte il senso-
re dell’orologio fino a quando il simbolo
lampeggerà. A questo punto è possibile
modificare l'ora impostata toccando i sensori
o . Si sentiranno due beep di seguito a
conferma della modifica.
Funzione di sicurezza per i bambini
Blocca il forno evitando che possa essere
messo in funzione da parte di bambini piccoli.
Per attivare questa funzione, toccare il simbo-
lo per un tempo prolungato, sarà emesso
un beep prolungato e saranno visualizzati dei
punti intermittenti intercalati tra le cifre dell’in-
dicatore di temperatura . Il forno a questo
punto è bloccato.
3172891-000 22/04/15 11:53 Página 8

9
ITALIANO
Per disattivare la funzione di sicurezza per i
bambini, toccare per un tempo prolungato il
simbolo fino a quando viene emesso un
segnale acustico lungo.
Attenzione
In caso di interruzione dell'alimentazione elettri-
ca, la programmazione dell'orologio elettronico
sarà cancellata e sull'orologio sarà visualizzata
l'indicazione 12:00. Sarà quindi necessario pro-
cedere a una nuova regolazione e programma-
zione.
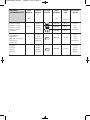
Utilizzo della sonda per carne
La sonda per carne misura la temperatura
all’interno dell’arrosto. Quando la sonda rag-
giunge una temperatura precedentemente
selezionata, il forno si scollega automatica-
mente. Cucinando con la sonda per carne
garantiamo un risultato di cottura ottimale indi-
pendentemente dal tipo di carne o dal peso
dell’arrosto.
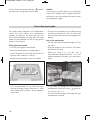
Come posizionare la sonda per carne?
• Usare esclusivamente la sonda per carne
originale.
• Inserire la sonda prima di iniziare la cottura.
• Infilare la sonda su un lato dell’arrosto affin-
ché la punta raggiunga il centro del pezzo
di carne.
• Inserire completamente la sonda fino
all'impugnatura.
• Si raccomanda di girare l’arrosto a metà cot-
tura; tenerne conto per non avere problemi
con la sonda.
• La punta della sonda non deve toccare l’os-
so o altre zone di grasso. Non deve neanche
toccare zone cave, come può succedere nel
caso del pollame o della selvaggina.
Utilizzo della sonda per carne
• Inserire nel forno l’arrosto preparato con la
sonda per carne.
• Collegare la spina della sonda nella presa
ubicata sul lato superiore sinistro del forno.
• Quando si collega la sonda, sull'indicatore di
temperatura della sonda (3) ubicato sul pan-
nello di comando verrà visualizzato un valore
raccomandato di temperatura (65
o
C).
• Per modificare la temperatura raccomanda-
ta toccare il sensore e poi i sensori
o .
• Si avvertiranno due beep di seguito a con-
ferma della temperatura selezionata.
3172891-000 22/04/15 11:53 Página 9

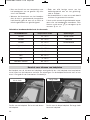
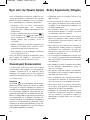
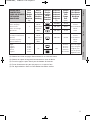
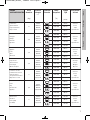
10
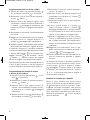
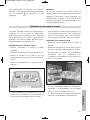
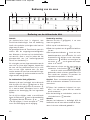
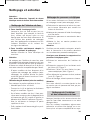
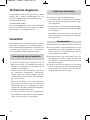
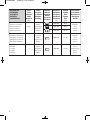
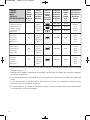
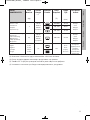
Tabella con valori indicativi di cottura con la sonda per carne
Roast-Beef 35 - 40
o
C AL SANGUE
Roast-Beef 45 - 50
o
C MEDIA COTTURA
Roast-Beef 55 - 60
o
C BEN COTTO
Cosciotto di agnello 65 - 70
o
C
Cosciotto di maiale 80 - 85
o
C
Lombata 65 - 70
o
C
Prosciutto 80 - 85
o
C
Pollo 75 - 80
o
C
Tacchino arrosto 80 - 85
o
C
Temperatura Sonda Osservazioni
• Selezionare una funzione e una temperatura
per la cottura dell'arrosto (consultare le
tabelle di cottura).
• Una volta raggiunta la temperatura selezio-
nata all'interno dell'arrosto, il forno si speg-
nerà e verrà emesso un segnale acustico
per alcuni istanti.
• Toccare qualsiasi sensore della parte fron-
tale dei comandi per bloccare il segnale
acustico.
• L'arrosto è cotto secondo il gusto e pronto
per essere servito.
In qualsiasi momento è possibile modificare
la temperatura selezionata per l'arrosto toc-
cando il sensore e poi i sensori e .
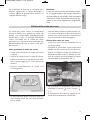
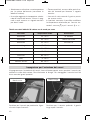
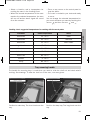
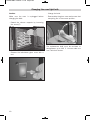
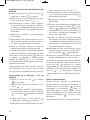
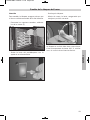
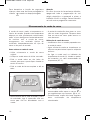
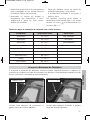
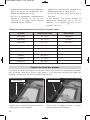
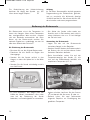
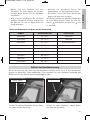
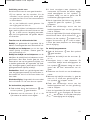
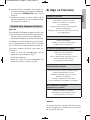
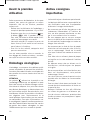
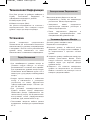
Posizione per il vassoio per pasticceria. Il gan-
cio corto sopra il vassoio.
Impugnatura per l'estrazione dei vassoi
L'impugnatura per l'estrazione dei vassoi viene utilizzata quando serve spostare il vassoio per
verificare lo stato della cottura. Fare riferimento ai disegni. Per maneggiare il vassoio fuori dal
forno usare dei guanti protettivi.
Posizione per il vassoio profondo. Il gancio
lungo sopra il vassoio.
COTTURA
Gancio corto
Gancio lungo
3172891-000 22/04/15 11:53 Página 10

11
ITALIANO
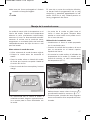
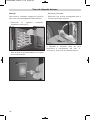
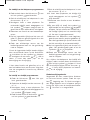
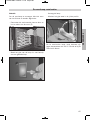
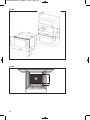
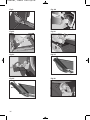
Sostituzione della lampadina del forno
• Smontare i supporti cromati allentando il
dado (E).
• Estrarre la lente del portalampada servendo-
si di un cacciavite.
E
• Sostituire la lampadina.
• Rimontare la lente, verificando che si inseris-
ca nella posizione corretta.
La lampadina da sostituire deve resistere alle
alte temperature (fino a 300 °C); richiedere il
ricambio al servizio di assistenza tecnica.
Attenzione
Per sostituire la lampadina, verificare innanzi-
tutto che il forno sia scollegato dall’alimenta-
zione elettrica.
3172891-000 22/04/15 11:53 Página 11

12
17 Sensor
18 Sensor / Child Safety Function
19 On / Off
10 Inside Light
11 Meat probe sensor
1FFYPI
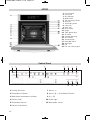
1 Control Panel
2 Oven Seal
3 Grill Element
4 Meat Probe
5 Tray removing handle
6 Grid tray
7 Telescopic guides
8 Cake tray
9 Deep tray
10 Door switch
11 Hinge
12 Triple glazed door
13 Air outlet
14 Cabinet Mounting
15 Grill Screen
16 Smoke Outlet
17 Back Wall Panel
18 Side lights
19 Fan
20 Full size interior glass
11 Cooking Functions
12 Temperature Indicator
13 Meat probe temperature indicator
14 Electric Clock
15 Temperature Sensor
16 Electric Clock Sensor
Control Panel
1 2 3 4 5 6
7
8
11 10 9
3172891-000 22/04/15 11:53 Página 12

13
ENGLISH
Conventional with Fan
Suitable for roasts and cakes. The fan spreads
the heat evenly throughout the inside of the
oven to reduce cooking time and temperature.
Turbo
The fan spreads the heat coming from an
element located at the back of the oven. As a
result of the evenly distributed temperature,
food can be cooked on two levels at the same
time.
Pizza
Ideal for baking pizzas, pies, and fruit tarts or
sponges.
Slow cooker
Designed to cook casseroles, stews, etc, in
the traditional way, and for all recipes
specifying long cooking times and low heat.
For the best results, we recommend using
covered casserole pans with lids, first making
sure that they can be used in the oven.
Defrosting
Convencional
This function is for use when baking cakes,
where the heat should be even to give a
spongy texture.
Lower Element
Heat only comes from beneath. Suitable for
warming plates or letting dough rise.
Grill and Lower Element
Ideal for roasts. This function can be used with
any size joints of meat.
Grill
Toasting and browning. This function allows
the surface to be cooked without affecting the
inside of the food. Suitable for flat pieces such
as steaks, ribs, fish and toasts.
Maxigrill
For toasting larger surfaces than possible with
the Grill function, in addition to greater
toasting power for faster food browning.
MaxiGrill with Fan
For even roasting and simultaneous surface
browning. Ideal for mixed grills. Perfect for
bulky pieces such as poultry and game. The
meat should be placed on the oven grid with
the tray below to collect meat juices.
Caution
The door must be closed during use with Grill,
MaxiGrill or MaxiGrill with Fan.
Oven Functions
3172891-000 22/04/15 11:53 Página 13

14
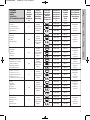
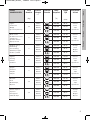
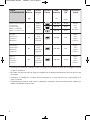
Recommendations for Defrosting Food
The defrost function works by means of a
2-level system of hot air. HI is for meats in
general and LO is for fish, cakes, pastries and
bread. When selecting the defrost function,
select HI or LO on the temperature display by
pressing on the temperature sensor and
then the or sensors.
• Unpackaged food should be placed on the
oven tray or on a dish.
• Defrost large pieces of meat or fish by
placing them over the grid with a tray
underneath to collect any liquid.
• Meat and fish do not need to be completely
thawed before cooking. Condiments can be
added once the surface is soft.
• Food should always be cooked after
defrosting.
• Do not refreeze defrosted food.
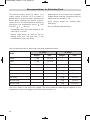
See the following chart for defrosting times and temperature levels:
The times shown in the chart are a guide. The time needed for defrosting will depend on the
temperature of the room, weight of the food and how frozen it is.
FOOD
LO LEVEL
Weight Time Weight Time
HI LEVEL
Bread
1
/
2
Kg
1
/
2
Kg
1
/
2
Kg
1 Kg
35 mins
25 mins
30 mins
40 mins
1 Kg
1,5 Kg
1
/
2
Kg
1
/
2
Kg
1 Kg
75 mins
90 mins
40 mins
60 mins
120 mins
Cake
Fish
Fish
Chicken
Chicken
Rib steak
Minced meat
Minced meat
3172891-000 22/04/15 11:54 Página 14

15
ENGLISH
Oven Use
Use of the electronic timer
Caution
The electronic clock features Touch-Control
technology. To operate, simply touch the glass
control symbols with your fingertip.
The touch control sensitivity continuously
adapts to changing conditions. Ensure that
the glass front of the control panel is clean
and free of any obstacles when turning on the
oven.
If the clock does not respond correctly when
you touch the glass, you will need to turn off
the oven for a few seconds and then turn it
back on. By doing this, the sensors adjust
automatically and will react once more to
fingertip control.
Setting the Electronic Clock
When turning your oven on, you will see the
clock flashing 12:00 . Set the clock by
touching the or symbols on the glass.
You will hear 2 beeps confirming the time has
been set.
If you want to change the time, touch the clock
sensor until the indicator flashes .
Change the time by touching the or
sensors. The two beeps you hear after that
will confirm the new time has been set.
Manual Operation
After setting the clock, the oven is ready for
use:
1 Press the On sensor .
2 Press on the desired cooking function
symbol.
3 The temperature display will show the
preset temperature for that cooking
function. Press on the temperature sensor
to change it. Select the desired
temperature by pressing on the or
sensors.
4 The top oven cavity will start to heat up.
Functions and will
start the fast preheating function for a few
minutes. The oven will beep when it reaches
the selected temperature.
Caution: this preheating function turns on the
turbo motor at the back of the top oven cavity.
5 During oven heating, the
o
display will flash
to show that the food is being heated.
6 Press on the Off sensor to stop cooking.
Caution
When cooking has finished, you will notice that
oven cooling feature will work until the tempera-
ture inside the oven has been suitably lowered.
1 2 3 4 5 6
7
8
11 10 9
3172891-000 22/04/15 11:54 Página 15

16
Oven Lighting
The inside light will go on:
–When the oven door is open. If the door is not
closed after a certain time, the light will turn off
to reduce power consumption.
–When any cooking function is selected. The light
will turn off after a certain time.
If you want to turn the light on during cooking, just
touch the Oven Light sensor . If you keep your
finger on this sensor for a few seconds, the light
will stay on throughout cooking.
Electronic Clock Functions
Cooking Time: This function allows you to
programme cooking time length, after which the
oven will turn off automatically.
Cooking Stop Time: This function allows you to
programme the time for cooking to stop, after
which the oven will turn off automatically.
Cooking Time and Cooking Stop Time: This
function allows both cooking time length and the
stop time to be programmed. With this function,
the oven switches on automatically at the set
time and operates for the cooking time it has
been programmed for. It switches itself off
automatically at the entered stop time.
Timer Alarm: A beep will go sound when the set
time has finished, whether the oven is on or off.
Child safety: This function locks the oven,
preventing small children from playing with it.
Programming the Timer Alarm
1 Press on the clock sensor several times
until the symbol lights up.
2 Select the length of time after which you
want the alarm to sound by pressing on the
or sensors.
3 You will then hear two beeps, the display will
show the time left before the alarm sounds
and the symbol will flash slowly,
indicating that the timer has been set.
4 Once the programmed time has passed, an
alarm will sound and the symbol will
begin to flash more quickly.
5 Press on any sensor on the control panel to
stop the alarm.
You can change the programmed time
whenever you want by touching the clock
sensor until the symbol flashes, and
then touching the or sensors. The two
beeps you hear after that will confirm the new
time has been set.
Programming Cooking Time
1 Press on the clock sensor . The symbol
will light up.
2 Select the cooking time by pressing the
or sensors.
3 Two consecutive beeps will then sound and
the display will show the remaining cooking
time. The symbol will flash slowly to
indicate that the oven will switch itself
automatically.
4 Select a cooking function and temperature.
5 Once the cooking time is complete, the oven
will turn off, an alarm will sound and the
symbol will flash more quickly.
6 Press on any sensor on the control panel to
stop the alarm.
You can change the programmed time
whenever you want by touching the clock
sensor and then on the or sensors.
The two beeps you hear after that will confirm
the new time has been set.
3172891-000 22/04/15 11:54 Página 16

17
ENGLISH
Programming the Cooking Stop Time
1 Press on the clock sensor several times
until the symbol lights
up.
2 Select the cooking stop time by pressing the
or sensors.
3 Two consecutive beeps will then sound and
the display will show the remaining cooking
time. The symbol will flash slowly to
indicate that the oven will switch itself
automatically.
4 Select a cooking function and temperature.
5 Once it is the set time, the oven will turn off,
an alarm will sound and the symbol will
flash more quickly.
6 Press on any sensor on the control panel to
stop the alarm.
You can change the programmed cooking stop
time at any moment by pressing on the clock
sensor until the symbol flashes and
then by pressing on the or sensors.
The two beeps you hear after that will confirm
the new time has been set.
You can use this function even if you are
already cooking with the oven. If this is the
case, follow all of the above instructions
except No. 4.
Programming Cooking Time and Cooking
Stop Time
11 Press on the clock sensor . The symbol
will light up.
12 Select the cooking time by pressing the
or sensors.
13 Two consecutive beeps will then sound,
and the display will show the remaining
cooking time. The symbol will flash
slowly.
14 Press on the clock sensor several
times until the symbol lights up.
15 Select the cooking stop time by pressing
the or sensors.
16 This will be confirmed by two beeps. The
current time will show on the display and
the symbol will remain lit.
17 Select a cooking function and temperature.
18 The oven will remain off, with the
symbol lit and the symbol flashing
slowly. The clock will show the current time
and the inside light will remain off. The
oven is now programmed.
19 When it is time to start cooking, the oven
will switch on and will operate for the
programmed cooking time. The clock
display will show the remaining cooking
time.
10 Once the set time is reached, the oven will
turn off, an alarm will sound and the
and symbols will flash.
11 Press on any sensor on the control panel
to stop the alarm.
If you wish to change the cooking stop time
while cooking is in progress, press on the
clock sensor until the symbol flashes.
You can then change the cooking stop time by
pressing on the or sensors. The two
beeps you hear after that will confirm the new
time has been set.
Child Safety Function
This function locks the oven, preventing small
children from playing with it. To turn on the
function, press on the
(16) symbol until you
hear a long beep and see several flashing
dots between the digits of the temperature
display . The oven is now locked.
3172891-000 22/04/15 11:54 Página 17

18
To turn off the child lock, keep the (16) symbol
pressed until a long beep sounds.
Caution
In the event of power failure, your electronic
clock timer settings will be erased and 12:00
will flash on the clock display. Reset the clock
and programme again.
Use of the meat probe
The meat probe measures the temperature
inside the roast. When this temperature
reaches a previously set level, the oven will
turn off automatically. Cooking with the meat
probe ensures optimum results for any type of
meat or size of roast.
Placing the meat probe
• Use only the original meat probe.
• Place the probe before roasting begins.
• Insert the probe into the side of the roast so
that the point reaches its centre.
• Insert the entire probe, up to the handle.
• It is recommended to turn the roast over
half-way through cooking. Bear this in mind
when placing the probe to avoid problems
with it later.
• The point of the probe must not be touching
the bone or fatty areas. Also, it should not
be in a hollow area, which could happen with
poultry.
Use of the meat probe
• Put the roast with the probe already in it into
the oven.
• Plug the probe into the socket in the upper
left side of the oven.
• When you plug it in, you will see a
recommended temperature (65
o
C) on the
probe temperature display (3) on the control
panel.
• If you want to change the recommended
temperature, touch the sensor and then
the sensors or .
• You will hear two beeps confirming the new
temperature selected.
3172891-000 22/04/15 11:54 Página 18

19
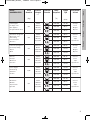
ENGLISH
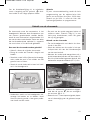
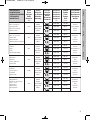
Cooking chart: suggested temperatures for cooking with the meat probe.
Roast-Beef 35 - 40
o
C RARE
Roast-Beef 45 - 50
o
C MEDIUM
Roast-Beef 55 - 60
o
C WELL DONE
Leg of lamb 65 - 70
o
C
Ham hock 80 - 85
o
C
Loin of pork 65 - 70
o
C
Roast ham 80 - 85
o
C
Chicken 75 - 80
o
C
Tur key 80 - 85
o
C
COOKING Probe temperature Notes
• Select a function and a temperature for
cooking the roast in the Cooking Chart.
• When the internal temperature of the roast
reaches the selected temperature, the oven
will turn off and an alarm signal will sound
for a few seconds.
• Press on any sensor on the control panel to
stop the alarm.
• The roast is cooked to your taste and ready
to serve.
You can change the selected temperature for
your roast whenever you want by touching the
sensor and then sensors and .
Position for cake tray. The short hook over the
tray.
Tray removing handle
The handle for removing trays is used when you need to slide the shelf out and check what’s
cooking. See drawings. To take the shelf out of the oven, use oven gloves.
Position for deep tray. The long hook over the
tray.
3172891-000 22/04/15 11:54 Página 19

20
Changing the oven light bulb
• Detach the chrome supports by loosening
the screw (E).
• Release the bulb-holder glass cover with a
tool.
E
• Change the bulb.
• Reassemble the glass cover and ensure that
everything fits in the correct position.
The replacement bulb must be resistant to
temperatures up to 300
o
C. You can order one
from Technical Service.
Caution
Make sure the oven is unplugged before
changing the bulb.
3172891-000 22/04/15 11:54 Página 20
A página está carregando...
A página está carregando...
A página está carregando...
A página está carregando...
A página está carregando...
A página está carregando...
A página está carregando...
A página está carregando...
A página está carregando...
A página está carregando...
A página está carregando...
A página está carregando...
A página está carregando...
A página está carregando...
A página está carregando...
A página está carregando...
A página está carregando...
A página está carregando...
A página está carregando...
A página está carregando...
A página está carregando...
A página está carregando...
A página está carregando...
A página está carregando...
A página está carregando...
A página está carregando...
A página está carregando...
A página está carregando...
A página está carregando...
A página está carregando...
A página está carregando...
A página está carregando...
A página está carregando...
A página está carregando...
A página está carregando...
A página está carregando...
A página está carregando...
A página está carregando...
A página está carregando...
A página está carregando...
A página está carregando...
A página está carregando...
A página está carregando...
A página está carregando...
A página está carregando...
A página está carregando...
A página está carregando...
A página está carregando...
A página está carregando...
A página está carregando...
A página está carregando...
A página está carregando...
A página está carregando...
A página está carregando...
A página está carregando...
A página está carregando...
A página está carregando...
A página está carregando...
A página está carregando...
A página está carregando...
A página está carregando...
A página está carregando...
A página está carregando...
A página está carregando...
A página está carregando...
A página está carregando...
A página está carregando...
A página está carregando...
A página está carregando...
A página está carregando...
A página está carregando...
A página está carregando...
A página está carregando...
A página está carregando...
A página está carregando...
A página está carregando...
A página está carregando...
A página está carregando...
A página está carregando...
A página está carregando...
A página está carregando...
A página está carregando...
A página está carregando...
A página está carregando...
A página está carregando...
A página está carregando...
A página está carregando...
A página está carregando...
A página está carregando...
A página está carregando...
A página está carregando...
A página está carregando...
A página está carregando...
A página está carregando...
A página está carregando...
A página está carregando...
A página está carregando...
A página está carregando...
A página está carregando...
A página está carregando...
A página está carregando...
A página está carregando...
A página está carregando...
A página está carregando...
A página está carregando...
A página está carregando...
A página está carregando...
A página está carregando...
A página está carregando...
A página está carregando...
A página está carregando...
A página está carregando...
A página está carregando...
A página está carregando...
A página está carregando...
A página está carregando...
A página está carregando...
A página está carregando...
A página está carregando...
A página está carregando...
A página está carregando...
A página está carregando...
A página está carregando...
A página está carregando...
A página está carregando...
A página está carregando...
A página está carregando...
A página está carregando...
A página está carregando...
A página está carregando...
A página está carregando...
A página está carregando...
A página está carregando...
A página está carregando...
A página está carregando...
A página está carregando...
A página está carregando...
A página está carregando...
A página está carregando...
A página está carregando...
A página está carregando...
A página está carregando...
A página está carregando...
A página está carregando...
A página está carregando...
A página está carregando...
A página está carregando...
A página está carregando...
A página está carregando...
A página está carregando...
A página está carregando...
A página está carregando...
A página está carregando...
A página está carregando...
A página está carregando...
A página está carregando...
A página está carregando...
A página está carregando...
A página está carregando...
A página está carregando...
-
 1
1
-
 2
2
-
 3
3
-
 4
4
-
 5
5
-
 6
6
-
 7
7
-
 8
8
-
 9
9
-
 10
10
-
 11
11
-
 12
12
-
 13
13
-
 14
14
-
 15
15
-
 16
16
-
 17
17
-
 18
18
-
 19
19
-
 20
20
-
 21
21
-
 22
22
-
 23
23
-
 24
24
-
 25
25
-
 26
26
-
 27
27
-
 28
28
-
 29
29
-
 30
30
-
 31
31
-
 32
32
-
 33
33
-
 34
34
-
 35
35
-
 36
36
-
 37
37
-
 38
38
-
 39
39
-
 40
40
-
 41
41
-
 42
42
-
 43
43
-
 44
44
-
 45
45
-
 46
46
-
 47
47
-
 48
48
-
 49
49
-
 50
50
-
 51
51
-
 52
52
-
 53
53
-
 54
54
-
 55
55
-
 56
56
-
 57
57
-
 58
58
-
 59
59
-
 60
60
-
 61
61
-
 62
62
-
 63
63
-
 64
64
-
 65
65
-
 66
66
-
 67
67
-
 68
68
-
 69
69
-
 70
70
-
 71
71
-
 72
72
-
 73
73
-
 74
74
-
 75
75
-
 76
76
-
 77
77
-
 78
78
-
 79
79
-
 80
80
-
 81
81
-
 82
82
-
 83
83
-
 84
84
-
 85
85
-
 86
86
-
 87
87
-
 88
88
-
 89
89
-
 90
90
-
 91
91
-
 92
92
-
 93
93
-
 94
94
-
 95
95
-
 96
96
-
 97
97
-
 98
98
-
 99
99
-
 100
100
-
 101
101
-
 102
102
-
 103
103
-
 104
104
-
 105
105
-
 106
106
-
 107
107
-
 108
108
-
 109
109
-
 110
110
-
 111
111
-
 112
112
-
 113
113
-
 114
114
-
 115
115
-
 116
116
-
 117
117
-
 118
118
-
 119
119
-
 120
120
-
 121
121
-
 122
122
-
 123
123
-
 124
124
-
 125
125
-
 126
126
-
 127
127
-
 128
128
-
 129
129
-
 130
130
-
 131
131
-
 132
132
-
 133
133
-
 134
134
-
 135
135
-
 136
136
-
 137
137
-
 138
138
-
 139
139
-
 140
140
-
 141
141
-
 142
142
-
 143
143
-
 144
144
-
 145
145
-
 146
146
-
 147
147
-
 148
148
-
 149
149
-
 150
150
-
 151
151
-
 152
152
-
 153
153
-
 154
154
-
 155
155
-
 156
156
-
 157
157
-
 158
158
-
 159
159
-
 160
160
-
 161
161
-
 162
162
-
 163
163
-
 164
164
-
 165
165
-
 166
166
-
 167
167
-
 168
168
-
 169
169
-
 170
170
-
 171
171
-
 172
172
-
 173
173
-
 174
174
-
 175
175
-
 176
176
-
 177
177
-
 178
178
-
 179
179
-
 180
180


Barazza 1FFYPI Instruções de operação
- Categoria
- Microondas
- Tipo
- Instruções de operação
em outras línguas
- español: Barazza 1FFYPI Instrucciones de operación
- français: Barazza 1FFYPI Mode d'emploi
- italiano: Barazza 1FFYPI Istruzioni per l'uso
- Nederlands: Barazza 1FFYPI Handleiding
- Deutsch: Barazza 1FFYPI Bedienungsanleitung
Outros documentos
-
Teka HA-890 Manual do proprietário
-
-
Foster KE multifunzione 9F Especificação
-
-
Foster KS 60 MF 9 Features List
-
-
-
Foster FL-F90 MTL Guia rápido
-
Baumatic BO667TS-DD Manual do usuário
-
Baumatic BO920TS - 33701358 Manual do usuário