Youin BK1700 Manual do usuário
- Categoria
- Acessórios para bicicletas
- Tipo
- Manual do usuário

YOUIN LUXOR
AN ELECTRIC
FAT BIKE LUXOR
INSIDE
BK1700
User manual · Manual de usuario
Manuel de l’Utilisateur
Manuale d’uso · Manual do usuário

2
YOUIN LUXOR
2
YOUmove
YOUup
YOUdown
YOUfold
YOUtravel
YOUrule
YOUIN LUXOR
Thanks for choosing our product.
Have fun with this electric bike.
Images may dier from the final version of the product

3
ENGLISH
Bike Assembly
Deploy the Product . . . . . . . . . . . . . . . . . . . . . . . . . . . . . . . . . . . . . . . . . . . . . . . . . 4
Insert, unlock and remove the battery . . . . . . . . . . . . . . . . . . . . . . . . . . . . . . . . 4
Technical information
Parts diagram . . . . . . . . . . . . . . . . . . . . . . . . . . . . . . . . . . . . . . . . . . . . . . . . . . . . . . 5
Wiring diagram . . . . . . . . . . . . . . . . . . . . . . . . . . . . . . . . . . . . . . . . . . . . . . . . . . . . . 5
Technical specifications . . . . . . . . . . . . . . . . . . . . . . . . . . . . . . . . . . . . . . . . . . . . . 6
Security
Use tips . . . . . . . . . . . . . . . . . . . . . . . . . . . . . . . . . . . . . . . . . . . . . . . . . . . . . . . . . . . 6
Before each use . . . . . . . . . . . . . . . . . . . . . . . . . . . . . . . . . . . . . . . . . . . . . . . . . . . . 7
Regular checkups (every 1-2 months) . . . . . . . . . . . . . . . . . . . . . . . . . . . . . . . . . . 7
Operation
Screen . . . . . . . . . . . . . . . . . . . . . . . . . . . . . . . . . . . . . . . . . . . . . . . . . . . . . . . . . . . . 7
Front fork . . . . . . . . . . . . . . . . . . . . . . . . . . . . . . . . . . . . . . . . . . . . . . . . . . . . . . . . . 8
Battery charge . . . . . . . . . . . . . . . . . . . . . . . . . . . . . . . . . . . . . . . . . . . . . . . . . . . . . 9
Checking the battery before using it for the first time . . . . . . . . . . . . . . . . . . . 9
Recycling Notice . . . . . . . . . . . . . . . . . . . . . . . . . . . . . . . . . . . . . . . . . . . . . 10
Content

4
YOUIN LUXOR
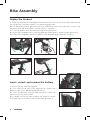
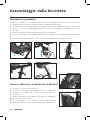
Deploy the Product
1- Grab the seat and the handlebar. Rotate the front half of the frame forward around
the hinge until the front wheel is in the driving position.
2- Lift the locking lever (picture 1) to fully unfold the frame until you hear a click. Flip
the lever forward and close it so the frame is secured.
3- Turn the pedals to their horizontal position (picture 2).
4- Raise the handlebar to its vertical position and close its locking lever (picture 3).
5- Place the handlebar and the saddle at the desired height (picture 4 and 5).
Insert, unlock and remove the battery
1- Insert the key into the keyhole.
2- Turn the key to the OPEN position to unlock the
battery, now it can be removed (picture 6).
3- Press the battery into the hole to close it again so
you can turn on your e-bike.
4- In order to turn on your e-bike, the internal switch
of the battery must be in the ON position (picture 7).
Bike Assembly
Picture 1
Picture 4
Picture 2
Picture 5
Picture 3
Picture 6
Picture 7

5ENGLISH
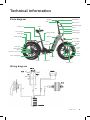
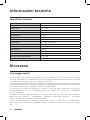
Technical information
Parts diagram
Wiring diagram
Brake lever
Display
Seat post QR
Frame
Frame QR
Seat
Seat post
Rear carrier
Rear light
Rear fender
Rear tyre
Motor
Cassette Sprocket
Rear derrailleur
Rear brake
Chain Crankset
Pedal
Refl ector
Battery
Grip
Handlebar
Folding part
Handlebar QR
Stem
Spiral Hose
Front light
Front
fork
Front
brake
Front
tyre
Rim
Front fender
Display
Display
Battery
Motor
Controller
Brake
Left
Right

6
YOUIN LUXOR
Technical information
Security
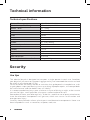
Technical specifications
Motor / Battery 36V 250W / 36V 10Ah
Maximum speed / Range 25 km-h / up to 45 km
Wheel / Rim 20" / Alloy
Crankset Prowheel
Shifter Shimano
Tires Kenda
Brake Disc
Saddle Comfortable
Frame 20" alloy folding
Cassette Sprocket Shimano
Chains KMC
Fender Plastic
Front fork Suspension (Lockable)
Light 36V screen controllable
Rear derailleur Shimano
Net weight / maximum load 30 kg / 127 kg
Use tips
This electric bicycle is designed to transport a single person in each use. Condition
your bicycle if you want to transport luggage and try not to exceed the maximum load
for which it was designed (127 kg).
Failure to follow the safety advice, or activities that go beyond its intended use, such
as going down steps, performing stunts or making improper repairs, will exempt both
the manufacturer and the dealer from all liability.
It is recommended to always wear a helmet. In case of driving at night, make sure to
turn on the lights, and if possible, also wear a reflective band or vest.
Remember to clean your bike regularly. To do this, avoid the use of pressurized water,
since the electronic components can get wet, which can cause a malfunction and
even personal injury.
Carefully clean painted surfaces, plastic parts and electronic components. Never use
abrasive products such as seawater, saltpeter, soda, etc.

7
ENGLISH
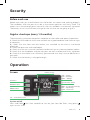
Battery charge
PAS - Pedal Assist Level
VOL - Voltage
CUR - Amperage
WATT - Wattage
ON/OFF button Speedometer (Km/h)
DOWN button
UP button
ODO - Accumulated mileage
DST - Trip Mileage
TIME - Travel time
Security
Operation
Before each use
Before each ride, you should check that the brakes are secure and working properly.
The handlebar and seat post must be in the correct position and firmly fixed. The
wheels must have enough pressure and all the nuts and bolts must be well tightened.
The battery must have sucient charge for the use that we are going to give it.
Regular checkups (every 1-2 months)
These controls guarantee the perfect condition of the e-bike and optimal operation.
1- Check that the welds on the frame and fork are in good condition and show no signs
of corrosion.
2- Check that the front and rear brakes are attached to the chassis and brake
eectively.
3- Check tire pressure and tread depth.
4- Check that the rims are well secured and do not have any loose or broken spokes.
5- Check that the handlebar and the seat post are well inserted and firmly tightened.
6- Check that the cables are suciently greased and that they have no obstacles in
their path.
7- Check that the battery is charged enough.
Screen
System on/o
Press and hold for a few seconds to turn on your You-ride Texas. Long press
again to turn it o.

8
YOUIN LUXOR
Operation
Change the information on the screen
Briefly press to change the information on the screen. You can toggle between the
following information:
VOL - Voltage / CUR - Amperage / WATT - Wattage
ODO - Accumulated mileage / DST - Trip mileage / TIME - Trip time
PAS level adjustment
Press or to adjust the level of pedal assistance.
Accompaniment mode
If you press and hold the button for 3 seconds, it will start the motor at a constant
speed of 6km/h to carry the bike eortlessly while walking next to it. Pressing the
brake will deactivate the accompaniment mode.
Do not use it if we are mounted on it. We recommend not to abuse this assistance,
especially on long or very steep slopes.
Front light on/o
Long press for for 3 seconds to turn on the front light. Long press again to turn
it o.
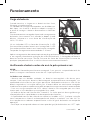
Rear light on/o
The rear light is turned on directly from the power
button above it. Press several times to switch between
the 3 available modes: steady light, flashing light 1 and
flashing light 2.
The tail light is powered by 2 batteries, please remove
the screws and open the cover to change them when
you run out of battery.
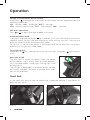
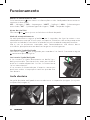
Front fork
In the front fork you can lock or unlock the suspension (picture 1) and adjust its
pressure (picture 2).
Picture 1 Picture 2

9
ENGLISH
Operation
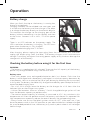
Battery charge
When you finish the trip or the battery is running low,
charge it immediately.
Charging methods can be divided into two types: one
is to take out the battery and then charge it, the other
is to charge the battery directly on the electric bicycle.
First connect the charger to the charging port of the
battery (without connecting it to the socket) and then
to the mains. Connect it to a 220V / 50-60Hz power
supply.
There is an LED indicator on the power supply. The
LED is red when the battery is charging. The LED turns
green when the battery is fully charged.
Recommended charging time: 5-6 hours.
After charging, please unplug the input plug (from the wall outlet) first, and then
unplug the output plug (from the bike). The battery charger must have constant
voltage. Fluctuating voltage or fluctuating power supply of any kind can damage the
storage cells of the battery.
Checking the battery before using it for the first time
WARNING
• The battery is supplied partially charged. To ensure the full capacity of the battery,
please fully charge it before using it for the first time.
Battery care
• Even with proper care, rechargeable batteries don’t last forever. Each time the
battery is discharged and subsequently recharged, its relative capacity decreases by
a few percent. You can maximize the life of your battery by following the instructions
in this guide. The battery should be fully charged immediately upon receipt for the full
recommended charging time
• For a full 100% charge, leave the battery on the charger for a full hour after the
indicator light on the charger turns green.
• Lithium-ion batteries have no “memory”. Partial charge/discharge cycles will not
harm the batteries capacity or performance.
• The nominal output capacity of a battery is measured at 25ºC. Any variation in this
temperature will alter the performance of the battery and shorten its expected life.
High temperatures especially reduce the overall battery life and operating time.
• Always make sure to turn the bike’s ignition switch to “OFF” after each use. If you
leave the power switch in the “ON” position, or your electric bike has not been charged
for an extended period of time, the battery may reach a point where it will no longer
hold a charge.

10
YOUIN LUXOR
Recycling Notice
Electrical and electronic equipment and batteries contain materials, components and
substances that can be harmful to you and your environment, as long as the waste
materials (waste electrical and electronic equipment and batteries) are not managed
correctly.
Electrical and electronic equipment and batteries are marked with the crossed out
bin, as shown below. This symbol means that old electrical and electronic equipment
and batteries should not be thrown away; they must be removed separately.
As the end user, it is necessary for you to deliver the exhausted batteries to the
appropriate collection points. In this way, you ensure that the batteries are recycled in
accordance with the legislation and do not cause any environmental damage.

11
ENGLISH

12
YOUIN LUXOR
12
Gracias por elegir nuestro producto.
Diviértete con esta bicicleta eléctrica.
YOUmove
YOUup
YOUdown
YOUfold
YOUtravel
YOUrule
Las imágenes pueden diferir de la versión final del producto
YOUIN LUXOR

13
ESPAÑOL
Montaje de la Bicicleta
Desplegar el Producto . . . . . . . . . . . . . . . . . . . . . . . . . . . . . . . . . . . . . . . . . . . . . . 14
Insertar, desbloquear y quitar la batería . . . . . . . . . . . . . . . . . . . . . . . . . . . . . . . 14
Información Técnica
Diagrama de piezas . . . . . . . . . . . . . . . . . . . . . . . . . . . . . . . . . . . . . . . . . . . . . . . . . 15
Diagrama de cableado . . . . . . . . . . . . . . . . . . . . . . . . . . . . . . . . . . . . . . . . . . . . . . 15
Especificaciones Técnicas . . . . . . . . . . . . . . . . . . . . . . . . . . . . . . . . . . . . . . . . . . . 16
Seguridad
Consejos de uso . . . . . . . . . . . . . . . . . . . . . . . . . . . . . . . . . . . . . . . . . . . . . . . . . . . 16
Antes de cada uso . . . . . . . . . . . . . . . . . . . . . . . . . . . . . . . . . . . . . . . . . . . . . . . . . 17
Controles periódicos (cada 1-2 meses) . . . . . . . . . . . . . . . . . . . . . . . . . . . . . . . . 17
Funcionamiento
Pantalla . . . . . . . . . . . . . . . . . . . . . . . . . . . . . . . . . . . . . . . . . . . . . . . . . . . . . . . . . . . 17
Horquilla frontal . . . . . . . . . . . . . . . . . . . . . . . . . . . . . . . . . . . . . . . . . . . . . . . . . . . . 18
Carga de la batería . . . . . . . . . . . . . . . . . . . . . . . . . . . . . . . . . . . . . . . . . . . . . . . . . 19
Comprobación de la batería antes de usarla por primera vez . . . . . . . . . . . . 19
Aviso sobre Reciclaje . . . . . . . . . . . . . . . . . . . . . . . . . . . . . . . . . . . . . . . . . 20
Contenido

14
YOUIN LUXOR
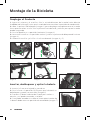
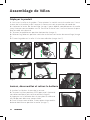
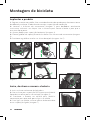
Montaje de la Bicicleta
Desplegar el Producto
1- Agarra el asiento y el manillar. Gira la mitad delantera del cuadro hacia delante
alrededor de la bisagra hasta que la rueda delantera esté en la posición de conducción.
2- Abre la palanca de bloqueo (imagen 1) para desplegar completamente el cuadro
hasta que escuches un clic. Gira la palanca hacia delante y ciérrala para que el cuadro
quede asegurado.
3- Gira los pedales a su posición horizontal (imagen 2).
4- Levanta el manillar a su posición vertical y cierra la palanca de bloqueo del mismo
(imagen 3).
5- Coloca el manillar y el sillín a la altura deseada (imagen 4 y 5).
Insertar, desbloquear y quitar la batería
1- Inserta la llave en el ojo de la cerradura.
2- Gira la llave a la posición OPEN para que la batería se
desbloquee y pueda ser extraída (imagen 6).
3- Presiona la batería dentro del hueco para volver a
cerrarla y así poder encender tu e-bike.
4- Para poder enceder tu e-bike el interruptor interior de
la batería debe estar en posición de encendido (imagen 7).
Imagen 1
Imagen 4
Imagen 2
Imagen 5
Imagen 3
Imagen 6
Imagen 7

15ESPAÑOL
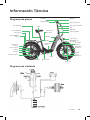
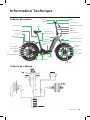
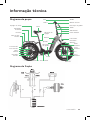
Información Técnica
Diagrama de piezas
Diagrama de cableado
Palanca de freno
Pantalla
Liberación
tija sillín
Cuadro
Liberación
cuadro
Sillín
Tija del sillín
Portaequipajes
Luz trasera
Guardabarros
trasero
Neumático
trasero
Motor
Piñones
Cambio trasero
Freno trasero
Cadena Eje central
Pedal
Refl ector
Batería
Empuñadura
Manillar
Parte plegable
Liberación manillar
Tija
Cableado
Luz frontal
Horquilla
frontal
Freno
delantero
Neumático
delantero
Llanta
Guardabarros
delantero
Pantalla
Pantalla
Batería
Motor
Controlador
Frenos
Izquierdo
Derecho

16
YOUIN LUXOR
Información Técnica
Seguridad
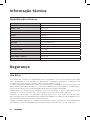
Especificaciones Técnicas
Motor / Batería 36V 250W / 36V 10Ah
Velocidad máxima / Autonomía 25 km-h / hasta 45 km
Rueda / Llanta 20" / Aleación
Platos y bielas Prowheel
Palanca de cambios Shimano
Neumáticos Kenda
Freno Disco
Sillín Tipo confortable
Cuadro 20" Aleación, plegable
Piñones Shimano
Cadenas KMC
Guardabarros Plástico
Horquilla delantera Suspensión (Bloqueable)
Luz 36V Controlable por pantalla
Cambio trasero Shimano
Peno neto / máximo 30 kg / 127 kg
Consejos de Uso
Esta bicicleta eléctrica está diseñada para transportar a una sola persona en cada
uso. Acondiciona tu bicicleta si deseas transportar equipaje y procura no exceder la
carga máxima para la cual fué diseñada (127 kg).
El hecho de no respetar los consejos de seguridad, ni las actividades que vayan más
allá de su uso presvisto, tales como bajar por escalones, realizar acrobacias o hacer
reparaciones inadecuadas, eximirán de toda responsabilidad tanto al fabricante como
al distribuidor.
Se recomienda llevar siempre el casco puesto. En caso de circular de noche, asegúrate
de conectar las luces, y a ser posible, usar también banda o chaleco reflectante.
Recuerda efectuar una limpieza periódica de tu bicicleta. Para ello evita el uso de agua
a presión, ya que los componentes electrónicos pueden mojarse, pudiendo provocar
un mal funcionamiento e incluso lesiones personales.
Limpiar cuidadosamente las superficies pintadas, las piezas de plástico y los
componentes electrónicos. No usar jamás productos abrasivos tales como agua
marina, salitre, sosas, etc.

17
ESPAÑOL
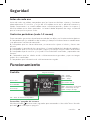
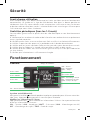
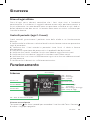
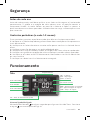
Carga de la batería
PAS - Nivel de asistencia de pedaleo
VOL - Voltaje
CUR - Amperaje
WATT - Vataje
Botón ON/OFF Velocímetro (Km/h)
Botón bajar
Botón subir
ODO - Kilometraje acumulado
DST - Kilometraje del viaje
TIME - Tiempo del viaje
Seguridad
Funcionamiento
Antes de cada uso
Antes de cada uso, debes comprobar que los frenos estén bien sujetos y funcionen
adecuadamente. El manillar y la tija del sillín deben estar en la posición correcta y
fijados firmemente. Las ruedas deben tener suficiente presión y todas las tuercas y
tornillos deben estar bien apretados. La batería debe disponer de carga suficiente
para el uso que le vayamos a dar.
Controles periódicos (cada 1-2 meses)
Estos controles garantizan el perfecto estado de la e-bike y un funcionamiento óptimo.
1- Comprobar que las soldaduras del cuadro y la horquilla estén en buenas condiciones
y no presenten señales de corrosión.
2- Comprobar que los frenos delantero y trasero están sujetos al chasis y frenan con
eficacia.
3- Comprobar la presión de los neumáticos y la profundidad de la banda de rodadura.
4- Comprobar que las llantas estén bien sujetas y no tengan ningún radio suelto o roto.
5- Comprobar que el manillar y la tija del sillín estén bien insertados y apretados con
firmeza.
6- Comprobar que los cables estén suficientemente engrasados y que no tengan
trabas en su recorrido.
7. Comprobar que la batería esté suficientemente cargada.
Pantalla
Encendido / apagado del sistema
Mantén pulsado durante unos segundos para encender tu You-ride Texas. Mantén
pulsado de nuevo para apagarla.

18
YOUIN LUXOR
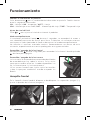
Funcionamiento
Cambiar la información en pantalla
Pulsa brevemente para ir cambiando de información en pantalla. Podrás alternar
entre la seiguiente información:
VOL - Voltaje / CUR - Amperaje / WATT - Vataje
ODO - Kilometraje acumulado / DST - Kilometraje del viaje / TIME - Tiempo del viaje
Ajuste de nivel del PAS
Pulse o para ajustar el nivel de asistencia al pedaleo.
Modo acompañamiento
Si mantienes pulsado el botón durante 3 segundos, se encenderá el motor a
una velocidad constante de 6km/h para llevar la bicicleta sin esfuerzo mientras
caminamos al lado. Apretando el freno se desactivará el modo acompañamiento.
No utilizarlo si estamos montados encima. Recomendamos no abusar de esta
asistencia, especialmente en cuestas prolongadas o muy pronunciadas.
Encendido / apagado de la luz frontal
Mantén pulsado durante 3 segundos para encender la luz frontal. Mantén pulsado
de nuevo para apagarla.
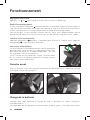
Encendido / apagado de la luz trasera
La luz trasera se enciende directamente desde el botón
de encendido que hay sobre la misma. Pulsa varias
veces para cambiar entre los 3 modos disponibles: luz
fija, luz intermitente 1 y luz intermitente 2.
La luz trasera funciona con 2 pilas, quita los tornillos
y abre la tapa para cambiarlas cuando te quedes sin
batería.
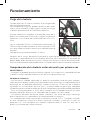
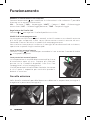
Horquilla frontal
En la horquilla frontal podrás bloquear o desbloquear la suspensión (imagen 1) y
ajustar la presión de la misma (imagen 2).
Imagen 1 Imagen 2

19
ESPAÑOL
Funcionamiento
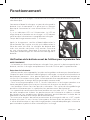
Carga de la batería
Cuando termines el viaje o la batería se esté agotando,
cárgala inmediatamente.
Los métodos de carga se pueden dividir en dos tipos:
uno es sacar la batería y luego cargarla, el otro es cargar
la batería directamente en la bicicleta eléctrica.
Primero conecta el cargador al puerto de carga de la
batería (sin conectarlo al enchufe) y luego a la corriente.
Conéctala a una fuente de alimentación de 220V / 50-
60Hz.
Hay un indicador LED en la fuente de alimentación. El
LED está rojo cuando la batería se está cargando. El LED
se vuelve verde cuando la batería está completamente
cargada.
Tiempo de carga recomendado: 5-6 horas.
Después de la carga, desenchufa primero el enchufe de entrada (de la toma de
corriente) y luego desenchufa el conector de salida (de la bicicleta). El cargador de
batería debe tener voltaje constante. El voltaje fluctuante o la fuente de alimentación
fluctuante de cualquier tipo pueden dañar las celdas de almacenamiento de la batería.
Comprobación de la batería antes de usarla por primera vez
ADVERTENCIA
• La batería se proporciona parcialmente cargada. Para asegurar la capacidad total de
la batería, cárgala completamente antes de usarla por primera vez.
Cuidado de la batería
• Incluso con el cuidado adecuado, las baterías recargables no duran para siempre.
Cada vez que la batería se descarga y posteriormente se recarga, su capacidad relativa
disminuye en un pequeño porcentaje. Puedes maximizar la vida útil de tu batería
siguiendo las instrucciones de esta guía. La batería debe cargarse por completo
inmediatamente cuando se reciba durante el tiempo de carga recomendado completo
• Para una carga completa al 100%, deja la batería en el cargador durante una hora
completa después de que la luz indicadora del cargador se vuelva verde.
• Las baterías de iones de litio no tienen “memoria”. Los ciclos de carga / descarga
parcial no dañarán la capacidad ni el rendimiento de las baterías.
• La capacidad de salida nominal de una batería se mide a 25ºC. Cualquier variación
en esta temperatura alterará el rendi miento de la batería y acortará su vida útil
esperada. Las altas temperaturas reducen especialmente la vida útil total de la
batería y el tiempo de funcionamiento.

20
YOUIN LUXOR
Funcionamiento
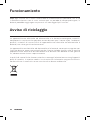
Aviso sobre Reciclaje
• Asegúrate siempre de poner el interruptor de encendido de la bicicleta en “APAGADO”
después de cada uso. Si dejas el interruptor de encendido en la posición “ON”, o tu
bicicleta eléctrica no se ha cargado durante un período de tiempo prolongado, la
batería puede llegar a un punto en el que ya no mantendrá la carga.
Los equipos eléctricos y electrónicos y las baterías contienen materiales, componentes
y sustancias que pueden ser perjudiciales para usted y su entorno, siempre que los
materiales de desecho (desechos de equipos eléctricos y electrónicos y baterías) no
se manejen correctamente.
Los equipos y baterías eléctricos y electrónicos están marcados con el contenedor
de basura tachado, como se muestra a continuación. Este símbolo significa que los
equipos y baterías eléctricos y electrónicos viejos no se deben tirar a la basura; deben
eliminarse por separado.
Como usuario final, es necesario que entregue las baterías agotadas en los puntos de
recolección apropiados. De esta forma, se asegura de que las baterías se reciclan de
acuerdo con la legislación y no causan ningún daño ambiental.
A página está carregando...
A página está carregando...
A página está carregando...
A página está carregando...
A página está carregando...
A página está carregando...
A página está carregando...
A página está carregando...
A página está carregando...
A página está carregando...
A página está carregando...
A página está carregando...
A página está carregando...
A página está carregando...
A página está carregando...
A página está carregando...
A página está carregando...
A página está carregando...
A página está carregando...
A página está carregando...
A página está carregando...
A página está carregando...
A página está carregando...
A página está carregando...
A página está carregando...
A página está carregando...
A página está carregando...
A página está carregando...
A página está carregando...
A página está carregando...
A página está carregando...
A página está carregando...
-
 1
1
-
 2
2
-
 3
3
-
 4
4
-
 5
5
-
 6
6
-
 7
7
-
 8
8
-
 9
9
-
 10
10
-
 11
11
-
 12
12
-
 13
13
-
 14
14
-
 15
15
-
 16
16
-
 17
17
-
 18
18
-
 19
19
-
 20
20
-
 21
21
-
 22
22
-
 23
23
-
 24
24
-
 25
25
-
 26
26
-
 27
27
-
 28
28
-
 29
29
-
 30
30
-
 31
31
-
 32
32
-
 33
33
-
 34
34
-
 35
35
-
 36
36
-
 37
37
-
 38
38
-
 39
39
-
 40
40
-
 41
41
-
 42
42
-
 43
43
-
 44
44
-
 45
45
-
 46
46
-
 47
47
-
 48
48
-
 49
49
-
 50
50
-
 51
51
-
 52
52


Youin BK1700 Manual do usuário
- Categoria
- Acessórios para bicicletas
- Tipo
- Manual do usuário
em outras línguas
- español: Youin BK1700 Manual de usuario
- français: Youin BK1700 Manuel utilisateur
- italiano: Youin BK1700 Manuale utente
- English: Youin BK1700 User manual
Artigos relacionados


Outros documentos
-
Nilox X5 Manual do usuário
-
 URBANGLIDE URBBK12931 Manual do usuário
-
 URBANGLIDE URBBK12928 Manual do usuário
-
Ar?v Meld EB16-EU-RD Manual do usuário
-
BERG fuego cx series Manual do usuário
-
 URBANGLIDE URBBK12915 Manual do usuário
-
Manta MES2001L Manual do usuário
-
Matrix CXM Manual do proprietário
-
-
 URBANGLIDE REFMU13076 Manual do usuário


