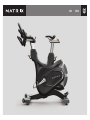
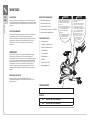
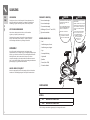
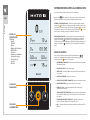
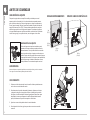
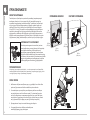
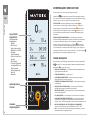
Matrix CXM Manual do proprietário
- Categoria
- Acessórios para bicicletas
- Tipo
- Manual do proprietário
Este manual também é adequado para

CXMCXC

2
3
15
27
39
51
63
75
87
99
111
123
ENGLISH
DEUTSCH
NEDERLANDS
DANSK
FRANÇAIS
ESPAÑOL
ITALIANO
ΕΛΛΗΝΙΚΆ
POLSKI
PORTUGUÊS
РУССКИЙ

3
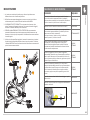
IMPORTANT PRECAUTIONS
SAVE THESE INSTRUCTIONS
• When using Matrix Cycles, basic precautions should always be followed, including the following: Read all instructions before using this equipment. It is
the responsibility of the owner to ensure that all users of this equipment are adequately informed of all warnings and precautions.
• This equipment is intended for commercial use. To ensure your safety and protect the equipment, read all instructions before operating.
• Use this indoor cycle for its intended purpose as
described in this manual. Do not use attachments that
have not been recommended by the manufacturer.
• Never operate the indoor cycle if it is not working properly,
or if it has been damaged. Contact Customer Tech Support
or the authorized dealers for examination and repair.
• Do not use the indoor cycle without proper footwear.
NEVER operate the indoor cycle with bare feet.
• Do not wear any clothing that might catch on
any moving parts of this indoor cycle.
• Keep hands and feet clear at all times from moving parts
to avoid injury. Never turn the pedal cranks by hand.
• Do not dismount the indoor cycle until the
pedals are at a complete STOP.
• Do not insert any object, hands or feet into any openings,
or expose hands, arms or feet to the drive mechanism
or other potentially moving part of the indoor cycle.
• Do not use any equipment that is damaged or has worn
or broken parts. Use only replacement parts supplied
by Customer Tech Support or the authorized dealers.
• Do not operate where aerosol (spray) products are
being used or when oxygen is being administered.
• Close supervision is necessary when used near children.
• This equipment is not intended for use by persons with
reduced physical, sensory or mental capabilities, or lack
of experience and knowledge, unless they have been
given supervision or instruction concerning use of the
equipment by a person responsible for their safety.
• Ensure that adjustment levers (seat and handlebar
fore-and-aft) are properly secured and do not
interfere with range of motion during exercise.
• When adjusting the seat and handlebar height,
hold the seat or handlebar with one hand,
while lifting and then locking the lever. Ensure
clamp is fully engaged prior to use.
• Incorrect or excessive exercise may result in serious
injury or death. If you experience any kind of pain,
including but not limited to chest pains, nausea, dizziness,
or shortness of breath, stop exercising immediately
and consult your physician before continuing.
• Do not jump on the unit.
• At no time should more than one person
be on unit while in operation.
• This unit should not be used by persons weighing
more than specied in the PRODUCT SPECIFICATIONS
SECTION. Failure to comply will void the warranty.
CAUTION!
CONSULT A PHYSICIAN BEFORE USING THIS EQUIPMENT. READ OWNER’S MANUAL BEFORE USE.
• It is essential that this equipment is used only indoors, in a climate controlled room. If this equipment has been exposed to colder temperatures or high moisture
climates, it is strongly recommended that the equipment is warmed up to room temperature and allowed time to dry out before rst time use.
WARNING!
TO REDUCE THE RISK OF BURNS, FIRE, ELECTRICAL SHOCK OR INJURY TO PERSONS:
• Do not use other attachments that are not recommended
by the manufacturer. Attachments may cause injury.
• To clean, wipe surfaces down with soap and slightly damp
cloth only; never use solvents. (See MAINTENANCE)
• At NO time should pets or children under the
age of 14 be closer to the unit than 10 feet.
• At NO time should children under the age of 14 use the unit.
• Children over the age of 14 should not use
the unit without adult supervision.
• Heart rate monitoring systems may be inaccurate.
• After exercising, push down on the brake lever to slow
the ywheel down and decrease the potential for injury.
• The indoor cycle does not have a independently
moving ywheel; the pedals will continue to move
together with the ywheel until the ywheel stops.
• Use the stationary training equipment
in a supervised environment.
ENGLISH

4
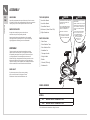
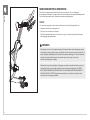
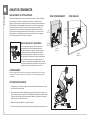
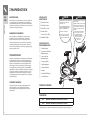
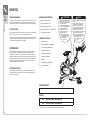
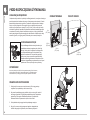
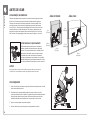
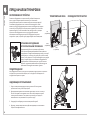
UNPACKING
Unpack the equipment where you will be using it. Place the carton
on a level at surface. It is recommended that you place a protective
covering on your oor. Never open box when it is on its side.
IMPORTANT NOTES
During each assembly step, ensure that ALL nuts
and bolts are in place and partially threaded.
Several parts have been pre-lubricated to aid in assembly
and usage. Please do not wipe this off. If you have diculty,
a light application of lithium grease is recommended.
WARNING!
There are several areas during the assembly process that
special attention must be paid. It is very important to follow
the assembly instructions correctly and to make sure all parts
are rmly tightened. If the assembly instructions are not
followed correctly, the equipment could have parts that are not
tightened and will seem loose and may cause irritating noises.
To prevent damage to the equipment, the assembly instructions
must be reviewed and corrective actions should be taken.
NEED HELP?
If you have questions or if there are any missing
parts, contact Customer Tech Support. Contact
information is located on the information card.
ASSEMBLY
TOOLS REQUIRED:
F 3 mm Allen Wrench
F 5 mm Allen Wrench
F 10 mm Allen Wrench
F Flat Wrench (15mm/17mm 325L)
F Phillips Screwdriver
PARTS INCLUDED:
F 1 Main Frame
F 1 Front Stabilizer Tube
F 1 Rear Stabilizer Tube
F 1 Handlebar Set
F 1 Transport Handle
F 1 Bicycle Saddle
F 2 Pedals
F 1 Console (CXM only)
F 1 Hardware Kit
CXC
CXM
SEAT AND HANDLEBARS: HOLD WITH ONE HAND WHILE
ADJUSTING HEIGHT. ENSURE CLAMP IS FULLY
ENGAGED PRIOR TO USE.
USE THE STATIONARY TRAINING EQUIPMENT IN A
SUPERVISED ENVIRONMENT UNDER THE DIRECT
SUPERVISION OF A TRAINED INSTRUCTOR.
SPINNING PEDALS CAN CAUSE INJURY.
THIS EXERCISE BICYCLE DOES NOT HAVE A
FREEWHEEL AND PEDAL SPEED MUST BE
REDUCED IN A CONTROLLED MANNER.
WARNING
KEEP CHILDREN UNDER THE AGE OF 14 AWAY FROM
EXERCISE EQUIPMENT.
ALL WARNINGS AND INSTRUCTIONS SHOULD BE READ
AND PROPER INSTRUCTION OBTAINED PRIOR TO USE.
USE THIS EQUIPMENT FOR ITS INTENDED PURPOSE
ONLY. CONSULT A PHYSICIAN BEFORE USING THIS
EQUIPMENT.
SET UP AND OPERATE THE STATIONARY EXERCISE
BICYCLE ON A SOLID LEVEL SURFACE. CARE
SHOULD BE TAKEN IN MOUNTING AND
DISMOUNTING THE STATIONARY EXERCISE
BICYCLE. BEFORE DISMOUNTING,
BRING THE PEDALS TO A
COMPLETE STOP.
CAUTION
SERIAL NUMBER
MODEL
F CXC MATRIX TARGET TRAINING CYCLE
F CXM MATRIX TARGET TRAINING CYCLE
* Use the information above when calling for service.
ENGLISH

5
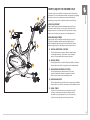
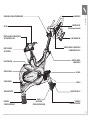
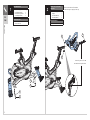
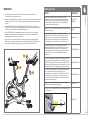
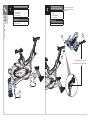
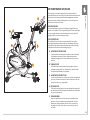
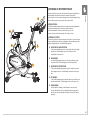
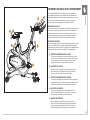
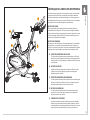
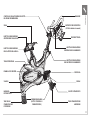
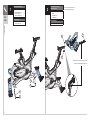
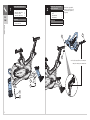
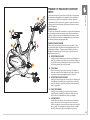
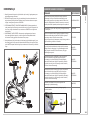
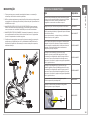
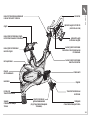
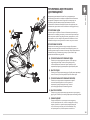
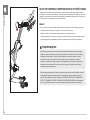
TENSION CONTROL & EMERGENCY BRAKE LEVER
SADDLE
HORIZONTAL SADDLE
ADJUSTMENT LEVER
SADDLE HEIGHT
ADJUSTMENT LEVER
MAIN FRAME
SERVICE PANEL
FLYWHEEL
TRANSPORT HANDLE
REAR STABILIZER TUBE
HANDLEBARS
DEVICE HOLDER
(CXM has console)
WATER BOTTLE HOLDER
HORIZONTAL HANDLEBAR
ADJUSTMENT LEVER
HANDLEBAR HEIGHT
ADJUSTMENT LEVER
CRANK
PEDALS
TRANSPORT WHEELS
FRONT STABILIZER TUBE
LEVELERS
UNDER STABILIZER TUBES)
ENGLISH

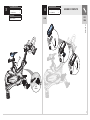
6
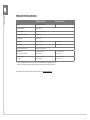
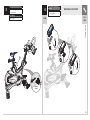
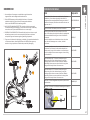
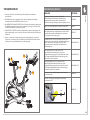
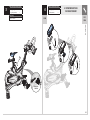
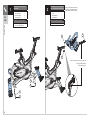
1 2
CXC
CXM
A
B
C
B
Red Hardware Pack
Description Qty
A
B
C
Bolt (M12x25L)
Flat Washer
Bolt (M12x70L)
2
4
2
Torque Value
A
C
78 Nm / 58 ft-lb
78 Nm / 58 ft-lb
E
D
F
Black (CXC) / Yellow (CXM)
Hardware Pack
Description Qty
D
E
F
Stopper
Screw (M8x20L)
Screw (M4x6L)
1
1
2
Torque Value
E 20 Nm / 14 ft-lb
Slide handlebars onto frame
before attaching (D), (E) and
then (F)
This part is for CXM only
CXM only: Push to lock
ENGLISH

7
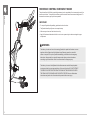
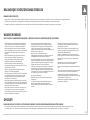
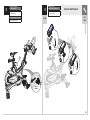
H
H
1
2
3
G
CXC
CXM
4
ASSEMBLY COMPLETE!
3
LEFT
PEDAL
Green Hardware Pack
Description Qty
H Screw (M4x10L) 3
CXM
ENGLISH
Pre-installed Hardware
Description Qty
G Bolt (M6x50L) 1
Torque Value
100 Nm / 74 ft-lb

8
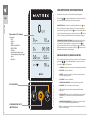
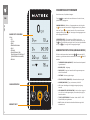
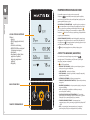
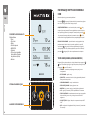
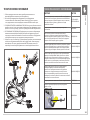
CXM
BACK-LIT LCD
Displays:
• Time
• RPM
• Watts
• Resistance Level
• MPH/KPH
• Distance
• Heart Rate (when heart
rate strap is worn)
• Calories
NAVIGATION ARROWS
CONFIRMATION KEY
CXM CONSOLE INFORMATION
Console turns on when pedals are moved.
Press
to change the large metric at the top from RPMs to
Watts, to HR, to a lap feature.
LAP/INTERVAL - when on the lap screen, press to start the rst
interval. Lap number, time and distance covered will be displayed.
Press to stop the interval. To start the next lap, press again,
etc. At the end of the workout, lap times/distances will be displayed.
SUMMARY SCREENS – after the workout is complete, an average
summary of RPM, Watts, MPH, HR, etc. will be displayed. Press
to
advance to the max summary screen for RPM, Watts MPH, HR, etc.
Press
again to advance to the Lap summary screen.
MANAGER MODE
To enter manager mode, press
simultaneously for 3-5
seconds, to exit manager mode, press and hold for 3-5 seconds.
• WORKOUT – set desired pause time and inactivity time
• USER – select weight
• UNIT – set console to display metric or imperial units
• SOFTWARE – version and updates
• FRAME LIFE – Accumulated distance and time
• MACHINE – Type, Serial Number, out of order
• LCD – adjust backlight brightness and contrast settings
• SHUTDOWN TIME – When in the workout summary, if there is
no RPM, this is the amount of time before the console shuts off
• PAIR HR – Disable / enable for ANT+/BLE heart rate pairing
screen
• ANT+ - enable or disable the broadcast function and set
broadcast ID
ENGLISH

9
CXM
USING THE HEART RATE FUNCTION
The heart rate function on this product is not a medical device. The heart rate reading
is intended only as an exercise aid in determining heart rate trends in general. Please
consult your physician.
When used in conjunction with a wireless chest transmitter (sold separately), your heart
rate can be transmitted wirelessly to the unit and displayed on the console. Compatible
with Bluetooth, ANT+ and Polar 5kHz heart rate devices.
NOTE: The chest strap must be tight and properly placed to receive an accurate and
consistent readout. If the chest strap is too loose, or positioned improperly, you may
receive an erratic or inconsistent heart rate readout.
WARNING!
Heart rate monitoring systems may be inaccurate. Over exercising may result in serious
injury or death. If you feel faint, stop exercising immediately.
BATTERY
When the battery is low, a low battery icon will be displayed in the upper right hand
corner of the screen.
The user will be prompted to pedal to charge (minimum of 67 RPMs). The battery icon will
disappear when sufficiently charged.
If the battery needs to be replaced, the console will display this message when necessary.
POWER ACCURACY
This bike displays power on the console. The power accuracy of this model has been
tested using the test method of ISO 20957-10:2017 to ensure a power accuracy within a
tolerance of ±10 % for input power ≥50 W, and within a tolerance of ±5 W for input power
<50 W. The power accuracy was verified using the following conditions:
Nominal Power Rotations per minute measured at crank
• 50 W 50 RPM
• 100 W 50 RPM
• 150 W 60 RPM
• 200 W 60 RPM
• 300 W 70 RPM
• 400 W 70 RPM
In addition to the above testing conditions, the manufacturer tested the power accuracy
at one additional point, using a crank rotation speed of approximately 80 RPM (or higher)
and comparing the displayed power to the input (measured) power.
ENGLISH

10
LEVELING THE EQUIPMENT
It is extremely important that the levelers are correctly
adjusted for proper operation. Turn leveling foot
clockwise to lower and counter-clockwise to raise unit.
Adjust each side as needed until the equipment is
level. An unbalanced unit may cause belt misalignment
or other issues. Use of a level is recommended.
BEFORE YOU BEGIN
LOCATION OF THE UNIT
Place the equipment on a level and stable surface away from direct sunlight. The
intense UV light can cause discoloration on the plastics. Locate your equipment in
an area with cool temperatures and low humidity. Please leave a clear zone on all
sides of the equipment that is at least 60 cm (23.6”). This zone must be clear of any
obstruction and provide the user a clear exit path from the machine. Do not place
the equipment in any area that will block any vent or air openings. The equipment
should not be located in a garage, covered patio, near water or outdoors.
PROPER USAGE
1. Sit on the cycle facing the handlebars. Both feet should
be on the floor one on each side of the frame.
2. To determine proper seat position, sit on the seat and position both feet on the
pedals. Your knee should bend slightly at the furthest pedal position. You should be
able to pedal without locking your knees or shifting your weight from side to side.
3. Adjust pedal straps to desired tightness.
4. To get off of the cycle, follow the proper usage steps in reverse.
WARNING!
Our equipment is heavy, use care and additional help if necessary when
moving. Failure to follow these instructions could result in injury.
TRAINING AREA
2 M
(78.7”)
0.56 M
(22.2”)
1.45 M
(57.2”)
FREE AREA
2 M
(78.7”)
1.76 M
(69.4”)
2.65 M
(104.4”)
ENGLISH

11
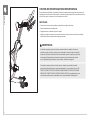
A
B
C
D
E
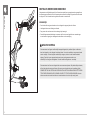
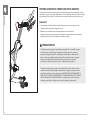
HOW TO ADJUST THE INDOOR CYCLE
The indoor cycle can be adjusted for maximum comfort and exercise
effectiveness. The instructions below describe one approach to adjusting
the indoor cycle to ensure optimal user comfort and ideal body
positioning; you may choose to adjust the indoor cycle differently.
SADDLE ADJUSTMENT
Proper saddle height helps ensure maximum exercise efficiency
and comfort, while reducing the risk of injury. Adjust the saddle
height to make sure it’s in proper position, one that keeps a slight
bend in your knee while your legs are in the extended position
HANDLEBAR ADJUSTMENT
Proper position for the handlebar is based primarily on comfort.
Typically, the handlebar should be positioned slightly higher
than the saddle for beginning cyclists. Advanced cyclists could try
different heights to get the arrangement most suitable for them.
A) SADDLE HORIZONTAL POSITION
Pull the adjustment lever down to slide the saddle forward
or backward as desired. Push the lever up to lock saddle
position. Test the saddle slide for proper operation.
B) SADDLE HEIGHT
Lift the adjustment lever up while sliding the saddle up and down
with the other hand. Push the lever down to lock saddle position.
C) HANDLEBAR HORIZONTAL POSITION
Pull the adjustment lever towards the rear of the cycle
to slide the handlebars forward or backward as desired.
Push the lever forward to lock handlebar position.
D) HANDLEBAR HEIGHT
Pull the adjustment lever up while raising or lowering the handlebar
with the other hand. Push the lever down to lock handlebar position.
E) PEDAL STRAPS
Place the ball of the foot into the toe cage until the ball of
the foot is centered over the pedal, reach down and pull
the pedal strap up to tighten prior to use. To remove your
foot from the toe cage, loosen the strap and pull out.
ENGLISH

12
RESISTANCE CONTROL / EMERGENCY BRAKE
The preferred level of difficulty in pedaling (resistance) can be regulated in fine increments by use of the
tension control lever. To increase the resistance, push the tension control lever towards the ground. To
decrease the resistance, pull up the lever upwards.
IMPORTANT:
• To stop the flywheel while pedaling, push down hard on the lever.
• The flywheel should quickly come to a complete stop.
• Make sure your shoes are fixed into the toe clip.
• Apply full resistance load when the bike is not in use to prevent injuries due to moving drive gear
components.
WARNING
The indoor cycle does not have a free moving flywheel; the pedals will continue to move
together with the flywheel until the flywheel stops. Reducing speed in a controlled
manner is required. To stop the flywheel immediately, push down the red emergency
brake lever. Always pedal in a controlled manner and adjust your desired cadence
according to your own abilities. Push the red lever down = emergency stop.
The indoor cycle uses a fixed flywheel that builds momentum and will keep the pedals
turning even after the user stops pedaling or if the user’s feet slip off. DO NOT ATTEMPT
TO REMOVE YOUR FEET FROM THE PEDALS OR DISMOUNT THE MACHINE UNTIL BOTH
THE PEDALS AND THE FLYWHEEL HAVE COMPLETELY STOPPED. Failure to follow these
instructions may lead to loss of control and the potential for serious injury.
ENGLISH

13
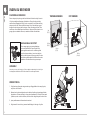
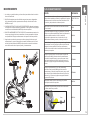
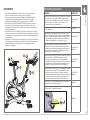
MAINTENANCE
1. Any and all part removal or replacement must be
performed by a qualied service technician.
2. DO NOT use any equipment that is damaged and or has worn or broken parts.
Use only replacement parts supplied by your country’s local MATRIX dealer.
3. MAINTAIN LABELS AND NAMEPLATES: Do not remove labels for
any reason. They contain important information. If unreadable or
missing, contact your MATRIX dealer for a replacement.
4. MAINTAIN ALL EQUIPMENT: Preventative maintenance is the key to
smooth operating equipment as well as keeping your liability to a
minimum. Equipment needs to be inspected at regular intervals.
5. Ensure that any person(s) making adjustments or performing maintenance
or repair of any kind is qualied to do so. MATRIX dealers will provide service
and maintenance training at our corporate facility upon request.
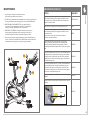
B
A
D
C
ENGLISH
MAINTENANCE SCHEDULE
ACTION FREQUENCY
Clean the indoor cycle using soft cloths or paper towels or other
Matrix approved solution (cleaning agents should be alcohol
and ammonia free). Disinfect the saddle and handlebars and
wipe off all bodily residues.
AFTER EACH USE
Make sure that the indoor cycle is level and does not rock. DAILY
Clean entire machine using water and a mild soap or other
Matrix approved solution (cleaning agents should be alcohol
and ammonia free).
Clean all exterior parts, the steel frame, front and rear
stabilizers, seat and handlebars.
WEEKLY
Test the emergency brake to make sure it is functioning
properly. To do this, press down the red emergency brake
lever while pedaling. When functioning properly, it should
immediately slow down the ywheel until it comes to a complete
stop.
BI-WEEKLY
Lubricate the saddle post (A). To do this, raise the saddle post to
the MAX position, spray with maintenance spray and rub down
the entire exterior surfaces with a soft cloth. Clean the saddle
slide (B) with a soft cloth and if necessary apply a small amount
of lithium/silicone grease.
BI-WEEKLY
Lubricate the handlebar post (C). To do this, raise the handlebar
post to the MAX position, spray with maintenance spray and
rub down the entire exterior surfaces with a soft cloth. Clean
the handlebar slide (D) with a soft cloth and if necessary apply a
small amount of lithium/silicone grease.
BI-WEEKLY
Inspect all assembly bolts and pedals on the machine for proper
tightness.
MONTHLY
Inspect handlebar and seat height adjustment levers for proper
tightness.
5 mm
MONTHLY

14
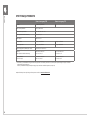
PRODUCT SPECIFICATIONS
CXM Indoor Cycle CXC Indoor Cycle
Console Back-lit LCD NA
Max User Weight 159 kg / 350 lbs
User Height Range 147 – 200.7 cm / 4’11” – 6’7”
Max Saddle and Handlebar Height 130.3 cm / 51.3”
Max Length 145.2 cm / 57.2”
Product Weight 56.5 kg / 124.6 lbs 55.2 kg / 121.7 lbs
Shipping Weight 62.4 kg / 137.6 lbs 61.1 kg / 134.7 lbs
Required Footprint (L x W)* 122.4 x 56.3 cm / 48.2” x 22.2”
Dimensions
(max saddle & handlebar height)
145.2 x 56.4 x 130.2 cm /
57.2” x 22.2 x 51.3”
145.2 x 56.4 x 130.2 cm /
57.2” x 22.2 x 51.3”
Overall Dimensions
(L x W x H)*
122.4 x 56.4 x 102.8 cm /
48.2” x 22.2 x 40.5”
122.4 x 56.4 x 102.8 cm /
48.2” x 22.2 x 40.5”
* Ensure a minimum clearance width of 0.6 meters (24”) for access to and passage around MATRIX equipment.
Please note, 0.91 meters (36”) is the ADA recommended clearance width for individuals in wheelchairs.
For most current owner’s manual and information, check www.matrixtness.com
ENGLISH

15
WICHTIGE VORSICHTSMASSNAHMEN
BEWAHREN SIE DIESE BEDIENUNGSANLEITUNG AUF
• Bei der Verwendung von Matrix Fahrrädern sollten grundlegende Vorsichtsmaßnahmen immer beachtet werden, einschließlich der folgenden: Lesen Sie vor der Nutzung dieses Geräts
alle Anweisungen. Es liegt in der Verantwortung des Eigentümers, sicherzustellen, dass alle Nutzer dieses Geräts über alle Warnungen und Vorsichtsmaßnahmen informiert werden.
• Dieses Produkt ist für den gewerblichen Gebrauch vorgesehen. Um Ihre Sicherheit zu gewährleisten und Schäden am Gerät zu vermeiden, lesen Sie sich vor Gebrauch bitte diese
Bedienungsanleitung durch.
• Verwenden Sie das Indoor-Fahrrad nur für den in
diesem Handbuch beschriebenen Zweck. Verwenden Sie
ausschließlich Zubehörteile, die vom Hersteller empfohlen
wurden.
• Verwenden Sie das Indoor-Fahrrad nicht, wenn es nicht
richtig funktioniert oder beschädigt ist. Wenden Sie sich
für die Überprüfung und Reparatur an den technischen
Kunden-Support oder den autorisierten Händler.
• Verwenden Sie das Indoor-Fahrrad nur mit geeignetem
Schuhwerk. Benutzen Sie das Indoor-Fahrrad NIEMALS
ohne Schuhe.
• Tragen Sie keine Kleidung, die sich an beweglichen Teilen
dieses Indoor-Fahrrads verfangen könnte.
• Um Verletzungen zu vermeiden, halten Sie Ihre Hände
und Füße immer von sich bewegenden Teilen fern. Die
Pedalkurbeln niemals von Hand drehen.
• Steigen Sie erst dann von dem Indoor-Fahrrad ab, wenn
sich die Pedale NICHT mehr bewegen.
• Stecken Sie keine Gegenstände, Hände oder Füße in
Öffnungen oder setzen Sie Hände, Arme oder Füße nicht
dem Antriebsmechanismus oder anderen möglicherweise
beweglichen Teilen des Indoor-Fahrrads aus.
• Benutzen Sie keine beschädigten Geräte oder solche, die
verschlissene oder defekte Teile aufweisen. Verwenden Sie
nur Ersatzteile, die vom technischen Kunden-Support oder
einem autorisierten Händler geliefert wurden.
• Betreiben Sie das Gerät nicht, wenn in der Nähe sprühbare
Produkte (Sprays) verwendet werden oder mit Sauerstoff
gearbeitet wird.
• Bei Verwendung in der Nähe von Kindern ist eine
sorgfältige Überwachung erforderlich.
• Dieses Gerät ist nicht für Personen mit eingeschränkten
physischen, sensorischen oder geistigen Fähigkeiten oder
mangelnden Erfahrungen und Kenntnissen bestimmt,
es sei denn, sie wurden von einer für ihre Sicherheit
verantwortlichen Person überwacht oder instruiert.
• Stellen Sie sicher, dass die Einstellhebel (Sitz und Lenker
vorn und hinten) ordnungsgemäß festgezogen sind und
den Bewegungsumfang während des Trainings nicht
beeinträchtigen.
• Wenn Sie die Höhe des Sitzes und des Lenkers einstellen,
halten Sie den Sitz oder den Lenker mit einer Hand
fest, während Sie den Hebel anheben und verriegeln.
Vergewissern Sie sich vor Benutzung, dass die Klemme
komplett eingerastet ist.
• Falsches oder übermäßiges Training kann zu schweren
Verletzungen oder zum Tod führen. Sollten Sie Schmerzen
haben, beispielsweise Schmerzen in der Brust, Übelkeit,
Schwindel oder Atemnot, beenden Sie sofort das Training
und stellen Sie sich vor dem Fortsetzen des Trainings bei
einem Arzt vor.
• Springen Sie nicht auf das Gerät.
• Während des Betriebs darf sich zu keinem Zeitpunkt mehr
als eine Person auf dem Gerät benden.
ACHTUNG!
WENDEN SIE SICH VOR DER VERWENDUNG DES GERÄTS AN EINEN ARZT. LESEN SIE DIE BEDIENUNGSANLEITUNG VOR DEM GEBRAUCH.
• Sie müssen dringend beachten, dass dieses Gerät ausschließlich für den Gebrauch in klimatisierten Innenräumen vorgesehen ist. Wenn dieses Gerät kälteren Temperaturen oder
hoher Luftfeuchtigkeit ausgesetzt war, wird dringend empfohlen, das Gerät auf Raumtemperatur zu erwärmen und vor dem ersten Gebrauch Zeit zum Trocknen zu lassen.
WARNUNG!
BEACHTEN SIE DIE FOLGENDEN ANWEISUNGEN ZUR REDUZIERUNG DER GEFAHR VON VERBRENNUNGEN, BRÄNDEN, STROMSCHLÄGEN
ODER PERSONENSCHÄDEN:
• Dieses Gerät sollte nicht von Personen benutzt werden, die
schwerer sind als im ABSCHNITT PRODUKTSPEZIFIKATION
angegeben. Bei Nichtbeachtung erlischt die Garantie.
• Verwenden Sie ausschließlich Zubehörteile, die vom
Hersteller empfohlen sind. Zubehörteile können
Verletzungen verursachen.
• Wischen Sie die Oberächen zur Reinigung mit Seife und
einem nur leicht feuchten Tuch ab; verwenden Sie keine
Lösemittel. (Siehe WARTUNG)
• Zu KEINEM Zeitpunkt dürfen sich Tiere oder Kinder unter
14 Jahren näher als 3 m am Gerät aufhalten.
• Das Gerät darf zu KEINEM Zeitpunkt von Kindern unter
14 Jahren verwendet werden.
• Kinder über 14 Jahren sollten das Gerät nur unter Aufsicht
eines Erwachsenen benutzen.
• Herzfrequenz-Überwachungssysteme sind ggf. ungenau.
• Drücken Sie nach dem Training den Bremshebel nach
unten, um das Schwungrad zu verlangsamen und das
Verletzungsrisiko zu verringern.
• Das Indoor-Fahrrad hat kein sich unabhängig bewegliches
Schwungrad. Die Pedale bewegen mit dem Schwungrad
weiter, bis das Schwungrad zum Stillstand kommt.
• Verwenden Sie das stationäre Trainingsgerät in einer
überwachten Umgebung.
DEUTSCH

16
SITZ UND LENKER: BEIM EINSTELLEN DER HÖHE MIT
EINER HAND FESTHALTEN. VERGEWISSERN SIE SICH
VOR BENUTZUNG, DASS DIE KLEMME KOMPLETT
EINGERASTET IST.
NUTZEN SIE DAS STATIONÄRE TRAININGSGERÄT IN
EINER BETREUTEN UMGEBUNG UNTER DER DIREKTEN
AUFSICHT EINES AUSGEBILDETEN TRAINERS.
FAHRRADPEDALE KÖNNEN VERLETZUNGEN
VERURSACHEN.
DIESES ÜBUNGSFAHRRAD HAT KEINEN FREILAUF.
DIE GESCHWINDIGKEIT DER PEDALE MUSS
DAHER IN KONTROLLIERTER WEISE
VERLANGSAMT WERDEN.
WARNUNG
HALTEN SIE KINDER UNTER 14 JAHREN VON DIESEM
ÜBUNGSGERÄT FERN.
VOR DER VERWENDUNG MÜSSEN ALLE WARNHINWEISE
GELESEN UND EINE RICHTIGE UNTERWEISUNG ERFOLGT
SEIN. DIESES GERÄT AUSSCHLIESSLICH FÜR DEN
BESTIMMUNGSGEMÄßEN ZWECK VERWENDEN. WENDEN SIE
SICH VOR DER VERWENDUNG DES GERÄTS AN EINEN ARZT.
STELLEN SIE DAS STATIONÄRE ÜBUNGSFAHRRAD AUF
EINER STABILEN UND EBENEN FLÄCHE AUF UND
BEDIENEN SIE ES NUR DORT. BEIM AUF- UND
ABSTEIGEN VOM GERÄT IST BESONDERE VORSICHT
GEBOTEN. STEIGEN SIE ERST DANN VOM
HEIMTRAINER AB, WENN DIE PEDALE
VOLLSTÄNDIG ZUM STILLSTAND
GEKOMMEN SIND.
VORSICHT
AUSPACKEN
Packen Sie das Gerät am Aufstellungsort aus. Stellen Sie den Karton
auf einer ebenen Fläche auf. Wir empfehlen, dass Sie eine Schutzdecke
auf den Boden legen. Öffnen Sie den Karton nicht, wenn dieser auf der
Seite liegt.
WICHTIGE HINWEISE
Stellen Sie während jedes Montageschritts sicher, dass ALLE Muttern
und Schrauben eingesteckt und teilweise eingeschraubt sind.
Mehrere Teile wurden zur Vereinfachung von Montage und Nutzung
vorgeschmiert. Wischen Sie dieses Schmiermittel nicht ab. Wenn
Probleme auftreten, wird das Auftragen von etwas Lithiumfett
empfohlen.
WARNUNG!
Es gibt mehrere Bereiche, auf die während des Montagevorgangs
besonders geachtet werden muss. Das korrekte Befolgen der
Montageanleitung ist sehr wichtig, und es muss sichergestellt werden,
dass alle Teile sicher befestigt wurden. Wenn die Montageanleitung
nicht korrekt befolgt wird, sitzen Teile des Geräts ggf. nicht fest und
scheinen locker zu sein, was zu irritierenden Geräuschen führen
könnte. Zur Vermeidung von Beschädigungen am Gerät müssen
die Montageanleitung gelesen und Korrekturmaßnahmen ergriffen
werden.
BRAUCHEN SIE HILFE?
Wenden Sie sich bei Fragen oder fehlenden Teilen an den
technischen Kunden-Support. Die Kontaktdaten nden Sie auf der
Informationskarte.
MONTAGE
BENÖTIGTE WERKZEUGE:
F Inbusschlüssel (3 mm)
F Inbusschlüssel (5 mm)
F Inbusschlüssel (10 mm)
F Gabelschlüssel (15 mm / 17 mm 325L)
F Kreuzschlitzschraubendreher
ENTHALTENE TEILE:
F 1 Hauptrahmen
F 1 Vorderes Stabilisatorrohr
F 1 Hinteres Stabilisatorrohr
F 1 Handgriffsatz
F 1 Transportgriff
F 1 Fahrradsattel
F 2 Pedale
F 1 Konsole (nur CXM)
F 1 Beschlagteilesatz
CXC
CXM
SERIENNUMMER
MODELL
F CXC MATRIX INDOOR-FAHRRAD
F CXM MATRIX INDOOR-FAHRRAD
* Geben Sie bei jedem Kontakt mit dem Kundendienst die oben stehenden Informationen an.
DEUTSCH

17
SPANNUNGS- UND NOTBREMSHEBEL
SATTEL
EINSTELLHEBEL HORIZONTALER
SATTELEINSTELLUNG
EINSTELLHEBEL
SATTELHÖHE
HAUPTRAHMEN
SERVICE-PANEL
SCHWUNGRAD
TRANSPORTGRIFF
HINTERES
STABILISATORROHR
HANDGRIFFE
GERÄTEHALTER
(CXM hat eine Konsole)
FLASCHENHALTER
EINSTELLHEBEL HORIZONTALE
LENKEREINSTELLUNG
EINSTELLHEBEL
LENKERHÖHE
KURBEL
PEDALE
TRANSPORTROLLE
VORDERES
STABILISATORROHR
HEBEL
(UNTER DEN
STABILISATORROHREN)
DEUTSCH

18
1 2
CXC
CXM
A
B
C
B
Roter Zubehörsatz
Beschreibung Menge
A
B
C
Schraube (M12x25L)
Flache Unterlegscheibe
Schraube (M12x70L)
2
4
2
Drehmomentwert
A
C
78 Nm / 58 ft-lb
78 Nm / 58 ft-lb
E
D
F
Schwarz (CXC) / Gelb (CXM)
Teilepaket
Beschreibung Menge
D
E
F
Stopper
Schraube (M8x20L)
Schraube (M4x6L)
1
1
2
Drehmomentwert
E 20 Nm / 14 ft-lb
Schieben Sie den Lenker auf den Rahmen
vor dem Anbringen von (D), (E) und dann (F)
Dieses Teil gibt es nur für CXM
Nur CXM: Zum Verriegeln drücken
DEUTSCH

19
H
H
1
2
3
G
CXC
CXM
4
MONTAGE ABGESCHLOSSEN!
3
LINKS
PEDAL
Grünes Teilepaket
Beschreibung Menge
H Schraube (M4x10L) 3
CXM
DEUTSCH
Vorinstallierte Komponenten
Beschreibung Menge
G Schraube (M6x50L) 1
Drehmoment
100 Nm

20
CXM
Beleuchtete LCD-Anzeige
Anzeigen:
• Zeit
• U/min
• Watt
• Widerstandsstufe
• MPH / KMH
• Distanz
• Herzfrequenz (wenn der
Herzfrequenzgurt getragen
wird)
• Kalorien
AUF-/AB-PFEILE
CONFIRMATION-TASTE
(BESTÄTIGUNG)
CXM-KONSOLEN INFORMATIONEN
Die Konsole schaltet sich ein, wenn die Pedale bewegt werden.
Drücken Sie
um die große Anzeige oben zwischen U/min, Watt,
Herzfrequenz oder einer Runden-Funktion umzuschalten.
RUNDE/INTERVALL - Drücken Sie auf dem Rundenbildschirm , um
das erste Intervall zu beginnen. Rundenzahl, Zeit und zurückgelegte
Strecke werden angezeigt. Drücken Sie um das Intervall zu stoppen.
Um die nächste Runde zu beginnen, drücken Sie nochmals usw. Am
Ende des Trainings werden Rundenzeiten / Entfernungen angezeigt.
ZUSAMMENFASSUNGSBILDSCHIRME - Nach Abschluss des Trainings
wird eine Zusammenfassung der durchschnittlichen Werte von U/
min, Watt, KMH, Herzfrequenz usw. angezeigt. Drücken Sie
um
zum Übersichtsbildschirm für die maximalen Werte von U/min, Watt,
KMH, Herzfrequenz usw. zu gelangen. Drücken Sie
erneut, um zum
Rundenübersichtsbildschirm zu gelangen.
MANAGER-MODUS (MANAGER-MODE)
Um in den Manager-Modus zu gelangen, drücken Sie für 3-5 Sekunden
gleichzeitig
. Um den Manager-Modus zu verlassen, drücken
und halten Sie für 3-5 Sekunden.
• TRAINING - gewünschte Pausenzeit und Inaktivitätszeit einstellen
• BENUTZER - Gewicht auswählen
• EINHEIT - Konsole so einstellen, dass metrische oder imperiale
Einheiten angezeigt werden
• SOFTWARE - Version und Updates
• LEBENSDAUER RAHMEN - Kumulierte Entfernung und Zeit
• MASCHINE - Typ, Seriennummer, außer Betrieb
• LCD - Helligkeit und Kontrast der Hintergrundbeleuchtung
anpassen
• ABSCHALTZEIT - Wenn in der Trainingsübersicht keine Drehzahl
angegeben ist, ist dies der Zeitraum bis zum Abschalten der
Konsole
• VERBINDEN HERZFREQUENZ – Deaktivieren / aktivieren für den
ANT + / BLE Herzfrequenz-Kopplungsbildschirm
• ANT + - Broadcast-Funktion aktivieren oder deaktivieren und die
Broadcast-ID festlegen
DEUTSCH
A página está carregando...
A página está carregando...
A página está carregando...
A página está carregando...
A página está carregando...
A página está carregando...
A página está carregando...
A página está carregando...
A página está carregando...
A página está carregando...
A página está carregando...
A página está carregando...
A página está carregando...
A página está carregando...
A página está carregando...
A página está carregando...
A página está carregando...
A página está carregando...
A página está carregando...
A página está carregando...
A página está carregando...
A página está carregando...
A página está carregando...
A página está carregando...
A página está carregando...
A página está carregando...
A página está carregando...
A página está carregando...
A página está carregando...
A página está carregando...
A página está carregando...
A página está carregando...
A página está carregando...
A página está carregando...
A página está carregando...
A página está carregando...
A página está carregando...
A página está carregando...
A página está carregando...
A página está carregando...
A página está carregando...
A página está carregando...
A página está carregando...
A página está carregando...
A página está carregando...
A página está carregando...
A página está carregando...
A página está carregando...
A página está carregando...
A página está carregando...
A página está carregando...
A página está carregando...
A página está carregando...
A página está carregando...
A página está carregando...
A página está carregando...
A página está carregando...
A página está carregando...
A página está carregando...
A página está carregando...
A página está carregando...
A página está carregando...
A página está carregando...
A página está carregando...
A página está carregando...
A página está carregando...
A página está carregando...
A página está carregando...
A página está carregando...
A página está carregando...
A página está carregando...
A página está carregando...
A página está carregando...
A página está carregando...
A página está carregando...
A página está carregando...
A página está carregando...
A página está carregando...
A página está carregando...
A página está carregando...
A página está carregando...
A página está carregando...
A página está carregando...
A página está carregando...
A página está carregando...
A página está carregando...
A página está carregando...
A página está carregando...
A página está carregando...
A página está carregando...
A página está carregando...
A página está carregando...
A página está carregando...
A página está carregando...
A página está carregando...
A página está carregando...
A página está carregando...
A página está carregando...
A página está carregando...
A página está carregando...
A página está carregando...
A página está carregando...
A página está carregando...
A página está carregando...
A página está carregando...
A página está carregando...
A página está carregando...
A página está carregando...
A página está carregando...
A página está carregando...
A página está carregando...
A página está carregando...
A página está carregando...
A página está carregando...
A página está carregando...
A página está carregando...
-
 1
1
-
 2
2
-
 3
3
-
 4
4
-
 5
5
-
 6
6
-
 7
7
-
 8
8
-
 9
9
-
 10
10
-
 11
11
-
 12
12
-
 13
13
-
 14
14
-
 15
15
-
 16
16
-
 17
17
-
 18
18
-
 19
19
-
 20
20
-
 21
21
-
 22
22
-
 23
23
-
 24
24
-
 25
25
-
 26
26
-
 27
27
-
 28
28
-
 29
29
-
 30
30
-
 31
31
-
 32
32
-
 33
33
-
 34
34
-
 35
35
-
 36
36
-
 37
37
-
 38
38
-
 39
39
-
 40
40
-
 41
41
-
 42
42
-
 43
43
-
 44
44
-
 45
45
-
 46
46
-
 47
47
-
 48
48
-
 49
49
-
 50
50
-
 51
51
-
 52
52
-
 53
53
-
 54
54
-
 55
55
-
 56
56
-
 57
57
-
 58
58
-
 59
59
-
 60
60
-
 61
61
-
 62
62
-
 63
63
-
 64
64
-
 65
65
-
 66
66
-
 67
67
-
 68
68
-
 69
69
-
 70
70
-
 71
71
-
 72
72
-
 73
73
-
 74
74
-
 75
75
-
 76
76
-
 77
77
-
 78
78
-
 79
79
-
 80
80
-
 81
81
-
 82
82
-
 83
83
-
 84
84
-
 85
85
-
 86
86
-
 87
87
-
 88
88
-
 89
89
-
 90
90
-
 91
91
-
 92
92
-
 93
93
-
 94
94
-
 95
95
-
 96
96
-
 97
97
-
 98
98
-
 99
99
-
 100
100
-
 101
101
-
 102
102
-
 103
103
-
 104
104
-
 105
105
-
 106
106
-
 107
107
-
 108
108
-
 109
109
-
 110
110
-
 111
111
-
 112
112
-
 113
113
-
 114
114
-
 115
115
-
 116
116
-
 117
117
-
 118
118
-
 119
119
-
 120
120
-
 121
121
-
 122
122
-
 123
123
-
 124
124
-
 125
125
-
 126
126
-
 127
127
-
 128
128
-
 129
129
-
 130
130
-
 131
131
-
 132
132
-
 133
133
-
 134
134
-
 135
135
-
 136
136


Matrix CXM Manual do proprietário
- Categoria
- Acessórios para bicicletas
- Tipo
- Manual do proprietário
- Este manual também é adequado para
em outras línguas
- français: Matrix CXM Le manuel du propriétaire
- italiano: Matrix CXM Manuale del proprietario
- Nederlands: Matrix CXM de handleiding
- Deutsch: Matrix CXM Bedienungsanleitung
- dansk: Matrix CXM Brugervejledning
- polski: Matrix CXM Instrukcja obsługi
Artigos relacionados
-
Matrix CXM Manual do proprietário
-
-
-
-
Matrix CB96 Manual do proprietário
-
-
-
-
-
Outros documentos
-
Polar FIN-90440 Manual do usuário
-
Stairmaster AirFit UB 9-4570 Manual do usuário
-
BH FITNESS H-920 Instructions For Assembly And Use
-
ProForm PFIVEX86015 Manual do proprietário
-
Domyos VS 900 Manual do usuário
-
-
 URBANGLIDE F2 Manual do usuário
-
Magene P325CS Guia de usuario
-
 Youin BK1700 Manual do usuário
-
Garmin Tacx NEO Bike Smart-Trainer Manual do usuário

