De Dietrich DOV499XE1 Manual do proprietário
- Categoria
- Microondas
- Tipo
- Manual do proprietário

Le guide d’utilisation de votre four
Using your oven
Bedienungsanleitung Dampfgarer
Gebruiksaanwijzing stoomoven
B
etjeningsvejledning til ovnen
Instrucciones de uso de su horno
O
guia de utilização do seu forno
DOV499*
DE
GB
DK
ES
FR
NL
PT
99634022_ML_A.qxd 13/12/04 16:54 Page 1

2
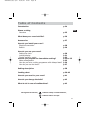
Sommaire
Edito p.3
La cuisson vapeur
Généralités p.4
Comment se présente votre four ? p.5
Accessoires p.6
Comment installer votre four ?
Raccordement électrique p.7
Encastrement p.8
Comment utiliser votre four ?
Réglage de l’heure p.9
Verrouillage afficheur p.10
Veille de l’afficheur p.11
Comment faire une cuisson immédiate ? p.12 à 14
Gestion de l’eau p.14
Comment faire une cuisson différée ? p.15
Comment utiliser la minuterie ? p.16
Description des fonctions p.17
Tableau de cuisson p.18-19
Comment entretenir votre four ? p.20
Comment changer l’ampoule ? p.21
Que faire en cas d’anomalies ? p.21
Qui contacter? p.22
Tout au long de la notice,
vous signale les consignes de sécurité,
vous signale les conseils et les astuces
99634022_ML_A.qxd 13/12/04 16:54 Page 2
A página está carregando ...
A página está carregando ...

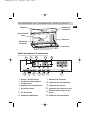
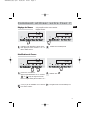
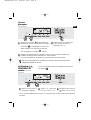
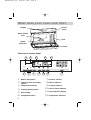
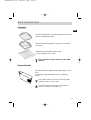
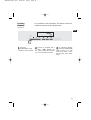
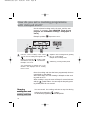
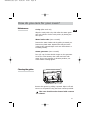
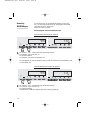
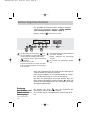
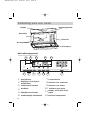
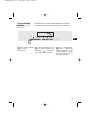
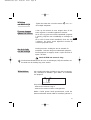
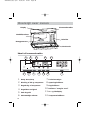
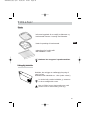
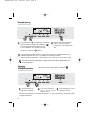
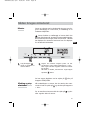
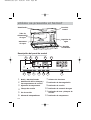
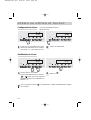
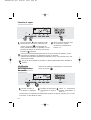
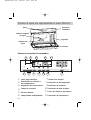
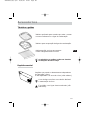
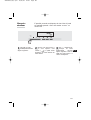
Comment se présente votre four?
Bandeau de
commande
Réservoir
Afficheur
Générateur
de vapeur
Tube d’arrivée
d’eau
Détail du bandeau de commande
Goulotte
START
STOP
Bouton : Marche/Arrêt
Modification des temps et
températures
Réglages des températures
Durée de cuisson
Fin de cuisson
Minuteur indépendant
1
2
3
4
5
6
1
3
2
4
5
6
7
7
Sélecteur de fonctions
Indicateur de décongélation
Indicateur de cuisson
Indicateur de d’absence d’eau
Afficheur de l’horloge et des
temps
Indicateur de température
8
10
9
11
12
8
10
9
11
12
5
FR
99634022_ML_A.qxd 13/12/04 16:54 Page 5
A página está carregando ...
A página está carregando ...

8
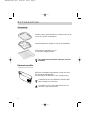
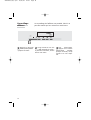
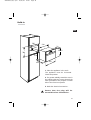
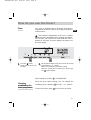
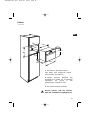
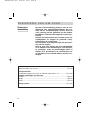
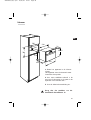
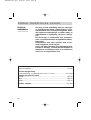
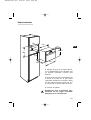
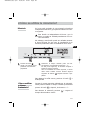
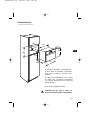
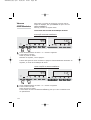
Encastrement
380
560
50
386,5
20
595
405
544
378
550
1. Placez l’appareil dans la niche.
L’appareil doit être horizontal. Contrôlez
cette position.
2. Pour plus de stabilité, fixez le four
dans le meuble par 2 vis dans les trous
prévus à cet effet sur les montants laté-
raux.
3. Effectuez le raccordement électrique.
Veillez à ce que la fiche soit
accessible après installation.
99634022_ML_A.qxd 13/12/04 16:54 Page 8

9
FR
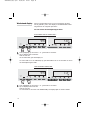
Comment utiliser votre four ?
Réglage de l’heure
A la première mise sous tension.
Réglez l’heure.
L’afficheur fait apparaître 12h00 cligno-
tant. Appuyez sur les touches + ou - et
faites défiler l’heure.
S’il n’y a pas de validation sur la touche , l’enregistrement est automatique au
bout d’une minute.
START
STOP
1
2
Vadidez avec START/STOP.
Modification de l’heure
L’heure fixe est affichée.
Appuyez simultanément sur les touches
et jusqu’au clignotement de
l’heure. Réglez l’heure par les touches + ou -
Vadidez avec
1
2
START
STOP
START
STOP
START
STOP
99634022_ML_A.qxd 13/12/04 16:54 Page 9

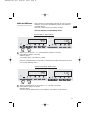
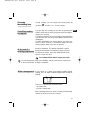
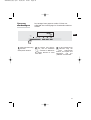
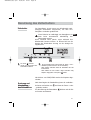
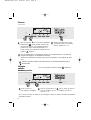
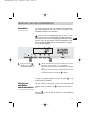
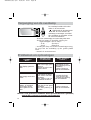
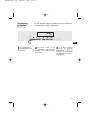
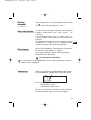
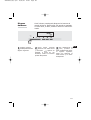
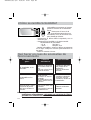
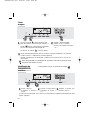
10
Un verrouillage de l’afficheur est possible. Celui-ci ne
peut être activé que hors cuisson en mode heure.
Verrouillage
afficheur
START
STOP
Appuyez sur la touche
START/STOP pendant
quelques secondes.
Un bip retentit et une “clé”
( ) apparaît sur l’écran .
A partir de ce moment, aucune
touche n’est active.
Pour déverrouiller,
appuyez sur la touche
START/STOP pendant
quelques secondes, un bip
retentit et la “clé” dispa-
raît.
1
2
3
99634022_ML_A.qxd 13/12/04 16:54 Page 10
A página está carregando ...

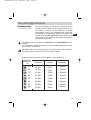
12
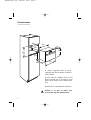
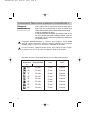
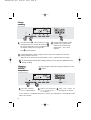
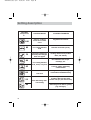
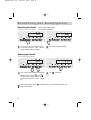
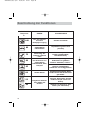
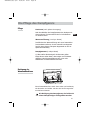
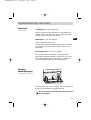
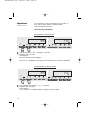
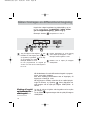
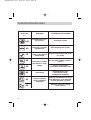
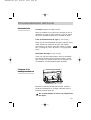
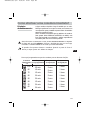
Comment faire une cuisson immédiate ?
Remplissez IMPERATIVEMENT le réservoir d'eau jusqu'au niveau maxi
avant la cuisson. Remettez le réservoir dans son logement en l'engageant
A FOND jusqu'à ce que vous ressentiez le PASSAGE D'UN CRAN.
Principe de
fonctionnement
L’eau contenue dans le réservoir arrive dans la cavité par un
tuyau. Cette eau est transformée en vapeur au contact d’une
surface chaude placée dans la partie inférieure de la cavité:
il s’agit du générateur de vapeur.
Il n’est pas nécessaire de rajouter de l’eau dans le plat de cuis-
son. Pour garantir UNE VRAIE CUISSON VAPEUR, votre four
est proposé avec une casserolerie spécialement étudiée pour
une parfaite cuisson.
Lors de la cuisson, l’appareil devient chaud. De la vapeur chaude s’échap-
pe lorsque vous ouvrez la porte de l’appareil. Eloignez les enfants.
Une durée de cuisson est préprogrammée pour les différentes fonctions.
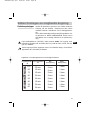
Cuisson
Température
Temps
préprogrammé
Temps réglage
mini
Temps réglage
maxi
25 min
15 min
15 min
20 min
30 min
15 min
30 min
30 min
5 min
5 min
5 min
5 min
5 min
5 min
5 min
5 min
1 heure
1 heure
1 heure
1 heure
1 heure
1 heure
1 heure
1 heure
100
85
75
90
95
80
55
60
°C
99634022_ML_A.qxd 13/12/04 16:55 Page 12
A página está carregando ...
A página está carregando ...
A página está carregando ...
A página está carregando ...
A página está carregando ...

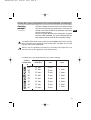
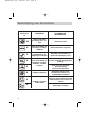
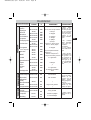
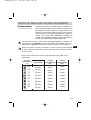
Pommes
de terre
Petits pois
frais
Haricots
verts
18
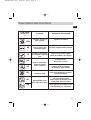
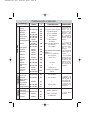
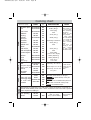
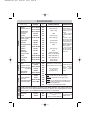
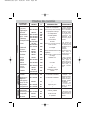
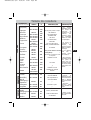
Tableau de cuisson
Artichauts
(petits)
TEMPS
Asperges
Brocolis
Carottes
Céleri-rave
Citrouille
Champignons
Courgettes
Crosnes
Epinards
Endives
Fenouil
Navets
40 à 45 min .
35 à 40 min.
18 min.
20 à 22 min.
25 à 30 min.
15 à 20 min.
15 min.
10 à 15 min.
20 min.
20 min.
35 min
30 min.
22 min.
30 à 35 min.
15 à 20 min.
20 à 25 min.
25 min.
40 à 45 min.
posés à l’envers dans le plat
pour les pointes, réduire le temps
en petits bouquets
en fines rondelles
en fines tranches
en cubes
en rondelles
trognon ôté et coupées en 2
dans la longueur
coupés en 2
en cubes
Poireaux
25 min.
coupés en 2
coupées en rondelles
entières
• Ces temps sont
fonction de la
nature, de la
grosseur et de la
fraîcheur des
légumes. Suivez
les indications
figurant dans la
colonne
«prépa-
rations»
.
• Le temps de
cuisson reste le
même quelle
que soit la quan-
tité à cuire.
Exemple :
1 ou 4 artichauts
même temps de
cuisson .
• Pour contrôler
le degré de cuis-
son piquez dans
la partie la plus
épaisse du légu-
me; s’il est cuit,
il n’y aura pas de
résistance.
(frais) remuer en cours de cuisson
(surgelés) ” ”
/
Choux
30 à 35 min.
22 min.
30 à 35 min.
Bruxelles
Fleurs en petits bouquets
Vert émincés
en fines lamelles
LEGUMES
PREPARATIONS
REMARQUES
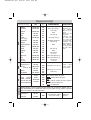
Coquilles
St Jacques
Moules/
Bigorneaux
Crabes/
Tourteaux
Homards
Langoustines
10 à 12 min.
20 à 25 min.
25 min.
30 à 35 min.
12 à 15 min.
avec aromates
avec aromates
/
selon le poids
/
• Disposez les
coquillages sur la
grille du plat en
verre,ajoutez her-
bes aromatiques.
• Déposez les
crustacés sur un
lit d’algues.
COQUILLAGES
CRUSTACES
Pommes/
pêches/poires
Compote
Crèmes
10 à 15 min.
25 min.
10 min.
entières, épluchées
fruits en lamelles
en ramequins
• Temps selon
maturité.
FRUITS
CREMES
ALIMENTS
Quelle que soit la quantité
100
100
100
100
100
100
100
100
100
100
100
100
100
100
100
100
100
100
°C
90
95
95
95
90
90
95
90
99634022_ML_A.qxd 13/12/04 16:55 Page 18

FR
19
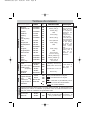
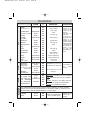
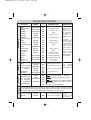
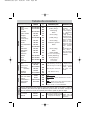
Brochet
Cabillaud/Colin
Dorade
Haddock
Hareng
Lieu
(noir & jaune)
Lotte
Maquereau
Merlan/Morue
Raie
• *Darnes: tran-
ches de poissons
rondes de 2 à 3
cm d’épaisseur
(180/200g) par
personne.
• Exigez des pro-
duits très frais.
• Posez des pois-
sons entiers dans
le plat tel quel ou
sur des feuilles
de laurier, de
fenouil ou autre
herbe aroma-
tique.
• Dès la fin de la
cuisson, ôtez la
peau qui se
décollera très
facilement.
Rougets
Rougets/Sole
Saumonette
Saumon
Thon
Truite
entière (1kg)
25 à 30 min.
13 à 15 min.
20 à 25 min.
15 min.
20 min.
15 à 20 min.
15 min.
20 min.
15 min.
25 à 30 min.
15 min.
10 min.
20 min.
15 à 20 min.
20 à 25 min.
20 à 25 min.
entier (1kg)
darnes (180 g)*
entière (1kg)
filets
entier (200g)
darnes (180 g)
entier (250g)
selon épaisseur
filets
entier (200g)
filets
gros tronçons
(6 à 10cm de long)
darnes (180/200 g)
darnes (180/200 g)
entière (200 g)
13 à 15 min.
Boeuf
Porc
(filets mignon)
Volaille
(blancs)
(Paupiettes)
Saucisses
15 à 30 min.
25 min.
20 à 25 min.
25 min.
20 min.
Rôti 800 g.:
55 à 60 min.
Cuisses poulet: 35 à 40 min.
Rôti dindonneau: 50-60 min.
Morteau 400 g
• Puis dorez au
gril dans un
autre plat.
VIANDES
Boudins
10 à 15 min.
• Egrenez à la
fourchette en
fin de cuisson.
RIZ, PÂTES
SEMOULE
Riz au lait
30 min.
100g de riz lavé-20cl de
lait-2 c. à soupe de sucre
Semoule
20 min.
200 g (1/4 litre d’eau)
Déposez directement dans un plat, recouvrez d’eau ou de lait. En effet la vapeur ne
suffit pas pour saturer ces aliments qui gonflent. Posez une feuille d’aluminium sur le
plat pour éviter les retombées des gouttelettes d’eau.
7 min.
5 à 6 min.
8 min.
Coque
: posé directement sur la grille.
Mol
let: posé directement sur la grille.
A
u plat: cassé dans un plat individuel posé sur
la grille et recouvert d’un film alimentaire.
à partir d’oeufs
très frais
conservés à
température
ambiante.
10 à 12 min.
Dur
TEMPS
PREPARATIONS
REMARQUES
ALIMENTS
Quelle que soit la quantité
°C
POISSONS
85
75
85
85
80
85
75
80
80
75
85
85
85
85
100
100
100
100
100
95
90
90
OEUFS
100
100
Tableau de cuisson
100
100
Cocotte: voir recettes détaillées.
100
90
100
99634022_ML_A.qxd 13/12/04 16:55 Page 19
A página está carregando ...
A página está carregando ...
A página está carregando ...

23
GB
Table of Contents
Introduction p.24
Steam cooking
Overview p.25
What does your oven look like? p.26
Accessories p.27
How do you install your oven?
Electrical connection p.28
Build-in p.29
How do you use your oven?
Setting the clock p.30
Locking display p.31
Display stand-by mode p.32
How do you program for immediate cooking? p.33 to 35
Water management p.35
How do you set a cooking programme with delayed start? p.36
How do you use the timer? p.37
Setting description p.38
Cooking chart p.39-40
How do you care for your oven? p.41
How do you change the bulb? p.42
What to do in case of malfunctions? p.42
Throughout the manual,
indicates safety recommendations,
indicates advice and tips
99634022_ML_A.qxd 13/12/04 16:55 Page 23
A página está carregando ...
A página está carregando ...

26
What does your oven look like?
Control
panel
Tank
Display
Steam
generator
Water intake
tube
Close-up of control panel
Gutter
START
STOP
Button: Stop/Start
Changing time and tempe-
rature
Temperature setting
Cooking duration/time
End cooking
Independent timer
1
2
3
4
5
6
1
3
2
4
5
6
7
7
Function selector
Defrost indicator
Cooking indicator
Lack of water indicator
Clock and time display
Temperature indicator
8
10
9
11
12
8
10
9
11
12
99634022_ML_A.qxd 13/12/04 16:55 Page 26

27
GB
Tank that allows for independent water supply to the
oven.
Its capacity is approximately one litre (maximum
level).
Pierced cooking dish to prevent contact between food
and the condensation water.
Dish that makes it possible to recover the condensa-
tion water.
Stainless steel removable support grid:
it must be placed in the oven.
Accessories
The cookware may be cleaned in the dish-
washer.
Removable tank
Cookware
Using water with a low level of lime will make
it easier to care for your oven.
Using demineralised water is forbidden
(not for human consumption).
99634022_ML_A.qxd 13/12/04 16:55 Page 27
A página está carregando ...

29
GB
Build-in
380
560
50
386,5
20
595
405
544
378
550
1. Place the appliance in the nook.
The appliance must be horizontal.
Check the position.
2. For greater stability, attach the oven in
the cabinet with two screws through the
holes provided for this purpose on either
side of the front inner panels.
3. Make the electrical connection..
Ensure that the plug will be
accessible after installation.
99634022_ML_A.qxd 13/12/04 16:55 Page 29
A página está carregando ...

31
GB
It is possible to lock the display. This feature cannot be
used during timed cooking programmes.
Locking
display
START
STOP
Press the
START/STOP touch
control for a few seconds.
A beep is sounded and a
"key" ( ) appears on
the screen. From this moment
on, no touch control is active.
To unlock the display,
press the START/STOP
touch control for a few
seconds: a beep is soun-
ded and the "key" disap-
pears.
1
2
3
99634022_ML_A.qxd 13/12/04 16:55 Page 31
A página está carregando ...

33
GB
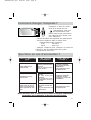
How do you program for immediate cooking?
You ABSOLUTELY MUST fill the water tank to the Max. level before cooking.
Return the tank to its housing by firmly pushing ALL THE WAY until you feel
the tank LOCK INTO POSITION.
Operating
principle
The water contained in the tank arrives in the cavity via a pipe.
This water is transformed into steam when it comes into con-
tact with a hot surface located in the lower part of the cavity:
this is the steam generator.
There is no need to add water to the cooking dish. To guaran-
tee REAL STEAM COOKING, your oven is furnished with spe-
cially designed cookware that will allow for perfect cooking.
When in use, the appliance becomes hot. Hot steam will escape when you
open the door of the appliance. Keep children away.
A cooking time is pre-programmed for the various settings.
Cooking
temperature
Pre-program-
med time
Min. setting
time
Max. setting
time
25 min
15 min
15 min
20 min
30 min
15 min
30 min
30 min
5 min
5 min
5 min
5 min
5 min
5 min
5 min
5 min
1 hour
1 hour
1 hour
1 hour
1 hour
1 hour
1 hour
1 hour
100
85
75
90
95
80
55
60
°C
99634022_ML_A.qxd 13/12/04 16:55 Page 33
A página está carregando ...
A página está carregando ...
A página está carregando ...
A página está carregando ...

38
Vegetables and meats
Delicate whole fish (trout)
Cooking delicate fish (sardine
filets, red mullet)
Boiled eggs; stuffed tomatoes
that maintain their shape.
Puddings, etc.
Terrines, pâtés. Reheating
cooked dishes
Melting chocolate, butter. Slightly
warm fruit for immediate serving
Defrosting fish filets before
breading. Berries that must
remain cool (for pies and sauces)
Defrosting meats before grilling
(eg: sausages)
Vapour cooking
mode most often
used
For cooking delicate
food
The meat remains iri-
descent, the collagen
does not appear
For cooking delicate
food, fruits, compotes
Low heat
Slow defrosting with-
out cooking
SETTING
Temperature
COOKING MODE
COOKING EXAMPLES
Setting description
100
85
75
90
95
80
55
60
°C
99634022_ML_A.qxd 13/12/04 16:56 Page 38

39
GB
Potatoes
Fresh
peas
Green
beans
Cooking chart
Artichokes
(small)
TIMES
Asparagus
Broccoli
Carrots
Celery root
Pumpkin
Mushrooms
Courgettes
Chinese
artichokes
Spinach
Endives
Fennel
Turnips
40 to 45 min.
35 to 40 min.
18 min.
20 to 22 min.
25 to 30 min.
15 to 20 min.
15 min.
10 to 15 min.
20 min.
20 min.
35 min
30 min.
22 min.
30 to 35 min.
15 to 20 min.
20 to 25 min.
25 min.
40 to 45 min.
Placed upside down in the dish
For tips decrease cooking time
in small bunches
in thin, round slices
in thin slices
in cubes
in round slices
core removed,
cut in half lengthwise
cut in half
in cubes
Leeks
25 min.
cut in half
cut in round slices
• These times
are a function of
the type, size
and freshness of
the vegetables.
Follow the indi-
cations that
appear in the
"Preparations"
column.
• The cooking
time remains the
same regardless
of the quantity
to be cooked.
Example:
1 or 4 artichokes
require the same
cooking time.
• To check done-
ness, stick the
tip of a knife into
the thickest part
of the vegetable;
there will be no
resistance if the
food is cooked.
(fresh) stir while cooking
(frozen) " "
/
Cauliflower
30 to 35 min.
22 min.
30 to 35 min.
Brussels sprouts
cauliflower in small bunches
chopped green cabbage
in thin strips
VEGETABLES
PREPARATIONS
NOTES
Sea scallops
Mussels/
periwinkles
Crabs
Lobsters
Langoustines
10 to 12 min.
20 to 25 min.
25 min.
30 to 35 min.
12 to 15 min.
with seasoning
with seasoning
/
depending on weight
/
• Place the scal-
lops on the grid of
the glass dish,
add aromatic
herbs.
• Place the crus-
taceans on a bed
of seaweed.
SHELLFISH
CRUSTACEANS
Apples/pears/
peaches
Compote
Puddings
10 to 15 min.
25 min.
10 min.
whole, peeled
fruit in strips
in ramekins
• Times depend
on ripeness.
FRUITS
PUDDINGS
FOOD
Whatever the quantity
°C
100
100
100
100
100
100
100
100
100
100
100
100
100
100
100
100
100
100
90
95
95
95
90
90
95
90
99634022_ML_A.qxd 13/12/04 16:56 Page 39

40
Northern pike
Cod
Sea bream
Haddock
Herring
Pollack/
black cod
Monkfish
Mackerel
Atlantic cod
Skate
• *Steaks: Round
slices of fish of 2
to 3 cm in thick-
ness (180/200g)
per person.
• Insist on very
fresh products.
• Place whole
fish in the dish as
is or on bay lea-
ves, fennel or
other aromatic
herbs.
• As soon as
cooking is com-
plete, remove
the skin, which
will detach easily.
Red mullet
Red mullet/Sole
Spotted dogfish
Salmon
Tuna
Trout
,
whole (1 kg)
25 to 30 min.
13 to 15 min.
20 to 25 min.
15 min.
20 min.
15 to 20 min.
15 min.
20 min.
15 min.
25 to 30 min.
15 min.
10 min.
20 min.
15 to 20 min.
20 to 25 min.
20 to 25 min.
whole (1 kg)
steaks (180 g)*
whole (1kg)
filets
whole (200 g)
steaks (180 g)
whole (250 g)
depending on thickness
filets
whole (200 g)
filets
thick steaks
(6 to 10 cm in length)
steaks (180/200 g)
steaks (180/200 g)
whole (200 g)
13 to 15 min.
Beef
Pork (filet mignon)
Poultry
(breasts, filets)
(stuffed)
Sausages
15 to 30 min.
25 min.
20 to 25 min.
25 min.
20 min.
Roast 800 g: 55 to 60 min.
Chicken thighs: 35 to 40 min.
Roast turkey: 50 to 60 min.
400 g piece
• Then brown
under the grill
in another
dish.*
MEATS
Boudins
10 to 15 min.
• Fluff with a fork
when cooking is
complete.
RICE, PASTA,
FARINA
Rice pudding
30 min.
100 g rinsed rice - 20 cl
milk - 2 T. sugar
Farina
20 min.
200 g (1/4 litre water)
Place directly in a dish then cover with water or milk. The steam is not enough to
saturate these inflating foods. Place a sheet of aluminium foil on the dish to prevent
water droplets from falling in.
7 min.
5 to 6 min.
8 min.
S
oft-boiled: placed directly on the grid.
Medium-boi
led: placed directly on the grid.
Fried
: broken in an individual dish placed on
the grid and covered with cooking wrap.
Start with very
fresh eggs kept
at room tem-
perature
10 to 12 min.
Hard-boiled
TIMES
PREPARATIONS
NOTES
FOOD
Whatever the quantity
°C
FISH
EGGS
Cooking chart
Poached: See detailed recipes.
85
75
85
85
80
85
75
80
80
75
85
85
85
85
100
100
100
100
100
95
90
90
100
100
100
100
100
90
100
99634022_ML_A.qxd 13/12/04 16:56 Page 40
A página está carregando ...
A página está carregando ...

43
DE
Inhalt
Vorwort S.44
Das Kochen mit Dampf
Allgemeines S.45
Wie sieht der Dampfgarer aus? S.46
Zubehör S.47
Installation des Dampfgarers
Stromanschluß S.48
Einbau S.49
Benutzung des Dampfgarers
Einstellung der Uhrzeit S.50
Sperrung des Anzeigers S.51
Stand-by des Anzeigers S.52
Das sofortige Kochen S.53 bis 55
Wasser-Management S.55
Zeitverzögertes Kochen S.56
Benutzung des Zeitschalters S.57
Beschreibung der Funktionen S.58
Kochtabelle S.59-60
Die Pflege des Dampfgarers S.61
Austausch der Glühbirne S.62
Abhilfe bei Störungen S.62
In der gesamten Betriebsanleitung,
Sicherheitshinweise
Tips und Tricks
99634022_ML_A.qxd 13/12/04 16:56 Page 43
A página está carregando ...
A página está carregando ...

46
Wie sieht der Dampfgarer aus?
Bedienleiste
Tank
Anzeiger
Dampfgenerator
Wasserzuführung
Details der Bedienleiste
Wasserablaufrinne
START
STOP
Taste: An/Aus
Änderung der Zeiten und
Temperaturen
Temperatureinstellungen
Gardauer
Ende des Garvorgangs
Unabhängiger Zeitschalter
1
2
3
4
5
6
1
3
2
4
5
6
7
7
Funktionswähler
Anzeiger des Auftauens
Anzeiger des Garens
Anzeiger für fehlendes Wasser
Anzeiger der Uhr und der
Garzeiten
Temperaturanzeiger
8
10
9
11
12
8
10
9
11
12
99634022_ML_A.qxd 13/12/04 16:56 Page 46
A página está carregando ...
A página está carregando ...
A página está carregando ...
A página está carregando ...
A página está carregando ...
A página está carregando ...
A página está carregando ...
A página está carregando ...
A página está carregando ...
A página está carregando ...
A página está carregando ...
A página está carregando ...
A página está carregando ...
A página está carregando ...
A página está carregando ...
A página está carregando ...
A página está carregando ...
A página está carregando ...
A página está carregando ...
A página está carregando ...
A página está carregando ...
A página está carregando ...
A página está carregando ...
A página está carregando ...
A página está carregando ...
A página está carregando ...
A página está carregando ...
A página está carregando ...
A página está carregando ...
A página está carregando ...
A página está carregando ...
A página está carregando ...
A página está carregando ...
A página está carregando ...
A página está carregando ...
A página está carregando ...
A página está carregando ...
A página está carregando ...
A página está carregando ...
A página está carregando ...
A página está carregando ...
A página está carregando ...
A página está carregando ...
A página está carregando ...
A página está carregando ...
A página está carregando ...
A página está carregando ...
A página está carregando ...
A página está carregando ...
A página está carregando ...
A página está carregando ...
A página está carregando ...
A página está carregando ...
A página está carregando ...
A página está carregando ...
A página está carregando ...
A página está carregando ...
A página está carregando ...
A página está carregando ...
A página está carregando ...
A página está carregando ...
A página está carregando ...
A página está carregando ...
A página está carregando ...
A página está carregando ...
A página está carregando ...
A página está carregando ...
A página está carregando ...
A página está carregando ...
A página está carregando ...
A página está carregando ...
A página está carregando ...
A página está carregando ...
A página está carregando ...
A página está carregando ...
A página está carregando ...
A página está carregando ...
A página está carregando ...
A página está carregando ...
A página está carregando ...
A página está carregando ...
A página está carregando ...
A página está carregando ...
A página está carregando ...
A página está carregando ...
A página está carregando ...
A página está carregando ...
A página está carregando ...
A página está carregando ...
A página está carregando ...
A página está carregando ...
A página está carregando ...
A página está carregando ...
A página está carregando ...
A página está carregando ...
A página está carregando ...
A página está carregando ...
A página está carregando ...
-
 1
1
-
 2
2
-
 3
3
-
 4
4
-
 5
5
-
 6
6
-
 7
7
-
 8
8
-
 9
9
-
 10
10
-
 11
11
-
 12
12
-
 13
13
-
 14
14
-
 15
15
-
 16
16
-
 17
17
-
 18
18
-
 19
19
-
 20
20
-
 21
21
-
 22
22
-
 23
23
-
 24
24
-
 25
25
-
 26
26
-
 27
27
-
 28
28
-
 29
29
-
 30
30
-
 31
31
-
 32
32
-
 33
33
-
 34
34
-
 35
35
-
 36
36
-
 37
37
-
 38
38
-
 39
39
-
 40
40
-
 41
41
-
 42
42
-
 43
43
-
 44
44
-
 45
45
-
 46
46
-
 47
47
-
 48
48
-
 49
49
-
 50
50
-
 51
51
-
 52
52
-
 53
53
-
 54
54
-
 55
55
-
 56
56
-
 57
57
-
 58
58
-
 59
59
-
 60
60
-
 61
61
-
 62
62
-
 63
63
-
 64
64
-
 65
65
-
 66
66
-
 67
67
-
 68
68
-
 69
69
-
 70
70
-
 71
71
-
 72
72
-
 73
73
-
 74
74
-
 75
75
-
 76
76
-
 77
77
-
 78
78
-
 79
79
-
 80
80
-
 81
81
-
 82
82
-
 83
83
-
 84
84
-
 85
85
-
 86
86
-
 87
87
-
 88
88
-
 89
89
-
 90
90
-
 91
91
-
 92
92
-
 93
93
-
 94
94
-
 95
95
-
 96
96
-
 97
97
-
 98
98
-
 99
99
-
 100
100
-
 101
101
-
 102
102
-
 103
103
-
 104
104
-
 105
105
-
 106
106
-
 107
107
-
 108
108
-
 109
109
-
 110
110
-
 111
111
-
 112
112
-
 113
113
-
 114
114
-
 115
115
-
 116
116
-
 117
117
-
 118
118
-
 119
119
-
 120
120
-
 121
121
-
 122
122
-
 123
123
-
 124
124
-
 125
125
-
 126
126
-
 127
127
-
 128
128
-
 129
129
-
 130
130
-
 131
131
-
 132
132
-
 133
133
-
 134
134
-
 135
135
-
 136
136
-
 137
137
-
 138
138
-
 139
139
-
 140
140
-
 141
141
-
 142
142
-
 143
143
-
 144
144


De Dietrich DOV499XE1 Manual do proprietário
- Categoria
- Microondas
- Tipo
- Manual do proprietário
em outros idiomas
- español: De Dietrich DOV499XE1 El manual del propietario
- français: De Dietrich DOV499XE1 Le manuel du propriétaire
- English: De Dietrich DOV499XE1 Owner's manual
- Nederlands: De Dietrich DOV499XE1 de handleiding
- Deutsch: De Dietrich DOV499XE1 Bedienungsanleitung
- dansk: De Dietrich DOV499XE1 Brugervejledning
Artigos relacionados
-
 De Dietrich DOV499 Series Manual do proprietário
-
 De Dietrich DOV737X Manual do proprietário
-
 De Dietrich DOV400XE1 Manual do proprietário
-
 De Dietrich DOV399XE1 Manual do proprietário
-
 De Dietrich DOV300XE1 Manual do proprietário
-
 De Dietrich DOV300XE1 Manual do proprietário
-
 De Dietrich DOV101WE1 Manual do proprietário


Outros documentos
-
Brandt FV800XS1 Manual do proprietário
-
Fagor 5HV-440X Manual do proprietário
-
-
-
Whirlpool SST2S Guia de usuario
-
-
-
Clatronic DR 2751 Manual do proprietário