A página está carregando...

Le guide d’utilisation de votre four
Using your oven
Bedienungsanleitung Ihres Backofens
Gebruiksaanwijzing van uw oven
Betjeningsvejledning til ovnen
Instrucciones de uso de su horno
O
guia de utilização do seu forno
DOV399*
FR
GB
DE
NL
DK
ES
PT
99627782_ML_A.qxd 25/03/03 16:38 Page 1

Sommaire
2
Edito p.3
Comment se présente votre four ? p.4
Accessoires p.5
Réservoir p.5
Comment installer votre four ?
Raccordement p.6
Dimensions utiles pour encastrer votre four p.7
Comment changer l’ampoule ? p.7
Comment utiliser votre four ?
Comment mettre à l’heure votre four ? p.8
Comment faire une cuisson immédiate ? p.9
Visualiser le niveau d’eau p.10
Arrêt en cours et en fin de cuisson p.10
Comment faire une cuisson différée ? p.11 à 12
Comment utiliser la minuterie ? p.13
Comment utiliser la sécurité enfant ? p.13
Comment mettre en veille votre afficheur ? p.14
Description des fonctions p.15
Que faire en cas d’anomalies de fonctionnement ? p.16
Qui contacter? p.17
Tout au long de la notice,
vous signale les consignes de sécurité,
vous signale les conseils et les astuces
99627782_ML_A.qxd 25/03/03 16:38 Page 2

START
STOP
75
95
55
60
80
85
90
4
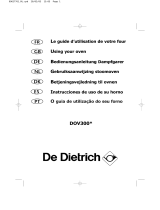
Comment se présente votre four ?
Bouton : Marche/Arrêt
Réglages des temps et
températures
Réglages des températures
Durée de cuisson
Fin de cuisson
Minuteur indépendant
1
2
3
4
5
6
1
3
2
4
5
6
7
7
Sélecteur de fonctions
Indicateur de cuisson des
surgelés
Indicateur de cuisson
Indicateur de niveau d’eau
Afficheur de l’horloge et des
temps
Indicateur de température
Bandeau de
commande
Réservoir
Intérieur du
four
Générateur
de vapeur
8
10
9
11
12
8
10
9
11
12
99627782_ML_A.qxd 25/03/03 16:38 Page 4

8
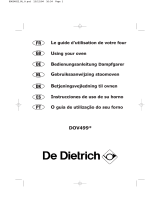
Remise à l’heure de l’horloge
• Appuyez simultanément sur les touches
et pendant quelques secondes
jusqu’à faire clignoter l’affichage.
• Ajustez le réglage de l’heure avec les
touches + ou -.
• Appuyez sur la touche pour valider.
Comment mettre à l'heure votre four ?
S’il n’y a pas de validation par la touche , l’enregistrement
est automatique au bout de quelques secondes.
START
STOP
Comment utiliser votre four ?
START
STOP
START
STOP
START
STOP
A la mise sous tension
• L’afficheur clignote.
• Réglez l’heure en appuyant sur les
touches + ou - (le maintien du doigt
sur la touche permet d’obtenir un
défilement rapide)
Exemple:12h30.
• Appuyez sur la touche START/STOP
pour valider.
99627782_ML_A.qxd 25/03/03 16:39 Page 8

75
95
55
60
80
85
90
START
STOP
11
FR
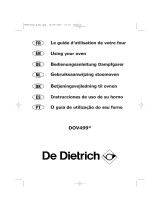
Réglez le mode de cuisson choisi et éven-
tuellement ajustez la température.
Exemple : position
température 100°C
Une durée de cuisson est préprogrammée
pour les différentes fonctions.
Cuisson
Temps
préprogrammé
Temps réglage
mini
Temps réglage
maxi
55°
60°
75°
80°
85°
90°
95°
25 min
30 min
30 min
15 min
15 min
15 min
20 min
30 min
10 min
10 min
10 min
10 min
10 min
10 min
10 min
10 min
1 heure
1 heure
1 heure
1 heure
1 heure
1 heure
1 heure
1 heure
75
95
55
60
80
85
90
START
STOP
Appuyez sur les touches + ou
- pour régler le
temps souhaité.
Exemple : 45 min
L’enregistrement de la durée ajustée doit être
confirmer en appuyant de nouveau sur la
touche ou START/STOP
.
Après ces actions, le four chauffe.
En fin de cuisson, une série de bips sonores
est émise durant quelques minutes et le sym-
bole clignote.
L’arrêt des bips se fait en appuyant sur la
touche START/STOP pendant 1 seconde.
Vous pouvez à tout moment modifier le temps
de cuisson en appuyant sur la touche
Pour annuler votre programmation, appuyez 2
fois sur la touche START/STOP.
Comment faire une cuisson différée ?
99627782_ML_A.qxd 25/03/03 16:39 Page 11

14
75
95
55
60
80
85
90
START
STOP
75
95
55
60
80
85
90
START
STOP
Comment mettre en veille votre afficheur ?
Afin de limiter la consommation d’énergie de votre four hors utilisation, vous avez la possi-
bilité de mettre votre afficheur en MODE VEILLE.
Pour cela, veuillez suivre la procédure suivante
ACTIVATION DU MODE VEILLE :
- Votre four doit être en mode affichage heure.
- Appuyez simultanément sur les touches
+ et
-
pendant 5 secondes.
- Votre afficheur indique “Lcd off”
- Relâchez l’appui.
- 30 secondes après votre afficheur s’éteint.
Votre four est maintenant en mode veille, il s’é-
teindra automatiquement après 30 secondes
en mode affichage heure.
DESACTIVATION DU MODE VEILLE :
- Votre four doit être en mode affichage heure.
- Appuyez simultanément sur les touches
+ et
-
pendant 5 secondes.
- Votre afficheur indique “Lcd on”.
- Relâchez l’appui.
- Vous êtes sorti du MODE VEILLE, votre affi-
cheur reste allumé en permanence.
75
95
55
60
80
85
90
START
STOP
75
95
55
60
80
85
90
START
STOP
Comment utiliser votre four ?
99627782_ML_A.qxd 25/03/03 16:39 Page 14

15
FR
FONCTIONS
CUISSON
EXEMPLES DE CUISSON
55°
60°
75°
80°
85°
90°
95°
Utilisable pour la majorité des
aliments
Décongélation de filets de pois-
son avant d’être panés.
Fruits rouges qui doivent rester
froids (pour tartes et coulis)
Décongélation de viandes avant
d’être grillées (ex: saucisses)
Cuisson de poissons fragiles
(filets de sardines, de rougets)
Fruits juste tièdes pour consom-
mation immédiate
Poissons fragiles entiers / truites
Oeufs cocotte; bonne tenue des
tomates farcies.
Ramequins, crèmes...
Terrines, foies de volailles.
Réchauffage plats cuisinés
Température de cuis-
son vapeur la plus
utilisée
Décongélation lente
sans risque de cuis-
son
La chair reste nacrée,
le collagène n’appa-
raît pas. Toutes les
saveurs, textures,
odeurs sont resti-
tuées
Pour la cuisson des
aliments fragiles
Description des fonctions
99627782_ML_A.qxd 25/03/03 16:39 Page 15

List of contents
18
Editorial p.19
Your oven, how it works p.20
Oven accessories p.21
Reservoir p.21
How to install your oven
Connecting up p.22
Dimensions for installation use p.23
Changing the light bulb p.23
How to use your oven
How to set the clock p.24
How to cook straightaway p.25
Checking the water level p.26
Stopping during or at the end of the cooking period p.26
Delaying the cooking p.27 to 28
How to use the timer p.29
Using the child safety p.29
Putting your display on standby mode p.30
Description des fonctions p.31
Troubleshooting p.32
How to contact us p.33
Throughout this manual,
indicates safety recommendations,
indicates advice to help you make the best
use of your oven
99627782_ML_A.qxd 25/03/03 16:39 Page 18

START
STOP
75
95
55
60
80
85
90
20
Your oven, how it works
Start/Stop button
Time and temperature
adjustment
Temperature adjustment
Cooking time
Cooking complete
Independent timer
1
2
3
4
5
6
1
32
4
5
6
7
7
Programme selector
Frozen food cooking
indicator
Cooking indicator
Water level indicator
Display clock/program times
Temperature indicator
Indicator
panel
Reservoir
Oven cavity
Steam
generator
8
10
9
11
12
8
10
9
11
12
99627782_ML_A.qxd 25/03/03 16:39 Page 20

23
GB
Dimensions for installation use
Place the appliance in the hole.
The appliance must be horizontal.
Check this position
380
560
50
386,5
20
595
405
544
378
550
The bulb is by the far right corner.
- Turn the cover slightly anti-clockwise (left)
- Unscrew the bulb the same way.
- Type of bulb:
- 15 W - 220/240 V
- Type E14 suitable up to 300ºC
- Change the bulb and reassemble the unit making sure the seals are positioned
correctly.
- Switch the oven back on at the mains.
Changing the light bulb
Warning! Switch off the power at the main switch before attempting to
change the bulb. Leave the oven to cool if necessary.
99627782_ML_A.qxd 25/03/03 16:39 Page 23

27
GB
75
95
55
60
80
85
90
START
STOP
Adjust the chosen cooking method and, if
need be, alter the temperature.
E.g.: position
temperature 100°C
Cooking times are already programmed in for
the different features.
Cook at
Pre-programmed
temperature
Min. temperatu-
re adjustment
Max.
temperature
55°
60°
75°
80°
85°
90°
95°
25 mins
30 mins
30 mins
15 mins
15 mins
15 mins
20 mins
30 mins
10 mins
10 mins
10 mins
10 mins
10 mins
10 mins
10 mins
10 mins
1 hour
1 hour
1 hour
1 hour
1 hour
1 hour
1 hour
1 hour
75
95
55
60
80
85
90
START
STOP
Press the buttons + or - to set the chosen
time.
E.g. : 45 mins
Confirm the altered time by pressing again on
the button or START/STOP
.
The oven will then heat up.
When cooking is over you will hear a series of
beeps that will last several minutes and the
symbol will blink.
You can stop the bleeps by pressing the
START/STOP control for a second.
Cooking times can be checked or changed
whenever you wish, simply by pressing the
control.
To cancel the programme press twice on
START/STOP.
Delaying the cooking
99627782_ML_A.qxd 25/03/03 16:39 Page 27

30
75
95
55
60
80
85
90
START
STOP
75
95
55
60
80
85
90
START
STOP
Putting your display on standby mode
To reduce your oven's power consumption to a minimum when it is not in use, you can
put your readout system in STANDBY MODE.
To carry out this operation, proceed as follows:
GOING INTO STANDBY MODE:
- Your oven must be in normal time readout mode.
- Press both the + and - controls for five
seconds at the same time.
- The display reads “Lcd off”.
- Take your fingers off the two controls.
- 30 seconds later your readout will switch off.
Your oven is now in standby mode; whenever
you are in the normal time readout mode, it will
turn off automatically after 30 seconds.
COMING OUT OF STANDBY MODE:
- Your oven must be in the normal time
readout mode.
- Press both the + and - controls for five
seconds at the same time.
- The display reads “Lcd on”.
- Take your fingers off the two controls.
- You are now out of the STANDBY MODE; the
readout is now permanently lit.
75
95
55
60
80
85
90
START
STOP
75
95
55
60
80
85
90
START
STOP
How to use your oven
99627782_ML_A.qxd 25/03/03 16:40 Page 30

33
GB
Copy here the details that are on your oven manufacturer's plate:
How to contact us
MADE IN FRANCE
220 - 240V ~ 50 Hz
BRANDT APPLIANCES SAS
7 rue Henri Becquerel
92500 RUEIL MALMAISON
De Dietrich
99627782_ML_A.qxd 25/03/03 16:40 Page 33

Inhalt
34
Vorwort s.35
Wie ist Ihr Backofen aufgebaut s.36
Zubehör s.37
Wasserbehälter s.37
Backofeninstallation
Anschluss s.38
Nützliche Maße für den Einbau Ihres Backofens s.39
Auswechseln einer Lampe s.39
Benutzung Ihres Backofens
Stellen der Uhr des Backofens s.40
Wie führen Sie eine sofortige Zubereitung durch s.41
Anzeige des Wasserstandes s.42
Stop während bzw. am Ende des Garvorgangs s.42
Wie führen Sie eine Änderung der Zubereitung durch s.43 - 44
Wie wird die unabhängige Schaltuhr benutzt s.45
Wie wird die Kindersicherung betätigt s.45
Umschalten der Anzeige in Stand-by s.46
Funktionsbeschreibung s.47
Was bei Betriebsanomalien tun s.48
Kontaktaufnahme s.49
In der Gebrauchsanweisung
geben Ihnen die Zeichen,
Sicherheitshinweise und,
Ratschläge und Tips.
99627782_ML_A.qxd 25/03/03 16:40 Page 34

START
STOP
75
95
55
60
80
85
90
36
Wie ist Ihr Backofen aufgebaut
Knopf An / Aus
Einstellung der Zeitangaben
und Temperaturen
Temperatureinstellungen
Gardauer
Ende der Gardauer
Unabhängiger Zeitschalter
1
2
3
4
5
6
1
3
2
4
5
6
7
7
Funktionswählschalter
Garanzeige für
Tiefkühlprodukte
Leistungsanzeige
Wasserstandsanzeige
Anzeigefeld der Uhr und der
Zeitangaben
Temperaturanzeiger
Aufbau der
Bedienblende
Wasserbehälter
Backofen
innen
Dampfgenerator
8
10
9
11
12
8
10
9
11
12
99627782_ML_A.qxd 25/03/03 16:40 Page 36

39
DE
Nützliche Maße für den Einbau Ihres Backofens
Positionieren Sie das Gerät in dem
Hohlraum.
Das Gerät muß horizontal aufgestellt
sein. Kontrollieren Sie diese Stellung.
380
560
50
386,5
20
595
405
544
378
550
Die Glühlampe befindet sich hinten rechts in der Backröhre.
- Drehen Sie die Glasabdeckung um eine Vierteldrehung links herum.
- Drehen Sie die Glühlampe ebenfalls links herum heraus.
- Technische Daten der Glühlampe:
- 15 W - 220/240 V
- 300°C - Sockel E 14
- Wechseln Sie die Glühlampe aus, montieren Sie die Glasabdeckung und achten Sie
dabei auf die richtige Positionierung der Dichtungen.
- Schließen Sie Ihren Dampfgarer wieder ans Stromnetz an.
Auswechseln einer Lampe
Vor jedem Eingriff in die Glühlampe den Ofen abschalten, um jeglichen
Spannungsstoß zu vermeiden und ggf. den Ofen abkühlen lassen.
99627782_ML_A.qxd 25/03/03 16:40 Page 39

75
95
55
60
80
85
90
START
STOP
43
DE
Stellen Sie den gewünschten Garmodus ein
und nehmen Sie eventuell eine
Temperatur-Feineinstellung vor.
Beispiel: Position
Temperatur 100°C
Für die verschiedenen Funktionen ist eine
Gardauer vorprogrammiert.
Garvorgang
Vorprogrammierte
Zeit
Kürzeste
einstellbare Zeit
Längste
einstellbare Zeit
55°
60°
75°
80°
85°
90°
95°
25 min.
30 min.
30 min.
15 min.
15 min.
15 min.
20 min.
30 min.
10 min.
10 min.
10 min.
10 min.
10 min.
10 min.
10 min.
10 min.
1 Stunde
1 Stunde
1 Stunde
1 Stunde
1 Stunde
1 Stunde
1 Stunde
1 Stunde
75
95
55
60
80
85
90
START
STOP
Drücken Sie die Tasten + bzw. -, um die
gewünschte Zeit einzustellen.
Beispiel: 45 min.
Um die eingestellte Dauer zu registrieren, ist
diese durch erneutes Drücken der Taste
bzw. START/STOP zu bestätigen.
Danach beginnt der Backofen zu heizen.
Am Ende des Garvorgangs ertönt für einige
Minuten eine Serie von Pieptönen, und das
Symbol blinkt.
Das Abschalten der Pieptöne erfolgt, indem
Sie 1 Sekunde lang auf die Taste
START/STOP drücken.
Sie können das Ende der Garzeit jederzeit
abfragen oder ändern, indem Sie auf die
Taste drücken.
Um Ihre Programmeingabe zu löschen,
drücken Sie zweimal die Taste START/STOP.
Wie führen Sie eine Änderung der Zubereitung durch
99627782_ML_A.qxd 25/03/03 16:40 Page 43

46
75
95
55
60
80
85
90
START
STOP
75
95
55
60
80
85
90
START
STOP
Umschalten der Anzeige in Stand-by
Wenn der Backofen nicht benutzt wird, ist die Anzeige unnötig. Um Energie zu sparen,
können Sie diese in STAND-BY VERSETZEN.
Dazu gehen Sie wie folgt vor:
STAND-BY AUSLÖSEN :
- Der Backofen muss sich in der Betriebsart
"Anzeige der Uhrzeit" befinden.
- Drücken Sie 5 Sekunden lang gleichzeitig auf
die Tasten +und -.
- Auf der Anzeige erscheint "Lcd off"
- Lassen Sie die beiden Tasten los.
- Nach 30 Sekunden wird die Anzeige in
Stand-by ver-setzt.
Der Backofen befindet sich nun im Stand-by-
Betrieb und die Anzeige verschwindet in der
Betriebsart "Anzeige der Uhrzeit" automatisch
nach 30 Sekunden.
STAND-BY BEENDEN:
- Der Backofen muss sich in der Betriebsart
"Anzeige der Uhrzeit" befinden.
- Drücken Sie 5 Sekunden lang gleichzeitig auf
die Tasten +und -.
- Auf der Anzeige erscheint "Lcd on".
- Lassen Sie die beiden Tasten los.
- Der Backofen befindet sich nun nicht mehr im
STAND-BY-BETRIEB und die Angaben auf der
Anzeige sind durchgehend sichtbar..
75
95
55
60
80
85
90
START
STOP
75
95
55
60
80
85
90
START
STOP
Benutzung Ihres Backofens
99627782_ML_A.qxd 25/03/03 16:40 Page 46

49
DE
Notieren Sie hier die auf dem Geräteschild Ihrer Abzugshaube stehenden Angaben:
K
ontaktaufnahme
MADE IN FRANCE
220 - 240V ~ 50 Hz
BRANDT APPLIANCES SAS
7 rue Henri Becquerel
92500 RUEIL MALMAISON
De Dietrich
99627782_ML_A.qxd 25/03/03 16:40 Page 49

Inhoud
50
Inleiding p.51
Presentatie van uw oven p.52
Oventoebehoren p.53
Watertank p.53
Installatie van uw oven
Aansluiting p.54
Nuttige afmetingen voor de inbouw van uw oven p.55
Vervanging van de ovenlamp p.55
Gebruik van uw oven
Instellen van het uur van de oven p.56
Onmiddellijk bakken p.57
Stand van het waterpeil p.58
Stoppen tijdens of op het einde van de stoomcyclus p.58
Uitgesteld bakken p.59 - 60
Gebruik van de schakelklok p.61
Kinderbeveiliging p.62
Hoe zet ik de display in stand-by p.63
Beschrijving van de bakfuncties p.64
Problemen en oplossingen p.65
Contactpersoon p.65
In deze gebruikshandleiding
geeft symbol
veiligheidsaanwijzingen en symbool,
tips en praktische richtlijnen aan
99627782_ML_A.qxd 25/03/03 16:40 Page 50
1/112