Toyotomi TRN-871ZR Manual do usuário
- Categoria
- Condicionadores de ar de sistema split
- Tipo
- Manual do usuário

User’s manual
Οδηγίες Χρήσης
Manuale d’installazione ed uso
Manual de usuario
Manual de utilizador
WALL MOUNTED AIR CONDITIONER INVERTER TYPE
ΚΛΙΜΑΤΙΣΤΙΚΟ ΤΟΙΧΟΥ ΤΥΠΟΥ INVERTER
CONDIZIONATORE SPLIT
AIRE ACONDICIONADO DE MONTAJE EN PARED TIPO INVERTER
AR CONDICIONADO INVERTER DO TIPO MURAL
MODELS/ΜΟΝΤΕΛΑ/MODELLI/MODELOS/MODELOS
TRN/TRG828ZR
TRN/TRG835ZR
TRN/TRG856ZR
TRN/TRG871ZR
Thank you for purchasing our product.
Before using this product, be sure to read this Instruction Manual to ensure proper usage. Please keep this ma-
nual for later reference. Improper use of this product may result in a malfunction, failure, unexpected accident,
or create a potential hazard.
Ευχαριστούε για την επιλογή σα στο κλιατιστικό TOYOTOMI.
Για τη σωστή του χρήση παρακαλούε διαβάστε το εγχειρίδιο χρήση προσεκτικά, πριν θέσετε τη ονάδα σε
λειτουργία και κρατήστε το σε καλή κατάσταση για ελλοντική αναφορά.
Grazie per aver scelto un prodotto TOYOTOMI.
Per un corretto funzionamento, leggere attentamente questo manuale prima di usare il condizionatore e
conservarlo per una futura consultazione.
Gracias por adquirir nuestro producto.
Antes de usar el producto, lea este manual de usuario con atención para garantizar su uso adecuado. Por favor,
guarde este manual para futuras consultas. El uso incorrecto de este producto puede causar fallos, averías,
accidentes inesperados o
riesgos potenciales.
Obrigado por comprar o nosso produto.
Antes de usar este produto, certifique-se de ler este manual de instruções para garantir o uso adequado do
mesmo. Por favor, guarde este manual para referência posterior. O uso indevido deste produto pode resultar
em um mau funcionamento, falha, acidente inesperado, ou criar um perigo potencial.

GB
2
This appliance is not intended for use by persons (including children) with reduced physical,
sensory or mental capabilities, or lack of experience and knowledge, unless they have been given
supervision or instruction concerning use of the appliance by a persen responsible for their safety.
Children should be supervised to ensure that they do not play with the appliance.
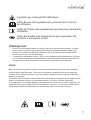
This marking indicates that this product should not be disposed with other household wastes
throughout the EU. To prevent possible harm to the environment or human health from uncon-
trolled waste disposal, recycle it responsibly to promote the sustainable reuse of mate-
rial resources. To return your used device, please use the return and collection systems
or contact the retailer where the product was purchased. They can take this product
for environmental safe recycling.
R32: 675

GB
3
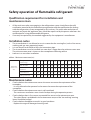
Appliance filled with flammable gas R32.
Before use the appliance, read the owner’s manual first.
Before install the appliance, read the installation manual first.
Before repair the appliance, read the service manual first.
The Refrigerant
• To realize the function of the air conditioner unit, a special refrigerant circulates in the sys-
tem. The used refrigerant is the fluoride R32, which is specially cleaned. The refrigerant is
flammable and inodorous. Furthermore, it can leads to explosion under certain conditions.
But the flammability of the refrigerant is very low. It can be ignited only by fire.
• Compared to common refrigerants, R32 is a nonpolluting refrigerant with no harm to the
ozonosphere. The influence upon the greenhouse effect is also lower. R32 hasgot very
good thermodynamic features which lead to a really high energy efficiency. The units
therefore need a less filling.
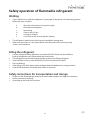
WARNING:
Do not use means to accelerate the defrosting process or to clean, other than those
recommended by the manufacture. Should repair be necessary, contact your nearest
authorized Service Centre. Any repairs carried out by unqualified personnel may be dangerous.
The appliance shall be stored in a room without continuously operating ignition sources. (for
example: open flames, an operating gas appliance or an operating electric heater.) Do not
pierce or burn. Appliance shall be installed, operated and stored in a room with a floor area
larger than 4m
2
. Appliance filled with flammable gas R32. For repairs, strictly follow
manufacturer’s instructions only. Be aware that refrigrants not contain odour. Read specialist’s
manual.

GB
4
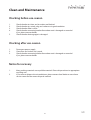
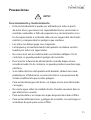
Precautions
WARNING
Operation and Maintenance
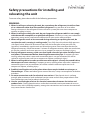
• This appliance can be used by children aged from 8 years and
above and persons with reduced physical, sensory ormental
capabilities or lack of experience and knowledge if they
have been given supervision or instruction concerning use
of the appliance in a safe way and understand the hazards
involved.
• Children shall not play with the appliance.
• Cleaning and user maintenance shall not be made by children-
without supervision.
• Do not connect air conditioner to multi-purpose socket.
Otherwise, it may cause fire hazard.
• Do disconnect power supply when cleaning air conditioner.
Otherwise, it may cause electric shock.
• If the supply cord is damaged, it must be replaced by the
manufacturer, its service agent or similarly qualified persons
in order to avoid a hazard.
• Do not wash the air conditioner with water to avoid electric
shock.
• Do not spray water on indoor unit. It may cause electric
shock or malfunction.
• After removing the filter, do not touch fins to avoid injury.
• Do not use fire or hair dryer to dry the filter to avoid
deformation or fire hazard.

GB
5
Precautions
WARNING
• Maintenance must be performed by qualified professionals.
Otherwise, it may cause personal injury or damage.
• Do not repair air conditioner by yourself. It may cause electric
shock or damage. Please contact dealer when you need to
repair air conditioner.
• Do not extend fingers or objects into air inlet or air outlet. It may
cause personal injury or damage.
• Do not block air outlet or air inlet. It may cause malfunction.
• Do not spill water on the remote controller, otherwise the
remote controller may be broken.
• When below phenomenon occurs, please turn off air condi-
tioner and disconnect power immediately and then contact the
dealer or qualified professionals for service.
• Power cord is overheating or damaged.
• There’s abnormal sound during operation.
• Circuit break trips off frequently.
• Air conditioner gives off burning smell.
• Indoor unit is leaking.
• If the air conditioner operates under abnormal conditions, it
may cause malfunction, electric shock or fire hazard.
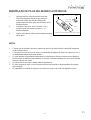
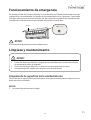
• When turning on or turning off the unit by emergency opera-
tion switch, please press this switch with an insulating object
other than metal.
• Do not step on top panel of outdoor unit, or put heavy objects.
It may cause damage or personal injury.

GB
6
Precautions
WARNING
Attachment
• Installation must be performed by qualified professionals.
Otherwise, it may cause personal injury or damage.
• Must follow the electric safety regulations when installing the
unit.
• According to the local safety regulations, use qualified power
supply circuit and circuit break.
• Do install the circuit break. If not, it may cause malfunction.
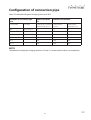
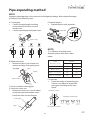
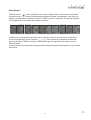
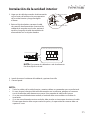
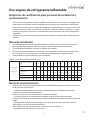
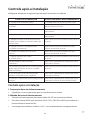
• An all-pole disconnection switch having a contact separation of
at least 3mm in all poles should be connected in fixed wiring.
• Including an circuit break with suitable capacity, please note the
following table. Air switch should be included magnet buckle
and heating buckle function, it can protect the circuit-short and
overload.
• Air Conditioner should be properly grounded. Incorrect groun-
ding may cause electric shock.
• Don’t use unqualified power cord.
• Make sure the power supply matches with the requirement of
airconditioner. Unstable power supply or incorrect wiring or
malfunction. Please install proper power supply cables before
using the air conditioner.
• Properly connect the live wire, neutral wire and grounding wire
of power socket.
• Be sure to cut off the power supply before proceeding any work
related to electricity and safety.

GB
7
Precautions
WARNING
• Do not put through the power before finishing installation.
• If the supply cord is damaged, it must be replaced by the manu-
facturer, its service agent or similarly qualified persons in order
to avoid a hazard.
• The temperature of refrigerant circuit will be high, please keep
the interconnection cable away from the copper tube.
• The appliance shall be installed in accordance with national
wiring regulations.
• Installation must be performed in accordance with the require-
ment of NEC and CEC by authorized personnel only.
• The air conditioner is the first class electric appliance. It must
be properly grounding with specialized grounding device by a
professional. Please make sure it is always grounded effectively,
otherwise it may cause electric shock.
• The yellow-green wire in air conditioner is grounding wire,
which can’t be used for other purposes.
• The grounding resistance should comply with national electric
safety regulations.
• The appliance must be positioned so that the plug is accessible.
• All wires of indoor unit and outdoor unit should be connected
by a professional.
• If the length of power connection wire is insufficient, please
contact the supplier for a new one. Avoid extending the wire by
yourself

GB
8
Precautions
WARNING
• For the air conditioner with plug, the plug should be reachable
after finishing installation.
• For the air conditioner without plug, an circuit break must be
installed in the line.
• If you need to relocate the air conditioner to another place, only
the qualified person can perform the work. Otherwise, it may
cause personal injury or damage.
• Select a location which is out of reach for children and far away
from animals or plants. If it is unavoidable, please add the fence
for safety purpose.
• The indoor unit should be installed close to the wall.
• Instructions for installation and use of this product are provided
by the manufacturer.

GB
9
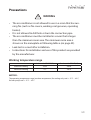
Precautions
WARNING
• The air conditioner is not allowed to use in a room that has run-
ning fire (such as fire source, working coal gas ware, operating
heater).
• It is not allowed to drill hole or burn the connection pipe.
• The air conditioner must be installed in a room that is larger
than the minimum room area. The minimum room area is
shown on the nameplate or following table a (on page 43).
• Leak test is a must after installation.
• Instructions for installation and use of this product are provided
by the manufacturer.
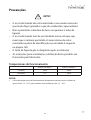
Working temperature range
Indoor side DB/WB(°C) Outdoor side DB/WB(°C)
Maximum cooling 32/23 43/26
Maximum heating 27/- 24/18
NOTICE:
The operating temperature range (outdoor temperature) for cooling only unit is -15°C ~ 43°C;
for heat pump unit is -15°C ~ 43°C .

GB
10
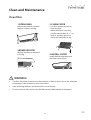
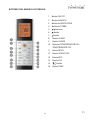
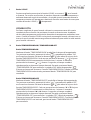
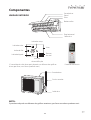
Parts name
INDOOR UNIT
air inlet
panel
filter
aux. button
horizontal louver
air outlet
heating indicator
cooling indicator
power indicator
(Display content or position may be different from above graphics,
please refer to actual products)
display
receiver window
air inlet
connection wire
air outlet
temp. indicator
drying indicator
remote control
NOTICE:
Actual product may be different from above graphics, please refer to actual products.

GB
11
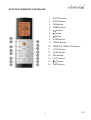
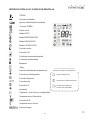
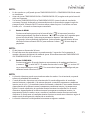
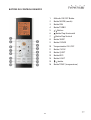
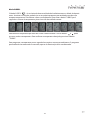
BUTTONS ON REMOTE CONTROLLER
1 ON/OFF button
2 MODE button
3 FAN button
4 TURBO button
5
/ button
6 button
7 button
8 SLEEP button
9 I SENSE button
10 TIMER ON / TIMER OFF buttons
11 CLOCK button
12 QUIET button
13 WIFI button
14 LIGHT button
15
/
button
16 TEMP button

GB
12
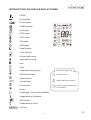
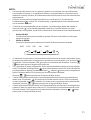
INTRODUCTION FOR ICONS ON DISPLAY SCREEN
temperature display type
Set temperature
Indoor ambient temperature
Outdoor ambient temperature
(not available)
I SENSE
Fan Function
Set fan speed
TURBO function
Send signal
AUTO mode
COOL mode
FAN mode
HEAT mode
Sleep function
LIGHT function
Left and right swing
Up and down swing
Lock
Clock
Temperature display type
Self-Clean function
Quiet function
Auto function
8°C function
Ionizer
Scavenging - fresh air (not available)
Temperature in Fahrenheit
WiFi function
Temperature in Celsius
Set Time

GB
13
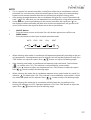
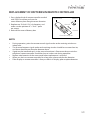
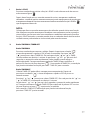
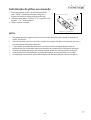
NOTE:
• This is a general use remote controller, it could be used for the air conditioners with mul-
tifunction; For some function, which the model doesn’t have, if press the corresponding
button on the remote controller that the unit will keep the original running status.
• After putting through the power, the air conditioner will give out a sound. Operation indi-
cator “ “ is ON. After that, you can operate the air conditioner by using remote controller.
• Under on status, pressing the button on the remote controller, the signal icon “ “ on
the display of remote controller will blink once and the air conditioner will give out a “de”
sound, which means the signal has been sent to the air conditioner.
1 ON/OFF button
Press this button to turn on the unit. Press this button again to turn off the unit.
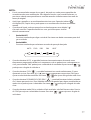
2 MODE button
Press this button to select your required operation mode.
AUTO COOL DRY FAN HEAT
• When selecting auto mode, air conditioner will operate automatically according to the sen-
sed temperature. Set temperature can’t be adjusted and will not be displayed as well. Press
“FAN” button can adjust fan speed. Press
/
button can adjust fan blowing angle.
• After selecting cool mode, air conditioner will operate under cool mode. Cool indicator
on indoor unit is ON (This indicator is not available for some models).
Press “ ” or “ ” button to adjust set temperature. Press “FAN” button to adjust fan speed.
Press
/
button to adjust fan blowing angle.
• When selecting dry mode, the air conditioner operates at low speed under dry mode. Dry
indicator on indoor unit is ON (This indicator is not available for some models). Under
dry mode, fan speed can’t be adjusted. Press
/
button to adjust fan blowing angle.
• When selecting fan mode, the air conditioner will only blow fan, no cooling and no
heating. All indicators are OFF, Operation indicator is ON. Press “FAN” button to adjust fan
speed. Press
/
button to adjust fan blowing angle.

GB
14
• When selecting heating mode, the air conditioner operates under heat mode. Heat indica-
tor on indoor unit is ON (This indicator is not available for some models). Press “ ” or “
” button to adjust set temperature. Press “FAN” button to adjust fan speed. Press
/
button to adjust fan blowing angle. (Cooling only unit won’t receive heating mode signal.
lf setting heat mode with remote controller, press ON/OFF button can’t start up the unit).
NOTE:
• For preventing cold air, after starting up heating mode, indoor unit will delay 1~5 minutes
to blow air (actual delay time is depending on indoor ambient temperature).
• Set temperature range from remote controller: 16°C~30°C (61-86°F); Fan speed: auto, low
speed, low-medium speed, medium speed, medium-high speed, high speed.
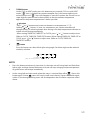
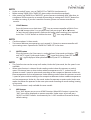
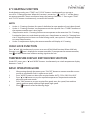
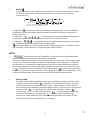
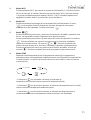
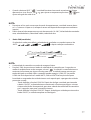
3 FAN button
This button is used for setting Fan Speed in the sequence that goes from
AUTO, , , , to , then back to Auto.
NOTE:
• It’s Low fan speed under Dry mode
• X-FAN function: Hold fan speed button for 2s in COOL or DRY mode, the icon “ ” is
displayed and the indoor fan will continue operation for a few minutes in order to dry
the indoor unit even though you have turned off the unit. After energization, X-FAN OFF
is defaulted. X-FAN is not available in AUTO, FAN or HEAT mode.
This function indicates that moisture on evaporator of indoor unit will be blowed after the
unit is stopped to avoid mould.
• Having set X-FAN function on: After turning off the unit by pressing ON/OFF button indoor
fan will continue running for a few minutes. at low speed. In this period, hold fan speed
button for 2s to stop indoor fan directly.
• Having set X-FAN function off: After turning off the unit by pressing ON/OFF button, the
complete unit will be off directly.
Auto
Low speed
Low Medium speed
Medium speed
Medium - High speed
High speed

GB
15
4 TURBO button
Under COOL or HEAT mode, press this button to turn to quick COOL or quick HEAT
mode. “ “ icon is displayed on remote controller. Press this button again to exit
turbo function and “ “ icon will disappear. If start this function, the unit will run at
super-high fan speed to cool or heat quickly so that the ambient temperature
approaches the preset temperature as soon as possible.
5 / button
• Press “ ” or “ ” button once increase or decrease set temperature 1C (°F).
Holding “ ” or “ ” button, 2s later, set temperature on remote controller will
change quickly. On releasing button after setting is finished, temperature indicator on
indoor unit will change accordingly.
• When setting TIMER ON, TIMER OFF or CLOCK, press “ ” or “ ” button to adjust time.
(Refer to CLOCK, TIMER ON, TIMER OFF buttons) When setting TIMER ON, TIMER OFF or
CLOCK, press “ ” or “ ” button to adjust time. (Refer to CLOCK, TIMER ON,
TIMER OFF buttons).
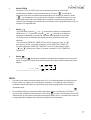
6 button
Press this button can select left & right swing angle. Fan blow angle can be selected
circularly as below:
NOTE:
• Press this button continuously more than 2s, the main unit will swing back and forth from
left to right, and then loosen the button, the unit will stop swinging and present position
of guide louver will be kept immediately.
• Under swing left and right mode, when the status is switched from off to , if press this
button again 2s later status will switch to off status directly; if press this button again
within 2s, the change of swing status will also depend on the circulation sequence stated
above.
no display
(stops at current position)

GB
16
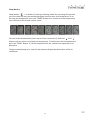
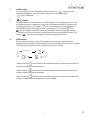
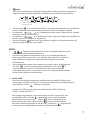
7 button
Press this button can select up & down swing angle. Fan blow angle can be selected
circularly as below:
• When selecting , air conditioner is blowing fan automatically. Horizontal louver will
automatically swing up & down at maximum angle.
• When selecting “ ” , air conditioner is blowing fan at fixed position.
Horizontal louver will stop at the fixed position.
• When selecting ” ” , air conditioner is blowing fan at fixed angle. Horizontal
louver will send air at the fixed angle.
• Hold button above 2s to set your required swing angle. When reaching your required
angle, release the button.
NOTE:
• ,may not be available. When air conditioner receives this signal, the air
conditioner will blow fan automatically.
• Press this button continuously more than 2s, the main unit will swing back and forth from
up to down, and then loosen the button. The unit will stop swinging and present position
of guide lover will be kept immediately.
• Under swing up and down mode, when the status is switched from off to , if press this
button again 2s later, status will switch to off status directly. lf press this button again
within 2s, the change of swing status will also depend on the circulation sequence stated
above.
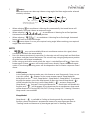
8 SLEEP button
In the Cooling or Heating mode, press this button to start Sleep mode. Once you set
it up, this symbol appears on the screen remote control. Sleep Mode has
three places to choose from, Sleep Mode 1, Sleep Mode 2, Sleep Mode 3. To navigate
through the options, press the sleep button. By pressing it once Sleep Mode 1
will be activated, by pressing it twice Sleep Mode 2 activates, three times
Sleep Mode 3 activates. Pressing the button for the fourth time will disable this
function and “ “ will disappear. If you deactivate the air conditioner, sleep mode
will be deactivated. During DRY, FAN, AUTO, Energy Saving & “8°C Heating” functions,
Sleep mode is not available.
Sleep Mode 1
Sleep Mode 1 is available in Cooling or Heating mode. By activating this
function, the air conditioner’s temperature increases by one degree per hour in
“Cooling” mode and decreases by one degree per hour in “Heating” mode.
No display
(horizontal louvers stops
at current position)

GB
17
Sleep Mode 2
Sleep mode 2 will only be activated during Cooling or Heating mode.
During Cooling:
-If the air conditioner temperature is set between 16°C - 23°C, the temperature will increase
by one degree per hour for the next 3 hours after the power is turned on and then
remains stable. At the 8th hour after the operation is switched on, the temperature will be
reduced by one degree automatically
- If the air conditioner temperature is set between 24°C - 27°C, the temperature will increase
by one degree per hour for the next 2 hours from the start of the operation and
then remain stable. At the 8th hour after the operation is switched on, the temperature
will be reduced by one degree automatically.
-If the air conditioner temperature is set between 28°C - 29°C, the temperature will increase
to a certain degree within the next hour of activation and then remain stable. At the 8th
hour after the operation is switched on, the temperature will be reduced by one degree
automatically.
-If the air conditioner temperature is set from 30°C to above, it will remain constant for 7
hours after the operation is switched on and at 8 o’clock the temperature will be reduced
by one degree automatically.
During Heating mode:
-If the air conditioner selection is 16°C, the air conditioner will continue to operate at
this temperature.
-If the air conditioner temperature is between 17°C and 20°C, the air conditioner’s
temperature will drop to a certain extent after the first hour of the operation and then
remain constant.
-If the air conditioner’s temperature is between 21°C - 27°C, the air conditioner’s temperature
will drop by one degree per hour within the first 2 hours of activation and then remain
constant.
-If the air conditioner’s temperature is between 28°C- 30°C, the air conditioner’s temperature
will be reduced by one degree per hour in the first 3 hours after activation and then
will remain constant.

GB
18
Sleep Mode 3
Sleep Mode 3 “ “ is available in Cooling or Heating modes. By activating this function,
you can create your own personalized program based on time and temperature. To set
the time and temperature, press the “TURBO” button for 3 seconds, and the temperature
icon will flash on the remote control screen.
You can set the temperature by hour, up to 8 hours continuously. With the “ ” and “ ”
buttons you can adjust and change the temperature. To confirm the desired temperature,
press the “TURBO” button. To set the temperature for the second hour repeat the same
procedure.
The personalized program is stored in the memory despite the deactivation of the air
conditioner.

GB
19
9 I SENSE button
Press this button to start I SENSE function and will be displayed on the remote
controller. After this function is set, the remote controller will send the detected
ambient temperature according to the controller and the unit will automatically
adjust the indoor temperature according to the detected temperature. Press this
button again to cancel I SENSE function and will disappear.
USEFUL TIP
Please put the remote controller near user when this function is set. Do not put the
remote controller near the object of high temperature or low temperature in order
to avoid detecting inaccurate ambient temperature. When I SENSE function is turned
on, the remote controller should be put within the area where indoor unit can receive
the signal sent by the remote controller.
10 TIMER ON / TIMER OFF button
TIMER ON button
“TIMER ON” button can set the time for timer on. After pressing this button,” ”
icon disappears and the word “ON” on remote controller blinks. Press “ ” or “ ”
button to adjust TIMER ON setting. After each pressing “ ” or “ ” button, TIMER ON
setting will increase or decrease 1 minute. Hold “ ” or “ ” button, 2s later, the time will
change quickly until reaching your required time. Press “TIMER ON” to confirm it.
The word “ON” will stop blinking. “ “ icon resumes displaying. Cancel TIMER ON:
Under the condition that TIMER ON is started up, press “TIMER ON” button to cancel it.
TIMER OFF button
“TIMER OFF” button can set the time for timer on. After pressing this button, “ “
icon disappears and the word “OFF” on remote controller blinks. Press “ ” or “ ”
button to adjust TIMER OFF setting. After each pressing “ ” or “ ” button, TIMER OFF
setting will increase or decrease 1 minute. Hold “ ” or “ ” button, 2s later, the time
will change quickly until reaching your required time. Press “TIMER OFF” to confirm it.
The word “OFF” will stop blinking. “ “ icon resumes displaying. Cancel TIMER OFF:
Under the condition that TIMER OFF is started up, press “TIMER OFF” button to cancel it.

GB
20
NOTE:
• Under on and off status, you set TIMER OFF or TIMER ON simultaneously.
• Before setting TIMER ON or TIMER OFF, please adjust the clock time properly.
• After starting up TIMER ON or TIMER OFF, set the constant circulating valid. After that, air
conditioner will be turned on or turned off according to setting time. ON/OFF button has
no effect on setting. If you don’t need this function, please use remote controller to
cancel it.
11 CLOCK button
Press this button to set clock time. “ “ icon on remote controller will blink. Press
“ ” or “ ” button within 5s to set clock time. Each pressing of “ ” or “ ” button,
2s later, time will change quickly. Release this button when reaching your required
time. Press “CLOCK” button to confirm the time. “ “ icon stops blinking.
NOTE:
• Clock time adopts 24-hour mode.
• The interval between two operations can’t exceed 5s. Otherwise, remote controller will
quite setting status. Operation for TIMER ON/ TIMER OFF is the same.
12 QUITE button
Press this button, the Quiet status is under the Auto Quiet mode and displays “ “
and “AUTO” signal. Quiet mode displays “ “ signal and during Quiet OFF there is
no “ “ signal displayed. After powered on, the Quiet OFF is defaulted.
NOTE:
• The Quiet function can be set up in all modes; Under the Quiet mode, the fan speed is not
available.
• When quiet function is selected: Under cooling mode: indoor fan operates at notch 4
speed. 10 minutes later or when indoor ambient temperature ≤28 ºC , indoor fan will
operate at notch 2 speed or quiet mode according to the comparison between indoor am-
binet temperature and set temperature. Under heating mode: indoor fan operates at notch
3 speed or quiet mode according to the comparison between indoor ambient temperature
and set temperature. Under dry, fan mode: indoor fan operates at quiet mode. Under auto
mode: the indoor fan operates at the auto quiet mode according to actual cooling, heating
or fan mode.
• The Quiet function is only available for some models.
13 WIFI button
Press “WiFi” button to turn on or off WiFi function. When WiFi function is turned on,
“WiFi” icon will be displayed on remote controller. Under status of unit off, press
“MODE” and “WiFi” buttons simultaneously for 1s. WiFi module will restore to factory
default setting.
A página está carregando...
A página está carregando...
A página está carregando...
A página está carregando...
A página está carregando...
A página está carregando...
A página está carregando...
A página está carregando...
A página está carregando...
A página está carregando...
A página está carregando...
A página está carregando...
A página está carregando...
A página está carregando...
A página está carregando...
A página está carregando...
A página está carregando...
A página está carregando...
A página está carregando...
A página está carregando...
A página está carregando...
A página está carregando...
A página está carregando...
A página está carregando...
A página está carregando...
A página está carregando...
A página está carregando...
A página está carregando...
A página está carregando...
A página está carregando...
A página está carregando...
A página está carregando...
A página está carregando...
A página está carregando...
A página está carregando...
A página está carregando...
A página está carregando...
A página está carregando...
A página está carregando...
A página está carregando...
A página está carregando...
A página está carregando...
A página está carregando...
A página está carregando...
A página está carregando...
A página está carregando...
A página está carregando...
A página está carregando...
A página está carregando...
A página está carregando...
A página está carregando...
A página está carregando...
A página está carregando...
A página está carregando...
A página está carregando...
A página está carregando...
A página está carregando...
A página está carregando...
A página está carregando...
A página está carregando...
A página está carregando...
A página está carregando...
A página está carregando...
A página está carregando...
A página está carregando...
A página está carregando...
A página está carregando...
A página está carregando...
A página está carregando...
A página está carregando...
A página está carregando...
A página está carregando...
A página está carregando...
A página está carregando...
A página está carregando...
A página está carregando...
A página está carregando...
A página está carregando...
A página está carregando...
A página está carregando...
A página está carregando...
A página está carregando...
A página está carregando...
A página está carregando...
A página está carregando...
A página está carregando...
A página está carregando...
A página está carregando...
A página está carregando...
A página está carregando...
A página está carregando...
A página está carregando...
A página está carregando...
A página está carregando...
A página está carregando...
A página está carregando...
A página está carregando...
A página está carregando...
A página está carregando...
A página está carregando...
A página está carregando...
A página está carregando...
A página está carregando...
A página está carregando...
A página está carregando...
A página está carregando...
A página está carregando...
A página está carregando...
A página está carregando...
A página está carregando...
A página está carregando...
A página está carregando...
A página está carregando...
A página está carregando...
A página está carregando...
A página está carregando...
A página está carregando...
A página está carregando...
A página está carregando...
A página está carregando...
A página está carregando...
A página está carregando...
A página está carregando...
A página está carregando...
A página está carregando...
A página está carregando...
A página está carregando...
A página está carregando...
A página está carregando...
-
 1
1
-
 2
2
-
 3
3
-
 4
4
-
 5
5
-
 6
6
-
 7
7
-
 8
8
-
 9
9
-
 10
10
-
 11
11
-
 12
12
-
 13
13
-
 14
14
-
 15
15
-
 16
16
-
 17
17
-
 18
18
-
 19
19
-
 20
20
-
 21
21
-
 22
22
-
 23
23
-
 24
24
-
 25
25
-
 26
26
-
 27
27
-
 28
28
-
 29
29
-
 30
30
-
 31
31
-
 32
32
-
 33
33
-
 34
34
-
 35
35
-
 36
36
-
 37
37
-
 38
38
-
 39
39
-
 40
40
-
 41
41
-
 42
42
-
 43
43
-
 44
44
-
 45
45
-
 46
46
-
 47
47
-
 48
48
-
 49
49
-
 50
50
-
 51
51
-
 52
52
-
 53
53
-
 54
54
-
 55
55
-
 56
56
-
 57
57
-
 58
58
-
 59
59
-
 60
60
-
 61
61
-
 62
62
-
 63
63
-
 64
64
-
 65
65
-
 66
66
-
 67
67
-
 68
68
-
 69
69
-
 70
70
-
 71
71
-
 72
72
-
 73
73
-
 74
74
-
 75
75
-
 76
76
-
 77
77
-
 78
78
-
 79
79
-
 80
80
-
 81
81
-
 82
82
-
 83
83
-
 84
84
-
 85
85
-
 86
86
-
 87
87
-
 88
88
-
 89
89
-
 90
90
-
 91
91
-
 92
92
-
 93
93
-
 94
94
-
 95
95
-
 96
96
-
 97
97
-
 98
98
-
 99
99
-
 100
100
-
 101
101
-
 102
102
-
 103
103
-
 104
104
-
 105
105
-
 106
106
-
 107
107
-
 108
108
-
 109
109
-
 110
110
-
 111
111
-
 112
112
-
 113
113
-
 114
114
-
 115
115
-
 116
116
-
 117
117
-
 118
118
-
 119
119
-
 120
120
-
 121
121
-
 122
122
-
 123
123
-
 124
124
-
 125
125
-
 126
126
-
 127
127
-
 128
128
-
 129
129
-
 130
130
-
 131
131
-
 132
132
-
 133
133
-
 134
134
-
 135
135
-
 136
136
-
 137
137
-
 138
138
-
 139
139
-
 140
140
-
 141
141
-
 142
142
-
 143
143
-
 144
144
-
 145
145
-
 146
146
-
 147
147
-
 148
148
-
 149
149


Toyotomi TRN-871ZR Manual do usuário
- Categoria
- Condicionadores de ar de sistema split
- Tipo
- Manual do usuário
em outras línguas
- español: Toyotomi TRN-871ZR Manual de usuario
- English: Toyotomi TRN-871ZR User manual
Outros documentos
-
Becken AR CONDICIONADO INVERTER I 12BTU Manual do proprietário
-
-
mundoclima Series MUVR-C6 “Cool Only” Guia de instalação
-
Samsung AR09TRHGAWKNAF Manual do usuário
-
-
-
AEG AXP Series Manual do usuário
-
-
Mitsubishi Electric PXZ-4F75VG Split-Type Air-Conditioner Manual do usuário
-
Panasonic CSTZ15SKEW Manual do proprietário