
Accutrend Plus
User’s Manual
Instrucciones de uso
Manual do Utilizador
Οδηγίες Xρήσης
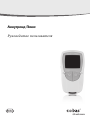
Руководство пользователя

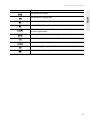
Manual version Revision date Changes
Version 1.0 2007-03 New document
Version 2.0 2011-06 New manual format; content update; revised
presentation safety information.
Version 3.0 2016-09 Update: Revised intended use and added GTIN
information.

0 6406947001 (02) 2016-09 EN-ES-PT-EL-RU
User’s Manual
A
ccutrend
®
Plus

4
©2011-2016, Roche Diagnostics. All rights reserved
The contents of this document, including all graphics, are the property of Roche Diagnostics. Information in
this document is subject to change without notice. Roche Diagnostics shall not be liable for technical or edi-
torial errors or omissions contained herein. No part of this document may be reproduced or transmitted in
any form or by any means, electronic or mechanical, for any purpose, without the express written permission
of Roche Diagnostics.
Please send questions or comments about this manual to your local Roche representative.
ACCU-CHEK, ACCU-CHEK MULTICLIX, ACCUTREND, COBAS and SAFE-T-PRO are trademarks of Roche.
All other trademarks are the property of their respective owners.
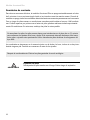
This instrument has been constructed and tested in accordance with EN 61010-1 (“Safety requirements for
electrical equipment for measurement, control and laboratory use; Part 1: General requirements”) and left our
factory in a safe condition.
To ensure that this remains so and to ensure safe operation the user must observe the instructions and warn-
ings given in this manual.
Installation, use and maintenance of the Accutrend Plus meter lie in the full responsibility of the user.
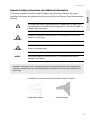
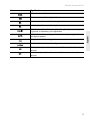
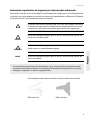
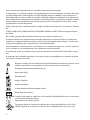
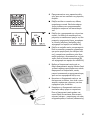
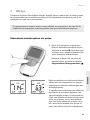
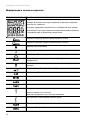
On the packaging and on the identification plate of the instrument you may encounter the following symbols,
shown here with their meaning:
Caution, consult accompanying documents. Refer to safety-related notes in the manual
accompanying this instrument.
Temperature limitation (Store at)
Use by
Manufacturer
Batch code/ Lot number
Catalogue number
In vitro diagnostic medical device
Global Trade Item Number
This product fulfills the requirements of the European Directive 98/79/EC on in vitro diagnostic
medical devices.
Consult instructions for use
The system fulfills the Canadian and U.S. safety requirements (UL LISTED, in accordance with
UL 61010A-1:02 and CAN/CSA-C22.2 No. 61010-1-04).
0123

5
English
1 Introduction 7
Before you start........................................................................................................................................... 7
Intended use ........................................................................................................................................ 7
Important information regarding use ......................................................................................... 7
If you need help.................................................................................................................................. 7
Test principle ....................................................................................................................................... 8
Checking the contents..................................................................................................................... 8
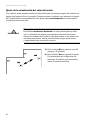
Important safety instructions and additional information........................................................... 9
Safety information............................................................................................................................ 10
Disposal of the system................................................................................................................... 10
General care....................................................................................................................................... 11
Electromagnetic interference ...................................................................................................... 11
Operating conditions ...................................................................................................................... 12
Quality control................................................................................................................................... 13
2 The Accutrend Plus Meter 14
Overview of the meter elements
......................................................................................................... 15
Display information and icons............................................................................................................. 16
Power supply.............................................................................................................................................. 18
3 Starting Up 19
Inserting the batteries
............................................................................................................................ 20
4 Meter Setup 23
Brief overview of the meter settings
................................................................................................. 23
General procedure for setting up the meter (set mode)........................................................... 24
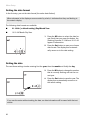
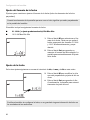
Setting the date format.......................................................................................................................... 26
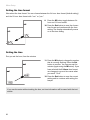
Setting the date ........................................................................................................................................ 26
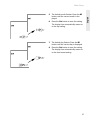
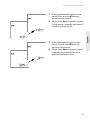
Setting the time format.......................................................................................................................... 28
Setting the time......................................................................................................................................... 28
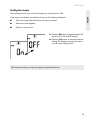
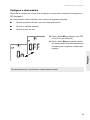
Setting the beeper ................................................................................................................................... 29
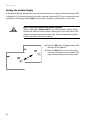
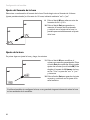
Setting the lactate display..................................................................................................................... 30
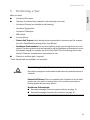
5 Performing a Test 31
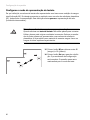
Brief overview of the steps to be carried out
................................................................................. 33
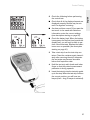
Code strips.................................................................................................................................................. 35
Powering on the meter........................................................................................................................... 36
Inserting the code strip.......................................................................................................................... 37
Checking the stored code numbers.................................................................................................. 38
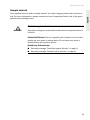
Sample material........................................................................................................................................ 39
Testing by healthcare professionals ................................................................................................ 40
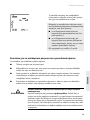
Preparing to perform a test.................................................................................................................. 41
Performing a test...................................................................................................................................... 43
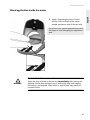
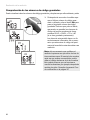
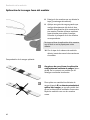
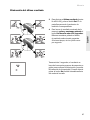
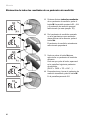
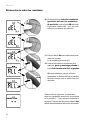
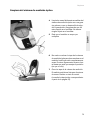
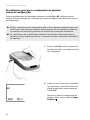
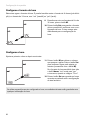
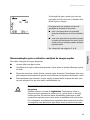
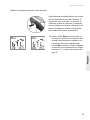
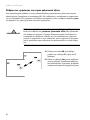
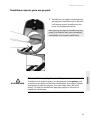
Recommendations for the collection and measurement of capillary blood...................... 45
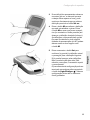
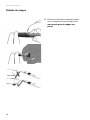
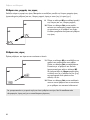
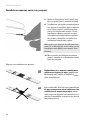
Blood collection........................................................................................................................................ 46
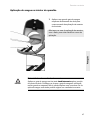
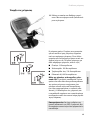
Blood application inside the meter.................................................................................................... 47

6
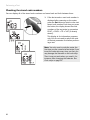
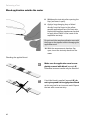
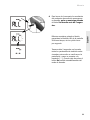
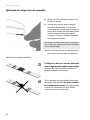
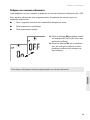
Blood application outside the meter................................................................................................. 48
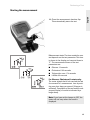
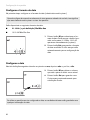
Starting the measurement .................................................................................................................... 49
Display of results...................................................................................................................................... 50
Disposal of used items after testing with blood........................................................................... 51
Flagging test results................................................................................................................................ 52
6 Control Testing 55
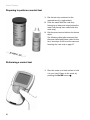
Preparing to perform a control test
................................................................................................... 56
Performing a control test....................................................................................................................... 56
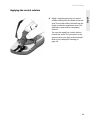
Applying the control solution .............................................................................................................. 59
Starting the measurement .................................................................................................................... 60
Display of results...................................................................................................................................... 61
Disposal of used items after control testing .................................................................................. 61
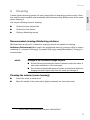
7 Memory 63
Reviewing results in memory
............................................................................................................... 63
Deleting results from memory............................................................................................................. 66
Deleting the last result........................................................................................................................... 67
Deleting all results of a test parameter............................................................................................ 68
Deleting all results................................................................................................................................... 70
8 Cleaning 71
Recommended cleaning/disinfecting solutions
........................................................................... 71
Cleaning the exterior (meter housing)............................................................................................. 71
Cleaning the measurement chamber cover/test strip guide................................................... 72
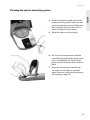
Cleaning the optical measuring system........................................................................................... 73
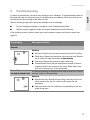
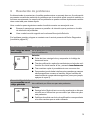
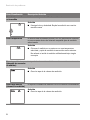
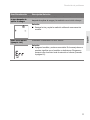
9 Troubleshooting 75
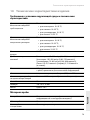
10 Product Specifications 79
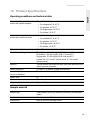
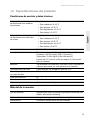
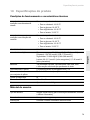
Operating conditions and technical data
........................................................................................ 79
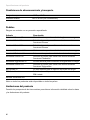
Sample material........................................................................................................................................ 79
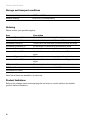
Storage and transport conditions ...................................................................................................... 80
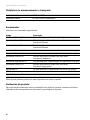
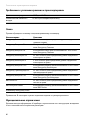
Ordering ..................................................................................................................................................... 80
Product limitations................................................................................................................................... 80
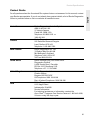
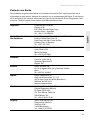
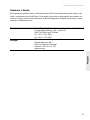
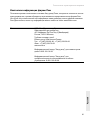
Contact Roche .......................................................................................................................................... 81
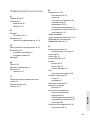
Index 83

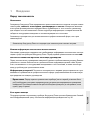
Introduction
7
English
1 Introduction
Before you start
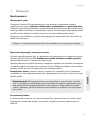
Intended use
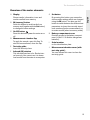
The Accutrend Plus meter is used for the quantitative determination of four blood parameters:
glucose, cholesterol, triglycerides, and lactate. The reflectance photometric measurement is
performed using test strips specific for each of these blood parameters. For detailed information
about each test, see the package inserts of the respective test strips.
The meter is suitable for professional use as well as for self-testing.
Important information regarding use
This manual contains all the information you need to operate and care for the Accutrend Plus
meter. Read this entire manual carefully before using the system for the first time.
Pay particular attention to the Important safety instructions and additional information section in
this chapter before you start testing. Also read the package inserts of the test strips and the
lancing device to be used.
Healthcare professionals: In addition, observe carefully the precautions and procedures
applying to professional use provided in the relevant sections of this manual.
If you need help
If you have any questions about the Accutrend Plus meter, please contact your local customer
support and service centre. You will find contact details on page 81.
Exception: The Accutrend Plus meter is not suitable for glucose self-testing.
Note: Before you use the meter for the first time (after you have first inserted the batteries),
you must set the date and time correctly to allow you to perform measurements properly.
Each time you replace the batteries you need to check (and, if necessary adjust) the date
and time.

Introduction
8
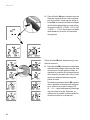
T
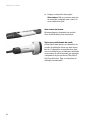
est principle
The meter reads the lot-specific characteristics of the test strips currently in use by means of a
code strip. This information is stored and therefore needs to be read only once per test strip con-
tainer. To run a test, an unused test strip is taken from the container and inserted into the meter.
When a strip is inserted, the application area of the test strip is illuminated by an LED (light-emit-
ting diode) from below. Before sample application, the reflection behaviour of the test strip is
determined by means of the light which is reflected from the application area (blank value).
The blood sample is then applied to the application area and the measurement chamber flap is
closed. The constituent to be determined in the applied sample undergoes an enzymatic reaction
with formation of a dye. The amount of dye formed increases with the concentration of the sub-
stance to be determined.
After a certain period of time (dependent on the test parameter), the colour intensity is measured
by illuminating the application area again from below using the LED. The intensity of the
reflected light is measured with a detector (reflectance photometry). The measured value is
determined from the signal strength of the reflected light, using the previously measured blank
value and the lot-specific information from the code strip. Finally, the result is displayed and
simultaneously saved to memory.
Checking the contents
■ Accutrend Plus meter
■ User’s manual
■ Four batteries (1.5 V, AAA)

Introduction
9
English
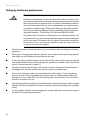
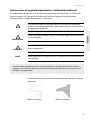
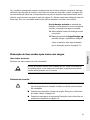
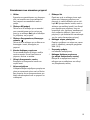
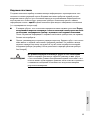
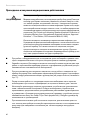
Important safety instructions and additional information
This section explains how safety-related messages and information related to the proper
handling of the system are presented in the Accutrend Plus User’s Manual. Read these passages
carefully.
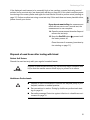
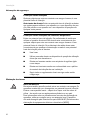
The safety alert symbol by itself (without a signal word) is used to pro-
mote awareness to hazards which are generic or to direct the reader to
related safety information
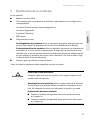
WARNING
Indicates a hazardous situation which, if not avoided, could result in
death or serious injury.
CAUTION
Indicates a hazardous situation which, if not avoided, could result in
minor or moderate injury.
NOTICE
Indicates a hazardous situation which, if not avoided, may result in
damage to the system.
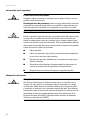
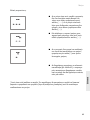
Important information that is not safety relevant is presented against a grey background
(without a symbol). Here you will find additional information on correct use of the meter or
useful tips.
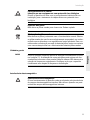
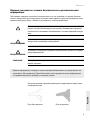
Illustrations in this manual show two different kinds of hands:
Hand without glove Hand with glove

Introduction
10
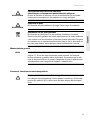
Safety information
Disposal of the system
WARNING
Protection against infection
Any object coming into contact with human blood is a potential source of
infection.
Patient Self-Testers: There is a potential risk of infection if you let other
people use your meter or lancing device. Do not share your meter or
lancing device with any other person.
WARNING
Protection against infection in a healthcare environment
There is a potential risk of infection. Healthcare professionals using the
Accutrend Plus meter must be aware that any object coming into contact
with human blood is a potential source of infection. Healthcare profes-
sionals must also be aware that any cross-contamination is a potential
source of infection for patients.
■ Use gloves.
■ Use an auto-disabling single-use lancing device for each patient.
■ Dispose of used lancets in a sturdy sharps container with lid.
■ Dispose of used test strips according to your institution’s
infection control policy.
■ Follow all health and safety regulations in force locally.
WARNING
Risk of infection
During testing the meter may come into contact with blood. Used meters
therefore carry a risk of infection. Dispose of your used meter - after
removing the batteries and cleaning the meter - according to the regula-
tions applicable in your country. For information about correct disposal,
contact your local council. The meter falls outside the scope of the Euro-
pean Directive 2002/96/ EC (Directive on waste electrical and electronic
equipment (WEEE)).
WARNING
For healthcare professionals:
Infection by a potentially biohazardous instrument
Dispose of the meter in line with your facility’s procedures for dealing
with potentially biohazardous waste.

Introduction
11
English
General care
Electromagnetic interference
WARNING
Exploding batteries
Do not throw used batteries into an open fire. They may explode.
Disposal of used batteries
Do not dispose of the batteries with normal domestic waste. Dispose of
used batteries in an environmentally responsible manner and in accord-
ance with applicable local regulations and directives. Contact your local
council/local authority or the manufacturer of the used batteries for
advice on correct disposal.
NOTICE
Clean the meter only with the solutions recommended (see page 71).
Using other solutions may result in incorrect operation and possible
system failure. Do not let cleaning solution enter the instrument. Make
sure that the meter is thoroughly dried after cleaning or disinfecting.
Electromagnetic interference
Strong electromagnetic fields may interfere with the proper operation of
the meter. Do not use the meter near strong electromagnetic fields.

Introduction
12
Operating conditions
T
o ensure that the meter functions properly, please observe the following guidelines:
■ Operate the meter only within the acceptable temperature range*. This range is test-
dependent:
– For cholesterol 18-35 °C
– For glucose 18-35 °C
– For triglycerides: 18-30 °C
– For lactate 15-35 °C
■ Only use the meter at a relative humidity between 10% and 85% (no condensation).
■ When testing, place the meter on a level, vibration-free surface, or hold it so it is roughly
horizontal.
* Please note: Different temperature ranges apply for Accutrend Controls. Refer to the package
insert for details.

Introduction
13
English
Quality control
The Accutrend Plus meter comprises numerous integrated or available control functions such as
the following:
■ An automatic check of the electronic components and functions when the meter is
powered on.
■ An automatic check of the ambient temperature before and during the measurement.
■ An automatic check of the test strip to make sure that the code information necessary for
measurement exists.
■ A check of the optical system and the overall function by means of control solutions.


The Accutrend Plus Meter
15
English
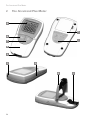
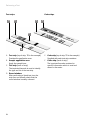
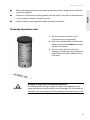
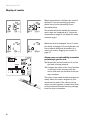
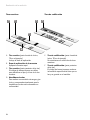
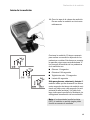
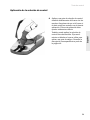
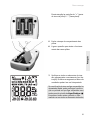
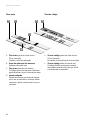
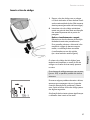
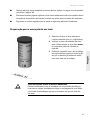
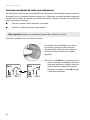
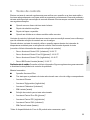
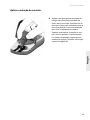
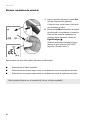
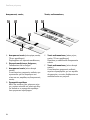
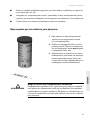
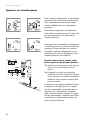
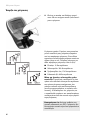
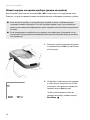
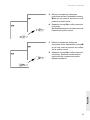
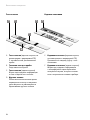
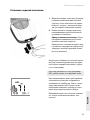
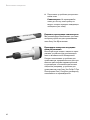
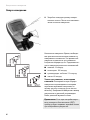
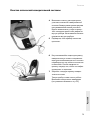
Overview of the meter elements
A Display
Shows results, information, icons and
results recalled from memory.
B M (memory) button
Press this button to recall results from
memory and (together with the Set button)
to change the meter settings.
C On/Off button
Press this button to pow
er the meter on or
off.
D Measurement chamber flap
To apply the sample, open this flap. To
start the measurement, close the flap.
E Test strip guide
Insert the test strip here.
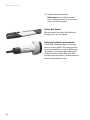
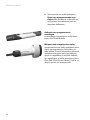
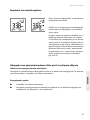
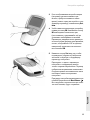
F Infrared (IR) window
This infrared interface is for Roche inter-
nal use only
. You cannot use it to down-
load results from the meter to a computer.
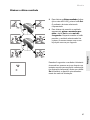
G Set button
By pressing this button, y
ou access the
various meter settings which are changed
using the M button. You also use this
button to switch between the different test
parameters to show the currently stored
code numbers (before measurement), or
to review results (when in memory mode).
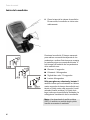
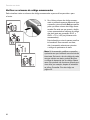
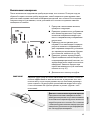
H Battery compartment cover
Pro
vides access to the battery compart-
ment (4 AAA 1.5 V alkaline manganese
batteries).
I Serial number
on the identifica
tion plate.
J Measurement chamber cover (with
test strip guide)
Y
ou can remove this cover to clean the
test strip guide.

The Accutrend Plus Meter
16
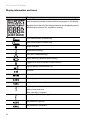
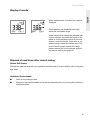
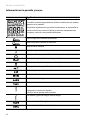
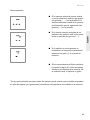
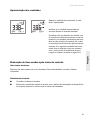
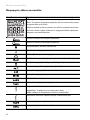
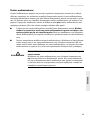
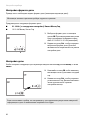
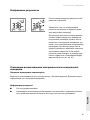
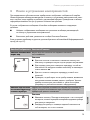
Display information and icons
Icon Meaning
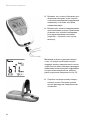
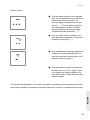
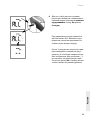
Every time the meter is powered on, you can check the display. The
meter temporarily shows all elements that may appear in the display.
Regularly check that all of the display elements are displayed properly.
Results may be misread if a segment is missing.
Close measurement chamber flap
Open measurement chamber flap
Beeper activated
Temperature warning
Error (see: Troubleshooting)
Battery warning (batteries almost empty)
Flagged as a control test with control solution
Flag for specific events (event 0–9)
Set mode
Memory mode
Code display
Test mode (measurement)
Test strip
flashes: insert test strip
static: test strip is inserted
Test strip and blood drop: apply blood
Test parameter: glucose
Test parameter: cholesterol

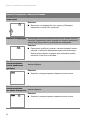
The Accutrend Plus Meter
17
English
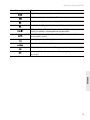
Test parameter: lactate
Test parameter: triglycerides
Lactate displayed as a whole blood value
Lactate displayed as a plasma value
Standard unit for lactate and (in some countries) for glucose, choles-
terol and triglycerides
Unit for glucose, cholesterol and triglycerides (in some countries)
Measurement time in seconds
Display of the code number
In the morning (if using the 12h time format with a.m./p.m.)
In the afternoon (if using the 12h time format with a.m./p.m.)
Icon Meaning

The Accutrend Plus Meter
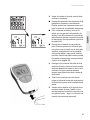
18
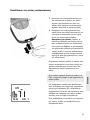
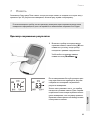
Power supply
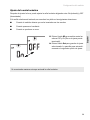
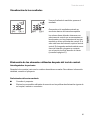
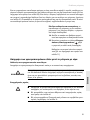
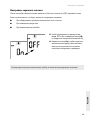
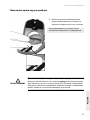
To save power, the Accutrend Plus meter automatically powers off after 2 minutes unless a
button has been pressed or a new test strip has been inserted. When the meter powers off, all
results obtained up to that point remain in memory.
With a set of fresh batteries, you will normally be able to perform at least 1,000 measurements.
When the battery warning is displayed for the first time, approximately 50 measurements can still
be performed. In this case, replace the batteries as soon as possible.
Results are retained in memory together with the date and time even when no batteries are
inserted. All other settings are retained, too.
When replacing the batteries you must insert the new batteries within one minute of removing
the old ones, to keep the date and time settings. If you take longer than this, you must re-enter
the date and time. Use only alkali-manganese batteries type AAA.
Think of the environment. Dispose of used batteries sensibly.
WARNING
Exploding batteries
Do not throw used batteries into an open fire. They may explode.

Starting Up
19
English
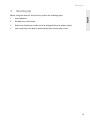
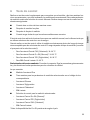
3 Starting Up
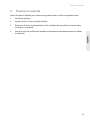
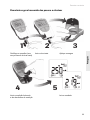
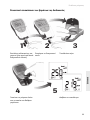
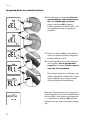
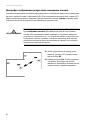
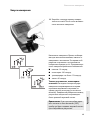
Before using the meter for the first time, perform the following steps:
1 Insert batteries.
2 Set date, time, and beeper.
3 Select how lactate test results are to be displayed (blood or plasma value).
4 Insert code strip (can also be done directly before performing a test).

Starting Up
20
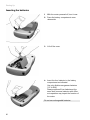
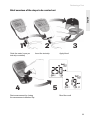
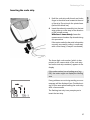
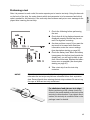
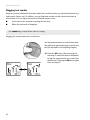
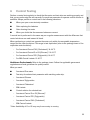
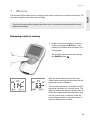
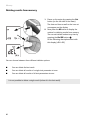
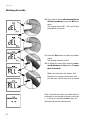
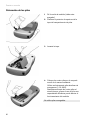
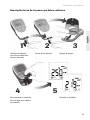
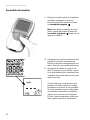
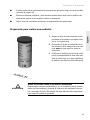
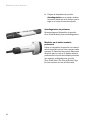
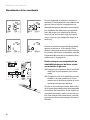
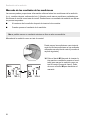
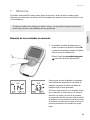
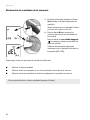
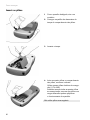
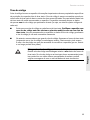
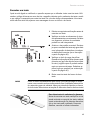
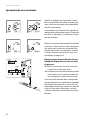
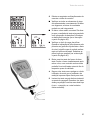
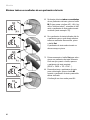
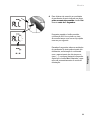
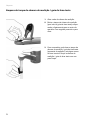
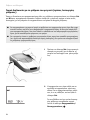
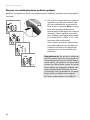
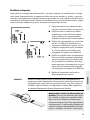
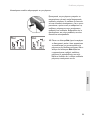
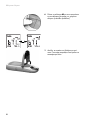
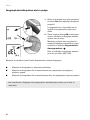
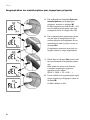
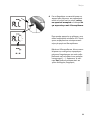
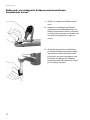
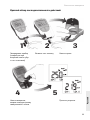
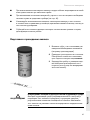
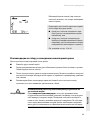
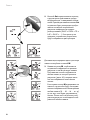
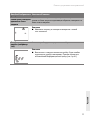
Inserting the batteries
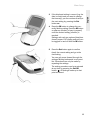
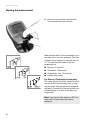
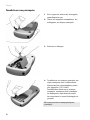
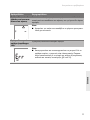
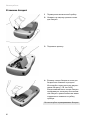
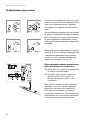
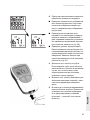
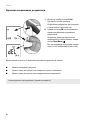
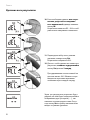
1 With the meter powered off, turn it over.
2 Press the battery compartment cover
release tab.
3 Lift off the cover.
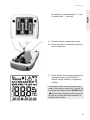
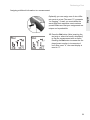
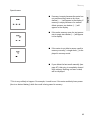
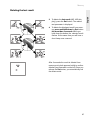
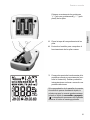
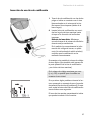
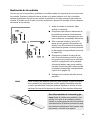
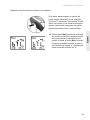
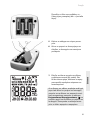
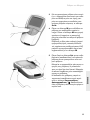
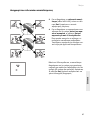
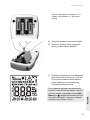
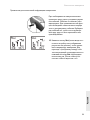
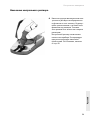
4 Insert the four batteries in the battery
compartment as indicated.
Use only alkaline manganese batteries
(1.5 V, AAA).
Always replace all four batteries at the
same time because batteries with differ-
ent capacities may impair the function of
the meter.
Do not use rechargeable batteries.
A página está carregando...
A página está carregando...
A página está carregando...
A página está carregando...
A página está carregando...
A página está carregando...
A página está carregando...
A página está carregando...
A página está carregando...
A página está carregando...
A página está carregando...
A página está carregando...
A página está carregando...
A página está carregando...
A página está carregando...
A página está carregando...
A página está carregando...
A página está carregando...
A página está carregando...
A página está carregando...
A página está carregando...
A página está carregando...
A página está carregando...
A página está carregando...
A página está carregando...
A página está carregando...
A página está carregando...
A página está carregando...
A página está carregando...
A página está carregando...
A página está carregando...
A página está carregando...
A página está carregando...
A página está carregando...
A página está carregando...
A página está carregando...
A página está carregando...
A página está carregando...
A página está carregando...
A página está carregando...
A página está carregando...
A página está carregando...
A página está carregando...
A página está carregando...
A página está carregando...
A página está carregando...
A página está carregando...
A página está carregando...
A página está carregando...
A página está carregando...
A página está carregando...
A página está carregando...
A página está carregando...
A página está carregando...
A página está carregando...
A página está carregando...
A página está carregando...
A página está carregando...
A página está carregando...
A página está carregando...
A página está carregando...
A página está carregando...
A página está carregando...
A página está carregando...
A página está carregando...
A página está carregando...
A página está carregando...
A página está carregando...
A página está carregando...
A página está carregando...
A página está carregando...
A página está carregando...
A página está carregando...
A página está carregando...
A página está carregando...
A página está carregando...
A página está carregando...
A página está carregando...
A página está carregando...
A página está carregando...
A página está carregando...
A página está carregando...
A página está carregando...
A página está carregando...
A página está carregando...
A página está carregando...
A página está carregando...
A página está carregando...
A página está carregando...
A página está carregando...
A página está carregando...
A página está carregando...
A página está carregando...
A página está carregando...
A página está carregando...
A página está carregando...
A página está carregando...
A página está carregando...
A página está carregando...
A página está carregando...
A página está carregando...
A página está carregando...
A página está carregando...
A página está carregando...
A página está carregando...
A página está carregando...
A página está carregando...
A página está carregando...
A página está carregando...
A página está carregando...
A página está carregando...
A página está carregando...
A página está carregando...
A página está carregando...
A página está carregando...
A página está carregando...
A página está carregando...
A página está carregando...
A página está carregando...
A página está carregando...
A página está carregando...
A página está carregando...
A página está carregando...
A página está carregando...
A página está carregando...
A página está carregando...
A página está carregando...
A página está carregando...
A página está carregando...
A página está carregando...
A página está carregando...
A página está carregando...
A página está carregando...
A página está carregando...
A página está carregando...
A página está carregando...
A página está carregando...
A página está carregando...
A página está carregando...
A página está carregando...
A página está carregando...
A página está carregando...
A página está carregando...
A página está carregando...
A página está carregando...
A página está carregando...
A página está carregando...
A página está carregando...
A página está carregando...
A página está carregando...
A página está carregando...
A página está carregando...
A página está carregando...
A página está carregando...
A página está carregando...
A página está carregando...
A página está carregando...
A página está carregando...
A página está carregando...
A página está carregando...
A página está carregando...
A página está carregando...
A página está carregando...
A página está carregando...
A página está carregando...
A página está carregando...
A página está carregando...
A página está carregando...
A página está carregando...
A página está carregando...
A página está carregando...
A página está carregando...
A página está carregando...
A página está carregando...
A página está carregando...
A página está carregando...
A página está carregando...
A página está carregando...
A página está carregando...
A página está carregando...
A página está carregando...
A página está carregando...
A página está carregando...
A página está carregando...
A página está carregando...
A página está carregando...
A página está carregando...
A página está carregando...
A página está carregando...
A página está carregando...
A página está carregando...
A página está carregando...
A página está carregando...
A página está carregando...
A página está carregando...
A página está carregando...
A página está carregando...
A página está carregando...
A página está carregando...
A página está carregando...
A página está carregando...
A página está carregando...
A página está carregando...
A página está carregando...
A página está carregando...
A página está carregando...
A página está carregando...
A página está carregando...
A página está carregando...
A página está carregando...
A página está carregando...
A página está carregando...
A página está carregando...
A página está carregando...
A página está carregando...
A página está carregando...
A página está carregando...
A página está carregando...
A página está carregando...
A página está carregando...
A página está carregando...
A página está carregando...
A página está carregando...
A página está carregando...
A página está carregando...
A página está carregando...
A página está carregando...
A página está carregando...
A página está carregando...
A página está carregando...
A página está carregando...
A página está carregando...
A página está carregando...
A página está carregando...
A página está carregando...
A página está carregando...
A página está carregando...
A página está carregando...
A página está carregando...
A página está carregando...
A página está carregando...
A página está carregando...
A página está carregando...
A página está carregando...
A página está carregando...
A página está carregando...
A página está carregando...
A página está carregando...
A página está carregando...
A página está carregando...
A página está carregando...
A página está carregando...
A página está carregando...
A página está carregando...
A página está carregando...
A página está carregando...
A página está carregando...
A página está carregando...
A página está carregando...
A página está carregando...
A página está carregando...
A página está carregando...
A página está carregando...
A página está carregando...
A página está carregando...
A página está carregando...
A página está carregando...
A página está carregando...
A página está carregando...
A página está carregando...
A página está carregando...
A página está carregando...
A página está carregando...
A página está carregando...
A página está carregando...
A página está carregando...
A página está carregando...
A página está carregando...
A página está carregando...
A página está carregando...
A página está carregando...
A página está carregando...
A página está carregando...
A página está carregando...
A página está carregando...
A página está carregando...
A página está carregando...
A página está carregando...
A página está carregando...
A página está carregando...
A página está carregando...
A página está carregando...
A página está carregando...
A página está carregando...
A página está carregando...
A página está carregando...
A página está carregando...
A página está carregando...
A página está carregando...
A página está carregando...
A página está carregando...
A página está carregando...
A página está carregando...
A página está carregando...
A página está carregando...
A página está carregando...
A página está carregando...
A página está carregando...
A página está carregando...
A página está carregando...
A página está carregando...
A página está carregando...
A página está carregando...
A página está carregando...
A página está carregando...
A página está carregando...
A página está carregando...
A página está carregando...
A página está carregando...
A página está carregando...
A página está carregando...
A página está carregando...
A página está carregando...
A página está carregando...
A página está carregando...
A página está carregando...
A página está carregando...
A página está carregando...
A página está carregando...
A página está carregando...
A página está carregando...
A página está carregando...
A página está carregando...
A página está carregando...
A página está carregando...
A página está carregando...
A página está carregando...
A página está carregando...
A página está carregando...
A página está carregando...
A página está carregando...
A página está carregando...
A página está carregando...
A página está carregando...
A página está carregando...
A página está carregando...
A página está carregando...
A página está carregando...
A página está carregando...
A página está carregando...
A página está carregando...
A página está carregando...
A página está carregando...
A página está carregando...
A página está carregando...
A página está carregando...
A página está carregando...
A página está carregando...
A página está carregando...
A página está carregando...
A página está carregando...
A página está carregando...
A página está carregando...
A página está carregando...
A página está carregando...
A página está carregando...
A página está carregando...
A página está carregando...
A página está carregando...
A página está carregando...
A página está carregando...
A página está carregando...
A página está carregando...
A página está carregando...
A página está carregando...
A página está carregando...
A página está carregando...
A página está carregando...
A página está carregando...
A página está carregando...
A página está carregando...
A página está carregando...
A página está carregando...
A página está carregando...
A página está carregando...
A página está carregando...
A página está carregando...
A página está carregando...
A página está carregando...
A página está carregando...
A página está carregando...
A página está carregando...
A página está carregando...
A página está carregando...
A página está carregando...
A página está carregando...
A página está carregando...
A página está carregando...
A página está carregando...
A página está carregando...
A página está carregando...
A página está carregando...
A página está carregando...
A página está carregando...
A página está carregando...
A página está carregando...
A página está carregando...
A página está carregando...
A página está carregando...
A página está carregando...
A página está carregando...
A página está carregando...
-
 1
1
-
 2
2
-
 3
3
-
 4
4
-
 5
5
-
 6
6
-
 7
7
-
 8
8
-
 9
9
-
 10
10
-
 11
11
-
 12
12
-
 13
13
-
 14
14
-
 15
15
-
 16
16
-
 17
17
-
 18
18
-
 19
19
-
 20
20
-
 21
21
-
 22
22
-
 23
23
-
 24
24
-
 25
25
-
 26
26
-
 27
27
-
 28
28
-
 29
29
-
 30
30
-
 31
31
-
 32
32
-
 33
33
-
 34
34
-
 35
35
-
 36
36
-
 37
37
-
 38
38
-
 39
39
-
 40
40
-
 41
41
-
 42
42
-
 43
43
-
 44
44
-
 45
45
-
 46
46
-
 47
47
-
 48
48
-
 49
49
-
 50
50
-
 51
51
-
 52
52
-
 53
53
-
 54
54
-
 55
55
-
 56
56
-
 57
57
-
 58
58
-
 59
59
-
 60
60
-
 61
61
-
 62
62
-
 63
63
-
 64
64
-
 65
65
-
 66
66
-
 67
67
-
 68
68
-
 69
69
-
 70
70
-
 71
71
-
 72
72
-
 73
73
-
 74
74
-
 75
75
-
 76
76
-
 77
77
-
 78
78
-
 79
79
-
 80
80
-
 81
81
-
 82
82
-
 83
83
-
 84
84
-
 85
85
-
 86
86
-
 87
87
-
 88
88
-
 89
89
-
 90
90
-
 91
91
-
 92
92
-
 93
93
-
 94
94
-
 95
95
-
 96
96
-
 97
97
-
 98
98
-
 99
99
-
 100
100
-
 101
101
-
 102
102
-
 103
103
-
 104
104
-
 105
105
-
 106
106
-
 107
107
-
 108
108
-
 109
109
-
 110
110
-
 111
111
-
 112
112
-
 113
113
-
 114
114
-
 115
115
-
 116
116
-
 117
117
-
 118
118
-
 119
119
-
 120
120
-
 121
121
-
 122
122
-
 123
123
-
 124
124
-
 125
125
-
 126
126
-
 127
127
-
 128
128
-
 129
129
-
 130
130
-
 131
131
-
 132
132
-
 133
133
-
 134
134
-
 135
135
-
 136
136
-
 137
137
-
 138
138
-
 139
139
-
 140
140
-
 141
141
-
 142
142
-
 143
143
-
 144
144
-
 145
145
-
 146
146
-
 147
147
-
 148
148
-
 149
149
-
 150
150
-
 151
151
-
 152
152
-
 153
153
-
 154
154
-
 155
155
-
 156
156
-
 157
157
-
 158
158
-
 159
159
-
 160
160
-
 161
161
-
 162
162
-
 163
163
-
 164
164
-
 165
165
-
 166
166
-
 167
167
-
 168
168
-
 169
169
-
 170
170
-
 171
171
-
 172
172
-
 173
173
-
 174
174
-
 175
175
-
 176
176
-
 177
177
-
 178
178
-
 179
179
-
 180
180
-
 181
181
-
 182
182
-
 183
183
-
 184
184
-
 185
185
-
 186
186
-
 187
187
-
 188
188
-
 189
189
-
 190
190
-
 191
191
-
 192
192
-
 193
193
-
 194
194
-
 195
195
-
 196
196
-
 197
197
-
 198
198
-
 199
199
-
 200
200
-
 201
201
-
 202
202
-
 203
203
-
 204
204
-
 205
205
-
 206
206
-
 207
207
-
 208
208
-
 209
209
-
 210
210
-
 211
211
-
 212
212
-
 213
213
-
 214
214
-
 215
215
-
 216
216
-
 217
217
-
 218
218
-
 219
219
-
 220
220
-
 221
221
-
 222
222
-
 223
223
-
 224
224
-
 225
225
-
 226
226
-
 227
227
-
 228
228
-
 229
229
-
 230
230
-
 231
231
-
 232
232
-
 233
233
-
 234
234
-
 235
235
-
 236
236
-
 237
237
-
 238
238
-
 239
239
-
 240
240
-
 241
241
-
 242
242
-
 243
243
-
 244
244
-
 245
245
-
 246
246
-
 247
247
-
 248
248
-
 249
249
-
 250
250
-
 251
251
-
 252
252
-
 253
253
-
 254
254
-
 255
255
-
 256
256
-
 257
257
-
 258
258
-
 259
259
-
 260
260
-
 261
261
-
 262
262
-
 263
263
-
 264
264
-
 265
265
-
 266
266
-
 267
267
-
 268
268
-
 269
269
-
 270
270
-
 271
271
-
 272
272
-
 273
273
-
 274
274
-
 275
275
-
 276
276
-
 277
277
-
 278
278
-
 279
279
-
 280
280
-
 281
281
-
 282
282
-
 283
283
-
 284
284
-
 285
285
-
 286
286
-
 287
287
-
 288
288
-
 289
289
-
 290
290
-
 291
291
-
 292
292
-
 293
293
-
 294
294
-
 295
295
-
 296
296
-
 297
297
-
 298
298
-
 299
299
-
 300
300
-
 301
301
-
 302
302
-
 303
303
-
 304
304
-
 305
305
-
 306
306
-
 307
307
-
 308
308
-
 309
309
-
 310
310
-
 311
311
-
 312
312
-
 313
313
-
 314
314
-
 315
315
-
 316
316
-
 317
317
-
 318
318
-
 319
319
-
 320
320
-
 321
321
-
 322
322
-
 323
323
-
 324
324
-
 325
325
-
 326
326
-
 327
327
-
 328
328
-
 329
329
-
 330
330
-
 331
331
-
 332
332
-
 333
333
-
 334
334
-
 335
335
-
 336
336
-
 337
337
-
 338
338
-
 339
339
-
 340
340
-
 341
341
-
 342
342
-
 343
343
-
 344
344
-
 345
345
-
 346
346
-
 347
347
-
 348
348
-
 349
349
-
 350
350
-
 351
351
-
 352
352
-
 353
353
-
 354
354
-
 355
355
-
 356
356
-
 357
357
-
 358
358
-
 359
359
-
 360
360
-
 361
361
-
 362
362
-
 363
363
-
 364
364
-
 365
365
-
 366
366
-
 367
367
-
 368
368
-
 369
369
-
 370
370
-
 371
371
-
 372
372
-
 373
373
-
 374
374
-
 375
375
-
 376
376
-
 377
377
-
 378
378
-
 379
379
-
 380
380
-
 381
381
-
 382
382
-
 383
383
-
 384
384
-
 385
385
-
 386
386
-
 387
387
-
 388
388
-
 389
389
-
 390
390
-
 391
391
-
 392
392
-
 393
393
-
 394
394
-
 395
395
-
 396
396
-
 397
397
-
 398
398
-
 399
399
-
 400
400
-
 401
401
-
 402
402
-
 403
403
-
 404
404
-
 405
405
-
 406
406
-
 407
407
-
 408
408
-
 409
409
-
 410
410
-
 411
411
-
 412
412
-
 413
413
-
 414
414
-
 415
415
-
 416
416
-
 417
417
-
 418
418
-
 419
419
-
 420
420
-
 421
421
-
 422
422
-
 423
423
-
 424
424
-
 425
425
-
 426
426
-
 427
427
-
 428
428
-
 429
429
-
 430
430
-
 431
431
-
 432
432


em outras línguas
Artigos relacionados
Outros documentos
-
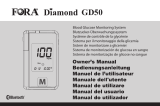 Fora Diamond GD50 Manual do proprietário
-
Accu-Chek Blood Glucose Meter Manual do usuário
-
iHealth Gluco+ BG5S Guia rápido
-
-
IBP TD-4222 Manual do proprietário
-
IBP TD 4313 Manual do proprietário
-
-
Terraillon WRIST BLOOD PRESSURE MONITORING Manual do usuário
-
Gima 23490 Manual do proprietário
-
Fora Blood Glucose Test Strip Instruções de operação
