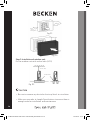
Becken AR COND MULTISPLIT 12x9 BAC4259 Manual do proprietário
- Categoria
- Condicionadores de ar de sistema split
- Tipo
- Manual do proprietário

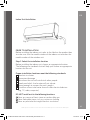
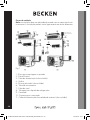
Multi Split Air Conditioner | Aire Acondicionado Multi Split | Ar Condicionado Multi Split
Aire Acondicionado Multi Split
Ar Condicionado Multi Split
Multi Split
Air Conditioner
BAC4259
BAC4306
AF Manual Instalacao MULTISPLIT 12x9 BAC4259_BAC4306 A5.indd 1 23/01/2019 12:00

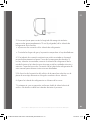
Dear client,
Thank you for purchasing this product.
The quality of this appliance has been certified by several
laboratory tests. This instructions manual is provided to
simplify the use of the appliance as well as to guarantee a
safe use.
Please read carefully the instructions and safety measures
described in this manual.
We sincerely hope you will be satisfied when using your new
appliance.
AF Manual Instalacao MULTISPLIT 12x9 BAC4259_BAC4306 A5.indd 2 23/01/2019 12:00

3
EN
Multi Split Air Conditioner | Aire Acondicionado Multi Split | Ar Condicionado Multi Split
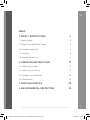
INDEX
1. SAFETY INSTRUCTIONS 4
1.1. Power Supply 5
1.2. Power Cord and Other Cables 5
1.3. Humidity and Water 5
1.4. Cleaning 6
1.5. General Precautions 6
2. OPERATING INSTRUCTIONS 12
2.1. Product Description 12
2.2. Indoor unit installation 13
2.3. Outdoor unit installation 33
2.4. Maintenance 73
3. POSTSALE SERVICE 78
4. ENVIRONMENTAL PROTECTION 78
AF Manual Instalacao MULTISPLIT 12x9 BAC4259_BAC4306 A5.indd 3 23/01/2019 12:00

4
1. SAFETY INSTRUCTIONS
Important Warnings
Before using your appliance read this instructions manual carefully and
keep it in a safe place as you may need to consult it in the future.
Before turning on your appliance, and to ensure a safe and correct
operation, do not use if:
• It has fallen to the ground;
• You notice any evidence of damage;
• Any anomaly occurs during its operation.
To avoid hazards or deterioration of your appliance through incorrect
use it is advisable to read these instructions thoroughly.
Your appliance may not be used for other purposes than the ones
intended and solely for household use. Any damage resulting from
using the appliance outside this scope, any incorrect use, as well as
any manual modifications to the product will not be covered and
automatically voids the warranty.
WARNING
RISK OF ELECTRIC SHOCK
DO NOT OPEN
Warning: to avoid the risk of electric shock, do not remove
the cover. The interior does not contain any parts that
can be repaired by the user. Ask for assistance from the
Customer Support Service.
AF Manual Instalacao MULTISPLIT 12x9 BAC4259_BAC4306 A5.indd 4 23/01/2019 12:00

5
EN
Multi Split Air Conditioner | Aire Acondicionado Multi Split | Ar Condicionado Multi Split
Assistance
In case of malfunction, take your appliance to a qualified technician for
assistance.
This appliance can be used by children from the age of 8 and by
people with reduced physical, sensorial or mental capabilities and/or
lack of experience and knowledge if they have been given instructions
on using the appliance safely and if they understand the hazards
involved. Children may not play with the appliance. Cleaning and
maintenance must not be carried out by children without supervision.
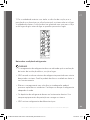
These instructions are also available at www.suporteworten.pt
1.1. Power Supply
Make sure the main voltage is compatible with the appliance’s. If this is
not the case please consult the Customer Support Service.
1.2. Power Cord and Other Cables
Do not tangle the cord or pull it to disconnect the appliance. Also, keep
the cord away from warm surfaces.
Never use the appliance if it has a damaged cable or socket.
Take it to the Technical Support Service for replacement.
1.3. Humidity and Water
Do not use your appliance in humid places. Do not allow the appliance
to become wet under any circumstances as this may be dangerous.
To avoid fire hazard or electric shock do not expose your appliance
to humidity or water. Furthermore, do not place your appliance under
water (e.g. for cleaning).
AF Manual Instalacao MULTISPLIT 12x9 BAC4259_BAC4306 A5.indd 5 23/01/2019 12:00

6
1.4. Cleaning
Before cleaning, be sure to switch o the appliance and remove the
plug from the main power supply. Always allow the unit to cool down
before cleaning.
To clean the exterior of the product, use a dry soft cloth only.
1.5. General Precautions
• Please follow the instructions in the user manual which will help you
to properly install and operate this product and enjoy its advanced
features. Please keep the instructions for future reference.
• Read all instructions before using the product.
• Maintenance and service operations are only to be carried out by
authorized professionals.
• Any damage caused by manual modifications to the product is not
covered by the warranty.
• If this product is used for other purposes than the ones originally
intended, or if it is not correctly connected, the product may become
damaged and the warranty will be voided.
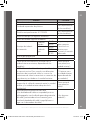
WARNING Failure to observe a warning may result in death.
The appliance must be installed in accordance with
national regulations.
CAUTION Failure to observe a caution may result in injury or
equipment damage.
This symbol indicates that you must never perform the
action indicated.
AF Manual Instalacao MULTISPLIT 12x9 BAC4259_BAC4306 A5.indd 6 23/01/2019 12:00

7
EN
Multi Split Air Conditioner | Aire Acondicionado Multi Split | Ar Condicionado Multi Split
WARNING
• In certain functional environments, such as kitchens, server rooms,
etc., the use of specially designed air-conditioning units is highly
recommended.
• Improper installation may result in electrical shock, short circuit,
leaks, fire or other damage to the equipment and personal property.
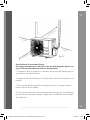
• Before you install the unit, consider strong winds, typhoons and
earthquakes that might aect your unit and locate it accordingly.
Failure to do so could cause the equipment to fail.
• The appliance shall be installed in accordance with national wiring
regulations.
• The unit must have an all-pole disconnection device with a
minimum 3 mm clearance in all poles, a leakage current that does
not exceed 10 mA, the residual current device (RCD) must have
a rated residual operating current not exceeding 30 mA, and the
unit’s disconnection must be incorporated in the fixed wiring in
accordance with wiring regulations.
• The unit’s disconnection must be incorporated with an all-pole
disconnection device in the fixed wiring in accordance with wiring
regulations.
• Maintenance and repair requiring the assistance of other skilled
personnel shall be carried out under the supervision of the person
competent in the use of flammable refrigerants.
• The appliance shall be stored so as to prevent mechanical damage
from occurring.
• Keep ventilation openings clear of obstruction.
AF Manual Instalacao MULTISPLIT 12x9 BAC4259_BAC4306 A5.indd 7 23/01/2019 12:00

8
• Do not turn on the power until all work has been completed.
• When moving or relocating the air conditioner, consult an
experienced service technicians to disconnect and reinstall it.
• Removal of the plug has to be such that an operator can check
from any of the points to which he has access that the plug remains
removed. If this is not possible, due to the unit’s construction or
installation, a disconnection with a locking system in the isolated
position shall be provided.
CAUTION
For units with an auxiliary electric heater, DO NOT install the unit
within 1 meter (3 feet) of any combustible materials.
DO NOT install the unit in a location that may be exposed to
combustible gas leaks. If combustible gas accumulates around the
unit, it may cause a fire.
DO NOT operate your air conditioner in a wet room such as a
bathroom or laundry room. Too much exposure to water can cause
electrical components to short circuit.
• The product must be properly grounded at the time of installation,
or electrical shock may occur.
• Install the drainage piping according to the instructions in this
manual. Improper drainage may cause water damage to your home
and property.
Cautions when using refrigerant in R32/R290 units
• Installation (Space)
− Installation of pipe-work shall be kept to a minimum.
− Pipe-work shall be protected from physical damage.
− Compliance with national gas regulations shall be observed.
AF Manual Instalacao MULTISPLIT 12x9 BAC4259_BAC4306 A5.indd 8 23/01/2019 12:00

9
EN
Multi Split Air Conditioner | Aire Acondicionado Multi Split | Ar Condicionado Multi Split
− Mechanical connections shall be accessible for maintenance
purposes.
− When mechanical ventilation is required, ventilation openings shall
be kept clear of obstruction.
− Properly dispose of the product according to national regulations.
− Store the unit in a well-ventilated area where the room size
corresponds to the room area as specified for operation.
− Spaces for refrigerant pipes shall be compliance with national gas
regulations.
• Servicing
− Any person involved with working on or breaking into a refrigerant
circuit should hold a current valid certificate from an industry-
accredited assessment authority, which authorizes their competence
to handle refrigerants safely in accordance with an industry
recognized assessment specification.
− Servicing shall only be performed as recommended by the
equipment manufacturer. Maintenance and repair requiring the
assistance of other skilled personnel shall be carried out under
the supervision of the person competent in the use of flammable
refrigerants.
• Do not use means to accelerate the defrosting process or to clean
other than those recommended by the manufacturer.
• The appliance shall be stored in a room without continuously
operating ignition sources (for example: open flames, an operating
gas appliance or an operating electric heater)
• Do not pierce or burn.
• Be aware that refrigerants may not contain an odour.
• Be aware not to let foreign matters (oil, water, etc) enter the piping.
Also, when storing the piping, securely seal the opening by pinching,
taping, etc.
AF Manual Instalacao MULTISPLIT 12x9 BAC4259_BAC4306 A5.indd 9 23/01/2019 12:00

10
• For indoor units, use R32 flareless joint assy only when connecting
the indoor unit and the connecting piping (when connecting
indoors). Use of pipes, flareless nut or flare nuts other than specified,
may cause product malfunction, burst piping or injury due to high
internal pressure of the refrigerant cycle caused by any inflow air.
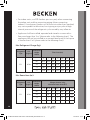
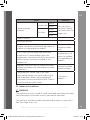
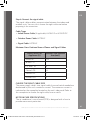
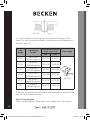
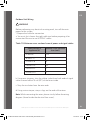
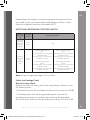
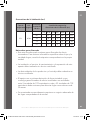
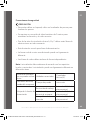
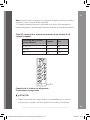
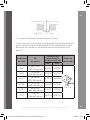
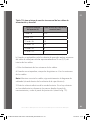
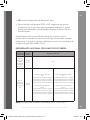
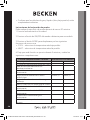
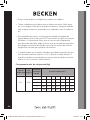
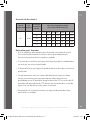
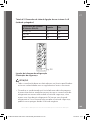
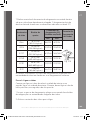
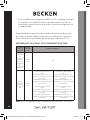
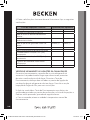
• Appliance shall be installed, operated and stored in a room with a
floor area larger than X m² (please refer to the following chart). The
appliance shall not be installed in an unventilated space if that space
is smaller than X m² (please refer to the following chart).
Max Refrigerant Charge (kg)
Refrigerant
Type
LFL
(kg/m3)
Installation
Height
H0(m)
Floor Area (m2)
R32 0.306
4 7 10 15 20 30 50
0.6 0.68 0.90 1.08 1.32 1.53 1.87 2.41
1.0 1.14 1.51 1.80 2.20 2.54 3.12 4.02
1.8 2.05 2.71 3.24 3.97 4.58 5.61 7.24
2.2 2.50 3.31 3.96 4.85 5.60 6.86 8.85
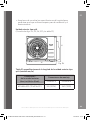
Min. Room Area (m2)
Refrigerant
Type
LFL
(kg/m3)
Installation
Height
H0(m)
Charge Amount in kg
Minimum Room Area (m2)
R32 0.306
1.224 1.836 2.448 3.672 4.896 6.12 7.956
0.6 29 51 116 206 321 543
1.0 10 19 42 74 116 196
1.8 3 6 13 23 36 60
2.2 2 4 9 15 24 40
AF Manual Instalacao MULTISPLIT 12x9 BAC4259_BAC4306 A5.indd 10 23/01/2019 12:00

11
EN
Multi Split Air Conditioner | Aire Acondicionado Multi Split | Ar Condicionado Multi Split
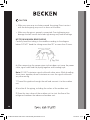
Note about Fluorinated Gasses
• This air conditioner contains fluorinated greenhouse gasses. For
specific information on the type and amount of gas, please refer to
the relevant label on the unit itself.
• Installation, service, maintenance and repair of this unit must be
performed by a certified technician.
• Product uninstallation and recycling must be performed by a
certified technician.
• Equipment with a leak-detection system installed and contain
fluorinated greenhouse gases in quantities between 5 tonnes of
CO2 equivalent or more and 50 tonnes of CO2 equivalent must be
checked for leaks at least every 24 months.
• It is strongly recommended to keep a proper record of checked unit
leaks.
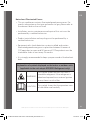
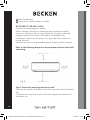
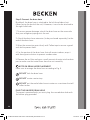
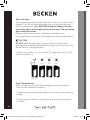
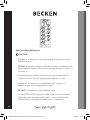
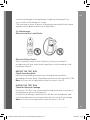
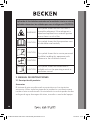
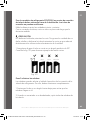
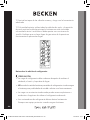
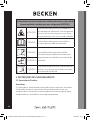
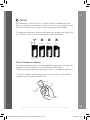
Explanation of symbols displayed on the indoor or outdoor units
(applicable to the unit adopts R32/R290 Refrigerant only):
WARNING
This symbol shows that this unit uses a
flammable refrigerant. If the refrigerant is
leaked and exposed to an external ignition
source, there is a risk of fire.
CAUTION This symbol shows that the operation man-
ual should be read carefully
AF Manual Instalacao MULTISPLIT 12x9 BAC4259_BAC4306 A5.indd 11 23/01/2019 12:00

12
2. OPERATING INSTRUCTIONS
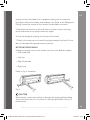
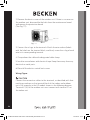
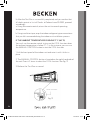
2.1. Product Description
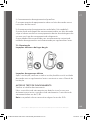
Accessories
The air conditioner system comes with the following accessories. Use
all the installation parts and accessories to install the air conditioner.
Improper installation may result in water leakage, electrical shock and
fire or equipment failure.
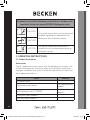
Explanation of symbols displayed on the indoor or outdoor units
(applicable to the unit adopts R32/R290 Refrigerant only):
CAUTION This symbol shows that a service personnel
should be handling this equipment with
reference to the installation manual.
CAUTION
CAUTION
This symbol shows that information is
available such as the operating manual or
installation manual.
Name Quantity
Installation plate 1
Plastic expansion sheath 5-8 (depending on
models)
Self-Tapping Screw A ST3.9X25 5-8 (depending on
models)
Drain joint (some models) 1
Seal ring (some models) 1
AF Manual Instalacao MULTISPLIT 12x9 BAC4259_BAC4306 A5.indd 12 23/01/2019 12:00

13
EN
Multi Split Air Conditioner | Aire Acondicionado Multi Split | Ar Condicionado Multi Split
2.2. Indoor unit installation
WARNING
The appliance must be stored in a well-ventilated area where the room
size corresponds to the room area as specified for operation.
The appliance shall be installed, operated and stored in a room with a
floor area larger than 4 m².
Name Quantity
Connecting pipe
assembly
Liquid side Ø6.35
Parts you must
purchase. Consult
a technician for the
proper size.
Ø9.52
Gas side
Ø9.52
Ø12.7
Ø15.9
Owner’s manual 1
Installation manual 1
Transfer connector (packed with the indoor or
outdoor unit, depending on models)
Optional part (one
piece/one indoor
unit)
NOTE: Pipe size may dier from appliance
to appliance. To meet dierent pipe size
requirements, sometimes the pipe connections
need a transfer connector installed on the
outdoor unit.
Optional part (1-5
pieces for outdoor
unit, depending on
models)
Magnetic ring (Hitch on the connective cable
between the indoor unit and outdoor unit after
installation.)
Optional part(one
piece/one cable)
Cord protection rubber ring (If the cord
clamp cannot fasten on a small cord, use the
cord protection rubber ring [supplied with
accessories] to wrap around the cord. Then fix
it in place with the cord clamp.)
1 (on some
models)
AF Manual Instalacao MULTISPLIT 12x9 BAC4259_BAC4306 A5.indd 13 23/01/2019 12:00

14
The appliance shall not be installed in an unventilated space, if that
space is smaller than 4 m².
For R290 refrigerant models, the room where the appliance is installed
should have the following minimum size:
• ≤ 9000 Btu/h units: 13 m²
• > 9000 B tu/h and ≤12 000 Btu/h units: 17 m²
• > 12 000 Btu/h and ≤18 000 Btu/h units: 26 m²
• > 18 000 Btu/h and ≤24 000 Btu/h units: 35 m²
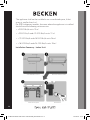
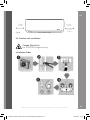
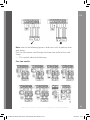
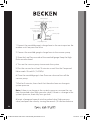
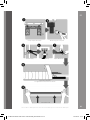
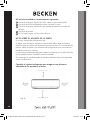
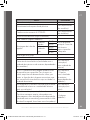
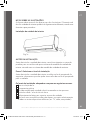
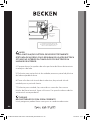
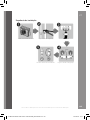
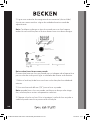
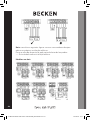
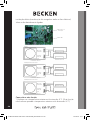
Installation Summary - Indoor Unit
Select Installation Location
2,3m (90,55in)
15cm (5,9in)
12cm
(4,75in) 12cm
(4,75in)
Determine Wall Hole Position
Drill Wall HoleAttach Mounting Plate
AF Manual Instalacao MULTISPLIT 12x9 BAC4259_BAC4306 A5.indd 14 23/01/2019 12:00

15
EN
Multi Split Air Conditioner | Aire Acondicionado Multi Split | Ar Condicionado Multi Split
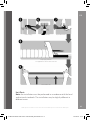
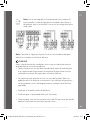
Connect Piping Connect Wiring
Wrap Piping and Cable
(not applicable for some locations in the US)
Mount Indoor Unit
Prepare Drain Hose
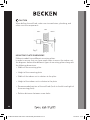
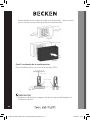
Unit Parts
Note: the installation must be performed in accordance with the local
and national standards. The installation may be slightly dierent in
dierent areas.
AF Manual Instalacao MULTISPLIT 12x9 BAC4259_BAC4306 A5.indd 15 23/01/2019 12:00

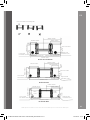
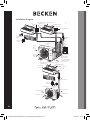
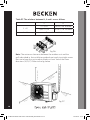
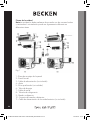
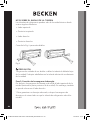
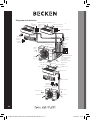
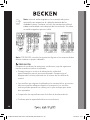
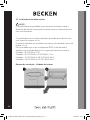
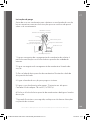
16
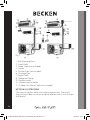
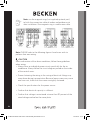
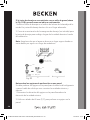
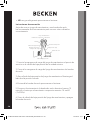
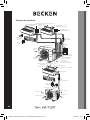
Fig. 1
Air-break switch
1 - Wall Mounting Plate
2 - Front Panel
3 - Power Cable (not included)
4 - Louver
5 - Purifier Filter (not included)
6 - Drainage Pipe
7 - Signal Cable
8 - Refrigerant Piping
9 - Remote control
10 - Remote control Holder
11 - Outdoor Unit Power Cable (not included)
NOTE ON ILLUSTRATIONS
This manual’s figures are for illustration purposes only. The actual
shape of your indoor unit may be slightly dierent, but its actual shape
shall prevail.
AF Manual Instalacao MULTISPLIT 12x9 BAC4259_BAC4306 A5.indd 16 23/01/2019 12:00

17
EN
Multi Split Air Conditioner | Aire Acondicionado Multi Split | Ar Condicionado Multi Split
Indoor Unit Installation
Fig. 1a
PRIOR TO INSTALLATION
Before installing the indoor unit, refer to the label on the product box
to make sure that the model number of the indoor unit matches the
model number of the outdoor unit.
Step 1: Select the installation location
Before installing the indoor unit, choose an appropriate location.
The following are standards that will help you choose an appropriate
location for the unit.
Proper installation locations meet the following standards:
Good air circulation
Convenient drainage
Noise from the unit will not disturb other people
Steady and solid - the location will not vibrate
Strong enough to support the unit’s weight
A location at least one meter from all other electrical devices
(e.g., TV, radio, computer)
DO NOT install unit in the following locations:
Near any source of heat, steam or combustible gas
Near flammable items such as curtains or clothing
Near any obstacle that might block air circulation
AF Manual Instalacao MULTISPLIT 12x9 BAC4259_BAC4306 A5.indd 17 23/01/2019 12:00

18
Near the doorway
In a location subject to direct sunlight
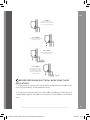
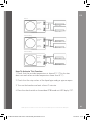
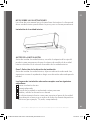
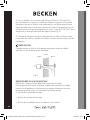
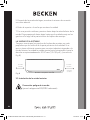
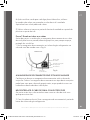
NOTE ABOUT THE WALL HOLE:
If there is no fixed refrigerant piping:
While choosing a location, be aware that you should leave ample
room for a wall hole (refer to step 3 below) for the signal cable and
refrigerant piping that connect the indoor and outdoor units.
The default position for all piping is the right side of the indoor unit
(facing the unit).
However, the unit can accommodate piping to both the left and right.
Refer to the following diagram to ensure proper distance from walls
and ceiling:
Fig. 1b
15cm (5,9in) or more
2,3m (90.55in) or more
12cm (4,75in)
or more
12cm (4,75in)
or more
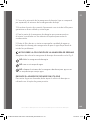
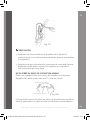
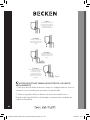
Step 2: Attach the mounting plate to the wall
The mounting plate is the device onto which you will mount the indoor
unit.
1. Remove the screw that attaches the mounting plate to the back of
the indoor unit.
AF Manual Instalacao MULTISPLIT 12x9 BAC4259_BAC4306 A5.indd 18 23/01/2019 12:00

19
EN
Multi Split Air Conditioner | Aire Acondicionado Multi Split | Ar Condicionado Multi Split
2. Place the mounting plate against the wall in a location that meets
the standards in step 1 above (see the Mounting Plate Dimensions for
detailed information on mounting plate sizes).
3. Drill holes to mount the screws in places that:
• have studs and can support the unit’s weight
• correspond to screw holes in the mounting plate
4. Secure the mounting plate to the wall with the screws provided.
5. Make sure that mounting plate is flat against the wall.
NOTE FOR CONCRETE OR BRICK WALLS:
If the wall is made of brick, concrete or a similar material, drill 5 mm-
diameter (0.2 in-diameter) holes in the wall and insert the sleeve
anchors provided. Then secure the mounting plate to the wall by
tightening the screws directly into the clip anchors.
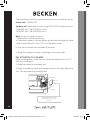
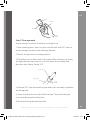
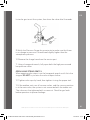
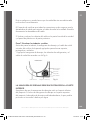
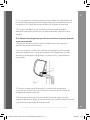
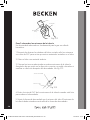
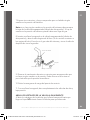
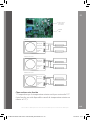
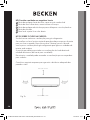
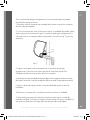
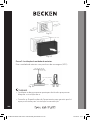
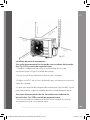
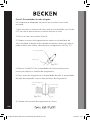
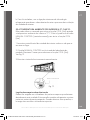
Step 3: Drill the wall hole to connect the piping
You must drill a hole in the wall for refrigerant piping, the drainage pipe,
and the signal cable that will connect the indoor and outdoor units.
1. Determine the location of the wall hole based on the position of the
mounting plate. Refer to the Mounting Plate Dimensions on the next
page to help you determine the optimal position. The wall hole should
have a minimum 65 mm (2.5 in) diameter, and at a slightly lower angle
to facilitate drainage.
2. Using a 65 mm (2.5 in) or 90 mm (3.54 in) (depending on models)
core drill, drill a hole in the wall. Make sure the hole is drilled at a slight
downward angle, so that the outdoor end of the hole is lower than
the indoor end by about 5 mm to 7 mm (0.2-0.27 in). This will ensure
proper water drainage (see Fig. 2).
3. Place the protective wall cu in the hole. This protects the edges of
the hole and will help seal it when you finish the installation process.
AF Manual Instalacao MULTISPLIT 12x9 BAC4259_BAC4306 A5.indd 19 23/01/2019 12:00

20
CAUTION
When drilling the wall hole, make sure to avoid wires, plumbing, and
other sensitive components.
Fig. 2
Indoor Outdoor
Wall
5-7mm
(0,2-0,7in)
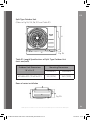
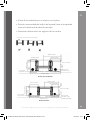
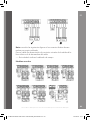
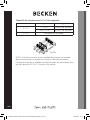
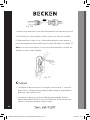
MOUNTING PLATE DIMENSIONS
Dierent models have dierent mounting plates.
In order to ensure that you have ample room to mount the indoor unit,
the diagrams below show dierent types of mounting plates along with
the following dimensions:
• Width of the mounting plate
• Height of the mounting plate
• Width of the indoor unit in relation to the plate
• Height of the indoor unit in relation to the plate
• Recommended position of the wall hole (both to the left and right of
the mounting plate)
• Relative distances between screw holes
AF Manual Instalacao MULTISPLIT 12x9 BAC4259_BAC4306 A5.indd 20 23/01/2019 12:00
A página está carregando...
A página está carregando...
A página está carregando...
A página está carregando...
A página está carregando...
A página está carregando...
A página está carregando...
A página está carregando...
A página está carregando...
A página está carregando...
A página está carregando...
A página está carregando...
A página está carregando...
A página está carregando...
A página está carregando...
A página está carregando...
A página está carregando...
A página está carregando...
A página está carregando...
A página está carregando...
A página está carregando...
A página está carregando...
A página está carregando...
A página está carregando...
A página está carregando...
A página está carregando...
A página está carregando...
A página está carregando...
A página está carregando...
A página está carregando...
A página está carregando...
A página está carregando...
A página está carregando...
A página está carregando...
A página está carregando...
A página está carregando...
A página está carregando...
A página está carregando...
A página está carregando...
A página está carregando...
A página está carregando...
A página está carregando...
A página está carregando...
A página está carregando...
A página está carregando...
A página está carregando...
A página está carregando...
A página está carregando...
A página está carregando...
A página está carregando...
A página está carregando...
A página está carregando...
A página está carregando...
A página está carregando...
A página está carregando...
A página está carregando...
A página está carregando...
A página está carregando...
A página está carregando...
A página está carregando...
A página está carregando...
A página está carregando...
A página está carregando...
A página está carregando...
A página está carregando...
A página está carregando...
A página está carregando...
A página está carregando...
A página está carregando...
A página está carregando...
A página está carregando...
A página está carregando...
A página está carregando...
A página está carregando...
A página está carregando...
A página está carregando...
A página está carregando...
A página está carregando...
A página está carregando...
A página está carregando...
A página está carregando...
A página está carregando...
A página está carregando...
A página está carregando...
A página está carregando...
A página está carregando...
A página está carregando...
A página está carregando...
A página está carregando...
A página está carregando...
A página está carregando...
A página está carregando...
A página está carregando...
A página está carregando...
A página está carregando...
A página está carregando...
A página está carregando...
A página está carregando...
A página está carregando...
A página está carregando...
A página está carregando...
A página está carregando...
A página está carregando...
A página está carregando...
A página está carregando...
A página está carregando...
A página está carregando...
A página está carregando...
A página está carregando...
A página está carregando...
A página está carregando...
A página está carregando...
A página está carregando...
A página está carregando...
A página está carregando...
A página está carregando...
A página está carregando...
A página está carregando...
A página está carregando...
A página está carregando...
A página está carregando...
A página está carregando...
A página está carregando...
A página está carregando...
A página está carregando...
A página está carregando...
A página está carregando...
A página está carregando...
A página está carregando...
A página está carregando...
A página está carregando...
A página está carregando...
A página está carregando...
A página está carregando...
A página está carregando...
A página está carregando...
A página está carregando...
A página está carregando...
A página está carregando...
A página está carregando...
A página está carregando...
A página está carregando...
A página está carregando...
A página está carregando...
A página está carregando...
A página está carregando...
A página está carregando...
A página está carregando...
A página está carregando...
A página está carregando...
A página está carregando...
A página está carregando...
A página está carregando...
A página está carregando...
A página está carregando...
A página está carregando...
A página está carregando...
A página está carregando...
A página está carregando...
A página está carregando...
A página está carregando...
A página está carregando...
A página está carregando...
A página está carregando...
A página está carregando...
A página está carregando...
A página está carregando...
A página está carregando...
A página está carregando...
A página está carregando...
A página está carregando...
A página está carregando...
A página está carregando...
A página está carregando...
A página está carregando...
A página está carregando...
A página está carregando...
A página está carregando...
A página está carregando...
A página está carregando...
A página está carregando...
A página está carregando...
A página está carregando...
A página está carregando...
A página está carregando...
A página está carregando...
A página está carregando...
A página está carregando...
A página está carregando...
A página está carregando...
A página está carregando...
A página está carregando...
A página está carregando...
A página está carregando...
A página está carregando...
A página está carregando...
A página está carregando...
A página está carregando...
A página está carregando...
A página está carregando...
A página está carregando...
A página está carregando...
A página está carregando...
A página está carregando...
A página está carregando...
A página está carregando...
A página está carregando...
A página está carregando...
A página está carregando...
A página está carregando...
A página está carregando...
A página está carregando...
A página está carregando...
A página está carregando...
A página está carregando...
A página está carregando...
A página está carregando...
A página está carregando...
A página está carregando...
A página está carregando...
A página está carregando...
A página está carregando...
A página está carregando...
A página está carregando...
-
 1
1
-
 2
2
-
 3
3
-
 4
4
-
 5
5
-
 6
6
-
 7
7
-
 8
8
-
 9
9
-
 10
10
-
 11
11
-
 12
12
-
 13
13
-
 14
14
-
 15
15
-
 16
16
-
 17
17
-
 18
18
-
 19
19
-
 20
20
-
 21
21
-
 22
22
-
 23
23
-
 24
24
-
 25
25
-
 26
26
-
 27
27
-
 28
28
-
 29
29
-
 30
30
-
 31
31
-
 32
32
-
 33
33
-
 34
34
-
 35
35
-
 36
36
-
 37
37
-
 38
38
-
 39
39
-
 40
40
-
 41
41
-
 42
42
-
 43
43
-
 44
44
-
 45
45
-
 46
46
-
 47
47
-
 48
48
-
 49
49
-
 50
50
-
 51
51
-
 52
52
-
 53
53
-
 54
54
-
 55
55
-
 56
56
-
 57
57
-
 58
58
-
 59
59
-
 60
60
-
 61
61
-
 62
62
-
 63
63
-
 64
64
-
 65
65
-
 66
66
-
 67
67
-
 68
68
-
 69
69
-
 70
70
-
 71
71
-
 72
72
-
 73
73
-
 74
74
-
 75
75
-
 76
76
-
 77
77
-
 78
78
-
 79
79
-
 80
80
-
 81
81
-
 82
82
-
 83
83
-
 84
84
-
 85
85
-
 86
86
-
 87
87
-
 88
88
-
 89
89
-
 90
90
-
 91
91
-
 92
92
-
 93
93
-
 94
94
-
 95
95
-
 96
96
-
 97
97
-
 98
98
-
 99
99
-
 100
100
-
 101
101
-
 102
102
-
 103
103
-
 104
104
-
 105
105
-
 106
106
-
 107
107
-
 108
108
-
 109
109
-
 110
110
-
 111
111
-
 112
112
-
 113
113
-
 114
114
-
 115
115
-
 116
116
-
 117
117
-
 118
118
-
 119
119
-
 120
120
-
 121
121
-
 122
122
-
 123
123
-
 124
124
-
 125
125
-
 126
126
-
 127
127
-
 128
128
-
 129
129
-
 130
130
-
 131
131
-
 132
132
-
 133
133
-
 134
134
-
 135
135
-
 136
136
-
 137
137
-
 138
138
-
 139
139
-
 140
140
-
 141
141
-
 142
142
-
 143
143
-
 144
144
-
 145
145
-
 146
146
-
 147
147
-
 148
148
-
 149
149
-
 150
150
-
 151
151
-
 152
152
-
 153
153
-
 154
154
-
 155
155
-
 156
156
-
 157
157
-
 158
158
-
 159
159
-
 160
160
-
 161
161
-
 162
162
-
 163
163
-
 164
164
-
 165
165
-
 166
166
-
 167
167
-
 168
168
-
 169
169
-
 170
170
-
 171
171
-
 172
172
-
 173
173
-
 174
174
-
 175
175
-
 176
176
-
 177
177
-
 178
178
-
 179
179
-
 180
180
-
 181
181
-
 182
182
-
 183
183
-
 184
184
-
 185
185
-
 186
186
-
 187
187
-
 188
188
-
 189
189
-
 190
190
-
 191
191
-
 192
192
-
 193
193
-
 194
194
-
 195
195
-
 196
196
-
 197
197
-
 198
198
-
 199
199
-
 200
200
-
 201
201
-
 202
202
-
 203
203
-
 204
204
-
 205
205
-
 206
206
-
 207
207
-
 208
208
-
 209
209
-
 210
210
-
 211
211
-
 212
212
-
 213
213
-
 214
214
-
 215
215
-
 216
216
-
 217
217
-
 218
218
-
 219
219
-
 220
220
-
 221
221
-
 222
222
-
 223
223
-
 224
224
-
 225
225
-
 226
226
-
 227
227
-
 228
228
-
 229
229
-
 230
230
-
 231
231
-
 232
232
-
 233
233
-
 234
234
-
 235
235
-
 236
236
-
 237
237
-
 238
238
-
 239
239
-
 240
240
-
 241
241
-
 242
242
-
 243
243
-
 244
244


Becken AR COND MULTISPLIT 12x9 BAC4259 Manual do proprietário
- Categoria
- Condicionadores de ar de sistema split
- Tipo
- Manual do proprietário
em outras línguas
Artigos relacionados
-
Becken BAC4256 BAC 4257 BAC4258 BAC4300 9000BTU Manual do proprietário
-
-
-
-
-
-
-
-
-
Outros documentos
-
 Kaysun Aquantia KHPS-MO HT Manual do usuário
-
HTW MULTISPLIT IX21D4 Guia de instalação
-
Infiniton SPLIT-BL3827 Manual do proprietário
-
EAS ELECTRIC MAJESTIC25K Manual do usuário
-
Infiniton SPTQS09A3W Manual do proprietário
-
-
-
Hisense R32 Air Conditioner Manual do usuário
-
Infiniton SPLIT-3908TP Manual do proprietário
