Maxell HUM2200 Manual do usuário
- Categoria
- Umidificadores
- Tipo
- Manual do usuário

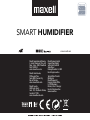
MODEL: HUM2200
POMANUAL DE USO
HUFELHASZNÁLÓI KÉZIKÖNYV
ESMANUAL DE USUARIO
ENUSER’S MANUAL
SMART HUMIDIFIER

CONTENT
Points for Attention
Product Overview
Specifications
Function Instruction
Works With Maxell Smart APP
Maintenance
FAQ
EN

Warning
01
POINTS FOR ATTENTION
Before using, please read this user manual carefully and keep it for future reference.
1. To avoid electric shock and fire, do not allow water, liquid or any flammable detergent to get into or
to clean the product.
2. Do not spray insecticide, perfume or other flammable spray around the products.
3. Before connecting the power supply, please check whether the voltage of the product is consistent
with the local power supply voltage.
4. This product can not replace normal ventilation, daily dust collection or oil pumping when cooking.
5. Ensure the product is used in condition of a stable and horizontal level.
6. Leave at least 30cm of space on the back and sides of the product, and at least 50cm of space
above the product when using.
7. Ensure both the filter and its cover are properly installed before using.
8. Do not insert finger or other things into the air outlet/inlet to prevent physical damage or trouble.
EN

02
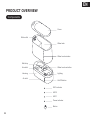
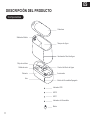
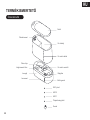
Components
PRODUCT OVERVIEW
Mist outlet
Cover
Water tank
Water level window
Water level controller
Lighting
On/Off button
LED2
LED1
Power indicator
Button
Housing
Air outlet
Mist chip
Air inlet
WiFi indicator
EN

03
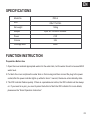
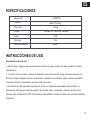
SPECIFICATIONS
FUNCTION INSTRUCTION
Preparation Before Use
1. Open the cover and add appropriate water into the water tank, but the water should not exceed MAX
water level.
2. Put back the cover and place the water tank on the housing and then connect the plug to the power
socket,after the power indicator lights up white for about 1 second, the device enters standby state.
3. The WiFi indicator flashes quickly. If there is a paired device before, the WiFi indicator will be always
on. If you need to re-pair, you need to press the button to flash the WiFi indicator.For more details,
please see the “Smart Operation Instruction”.
Model No
Size
Net weight
Adapter
Power
Volume
Coverage area
PRO-4
205x117x218m
1.42kg
Input: AC 100-240V 50/60HZ
21W
≤20m2
2.2L
EN

04
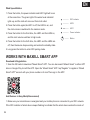
1. Press the button, the power indicator and LED1 light will be on
at the same time. The green light of the water level indicator l
ights up, and the mist will come out from mist outlet.
2. Press the button again,the LED1 is off, the LED2 is on, and
the mist volume is switched to the medium mode.
3. Press the button for the third time, the LED1 and the LED2 on,
and the mist volume switches to high mode.
4. Press the button for the forth time, the LED1 and the LED2 are
off, then the device stops working and enters the standby state.
5. Long press the button to enter WiFi pairing mode
Wind Speed Button
If the WiFi indicator of smart device keeps flashing to indicate that the smart device enters the mode of
1. Make sure your smart device is energized and your mobile phone is connected to your WiFi network.
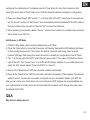
Add Devices in Easy Mode(Recommend)
WORKS WITH MAXELL SMART APP
Download & Registration
LED2
LED1
Power indicator
Button
WiFi indicator
EN
1. Scan the QR code to download “Maxell Smart” APP. You can also search“Maxell Smart” in either APP
store or Google Play to instll the APP. Open the “Maxell Smart” APP. tap“Register” to register a "Maxell
Smart” APP" account with your phone number or E-mai.Then sign in the APP.

05
2. Open your “Maxell Smart” APP and tap “+” on the top right of the APP. Select type of service device,
tap “All devices” and turn to” Add Device", then automatically fetch the password of the WiF inetwork
that your mobile phone connects to.Then tap “OK” to connect to the device.
3. When appearing “Successfully added 1 device”, it means the connection is complete and your device
will be listed in your APP list.
configuring the mobile phone; if not,please press the Timer button for more than 5 seconds, after
hearing the smart devices "beep",then loose it and this means the device is already for configuration.
Add Devices in AP Mode
Why falled in adding device?
Q&A
1. If failed in Easy Mode, users could also add devices in AP Mode.
2. Press the Timer button for more than 5 seconds until hearing "beep'and the WiFiindicator light begin
to flash quickly,then press the Timer button for another 5 seconds until haring “beep” and the
indicator light begin flash slowly,this means the device is already for configuration in the AP Mode.
3. Tap “+”on the top right of the APP. Select Device Type and tap it. Then select “AP Mode”on the top
right of the APP. Tap “Connect now” to go to the WLAN Settings interface in your mobile phone and
select the WiFi network named “Smar Life XXXX” to connect it.
Now you can control your smart device via your mobile phone APP anytime and anywhere(Make sure
your mobile phone and smart device are all connected to the network,and to change the router name
into Maxell Smart XXX).
4. Return to the “Maxell Smart” APP,the connection willstart automatically.
5. Retun to the “Maxell Smart” APP,the connection will start automatically. When appears “Successully
added 1 device”, it means the connection is complete and your devicewill b listed in your APP list.
EN

06
3. Make sure the device is ready for configuration.Please refer to the Product Instruction “Add Devices
in Easy Mode” or “Add Devices in AP Mode” for details.
4. Make sure the connected devices have not reached the maximum number of WiFi router. If not,
please disconnect the network of some devices.
5. Make sure password of the WiFi network is correct when adding new device.
6. Make sure you have not used any Chinese Characters to name your WiFi network.
1. Make sure the device is powered on and close to your moble phone when adding device.
2. Make sure your mobile phone is connected to the WiFi network and your WiFi router is working
properly.
Can I control device with 2G/3G/4G/5G network?
When adding device for the frst time, it requires that your mobl phone and dvice are connected to the
same WiFi network.After adding device successfly, you can remote control your device with 2G/3G/4G/
5G network.
How can I share my device with others?
Open your Maxell Smart App, select your device and tap the buton in the top right corner. Tap "Shared
devices' and"Add sharing,then select the"country/region"where the account belongs to and input the "
Account number(a phone number or an E-mail address)you want to share with.(Please make sure the
phone number or E-mail is registered.)
How can I manager the device shared by others?
Open your Maxell Smart App and you can operate the device by tapping the product in the"Shared device I
received" on the home page.
How to remove device?
EN

07
Method 1:
Press the Timer/WiFi buton for more than 5 seconds,you wil hear “beep”, it means the device is
removed, and the WiFi indicator light begin to flash quickly again.
Method 2:
Open your “Maxell Smart”APP,select your device and tap the button in the top right corner.Tap “More”.
Then tap the “Remove Device” in the bottom, the WiFi indicator light begin to flash quicky again.
1. If the water tank is short of water, the power indicator will light in red for reminder.
2. When the product is automatically supplying the water, the power indicator will flash
white light. 3. The device will automatically add water to the water tank of the housing under working
condition,while it will automatically stop working when the water runs out;
4. Under working condition, the mist will be paused and the power indicator will light red when you lift
up the water tank. But it will mist normally and return to the previous working state when you put it
back.
1. Please do not to rinse the device with water to prevent the water from damaging the machine.
2. Note that the magnet surface of the water valve at the bottom of the water tank should be kept clean,
and avoid adsorbing foreign object. Otherwise, the machine may not work properly.
1. DO NOT put or use where your children and pet cantouch.
2. DO NOT pull the plug when your hands are wet.
3. DO NOT block off the air inlet and air outlet.
4. DO NOT let it work if no water in the water tank.Please pull the plug when not in use.
5. If abnormality happens when using, DO NOT dismantleand repair by yourself. Please unplug the
power andcontact with local manufactu.
Notice
Safety warning
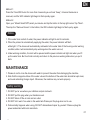
MAINTENANCE
EN

1. Clean tap water or pure water in normal temperature is available for this product.
2. Place the product in a horizontal place before using.
3. Pour out the water after using, otherwise it will cause trouble and bacteria.
4. Unplug if the machine is not use for a long time.
5. The machine will produce mist when working, so please stay away from valuable goods or
appliances.
6. DO NOT operate if no water to avoid machine failure.
7. DO NOT directly add water to the water tank of housing ,in particular, Do NOT add water from the
air outlet.
Attention
Clean
1. Ensure the machine is power-off and unplugged.
2. Take out the filter and clean the dust adsorbed on the outer surface of the filter.
3. Use a soft cloth with neutral cleanser to clean away any dust or debris from the surface of the
machine and air inlet/outlet.
4. After the machine completely dry out, put on the bag and place it in a cool and well-ventilated place.
1. Turn off the machine and unplug the power supply, arrange and bundle the power cord.
2. Take out the filter and clean the dust adsorbed on the outer surface of the filter.
3. Clean the air inlet/outlet, wipe the body with a neutral detergent and a soft cloth
4. After the machine is completely dried, put on a dust cover/bag and place it in a well-ventilated place
not exposed to direct sunlight.
5. If you do not use it for a long time, please turn on the machine for a few minutes from time to time to
ensure a good performance.
Store
Notice: Please don’t drop any water into the machine when clean the air outlet.
08
EN

The device does
not work after
starting
Significant
noise
Please check whether the power is connected, if not ,please plug in the
power supply.
Check that the power line matches the product.
FAQ
If any abnormality happens during use, please stop using immediately and refer to the following “FAQ”
for preliminary checking.It is not limited to the following questions, if problems remain or other problems
arise, please contact the after sales service or local dealer for further assistance. In order to ensure
your benefit, please do not disassemble the machine by yourself except professional technicians, so as
not to cause unnecessary loss.
TROUBLES COUNTERMEASURES
09
Make sure the water in the humidifier is adequate. Add some water if the
water is not enough.
Please make sure the water in the container is adequate.
Please clean the mist chip if it is contaminated.
Please make sure there is no dislocation of covers. Otherwise
the mist can not be transmitted to the mist outlet.
EN

CONTENIDO
Importantes Instrucciones
Descripción del Producto
Especificaciones
Instrucciones de Uso
Trabaja con la Aplicación
Mantenimiento
Preguntas Frecuentes
ES

Advertencia
10
IMPORTANTES INSTRUCCIONES DE SEGURIDAD
Antes de usar, lea atentamente este manual de usuario y consérvelo para consultarlo en el futuro.
1. Para evitar descargas eléctricas e incendios, no permita que entre agua, líquido o cualquier detergente
inflamable en el producto, ni lo use para limpiar el producto.
2. No rocíe insecticida, perfume u otro aerosol inflamable alrededor del producto.
3. Antes de conectar la fuente de alimentación, compruebe si el voltaje del producto es constante
con la tensión de alimentación local.
4. Este producto no puede reemplazar la ventilación normal, la recolección diaria de polvo o la
extracción de aceite al cocinar.
5. Asegúrese de que el producto se utilice sobre una superficie estable a un nivel horizontal.
6. Deje al menos 30 cm de espacio en la parte posterior y los lados del producto, y al menos 50 cm de
espacio arriba del producto.
7. Asegúrese de que tanto el filtro como su cubierta estén instalados correctamente antes de usarlos.
8. No inserte los dedos u otras cosas en la entrada / salida de aire para evitar daños físicos o problemas.
ES

11
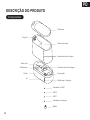
Componentes
Salida de Niebla
Cobertura
Tanque de Agua
Ventana de Nivel de Agua
Control de Nivel de Agua
Iluminación
Botón de Encendido/Apagado
LED2
LED1
Indicador de Encendido
Botón
Cubierta
Salida de aire
Chip de neblina
Aire
Indicador WiFi
ES
DESCRIPCIÓN DEL PRODUCTO

12
ESPECIFICACIONES
INSTRUCCIONES DE USO
Preparación antes de uso
1. Abra la tapa y agregue agua apropiada en el tanque de agua, el agua no debe exceder el máximo
nivel de agua.
2. Vuelva a colocar la tapa y coloque el tanque de agua en la carcasa, luego conecte el enchufe a la
toma de corriente, después de que se encienda el indicador de encendido, espere aproximadamente
1 segundo mientras el dispositivo entra en modo de espera.
3. El indicador de Wifi parpadea rápidamente. Si hay un dispositivo emparejado anteriormente, el
indicador de Wifi siempre estará encendido. Si necesita volver a emparejar, presione el botón para
que parpadee el indicador de Wifi. Para obtener más detalles, consulte la “Instrucción de funcionamiento
inteligente”.
Modelo No
Tamaño
Peso neto
Voltaje
Poder
Volumen
Área de covertura
HUM2200
205x117x218m
1.42kg
Entrada: AC 100-240V 50/60HZ
21W
≤20m2
2.2L
ES

13
Botón de velocidad del viento
1. Asegúrese de que su dispositivo inteligente esté energizado y su teléfono móvil esté conectado a su
red WiFi. Si el indicador WiFi del dispositivo inteligente sigue parpadeando para indicar que el
TRABAJA CON LA APLICACIÓN MAXELL SMART
LED2
LED1
Power indicator
Button
WiFi indicator
ES
1. Presione el botón, el indicador de encendido y la luz LED1 se
encenderán al mismo tiempo. La luz verde del indicador de nivel de
agua se encenderá y la niebla saldrá por la salida de niebla.
2. Presione el botón nuevamente, el LED1 está apagado, el LED2
está encendido y el volumen de niebla cambia al modo medio.
3. Presione el botón por tercera vez, el LED1 y el LED2 se encien-
den, y el volumen de niebla cambia al modo alto.
4. Presione el botón por cuarta vez, el LED1 y el LED2 se apagan,
el dispositivo deja de funcionar y entra en modo de espera.
5. Mantenga presionado el botón para ingresar al modo de
emparejamiento Wifi.
Descarga y registro
1. Escanee el código QR para descargar la APLICACIÓN “Maxell Smart”. También puede buscar
"Maxell Smart" en cualquiera de las tiendas de aplicaciones o Google Play para instalar la APP. Abra
la aplicación "Maxell Smart". toque "Registrarse" para registrar una cuenta "Maxell Smart"
con su número de teléfono o E-mail. Luego inicie sesión en la APP.
Agregar dispositivos en modo fácil (recomendado)

14
Agregar dispositivos en modo AP
¿Por qué ha fallado la adición de un dispositivo?
PREGUNTAS Y RESPUESTAS
ES
dispositivo inteligente ingresa al modo de configuración del teléfono móvil; de lo contrario, presione el
botón del temporizador durante más de 5 segundos, después de escuchar el "bip" de los dispositivos
inteligentes, luego suéltelo y esto significa que el dispositivo ya está para la configuración.
2. Abra su APLICACIÓN "Maxell Smart" y toque "+" en la parte superior derecha de la APLICACIÓN.
Seleccione el tipo de dispositivo de servicio, toca "Todos los dispositivos" y cambia a "Agregar
dispositivo", luego busca automáticamente la contraseña de la red WiFi al que se conecta su teléfono
móvil. Luego, toque "Aceptar" para conectarse al dispositivo.
3. Cuando aparezca "1 dispositivo agregado con éxito", significa que la conexión está completa y su
dispositivo aparecerá en la lista de aplicaciones.
1. Si el modo fácil falla, los usuarios también pueden agregar dispositivos en modo AP.
2. Presione el botón del temporizador durante más de 5 segundos hasta que escuche un "pitido" y la
luz indicadora de Wifi comience a parpadear rápidamente, presione el botón del temporizador durante
otros 5 segundos hasta que escuche un "pitido" y la luz indicadora parpadee lentamente. esto
significa que el dispositivo está listo para la configuración en el modo AP.
3. Toque "+" en la parte superior derecha de la APLICACIÓN. Seleccione Tipo de dispositivo y
tóquelo. Luego seleccione "Modo AP" en la parte superior a la derecha de la APLICACIÓN. Toque
"Conectar ahora" para ir a la interfaz de configuración de WLAN en su teléfono móvil
4. Regrese a la APLICACIÓN “Maxell Smart”, la conexión se iniciará automáticamente.
5. Regrese a la APLICACIÓN "Maxell Smart", la conexión se iniciará automáticamente. Cuando
aparece "1 dispositivo agregado con éxito", significa que la conexión está completa y su dispositivo
aparecerá en la lista de aplicaciones.
Ahora puede controlar su dispositivo inteligente a través de la aplicación de su teléfono móvil en
cualquier momento y en cualquier lugar (asegúrese de que su teléfono móvil y dispositivo inteligente
estén conectados a la red y cambie el nombre del enrutador Wifi a Maxell Smart XXX).

15
ES
1. Asegúrese de que el dispositivo esté encendido y cerca de su teléfono móvil cuando agregue el
dispositivo.
2. Asegúrese de que su teléfono móvil esté conectado a la red Wifi y que su enrutador Wifi funcione
correctamente.
3. Asegúrese de que el dispositivo esté listo para la configuración. Consulte la instrucción del
producto "Agregar dispositivos en modo fácil" o "Agregar dispositivos en modo AP" para obtener más
detalles.
4. Asegúrese de que los dispositivos conectados no hayan alcanzado el número máximo permitido
en el enrutador Wifi. Si no es así, desconecte algunos dispositivos de la red.
5. Asegúrese de que la contraseña de la red Wifi sea correcta al agregar un nuevo dispositivo.
6. Asegúrese de no haber utilizado ningún carácter chino para nombrar su red Wifi.
¿Puedo controlar el dispositivo con una red 2G / 3G / 4G / 5G?
Al agregar un dispositivo por primera vez, es necesario que su teléfono móvil y su dispositivo estén
conectados a la misma red Wifi. Después de agregar el dispositivo con éxito, puede controlarlo a
distancia con la red 2G / 3G / 4G / 5G.
¿Cómo puedo compartir mi dispositivo con otras personas?
Abra su aplicación Maxell Smart, seleccione su dispositivo y toque el botón en la esquina superior
derecha. Toque "Dispositivos compartidos" y "Agregar", luego seleccione el "país / región" donde
está registrada la cuenta e ingrese el número de cuenta (un número de teléfono o una dirección de
correo electrónico) con la que desea compartir. (Asegúrese de que el número de teléfono o el correo
electrónico estén registrados).
¿Cómo puedo administrar el dispositivo compartido por otros?
Abra su aplicación Maxell Smart y opere el dispositivo tocando el producto en el "Dispositivo recibido
compartido I" en la página de inicio.
¿Cómo quitar el dispositivo?

16
Aviso
Advertencia
MAINTENANCE
ES
Método 1:
Presione el botón Timer / WiFi durante más de 5 segundos, escuchará un "bip", significa que el
dispositivo se quitó y la luz indicadora de WiFi comenzará a parpadear rápidamente.
Método 2:
Abra su aplicación "Maxell Smart", seleccione su dispositivo y toque el botón en la esquina superior
derecha. Toque "Más". Luego toque "Quitar dispositivo" en la parte inferior, la luz indicadora de Wifi
comenzará a parpadear rápidamente nuevamente
1. Si el tanque de agua tiene poca agua, el indicador de encendido se volverá rojo como recordatorio.
2. Cuando el producto está suministrando agua automáticamente, el indicador de encendido
parpadeará
luz blanca.
3. El dispositivo agregará agua automáticamente al tanque de agua de la carcasa mientras está en
condiciones de trabajo, dejará de funcionar automáticamente cuando se acabe el agua.
4. En condiciones de funcionamiento, la niebla se detendrá y la luz indicadora de encendido se
volverá roja cuando levante el tanque de agua. Pero se empañará normalmente y volverá al estado
de funcionamiento anterior cuando lo vuelva a colocar.
1. No enjuague el dispositivo con agua para evitar que el agua dañe la máquina.
2. Tenga en cuenta que la superficie del imán de la válvula de agua en la parte inferior del tanque de
agua debe mantenerse limpia y evitar adsorber cualquier objeto extraño. De lo contrario, es posible
que la máquina no funcione correctamente.
1. NO lo coloque ni lo use donde sus hijos y su mascota puedan tocarlo.
2. NO tire del enchufe con las manos mojadas.
3. NO bloquee la entrada y salida de aire.
4. NO deje que funcione si no hay agua en el tanque de agua. Desenchufe cuando no esté en uso.
5. Si el producto no funciona normalmente, NO lo desmonte ni lo repare usted mismo. Desconecte la
alimentación y póngase en contacto con el fabricante local.

Seguridad
Limpieza
Almacenamiento
17
ES
1. Para este producto se requiere agua limpia del grifo o agua pura a temperatura ambiente.
2. Coloque el producto en posición horizontal antes de usarlo.
3. Vierta el agua después de usarla, de lo contrario causará problemas y bacterias.
4. Desenchufe si la máquina no se utiliza durante mucho tiempo.
5. La máquina producirá neblina cuando esté funcionando, así que manténgala alejada de artículos o
electrodomésticos valiosos.
6. NO opere si no hay agua para evitar fallas en la máquina.
7. NO agregue agua directamente al tanque de agua de la carcasa. NO agregue agua de la salida de
aire.
1. Asegúrese de que la máquina esté apagada y desenchufada.
2. Saque el filtro y limpie el polvo adsorbido en la superficie exterior del filtro.
3. Utilice un paño suave con un limpiador neutro para limpiar el polvo o la suciedad de la superficie
de la máquina y la entrada / salida de aire.
4. Una vez que la máquina se haya secado por completo, colóquese la bolsa y colóquela en un lugar
fresco y bien ventilado.
1. Apague la máquina y desenchufe la fuente de alimentación, coloque y agrupe el cable de
alimentación.
2. Saque el filtro y limpie el polvo adsorbido en la superficie exterior del filtro.
3. Limpiar la entrada / salida de aire, limpiar el cuerpo con un detergente neutro y un paño suave.
4. Una vez que la máquina esté completamente seca, colóquese una funda o bolsa contra el polvo
y colóquela en un lugar bien ventilado que no esté expuesto a la luz solar directa.
5. Si no lo usa durante mucho tiempo, encienda la máquina durante unos minutos de vez en cuando
para asegurar un desempeño continuo.
Aviso: No deje caer agua en la máquina cuando limpie la salida de aire.
A página está carregando...
A página está carregando...
A página está carregando...
A página está carregando...
A página está carregando...
A página está carregando...
A página está carregando...
A página está carregando...
A página está carregando...
A página está carregando...
A página está carregando...
A página está carregando...
A página está carregando...
A página está carregando...
A página está carregando...
A página está carregando...
A página está carregando...
A página está carregando...
A página está carregando...
A página está carregando...
A página está carregando...
A página está carregando...
-
 1
1
-
 2
2
-
 3
3
-
 4
4
-
 5
5
-
 6
6
-
 7
7
-
 8
8
-
 9
9
-
 10
10
-
 11
11
-
 12
12
-
 13
13
-
 14
14
-
 15
15
-
 16
16
-
 17
17
-
 18
18
-
 19
19
-
 20
20
-
 21
21
-
 22
22
-
 23
23
-
 24
24
-
 25
25
-
 26
26
-
 27
27
-
 28
28
-
 29
29
-
 30
30
-
 31
31
-
 32
32
-
 33
33
-
 34
34
-
 35
35
-
 36
36
-
 37
37
-
 38
38
-
 39
39
-
 40
40
-
 41
41
-
 42
42


Maxell HUM2200 Manual do usuário
- Categoria
- Umidificadores
- Tipo
- Manual do usuário
em outras línguas
- español: Maxell HUM2200 Manual de usuario
- English: Maxell HUM2200 User manual
Artigos relacionados
Outros documentos
-
Orbit B-hyve Guia rápido
-
 Bakeey C20 Manual do usuário
-
 V-TAC VT-5555 Manual do usuário
-
Infiniton SPLIT-BL3827 Manual do proprietário
-
Moen TS3304BL Manual do usuário
-
HTW ACUMULADOR AEROTERMICO VAW Manual do usuário
-
SouthWing SF-505 Manual do usuário
-
 Miniland humitop connect Manual do usuário
-


