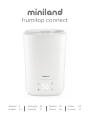
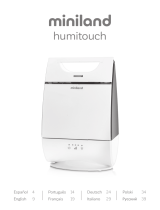
Miniland humitop connect Manual do usuário
- Categoria
- Umidificadores
- Tipo
- Manual do usuário

humitop connect
Español
English
Polski
Русский
Deutsch
Italiano
Português
Français
5
14
58
67
40
49
22
31


3

4
Download on the
Android App on

5
ÍNDICE
1. Introducción
2. Contenido
3. Instrucciones de seguridad
4. Características del producto
5. Instrucciones de uso
6. Mantenimiento
7. Especicaciones técnicas
8. Información sobre la retirada del producto
1. INTRODUCCIÓN
Le felicitamos por haber adquirido este humidicador con conexión wi, con el que
podrá cuidar el ambiente de su hogar sin importar dónde esté. La aplicación eMyBaby®
permite hacer seguimiento de la evolución del ambiente gracias a los valores grácos
de la humedad y temperatura. Esperamos que quede satisfecho con la compra de
este producto.
Antes de utilizar este dispositivo, lea atentamente todas las instrucciones de este
manual. Conserve este manual ya que contiene información importante.
NOTA: Las características descritas en este manual de usuario están sujetas a
modicaciones sin previo aviso.
2. CONTENIDO
1 humidicador de vapor frío
2 esponjas adicionales para el compartimento de esencias
1 manual de instrucciones, guía rápida, hoja de limpieza y garantía
· Si falta algo del contenido arriba detallado, póngase en contacto con su punto
de venta.
3. INSTRUCCIONES DE SEGURIDAD
Lea cuidadosamente este manual de instrucciones antes de utilizar su humidicador
por primera vez y consérvelo para poder utilizarlo como referencia en el futuro.
3.1. INSTRUCCIONES DE SEGURIDAD GENERALES
Al utilizar cualquier dispositivo eléctrico es necesario seguir algunas precauciones
básicas de seguridad en todo momento:
1. Asegúrese de que la potencia utilizada se corresponde con la indicada en la
etiqueta de clasicación.
2. Asegúrese de que siempre haya agua en el depósito de agua al utilizar la unidad.
3. Utilice únicamente agua de grifo limpia y fría para llenar el depósito (el agua
suavizada o destilada se recomienda en zonas de agua dura).
4. Mantenga siempre la unidad de tal forma que la boquilla de vapor permanezca
lejos de los niños, las paredes, los muebles y los aparatos eléctricos.
5. Coloque el humidicador en una supercie plana y lisa.
6. Desconecte siempre el humidicador de la fuente de alimentación cuando no lo
esté utilizando y cuando lo esté limpiando.
7. Este aparato está pensado únicamente para uso doméstico.
8. Nunca cubra el humidicador cuando esté en funcionamiento pues esto podría
causar daños en la unidad.
9. No añada esencias a la base o al depósito de agua. Las esencias deben ir en el
compartimento para esencias.
10. No añada esencias a la base o al depósito de agua. No incline ni ladee la unidad ni
intente vaciarla o llenarla mientras está en funcionamiento.
ESPAÑOL

6
11. No sumerja el humidicador en agua ni deje que el agua entre en contacto con el
conector ni con el dispositivo de control.
12. No intente abrir ninguna parte del humidicador.
13. Mantenga el humidicador limpio. No deje que ningún objeto entre en el conducto
de ventilación, dado que esto podría provocar daños en la unidad.
14. Es necesaria una supervisión próxima cuando se utiliza este aparato cerca de un
niño.
15. No permita nunca que el cable toque supercies húmedas o calientes, ni que se
enrolle o quede al alcance de los niños.
16. No lo utilice en el exterior.
17. Coloque el aparato alejado de cualquier fuente de calor, como por ejemplo estufas
y chimeneas, y manténgalo alejado de la luz solar directa.
18. No utilice nunca el aparato con un cable o un enchufe dañado, ni después de que
el aparato haya sufrido un fallo al funcionar o que esté dañado de alguna manera.
19. No utilice el aparato para otro uso distinto al que ofrece.
20. Cualquier reparación que sea necesario realizar en el humidicador debe llevarla a
cabo el servicio técnico autorizado.
21. Regule el ujo de vapor de acuerdo al tamaño de la habitación.
22. No utilice detergente para limpiar ninguna parte que contenga agua. El detergente
puede interferir con la salida de la unidad si entra en contacto con el agua.
23. Este aparato no está pensado para que lo utilicen personas (incluyendo niños) con
capacidades físicas, sensoriales o mentales reducidas, que no tengan experiencia
ni conocimientos, a menos que dispongan de la supervisión de una persona
responsable de su seguridad o que ésta les suministre formación para utilizar el
aparato.
24. Si el cable de alimentación está dañado, debe ser reemplazado por el fabricante,
un técnico de servicio técnico u otra persona cualicada para evitar que se
produzcan daños.
25. Mantenga el aparato a las temperaturas de ambiente normales de una vivienda.
No utilice el aparato en lugares fríos, ya que en ese caso podría sufrir daños. Si
las temperaturas fueran bajo cero y hubiera hielo en el interior de la unidad, no la
encienda antes de haber retirado el hielo o haber esperado a que se funda.
26. No enchufe el aparato con las manos húmedas debido al riesgo de electrocución.
27. No toque el elemento transductor con la unidad encendida.
¡ESTE HUMIDIFICADOR NO ES UN JUGUETE!
No deje que los niños jueguen con este aparato. Podrían producirse daños graves e
incluso la electrocución. Este aparato debe ser manejado únicamente por adultos. Se
debe supervisar a los niños para garantizar que no juegan con el humidicador.
IMPORTANTE: Tenga en cuenta que cualquier cambio o modicación en el
equipo no efectuada por el servicio técnico de MINILAND no estará cubierta por
la garantía del producto.
4. CARACTERÍSTICAS DEL PRODUCTO
1. Posibilidad de congurar los ajustes deseados a través de la aplicación eMyBaby®
mediante conexión wi, desde cualquier lugar.
2. La aplicación eMyBaby® permite hacer seguimiento de la evolución del ambiente
gracias a los valores grácos de humedad y temperatura.
3. Programación inteligente de la humedad relativa deseada.
4. Cómodo rellenado de agua por la parte superior del depósito.
5. Temporizador con programación de apagado automático hasta 12 horas.
6. Compartimento para esencias (no incluidas).
ESPAÑOL

7
7. Apagado automático cuando el agua se ha consumido por completo.
8. Visualización de la humedad relativa: el sensor del humidicador mide el valor de
humedad de la estancia y lo muestra en pantalla.
9. Filtro de agua: ayuda a mantener el agua limpia y fresca.
10. Suave luz azul de compañía opcional.
4.1. DESCRIPCIÓN DE LAS PIEZAS
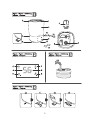
4.1.1. HUMIDIFICADOR (Figura 1)
1. Boquilla
2. Depósito de agua
3. Tapa del depósito de agua
4. Filtro del agua
5. Panel de control
6. Base de la unidad
7. Transductor ultrasónico
8. Salida de aire
9. Compartimento de esencias
10. Adaptador de corriente
11. Sensor de temperatura y humedad
12. Luz de compañía
13. Esponjas adicionales
4.1.2. PANEL DE CONTROL (Figura 2)
A. Pantalla
B. Indicador de estado
C. Encendido/apagado
D. Ajuste de emisión de vapor
E. Ajuste de humedad relativa
F. Ajuste de temporizador
4.2. PRINCIPIO DE FUNCIONAMIENTO
El humidicador transforma el agua almacenada en el depósito en vapor de agua.
El sistema de ventilación de la máquina emite este vapor al aire seco, creando la
humedad necesaria.
5. INSTRUCCIONES DE USO
5.1. ADICIÓN DE AGUA (Figura 3)
Se recomienda al usuario que utilice el humidicador con agua descalcicada.
Siga las instrucciones indicadas en la sección de Limpieza.
Para añadir agua, siga las siguientes instrucciones:
1. Coloque el aparato sobre una supercie plana. Retire el depósito de agua (3) de la
base de la unidad.
2. Añada agua fría al depósito de agua (2). No añada agua caliente, ya que se
producirían fugas.
3. Instale de nuevo la tapa del depósito de agua cuidadosamente.
ATENCIÓN: No mueva el aparato cuando el depósito de agua esté totalmente
lleno de agua.
5.2. ENCENDIDO / APAGADO DEL HUMIDIFICADOR
Para encender el humidicador, conecte el adaptador a la toma de corriente y pulse
el botón de encendido/apagado (C). La pantalla y la luz azul de compañía se
iluminarán.
ESPAÑOL

8
NOTA: La pantalla se apaga después de diez segundos para un mejor descanso
nocturno; sin embargo, el humidicador continúa en funcionamiento. Si desea volver a
encender la pantalla pulse cualquier botón.
5.3. LUZ DE COMPAÑÍA
Para apagar o encender la luz de compañía puede hacerlo desde el apartado
HUMITOP CONNECT de la aplicación eMyBaby® o pulsando el botón de ajuste de
humedad relativa
(E) durante dos segundos. La luz de compañía y la pantalla se
apagarán. Si desea encender solo la pantalla, pulse cualquier botón.
5.4. AJUSTE DEL TEMPORIZADOR
Para programar el apagado automático de la unidad puede hacerlo desde el apartado
HUMITOP CONNECT de la aplicación eMyBaby® o pulsando el botón de ajuste de
temporizador (F). Aparecerá en pantalla el símbolo “01”, indicando que pasada 1
hora el dispositivo se apagará automáticamente. Siga pulsando el botón (F) para
seleccionar el temporizador entre 1 y 12 horas. Con el símbolo “- -” el temporizador
quedaría desactivado. Para establecer el tiempo de apagado automático deseado,
espere a que el número deje de parpadear. El humidicador quedará así programado
para apagarse transcurridas las horas establecidas.
5.5. PROGRAMACIÓN INTELIGENTE DE HUMEDAD RELATIVAt
Para activar la programación inteligente de la humedad relativa puede hacerlo desde
el apartado HUMITOP CONNECT de la aplicación eMyBaby® o pulsando el botón
(E) sucesivamente hasta alcanzar nivel de humedad relativa que desea establecer.
Recomendamos una humedad relativa de entre el 45% y el 60%. El aparato
permite congurarse entre el 30% y el 90% de humedad relativa. Con el símbolo
“Co” (Operación Continua) la programación inteligente quedaría desactivada. Para
establecer la programación de humedad relativa deseada, espere a que el número
deje de parpadear. El humidicador quedará así programado para mantener la
humedad relativa en la estancia establecida.
NOTA: Si la humedad de la estancia es mayor que la deseada, el humidicador entra
en reposo. Si la humedad de la estancia es menor que la deseada, el humidicador se
activará automáticamente.
5.6. AJUSTE DE EMISIÓN DE VAPOR
Para ajuster la emisión de vapor puede hacerlo desde el apartado HUMITOP CONNECT
de la aplicación eMyBaby® o pulsando el botón (D) sucesivamente para cambiar el
ujo de vapor deseado entre los tres niveles de vapor disponibles: bajo, medio y alto.
Para el uso nocturno recomendamos el nivel bajo.
5.7. AVISO DE DEPÓSITO VACÍO
Cuando el depósito esté vacío, el humidicador se apagará automáticamente y se
encenderá la luz de compañía en color rojo para avisar de ello. Para seguir usando el
humidicador rellene el depósito de agua como se indica en el apartado 5.1 de este
manual.
5.8. ADICIÓN DE ESENCIAS (Figura 4)
Si desea añadir esencias (no incluidas), extraiga la tapa del compartimento de esencias
(9) pulsando sobre la misma y vierta 3 gotas sobre la esponja. Coloque de nuevo el
compartimento de esencias en su posición.
ESPAÑOL

9
NOTA:
• Cuando hace frío, las ventanas e incluso las paredes pueden empañarse o desarrollar
escarcha debido a un exceso de humedad interior. Si sucediera esto, reduzca el
ajuste de la intensidad del vapor para evitar daños debido a la condensación del
agua.
• Un exceso de humedad en la habitación puede hacer que la humedad se acumule en
las supercies. La humedad acumulada también puede dañar los suelos, muebles y
las paredes, especialmente el papel pintado.
• Para eliminar el exceso de humedad, especialmente en una habitación pequeña,
deje la puerta de la habitación abierta y reduzca la intensidad del vapor o apague el
humidicador.
ESPAÑOL
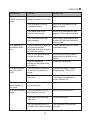
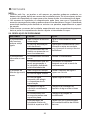
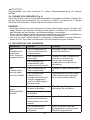
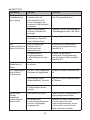
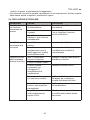
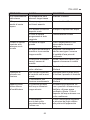
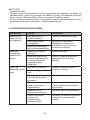
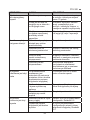
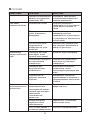
SÍNTOMAS CAUSA ACCIÓN
El humidicador
no funciona,
aunque está
encendido
No ha conectado la fuente
de alimentación
Conecte el humidicador a la
red eléctrica
El cable de alimentación
está dañado
Inmediatamente interrumpa su
uso y póngase en contacto con
el personal de servicio técnico
de Miniland
El humidicador está
defectuoso o presenta un
mal funcionamiento
El humidicador
no emite aire ni
vapor
El humidicador no está
encendido
Enciende el humidicador
El humidicador está
en modo programación
y la humedad relativa
establecida ha sido
alcanzada
Incremente la humedad
deseada o cambie el modo de
funcionamiento
El indicador de
falta de agua está
encendida
No hay agua en el tanque Rellene el depósito de agua y
espere un minuto
El nivel de agua es bajo
El nivel de agua requerido
no ha alcanzado el
compartimento de
vaporización
Espere unos minutos
El depósito de agua
no está colocado
correctamente
Compruebe la colocación del
depósito de agua sobre la base
El humidicador no está
sobre una supercie plana
Compruebe la posición del
humidicador
El porcentaje de humedad
relativa de la estancia es
mayor que el 90%
Espere a que el porcentaje de
humedad relativa de la estancia
disminuya
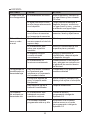
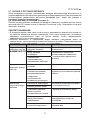
5.9. RESOLUCIÓN DE PROBLEMAS

10
ESPAÑOL
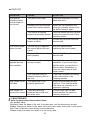
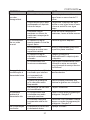
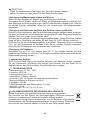
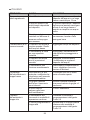
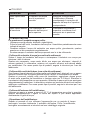
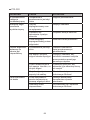
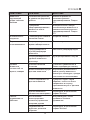
SÍNTOMAS CAUSA ACCIÓN
El vapor tiene un
olor desagradable
El humidicador es nuevo Abra el depósito y ventílelo en
un lugar fresco y seco durante
12 horas
El agua está sucia o lleva
mucho tiempo almacenada
en el depósito
Limpie concienzudamente el
depósito de agua, ventílelo en
un lugar fresco y seco, y vuelva
a rellenarlo con agua limpia
Persisten olores residuales
en el difusor de esencias
en la esponja de esencias
Cambie o retire la esponja de
esencias, lávela y déjela secar
El humidicador
hace un ruido
inusual
El depósito de agua
resuena cuando el nivel de
agua es bajo
Añada agua en el depósito
El humidicador está
sobre una supercie
inestable
Mueva el humidicador a una
supercie plana y estable
El depósito de agua
no está colocado
correctamente
Apague y desenchufe el
humidicador, después ajuste
el depósito de agua
El humidicador no
funciona correctamente
Inmediatamente interrumpa su
uso y póngase en contacto con
el personal de servicio técnico
de Miniland
La capacidad de
humidicador es
demasiada baja
Hay aire natural o articial
en la estancia que
interere en el incremento
de humedad relativa
Comprueba si hay puertas o
ventanas abiertas
La rejilla de entrada de
aire y la boquilla están
bloqueadas
Retire cualquier elemento que
obstruya las rejillas o la boquilla
Hay restos de cal en la
base del humidicador
Limpie el transductor
La humedad
del ambiente es
demasiado alta
El humidicador está
trabajando en modo
operación continua
Cambie el modo a
programación inteligente.
Apartado 5.5
La humedad deseada
programada está muy alta
Seleccione una humedad
relativa menor en el modo
de programación inteligente.
Apartado 5.5

11
ESPAÑOL
SÍNTOMAS CAUSA ACCIÓN
Hay
condensación en
la estancia
La temperatura de la
estancia es demasiado baja
Caliente la estancia
El vapor deja de
salir de repente
Se ha agotado el
tiempo programado del
temporizador
Encienda el humidicador
El aviso de depósito vacío
está encendido
Rellene el depósito de agua
Se ha alcanzado el nivel de
humedad programado
El funcionamiento es normal
El nivel de
humedad
mostrado en
la pantalla es
incorrecto
La estancia es demasiado
grande
Ponga el humidicador en una
estancia más adecuada
Se ha acumulado humedad
en el interior del sensor de
humedad
Apague el humidicador y deje
que el sensor de humedad se
seque al aire antes de volver
a usarlo
La boquilla está orientada
en la dirección del sensor
de humedad
Gire la boquilla de manera que
quede orientada hacia el lado
opuesto al sensor de humedad
El sensor de humedad está
roto o defectuoso
Póngase en contacto con el
personal de servicio técnico de
Miniland
El panel de
control no
funciona
Está intentando operar el
panel de control con las
manos húmedas
Séquese las manos para
operar el panel de control
El humidicador no
funciona correctamente
Póngase en contacto con el
personal de servicio técnico de
Miniland
Aparece polvo
blanco alrededor
del humidicador
El agua utilizada tiene un
alto contenido mineral
Utilice agua destilada con el
humidicador. Si no dispone
de agua destilada, utilice agua
puricada o ltrada. Recuerde
limpiar el tanque de agua al
menos una vez a la semana
El humidicador no se ha
limpiado correctamente
después de su último uso
Limpie el humidicador
siguiendo las instrucciones de
la hoja de limpieza

12
6. MANTENIMIENTO
Para mantener el producto siempre limpio:
∙ Utilice agua puricada, o en su defecto agua descalcicada o embotellada.
∙ Limpie la base de la unidad, el depósito de agua y el transductor periódicamente
como se indica a continuación.
∙ Cambie siempre el agua del depósito por agua limpia a diario, en caso de que ésta
no se haya consumido totalmente.
∙ Vacíe siempre el depósito de agua cuando no lo esté utilizando.
- Limpieza del depósito de agua (una vez a la semana):
Aclare el depósito con agua para eliminar los restos de cal.
En caso de que sea necesario, use vinagre disuelto en agua para eliminar los depósitos
de cal resistentes. Alternativamente, existe en el mercado soluciones limpiadoras de
cal aptas para humidicadores. Para usar este tipo de productos, siga las instrucciones
de uso del fabricante.
- Limpieza de la cavidad de la base (una vez a la semana):
Si se hubieran formado depósitos de cal en la cavidad de la base, elimínelos con un
trapo suave humedecido con un agente de limpieza neutro o vinagre y aclare con agua.
En caso de almacenarse cal en la zona del transductor, añada unas gotas de
vinagre sobre la supercie del transductor y deje actuar de 2 a 5 minutos. Elimine
las incrustaciones de la supercie con un cepillo. Utilice un trapo limpio para secar
adecuadamente el transductor. Alternativamente, existe en el mercado soluciones
limpiadoras de cal aptas para humidicadores. Para usar este tipo de productos, siga
las instrucciones de uso del fabricante.
- Limpieza del exterior del humidicador:
Utilice un trapo y agua a menos de 40ºC de temperatura para limpiar las manchas
del exterior del aparato. La boquilla de salida de vapor puede lavarse aplicando
directamente un chorro de agua.
- Almacenamiento del humidicador:
Cuando no vaya a utilizar el aparato durante un período de tiempo prolongado, vacíe
totalmente el depósito de agua. Limpie el humidicador, séquelo cuidadosamente e
introdúzcalo en su embalaje original.
SÍNTOMAS CAUSA ACCIÓN
El vapor se sale
de la base
El depósito de agua no está
colocado correctamente
Apague y desenchufe
el humidicador. Luego
alinee la tapa del tanque de
agua correctamente en su
respectiva abertura
El vapor sale
alrededor de la
boquilla
Hay aberturas entre la
boquilla y el tanque de
agua
Vuelva a colocar la tapa y
compruebe si la boquilla está
situada correctamente
ESPAÑOL

13
7. ESPECIFICACIONES TÉCNICAS
- Alimentación: AC 220 - 240V
- Frecuencia: 50/60 Hz
- Consumo de potencia: 30 W
- Flujo de vapor: 100ml/h / 300ml/h
- Autonomía: mínimo 20 horas al ujo máximo
- Máxima eciencia en habitaciones de hasta 40m²
- Ruido: ≤35 dB
- Capacidad del depósito de agua: 5,5 litros
- Peso: 1,76 Kg
- Tamaño: 21,4 x 21,4 x 33,3 (cm)
8. INFORMACIÓN SOBRE LA RETIRADA DEL PRODUCTO
Es necesario desechar el producto de manera responsable.
No se deshaga de los productos que muestren el símbolo del contenedor de
basura tachado junto con el resto de los residuos domésticos.
Una vez nalizada su vida útil, estos productos deben desecharse llevándolos
a un centro de recogida y tratamiento designado por las autoridades locales.
También puede ponerse en contacto con el establecimiento en el que adquirió
el producto.
ESPAÑOL

14
ENGLISH
CONTENTS
1. Introduction
2. Content
3. Safety instructions
4. Product features
5. Instructions for use
6. Maintenance
7. Technical specications
8. Information about the disposal of the product
1. INTRODUCTION
We congratulate you for having purchased this humidier with Wi-Fi connection, with
which you’ll be able to take care of the atmosphere in your home, no matter where you
are. The eMyBaby® application allows you to monitor the evolution of the atmosphere
thanks to the humidity and temperature graphs. We’re sure you’ll be satised with your
purchase of this product.
NOTE: The features described in this user’s manual are subject to modication
without any prior notice.
2. CONTENTS
1 cold vapour humidier
2 additional sponges for the essence compartment
1 instruction manual, quick guide, cleaning sheet and warranty
· If any of the above stated contents is missing, contact your point of sale.
3. SAFETY INSTRUCTIONS
Read this instruction manual carefully before using your humidier for the rst time and
keep it so that it can be used as a reference in the future.
3.1. GENERAL SAFETY INSTRUCTIONS:
Whenever using any electrical device, it is necessary to follow certain basic precautions
at all times:
1. Make sure that the power used corresponds with that stated on the classication
label.
2. Make sure that there is always water in the water tank when using the unit.
3. Only use clean and cold tap water to ll the water tank (softened or distilled water is
recommended for areas with hard water).
4. Always keep the unit in such a position that the vapour nozzle stays far away from
children, walls, furniture, and electric apparatus.
5. Place the humidier on a at and smooth surface.
6. Always unplug the humidier from the power supply when it is not being used and
when it is being cleaned.
7. This device is only designed for domestic use.
8. Never cover the humidier when it is operational because the unit could be
damaged.
9. Do not add essences to the base or to the water tank. Essences must be placed in
the essence compartment.
10. Do not incline or tilt the unit nor try to empty or ll it whilst it is operational.
11. Do not immerse the humidier in water nor allow water to come into contact with
either the plug or the control device.
12. Do not try to open any part of the humidier.

15
13. Keep the humidier clean. Do not allow any object to enter the ventilation duct
because this could damage the unit.
14. Close supervision is necessary when the device is being used in the presence of
a child.
15. Never allow the cable to come into contact with wet or hot surfaces, nor allow it to
wind up or be within the reach of children.
16. Do not use outside.
17. Place the device far away from any heat source, such as heaters or chimney, for
example, and keep it out of direct sunlight.
18. Do not use the device with a damaged cable or plug, nor after the device has
suered a failure when operational or is damaged in any fashion.
19. Do not use the device for anything other than its intended purpose.
20. Any repairs that may be required to be performed on the humidier must be carried
out by the authorised technical service.
21. Regulate the ow of vapour according to the size of the room.
22. Do not use detergent to clean any part which contains water. Detergent can interfere
with the outlet of the device if it comes into contact with water.
23. This device is not designed to be used by people (including children) whose
physical, sensory, or cognitive capabilities are reduced, or who lack experience and
expertise, unless they are being supervised or instructed concerning the use of the
appliance by a person who is responsible for their safety.
24. If the power supply cable is damaged, it must be replaced by the manufacturer, a
technician from the technical service, or another qualied person in order to avoid
further damage being caused.
25. Keep the device at normal room temperature. Do not use the device in cold places
because this could damage the device. If temperatures fall below zero and there
is ice in the interior of the unit, do not turn it on before removing the ice or waiting
for it to melt.
26. Do not plug in the device with damp/wet hands due to the risk of electrocution.
27. Do not touch the transducer element when the unit is powered on.
THIS HUMIDIFIER IS NOT A TOY!
Do not allow children to play with this device. Serious injuries, up to and including
electrocution, could result. This device must only be handled by adults. Children must
be supervised to make sure that they do not play with the humidier.
IMPORTANT: Bear in mind that any change of modication to the unit that is
not carried out by the MINILAND technical service will not be covered by the
product’s warranty.
4. PRODUCT FEATURES
1. It is possible to congure the desired settings using the eMyBaby® application via
the Wi-Fi connection, from wherever you are.
2. Smart programming of your desired relative humidity.
3. Easy to ll with water through the top of the tank.
4. Timer with automatic switch-o after 12 hours.
5. Compartment for essential oils (not included).
6. Switches o automatically when the water has run out.
7. Relative humidity display: the humidier’s sensor measures the level of humidity in
the room and displays it on screen.
8. Water lter: helps keep the water clean and fresh.
9. Optional gentle blue night light.
ENGLISH

16
4.1 DESCRIPTION OF THE PARTS
4.1.1 HUMIDIFIER (Figure 1)
1. Nozzle
2. Water tank
3. Water tank cover
4. Water lter
5. Control panel
6. Base of the unit
7. Ultrasonic transducer
8. Air outlet
9. Essence compartment
10. Mains adaptor
11. Temperature and humidity sensor
12. Nightlight
13. Additional sponges
4.1.2. CONTROL PANEL (Figure 2)
A. Screen
B. Status indicator
C. On/o
D. Mist outlet setting
E. Relative humidity setting
F. Timer setting
4.2. PRINCIPLES OF OPERATION
The humidier uses the water stored in the water tank to make water vapour. The
machine’s fan system releases this vapour into the dry air, creating the necessary
humidity.
5. INSTRUCTIONS FOR USE
5.1. ADDING WATER (Figure 3)
Users are advised to use the humidier with distilled water. (Follow the instructions in
the Cleaning section).
To add water, follow the instructions below:
1. Place the device on a at surface. Remove the water tank cover (3) from the base
of the unit.
2. Add cold water to the water tank (2). Do not add hot water, as it will leak.
3. Carefully t the cover back on the water tank.
NB: Do not move the device when the water tank is totally full.
5.2. POWERING THE HUMIDIFIER ON AND OFF
To switch the humidier on, plug the adapter in to the mains and press the on/o button
(C). The screen and the blue night light will light up.
NOTE: The screen switches o after ten seconds for a better night’s sleep, but the
humidier continues to work. Press any button to switch the screen on again.
5.3. NIGHT LIGHT
To switch the night light o or on, you can do so under the HUMITOP CONNECT
section of the eMyBaby® application or by pressing the relative humidity setting button
(E) for two seconds. The night light and the screen will switch o. To switch just the
screen on, press any button.
5.4. ADJUSTMENT OF THE TIMER
To program the unit to switch o automatically, you can do so under the HUMITOP
CONNECT section of the eMyBaby® application or by pressing the timer setting button
(F). The “01” symbol will be displayed on screen, indicating that after 1 hour the
device will switch o automatically. Keep pressing the button
(F) to set the timer
ENGLISH

17
for between 1 and 12 hours. When it shows the “- -” symbol, the timer will be disabled.
To set the desired automatic switch-o time, wait for the number to stop ashing. The
humidier will then be programmed to switch o after the established number of hours.
5.5. SMART RELATIVE HUMIDITY PROGRAMMING
To activate smart relative humidity programming, you can do so under the HUMITOP
CONNECTsection of the eMyBaby® application or by pressing the button
(E)
successively until you reach the desired level of relative humidity. We recommend
a relative humidity between 45% and 60%. The device can be set to between 30%
and 90% relative humidity. When the “C
o” symbol (Continuous Operation) appears,
smart programming will be disabled. To set the desired automatic relative humidity
programming, wait for the number to stop ashing. The humidier will then be
programmed to maintain the set relative humidity in the room.
NOTE: If the humidity of the room is above the set level, the humidier enters a rest
state. If the humidity of the room is below the set level, the humidier automatically
activates.
5.6. ADJUSTMENT OF VAPOUR RELEASE
To adjust the vapour release, you can do so under the HUMITOP CONNECT section of
the eMyBaby® application or by pressing the
(D) successively to change the desired
mist outlet between the three available mist levels: low, medium and high. For night-
time use we recommend the low level.
5.7. EMPTY TANK WARNING
When the tank is empty, the humidier switches o automatically and the night light
turns red to indicate this. In order to continue using the humidier rell the water tank
as described in section 5.1 of this manual.
5.8. ADDING ESSENCES (Figure 4)
If you wish to add essential oils (not included), remove the cover of the essence
compartment (9) by pressing it and pour 3 drops onto the sponge. Put the essential oil
compartment back in its place.
NOTE:
• When it is cold, the windows and even the walls could fog up or allow frost to develop
due to excessive interior humidity. If this happens, reduce the adjustment of the
vapour intensity to avoid damage due to the condensation of the water.
• An excess of humidity in the room can cause the humidity to gather on the surfaces
where it could encourage the growth of bacteria and fungi. The accumulated humidity
could also damage the furniture and walls, especially wallpaper.
• In order to correct excessive humidity, especially in a small room, leave the door of
the room open and adjust the intensity of the vapour.
ENGLISH

18
ENGLISH
5.9. TROUBLESHOOTING
PROBLEM CAUSE SOLUTION
The humidier
does not work,
even though it is
switched on
It has not been connected
to the power supply
Connect the humidier to the
mains
The power supply cable is
damaged
Stop using it immediately and
contact the Miniland technical
service sta
The humidier is faulty or
there is a malfunction
The humidier
does not release
air or mist
The humidier is not
switched on
Switch the humidier on
The humidier is in
programming mode and
the set relative humidity
has been reached
Increase the desired humidity or
change the operating mode
The lack of water
indicator is on
There is no water in the
tank
Fill the water tank and wait a
minute
The water level is low
The required water level
has not reached the
vaporization compartment
Wait for a few minutes
The water tank is not
properly positioned
Check that the water tank is
properly position on the base
The humidier is not on a
at surface
Check the position of the
humidier
The percentage of relative
humidity in the room is
above 90%
Wait for the percentage of
relative humidity in the room to
decrease
The mist has a
strange smell
The humidier is new Open the cover and leave it to
air in a cool, dry place for 12
hours
The water is dirty or has
been left in the tank for a
long time
Clean the water tank
thoroughly, leave it to dry in a
cool, dry place, then ll it with
clean water again
Residual smells remain in
the sponge of the essential
oil diuser
Change or remove the essential
oil sponge, wash it and leave
it to dry

19
PROBLEM CAUSE SOLUTION
The humidier
makes an unusual
noise
The water makes a sound
when the water level is low
Add water to the tank
The humidier is on an
unstable surface
Move the humidier to a at,
stable surface
The water tank is not
properly positioned
Switch the humidier o and
unplug it, then adjust the tank
The humidier does not
work properly
Stop using it immediately and
contact the Miniland technical
service sta
The capacity of
humidier is too
low
There is natural or articial
air in the room that
interferes with the increase
in relative humidity
Check that there are no doors
or windows open
The air inlet grille and the
nozzle are blocked
Remove any element that is
obstructing the grilles or the
nozzle
There is limescale
residue in the base of the
humidier
Clean the transducer
The atmospheric
humidity is too
high
The humidier is working
in continuous operation
mode
Change the mode to smart
programming. Section 5.5
The desired humidity is
very high
Select a lower relative humidity
in the smart programming
mode. Section 5.5
There is
condensation in
the room
The temperature of the
room is too low
Heat the room
The mist suddenly
stops
The programmed time of
the timer has run out
Switch the humidier on
The empty tank warning
light is on
Fill the water tank
The programmed level of
humidity has been reached
The humidier is operating
normally
ENGLISH

20
6. MAINTENANCE
In order to always keep the product clean:
∙ Use puried water.
∙ Regularly clean the base of the unit, the water tank, and the transducer accordi
∙ Always change the water in the water tank with clean water every day, in the event
that it has not all been used during normal operation.
∙ Always empty the water tank when it is not being used.
PROBLEM CAUSE SOLUTION
The level of
humidity shown
on the screen is
not correct
The room is too large Place the humidier in a more
adequate room
Humidity has accumulated
inside the humidity sensor
Switch o the humidier and
leave the humidity sensor to air
dry before using it again
The nozzle is pointing
toward the humidity sensor
Twist the nozzle so that it points
toward the opposite side to the
humidity sensor
The humidity sensor is
broken or faulty
Contact the Miniland technical
service sta
The control panel
does not work
You are trying to operate
the control panel with wet
hands
Dry your hands before
operating the control panel
The humidier does not
work properly
Contact the Miniland technical
service sta
A white powder
appears around
the humidier
The water used has a high
mineral content
Use distilled water in the
humidier. If you do not have
distilled water, use puried or
ltered water. Remember to
clean the water tank at least
once a week
The humidier was not
cleaned properly after its
last use
Clean the humidier according
to the instructions in the
Cleaning section
Mist comes out of
the base
The water tank is not
properly positioned
Switch the humidier o and
unplug it. Then line the water
tank cover up correctly in its
respective opening
Mist comes out
around the nozzle
There are openings
between the nozzle and
the water tank
Put the cover back on and
check whether the nozzle is
correctly positioned
ENGLISH
A página está carregando...
A página está carregando...
A página está carregando...
A página está carregando...
A página está carregando...
A página está carregando...
A página está carregando...
A página está carregando...
A página está carregando...
A página está carregando...
A página está carregando...
A página está carregando...
A página está carregando...
A página está carregando...
A página está carregando...
A página está carregando...
A página está carregando...
A página está carregando...
A página está carregando...
A página está carregando...
A página está carregando...
A página está carregando...
A página está carregando...
A página está carregando...
A página está carregando...
A página está carregando...
A página está carregando...
A página está carregando...
A página está carregando...
A página está carregando...
A página está carregando...
A página está carregando...
A página está carregando...
A página está carregando...
A página está carregando...
A página está carregando...
A página está carregando...
A página está carregando...
A página está carregando...
A página está carregando...
A página está carregando...
A página está carregando...
A página está carregando...
A página está carregando...
A página está carregando...
A página está carregando...
A página está carregando...
A página está carregando...
A página está carregando...
A página está carregando...
A página está carregando...
A página está carregando...
A página está carregando...
A página está carregando...
A página está carregando...
A página está carregando...
A página está carregando...
A página está carregando...
A página está carregando...
A página está carregando...
-
 1
1
-
 2
2
-
 3
3
-
 4
4
-
 5
5
-
 6
6
-
 7
7
-
 8
8
-
 9
9
-
 10
10
-
 11
11
-
 12
12
-
 13
13
-
 14
14
-
 15
15
-
 16
16
-
 17
17
-
 18
18
-
 19
19
-
 20
20
-
 21
21
-
 22
22
-
 23
23
-
 24
24
-
 25
25
-
 26
26
-
 27
27
-
 28
28
-
 29
29
-
 30
30
-
 31
31
-
 32
32
-
 33
33
-
 34
34
-
 35
35
-
 36
36
-
 37
37
-
 38
38
-
 39
39
-
 40
40
-
 41
41
-
 42
42
-
 43
43
-
 44
44
-
 45
45
-
 46
46
-
 47
47
-
 48
48
-
 49
49
-
 50
50
-
 51
51
-
 52
52
-
 53
53
-
 54
54
-
 55
55
-
 56
56
-
 57
57
-
 58
58
-
 59
59
-
 60
60
-
 61
61
-
 62
62
-
 63
63
-
 64
64
-
 65
65
-
 66
66
-
 67
67
-
 68
68
-
 69
69
-
 70
70
-
 71
71
-
 72
72
-
 73
73
-
 74
74
-
 75
75
-
 76
76
-
 77
77
-
 78
78
-
 79
79
-
 80
80


Miniland humitop connect Manual do usuário
- Categoria
- Umidificadores
- Tipo
- Manual do usuário
em outras línguas
- español: Miniland humitop connect Manual de usuario
- français: Miniland humitop connect Manuel utilisateur
- italiano: Miniland humitop connect Manuale utente
- English: Miniland humitop connect User manual
- русский: Miniland humitop connect Руководство пользователя
- Deutsch: Miniland humitop connect Benutzerhandbuch
- polski: Miniland humitop connect Instrukcja obsługi
Artigos relacionados
-
 Miniland humitouch pure Manual do usuário
-
 Miniland humidrop Manual do usuário
-
 Miniland natural sleeper Manual do usuário
-
 Miniland humitop Manual do usuário
-
 Miniland Baby humitouch Manual do usuário
-
 Miniland sweetBeat Manual do usuário
-
 Miniland digimonitor 3.5" touch Manual do usuário
-
 Miniland naturmeal on-the-go Manual do usuário
-
 Miniland beMyBuddy elphy Manual do usuário
-
 Miniland beMyBuddy foxy Manual do usuário


Outros documentos
-
Solac HU1061 Manual do proprietário
-
Palson Ocean Manual do proprietário
-
-
Tigex 80800552 Operating Instructions Manual
-
Bionaire BU3000 Manual do proprietário
-
UFESA HF3000 Manual do proprietário
-
-
 Miniland Baby ozonball 89026 Manual do usuário
-
Philips Humidifier SC580 Manual do usuário
-
BABYMOOV Humidificateur digital Instruções de operação
