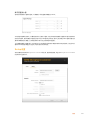
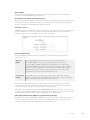
Blackmagic ATEM Microphone Converter Manual do usuário
- Tipo
- Manual do usuário

ATEM
Microphone
Converter
ATEM Microphone Converter
December 2023
Installation and Operation Manual


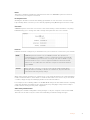
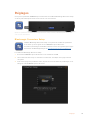
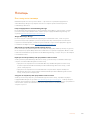
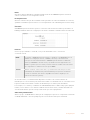
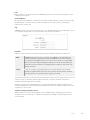
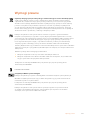
Welcome
Thank you for purchasing ATEM Microphone Converter!
ATEM Microphone Converter is an extremely high quality analog to digital audio
converter formultiple microphone sources.
The combined XLR/TRS inputs allow XLR or jack cables to be connected,
embedding the 4 analog inputs as MADI channels 1, 2, 3 and 4. The MADI input
allows multiple ATEM Microphone Converters to be daisy chained so more than
4channels ofaudio can be embedded into a single MADI connection!
Your converter features ultra high dynamic range input conversion so you get an
extremely low noise floor of -129dBV and all mic level sources can be individually
adjusted using a discrete digital preamplifier. Phantom power and mic or line audio
inputlevels can be set using the small built in switches, plus the HDMI monitoring
outputlets you visually see waveforms, audio levels and settings for each source.
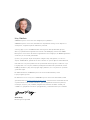
This instruction manual shows you how to get started with your ATEM
MicrophoneConverter.
Check the support page on our website at www.blackmagicdesign.com for the
latestversion of this manual and for updates to your ATEM Microphone Converter’s
internal software. Whendownloading the software, be sure to register with your
informationso we can keep you updated when new software is released. Weare
continually working on new features and improvements, so we are keen to
hear from you!
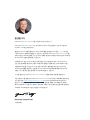
Grant Petty
CEO Blackmagic Design
English

Contents
Getting Started 5
Connecting Power 5
Connecting Audio 6
Connecting to an ATEM Switcher 7
Connecting a Monitor 7
Settings 8
Blackmagic Converters Setup 8
Audio Settings 9
Setup Settings 10
Updating Blackmagic Converters Setup utility 12
Changing Settings Using Switches 12
Using the Monitor Output 13
Connecting Additional Converters 14
Mounting ATEM Microphone Converter 16
Help 17
Regulatory Notices 18
Safety Information 19
Warranty 20
4ATEM Microphone Converter 4

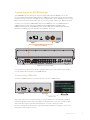
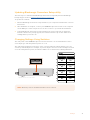
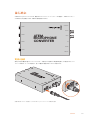
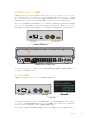
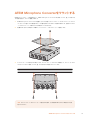
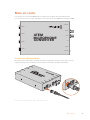
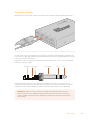
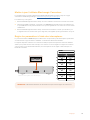
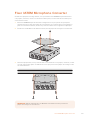
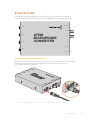
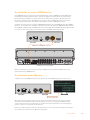
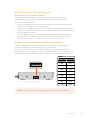
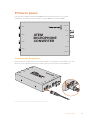
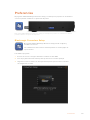
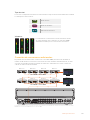
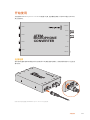
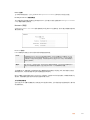
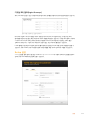
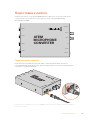
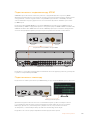
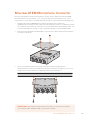
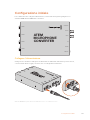
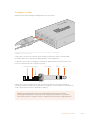
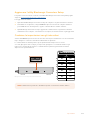
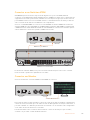
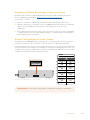
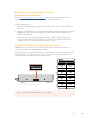
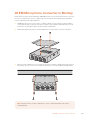
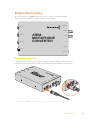
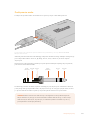
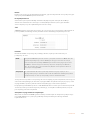
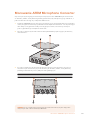
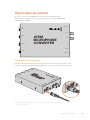
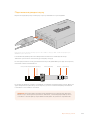
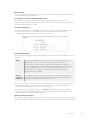
Getting Started
Getting started with your ATEM Microphone Converter is as simple as plugging in power,
connecting analog audio sources and plugging the MADI output into an ATEM switcher.
ATEM
MICROPHONE
CONVERTER
POWER +12V
ETHERNET
USB
MADI IN
MADI OUT
MONITOR OUT
MIC/LINE 1
MIC/LINE 2
MIC/LINE 3
MIC/LINE 4
Connecting Power
Connect the included 12 volt power supply to the power input using the socket adapter for your
country. Tightening the locking ring secures the cable to prevent accidental disconnection.
Connect power to your ATEM Microphone Converter using the supplied power adaptor
5Getting Started

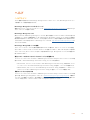
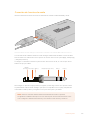
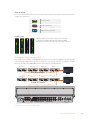
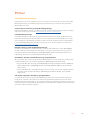
Connecting Audio
Connect your audio sources to your converter via the combo XLR and 1/4” jack inputs.
Connect mic or line level analog audio to the ATEM Microphone Converter’s XLR or TRS inputs
Your converter’s 1/4” jacks let you connect balanced analog audio via TRS connectors.
TRSstands for Tip, Ring, Sleeve which refers to the three contacts of the jack connector.
The illustration in this section displays the wiring pins inside the male 1/4” jack connector
ifyouwant to make your own cables.
Sleeve (Ground) Tip (+) Sleeve (Ground) Ring (–) Tip (+)
Ring (–)
The illustration shows the jack connector’s positive, negative and ground wiring pins. If you
need to reverse the polarity of your analog audio cable to suit your audio equipment, you can
simply swap the positive and negative wiring on the tip and ring pins.
NOTE Microphone phantom power is supported on all inputs. To learn more about
setting phantom power as well as mic and line inputs, refer to the ‘changing settings
using switches’ section in thismanual.
6Getting Started

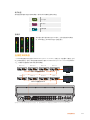
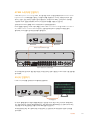
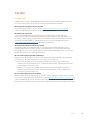
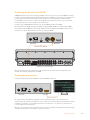
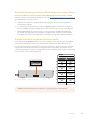
Connecting to an ATEM Switcher
Your ATEM Microphone Converter supports digital audio with the MADI protocol, also
known as Multichannel Audio Digital Interface. MADI is popular with most professional audio
manufacturers, broadcasters and high end recording facilities. These MADI ports have robust
BNC connectors and transmit audio data over 75 ohm coaxial cables up to 100 meters long.
Connect your converter’s MADI BNC output to the MADI input on your ATEM switcher.
ATEMswitcher models that support MADI include ATEM 4 M/E Constellation HD,
ATEMConstellation 8K and ATEM Television Studio HD8 ISO. The MADI input LED will
illuminatered when powered and white once MADI is detected.
CH 1 CH 2
PUSH PUSH
USE ONLY WITH A 250V FUSE
USB REMOTE TALKBACK
B
USB A
12-30V 6A
REF OUT TIMECODE OUT
1 2 3 4 5 6 7 8
1 2 3 4 5 6 7 8
REF IN TIMECODE IN
MADI OUT
MADI IN
AUX 1 PROGRAM
AUX 2 MULTIVIEW MULTIVIEW CONTROL OUT STUDIO OUT STEREO INETHERNET SDI INPUTS ANALOG AUDIO IN TALKBACK
SDI OUTPUTS
L L
R R R
LPUSH
ATEM Television Studio HD8
MADI OUT to MADI IN
You can find more information about controlling audio levels and enhancing the quality
ofyouraudio in the manual for your ATEM switcher.
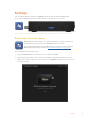
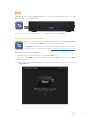
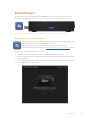
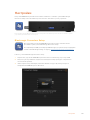
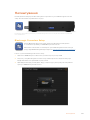
Connecting a Monitor
Connect an HDMI television or monitor into the converter’s HDMI output.
Monitor Out
This video output lets you view the levels of each channel, plus a continuously updating
waveform showing audio peaks over a 60 second duration. You can also visually confirm
thatphantom power is activated and if inputs are set to mic or line level audio.
For more details about the monitor output and all the information it displays, refer to the
‘using the monitor output’ section.
7Getting Started

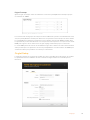
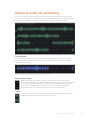
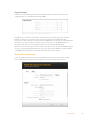
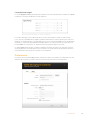
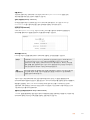
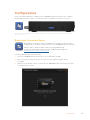
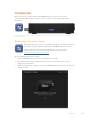
Settings
You can adjust different settings for ATEM Microphone Converter using the Blackmagic
Converters Setup utility and via the small switches on the side of your converter.
Adjust settings using the Blackmagic Converters Setup utility and the switches on the side of your converter
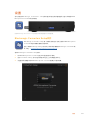
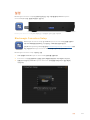
Blackmagic Converters Setup
Blackmagic Converters Setup is a software utility used to change settings and
update the internal software in your ATEM Microphone Converter.
First, download and install the latest Blackmagic Converters software from the
Blackmagic Design support center at www.blackmagicdesign.com/support
To use Blackmagic Converters Setup:
1 Connect ATEM Microphone Converter to your computer via USB.
2 Launch Converters Setup. Your converter model will be named in the utility home page.
3 Click on the circular ‘setup’ icon or the image of your ATEM Microphone Converter to open
the audio settings.
8Settings

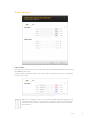
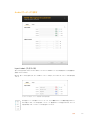
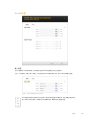
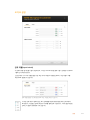
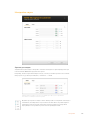
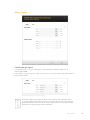
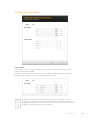
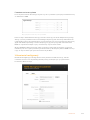
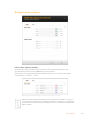
Audio Settings
Input Labels
Customize the name and color of each input. This helps visually identify the inputs when using
the HDMI monitor output.
A quick example would be to name each source, then set all mic level sources to red and line
level sources to blue.
Label your inputs and select their display color using the menu
Indicators to the right of each color selection menu will display the input type and
whether phantom power is selected. These settings are selected via the switches
on the side of the converter. Information on setting the switches is provided later
inthis manual.
9Settings

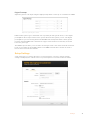
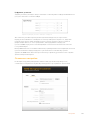
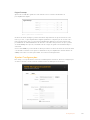
Digital Preamps
Adjust the gain for each input using the digital preamp slider controls up to a maximum of +30dB.
Adjust the gain using the sliders
Different microphone types and brands can vary widely in analog audio levels, so the digital
preamplifiers allow compensation for the specific brand of microphone you use. The digital
preamplifier is processed using internal 32 bit RAW audio bit depth and that is much greater
precision than the MADI audio standard can support. This results in an extremely clean and
noise free gain stage.
The HDMI output enables you to measure the changes made to the audio waveform and meter
levels as you adjust the preamplifier sliders. The ATEM’s internal mixer can then be used to
finesse these levels into the final mix.
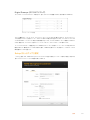
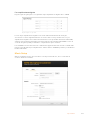
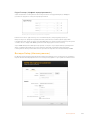
Setup Settings
Setup settings let you change the name of your microphone converter, change network
settingsand displays the current version of your microphone converter’s internal software.
10Settings

Name
This name is helpful to identify the unit when more than one ATEM Microphone Converter is
connected to your computer or network.
Identify Converter
Clicking the checkbox activates the flashing green LEDs on each end of the converter. This
helps identify which converter you are currently adjusting using Blackmagic Converters Setup.
Network
ATEM Microphone Converter can connect to the network using a static IP address or by using
DHCP allowing you to change the audio settings and update the unit over a network.
Protocol
DHCP and static IP settings let you determine how your converter is connected to your network.
DHCP ATEM Microphone Converters are set to DHCP by default. The dynamic host
configuration protocol, or DHCP, is a service on network servers that automatically
finds your ATEM Microphone Converter and assigns an IP address. DHCP is a great
service that makes it easy to connect equipment via Ethernet and ensure their IP
addresses do not conflict with each other. Most computers andnetwork switchers
support DHCP.
Static IP When ‘static IP’ is selected, you can enter your network details manually. When
setting IP addresses manually so all units can communicate, they must share the
same subnet mask and gateway settings.
When using static IP and there are other devices on the network that have the same identifying
number in their IP address, there will be a conflict and the units won’t connect. If you encounter
a conflict, simply change the identifying number in the unit’s IP address.
For example, if the conflicting address is 192.100.40.30 change the last number field to anything
other than 30. If the new number is also being used, keep changing it until you find a unique
number that isn’t being used by other equipment.
Allow utility administration
Enabling the ‘via USB’ setting limits setting changes to only the computer connected via USB.
This removes the risk of anyone on the network making accidental settings changes.
11Settings

Updating Blackmagic Converters Setup utility
The first step is to download the Blackmagic Converters Setup utility from the Blackmagic
Design support center at www.blackmagicdesign.com/support
To update the software:
1 Run the Blackmagic Converters Setup installer on your computer and follow the onscreen
instructions.
2 After installation is complete, connect your ATEM Microphone Converter to the computer
viathe USB port on the rear panel. You can also connect to your network via Ethernet.
3 Launch Blackmagic Converters Setup and follow any onscreen prompt to update the
internal software. If no prompt appears, the internal software is up to date and there is
nothing further you need to do.
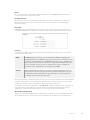
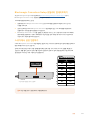
Changing Settings Using Switches
The side panel of the ATEM Microphone Converter features a set of small switches used to
select input type and turn phantom power on or off.
The switch legend printed on the base of the converter indicates which switches are to be
on/off for particular inputs. For example, if you have inputs 1 and 2 set to line and inputs 3 and 4
set to mic with phantom power, the switches will be set as shown in the following illustration.
LINE MIC
PHANTOM PWR
OFF
PHANTOM PWR
ON
PHANTOM PWR
OFF
PHANTOM PWR
ON
PHANTOM PWR
OFF
PHANTOM PWR
ON
PHANTOM PWR
OFF
PHANTOM PWR
ON
1
2
3
4
5
6
7
8
ATEM
Microphone Converter
LINE MIC
LINE MIC
LINE MIC
INPUT 3
INPUT 4
INPUT 2
INPUT 1
1 2 3 4 5 6 7 8
Inputs 1 and 2 set to line level
NOTE Phantom power is disabled when line level is selected.
12Settings

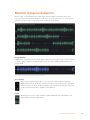
Using the Monitor Output
The monitor output is a fast way to visually check your audio inputs. At a glance, you can see
realtime waveforms of the previous 60 seconds, VU level meters plus indicators for phantom
power and mic or line level audio.
Waveforms
The realtime waveforms on the HDMI monitor output display up to the last 60 seconds of audio
starting from the right hand side. The color of the waveform can be changed via the Converters
Setup utility.
Elapsed time can be seen via the scale at the bottom of the output
Input ID
Each channel displays the input number. When connecting 2 or more converters
together, the numbers will continue from 5 onwards as each converter is connected
up to a maximum of 16 inputs per HDMI output. Asadditional converters are
connected, the input will increase sequentially soyou always know which
input is which.
Label
If the input has been labelled using the Blackmagic Converters Setup utility,
thelabelswill appear above each waveform.
13Using the Monitor Output

Level Type
Icons to the left of the waveform will display the current level type set using the switches
ontheside of your converter.
LINE
Line Level
MIC
Mic Level
+48
Phantom Power
Meters
Audio meters to the right of the waveform display the
VUlevel. Thesize of the VU meters on the HDMI output
will decrease as you connect more converters.
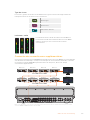
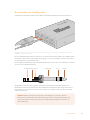
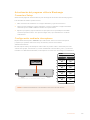
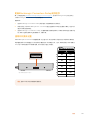
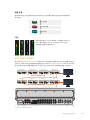
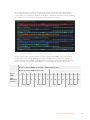
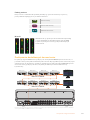
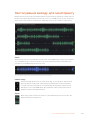
Connecting Additional Converters
Up to 4 ATEM Microphone Converters can be connected to the one HDMI output so you can
see all 16 channels at once. When connecting more than 4 converters together, connect a
monitor to the first of each additional bank of 4 ATEM Microphone converters so you can view
each additional microphone converter.
CH 1 CH 2
PUSH PUSH
USE ONLY WITH A 250V FUSE
USB REMOTE TALKBACK
B
USB A
12-30V 6A
REF OUT TIMECODE OUT
1 2 3 4 5 6 7 8
1 2 3 4 5 6 7 8
REF IN TIMECODE IN
MADI OUT
MADI IN
AUX 1 PROGRAM
AUX 2 MULTIVIEW MULTIVIEW CONTROL OUT STUDIO OUT STEREO INETHERNET SDI INPUTS ANALOG AUDIO IN TALKBACK
SDI OUTPUTS
L L
R R R
LPUSH
MADI OUT to MADI IN
MADI OUT to MADI IN
MADI 9-12 MADI 5-8 MADI 1-4MADI 13-16
MADI 29-32 MADI 25-28 MADI 21-24 MADI 17-20
MADI 17-32
MADI 1-16
This illustration shows 8 microphone converters daisy chained together to send 32 channels of audio via MADI
to ATEM Television Studio HD8
14Using the Monitor Output

Once you have 3 or more converters daisy chained together, the amount of room decreases.
This means some information will become hidden to make space for more inputs. You can
check mic/line level and phantom power settings using the setup utility or by checking the small
switches on the side of the unit.
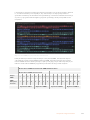
HDMI monitor output when connecting 4 converters together
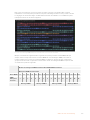
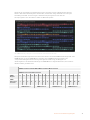
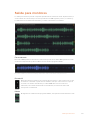
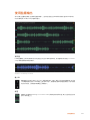
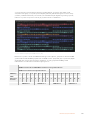
Each additional converter will populate the next four MADI channels so each input corresponds
to both the MADI input on your ATEM switcher and the input number on the HDMI monitor
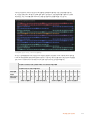
output. The table below shows how the groups of audio inputs will populate on the ATEM
switcher’s audio mixer when daisy chaining multiple units.
ATEM Constellation 8K and ATEM 4 M/E Constellation model switchers
ATEM Television Studio model switchers
MADI Input 1-4 5-8 9-12 13-16 17-20 21-24 25-28 29-32 33-36 37-40 41-44 45-48 49-52 53-56 57-60 61-64
ATEM
Microphone
Converter
1 2 3 4 5 6 7 8 9 10 11 12 13 14 15 16
HDMI Display 1 HDMI Display 2 HDMI Display 3 HDMI Display 4
15Using the Monitor Output

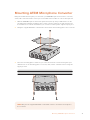
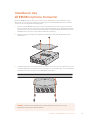
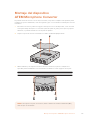
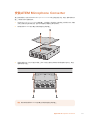
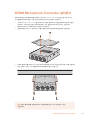
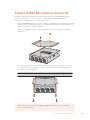
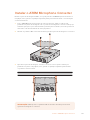
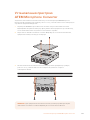
Mounting ATEM Microphone Converter
Using the included mount plate you can fasten your ATEM Microphone Converter to a lectern,
desk, wall or other flat surface to keep it secure while still accessible to connect microphones.
1 With the ATEM Microphone Converter upside down, line up the pre drilled holes on the
mounting plate with the mounting points on the converter. There is enough clearance for
the rubber feet to remain attached but you can remove with a plastic edged scraping tool.
2 Using the supplied M3 5mm countersunk screws fasten the mounting plate to the converter.
LINE
PHANTOM PWR
OFF
PHANTOM PWR
ON
PHANTOM PWR
OFF
PHANTOM PWR
ON
MIC
INPUT 1
INPUT 2
LINE MIC
PHANTOM PWR
OFF
PHANTOM PWR
ON
INPUT 3
LINE MIC
PHANTOM PWR
OFF
ATEM
Microphone Converter
PHANTOM PWR
ON
INPUT 4
LINE MIC
MOUNT PLATE
3 Once the mounting plate is attached, you can now attach the converter using the 4 pre
drilled holes on the mounting plate to a lectern, desk, wall or other flat surface using self
tapping screws.
MOUNT PLATE
NOTE Only use the supplied M3 5mm countersunk screws to attach the mount plate to
the converter.
16Mounting ATEM Microphone Converter

Help
Getting Help
The fastest way to obtain help is to go to the Blackmagic Design online support pages and
check the latest support material available for your Blackmagic Converter.
Blackmagic Design Online Support Pages
The latest manual, software and support notes can be found at the Blackmagic Design support
center at www.blackmagicdesign.com/support.
Blackmagic Design Forum
The Blackmagic Design forum on our website is a helpful resource you can visit for
more information and creative ideas. This can also be a faster way of getting help
as there may already be answers you can find from other experienced users and
Blackmagic Design staff which will keep you moving forward. You can visit the forum at
https://forum.blackmagicdesign.com
Contacting Blackmagic Design Support
If you can’t find the help you need in our support material, or on the forum, please click the
“Send us an email” button on the support page to email a support request. Alternatively,
clickon the “Find your local support team” button and call your nearest Blackmagic Design
support office.
Checking the Software Version Currently Installed
To check which version of Blackmagic Converters Setup software is installed on your computer,
open the About Blackmagic Converters Setup window.
On Mac OS, open Blackmagic Converters Setup from the Applications folder. Select About
Blackmagic Converters Setup from the application menu to reveal the version number.
On Windows, open Blackmagic Converters Setup from your Start menu. Click on the Help
menu and select About Blackmagic Converters Setup to reveal the version number.
How to Get the Latest Software Updates
After checking the version of Blackmagic Converters Setup software installed on your computer,
please visit the Blackmagic Design support center at www.blackmagicdesign.com/support to
check for the latest updates. While it is usually a good idea to run the latest updates, it is wise to
avoid updating any software if you are in the middle of an important project.
17Help

Regulatory Notices
Disposal of Waste of Electrical and Electronic Equipment Within the European Union.
The symbol on the product indicates that this equipment must not be disposed of with other
waste materials. In order to dispose of your waste equipment, it must be handed over to a
designated collection point for recycling. The separate collection and recycling of your waste
equipment at the time of disposal will help conserve natural resources and ensure that it is
recycled in a manner that protects human health and theenvironment. Formore information
about where you can drop off your waste equipment for recycling, please contact your local
city recycling office or the dealer from whom you purchased the product.
This equipment has been tested and found to comply with the limits for a Class A digitaldevice,
pursuant to Part 15 of the FCC rules. These limits are designed to provide reasonable
protection against harmful interference when the equipment is operated inacommercial
environment. This equipment generates, uses, and can radiate radio frequency energy and,
if not installed and used in accordance with the instructions, maycause harmful interference
to radio communications. Operation of this product in aresidential area is likely to cause
harmful interference, in which case the user will be required to correct the interference at
personal expense.
Operation is subject to the following two conditions:
1 This device may not cause harmful interference.
2 This device must accept any interference received, including interference that maycause
undesired operation.
Connection to HDMI interfaces must be made with high quality shielded HDMI cables.
R-R-BMD-20221125001
ISED Canada Statement
This device complies with Canadianstandards for Class A digital apparatus.
Any modifications or use of this product outside its intended use could void compliance to
these standards.
Connection to HDMI interfaces must be made with high quality shielded HDMI cables.
This equipment has been tested for compliance with the intended use in a
commercial environment. If the equipment is used in a domestic environment,
it may cause radio interference.
18Regulatory Notices

Safety Information
This equipment is suitable for use in tropical locations with an ambient temperature of
up to 40ºC.
Use only at altitudes not more than 2000m above sea level.
No operator serviceable parts inside. Refer servicing to your local Blackmagic Design
service centre.
State of California statement
This product can expose you to chemicals such as trace amounts of polybrominated biphenyls
within plastic parts, which is known to the state of California to cause cancer and birth defects
or other reproductive harm.
Formore information go to www.P65Warnings.ca.gov.
Singapore Notice
The power adapter supplied with your Blackmagic Design equipment has interchangeable
plugs to suit the mains socket outlets in a number of countries. Each plug marked with the
model numbers APD2-UK or APD2-EU are approved and suitable for use in Singapore.
19Safety Information

Warranty
12 Month Limited Warranty
Blackmagic Design warrants that this product will be free from defects in materials and workmanship
for a period of 12 months from the date of purchase. If a product proves to be defective during this
warranty period, Blackmagic Design, at its option, either will repair the defective product without
charge for parts and labor, or will provide a replacement in exchange for the defective product.
In order to obtain service under this warranty, you the Customer, must notify Blackmagic Design
of the defect before the expiration of the warranty period and make suitable arrangements for
the performance of service. The Customer shall be responsible for packaging and shipping the
defective product to a designated service center nominated by Blackmagic Design, with shipping
charges pre paid. Customer shall be responsible for paying all shipping charges, insurance, duties,
taxes, and any other charges for products returned to us for any reason.
This warranty shall not apply to any defect, failure or damage caused by improper use or improper
or inadequate maintenance and care. Blackmagic Design shall not be obligated to furnish service
under this warranty: a) to repair damage resulting from attempts by personnel other than Blackmagic
Design representatives to install, repair or service the product, b) to repair damage resulting from
improper use or connection to incompatible equipment, c) to repair any damage or malfunction
caused by the use of non Blackmagic Design parts or supplies, or d) to service a product that
has been modified or integrated with other products when the effect of such a modification or
integration increases the time or difficulty of servicing the product. THIS WARRANTY IS GIVEN BY
BLACKMAGIC DESIGN IN LIEU OF ANY OTHER WARRANTIES, EXPRESS OR IMPLIED. BLACKMAGIC
DESIGN AND ITS VENDORS DISCLAIM ANY IMPLIED WARRANTIES OF MERCHANTABILITY OR
FITNESS FOR A PARTICULAR PURPOSE. BLACKMAGIC DESIGN’S RESPONSIBILITY TO REPAIR
OR REPLACE DEFECTIVE PRODUCTS IS THE WHOLE AND EXCLUSIVE REMEDY PROVIDED TO
THE CUSTOMER FOR ANY INDIRECT, SPECIAL, INCIDENTAL OR CONSEQUENTIAL DAMAGES
IRRESPECTIVE OF WHETHER BLACKMAGIC DESIGN OR THE VENDOR HAS ADVANCE NOTICE
OF THE POSSIBILITY OF SUCH DAMAGES. BLACKMAGIC DESIGN IS NOT LIABLE FOR ANY
ILLEGAL USE OF EQUIPMENT BY CUSTOMER. BLACKMAGIC IS NOT LIABLE FOR ANY DAMAGES
RESULTING FROM USE OF THIS PRODUCT. USER OPERATES THIS PRODUCT AT OWN RISK.
© Copyright 2023 Blackmagic Design. All rights reserved. ‘Blackmagic Design’, ‘DeckLink’, ‘HDLink’, ‘Workgroup Videohub’,
‘Multibridge Pro’, ‘Multibridge Extreme’, ‘Intensity’ and ‘Leading the creative video revolution’ are registered trademarks in the
US and other countries. All other company and product names may be trade marks of their respective companies with which
they are associated.
Thunderbolt and the Thunderbolt logo are trademarks of Intel Corporation in the U.S. and/or other countries.
20Warranty
A página está carregando...
A página está carregando...
A página está carregando...
A página está carregando...
A página está carregando...
A página está carregando...
A página está carregando...
A página está carregando...
A página está carregando...
A página está carregando...
A página está carregando...
A página está carregando...
A página está carregando...
A página está carregando...
A página está carregando...
A página está carregando...
A página está carregando...
A página está carregando...
A página está carregando...
A página está carregando...
A página está carregando...
A página está carregando...
A página está carregando...
A página está carregando...
A página está carregando...
A página está carregando...
A página está carregando...
A página está carregando...
A página está carregando...
A página está carregando...
A página está carregando...
A página está carregando...
A página está carregando...
A página está carregando...
A página está carregando...
A página está carregando...
A página está carregando...
A página está carregando...
A página está carregando...
A página está carregando...
A página está carregando...
A página está carregando...
A página está carregando...
A página está carregando...
A página está carregando...
A página está carregando...
A página está carregando...
A página está carregando...
A página está carregando...
A página está carregando...
A página está carregando...
A página está carregando...
A página está carregando...
A página está carregando...
A página está carregando...
A página está carregando...
A página está carregando...
A página está carregando...
A página está carregando...
A página está carregando...
A página está carregando...
A página está carregando...
A página está carregando...
A página está carregando...
A página está carregando...
A página está carregando...
A página está carregando...
A página está carregando...
A página está carregando...
A página está carregando...
A página está carregando...
A página está carregando...
A página está carregando...
A página está carregando...
A página está carregando...
A página está carregando...
A página está carregando...
A página está carregando...
A página está carregando...
A página está carregando...
A página está carregando...
A página está carregando...
A página está carregando...
A página está carregando...
A página está carregando...
A página está carregando...
A página está carregando...
A página está carregando...
A página está carregando...
A página está carregando...
A página está carregando...
A página está carregando...
A página está carregando...
A página está carregando...
A página está carregando...
A página está carregando...
A página está carregando...
A página está carregando...
A página está carregando...
A página está carregando...
A página está carregando...
A página está carregando...
A página está carregando...
A página está carregando...
A página está carregando...
A página está carregando...
A página está carregando...
A página está carregando...
A página está carregando...
A página está carregando...
A página está carregando...
A página está carregando...
A página está carregando...
A página está carregando...
A página está carregando...
A página está carregando...
A página está carregando...
A página está carregando...
A página está carregando...
A página está carregando...
A página está carregando...
A página está carregando...
A página está carregando...
A página está carregando...
A página está carregando...
A página está carregando...
A página está carregando...
A página está carregando...
A página está carregando...
A página está carregando...
A página está carregando...
A página está carregando...
A página está carregando...
A página está carregando...
A página está carregando...
A página está carregando...
A página está carregando...
A página está carregando...
A página está carregando...
A página está carregando...
A página está carregando...
A página está carregando...
A página está carregando...
A página está carregando...
A página está carregando...
A página está carregando...
A página está carregando...
A página está carregando...
A página está carregando...
A página está carregando...
A página está carregando...
A página está carregando...
A página está carregando...
A página está carregando...
A página está carregando...
A página está carregando...
A página está carregando...
A página está carregando...
A página está carregando...
A página está carregando...
A página está carregando...
A página está carregando...
A página está carregando...
A página está carregando...
A página está carregando...
A página está carregando...
A página está carregando...
A página está carregando...
A página está carregando...
A página está carregando...
A página está carregando...
A página está carregando...
A página está carregando...
A página está carregando...
A página está carregando...
A página está carregando...
A página está carregando...
A página está carregando...
A página está carregando...
A página está carregando...
A página está carregando...
A página está carregando...
A página está carregando...
A página está carregando...
A página está carregando...
A página está carregando...
A página está carregando...
A página está carregando...
A página está carregando...
A página está carregando...
A página está carregando...
A página está carregando...
A página está carregando...
A página está carregando...
A página está carregando...
A página está carregando...
A página está carregando...
A página está carregando...
A página está carregando...
A página está carregando...
A página está carregando...
A página está carregando...
A página está carregando...
A página está carregando...
A página está carregando...
A página está carregando...
A página está carregando...
A página está carregando...
A página está carregando...
A página está carregando...
A página está carregando...
A página está carregando...
A página está carregando...
A página está carregando...
A página está carregando...
A página está carregando...
A página está carregando...
A página está carregando...
A página está carregando...
A página está carregando...
A página está carregando...
A página está carregando...
A página está carregando...
A página está carregando...
A página está carregando...
A página está carregando...
A página está carregando...
A página está carregando...
-
 1
1
-
 2
2
-
 3
3
-
 4
4
-
 5
5
-
 6
6
-
 7
7
-
 8
8
-
 9
9
-
 10
10
-
 11
11
-
 12
12
-
 13
13
-
 14
14
-
 15
15
-
 16
16
-
 17
17
-
 18
18
-
 19
19
-
 20
20
-
 21
21
-
 22
22
-
 23
23
-
 24
24
-
 25
25
-
 26
26
-
 27
27
-
 28
28
-
 29
29
-
 30
30
-
 31
31
-
 32
32
-
 33
33
-
 34
34
-
 35
35
-
 36
36
-
 37
37
-
 38
38
-
 39
39
-
 40
40
-
 41
41
-
 42
42
-
 43
43
-
 44
44
-
 45
45
-
 46
46
-
 47
47
-
 48
48
-
 49
49
-
 50
50
-
 51
51
-
 52
52
-
 53
53
-
 54
54
-
 55
55
-
 56
56
-
 57
57
-
 58
58
-
 59
59
-
 60
60
-
 61
61
-
 62
62
-
 63
63
-
 64
64
-
 65
65
-
 66
66
-
 67
67
-
 68
68
-
 69
69
-
 70
70
-
 71
71
-
 72
72
-
 73
73
-
 74
74
-
 75
75
-
 76
76
-
 77
77
-
 78
78
-
 79
79
-
 80
80
-
 81
81
-
 82
82
-
 83
83
-
 84
84
-
 85
85
-
 86
86
-
 87
87
-
 88
88
-
 89
89
-
 90
90
-
 91
91
-
 92
92
-
 93
93
-
 94
94
-
 95
95
-
 96
96
-
 97
97
-
 98
98
-
 99
99
-
 100
100
-
 101
101
-
 102
102
-
 103
103
-
 104
104
-
 105
105
-
 106
106
-
 107
107
-
 108
108
-
 109
109
-
 110
110
-
 111
111
-
 112
112
-
 113
113
-
 114
114
-
 115
115
-
 116
116
-
 117
117
-
 118
118
-
 119
119
-
 120
120
-
 121
121
-
 122
122
-
 123
123
-
 124
124
-
 125
125
-
 126
126
-
 127
127
-
 128
128
-
 129
129
-
 130
130
-
 131
131
-
 132
132
-
 133
133
-
 134
134
-
 135
135
-
 136
136
-
 137
137
-
 138
138
-
 139
139
-
 140
140
-
 141
141
-
 142
142
-
 143
143
-
 144
144
-
 145
145
-
 146
146
-
 147
147
-
 148
148
-
 149
149
-
 150
150
-
 151
151
-
 152
152
-
 153
153
-
 154
154
-
 155
155
-
 156
156
-
 157
157
-
 158
158
-
 159
159
-
 160
160
-
 161
161
-
 162
162
-
 163
163
-
 164
164
-
 165
165
-
 166
166
-
 167
167
-
 168
168
-
 169
169
-
 170
170
-
 171
171
-
 172
172
-
 173
173
-
 174
174
-
 175
175
-
 176
176
-
 177
177
-
 178
178
-
 179
179
-
 180
180
-
 181
181
-
 182
182
-
 183
183
-
 184
184
-
 185
185
-
 186
186
-
 187
187
-
 188
188
-
 189
189
-
 190
190
-
 191
191
-
 192
192
-
 193
193
-
 194
194
-
 195
195
-
 196
196
-
 197
197
-
 198
198
-
 199
199
-
 200
200
-
 201
201
-
 202
202
-
 203
203
-
 204
204
-
 205
205
-
 206
206
-
 207
207
-
 208
208
-
 209
209
-
 210
210
-
 211
211
-
 212
212
-
 213
213
-
 214
214
-
 215
215
-
 216
216
-
 217
217
-
 218
218
-
 219
219
-
 220
220
-
 221
221
-
 222
222
-
 223
223
-
 224
224
-
 225
225
-
 226
226
-
 227
227
-
 228
228
-
 229
229
-
 230
230
-
 231
231
-
 232
232
-
 233
233
-
 234
234
-
 235
235
-
 236
236
-
 237
237
-
 238
238
-
 239
239
-
 240
240
-
 241
241
-
 242
242
-
 243
243
-
 244
244
-
 245
245
-
 246
246
-
 247
247
-
 248
248


Blackmagic ATEM Microphone Converter Manual do usuário
- Tipo
- Manual do usuário
em outras línguas
Artigos relacionados
-
Blackmagic ATEM Converters Manual do usuário
-
-
-
Blackmagicdesign Web Presenter Manual do proprietário
-
-
-
-
-
Blackmagic Desktop Video Manual do usuário
-
