
made in europe
instructions • instrucciones • instruções • gebruiksaanwijzing
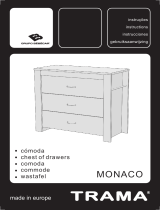
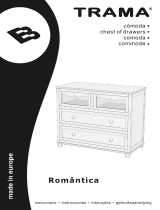
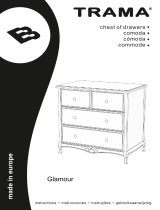
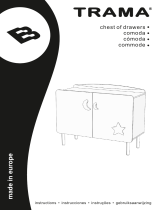
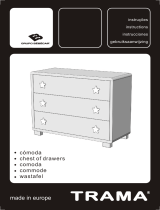
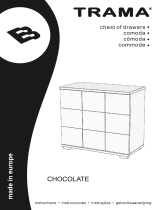
cómoda
chest of drawers
comoda
commode
Inova

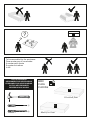
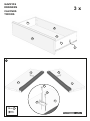
TOOLS REQUIRED
HERRAMIENTAS NECESARIAS
FERRAMENTAS NECESSARIAS
OUTILS NÉCESSAIRES
GEREEDSCHAP NODIG
?
To be assembled by the purchaser
Para montar por el consumidor
A montar pelo cliente
À monter soi-même
In Kit
89x62,5x11cm
1
2
111x64x9,5cm
BOX
CAJA
CAIXAS

J
I
G
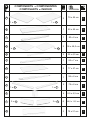
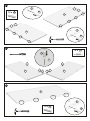
COMPONENTS COMPONENTES
COMPOSANTS INHOUD
A279 x 49 cm
A1
1 x
A2
1 x
B195 x 49 cm
180 x 8 cm
C
256 x 48,5 cm
DD1
1 x
D2
1 x
E252 x 4,5 cm
192 x 7 cm
F
277 x 47 cm
196 x 8 cm
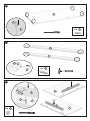
J2
1 x 279 x 8 cm
J1
1 x
48,5 x 6,5 cm
K
L1
L3 x
L2
3 x 40,5 x 13,5 cm
6
379 x 21 cm
M
2
1
1
2
2
1
2
1
1
1
1
2

X
V
Z
Y
T
S
Q
H
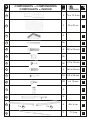
COMPONENTS COMPONENTES
COMPOSANTS INHOUD
376 x 40 cm
O
N374 x 13,5 cm
54
P
4
M6 x 25 mm4
54
R
3,5 x 16 mm
58
M6 x 20 mm4
18 3,5 x 20 mm
4 x 16 mm
20
U6
6
40 x 4 cm
W
W1
3 x W2
3 x 6
171,3 cm
1
2
2
1
2
2
2
1
1
2
2
1
2
2

§
#
£
&
@
COMPONENTS COMPONENTES
COMPOSANTS INHOUD
1
1
2
6
28
7,75 x 35 mm 2
2
2
2
2
89 cm
51 cm
96 cm
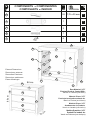
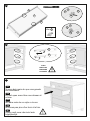
Raw Material: MDF
Finished Product Coated With:
Varnish or Painted (non-toxic)
Materia Prima: MDF
Producto terminado acabado de:
Barniz o Pintura (no tóxicos)
Matéria-Prima: MDF
Acabamento do Produto:
Verniz ou Lacado (não toxico)
Matière Première: MDF
Produit Fini enduit de:
Vernis ou Peinture (non toxique)
External Dimensions
Dimensiones externas
Dimensões Exteriores
Dimensions extérieures
Extern Afmetingen
A2
D2
B
I
M
M
M
A1
J1
J2
C
B
A1
I
X
G
G
F
CK
K
J1
J2
H
K
W2
W2
W2
V
V
V

@
@
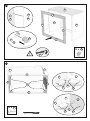
03
02
01
A
A1
A2
A
x
12
A1
A2
P
A
P
x
6
B
B
x
4
@
@
@

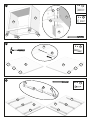
05
04
B
P
x
4
P
B
F
06
A1
A2
A
E
E
E
R
4 x
P
R
@
x
4
@
C
FC

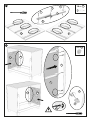
09
08
A1
F
A1
F
R
R
1 x
07
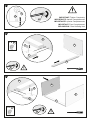
IMPORTANT: Tighten Completely
IMPORTANTE: Apriete Completamente
IMPORTANTE: Apertar Completamente
IMPORTANT: Fixer Completement
BELANGRIJK: Draai Volledig Vast
R
R
P
A1
F
A2
A2
F
R
R
R
1 x
R

@
12
11
10
B
A1
A2
R
R
4 x
B
R
A
x
2
P
x
4
P
I
I
@
I
I

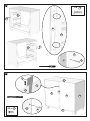
14
13
P
x
16
P
C
R
CR
R
R
4 x
J1
J2
J
J1
J2
II
J
J

Z
15
16
A1
B
A2
C
R
R
12 x
A
B
R
A
B
J
C
A1
A2
F
F
A
A
C
16 x
I
J1
J2
I
J1
J2
Z
J
H
Z
Z
H
Z
H

S
17
19
18
D
D1
D2
D1
D2
W1
W1
W1
W2
W2
W2
x
6
24 x
W
T
H
A
K
ZT
A1
A2
K
K
K
K
4 x
Z
4 x
@
@
S
S
S

Y
Y
Y
D
V
Y
18 x
D1
D2
D1
D2
D
J
J1
J2
20
R
4 x
D
R
R
21

Q
D1
D2
E
E
4 x
D
E
E
D
G
GX
A2
F
B
Q
S
22
23
X
22 x
G
G
GS

GAVETAS
DRAWERS
CAJONES
TIROIRS
3 x
L1L2
L
UU
U
S
S
M
L1
L2
N
O
U
S
12 x
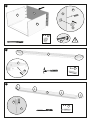
24

28
1525
15
16 27
26
IMPORTANT: Tighten Completely
IMPORTANTE: Apriete Completamente
IMPORTANTE: Apertar Completamente
IMPORTANT: Fixer Completement
BELANGRIJK: Draai Volledig Vast
R
L1
L2
O
N
R
P
P
x
12
R
12 x
P
P
R
R
N
N
L
L1
L2
P
x
12
R
12 x
R
M
L1
L2
O
N
M
R
L
PP
O

§
29
x
6
O
O
NM
M
N
O
N
M
PUSH
EMPUJAR
EMPURRE
POUSSER
§
§
V
V
30
Nunca abrir mais do que uma gaveta
em simultânio.
Do not open more than one drawer at
a time.
No abre más de un cajón a la vez.
N'ouvrez pas plus d'un tiroir à la fois.
Open nooit meer dan één lade
tegelijkertijd.
PT
GB
ES
FR
NL
31

U
U
NL
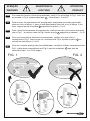
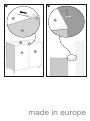
ATENÇÃO
WARNING
ADVERTENCIA
ACHTUNG
ATTENTION
OPGELET
FIG. 1 FIG. 2
PT Para o bom funcionamento do amortecedor, verifique se este se encontra de acordo
com a Fig.1 , se estiver como na Fig.2 ajuste a peça seguindo os passos I , II e III.
U
U
STEP I
STEP III
STEP II
GB For a smooth function of the shock absorber, verify if it is according to Fig 1, but if it is
as showed in Fig 2, please adjust part , follow steps I, II and III.
U
ES Para el mejor funcionamiento del amortiguador, asegúrese que está posicionado
como se ve en el dibujo 1; pero, si está posicionado como se ve en el dibujo 2, por
favor, haga el ajuste a la pieza siguiendo los pasos I, II y III.
U
Voor een correcte werking van de schokdemper, controleer of deze overeenkomt met
Fig.1. Indien deze overeenkomt met Fig.2, pas het onderdeel aan door de
instructies stap I, II en III te volgen.
FR
U
Pour que I’amortissuer fonctionne correctement, veuillez à ce que celui-ci
corresponde à Fig.1. Dans le cas où il correspond à Fig.2, ajoutez la pièce en
suivant les instructions I, II et III.
U
U
U
VV

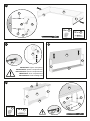
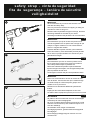
IMPORTANT
We recommend that you secure the furniture to the
wall with this safety strap.
This is to prevent the furniture from tipping or falling if a
child tries to climb or hang on it.
Different walls require different types of fixings, therefore
use fixings suitable for the walls of your home.
The fittings included in this packet are for concrete walls.
IMPORTANTE
Recomendamos que fije el mueble a la pared con la
cinta de seguridad. Esto es para evitar el riesgo de que
vuelque o caiga el mueble si un niño intenta subirse
encima o colgarse del mueble.
Paredes distintas requieren tornillos y tacos distintos.
Utilice los tornillos y tacos adecuados para las paredes
de su casa; los proporcionados con este kit son para
paredes de hormigón.
IMPORTANTE
Recomendamos que fixe os móveis à parede com a
fita de segurança incluída, para evitar que tombe se
uma criança tentar trepar ou pendurar-se.
Diferentes materiais de parede requerem diferente
tipo de ferragens de fixação, use ferragens adequadas
para as paredes da sua casa.
As ferragens incluídas são para uma parede de betão.
IMPORTANT
Nous vous recommandons de fixer le meuble au mur
avec la laniere. Ceci afin d'eviter que le meuble bouge
ou tombe lorsqu'un enfant essaye de grimper sur le
meuble ou de s'y accrocher.
Differents murs demandent differents systemes de
fixation.
Employez donc les fixations adaptees a votre mur.
La fixation dans ce paquet est prevue pour un mur normal
BELANGRIJK
Wij raden u aan het meubel aan de muur te bevestigen
met behulp van het bevestigingslint.
Dit om te vermijden dat het meubel verschuift of omvalt
wanneer een kind tracht op het meubel te kruipen of er
zich aan vasthangt.
Verschilende muren vragen verschillende
bevestigingssystemen; gebruik steeds de aangepaste
bevestigingen.
De bevestiging hierbijgevoegd is voorzien voor een
normale muur.
GB
ES
PT
FR
NL
safety strap - cinta de seguridad
fita de segurança - lanière de sécurité
veiligheidslint
31
#
£
32
34
33

made in europe
B
G
B
G
B
G
£
&
3635
A página está carregando...
A página está carregando...
A página está carregando...
A página está carregando...
-
 1
1
-
 2
2
-
 3
3
-
 4
4
-
 5
5
-
 6
6
-
 7
7
-
 8
8
-
 9
9
-
 10
10
-
 11
11
-
 12
12
-
 13
13
-
 14
14
-
 15
15
-
 16
16
-
 17
17
-
 18
18
-
 19
19
-
 20
20
-
 21
21
-
 22
22
-
 23
23
-
 24
24


em outras línguas
- español: Bebecar INOVA El manual del propietario
- français: Bebecar INOVA Le manuel du propriétaire
- English: Bebecar INOVA Owner's manual
- Nederlands: Bebecar INOVA de handleiding
Artigos relacionados
-
 Bebecar Monaco Manual do proprietário
-
 Bebecar Romantica Manual do proprietário
-
 Bebecar Advance Manual do proprietário
-
 Bebecar GLAMOUR Manual do proprietário
-
 Bebecar Faro Manual do proprietário
-
 Bebecar Hada Manual do proprietário
-
 Bebecar Gamma Manual do proprietário
-
 Bebecar Chocolate Manual do proprietário


