Sub-Zero DO30CM/B Guia de usuario
- Categoria
- Fogões
- Tipo
- Guia de usuario
Este manual também é adequado para

M SERIES OVEN
USE AND CARE GUIDE
CLEANING, MAINTENANCE, AND MORE

2
|
Wolf Customer Care 800.222.7820
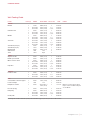
Contents
4 Safety Precautions
6 M Series Oven Features
7 Oven Operation
17 Cooking Guide
20 Care Recommendations
21 Troubleshooting
23 Wolf Warranty
M SERIES OVEN

wolfappliance.com
|
3
Customer Care
The model and serial number are printed on the enclosed
product registration card. Both numbers are also listed on
the product rating plate. Refer to page 6 for rating plate
location. For warranty purposes, you will also need the date
of installation and name of your authorized Wolf dealer.
Record this information below for future reference.
SERVICE INFORMATION
Model Number
Serial Number
Date of Installation
Certied Service Name
Certied Service Number
Authorized Dealer
Dealer Number
If your product ever needs attention, be sure to use a Wolf
Factory Certied Service provider recommended by our
customer care center, or select one from our list of providers
available at wolfappliance.com/locator. All Factory Certi-
ed Service providers are carefully selected and thoroughly
trained by us.
M SERIES OVEN
Important Note
To ensure this product is installed and operated as safely
and efciently as possible, take note of the following types
of highlighted information throughout this guide:
IMPORTANT NOTE highlights information that is especially
important.
CAUTION indicates a situation where minor injury or product
damage may occur if instructions are not followed.
WARNING states a hazard that may cause serious injury or
death if precautions are not followed.
IMPORTANT NOTE: Throughout this guide, dimensions in
parentheses are millimeters unless otherwise specied.

4
|
Wolf Customer Care 800.222.7820
SAFETY PRECAUTIONS
• Always use dry pot holders when removing pans
from this appliance. Wet or damp pot holders can
cause steam burns. Do not use a towel or bulky
cloth in place of pot holders.
• Position oven racks in desired locations when oven
is cool. If a rack must be repositioned after the
oven is already hot, be sure pot holder does not
contact a hot heating element in the oven.
• Do not repair or replace any part of this appli-
ance unless specically recommended in literature
accompanying this appliance.
• Do not use aluminum foil to line any part of this
appliance.
• Never use this appliance to warm or heat the room.
• Do not leave children alone or unattended in the
area where this appliance is in use. Never allow
children to sit or stand on the appliance.
• Do not store items of interest to children above or
at the back of this appliance, as they could climb
on the appliance to reach items and be injured.
CAUTION
Before using self-clean, remove broiler pan, oven
racks, oven rack guides and any other utensils.
IMPORTANT INSTRUCTIONS
GENERAL SAFETY PRECAUTIONS
• Read this guide carefully before using this appli-
ance to reduce risk of re, electric shock or injury.
• This appliance must be properly installed and ser-
viced by a qualied installer or service agency and
grounded by a qualied technician.
• Clean only those parts listed in this guide.
• Do not use oven cleaners. No commercial oven
cleaner or oven liner protective coating of any kind
should be used in or around any part of the oven.
• Do not touch heating elements or interior surfaces
of oven. Heating elements may be hot even though
they are dark in color. Interior surfaces become hot
enough to cause burns. During and after use, do
not touch, or let clothing or other ammable mate-
rials contact heating elements or interior surfaces
of oven until they have had sufcient time to cool.
• Exercise caution when opening the oven door. Let
hot air or steam escape before looking or reaching
into the oven.
• Be sure that the oven cool air intake (located above
the door) and oven exhaust vent (located below the
door) are unobstructed at all times.

wolfappliance.com
|
5
SAFETY PRECAUTIONS
IMPORTANT INSTRUCTIONS
GENERAL SAFETY PRECAUTIONS
• Do not use water on grease res. Smother
the ame or use a dry chemical or foam-type
extinguisher.
• Do not heat unopened food containers, such as
baby food jars and cans. Pressure build-up may
cause the container to burst and cause injury.
• Do not store or use gasoline or other ammable
vapors and liquids in the vicinity of this or any other
appliance.
• Do not clean oven gasket; rubbing or moving the
gasket may compromise the door seal.
• Wear proper apparel. Loose-tting or hanging
garments should never be worn while using this
appliance.
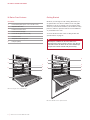
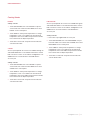
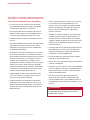
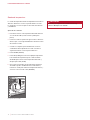
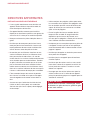
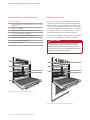
• For contemporary models, press the upper middle
section of the door rmly to open. To close, rotate
the door upward, then press rmly to close. Refer
to the illustration below.
PRESS TO OPEN
Contemporary model
WARNING
PROPOSITION 65 FOR CALIFORNIA RESIDENTS
Cancer and Reproductive Harm—
www.P65Warnings.ca.gov

6
|
Wolf Customer Care 800.222.7820
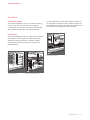
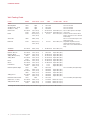
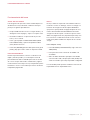
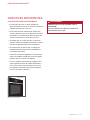
M SERIES OVEN FEATURES
M Series Oven Features
FEATURES
1
Product Rating Plate (lower oven for double ovens)
2
Adjustable Oven Rack
3
Full-Extension Oven Racks
4
Control Panel and Display
5
Control Knobs (professional model)
6
Convection Fans
7
Temperature Probe Receptacle
8
Halogen Lighting
Getting Started
We know you are eager to start cooking, but before you
do, please take some time to read this use & care guide.
Whether you are an occasional cook or an expert chef, it
will be to your benet to familiarize yourself with the safety
practices, features, operation and care recommendations
of your Wolf M series oven.
To ensure the best results, review cooking modes and
special features on page 12.
CAUTION
Do not place cookware on the oven oor or use
aluminum foil or other material to line the oven oor or
side walls. Failure to adhere to this notice will damage
the porcelain interior and will void your warranty.
M series single oven—transitional
4
7
8
3
6
2
M series double oven—professional
4
7
6
8
3
2
5
1

wolfappliance.com
|
7
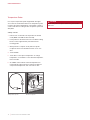
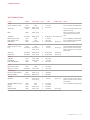
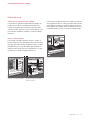
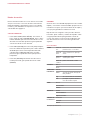
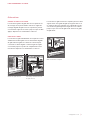
To insert a full-extension rack, place the two rear tabs onto
the rack guide (one tab above and one below). Refer to the
illustration below. Angle the rack slightly and slide back until
the front rack notch engages the front rack guide.
Oven Racks
OVEN RACK GUIDES
To insert the rack guides in the oven, locate the mounting
screws on the oven side walls. Place the rack guide
mounting tabs over the top screws, pivot inward and slide
down until fully seated. Refer to the illustration below.
OVEN RACKS
To insert a standard rack in the oven, place the rack anti-tip
lock under the side rack guide rails. Slide the rack back
and lift up to clear the rack stops. Continue to slide the
rack back until completely inside the oven. Refer to the
illustration below.
OVEN OPERATION
MOUNTING
TA B
ANTI-TIP
LOCK
RACK
STOP
Oven rack guide
Oven rack anti-tip lock
REAR TA B
Full-extension rack

8
|
Wolf Customer Care 800.222.7820
OVEN OPERATION
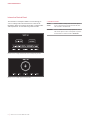
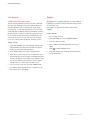
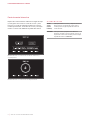
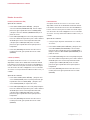
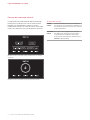
Interactive Control Panel
The interactive control panel utilizes touch technology to
select cooking modes and other functions. Refer to the
illustrations below. For professional models, cooking modes
and temperatures are selected using selector knobs.
COOKING OPTIONS
QUICK
START
Touch to initiate cooking, then select from options
on the control panel. For professional model, turn
selector knob to desired mode.
GOURMET Touch to initiate Gourmet meal preparations, then
select from options on the control panel. For profes-
sional model, turn selector knob to GOURMET.
Home screen—single transitional and contemporary shown
Home screen—single professional shown

wolfappliance.com
|
9
OVEN OPERATION
Oven Operation
PRIOR TO USE
To ensure all residual oil from the manufacturing process
has been removed, each oven must go through the fol-
lowing procedure:
1 Clean oven thoroughly with hot water and a mild deter-
gent. Rinse and dry with a soft cloth.
2 Turn on ventilation. Some smoke and odor is normal.
3 Touch or turn knob to CONVECTION ROAST and adjust
temperature to 500°F
(260°C) for one hour.
4 Touch OFF (turn knob for professional model) and allow
oven to cool with door closed.
PREHEAT
During preheat, the oven is heated as quickly and evenly
as possible and is not ideal for cooking. Preheat should be
utilized for all cooking modes except broil, warm and some
modes in Gourmet. Once preheat is complete, an audible
chime indicates the oven has reached set temperature.
CLOCK
The clock is visible on the control panel during all cooking
modes, however, the oven is shipped with the standby
power feature enabled which causes the screen to go blank
after ve minutes of inactivity. To disable standby power,
refer to extended options on page 10. It is very important
the clock is set to the correct time if a timed cook feature is
used. The clock must be reset after a power outage.
Setting clock:
1 Touch SETTINGS, then select TIME.
2 Touch 12 HOUR or 24 HOUR mode.
3 Use slide bar to set time of day, select AM or PM, then
touch SET. An audible chime indicates the clock has
been set.
Time can also be adjusted by touching the time display on
the home screen.

10
|
Wolf Customer Care 800.222.7820
OVEN OPERATION
Oven Operation
TIMER
Each timer can be set for a maximum of 11 hours and 59
minutes. Once a time is set, the countdown is illuminated
on the control panel display. The timer is independent from
the oven. Setting the timer does not affect cook time or stop
time.
Setting timer:
1 Touch TIMER 1 or TIMER 2.
2 Use slide bar to set duration, then touch SET. An audible
chime indicates the timer has been set.
3 To cancel or edit, touch the countdown time on the
display.
4 Oven will chime and time will ash when complete. Timer
will continue to chime until canceled or reset.
EXTENDED OPTIONS
Touch SETTINGS to access extended options. Touch or use
the slide bar to select the desired option. If more information
is needed, touch INFO.
• Temperature Offset (service only).
• Calibration—screen calibration.
• Sound—volume and tone.
• Brightness.
• Time—12 hour or 24 hour.
• Sabbath Mode.
• Clock—digital or analog.
• Standby Power.
• Language.
• Units—°F/Imperial or °C/Metric.
• Showroom Mode (for showroom use only).
• About (service only).

wolfappliance.com
|
11
Cooking Modes
The oven has ten cooking modes—bake, roast, broil, con-
vection roast, convection, Gourmet, proof, stone, dehydrate
and warm. Stone and dehydrate require accessories. Refer
to the chart on page 12.
SETTING CONTROLS
1 Touch QUICK START. Oven will default to BAKE mode.
Touch or use slide bar to select desired cooking mode.
For professional model, turn selector knob to desired
cooking mode.
2 Touch START to select preset temperature. To change
temperature, touch or use slide bar to select desired
temperature, then touch START. For professional model,
turn selector knob to adjust temperature.
3 Touch OFF to end mode. For professional model, turn
selector knob to OFF.
GOURMET
Gourmet provides a variety of quick and convenient meal
preparations. Gourmet also provides recommendations for
ideal rack positions and tips to ensure cooking condence.
Choose from six categories—meat, sh, baked goods,
pizza, vegetables and one dish meals. Each category can
be rened to ensure the most effective cooking mode and
rack position to create a cooking masterpiece. Refer to the
Gourmet guide below.
GOURMET GUIDE
MEAT Beef* steak, tenderloin, roast,
prime rib, meatloaf, slow cook
Poultry* whole bird, fresh pieces, whole
breast
Pork* ribs, tenderloin, roast, steak,
chop, whole ham
Lamb* leg, roast, rib rack
FISH Steak*
Fillet*
BAKED GOODS Cookies
Cake sheet, uted, angel, pound,
cupcakes
Pie single crust, double crust
Bread quick bread, yeast loaf,
yeast rolls, biscuits
PIZZA Fresh
Par-Baked
Calzone
VEGETABLES Roasted
Sweet Potato*
Baked Potato*
ONE DISH MEALS Casserole*
Lasagna*
Quiche
*Does not require preheat.
OVEN OPERATION

12
|
Wolf Customer Care 800.222.7820
OVEN OPERATION
Cooking Modes
MODE PRESET RANGE PROBE USES
BAKE 350°F
(175°C)
200 – 550°F
(95 – 290°C)
•
Best for single-rack cooking, primarily baked foods. Use for
standard recipes.
ROAST 350°F
(175°C)
200 – 550°F
(95 – 290°C)
•
Best for roasting less tender cuts of meat, such as chuck roasts
and stew meat that should be covered.
BROIL High
Med
Low
550°F (290°C)
450°F (230°C)
350°F (175°C)
Best for broiling meats, sh and poultry pieces up to 1" thick.
Utilize two-piece broiler pan and always broil with oven door
closed.
CONVECTION ROAST 325°F
(165°C)
200 – 550°F
(95 – 290°C)
•
Gently browns exterior and seals in juices. Perfect for roasting
tender cuts of beef, lamb, pork and poultry.
CONVECTION 325°F
(165°C)
200 – 550°F
(95 – 290°C)
•
Uniform air movement makes it possible to multi-level rack cook
with even browning.
GOURMET — —
•
Gourmet provides quick and convenient meal preparations with
recommendations for cooking mode and rack position. Refer to
page 11. Preset temperature and range are dependent on food
and desired doneness.
PROOF 85°F
(30°C)
85 – 110°F
(30 – 45°C)
Ideal for proong, or rising bread dough. Refer to page 13.
STONE 450°F
(230°C)
200 – 550°F
(95 – 290°C)
•
Baking on a ceramic stone. Great for pizza and bread. Stone
accessory required. Refer to page 13.
DEHYDRATE 135°F
(60°C)
110 – 170°F
(45 – 75°C)
Dry a variety of fruits, vegetables, herbs and meat strips.
Accessory racks required. Refer to page 13.
WARM 180°F
(80°C)
140 – 200°F
(60 – 95°C)
•
Designed to keep foods at serving temperature.

wolfappliance.com
|
13
OVEN OPERATION
Cooking Modes
PROOF
Setting controls:
1 Touch QUICK START, then select PROOF. For profes-
sional model, turn selector knob to MORE, then select
PROOF on the control panel.
2 Touch START to select preset temperature. To change
temperature, touch or use slide bar to select desired
temperature, then touch START. For professional model,
turn selector knob to adjust temperature.
3 Touch OFF to end mode. For professional model, turn
selector knob to OFF.
STONE
Accessory kit required. Accessories are avail able through an
authorized Wolf dealer. For local dealer information, visit the
nd a showroom section of our website, wolfappliance.com.
Additional use & care information is included with the
accessory kit.
Setting controls:
1 Touch QUICK START, then select STONE. For profes-
sional model, turn selector knob to MORE, then select
STONE on the control panel.
2 Touch START to select preset temperature. To change
temperature, touch or use slide bar to select desired
temperature, then touch START. For professional model,
turn selector knob to adjust temperature.
3 Touch OFF to end mode. For professional model, turn
selector knob to OFF.
DEHYDRATE
Accessory kit required. Accessories are avail able through an
authorized Wolf dealer. For local dealer information, visit the
nd a showroom section of our website, wolfappliance.com.
Additional use & care information is included with the
accessory kit.
Setting controls:
1 Place door stop supplied with accessory kit.
2 Touch QUICK START, then select DEHYDRATE. For pro-
fessional model, turn selector knob to MORE, then select
DEHYDRATE on the control panel.
3 Touch START to select preset temperature. To change
temperature, touch or use slide bar to select desired
temperature, then touch START. For professional model,
turn selector knob to adjust temperature.
4 Touch OFF to end mode. For professional model, turn
selector knob to OFF.

14
|
Wolf Customer Care 800.222.7820
Temperature Probe
Use only the temperature probe shipped with this appli-
ance. Refer to the illustration below. The temperature probe
measures the internal temperature of food while cooking. It
can be used with all cooking modes except broil, proof and
dehydrate.
Setting controls:
1 Preheat oven to desired oven temperature in desired
mode (BAKE or STONE mode for breads).
2 Insert probe into the thickest area of food. When making
bread, cook for approximately 10 minutes before
inserting probe.
3 When preheat is complete, insert probe into probe
receptacle. Refer to the illustration below. Close oven
door.
4 Touch PROBE.
5 Touch SET to select preset temperature. To change
temperature, use slide bar to select desired temperature,
then touch SET.
6 An audible chime indicates internal temperature has
reached probe setpoint. Remove and reinsert probe to
verify internal temperature, then select OK or OFF.
OVEN OPERATION
CAUTION
Probe and probe receptacle will be very hot. Handle
with care.
Temperature probe
Probe receptacle

wolfappliance.com
|
15
OVEN OPERATION
Sabbath
This appliance is certied by Star-K to meet strict religious
regulations in conjunction with specic instructions found
on www.star-k.org.
Roast, bake, proof and warm modes can be used in
Sabbath.
Setting controls:
1 Turn oven light on or off.
2 Touch SETTINGS, then select SABBATH MODE.
3 Touch ON, then touch SET.
4 Select cooking mode and temperature, then touch
START.
5 Touch to initiate Sabbath mode.
6 Touch OFF to end mode. For professional model, turn
selector knob to OFF.
Auto Program
TIMED COOK | DELAYED START
Timed cook automatically turns the oven off at a specied
time. The oven will begin to heat immediately and will turn
off at the desired stop time. Delayed start automatically
turns the oven on and off at specied times. The oven will
remain idle until the desired start time and will turn off at the
desired stop time. If preheat is required, preheat time must
be accounted for when determining cooking duration. The
clock must be set to the correct time to function properly.
Use in any cooking mode except broil, Gourmet or stone.
Setting controls:
1 Touch QUICK START, then select desired cooking mode
and temperature. For professional model, turn selector
knobs to desired mode and temperature.
2 Touch TIMED COOK, then select cooking duration.
3 Touch SET to conrm stop time or use slide bar to select
desired stop time, then touch SET. Cooking duration and
stop time will appear on the display. Oven will chime with
one minute remaining. Oven will chime when complete
and will continue to chime until canceled or reset.
4 To cancel, reset or turn oven off, touch TIMED COOK.
5 Oven will automatically turn off when cook time is com-
plete. Touch OK to clear display.

16
|
Wolf Customer Care 800.222.7820
OVEN OPERATION
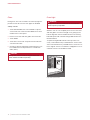
Oven Light
WARNING
Verify power is disconnected from the electrical box
before replacing a light bulb.
Allow the oven to cool completely, then remove oven racks
and rack guides. To remove the light cover, gently pry the
bottom edge with a at screwdriver. Remove the existing
bulb and replace with a 40-watt halogen bulb. Refer to the
illustration below.
To replace the light bulb located on the top of the oven
cavity, contact Wolf Factory Certied Service. For the name
of the nearest Wolf Factory Certied Service, check the con-
tact & support section of our website, wolfappliance.com or
call Wolf customer care at 800-222-7820.
Clean
During clean, the oven is heated to an extremely high tem-
perature to burn off food soil. Oven lights are disabled.
Setting controls:
1 Touch QUICK START, then select CLEAN. For profes-
sional model, turn selector knob to MORE, then select
CLEAN on the control panel.
2 Remove oven racks and rack guides, then touch OK.
3 Touch START.
4 Touch OFF to end mode. For professional model, turn
selector knob to OFF.
5 Oven door will lock and remain locked until clean cycle
has ended and oven temperature has cooled below
550°F
(290°C).
CAUTION
During clean, exterior surfaces may get hotter than
usual. Children should be kept away.
LIGHT
COVER
Light bulb replacement

wolfappliance.com
|
17
COOKING GUIDE
Wolf Cooking Guide
FOOD RACK(S) MODE OVEN TEMP POSITION TIME NOTES
BREADS
Biscuits 1 Roast 400°F (205°C) 3 5–10 min
2 Convection 425°F
(220°C) 2, 5 5–10 min
3 Convection 425°F
(220°C) 2, 4, 6 5–10 min
Cinnamon rolls 1 Bake 350°F
(175°C) 3 20–25 min
2 Convection 325°F
(165°C) 2, 5 20–25 min
3 Convection 325°F
(165°C) 2, 4, 6 20–25 min
Mufns 1 Bake 400°F (205°C) 3 15–20 min
2 Convection 375°F
(190°C) 2, 5 10–15 min
3 Convection 375°F (190°C) 2, 4, 6 10–15 min
Yeast rolls 1 Convection 375°F
(190°C) 3 10–20 min
2 Convection 375°F
(190°C) 2, 5 10–20 min
3 Convection 375°F
(190°C) 2, 4, 6 10–20 min
Yeast bread (loaf pan) 1 Bake 350°F
(175°C) 3 20–45 min
Yeast bread (no pan) 1 Stone 450°F (230°C) 1 15–45 min
Quick breads 1 Bake 350°F
(175°C) 3 40–50 min
Garlic bread 1 Broil
Med
5
Toast 1 Broil High 5
CAKES
Angel food cake 1 Bake 350°F (175°C) 1 35–45 min
Bundt or pound cake 1 Bake 350°F
(175°C) 3 40–50 min
Mixes or from scratch 1 Bake 350°F (175°C) 3 20–30 min
2 Convection 325°F
(165°C) 2, 5 20–30 min
3 Convection 325°F
(165°C) 2, 4, 6 20–30 min
Cupcakes 1 Bake 350°F
(175°C) 3 20–25 min
2 Convection 325°F
(165°C) 2, 5 15–25 min
3 Convection 325°F
(165°C) 2, 4, 6 15–25 min
COOKIES
Cookies or bars 1 Bake 350°F (175°C) 3 10–25 min
2 Convection 325°F
(165°C) 2, 5 10–25 min
3 Convection 325°F
(165°C) 2, 4, 6 10–25 min
PIES
2-crust, lled or streusel topped 1 Bake 375°F (190°C) 3 40–45 min
Lemon meringue 1 Broil Low 3 10–15 min
Pumpkin or custard 1 Bake 425°F
(220°C) /
325°F (165°C)
3 see note Bake for 15 min at 425°F, reduce
temp to 325°F and bake until pie is
set, 45–60 min.
Pie crust (empty) 1 Bake 425°F (220°C) 3 10–15 min
Puff pastry 1 Bake 400°F
(205°C) 3 10–15 min
2 Convection 375°F
(190°C) 2, 5 10–15 min
3 Convection 375°F
(190°C) 2, 4, 6 10–15 min
Cream puffs 1 Convection 400°F
(205°C) 3 20–30 min
Consuming raw or undercooked meats, poultry, seafood, shellsh or eggs may increase your risk of foodborne illness.

18
|
Wolf Customer Care 800.222.7820
Wolf Cooking Guide
FOOD MODE OVEN TEMP RACK TIME PROBE TEMP NOTES
BEEF
Ground patties Broil High 5 10–15 min Turn over at 7 min.
Steaks (under 1" thick) Broil High 5 10–15 min Turn over at 6 min.
Steaks (1–3" thick) Broil High 5 10–20 min Turn over at 8 min.
Chuck roast Conv Roast 325°F
(165°C) 3 20–25 min/lb Med 150°F (65°C) Place in dish, liquid
1
/2 the height
of the meat.
Roast 350°F
(175°C) 3 20–25 min/lb Med 150°F (65°C)
Roast Roast 425°F (220°C) /
325°F (165°C)
2 see note Rare 135°F (60°C) Roast for 30 min at 425°F, reduce
temp to 325°F and cook to desired
internal temp.
Slow roast Bake 300°F (150°C) 2 Place in covered dish, liquid
1
/4 the
height of the meat.
Prime rib Roast 450°F
(230°C) /
225°F (105°C)
2 see note Rare 130°F (55°C) No preheat required. Roast for
30 min at 450°F, reduce temp to
225°F and cook to desired internal
temp.
Tenderloin Conv Roast 450°F (230°C) 3 10–20 min/lb Rare 130°F (55°C)
POULTRY
Chicken, bone-in Conv Roast 325°F (165°C) 5 20–25 min Thigh 180°F (80°C)
Chicken, whole Conv Roast 325°F (165°C) 2 10–20 min/lb Thigh 180°F (80°C)
Turkey, whole (brined) Bake 350°F (175°C) 1 10–15 min/lb Thigh 180°F (80°C)
Turkey, whole Conv Roast 325°F (165°C) 1 10–15 min/lb Thigh 180°F (80°C)
Roast 325°F (165°C) 1 10–15 min/lb Thigh 180°F (80°C)
Duck Conv Roast 325°F (165°C) 2 15–20 min/lb Thigh 180°F (80°C)
Goose Conv Roast 325°F (165°C) 2 15–20 min/lb Thigh 180°F (80°C)
Cornish hen Conv Roast 325°F (165°C) 3 1 hour Thigh 180°F (80°C)
Roast 350°F (175°C) 3 1 hour Thigh 180°F (80°C)
Chicken quarters, thighs Broil Med 5 20–25 min Turn over halfway through broiling.
Roast 350°F (175°C) 3 30–40 min Thigh 180°F (80°C)
Conv Roast 325°F (165°C) 3 30–40 min Thigh 180°F (80°C)
Bake 350°F (175°C) 3 30–40 min Thigh 180°F (80°C)
Turkey pieces Conv Roast 325°F (165°C) 3 30–40 min Thigh 180°F (80°C)
Roast 350°F (175°C) 3 30–40 min Thigh 180°F (80°C)
Chicken boneless breast Broil Med 5 10–15 min Turn over halfway through broiling.
(attened to
1
/2" thick) Conv Roast 350°F (175°C) 3 15–20 min Breast 165°F (75°C)
Turkey breast, whole Conv Roast 325°F (165°C) 2 15–20 min Breast 165°F (75°C)
Roast 350°F (175°C) 2 15–20 min Breast 165°F (75°C)
Consuming raw or undercooked meats, poultry, seafood, shellsh or eggs may increase your risk of foodborne illness.
COOKING GUIDE

wolfappliance.com
|
19
Wolf Cooking Guide
FOOD MODE OVEN TEMP RACK TIME PROBE TEMP NOTES
PORK
Chops, steaks (
1
/2" thick) Broil High 5 5–10 min Turn over halfway through broiling.
Conv Roast 350°F
(175°C) 3 10–15 min
Slow roast Bake 300°F
(150°C) 2 Place in covered dish, liquid
1
/4 the
height of the meat.
Ribs Bake 300°F
(150°C) 3 Place in foil packets or covered
dish, liquid
1
/4 the height of the
meat.
Tenderloin Conv Roast 400°F
(205°C) 3 15–20 min/lb Rare 130°F (55°C)
Ham steak (
1
/2" thick) Broil High 5 5–10 min Turn over halfway through broiling.
Ham steak (1" thick) Broil High 5 10–15 min Turn over halfway through broiling.
Ham, whole Bake 335°F
(170°C) 2 10–15 min/lb 160°F (70°C) Cover and rest 15 min.
LAMB
Chops, steaks (
3
/4" thick) Broil High 5 5–10 min Turn over halfway through broiling.
Leg Conv Roast 425°F
(220°C) /
325°F (165°C)
2 see note 145°F (65°C) Roast for 30 min at 425°F, reduce
temp to 325°F and cook to desired
internal temp.
Veal roast Conv Roast 300°F
(150°C) 2 30–35 min/lb 140°F (60°C)
Crown rack Conv Roast 325°F (165°C) 2 15–20 min/lb 145°F (65°C)
PIZZA
Calzones Stone 375°F (190°C) 1 10–15 min
Homemade Stone 450°F
(230°C) 1 5–15 min
French bread pizza Broil Med 5 10–15 min
FISH
Fillet (under 1" thick) Broil Med 5 10–20 min
Fillet (over 1" thick) Conv Roast 375°F (190°C) 5 15–25 min
VEGETABLES
Potatoes, sweet potatoes Bake 350°F (175°C) 3 45–60 min
Mixed vegetables Conv Roast 400°F
(205°C) 4 10–20 min
OTHER
Meatloaf Roast 425°F (220°C) /
325°F (165°C)
2 see note 165°F (75°C) Roast for 20 min at 425°F, reduce
temp to 325°F and cook to desired
internal temp.
Sausage, bratwurst (fresh) Broil Med 5 10–15 min Turn over halfway through broiling.
Nachos Broil Low 3 15–20 min
Quiche Bake 350°F
(175°C) 3 40–50 min
One dish meals Bake 350°F
(175°C) 3 45–60 min 175°F (80°C)
Consuming raw or undercooked meats, poultry, seafood, shellsh or eggs may increase your risk of foodborne illness.
COOKING GUIDE

20
|
Wolf Customer Care 800.222.7820
CARE RECOMMENDATIONS
Care Recommendations
CLEANING
Stainless steel Use a nonabrasive stainless steel cleaner and apply with a soft lint-free cloth. To bring out the natural
luster, lightly wipe surface with a water-dampened microber cloth followed by a dry polishing chamois.
Always follow the grain of stainless steel.
Black glass Spray glass cleaner on a cloth to clean.
Oven racks and guides Remove and place on a at surface near the sink. Clean with hot water and mild detergent or paste of
baking soda and water. Do not immerse in water. Towel dry.
Control panel Use a spray degreaser to remove ngerprints and food soil. Spray on a cloth before wiping panel.
IMPORTANT NOTE: Do not spray cleaners directly on control panel.
Oven interior Before utilizing the clean feature, use a razor blade to gently lift baked on foods from the oven cavity and
window. For stubborn stains, spray with a mild abrasive cleaner or spray degreaser and scrub with a no-
scratch Scotch-Brite™ pad (pink or blue). Wash the entire oven cavity with soap and water to remove all
cleaning chemicals before entering the clean cycle. If residue is not cleaned from the cavity, etching of the
porcelain may occur. Once the clean cycle is complete, allow the oven to cool completely and wipe out ash
with a damp cloth.
Broiler pan To clean the upper rack, use mild detergent and a scouring pad. Rinse and dry. To clean the bottom pan,
discard grease and wash with hot water and mild detergent. Rinse and dry. The upper rack is dishwasher
safe, however, do not place the porcelain-coated pan in dishwasher.
A página está carregando...
A página está carregando...
A página está carregando...
A página está carregando...
A página está carregando...
A página está carregando...
A página está carregando...
A página está carregando...
A página está carregando...
A página está carregando...
A página está carregando...
A página está carregando...
A página está carregando...
A página está carregando...
A página está carregando...
A página está carregando...
A página está carregando...
A página está carregando...
A página está carregando...
A página está carregando...
A página está carregando...
A página está carregando...
A página está carregando...
A página está carregando...
A página está carregando...
A página está carregando...
A página está carregando...
A página está carregando...
A página está carregando...
A página está carregando...
A página está carregando...
A página está carregando...
A página está carregando...
A página está carregando...
A página está carregando...
A página está carregando...
A página está carregando...
A página está carregando...
A página está carregando...
A página está carregando...
A página está carregando...
A página está carregando...
A página está carregando...
A página está carregando...
A página está carregando...
A página está carregando...
A página está carregando...
A página está carregando...
-
 1
1
-
 2
2
-
 3
3
-
 4
4
-
 5
5
-
 6
6
-
 7
7
-
 8
8
-
 9
9
-
 10
10
-
 11
11
-
 12
12
-
 13
13
-
 14
14
-
 15
15
-
 16
16
-
 17
17
-
 18
18
-
 19
19
-
 20
20
-
 21
21
-
 22
22
-
 23
23
-
 24
24
-
 25
25
-
 26
26
-
 27
27
-
 28
28
-
 29
29
-
 30
30
-
 31
31
-
 32
32
-
 33
33
-
 34
34
-
 35
35
-
 36
36
-
 37
37
-
 38
38
-
 39
39
-
 40
40
-
 41
41
-
 42
42
-
 43
43
-
 44
44
-
 45
45
-
 46
46
-
 47
47
-
 48
48
-
 49
49
-
 50
50
-
 51
51
-
 52
52
-
 53
53
-
 54
54
-
 55
55
-
 56
56
-
 57
57
-
 58
58
-
 59
59
-
 60
60
-
 61
61
-
 62
62
-
 63
63
-
 64
64
-
 65
65
-
 66
66
-
 67
67
-
 68
68


Sub-Zero DO30CM/B Guia de usuario
- Categoria
- Fogões
- Tipo
- Guia de usuario
- Este manual também é adequado para
em outras línguas
- español: Sub-Zero DO30CM/B Guía del usuario
- français: Sub-Zero DO30CM/B Mode d'emploi
Artigos relacionados
-
Sub-Zero IR304TE/S/TH Guia de usuario
-
Sub-Zero DF606F Guia de usuario
-
Wolf SO24TE/S/TH Manual do usuário
-
Sub-Zero CSO30CM/B/TH Guia de usuario
-
Sub-Zero CW24/B Guia de usuario
-
Sub-Zero GR484CG Guia de usuario
-
-
-
-
Sub-Zero MDD24TE/S/TH Guia de usuario
Outros documentos
-
LG LSWS306ST Manual do usuário
-
Euro Cuisine PM600 Manual do proprietário
-
Electrolux EQT4520BOZ Manual do usuário
-
Black & Decker CTO7100B Use And Care Book Manual
-
Infiniton HSM-30N45 Manual do proprietário
-
Hamilton Beach 31220 Guia de usuario
-
Waring Commercial WPO350 Manual do usuário
-
-
Whirlpool WOD97EC0HZ Guia de usuario
-
Star PGT14IT Manual do proprietário