Waring Commercial WPO350 Manual do usuário
- Categoria
- Fornos
- Tipo
- Manual do usuário

SINGLE AND DOUBLE
PIZZA OVENS
HORNOS PARA PIZZA
SIMPLE/DOBLE
FOURS À PIZZA
SIMPLE/DOUBLE
For your safety and continued enjoyment of this product,
always read the instruction book carefully before using.
Para su seguridad y para disfrutar plenamente de este producto,
siempre lea cuidadosamente las instrucciones antes de usarlo.
An que votre appareil vous procure en toute sécurité beaucoup de satisfaction,
lire attentivement le mode d’emploi avant de l’utiliser.
WPO100 WPO350

2
IMPORTANT SAFEGUARDS
READ ALL INSTRUCTIONS
When using electrical appliances, basic safety precautions should
always be followed, including those listed below:
1. To protect against electrical hazards, do not immerse oven in
water or other liquids.
2. NEVER clean with water jets, which can result in critical bodily
injury or death.
3. DO NOT USE if cord or plug is damaged or if machine has
malfunctioned, been dropped or damaged. Return appliance to
the nearest authorized service facility for examination, repair or
electrical or mechanical adjustment.
4. Do not use outdoors.
5. Do not let cord hang over edge of table or counter, or touch
hot surfaces.
6. Improper installation or use can result in electric shock, injury,
or damage to your oven or property.
7. Your pizza oven is a heavy-duty appliance designed for
commercial use, and is intended to be operated by trained
professionals only.
8. To prevent risk of re, oven should be installed in a
noncombustible environment. Any combustible materials must
be at least 18 inches away from sides, front and back of oven
and at least 40 inches from top.
9. Oven must be thoroughly cleaned before rst use and after all
uses (see USE AND CARE).
10. Always be sure to disconnect oven from power source when not
in use and before cleaning or servicing.
11. Always allow oven to cool before moving or servicing. Surfaces
are hot during use and remain hot for a while, even after power
is off.
12. Do not allow insertion of any foreign object into any ventilation
or exhaust opening; this can cause electric shock, re or
damage to the oven.
13. Never block air intakes or exhaust openings, or use on
cushioned surfaces where blockage may occur.

3
14. This appliance is not intended for use by persons (including
children) with reduced physical, sensory or mental capabilities,
or lack of experience and knowledge, unless they have been
given supervision or instruction concerning use of the appliance
by a person responsible for their safety.
15. E xtreme caution should be exercised when using containers
constructed of the following materials in the oven: paper,
cardboard, plastic or similar products.
SAVE THESE INSTRUCTIONS
APPROVED FOR
COMMERCIAL USE
CONTENTS
Important Safeguards .................................................................. 2
Grounding Instructions ................................................................. 4
Introduction .................................................................................. 5
Features and Benets .................................................................. 6
Parts and Accessories ................................................................. 7
Oven Installation ........................................................................... 9
Pizza Ceramic Deck Installation & Conditioning .......................... 9
Before Using Your Pizza Oven ................................................... 10
Baking Instructions ..................................................................... 10
Tips and Hints .............................................................................11
Use and Care ..............................................................................11
Installing and Replacing Oven Light ........................................... 12
Safety Feature ............................................................................ 13
Warranty ..................................................................................... 14

4
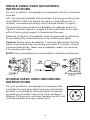
208/240V
SINGLE PIZZA OVEN GROUNDING
INSTRUCTIONS
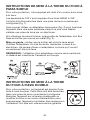
For your protection, this appliance is equipped with a 3-conductor
cord set.
120 volt units are supplied with a molded 3-prong grounding-type
plug (NEMA 5-15P) and should be used in combination with a
properly connected grounding-type outlet as shown in Figure 1.
If a grounding-type outlet is not available, an adapter, shown in
Figure 2, may be utilized to enable a 2-slot wall outlet to be used
with a 3-prong plug (except in Canada and Europe).
Referring to Figure 3, the adapter must be grounded by attaching
its grounding lug under the screw of the outlet cover plate.
Caution: Before using an adapter, it must be determined that the
outlet cover plate screw is properly grounded. If in doubt, consult
a licensed electrician. Never use an adapter unless you are sure
it is properly grounded.
NOTE: Use of an adapter is not permitted in Canada and Europe.
DOUBLE PIZZA OVEN GROUNDING
INSTRUCTIONS
For your protection, this appliance is supplied with
a molded 3-prong grounding-type plug and should
be used in combination with a properly connected
grounding-type outlet. Use of any other voltage or
altering of the plug or cord may damage the unit, will
void the warranty and may cause injury.

5
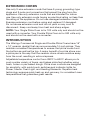
EXTENSION CORDS
Use only 3-wire extension cords that have 3-prong grounding-type
plugs and 3-pole cord connectors that accept the plug from the
appliance. Use only extension cords that are intended for indoor
use. Use only extension cords having an electrical rating not less than
the rating of the appliance. Do not use damaged extension cords.
Examine extension cord before using and replace it if damaged.
Do not abuse extension cord and do not yank on any cord to
disconnect. Keep cord away from heat and sharp edges.
NOTE: Your Single Pizza Oven is for 120 volts only and should not be
used with a converter. Your Double Pizza Oven is for 240 volts only
and should not be used with a converter.
INTRODUCTION
The Waring® Commercial Single and Double Pizza Ovens have 16"
x 14" ceramic deck(s) that can accommodate 14-inch pizzas. They
maintain consistent temperatures to ensure that pizza cooks from
the bottom as well as the top. A major benet of a pizza stone over
a pizza pan is the way that the ceramic stone drives moisture away
from the crust, resulting in extra crispness.
Adjustable temperature control from 280°F to 600°F allows you to
cook a wider variety of items, and bakes pizza fast whether using
fresh, frozen or par-baked dough. Pizza oven controls are designed
for simplicity, with quick-touch switches and indicator lights for
Power, Interior Oven Light, and Heating Elements. Superior heat
technology ensures quick heat-up and recovery, for consistent oven
temperatures that guarantee great results.

6
FEATURES AND BENEFITS
1. Temperature Control Knob
Mechanical dial to select temperature settings (280°F - 600°F).
2. Manual Timer
Timer range up to 15 minutes. An audible signal (single chime)
indicates selected time has elapsed. NOTE: TIMER DOES NOT TURN
OVEN ON OR OFF.
3. Power ON/OFF Switch with Indicator Light
Main power control for oven chamber/s.
4. Ceramic Pizza Deck
16" x 14" Pizza Deck ts into base of oven’s interior – maintains
temperature very well and ensures that pizza cooks from the bottom
as well as the top – pizza or bread can be placed directly on deck.
5. Door Handle
Heavy-duty, easy-to-grip design.
6. T empered Glass Door
Clear view lets you monitor the cooking process.
7. Interior Light
Replaceable bulb; removable, heatproof glass-bulb cover.
8. Rear Exhaust Vent (not shown)
Directs any exhaust from cooking process to the side of unit and away
from walls.
9. Deck Cleaning Brush
Features heavy-duty bristles and a scraper for cleaning the deck
without damaging the ceramic.
10. Adjustable Legs (Double Oven only)
Set height to the proper level for your space.

7
1
2
4
3
9
7
6
10
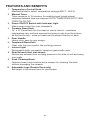
PARTS AND ACCESSORIES
Single Oven
1. ON/OFF Switch
2. Temperature Control Knob
3. Timer (15 minutes)
4. Ready Light
5. Ceramic Pizza Deck (packed separately, not shown)
6. Door Handle
7. Tempered Glass Door
8. Interior Light (not shown)
9. Legs (not adjustable or removable)
10. Deck Cleaning Brush

8
4
3
5
1
4
3
5
2
7
8
10
7
8
11
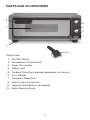
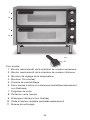
Double Oven
1. Top Chamber ON/OFF Switch
2. Bottom Chamber ON/OFF Switch
3. Temperature Control Knobs
4. Timer (15 minutes)
5. Ready Lights
6. Two Ceramic Pizza Decks (packed separately, not shown)
7. Door Handles
8. Tempered Glass Doors
9. Interior Lights (not shown)
10. Adjustable Legs (packed separately)
11. Deck Cleaning Brush

9
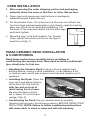
OVEN INSTALLATION
1. A fter removing the outer shipping carton and packaging
material, place the oven on the floor or other flat surface.
2. Open oven and remove any instructions or packaging
material shipped inside the unit.
3. For the Double Oven, lift up the front of the oven and attach the
two front legs (packed separately in styrofoam), carefully twisting
each one into a corner and hand-tightening. Lift
the back of the oven and attach the two back legs
and hand-tighten.
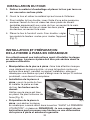
4. Move the oven to its nal location. For Double
Oven, adjust the bottom portion of the legs to
level the unit (g. 1).
(fig. 1)
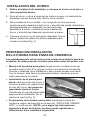
PIZZA CERAMIC DECK INSTALLATION
& CONDITIONING
Read these instructions carefully before installing or
conditioning the ceramic deck. New deck must be conditioned
(pre-dried) prior to first use.
• Handling the Ceramic Deck: If deck is struck against hard
surface before, during or after installation, it can develop a full
or hairline crack which may expand over time and require you to
replace it.
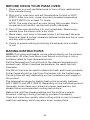
• Installing the Deck: Open the
oven door and place ceramic
pizza deck into the bottom
with the slot on front of
deck facing front of oven.
Be sure the deck is rmly
set in place. Do not force or
wedge it (g. 2).
•
Conditioning the Deck: Pre-dry ceramic deck by carefully
following instructions in the following section, BEFORE USING YOUR
PIZZA OVEN. NOTE: Failure to follow conditioning instructions
will cause deck to crack or warp and will void warranty.
(fig. 2)
SLOT

10
BEFORE USING YOUR PIZZA OVEN
1. Place oven in a well-ventilated area to burn off any residual dust
from manufacturing.
2. Plug unit in, open door and set Temperature Control to 400˚F
(205˚C). After one hour, close door and increase temperature
to 500˚F (260˚C) for at least 1½ hours.
NOTE: The oven may emit an odor during this process; this is
normal and not harmful, and should quickly dissipate.
3. Turn off the oven and allow it to cool completely. Remove any
residue from the interior with a dry cloth.
4. Place clean, cool oven in the area where it will be used. Be sure
there is at least 6 inches’ clearance between sides and top of oven
and any wall or cabinet.
5. Check to ensure nothing is blocking the exhaust vent on back
of unit.
BAKING INSTRUCTIONS
NOTE: Only pizza and breads can be placed directly on the ceramic
pizza deck. All other food items must be put onto a tray or into a
container rated for high-temperature use.
Set the Temperature Control Knob to the desired temperature to
preheat oven. When it reaches temperature, the ready light will
illuminate.
The Pizza Oven can be used to bake both fresh and frozen products.
Frozen items should go right from the freezer into the heated oven.
Cooking time will vary depending on the consistency and weight of
the product.
The temperature range for baking fresh pizza is usually between
500˚F (260˚C) and 575˚F (300˚C), depending on the individual product.
Generally, frozen items are cooked at a lower temperature, but
always follow recommended cooking instructions.
Bake pizza until the cheese bubbles and the bottom is evenly
browned, rotating it during the baking process if necessary.
Open and close door quickly when putting pizza in oven to prevent
heat from escaping, which can slow down cooking time.

11
TIPS AND HINTS
• Be sure ceramic pizza deck is dry. Wet spots or spills will cause
food to stick.
• Never season the ceramic pizza deck with any type of baking oil.
• Increase temperature during heavy production times to maintain
ideal baking temperature. Be sure to decrease it when rush slows
to prevent burning.
• If toppings need more time to cook, a piece of screen placed
under pizza can prevent bottom from overcooking.
• Pizza with heavy toppings requires a lower temperature and longer
baking time.
• Scrape off burnt residue from pizza deck daily with deck brush
provided. Buildup can cause an “off” avor and increase bake
time.
• Frozen items cannot be placed directly on hot deck to thaw.
Place food onto a screen or into a pan.
USE AND CARE
Daily cleaning is suggested to keep oven performing at its best.
ALLOW OVEN TO COOL COMPLETELY BEFORE CLEANING.
1. Always unplug the oven from the power source.
2. Do not use any sharp or hard kitchen utensils on the oven as
this could damage the surface of the appliance.
3. To clean ceramic pizza deck, remove deck from cool oven.
With the provided deck brush, scrape off hardened spillage.
To clean heavily soiled decks, return deck to oven and run at
highest temperature in a well-ventilated area for ½ hour. When
oven and deck are cool, remove deck and brush off residue.
NOTE: Never use high-abrasion brushing or water to clean
deck, or immerse or let any water or any other liquids come
into contact with the ceramic deck. Any of these can cause
deck to crack.
4. Wipe interior of oven with damp cloth, avoiding heating
elements.
5. When cleaning stainless steel exterior, use stainless steel
cleaner and wipe in the direction of the grain.

12
6. To clean the glass door, use a glass cleaner or damp cloth and
dry with a clean cloth.
7. When opening oven door, be sure to guide the door while
lowering it. Doing so will prevent possible damage to the door
jamb after an extended period of time.
8. For further information or to purchase additional accessories,
call Waring Customer Service at 1-800-492-7464.
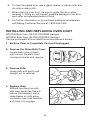
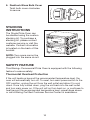
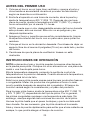
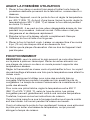
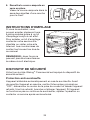
INSTALLING AND REPLACING OVEN LIGHT
WPO100 Bulb Type: G9 100-120V/25W Halogen
WPO350 Bulb Type: G9 220-240V/25W Halogen
Can be purchased at local retail/home improvement stores.
1. Be Sure Oven Is Completely Cool and Unplugged
2. Remove the Glass Bulb Cover
Locate bulb cover in back
right corner. Carefully twist
counterclockwise and remove.
3. Remove Bulb
Grasp bulb and gently pull
straight out to remove.
4. Replace Bulb
Without touching the bulb
with bare hands (as this will
reduce the lifespan), use a
clean tissue or cloth glove
to position new bulb carefully
and push in to engage.

13
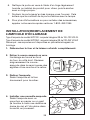
5. Reattach Glass Bulb Cover
Twist bulb cover clockwise
to secure.
STACKING
INSTRUCTIONS
The Single Pizza Oven can
be stacked using the custom
stacking kit. To purchase a
stacking kit, please contact
customer service or visit the
website. Contact information
is located on the back of this
booklet.
NOTE: Two ovens cannot be
plugged into the same circuit.
SAFETY FEATURE
This Waring® Commercial Pizza Oven is equipped with the following
feature to ensure safety:
Thermostat Overload Protection
If the unit heats up beyond the recommended temperature level, the
oven will automatically turn off. To reset, turn main power switch to the
OFF position, unplug the unit from the wall outlet and allow it to cool
down. Once fully cooled down, plug the unit back into the wall outlet
and turn main power on. If the unit will not turn back on, or continues to
heat beyond the recommended temperature level, repeat steps above
or call a Waring Certied Customer Service Center for assistance.

14
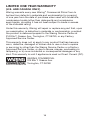
LIMITED ONE YEAR WARRANTY
(U.S. AND CANADA ONLY)
Waring warrants every new Waring® Commercial Pizza Oven to
be free from defects in materials and workmanship for a period
of one year from the date of purchase when used with foodstuffs,
nonabrasive liquids (other than detergents) and nonabrasive
semi-liquids, providing it has not been subject to loads in excess
of the indicated rating.
Under this warranty, Waring will repair or replace any part that, upon
our examination, is defective in materials or workmanship, provided
the product is delivered prepaid to the Waring Service Center at
314 Ella T. Grasso Ave., Torrington, CT 06790, or any Factory
Approved Service Center.
This warranty does not: a) apply to any product that has become
worn, defective, damaged or broken due to use or due to repairs
or servicing by other than the Waring Service Center or a Factory
Approved Service Center, or due to abuse, misuse, overloading or
tampering; or b) cover incidental or consequential damages of any
kind. This warranty is void if appliance is used on Direct Current (DC).
WARING COMMERCIAL
314 Ella T. Grasso Ave.
Torrington, CT 06790

15
MEDIDAS DE SEGURIDAD
IMPORTANTES
LEA TODAS LAS INSTRUCCIONES
Al usar aparatos eléctricos, siempre debe tomar precauciones
básicas de seguridad, entre ellas las siguientes:
1. Para reducir el riesgo de electrocución, no coloque el aparato
en agua ni en ningún otro líquido.
2. NUNCA lo lave a presión; esto presenta un riesgo de herida
grave o de muerte.
3. NO UTILICE este aparato si el cable o el enchufe están
dañados, después de un mal funcionamiento, después de
que se haya caído o si está dañado; regréselo a un centro de
servicio autorizado para su revisión, reparación o ajuste.
4. No lo utilice en exteriores.
5. No permita que el cable cuelgue del borde de la encimera o de
la mesa, ni que tenga contacto con superficies calientes.
6. El uso indebido o la instalación incorrecta de este producto
pueden causar una descarga eléctrica, una herida o daños al
aparato o a su propiedad.
7. Este horno para pizza es un aparato de alto rendimiento
diseñado para uso comercial. Ha sido diseñado para ser
operado por profesionales capacitados solamente.
8. Para reducir el riesgo de incendio, instale este aparato en un
ambiente no combustible. Deje un espacio libre de al menos 18
pulgadas (46 cm) en los lados del aparato y 40 pulgadas (1m)
arriba del aparato.
9. Limpie el horno antes del primer uso y después de cada
uso, según se describe en la sección “LIMPIEZA Y
MANTENIMIENTO”.
10. Siempre desenchufe el aparato cuando no lo usa y antes de
limpiarlo.
11. Permita que el aparato se enfríe antes de moverlo o limpiarlo.
La superficie del aparato se pone muy caliente durante el uso y
permanece caliente durante mucho tiempo después del uso.
12. No introduzca ningún objeto en los orificios de ventilación o
de evacuación del aire; esto puede presentar un riesgo de
descarga eléctrica, incendio o daño al aparato.

16
13. Nunca bloquee las aberturas de aire ni coloque el aparato sobre
una superficie blanda, donde se puedan obstruir.
14. Los niños o las personas que carezcan de la experiencia o
de los conocimientos necesarios para manipular el aparato,
o aquellas cuyas capacidades físicas, sensoriales o mentales
estén limitadas, no deben utilizar el aparato sin la supervisión o
la dirección de una persona responsable por su seguridad.
15. T enga mucho cuidado al poner en el horno envases de papel,
cartón, plástico o materiales semejantes.
GUARDE ESTAS INSTRUCCIONES
APROBADO PARA
USO COMERCIAL
ÍNDICE
Medidas de seguridad importantes ........................................... 15
Instrucciones de puesta a tierra ................................................. 17
Introducción ............................................................................... 18
Características .......................................................................... 19
Piezas y accesorios .................................................................... 20
Instalación del horno .................................................................. 22
Preparación/Instalación de la piedra para pizza de cerámica ... 22
Antes del primer uso .................................................................. 23
Instrucciones de operación ........................................................ 23
Consejos y sugerencias ............................................................. 24
Instrucciones de uso ................................................................. 24
Reemplazo de la bombilla .......................................................... 25
Mecanismo de seguridad ........................................................... 26
Garantía ...................................................................................... 27

17
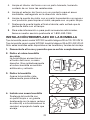
INSTRUCCIONES DE PUESTA A TIERRA
DEL HORNO PARA PIZZAS SIMPLE
Para su protección, este aparato está equipado con un cable
eléctrico con conductor de tierra.
Los aparatos de 120 V están equipados con clavija tripolar de
conexión con tierra (NEMA 5-15P), la cual debe ser conectada a una
toma de corriente puesto a tierra (Fig. 1).
Si una toma de corriente puesta a tierra no está disponible, se podrá
usar un adaptador para conectar el aparato a una toma de corriente
polarizada (Fig. 2).
El adaptador debe ser puesto a tierra mediante un tornillo de metal
que conecte la lengüeta del adaptador a la placa de la toma de
corriente (Fig. 3).
Precaución: antes de enchufar el adaptador, cerciórese de
que la toma de corriente está puesta a tierra. Si no está seguro,
comuníquese con un electricista. Nunca use un adaptador sin estar
seguro/a de que la toma de corriente esté puesta a tierra.
NOTA: está prohibido usar un adaptador en Canadá y en Europa.
INSTRUCCIONES DE PUESTA A TIERRA DEL
HORNO PARA PIZZAS DOBLE
Para su protección, el cable de este aparato cuenta
con un enchufe con puesta a tierra, el cual debe ser
conectado a una toma de corriente debidamente
puesta a tierra. Utilizar el aparato sobre una red de
tensión inadecuada o modificar el cable o el enchufe
puede dañar el aparato y causar lesiones. Además,
invalidará la garantía.
208/240V

18
USO DE EXTENSIONES
Use solamente extensiones con puesta a tierra. Use solamente
extensiones para uso en interiores La clasificación nominal de la
extensión debe ser por lo menos igual a la del aparato. No utilice
extensiones dañadas. Examine la extensión antes de usarla y
reemplácela si está dañada.
No jale el cable para desconectar la extensión; agárrela por la clavija.
Mantenga el cable alejado de las fuentes de calor y de los objetos
cortantes.
NOTA: enchufe el horno para pizzas simple en una toma de corriente
de 120V; no utilice el aparato con un convertidor de voltaje. Enchufe
el horno para pizzas doble en una toma de corriente de 240V; no
utilice el aparato con un convertidor de voltaje.
INTRODUCCIÓN
Los hornos para pizzas simple/doble Waring® Commercial están
equipados con piedras para pizzas de cerámica de 16 x 14
pulgadas (40.5 cm x 35.5 cm) que permiten hornear pizza de hasta
14 pulgadas (35.5 cm) de diámetro. Mantienen constantes las
temperaturas en la(s) cámara(s) de cocción para que las pizzas se
cocinen uniformemente tanto abajo como arriba. Una de las ventajas
de la piedra para pizza sobre una placa de metal es que la cerámica
absorbe la humedad, para una corteza más crujiente.
La temperatura, ajustable desde 280°F (65 °C) hasta 600°F
(425°C), permite cocinar una variedad de alimentos y hornear pizza
rápidamente, ya sea esté hecha con masa fresca, masa congelada
o masa precocida. Los controles del horno han sido diseñados con
un enfoque en la simplicidad. Incluyen interruptores con indicadores
luminosos para encender/apagar el horno, la luz y las resistencias.
Una tecnología térmica superior asegura un calentamiento rápido y
un calor constante, para resultados excepcionales.

19
CARACTERÍSTICAS
1. Perilla de control de temperatura
Perilla mecánica que permite ajustar la temperatura desde 280°F
(65°C) hasta 600°F (425°C).
2. Temporizador manual
Hasta 15 minutos. Una señal sonora (un pitido) indica el final del
tiempo. NOTA: EL TEMPORIZADOR NO ENCIENDE/APAGA EL
HORNO.
3. Botón de encendido/apagado con indicador luminoso
Enciende/apaga la(s) cámara(s) de cocción.
4. Piedra para pizza de cerámica
Placa de cerámica de 16 x 14 pulgadas (40.5 cm x 35.5 cm) que
mantiene constante la temperatura para una cocción uniforme
tanto arriba como abajo. Nota: solamente el pan y la pizza pueden
hornearse directamente en la piedra.
5. Asa de la puerta
Diseño resistente y de fácil agarre.
6. Puerta de vidrio templado
Puerta transparente que permite observar el proceso cocción.
7. Luz interior
Bombilla reemplazable con cubre-bombilla de vidrio removible y
resistente al calor.
8. Placa de ventilación trasera (no ilustrada)
Dirige el aire caliente hacia los costados de la unidad, lejos de las
paredes.
9. Cepillo de limpieza
Cuenta con resistentes cerdas y un raspador, para limpiar la piedra
para pizza sin dañar la cerámica.
10. Patas ajustables (horno doble solamente)
Permiten nivelar el horno, ajustando la altura al nivel deseado.

20
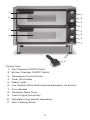
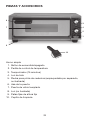
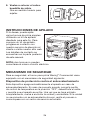
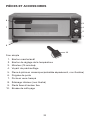
PIEZAS Y ACCESORIOS
1
2
4
3
9
7
6
10
Horno simple
1. Botón de encendido/apagado
2. Perilla de control de temperatura
3. Temporizador (15 minutos)
4. Luz de listo
5. Piedra para pizza de cerámica (empaquetada por separado,
no ilustrada)
6. Asa de la puerta
7. Puerta de vidrio templado
8. Luz (no ilustrada)
9. Patas fijas de altura fija
10. Cepillo de limpieza
A página está carregando...
A página está carregando...
A página está carregando...
A página está carregando...
A página está carregando...
A página está carregando...
A página está carregando...
A página está carregando...
A página está carregando...
A página está carregando...
A página está carregando...
A página está carregando...
A página está carregando...
A página está carregando...
A página está carregando...
A página está carregando...
A página está carregando...
A página está carregando...
A página está carregando...
A página está carregando...
A página está carregando...
A página está carregando...
A página está carregando...
A página está carregando...
-
 1
1
-
 2
2
-
 3
3
-
 4
4
-
 5
5
-
 6
6
-
 7
7
-
 8
8
-
 9
9
-
 10
10
-
 11
11
-
 12
12
-
 13
13
-
 14
14
-
 15
15
-
 16
16
-
 17
17
-
 18
18
-
 19
19
-
 20
20
-
 21
21
-
 22
22
-
 23
23
-
 24
24
-
 25
25
-
 26
26
-
 27
27
-
 28
28
-
 29
29
-
 30
30
-
 31
31
-
 32
32
-
 33
33
-
 34
34
-
 35
35
-
 36
36
-
 37
37
-
 38
38
-
 39
39
-
 40
40
-
 41
41
-
 42
42
-
 43
43
-
 44
44


Waring Commercial WPO350 Manual do usuário
- Categoria
- Fornos
- Tipo
- Manual do usuário
em outras línguas
Artigos relacionados
Outros documentos
-
Indesit KN6C61A(W)/P Guia de usuario
-
-
-
Maytag Range 8113P636-60, MER6765BAB, MER6765BAW, MER6765BAQ, MER6765BAS Manual do usuário
-
Sub-Zero DO30PM/S/PH Guia de usuario
-
Bosch HBC84E663/39 Manual do proprietário
-
Siemens HB84E562 Manual do usuário
-
-
-
Whirlpool UT 104S P 0 /HA Guia de usuario