Creality Sermoon D3 3D Printer Guia de usuario
- Categoria
- Impressoras 3D
- Tipo
- Guia de usuario

3D Printer Quick Start Guide
Sermoon D3
V1.2
EN CNES DE FR Pyc. PT-BR IT TR


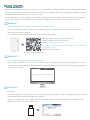
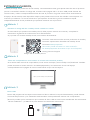
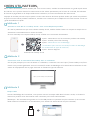
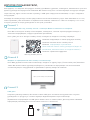
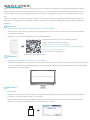
Scan the QR code of "Creality Cloud" by your mobile phone.
QR code of Creality Cloud
If it is your first time using Creality Cloud, please register an account first and fill in the information
according to the APP prompts;
If you already have a Creality Cloud account, please log in directly.
If it is more convenient for you to use a computer, log in to https://www.creality.com/download. You can
also find the manual/unboxing video and related equipment usage information on the homepage by enter-
ing the machine type.
Log in Creality official website with a computer
Method 1
Method 2
Method 3
USB Disk
DEAR USERS,
https://www.creality.com/download
Open the package of the machine, you can find the USB disk from the toolbox, and get the product manual
and related video materials through the computer.
(Note: The information on the USB Disk may not be the latest. It is recommended to use Method 1 and
Method 2 to obtain the latest information.)
Thanks for choosing Creality 3D products. For your convenience, please read this quick guide carefully before
use. You can obtain the relevant instructions and videos through the QR code, webpage link address, and USB
disk before use, and follow the instructions strictly.
Creality 3D team is always ready to provide high-quality services. No matter what problems you have during
use, please contact us by the telephone and email provided at the end of the quick installation guide.
Having: Creality New Product Information
Having: Creality Cloud Fun Printing
Having: Unboxing Information
(The user can find the manual/unboxing video by searching
the machine type)
Having: Service Support

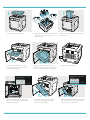
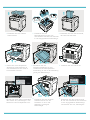
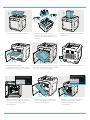
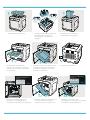
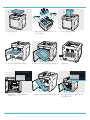
1. 2.
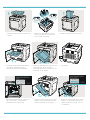
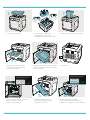
Remove the top foam. Remove the belt fasteners and
move the extruder kit in the
order shown.
3. Remove the foam that holds the
Extruder.
4. 5.
Lift the transparent cover in
order and then remove it in a
horizontal position.
Remove the foam tray at the
bottom of the transparent cover
in the order shown in the figure.
Switch on the power.
6.
7. 8. Remove the bottom foam A
from the platform in order
shown in the figure.
9. Remove foam B from the bottom
of the platform in order shown
and click on “Confirm".
After switching on the power,
click on "Confirm" and lift the
printing platform.
A
1
112
3
12
3
3
Remove the
belt fasteners
Move the
extruder
2
2
12
3B
Remove the
belt fasteners

Reminder: For the manual and unboxing video, please refer to the accompanying information in the USB flash drive or visit the link to the
official website https://www.creality.com/download.
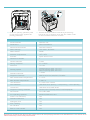
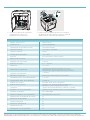
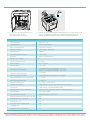
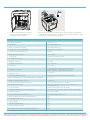
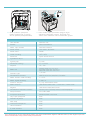
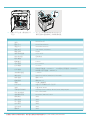
General Specifications
ProductModel
Nozzle Diameter
Extruder
SupportedFilament
Max. HeatedBedTemperature
Max.NozzleTemperature
Printlnterface
RatedVoltage
Number of Nozzles
Max.BuildDimensions
Sermoon D3
300*250*300mm
Dimensions 553*578*656mm
1
USB flash drive printing / LAN printing / Cloud printing
Connection USB flash drive/WIFI/RJ45
Auto Leveling Yes
100-240V~,50/60Hz
0.4mm
Slicing Thickness 0.1-0.4mm
SpriteDirectDrive
ABS/PLA/PETG/ASA/PET/TPU95A
≤ 110℃
Ambient Temperature 10℃-30℃
≤ 300 ºC
Printing Speed Standard printing speed: 100 mm/s;
PLA max printing speed: 150 mm/s;
ABS max printing speed: 250 mm/s
Filament Diameter 1.75mm
Filament Detection
IntelligentDoor
Power Loss Recovery Yes
Yes
Yes
Air Filtration Yes
Built-InLiveCamera Yes
Rated Power
UserInterface 4.3inchtouchscreen
500W
Supported Slicing Software Creality Print/Creality Slicer/Cura/Simplify3D
File Format STL/OBJ/3MF
PC Operating Systems
Precision
Windows/MacOS/Linux
±0.1mm
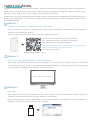
11.Thread the thick Teflon Tube through the fixing
hole from top to bottom, then the thin Teflon Tube
on the Filament Detection module.
10. Place the printing platform plate
(to be placed tight against the
printing platform).
12
2
1

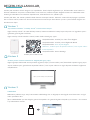
Escanee el código QR de "Creality Cloud" usando su celular.
Código QR de Creality Cloud
Si está usando por primera vez Creality Cloud, debe primero crearse una cuenta y completar la
información siguiendo las indicaciones de la APLICACIÓN.
Si ya posee una cuenta Creality Cloud, inicie sesión directamente.
Si le resulta más cómoda la computadora, inicie sesión en https://www.creality.com/download. También
puede encontrar el video manual o de desempaquetado y la información de uso del equipo
correspondiente en la página de inicio introduciendo el tipo de la máquina.
Tome una computadora e inicie sesión en el sitio web oficial de Creality
Método 1
Método 2
Método 3
Disco USB
ESTIMADOS USUARIOS,
https://www.creality.com/download
Dentro del paquete de la máquina se encuentra el disco USB en la caja de herramientas, puede obtener
el manual del producto y los materiales audiovisuales correspondientes usando una computadora.
(Nota: Es posible que la información que contiene el disco USB no sea la más actualizada. Se recomienda
utilizar el Método 1 y el Método 2 para obtener la información más actual).
Gracias por elegir los productos 3D de Creality. Lea atentamente esta guía rápida antes de usar el producto
para su comodidad. Usando el código QR, el enlace de la página web o el disco USB puede obtener las
instrucciones y videos correspondientes antes de usar el producto. Siga las instrucciones estrictamente.
El equipo 3D de Creality está disponible siempre para prestar servicios de alta calidad. Comuníquese con
nosotros por teléfono o el correo electrónico que aparece al final de la guía de instalación rápida
independientemente de los problemas que presente mientras usa el producto.
Teniendo: Información sobre nuevos productos de Creality
Teniendo: Impresiones divertidas de Creality Cloud
Teniendo:Desempaquetado
(El usuario puede encontrar un video manual/o
de desempaquetado buscando el tipo de la máquina)
Having: Service Support

1. 2.
Retire la espuma de la parte de
arriba.
Retire los sujetadores de la
cinta y mueva el kit extrusor
en el orden indicado.
3. Retire la espuma del extrusor.
4. 5.
Levante la cubierta transparente
de forma ordenada y luego
retírela en posición horizontal.
Retire la bandeja de espuma que
está debajo de la cubierta
transparente en el orden que se
muestra en la figura.
Encienda.
6.
7. 8. Retire la espuma A de la parte
inferior de la plataforma en el
orden indicado en la figura.
9. Retire la espuma B de la parte
inferior de la plataforma en el
orden indicado y haga clic en
“Confirmar".
Después de encender, haga clic
en “Confirmar" y levante la
plataforma de impresión.
A
1
112
3
12
3
3
Retire las
sujetadores
de la cinta
Retire las
sujetadores
de la cinta
Mueva el
extrusor
2
2
12
3B

Consejo: Para ver el manual del dispositivo y el vídeo de instrucciones de desembalaje, consulte la información en la unidad de
almacenamiento USB proporcionado junto con el dispositivo o el enlace de nuestro sitio oficial: https://www.creality.com/download.
Especificaciones generales
Modelo de producto
Diámetro de la boquilla
Extrusor
Filamento soportado
Temperatura máx. de la cama caliente
Temperatura máx. de la boquilla
Interfaz de impresión
Tensión nominal
Número de boquillas
Dimensiones de construcción máx.
Sermoon D3
300*250*300mm
Dimensiones 553*578*656mm
1
Impresión con unidad de almacenamiento USB /
impresión en LAN / impresión en la nube
Conexión Unidad de almacenamiento USB/Wi-Fi/RJ45
Nivelación automática Sí
100-240V~,50/60Hz
0,4 mm
Espesor de corte 0,1 – 0,4mm
Accionamiento directo sprite
ABS/PLA/PETG/ASA/PET/TPU95A
≤ 110℃
Temperatura ambiente 10℃-30℃
≤ 300 ºC
Velocidad de impresión Velocidad de impresión estándar: 100 mm/s;
velocidad máx. de impresión de PLA: 150 mm/s;
velocidad de impresión máxima de ABS: 250 mm/s
Diámetro del filamento 1,75 mm
Detección de filamento
Puerta inteligente
Recuperación de la pérdida de energía Sí
Sí
Sí
Filtración de aire Sí
Cámara en vivo incorporada Sí
Potencia nominal
Interfaz de usuario Pantalla táctil de 4,3 pulgadas
500W
Software de corte soportado Creality Print/Creality Slicer/Cura/Simplify3D
Formato de archivo STL/OBJ/3MF
Sistemas operativos de computadora
Precisión
Windows/Mac OS/Linux
±0,1 mm
11.Pase el tubo de teflón grueso por el orificio
de fijación de arriba a abajo, luego el tubo de
teflón fino en el módulo de detección.
10. Coloque la placa de impresión
(ajústela bien contra la
plataforma de impresión).
12
2
1

Scannen Sie den QR-Code von „Creality Cloud“ mit Ihrem Mobiltelefon.
QR-Code der Creality Cloud
Wenn Sie Creality Cloud zum ersten Mal nutzen, registrieren Sie bitte zunächst ein Konto und geben Sie
die Informationen gemäß den Aufforderungen der APP ein;
Wenn Sie bereits über ein Creality Cloud-Konto verfügen, melden Sie sich bitte direkt an.
Wenn es für Sie bequemer ist, einen Computer zu benutzen, melden Sie sich unter https://www.creality.com/
download an. Sie können auch das Handbuch/Entpackungs-Video und die zugehörigen Informationen zur
Nutzung des Geräts auf der Homepage abrufen, indem Sie den Gerätetyp eingeben.
Melden Sie sich mit einem Computer auf der offiziellen Website der Creality an
Methode 1
Methode 2
Methode 3
USB-Diskette
LIEBE ANWENDER,
https://www.creality.com/download
Wenn Sie die Gerät-Verpackung öffnen, finden Sie die USB-Diskette in der Toolbox. Das Produkthandbuch
und das zugehörige Videomaterial können Sie über den Computer abrufen.
(Anmerkung: Die Informationen auf der USB-Diskette sind möglicherweise nicht auf dem neuesten Stand.
Es wird empfohlen, Methode 1 und Methode 2 anzuwenden, um die neuesten Informationen zu erhalten)
Vielen Dank, dass Sie sich für ein Creality 3D-Produkt entschieden haben. Bitte lesen Sie diese Kurzanleitung
vor dem Gebrauch sorgfältig durch. Sie können die entsprechenden Anleitungen und Videos über den QR-Code,
die Link-Adresse der Webseite und die USB-Diskette vor der Verwendung abrufen und die Anweisungen genau
befolgen.
Das Team von Creality 3D ist stets bereit, hochwertige Dienstleistungen zu erbringen. Sollten während der
Nutzung Probleme haben, kontaktieren Sie uns bitte über die am Ende der Kurzanleitung angegebenen
Telefonnummern und E-Mail-Adressen.
Enthält: Creality Neue Produktinformation
Enthält: Creality Cloud Spaß am Drucken
Enthält: Entpackungs-Informationen
(Der Benutzer kann das Handbuch/Entpackungs-Video
finden, indem er nach demGerätetyp sucht)
Enthält: Service-Unterstützung

1. 2.
Entfernen Sie den oberen
Schaumstoff.
Entfernen Sie die
Riemenbefestigungen und
verschieben Sie den Extrudersatz
in der angegebenen Reihenfolge.
3. Entfernen Sie den Schaumstoff,
der den Extruder hält.
4. 5.
Heben Sie die transparente
Abdeckung nacheinander an
und entfernen Sie sie dann in
horizontaler Position.
Entfernen Sie die
Schaumstoffablage an der
Unterseite der transparenten
Abdeckung in der in der Abbildung
gezeigten Reihenfolge.
Schalten Sie das Gerät ein.
6.
7. 8. Entfernen Sie den unteren
Schaumstoff A von der
Plattform in die in der
Abbildung gezeigten
Reihenfolge.
9. Entfernen Sie den Schaumstoff
B von der Unterseite der Plattform
in der angegebenen Reihenfolge
und klicken Sie auf „Bestätigen“.
Klicken Sie nach dem Einschalten
des Geräts auf „Bestätigen“ und
heben Sie die Druckplattform an.
A
1
112
3
12
3
3
Verschieben
Sie den
Extruder
2
2
12
3B
Entfernen Sie die
Gurtbefestigungen
Entfernen Sie die
Gurtbefestigungen

Tipp: Die Bedienungsanleitung und das Video mit der Anleitung zum Auspacken des Geräts finden Sie auf der USB-Diskette, die Sie
zusammen mit dem Gerät bekommen haben, oder auf unserer offiziellen Website-Verknüpfung: https://www.creality.com/download.
Allgemeine Angaben
Gerätemodell
Düsen-Durchmesser
Extruder
Unterstütztes Filament
Max. Temperatur des Heizbetts
Max. Düsentemperatur
Druckschnittstelle
Nennspannung
Anzahl der Düsen
Max. Abmessungen
Sermoon D3
300*250*300mm
Abmessungen 553*578*656mm
1
USB-Stick-Druck/LAN-Druck/Cloud-Druck
Anschluss USB-Flash-Laufwerk/WIFI/RJ45
Automatisches Nivellieren Ja
100-240V~,50/60Hz
0,4 mm
Schnittdicke 0,1-0,4 mm
Sprite Direktantrieb
ABS/PLA/PETG/ASA/PET/TPU95A
≤ 110℃
Umgebungstemperatur 10℃-30℃
≤ 300 ºC
Druckgeschwindigkeit Standard-Druckgeschwindigkeit: 100 mm/s;
PLA max. Druckgeschwindigkeit: 150 mm/s;
ABS max. Druckgeschwindigkeit: 250 mm/s
Filament-Durchmesser 1,75 mm
Erkennung des Filaments
Intelligente Tür
Wiederherstellung bei Stromausfall Ja
Ja
Ja
Luftfilterung Ja
Eingebaute Live-Kamera Ja
Nennleistung
Benutzeroberfläche 4,3-Zoll-Touchscreen
500W
Unterstützte Slicing Software Creality Print/Creality Slicer/Cura/Simplify3D
Dateiformat STL/OBJ/3MF
PC Betriebssysteme
Genauigkeit
Windows/Mac OS/Linux
±0,1 mm
11.Fädeln Sie den dickwandigen Teflonschlauch von oben nach unten
durch die Befestigungsöffnung, anschließend verschieben Sie den
dünnen Teflonschlauch auf das Filament-Erkennungsmodul .
10. Legen Sie die Druckplatte auf
(sie muss fest an der
Druckplattform anliegen).
12
2
1

Scannez le code QR de « Creality Cloud » avec votre téléphone portable.
Code QR de Creality Cloud
Si c'est la première fois que vous utilisez Creality Cloud, veuillez d'abord créer un compte et remplir les in-
formations conformément aux invites de l'APP ;
Si vous avez déjà un compte Creality Cloud, veuillez-vous connecter directement.
S'il est plus pratique pour vous d'utiliser un ordinateur, connectez-vous sur https://www.creality.com/dow-
nload. Vous pouvez également trouver le manuel/la vidéo de déballage et les informations relatives à l'utili-
sation de l'équipement sur la page d'accueil en entrant le type de machine.
Connectez-vous au site officiel de Creality avec un ordinateur
Méthode 1
Méthode 2
Méthode 3
Disque USB
CHERS UTILISATEURS,
https://www.creality.com/download
Ouvrez l'emballage de la machine, vous pouvez trouver le disque USB dans la boîte à outils, et obtenir le
manuel du produit et les documents vidéo connexes par le biais del'ordinateur.
(Remarque : les informations figurant sur la clé USB peuvent ne pas être les plus récentes. Il est recomm
andé d'utiliser la méthode 1 et la méthode 2 pour obtenir les informations les plus récentes).
Merci d'avoir choisi les produits Creality 3D. Pour votre confort, veuillez lire attentivement ce guide rapide avant
de l'utiliser. Vous pouvez obtenir les instructions et les vidéos pertinentes par le biais du code QR, de l'adresse
du lien de la page Web et du disque USB avant l'utilisation, et suivre strictement les instructions.
L'équipe de Creality 3D est toujours prête à fournir des services de haute qualité. Quels que soient les problèm-
es que vous rencontrez pendant l'utilisation, veuillez nous contacter par le téléphone et l'email fournis à la fin du
guide d'installation rapide.
Ayant : Informations sur les nouveaux produits de Creality
Ayant : Creality Cloud Fun Printing
Ayant : Informations sur le déballage
(L'utilisateur peut trouver le manuel/la vidéo de déballage
en recherchant le type de machine)
Ayant : Service Support

1. 2.
Retirez la mousse supérieure. Retirer les fixations de la
courroie et faire progresser
le kit d'extrudeuse dans l'ordre
indiqué.
3. Retirez la mousse qui maintient
l'extrudeuse.
4. 5.
Soulevez le couvercle
transparent dans l'ordre, puis
retirez-le en position horizontale.
Retirez le bac en mousse situé au
bas du couvercle transparent dans
l'ordre indiqué sur la figure.
Mettez l'appareil sous tension.
6.
7. 8. Retirez la mousse inférieure A
de la plate-forme dans l'ordre
indiqué sur la figure.
9. Retirez la mousse B du bas de
la plate-forme dans l'ordre
indiqué et cliquez sur
«Confirmer».
Après avoir mis l'appareil sous
tension, cliquez sur «Confirmer»
et soulevez la plate-forme
d'impression.
A
1
112
3
12
3
3
Enlever les
fixations de
la courroie
Enlever les
fixations de
la courroie
Déplacer
l'extrudeuse
2
2
12
3B

Reminder: For the manual and unboxing video, please refer to the accompanying information in the USB flash drive or visit the link to the
official website https://www.creality.com/download.
Specifications générales
Modèle du produit
Diamètre de la buse
Extrudeuse
Filament supporté
Température max. Température du lit chauffé
Température max. Température de la buse
Interface d'impression
Tension nominale
Nombre de buses
Max. Dimensions de la construction
Sermoon D3
300*250*300mm
Dimensions 553*578*656mm
1
Impression sur clé USB/Impression sur réseau local/
Impression dans les nuages
Connexion Clé USB/WIFI/RJ45
Mise à niveau automatique Oui
100-240V~,50/60Hz
0,4 mm
Épaisseur de la tranche 0,1-0,4 mm
Sprite Direct Drive
ABS/PLA/PETG/ASA/PET/TPU95A
≤ 110 ºC
Température ambiante 10℃-30℃
≤ 300 ºC
Vitesse d'impression Vitesse d'impression standard : 100 mm/s ;
vitesse d'impression maximale du PLA : 150 mm/s ;
vitesse d'impression maximale de l'ABS : 250 mm/s
Diamètre du filament 1,75 mm
Détection de filament
Porte intelligente
Récupération en cas de perte d'alimentationOui
Oui
Oui
Filtration de l'air Oui
Caméra en direct intégrée Oui
Puissance nominale
Interface utilisateur Écran tactile de 4,3 pouces
500W
Logiciel de découpage pris en charge Creality Print/Creality Slicer/Cura/Simplify3D
Format de fichier STL/OBJ/3MF
Systèmes d'exploitation du PC
Précision
Windows/Mac OS/Linux
±0,1 mm
11.Passer le tube en téflon épais dans le trou
de fixation de haut en bas, puis le tube en
téflon fin sur le module de détection de filament.
10. Placez la plaque d'impression
(à placer de manière étanche
contre la plateforme d'impression).
12
2
1

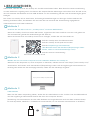
Отсканируйте QR-код «Creality Cloud» с помощью Вашего мобильного телефона.
QR-код Creality Cloud
Если Вы используете Creality Cloud впервые, пожалуйста, сначала зарегистрируйте аккаунт и
заполните информацию, следуя подсказкам приложения;
Если у Вас уже есть аккаунт Creality Cloud, пожалуйста, войдите в систему напрямую.
Если Вам удобнее использовать компьютер, войдите по адресу https://www.creality.com/download.
Также Вы можете найти руководство/видео по распаковке и информацию об использовании
соответствующего оборудования на домашней странице, введя тип машины.
Войдите на официальный сайт Creality на компьютере
Способ 1
Способ 2
Способ 3
USB-диск
ДОРОГИЕ ПОЛЬЗОВАТЕЛИ,
https://www.creality.com/download
Откройте упаковку машины, Вы можете найти USB-диск на панели инструментов и получить
руководство по продукту и соответствующие видеоматериалы через компьютер.
(Примечание: информация на USB-диске может быть не самой новой. Для получения новейшей
информации рекомендуется использовать Способ 1 и Способ 2.)
Благодарим, что выбрали 3D продукты Creality. Для Вашего удобства, пожалуйста, внимательно прочтите
данное руководство перед использованием. Вы можете получить соответствующие инструкции и видео
через QR-код, адрес ссылки на веб-страницу и USB-диск перед использованием, и строго следовать
инструкциям.
Команда 3D Creality всегда готова предоставить высококачественные услуги. Вне зависимости от того,
какие проблемы у Вас возникают во время использования, свяжитесь с нами по телефону и эл. почте,
которые указаны в конце руководства по быстрой установке.
Наличие: информация о новой продукции Creality
Наличие: веселая печать Creality Cloud
Наличие: информацию о распаковке
(Пользователь может найти руководство/видео по
распаковке, выполнив поиск по модели машины)
Наличие: сервисная поддержка

1. 2.
Удалите верхнюю пену. Снимите крепления ремня и
переместите комплект
экструдера в указанном
порядке.
3. Удалите пену, которая
удерживает экструдер.
4. 5.
Поднимите прозрачную
крышку по порядку, и затем
удалите ее в горизонтальном
положении.
Удалите пенопластовый лоток
в нижней части прозрачной
крышки в порядке, который
указан на рисунке.
Включите питание.
6.
7. 8. Удалить нижний слой пены А
с платформы в порядке,
который указан на рисунке.
9. Удалите пену B со дна
платформы в указанном порядке
и нажмите «Подтвердить».
После включения питания
нажмите «Подтвердить» и
поднимите печатную платформу.
A
1
112
3
12
3
3
Снимите
крепления
ремня
Снимите
крепления
ремня
Переместите
экструдер
2
2
12
3B

Совет: Для получения Руководства по устройству и видео-инструкции по распаковке обратитесь к информации на USB-накопителе,
поставляемым вместе с устройством, или перейдите на наш официальный веб-сайт по ссылке: https://www.creality.com/download.
Общие характеристики
Модель продукта
Диаметр сопла
Экструдер
Поддерживаемая нить
Макс. Температура подогревающейся платформы
Макс. Температура сопла
Интерфейс печати
Номинальное напряжение
Количество сопел
Макс. размеры сборки
Sermoon D3
300*250*300mm
Размеры 553*578*656mm
1
Печать с USB-накопителя/Печать через LAN/
Облачная печать
Подключение USB-накопитель/Wi-Fi/RJ45
Автовыравнивание Да
100-240V~,50/60Hz
0,4 mm
Толщина резания 0,1-0,4 mm
Прямой привод Sprite
ABS/PLA/PETG/ASA/PET/TPU95A
≤ 110 ℃
Температура среды 10℃-30℃
≤ 300 ºC
Скорость печати Стандартная скорость печати: 100 mm/s;
макс. скорость печати PLA: 150 mm/s;
макс. скорость печати ABS: 250 mm/s
Диаметр нити 1,75 mm
Обнаружение нити
Умная дверь
Восстановление после потери питания Да
Да
Да
Фильтрация воздуха Да
Встроенная камера прямой передачи Да
Номинальная мощность
Пользовательский интерфейс Сенсорный экран 4,3-дюйма
500W
Поддерживаемое ПО для резания Creality Print/Creality Slicer/Cura/Simplify3D
Формат файла STL/OBJ/3MF
Операционные системы ПК
Точность
Windows/Mac OS/Linux
±0,1 mm
11.Проденьте толстую тефлоновую трубу через крепежное
отверстие сверху вниз, а затем тонкую тефлоновую трубу
на модуле обнаружения нитей и.
10. Разместите печатную форму
(должна плотно прилегать к
печатной платформе).
12
2
1

Escaneie o código QR de "Creality Cloud” pelo seu celular.
Código QR da Creality Cloud
Se for a primeira vez que usa o Creality Cloud, registre uma conta primeiro e preencha as informações de
acordo com as instruções do APP;
Se você já tem uma conta no Creality Cloud, faça login diretamente.
Se for mais conveniente para você usar um computador, faça login em https://www.creality.com/download.
Você também pode encontrar o vídeo/manual de desempacotamento e informações de uso de equipament-
os relacionados na página inicial digitando o tipo de máquina.
Faça login no site oficial da Creality com um computador
Método 1
Método 2
Método 3
Disco USB
CAROS USUÁRIOS,
https://www.creality.com/download
Abra o pacote da máquina, você pode encontrar o disco USB na caixa de ferramentas, e obter o manual do
produto e materiais de vídeo relacionados através do computador.
(Nota: As informações no disco USB podem não ser as mais recentes. Recomenda-se o uso do Método 1 e
do Método 2 para obter as informações mais recentes.)
Obrigado por escolher produtos 3D da Creality. Para sua conveniência, leia este guia rápido com cuidado an-
tes de usar. Você pode obter as instruções e vídeos relevantes através do código QR, endereço de link da pá-
gina web e disco USB antes de usar, e seguir as instruções estritamente.
A equipe 3D da Creality está sempre pronta para fornecer serviços de alta qualidade. Não importa quais prob-
lemas você tenha durante o uso, entre em contato conosco pelo telefone e e-mail fornecidos no final do guia
de instalação rápida.
Ter: Novas Informações do Produto da Creality
Ter: Impressão Divertida na Nuvem da Creality
Ter: Informação de desempacotamento
(O usuário pode encontrar o vídeo/manual de desempacot-
amento pesquisando o tipo de máquina)
Ter: Suporte de serviço

1. 2.
Remova a espuma superior. Remova os fechos da correia
e mova o kit da extrusora na
ordem mostrada.
3. Remova a espuma que apoia a
extrusora.
4. 5.
Levante a tampa transparente
em ordem e, em seguida,
remova-a horizontalmente.
Remova a bandeja de espuma na
parte inferior da tampa
transparente na ordem mostrada
na figura.
Ligue a alimentação.
6.
7. 8. Remova a espuma A do fundo
da plataforma na ordem
mostrada na figura.
9. Remova a espuma B do fundo
da plataforma na ordem mostrada
e clique em “Confirmar”.
Após ligar a energia, clique em
“Confirmar” e levante a
plataforma de impressão.
A
1
112
3
12
3
3
Remova os
fechos da
correia
Remova os
fechos da
correia
Mova a
extrusora
2
2
12
3B

Dica: Para o manual do dispositivo e o vídeo de instrução para desembalar, consulte as informações no pendrive USB que acompanha o
dispositivo ou no link de nosso site oficial: https://www.creality.com/download.
Especificações Gerais
Modelo do Produto
Diâmetro do Bico
Extrusora
Filamento Suportado
Temperatura Máx. da Placa Aquecida
Temperatura Máx. do Bico
Interface de Impressão
Tensão Nominal
Número de Bicos
Dimensões Máx. da Construção
Sermoon D3
300*250*300mm
Dimensões 553*578*656mm
1
Impressão por unidade USB/ mpressão por LAN/impressão por Nuvem
Conexão Unidade USB/WIFI/RJ45
Autonivelamento Sim
100-240V~,50/60Hz
0,4 mm
Espessura do Corte 0,1-0,4 mm
Unidade Direta Sprite
ABS/PLA/PETG/ASA/PET/TPU95A
≤ 110℃
Temperatura Ambiente 10℃-30℃
≤ 300 ºC
Velocidade de impressão Velocidade de impressão padrão 100 mm/s;
velocidade máx. de impressão PLA: 150 mm/s;
velocidade máx. de impressão ABS: 250 mm/s
Diâmetro do Filamento 1,75 mm
Detecção de Filamento
Porta Inteligente
Recuperação de Perda de Energia Sim
Sim
Sim
Filtragem de Ar Sim
Câmera Ao Vivo Integrada Sim
Alimentação Nominal
Interface do Usuário Tela sensível ao toque de 4,3 polegadas
500W
Software de Corte Suportado Creality Print/Creality Slicer/Cura/Simplify3D
Formato do Arquivo STL/OBJ/3MF
Sistemas Operacionais de PC
Precisão
Windows/Mac OS/Linux
±0,1 mm
11.Rosqueie o Tubo grosso de Teflon no buraco de
fixação de cima para baixo, em seguida, o Tubo
fino de Teflon no módulo de Detecção de Filamento.
10. Coloque a placa de impressão
(a ser colocada com firmeza
na plataforma de impressão).
122
1
A página está carregando...
A página está carregando...
A página está carregando...
A página está carregando...
A página está carregando...
A página está carregando...
A página está carregando...
A página está carregando...
A página está carregando...
A página está carregando...
A página está carregando...
A página está carregando...
-
 1
1
-
 2
2
-
 3
3
-
 4
4
-
 5
5
-
 6
6
-
 7
7
-
 8
8
-
 9
9
-
 10
10
-
 11
11
-
 12
12
-
 13
13
-
 14
14
-
 15
15
-
 16
16
-
 17
17
-
 18
18
-
 19
19
-
 20
20
-
 21
21
-
 22
22
-
 23
23
-
 24
24
-
 25
25
-
 26
26
-
 27
27
-
 28
28
-
 29
29
-
 30
30
-
 31
31
-
 32
32


Creality Sermoon D3 3D Printer Guia de usuario
- Categoria
- Impressoras 3D
- Tipo
- Guia de usuario
em outras línguas
- español: Creality Sermoon D3 3D Printer Guía del usuario
- français: Creality Sermoon D3 3D Printer Mode d'emploi
- italiano: Creality Sermoon D3 3D Printer Guida utente
- English: Creality Sermoon D3 3D Printer User guide
- русский: Creality Sermoon D3 3D Printer Руководство пользователя
- Deutsch: Creality Sermoon D3 3D Printer Benutzerhandbuch
- Türkçe: Creality Sermoon D3 3D Printer Kullanici rehberi
Outros documentos
-
 Blocks Zero Manual do usuário
-
Dremel 3D20 Idea Builder Original Instructions Manual
-
bq Witbox Guia rápido
-
bq Witbox Go! Guia rápido
-
HP DesignJet T2300 Multifunction Printer series Instruções de operação
-
HP Color LaserJet Pro M255-M256 Printer series Guia de referência
-
-
-
-
