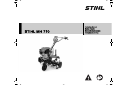
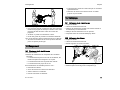
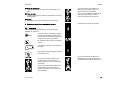
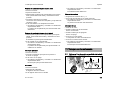
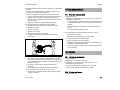
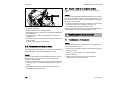
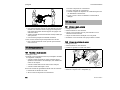
STIHL MH 710 Manual do usuário
- Categoria
- Cortadores de grama
- Tipo
- Manual do usuário

STIHL MH 710
Instruction Manual
Notice d’emploi
Manual de instrucciones
Instruções de serviço


Translation of Original Instruction
Manual
Printed on chlorine-free paper
Printing inks contain vegetable oils, paper can be recycled.
© STIHL Tirol GmbH 2020
0478-404-9905-A. VA0.M20. Lon.
0000009173_003_GB
0478-404-9905-A
English
1
This instruction manual is protected by copyright. All rights reserved, especially the rights to reproduce, translate and process
with electronic systems.
Contents
1 Introduction
. . . . . . . . . . . . . . . . . . . . . . . . . . . . . . . . . . . . . . . . .
2
2 Guide to Using this Manual
. . . . . . . . . . . . . . . . . . . . . . . . . .
2
2.1 Applicable Documents
. . . . . . . . . . . . . . . . . . . . . . . . . . . . . . .
2
2.2 Warning Notices in Text
. . . . . . . . . . . . . . . . . . . . . . . . . . . . .
3
2.3 Symbols in Text
. . . . . . . . . . . . . . . . . . . . . . . . . . . . . . . . . . . . .
3
3 Overview
. . . . . . . . . . . . . . . . . . . . . . . . . . . . . . . . . . . . . . . . . . . .
3
3.1 Tiller
. . . . . . . . . . . . . . . . . . . . . . . . . . . . . . . . . . . . . . . . . . . . . . . .
3
3.2 Symbols
. . . . . . . . . . . . . . . . . . . . . . . . . . . . . . . . . . . . . . . . . . . .
5
4 Safety Precautions
. . . . . . . . . . . . . . . . . . . . . . . . . . . . . . . . . .
6
4.1 Warning Symbols
. . . . . . . . . . . . . . . . . . . . . . . . . . . . . . . . . . .
6
4.2 Intended Use
. . . . . . . . . . . . . . . . . . . . . . . . . . . . . . . . . . . . . . . .
6
4.3 Requirements for the User
. . . . . . . . . . . . . . . . . . . . . . . . . .
6
4.4 Clothing and Equipment
. . . . . . . . . . . . . . . . . . . . . . . . . . . . .
7
4.5 Work Area and Surroundings
. . . . . . . . . . . . . . . . . . . . . . . .
7
4.6 Safe Condition
. . . . . . . . . . . . . . . . . . . . . . . . . . . . . . . . . . . . . .
8
4.7 Fuel and Refueling
. . . . . . . . . . . . . . . . . . . . . . . . . . . . . . . . . .
9
4.8 Working
. . . . . . . . . . . . . . . . . . . . . . . . . . . . . . . . . . . . . . . . . . . .
10
4.9 Transporting
. . . . . . . . . . . . . . . . . . . . . . . . . . . . . . . . . . . . . . .
11
4.10 Storing
. . . . . . . . . . . . . . . . . . . . . . . . . . . . . . . . . . . . . . . . . . . . .
11
4.11 Cleaning, Maintenance and Repair
. . . . . . . . . . . . . . . . .
11
5 Preparing Cultivator for Operation
. . . . . . . . . . . . . . . . . .
12
5.1 Preparing the Tiller for Operation
. . . . . . . . . . . . . . . . . . .
12
6 Assembling the Cultivator
. . . . . . . . . . . . . . . . . . . . . . . . . .
12
6.1 Fitting and Removing the Blades
. . . . . . . . . . . . . . . . . . .
12
6.2 Attaching and Removing the Running Wheels
. . . . . .
13
6.3 Attaching the Front Wheel
. . . . . . . . . . . . . . . . . . . . . . . . . .
14
6.4 Attaching the Blade Spur
. . . . . . . . . . . . . . . . . . . . . . . . . . .
14
6.5 Attaching the Handlebar
. . . . . . . . . . . . . . . . . . . . . . . . . . . .
15
6.6 Attaching the Cables
. . . . . . . . . . . . . . . . . . . . . . . . . . . . . . .
16
6.7 Attaching the Transport Handle
. . . . . . . . . . . . . . . . . . . . .
17
6.8 Attaching the Guard and Covers
. . . . . . . . . . . . . . . . . . . .
18
6.9 Topping Up the Gearbox Oil
. . . . . . . . . . . . . . . . . . . . . . . .
19
6.10 Topping Up the Engine Oil
. . . . . . . . . . . . . . . . . . . . . . . . .
20
6.11 Filling the Oil Bath Air Filter
. . . . . . . . . . . . . . . . . . . . . . . .
20
7 Refueling the Tiller
. . . . . . . . . . . . . . . . . . . . . . . . . . . . . . . . .
20
7.1 Refueling the Tiller
. . . . . . . . . . . . . . . . . . . . . . . . . . . . . . . . .
20
8 Adjusting the Tiller for the User
. . . . . . . . . . . . . . . . . . . . .
21
8.1 Adjusting the Handlebar Height
. . . . . . . . . . . . . . . . . . . .
21
8.2 Adjusting the Handlebar Laterally
. . . . . . . . . . . . . . . . . .
21
9 Starting and Stopping the Tiller
. . . . . . . . . . . . . . . . . . . . .
22
9.1 Starting and Stopping the Engine
. . . . . . . . . . . . . . . . . . .
22
9.2 Setting the Gear
. . . . . . . . . . . . . . . . . . . . . . . . . . . . . . . . . . .
22
9.3 Adjusting the Engine Speed
. . . . . . . . . . . . . . . . . . . . . . . .
23
9.4 Engaging and Disengaging Self-propulsion
. . . . . . . . .
23
10 Checking the Cultivator
. . . . . . . . . . . . . . . . . . . . . . . . . . . .
24
10.1 Checking the Controls
. . . . . . . . . . . . . . . . . . . . . . . . . . . . .
24
11 Working with the Cultivator
. . . . . . . . . . . . . . . . . . . . . . . . .
25
11.1 Placing the Front Wheel in the Operating Position
. . .
25
11.2 Adjusting the Blade Spur
. . . . . . . . . . . . . . . . . . . . . . . . . . .
25
11.3 Using the PTO Drive
. . . . . . . . . . . . . . . . . . . . . . . . . . . . . . .
26
11.4 Switching the Headlamp On and Off
. . . . . . . . . . . . . . .
26
11.5 Holding and Guiding the Tiller
. . . . . . . . . . . . . . . . . . . . . .
27
11.6 Loosening Firm Soil or Working Soil Additives
into Loose Soil
. . . . . . . . . . . . . . . . . . . . . . . . . . . . . . . . . . . . .
27
11.7 Tilling Loose Soil
. . . . . . . . . . . . . . . . . . . . . . . . . . . . . . . . . .
27
11.8 Making Furrows
. . . . . . . . . . . . . . . . . . . . . . . . . . . . . . . . . . . .
27
12 After Finishing Work
. . . . . . . . . . . . . . . . . . . . . . . . . . . . . . .
28
12.1 After Finishing Work
. . . . . . . . . . . . . . . . . . . . . . . . . . . . . . .
28
13 Transporting
. . . . . . . . . . . . . . . . . . . . . . . . . . . . . . . . . . . . . . .
28
13.1 Transporting the Tiller
. . . . . . . . . . . . . . . . . . . . . . . . . . . . .
28
14 Storing
. . . . . . . . . . . . . . . . . . . . . . . . . . . . . . . . . . . . . . . . . . . . .
29
14.1 Storing the Tiller
. . . . . . . . . . . . . . . . . . . . . . . . . . . . . . . . . . .
29
15 Cleaning
. . . . . . . . . . . . . . . . . . . . . . . . . . . . . . . . . . . . . . . . . . .
29
15.1 Cleaning the Tiller
. . . . . . . . . . . . . . . . . . . . . . . . . . . . . . . . .
29
15.2 Cleaning the Hoes
. . . . . . . . . . . . . . . . . . . . . . . . . . . . . . . . .
29
16 Maintenance
. . . . . . . . . . . . . . . . . . . . . . . . . . . . . . . . . . . . . . .
29
16.1 Maintenance Intervals
. . . . . . . . . . . . . . . . . . . . . . . . . . . . .
29

0478-404-9905-A
2
English
1 Introduction
Dear Customer,
Thank you for choosing STIHL. We develop and
manufacture our quality products to meet our customers’
requirements. The products are designed for reliability even
under extreme conditions.
STIHL also stands for premium service quality. Our dealers
guarantee competent advice and instruction as well as
comprehensive service support.
STIHL expressly commit themselves to a sustainable and
responsible handling of natural resources. This user manual
is intended to help you use your STIHL product safely and in
an environmentally friendly manner over a long service life.
We thank you for your confidence in us and hope you will
enjoy working with your STIHL product.
Dr. Nikolas Stihl
IMPORTANT! READ BEFORE USING AND KEEP IN A
SAFE PLACE FOR REFERENCE.
2.1 Applicable Documents
Local safety regulations apply.
► In addition to this instruction manual, read, understand
and keep the following documents:
– STIHL EHC 700 engine instruction manual
16.2 Lubricating the Gearbox
. . . . . . . . . . . . . . . . . . . . . . . . . . . .
30
16.3 Checking the Gearbox Oil Level
. . . . . . . . . . . . . . . . . . . .
30
16.4 Changing the Gearbox Oil
. . . . . . . . . . . . . . . . . . . . . . . . . .
30
17 Repairing
. . . . . . . . . . . . . . . . . . . . . . . . . . . . . . . . . . . . . . . . . .
31
17.1 Repairing the Cultivator and Blades
. . . . . . . . . . . . . . . .
31
18 Troubleshooting
. . . . . . . . . . . . . . . . . . . . . . . . . . . . . . . . . . . .
32
18.1 Remedying Tiller Faults
. . . . . . . . . . . . . . . . . . . . . . . . . . . .
32
19 Specifications
. . . . . . . . . . . . . . . . . . . . . . . . . . . . . . . . . . . . . .
34
19.1 STIHL MH 710 Tiller
. . . . . . . . . . . . . . . . . . . . . . . . . . . . . . .
34
19.2 Sound Values and Vibration Values
. . . . . . . . . . . . . . . .
34
19.3 REACH
. . . . . . . . . . . . . . . . . . . . . . . . . . . . . . . . . . . . . . . . . . . .
34
20 Spare Parts and Accessories
. . . . . . . . . . . . . . . . . . . . . . .
34
20.1 Spare parts and accessories
. . . . . . . . . . . . . . . . . . . . . . .
34
21 Disposal
. . . . . . . . . . . . . . . . . . . . . . . . . . . . . . . . . . . . . . . . . . .
34
21.1 Disposing of the Tiller
. . . . . . . . . . . . . . . . . . . . . . . . . . . . . .
34
22 EC Declaration of Conformity
. . . . . . . . . . . . . . . . . . . . . . .
34
22.1 STIHL MH 710.0 Tiller
. . . . . . . . . . . . . . . . . . . . . . . . . . . . .
34
23 Safety Information for Tillers
. . . . . . . . . . . . . . . . . . . . . . .
35
23.1 Introduction
. . . . . . . . . . . . . . . . . . . . . . . . . . . . . . . . . . . . . . . .
35
23.2 General Information
. . . . . . . . . . . . . . . . . . . . . . . . . . . . . . . .
35
23.3 Preparatory Measures
. . . . . . . . . . . . . . . . . . . . . . . . . . . . .
35
23.4 Handling
. . . . . . . . . . . . . . . . . . . . . . . . . . . . . . . . . . . . . . . . . . .
36
23.5 Maintenance and Storage
. . . . . . . . . . . . . . . . . . . . . . . . . .
36
1 Introduction
2 Guide to Using this Manual

0478-404-9905-A
3
English
3 Overview
2.2 Warning Notices in Text
DANGER
This notice refers to risks which result in serious or fatal
injury.
► Serious or fatal injuries can be avoided by taking the
precautions mentioned.
WARNING
This notice refers to risks which can result in serious or fatal
injury.
► Serious or fatal injuries can be avoided by taking the
precautions mentioned.
NOTICE
This notice refers to risks which can result in damage to
property.
► Damage to property can be avoided by taking the
precautions mentioned.
2.3 Symbols in Text
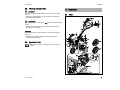
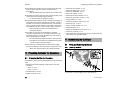
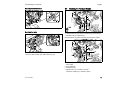
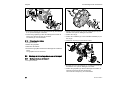
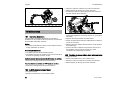
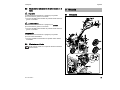
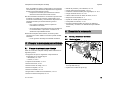
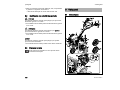
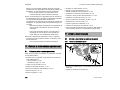
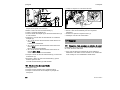
3.1 Tiller
This symbol refers to a chapter in this instruction
manual.
3Overview

0478-404-9905-A
4
English
3 Overview
1 Throttle lever
The throttle lever is used to adjust the engine speed.
2Gear lever
The gear lever is used to set the gears.
3 Handlebar
The handlebar is used to hold, guide and transport the
tiller.
4Cover
The cover protects the engine.
5 Oil bath air filter
The oil bath air filter filters the air taken in by the engine.
6 Headlamp
The headlamp illuminates the working area.
7 Starter handle
The starter handle is used to start the engine.
8 Transport handle
The transport handle is used to carry the tiller.
9Hoe
The hoes till the ground.
10 Front wheel
The front wheel is used to transport the tiller.
11 Gearbox housing
The gearbox housing covers the gearbox.
12 Engine oil cap
The engine oil cap seals the opening for adding engine
oil.
13 Folding retainer
The folding retainer secures the hoe.
14 Blade spur
The blade spur is used to regulate the working speed and
working depth.
15 Gearbox oil cap
The gearbox oil cap seals the opening for adding
gearbox oil.
16 Clutch lever for self-propulsion
The clutch lever for self-propulsion engages and
disengages the drive shaft.
17 Clutch lever for lateral adjustment
The clutch lever for lateral adjustment is used to adjust
the handlebar laterally.
18 Handle
The handles are used to operate, hold and guide the
tiller.
19 Main switch
The main switch is used to start and stop the engine.
20 Light switch
The light switch is used to switch the headlamp on and
off.
21 Lever
The lever is used to set the handlebar height.
22 Clutch lever for reverse gear
The clutch lever for reverse gear engages and
disengages the drive shaft.
23 Fuel tank cap
The fuel tank cap seals the opening for adding petrol.
24 Guard
The guard protects the user from high-velocity objects
and from contact with the hoes.
25 Cover
The cover protects the PTO.
26 Blade spur mounting
The blade spur mounting consists of a pin and retaining
pin and secures the blade spur.
27 Screw plug
The screw plug seals the opening for draining the
gearbox oil.
28 Spark plug
The spark plug ignites the fuel in the engine.

0478-404-9905-A
5
English
3 Overview
29 Spark plug socket
The spark plug socket connects the ignition lead to the
spark plug.
30 Running wheel
The running wheels are used to transport the tiller.
# Rating plate with machine number
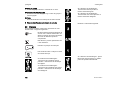
3.2 Symbols
The symbols can be on the tiller and have the following
meaning:
Guaranteed sound power level in
accordance with Directive 2000/14/EC
in dB(A) for the purpose of comparing
the sound emissions of products.
Do not dispose of the product with
domestic waste.
Indicates the position of the main
switch.
This symbol indicates the nominal
speed of the PTO.
If the clutch lever for self-propulsion is
pressed: self-propulsion is engaged.
If the clutch lever for self-propulsion is
not pressed: self-propulsion is
disengaged.
L
WA
If the clutch lever for reverse gear is
pressed: reverse gear is engaged.
If the clutch lever for reverse gear is not
pressed: reverse gear is disengaged.
Indicates the engaged gear.
If the clutch lever for lateral adjustment
is pressed: the handlebar can be
adjusted laterally.

0478-404-9905-A
6
English
4 Safety Precautions
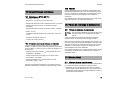
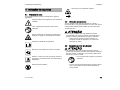
4.1 Warning Symbols
The warning symbols on the tiller have the following
meaning:
4.2 Intended Use
The STIHL MH 710 tiller is used to loosen and till soil, work
in soil additives and make furrows.
The working width formed by the hoes must not exceed
970 mm.
WARNING
■ Failure to use the tiller as intended may result in serious
or fatal injury to people and damage to property.
– Use the tiller as described in this instruction manual
and in the engine instruction manual.
4.3 Requirements for the User
WARNING
■ Uninstructed users cannot recognise or evaluate the
dangers posed by the tiller. This may result in serious or
fatal injury to the user or other people.
– If passing on the tiller to another person: provide
them with the tiller and engine instruction manuals
also.
– Make sure that the user meets the following
conditions:
– The user is rested.
– The user is physically, sensorily and mentally
capable of operating the tiller and working with
it. If the user is physically, sensorily or mentally
4 Safety Precautions
Follow the safety instructions and their
measures.
Read, understand and keep the instruction
manual.
Observe the safety instructions on high-velocity
objects and their measures.
Maintain a safety distance.
Do not touch turning hoes.
Detach the spark plug socket during transport,
storage, maintenance or repair.
Wear hearing protection.
Do not touch hot surfaces.
– Read, understand and keep the
instruction manual.

0478-404-9905-A
7
English
4 Safety Precautions
impaired, the machine must only be used under
supervision or following instruction by a
responsible person.
– The user can recognise and evaluate the
dangers posed by the tiller.
– The user is aware that they are responsible for
accidents and damage.
– The user is of legal age or the user is being
trained under supervision in a profession in
accordance with national regulations.
– The user has received instruction from a STIHL
specialist dealer or a competent person before
using the tiller for the first time.
– The user is not impaired by alcohol, medicines
or drugs.
– If anything is unclear: consult a STIHL specialist
dealer.
4.4 Clothing and Equipment
WARNING
■ Long hair may be pulled into the tiller when working. This
may result in serious injury to the user.
– Tie back long hair to ensure that it cannot be pulled
into the tiller.
■ Objects may be thrown up at high velocity while working.
This may result in injury to the user.
– Wear close-fitting safety glasses. Suitable safety
glasses are tested in accordance with EN 166 or
national regulations and available commercially with
the corresponding marking.
– Wear long trousers made from resistant material.
■ Noise is produced when working. Noise can damage the
hearing.
■ Dust may be stirred up while working. Breathing in dust
may be harmful to health and cause allergic reactions.
– If dust is stirred up: wear a dust mask.
■ Unsuitable clothing may get caught in wood, brambles
and in the tiller. This may result in serious injury to the
user.
– Wear close-fitting clothing.
– Remove scarves and jewellery.
■ The user may come into contact with the hoes when
working. This may result in serious injury to the user.
– Wear protective boots with steel caps.
– Wear long trousers made from resistant material.
■ The user may come into contact with the hoes during
cleaning or maintenance. This may result in injury to the
user.
– Wear work gloves made from resistant material.
■ Wearing unsuitable footwear may cause the user to slip.
This may result in injury to the user.
– Wear sturdy, closed-toed footwear with high-grip
soles.
4.5 Work Area and Surroundings
WARNING
■ Bystanding people, children and animals cannot
recognise or evaluate the dangers posed by the tiller and
high-velocity objects. This may result in serious injury to
bystanding people, children and animals and damage to
property.
– Wear hearing protection.

0478-404-9905-A
8
English
4 Safety Precautions
– Maintain a distance from objects.
– Do not leave the tiller unattended.
– Make sure that children cannot play with the tiller.
■ Hot exhaust gases are emitted from the muffler when the
engine is running. Hot exhaust gases may ignite easily
inflammable materials and cause fires.
– Keep the exhaust gas flow away from easily
inflammable materials.
4.6 Safe Condition
4.6.1 Tiller
The tiller is in safe condition when the following conditions
are met:
– The tiller is not damaged.
– The hoes or running wheels are installed in pairs.
– There is no petrol leaking from the tiller.
– The fuel tank cap is closed.
– There is no engine oil leaking from the tiller.
– The engine oil cap is closed.
– The oil bath air filter is sealed.
– There is no gearbox oil leaking from the gearbox housing.
– The gearbox oil cap is closed.
– The screw plug is closed.
– The tiller is clean.
– The controls are working and have not been modified.
– The hoes or running wheels are correctly attached.
– Only genuine STIHL accessories for this tiller are
attached.
– The accessories are correctly attached.
WARNING
■ If not in safe condition, components may no longer
operate correctly, safety devices may be disabled and fuel
may leak. This may result in serous or fatal injury to
people.
– Use an undamaged tiller.
– If there is petrol leaking from the tiller: do not use the
tiller and consult a STIHL specialist dealer.
– Close the fuel tank cap.
– If there is engine oil leaking from the tiller: do not use
the tiller and consult a STIHL specialist dealer.
– Close the engine oil cap.
– If there is gearbox oil leaking from the tiller: do not
use the tiller and consult a STIHL specialist dealer.
– Close the gearbox oil cap.
– The screw plug is tightened securely.
– If the tiller is dirty: clean the tiller.
– Do not modify the tiller. Exception: attaching hoes or
running wheels.
– If the controls are not working: do not use the tiller.
– Only attach genuine STIHL accessories for this tiller.
– Attach hoes and running wheels as described in this
instruction manual.
– Attach accessories as described in this instruction
manual or in the instruction manual for the
accessories.
– Do not insert objects into the apertures in the tiller.
– Replace worn or damaged warning signs.
– If anything is unclear: consult a STIHL specialist
dealer.
– Keep bystanding people, children and
animals out of the work area.

0478-404-9905-A
9
English
4 Safety Precautions
4.6.2 Rotor Blades
The blades are in a safe condition if the following points are
observed:
– The blades are not damaged.
– The blades are not deformed.
– The blades are properly mounted.
WARNING
■ The user can lose control of the cultivator if it is not in a
safe condition. This can result in serious injuries.
– Work with undamaged rotor blades.
– If you have any queries: Contact your STIHL
servicing dealer for assistance.
4.7 Fuel and Refueling
WARNING
■ The fuel used for this tiller is petrol. Petrol is extremely
inflammable. If petrol comes into contact with an open
flame or hot objects, it may cause fires or explosions. This
may result in serious or fatal injury to people and damage
to property.
– Protect petrol from heat and fire.
– Do not spill petrol.
– If petrol is spilled: wipe up the petrol with a cloth and
wait until all parts of the tiller are dry before
attempting to start the engine.
– Do not smoke.
– Do not refuel in the vicinity of flames.
– Before refilling the tank, stop the engine and allow it
to cool.
– If the tank needs to be emptied: do this out of doors.
– Start the engine at least 3 m away from the refueling
site.
– Never store the tiller with petrol in the tank inside a
building.
■ Breathing in petrol fumes may result in poisoning.
– Do not breathe in petrol fumes.
– Refuel in a well ventilated place.
■ The tiller warms up while working. The petrol expands and
overpressure may occur in the fuel tank. Petrol may gush
out if the fuel tank cap is opened. The gushing petrol may
ignite. This may result in serious injury to the user.
– Allow the tiller to cool down before opening the fuel
tank cap.
■ Clothing that comes into contact with petrol is highly
inflammable. This may result in serious or fatal injury to
people and damage to property.
– If clothing comes into contact with petrol: change
clothing.
■ Petrol poses a risk to the environment.
– Do not spill fuel.
– Dispose of petrol in accordance with regulations and
in an environmentally acceptable way.
■ If petrol comes in contact with the skin or eyes, this may
cause irritation.
– Avoid contact with petrol.
– In the event of contact with the skin: wash the
affected areas with plenty of soap and water.
– In the event of contact with the eyes: rinse the eyes
with plenty of water for at least 15 minutes and seek
medical attention.
■ Overflowed petrol may ignite. This may result in serious or
fatal injury to people and damage to property.
– Clean any surfaces contaminated with petrol.
– Avoid attempts at starting until the petrol fumes have
dispersed.

0478-404-9905-A
10
English
4 Safety Precautions
■ The tiller's ignition system generates sparks. Sparks may
escape and cause fires and explosions in highly
inflammable or explosive environments. This may result in
serious or fatal injury to people and damage to property.
– Use the spark plugs described in the engine
instruction manual.
– Screw in the spark plug and tighten.
– Press firmly on the spark plug socket.
■ The tiller may be damaged if it is refueled with petrol that
is not suitable for the engine.
– Use fresh, good quality unleaded petrol.
– Observe the specifications in the engine instruction
manual.
4.8 Working
WARNING
■ The user may lose control of the tiller if they do not start
the engine correctly. This may result in serious injury to
the user.
– Start the engine as described in this instruction
manual.
■ In certain situations, the user may no longer be able to
concentrate on their work. The user may lose control of
the tiller, trip, fall and be seriously injured.
– Work calmly and carefully.
– If the light and visibility conditions are poor: do not
use the tiller.
– Operate the tiller alone.
– Guide the hoes close to the ground.
– Watch out for obstacles.
– Do not tilt the tiller.
– If working on stony or hard ground: do not work at full
throttle.
– Work standing on the ground and maintain balance.
– If signs of fatigue occur: take a break.
– If working on a slope: work across the slope.
– Do not work on slopes with an inclination greater
than 15° (26.8%).
■ Exhaust gases are produced when the engine is running.
Breathing in exhaust gases may result in poisoning.
– Do not breathe in exhaust gases.
– Use the tiller in a well ventilated place.
– If nausea, headaches, vision problems, hearing
problems or dizziness occur: stop working and
consult a doctor.
■ If the user is wearing hearing protection and the engine is
running, their perception and assessment of noise may be
limited.
– Work calmly and carefully.
■ The turning hoes may cut the user. This may result in
serious injury to the user.
■ The tiller may be damaged if the hoes are blocked by an
object and throttle is applied.
– Stop the engine. Only then remove the object.
■ Coming into contact with the rotating PTO may result in
serious injury to the user.
■ If the tiller changes or starts to behave differently when
working, it may not be in safe condition. This may result in
serious injury to people and damage to property.
– Stop working and consult a STIHL specialist dealer.
■ The tiller may cause vibrations when working.
– Wear gloves.
– Take breaks.
– Do not touch turning hoes.
– Stop the engine before removing or
attaching the cover.
– Do not touch a rotating PTO.

0478-404-9905-A
11
English
4 Safety Precautions
– If signs of a circulatory disturbance occur: consult a
doctor.
■ The hoes continue to turn for a short time when the clutch
lever is released. This may result in serious injury to
people.
– Wait until the hoes are no longer turning.
DANGER
■ If working near live wires, the hoes may come into contact
with the live wires and damage them. This may result in
serious or fatal injury to the user.
– Do not work near live wires.
4.9 Transporting
WARNING
■ The gearbox housing may become hot when working. This
may result in the user burning themselves.
– Do not touch the hot gearbox housing.
■ The tiller may tip over or move during transport. This may
result in injury to people and damage to property.
– Stop the engine.
– Secure the tiller with lashing straps, belts or a net so
it cannot tip over and move.
■ The muffler and engine may be hot after the engine has
been running. This may result in the user burning
themselves.
– Tilt and push the tiller towards the user.
■ The tiller is heavy. Attempting to carry the tiller without
assistance may result in injury to the user.
– Wear gloves.
– The tiller must be carried by two people.
4.10 Storing
WARNING
■ Children are not aware of and cannot assess the dangers
of a cultivator and can be seriously injured.
– Shut off the engine.
– Store the cultivator out of the reach of children.
■ Dampness can corrode the electrical contacts on the
cultivator and metal components. This can damage the
cultivator.
– Store your cultivator in a clean and dry condition.
4.11 Cleaning, Maintenance and Repair
WARNING
■ The hoes may unintentionally start to rotate if the engine
is running during cleaning, maintenance or repair. This
may result in serious injury to people and damage to
property.
– Stop the engine.
– Detach the spark plug socket.
– Detach the spark plug socket.

0478-404-9905-A
12
English
5 Preparing Cultivator for Operation
■ The muffler and engine may be hot after the engine has
been running. This may result in people burning
themselves.
– Wait until the muffler and engine have cooled down.
■ The gearbox housing may become hot when working. This
may result in the user burning themselves.
– Do not touch the hot gearbox housing.
■ Abrasive cleaning agents, using a water jet for cleaning or
sharp objects may result in damage to the tiller or hoes. If
the tiller or hoes are not cleaned correctly, components
may no longer operate correctly and safety devices may
be disabled. This may result in serious injury to people.
– Clean the tiller and hoes as described in this
instruction manual.
■ If the tiller or hoes are not maintained or repaired
correctly, components may no longer operate correctly
and safety devices may be disabled. This may result in
serous or fatal injury to people.
– Do not maintain or repair the tiller or hoes yourself.
– If the tiller or hoes need to be maintained or repaired:
consult a STIHL specialist dealer.
■ The user may cut themselves on sharp cutting edges
during hoe cleaning. This may result in injury to the user.
– Wear work gloves made from resistant material.
5.1 Preparing the Tiller for Operation
The following steps must be performed before commencing
work:
► Make sure that the following components are in safe
condition:
– Tiller, @ 4.6.1
– Hoes, @ 4.6.2
► Clean the tiller, @ 15.1
► Attach the hoes, @ 6.1
► Attach the front wheel, @ 6.3
► Attach the blade spur, @ 6.4
► Attach the handlebar, @ 6.5.
► Attach the cables, @ 6.6
► Attach the transport handle, @ 6.7
► Attach the guard and covers, @ 6.8
► Add gearbox oil, @ 6.9
► Check the gearbox oil level, @ 16.3
► Add engine oil, @ 6.10
► Fill the oil bath air filter, @ 6.11
► Refuel the tiller, @ 7
► Adjust the handlebar for the user, @ 8
► Check the controls, @ 10
► If the steps cannot be performed: do not use the tiller and
consult a STIHL specialist dealer.
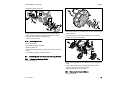
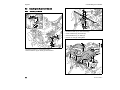
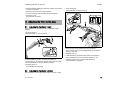
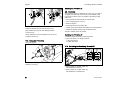
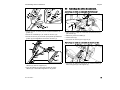
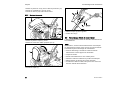
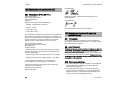
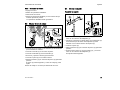
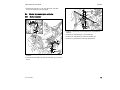
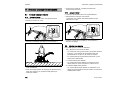
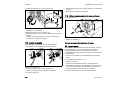
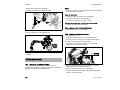
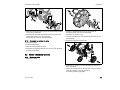
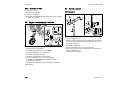
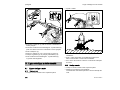
6.1 Fitting and Removing the Blades
6.1.1 Attaching the Hoes
► Fit covers (1) and couplers (2) on drive shaft (3).
5 Preparing Cultivator for Operation
6 Assembling the Cultivator

0478-404-9905-A
13
English
6 Assembling the Cultivator
► Tighten locking screws (4).
► Push hoes (5) onto drive shaft (3) so the bores align.
► Push folding retainers (6) through the bores in drive
shaft (2) and close the securing clips.
Hoes (5) are secured.
6.1.2 Removing the Hoes
► Stop the engine.
► Pull out the folding retainers.
► Remove the hoes.
► Push the folding retainers through the bores in the drive
shaft.
The folding retainers are kept in place.
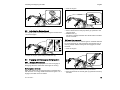
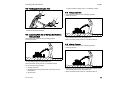
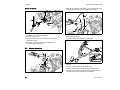
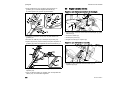
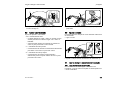
6.2 Attaching and Removing the Running Wheels
6.2.1 Attaching the Running Wheels
► Stop the engine.
► Place axle mount (1) on rubber tyre (2) so the bores align.
► Insert bolts (3).
► Place washers (4) and spring washers (5) on bolts (3).
► Screw on nuts (6) and tighten.
► Push running wheels (7) onto drive shaft (8) so the bores
align.
► Push folding retainers (9) through the bores in drive
shaft (8) and close the securing clips.
Running wheels (7) are secured.
6.2.2 Removing the Running Wheels
► Stop the engine.

0478-404-9905-A
14
English
6 Assembling the Cultivator
► Pull out the folding retainers.
► Remove the running wheels.
► Push the folding retainers through the bores in the drive
shaft.
The folding retainers are kept in place.
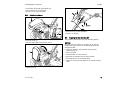
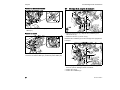
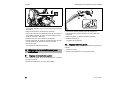
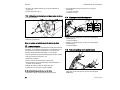
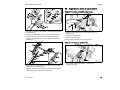
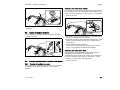
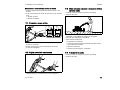
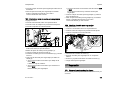
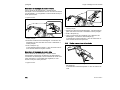
6.3 Attaching the Front Wheel
► Slide front wheel (1) into frame (2) so the bores align.
► Insert bolt (3) into the upper bore.
► Place washer (4) on bolt (3).
► Screw on nut (5) and tighten.
► Insert pin (6) through the lower bore.
► Push retaining pin (7) through the bore in pin (6).
Pin (6) is secured and front wheel (1) is locked in position.
The front wheel must not be dismantled again.
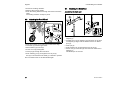
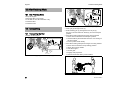
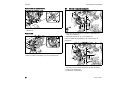
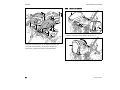
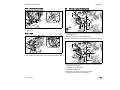
6.4 Attaching the Blade Spur
Assembling the blade spur
► Screw nuts (1) onto bolts (2) and screw into the bores in
adapter (3).
► Fit blade spur (4) into adapter (3) from below so the bore
on adapter (3) aligns with the lowermost bore on blade
spur (4).
► Insert pin (5).
► Push retaining pin (6) through the bore in pin (5).
► Screw nuts (7) onto bolts (8) and screw into the bores in
adapter (3).
The blade spur is secured.

0478-404-9905-A
15
English
6 Assembling the Cultivator
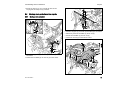
Attaching the blade spur
► Insert the adapter with attached blade spur (9) into
mount (10) on the tiller.
► Insert pin (11).
► Push retaining pin (12) through the bore in pin (11).
► Install screws (2) and tighten firmly.
The blade spur is secured.
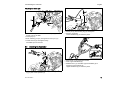
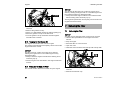
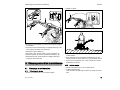
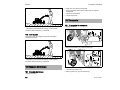
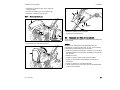
6.5 Attaching the Handlebar
► Fit lower handlebar (1) onto mount (2) and align locating
lug (3) with centre position (4).
► Screw pin (5) into locating lug (3) and tighten.
► Screw in screw (6).
Lower handlebar (1) is locked in place.
► Press lever (7) downwards and hold.
► Insert upper handlebar (8).
► Release lever (7) and allow upper handlebar (8) to
engage at centre detent (9).
Upper handlebar (8) is locked in place.

0478-404-9905-A
16
English
6 Assembling the Cultivator
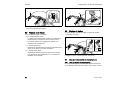
► Insert screw clamp (10) through lower handlebar (1).
► Fit washers (11) and screw on nuts (12).
► Tighten nuts (12) so upper handlebar (8) can be adjusted
when opening lever (7).
► Insert cables and wiring harness (13) in clip (14).
► Fasten the cables to the handlebar at regular intervals
using cable ties (15).
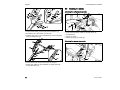
6.6 Attaching the Cables
Attaching the self-propulsion cable
► Insert self-propulsion cable (1) through lever (2).
► Fit washer (3).
► Screw on nut (4).
► Attach spring (5) to holder (6).
Attaching the reverse gear cable
► Attach reverse gear cable (7) to holder (8) and holder (9).

0478-404-9905-A
17
English
6 Assembling the Cultivator
Securing the throttle cable
► Secure throttle cable (10) using cable clip (11).
Securing the cable
► Secure cable (12) using cable clip (13).
► Secure cable conduit (14) with cable clip (15).
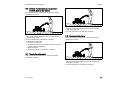
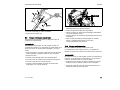
6.7 Attaching the Transport Handle
► Unscrew nuts (1) and remove washers (2) and bolts (3).
► Discard nuts (1) and bolts (3).
Reuse washers (2) when attaching the transport handle.
► Hold transport handle (4) against bracket (5) so the front
bores align.
► Insert bolts (6).
► Fit washers (2).
► Tighten nuts (7) to 35 Nm to 40 Nm.
Transport handle (4) is locked in place.

0478-404-9905-A
18
English
6 Assembling the Cultivator
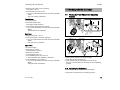
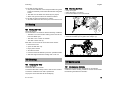
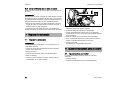
6.8 Attaching the Guard and Covers
6.8.1 Attaching the Guard
► Position holders (1) so the bores align.
► Place washers (2) on bolts (3) and screw in.
► Position holder (4) so the bores align.
► Insert washers (5) and bolts (6).
► Place washers (7) on bolts (6).
► Screw on nuts (8) and tighten.
A página está carregando...
A página está carregando...
A página está carregando...
A página está carregando...
A página está carregando...
A página está carregando...
A página está carregando...
A página está carregando...
A página está carregando...
A página está carregando...
A página está carregando...
A página está carregando...
A página está carregando...
A página está carregando...
A página está carregando...
A página está carregando...
A página está carregando...
A página está carregando...
A página está carregando...
A página está carregando...
A página está carregando...
A página está carregando...
A página está carregando...
A página está carregando...
A página está carregando...
A página está carregando...
A página está carregando...
A página está carregando...
A página está carregando...
A página está carregando...
A página está carregando...
A página está carregando...
A página está carregando...
A página está carregando...
A página está carregando...
A página está carregando...
A página está carregando...
A página está carregando...
A página está carregando...
A página está carregando...
A página está carregando...
A página está carregando...
A página está carregando...
A página está carregando...
A página está carregando...
A página está carregando...
A página está carregando...
A página está carregando...
A página está carregando...
A página está carregando...
A página está carregando...
A página está carregando...
A página está carregando...
A página está carregando...
A página está carregando...
A página está carregando...
A página está carregando...
A página está carregando...
A página está carregando...
A página está carregando...
A página está carregando...
A página está carregando...
A página está carregando...
A página está carregando...
A página está carregando...
A página está carregando...
A página está carregando...
A página está carregando...
A página está carregando...
A página está carregando...
A página está carregando...
A página está carregando...
A página está carregando...
A página está carregando...
A página está carregando...
A página está carregando...
A página está carregando...
A página está carregando...
A página está carregando...
A página está carregando...
A página está carregando...
A página está carregando...
A página está carregando...
A página está carregando...
A página está carregando...
A página está carregando...
A página está carregando...
A página está carregando...
A página está carregando...
A página está carregando...
A página está carregando...
A página está carregando...
A página está carregando...
A página está carregando...
A página está carregando...
A página está carregando...
A página está carregando...
A página está carregando...
A página está carregando...
A página está carregando...
A página está carregando...
A página está carregando...
A página está carregando...
A página está carregando...
A página está carregando...
A página está carregando...
A página está carregando...
A página está carregando...
A página está carregando...
A página está carregando...
A página está carregando...
A página está carregando...
A página está carregando...
A página está carregando...
A página está carregando...
A página está carregando...
A página está carregando...
A página está carregando...
A página está carregando...
A página está carregando...
A página está carregando...
A página está carregando...
A página está carregando...
A página está carregando...
A página está carregando...
A página está carregando...
A página está carregando...
A página está carregando...
A página está carregando...
A página está carregando...
A página está carregando...
A página está carregando...
A página está carregando...
A página está carregando...
A página está carregando...
A página está carregando...
A página está carregando...
A página está carregando...
A página está carregando...
A página está carregando...
-
 1
1
-
 2
2
-
 3
3
-
 4
4
-
 5
5
-
 6
6
-
 7
7
-
 8
8
-
 9
9
-
 10
10
-
 11
11
-
 12
12
-
 13
13
-
 14
14
-
 15
15
-
 16
16
-
 17
17
-
 18
18
-
 19
19
-
 20
20
-
 21
21
-
 22
22
-
 23
23
-
 24
24
-
 25
25
-
 26
26
-
 27
27
-
 28
28
-
 29
29
-
 30
30
-
 31
31
-
 32
32
-
 33
33
-
 34
34
-
 35
35
-
 36
36
-
 37
37
-
 38
38
-
 39
39
-
 40
40
-
 41
41
-
 42
42
-
 43
43
-
 44
44
-
 45
45
-
 46
46
-
 47
47
-
 48
48
-
 49
49
-
 50
50
-
 51
51
-
 52
52
-
 53
53
-
 54
54
-
 55
55
-
 56
56
-
 57
57
-
 58
58
-
 59
59
-
 60
60
-
 61
61
-
 62
62
-
 63
63
-
 64
64
-
 65
65
-
 66
66
-
 67
67
-
 68
68
-
 69
69
-
 70
70
-
 71
71
-
 72
72
-
 73
73
-
 74
74
-
 75
75
-
 76
76
-
 77
77
-
 78
78
-
 79
79
-
 80
80
-
 81
81
-
 82
82
-
 83
83
-
 84
84
-
 85
85
-
 86
86
-
 87
87
-
 88
88
-
 89
89
-
 90
90
-
 91
91
-
 92
92
-
 93
93
-
 94
94
-
 95
95
-
 96
96
-
 97
97
-
 98
98
-
 99
99
-
 100
100
-
 101
101
-
 102
102
-
 103
103
-
 104
104
-
 105
105
-
 106
106
-
 107
107
-
 108
108
-
 109
109
-
 110
110
-
 111
111
-
 112
112
-
 113
113
-
 114
114
-
 115
115
-
 116
116
-
 117
117
-
 118
118
-
 119
119
-
 120
120
-
 121
121
-
 122
122
-
 123
123
-
 124
124
-
 125
125
-
 126
126
-
 127
127
-
 128
128
-
 129
129
-
 130
130
-
 131
131
-
 132
132
-
 133
133
-
 134
134
-
 135
135
-
 136
136
-
 137
137
-
 138
138
-
 139
139
-
 140
140
-
 141
141
-
 142
142
-
 143
143
-
 144
144
-
 145
145
-
 146
146
-
 147
147
-
 148
148
-
 149
149
-
 150
150
-
 151
151
-
 152
152
-
 153
153
-
 154
154
-
 155
155
-
 156
156
-
 157
157
-
 158
158
-
 159
159
-
 160
160


STIHL MH 710 Manual do usuário
- Categoria
- Cortadores de grama
- Tipo
- Manual do usuário
em outras línguas
- español: STIHL MH 710 Manual de usuario
- français: STIHL MH 710 Manuel utilisateur
- English: STIHL MH 710 User manual
Artigos relacionados
Outros documentos
-
Wolf MOB2 Manual do proprietário
-
Garland Roll and Comb 602 QG Manual do usuário
-
Electrolux Petrol Tiller Manual do usuário
-
Wolf MIB Manual do proprietário
-
Dolmar MC-CS1 Manual do proprietário
-
TOYAMA TT65A Manual do proprietário
-
Husqvarna TF 545P Manual do usuário
-
 VERCIEL S25KR6 Manual do proprietário
-
Agria 1000 Manual do proprietário
-
Mountfield NS 25 Instruções de operação
