
TF 545P
EN Operator's manual 6-13
ES Manual de usuario 14-22
PT Manual do utilizador 23-31

A
B
CX4
DX4
E
F
I
X
X
X
X
X23
19
17
16
13 12
14 10
8
K2
X17
X2
L
G
H
J
X6
X2
X2
X16
X10
X6
J
M
N
O
P
Q
R
2
2X32
2
X32
X32
X 4
17
25
26
27
19
11 24
19
5
5
3
14
16
14 22
15
7
10
12
2
2
18
20
4
13
13
4
6
6
23
8
8
21
8
1
9
1

2 3 4 5 6 7
8 9 10 11 12 13
14 15 16
A
C
D
E
F
I
J
G
H
L
B
M
O
Q
K
R
N
P
17
P
R
Q
18
P
R
Q
19
P
R
Q
20
PR
Q
21
M
O
J
N
22
C
D
23
24
25
26
27
28

29
30
A
E
31
G
L
F
K
32
H
L
F
33
I
B
E
34
A
I
J
A
E
E
35
A
E
I
J
36
37
38
39
40
41
42
43
44

45
46
A
B
47
48
49
50
51
52
53
54
55
56

Contents
Introduction..................................................................... 6
Safety..............................................................................7
Assembly........................................................................ 9
Operation........................................................................ 9
Maintenance................................................................. 10
Transportation and storage...........................................11
Technical data.............................................................. 12
Accessories.................................................................. 12
EU Declaration of conformity........................................ 13
Introduction
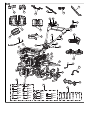
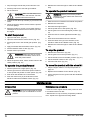
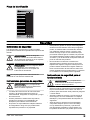
Product overview
(Fig. 1)
1. Engine
2. Tine blade cover
3. Handle
4. Extension cover
5. Tine blades
6. Drag bar
7. Top cover
8. Locking handle
9. Bumper
10. Clutch control
11. Throttle control
12. Reverse control
13. Side cover
14. Cable cover
15. Connector joint
16. Tine blade holder (primary)
17. Tine blade holder (secondary)
18. Tine cover bracket, front
19. Gear lever
20. Wheel kit
21. Tine cover bracket, rear
22. Rubber holder
23. Connecting plate
24. ON/OFF switch
25. Hardware bag
26. Hardware bag (for tine blades only)
27. Tool bag
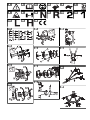
Symbols on the product
(Fig. 2) WARNING: Be careful and use the product
correctly. This product can cause serious
injury or death to the operator or others.
(Fig. 3) Read the operator's manual carefully
and make sure that you understand the
instructions before use.
(Fig. 4) Use approved hearing protection and
approved eye protection.
(Fig. 5) Fast.
(Fig. 6) Slow.
(Fig. 7) Stop the engine and remove the ignition
cable before repairs or maintenance.
(Fig. 8) Warning: Rotating parts. Keep hands and
feet clear.
(Fig. 9) Keep your distance!
(Fig. 10) Neutral gear.
(Fig. 11) Reverse gear.
(Fig. 12) Fast forward.
(Fig. 13) Slow forward.
(Fig. 14) Low speed.
(Fig. 15) High speed.
(Fig. 16) This product complies with applicable EU
Directives.
Note: Other symbols/decals on the product refer to
certification requirements for other commercial areas.
61628 - 003 - 26.01.2022

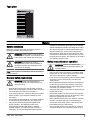
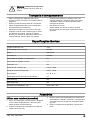
Type plate
Husqvarna AB
SE-561 82 Huskvarna
SWEDEN
Serial No.
Article No.
Model
Tilling scope
Tilling depth
Gear shifting
Engine displacement
Engine oil quality
Engine oil capacity
Gearbox oil quality
Gearbox oil capacity
Nominal power
Net weight
Fuel (octan/cetan)
Product
Safety
Safety definitions
Warnings, cautions and notes are used to point out
specially important parts of the manual.
WARNING: Used if there is a risk of injury
or death for the operator or bystanders if the
instructions in the manual are not obeyed.
CAUTION: Used if there is a risk of
damage to the product, other materials or
the adjacent area if the instructions in the
manual are not obeyed.
Note: Used to give more information that is necessary in
a given situation.
General safety instructions
WARNING: Read and understand the
warning instructions that follow before you
use the product.
• Read all the instructions in this operator’s manual
and on the product before operation. Make sure that
you understand and obey the instructions.
• If you have problems or questions about the product,
please speak to your Husqvarna dealer for more
information.
• The operator is responsible for any unsafe situations
or risks that people and property are exposed to.
• This product produces an electromagnetic field
during operation. This field may under some
circumstances interfere with active or passive
medical implants. To reduce the risk of serious or
fatal injury, we recommend persons with medical
implants to consult their physician and the medical
implant manufacturer before operating this product.
• We reserve the right to change specifications and
designs without prior notice so as to implement
improvements. Note that no legal claims are valid
on the basis of information in this manual. Use only
genuine parts for repairs. The warranty is not valid if
non genuine parts are used.
Safety instructions for operation
WARNING: Read and understand the
warning instructions that follow before you
use the product.
• Only use the product for which it is intended, tilling
the ground. Do not use the product for other tasks.
This can be dangerous or cause damage.
• Learn how to use the product and its functions safely
and learn to how to stop quickly. Also learn the
safety decals.
• Never operate the product before the working area
is clear and you have a firm foothold. Look out for
obstacles with unexpected movement. Take great
care when you operate in slopes.
• Only allow the product to be used by adults who are
familiar with its use.
• Never allow children or other persons not trained in
the use of the product to use or do servicing. Local
laws may regulate the age of the user.
• Keep unauthorized persons at a distance. Children,
animals, onlookers and helpers should be kept
outside the safety zone of 20 m. Stop the product
immediately if anyone approaches.
• Never use the product if you are tired, if you have
consumed alcohol, if you are taking other drugs or
1628 - 003 - 26.01.2022 7

medication that can affect your vision, judgement or
coordination.
• Pay particular attention on hard ground.
• The product has the tendency to be much less stable
on cultivated ground.
• Never use the product when you are barefoot.
Always wear protective shoes or protective boots,
preferably with steel toes. Never wear loose-fitting
clothing, jewelry or similar that can get caught in
moving parts. Use hearing protection to minimize the
risk of hearing impairment.
• Never use the product itself to transport people.
• Compliance with and strict adherence to the
conditions of operation, servicing and repair as
specified by the manufacturer also constitute
essential elements of the intended use.
• Stop the engine when the product is not in use.
• Walk with the product, do not run.
• Pay close attention when pulling the product towards
you or reversing the direction of rotation.
• Keep a safe distance from the rotating blades, set by
the length of the steering column. Keep your hands
and feet away from the rotating blades.
• The engine and the exhaust system become very
hot during operation. Risk of burn injuries if touched.
• Only use the product in daylight or in other well-lit
conditions.
• Do not use the product on ground that slopes more
than 20 °.
• Operate across slopes, not up or down.
• Under no circumstances should you modify the
original design of the product without approval from
the manufacturer. Always use original spare parts.
Not approved modifications and/or accessories may
lead to serious injury or death to the user or others.
The warranty is not valid if non genuine parts are
used.
• Stop the engine immediately if the following occurs:
Excessive vibration and / or noise, mechanical jam
preventing engine from turning, difficulties to engage
or disengage the clutch, a collision with a foreign
object or deterioration of the engine stop cable.
• If the engine halt cable is severed, use the starter
control to stop the engine. Allow the product to cool
down. Disconnect the spark plug cap from the spark
plug. Check that the product is not damaged. If the
product is damaged, speak to an approved service
workshop for repair.
• Always exercise care and use your common sense.
Avoid all situations which you consider to be
beyond your capability. If you still feel uncertain
about operating procedures after reading these
instructions, you should consult an expert before
continuing. Contact an authorised service workshop.
• Do not modify safety equipment. Check regularly to
be sure it works properly.
• Inappropriate assembly of this product could cause
severe injuries. Ensure that you follow all the
instructions carefully.
Fuel safety
WARNING: Read and understand the
warning instructions that follow before you
use the product.
• Fuel is highly inflammable. Exercise care and
refuel outdoors. Fire, open flame and smoking are
prohibited.
• Bear in mind the risk of fire, explosion and inhaling
fumes. If you spill fuel on yourself or your clothes,
change your clothes.
• The engine emits carbon monoxide, which is a
colourless, poisonous gas. Do not use the machine
in enclosed spaces.
Safety instructions for maintenance
WARNING: Read and understand the
warning instructions that follow before you
use the product.
• Always stop the engine before repair, cleaning,
maintenance work or when changing the tools on the
product. Never make adjustments with the product
running.
• Regular maintenance is essential for safety and to
maintain the levels of performance.
• Wear heavy-duty gloves when changing the tools on
the product.
• Replace the rotating blade in complete sets to keep
them balanced. Always use original spare parts.
• Check that nuts and screws are tight.
• Never use a product that has a faulty muffler.
Contact an authorized service workshop.
• For your own safety, do not alter the characteristics
of the product. Do not change the engine speed
settings and do not run the engine at excess speed.
• Always use original spare parts.
• When the service life of this product has been
served and it is no longer used it should be returned
to the dealer or to an applicable station for recycling.
• Make sure to not cut the cables/wires or scratch the
machine when cutting the edges of the case.
81628 - 003 - 26.01.2022

Assembly
Introduction
WARNING: Read and understand the safety
chapter before you assemble the product.
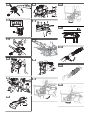
To assemble the tine blades
• Refer to the illustration for an overview of the bolts,
screws, nuts and washers that are necessary to
assemble the tine blades. (Fig. 17)
• Obey the instructions in the illustrations below.
Note: The illustrations only show the assembly of the
tine blades on the right side. The same instructions
are applicable on the left side. Make sure that the
sharp edges point in the same direction on the right
and left tine blades.
(Fig.
18)
(Fig.
19)
(Fig.
20)
(Fig.
21)
(Fig.
22)
(Fig.
23)
To assemble the product
1. Refer to the illustration for an overview of the bolts,
screws, nuts and washers that are necessary to
assemble the product. (Fig. 17)
2. Install the connection joint. (Fig. 24)
3. Install the drag bar. (Fig. 25)
4. Install the handlebar. (Fig. 26)
5. Adjust the height of the handle and tighten the
knobs. (Fig. 27)
6. Adjust the handle left or right and tighten the knobs.
(Fig. 28)
7. Turn the clutch control to the correct side. Attach the
bolt. (Fig. 29)
8. Install the cable cover.
a) Install the cables correctly.
b) Install the rubber holder. (Fig. 30)
c) Install the cable cover and tighten the screw.
(Fig. 31)
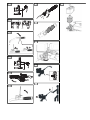
9. Install the tine cover:
CAUTION: Install the 4 bolts and nuts
before your tighten them fully.
a) (Fig. 32)
b) (Fig. 33)
c) (Fig. 34)
d) (Fig. 35)
e) (Fig. 36)
10. Install the gear lever. (Fig. 37)
11. After assembly, tighten all bolts and nuts again.
CAUTION: Do not disassemble the product.
Speak to an approved servicing dealer for
that task.
To install the PTO connection for
accessories
• Install as shown in the illustration. (Fig. 38)
Operation
Introduction
WARNING: Read and understand the safety
chapter before you use the product.
To do before you operate the product
• Do an inspection of the work area. Remove all loose
objects that can eject from the product and cause
serious injury to the operator or others. Such items
include stones, glass or steel wire.
• Do a check of the engine oil level and fill engine oil if
it is necessary.
• Do a check of the oil level of the gearbox and fill oil if
it is necessary.
• Do a check of the fuel level and fill fuel if it is
necessary.
• Do an overhaul of the product.
a) Replace worn or damaged parts.
b) Do a check for fuel leaks.
c) Make sure that all guards and covers are
installed correctly.
d) Do a check of all nuts and screws.
e) Make sure that the electrical wires are not
damaged.
To fill fuel
CAUTION: Do not use gasoline with an
octane number less than 90 RON (87 AKI).
This can cause damage to the product.
1628 - 003 - 26.01.2022 9

1. Stop the engine and let the product become cool.
2. Put the product in an area with good airflow.
3. Fill the fuel tank.
CAUTION: Make sure that there is not
too much fuel in the fuel tank. The fuel
expands when it becomes hot.
4. Tighten the fuel tank cap carefully to prevent the risk
of fire.
5. Clean the product and the area around the product
from fuel spillage.
6. Move the product 3 m/10 ft or more away from the
refueling area and the fuel source before you start
the engine.
To start the product
1. Open the fuel valve. (Fig. 39)
2. Open the choke with the choke control. (Fig. 40)
3. Put the gear lever in the neutral gear position. (Fig.
41)
4. Apply full throttle with the throttle control. (Fig. 42)
5. Set the ON/OFF switch to ON. (Fig. 43)
6. Pull the starter rope handle.
WARNING: Make sure that no person
or animal is in the safety zone of 20 m
when the product starts.
7. When the product starts, set the choke control to the
choke position. (Fig. 44)
To operate the product forward
1. Set the speed lever to high speed. (Fig. 45)
2. Use the gear lever to select drive speed. Position 1
is slow speed and position 2 is fast speed. (Fig. 46)
3. Push down the throttle lock on the handle.
4. Push the clutch lever (A) in the direction of the
handle to make the tine blades rotate. (Fig. 47)
5. Release the clutch lever (B) to make the tine blades
stop.
To operate the product rearward
WARNING: Before you move the product
rearward, you must release the clutch lever
to prevent injury.
1. Make sure that no obstacles are behind the product.
2. Release the clutch lever.
3. Decrease the engine speed.
4. Set the speed lever to low speed. (Fig. 48)
5. Put the gear lever in the neutral gear position. (Fig.
41)
6. Push the reverse control against the handle. (Fig.
49)
7. Push down the throttle lock on the handle.
8. Push the clutch lever (A) in the direction of the
handle to make the tine blades rotate. (Fig. 47)
9. Release the clutch lever (B) to make the tine blades
stop.
To stop the product
1. Release the clutch lever. (Fig. 50)
2. Put the gear lever in the N position. (Fig. 41)
3. Set the throttle control to the MIN. position. (Fig. 51)
4. Set the ON/OFF switch to OFF. (Fig. 52)
5. Close the fuel valve. (Fig. 53)
To move the product with the wheel kit
1. Stop the engine. Refer to
To stop the product on
page 10
.
2. Replace the tine blades for the wheels. (Fig. 54)
3. Lift the drag bar from the ground with the handlebar.
(Fig. 55)
Maintenance
Introduction
WARNING: Read and understand the safety
chapter before you do maintenance on the
product.
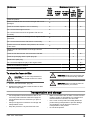
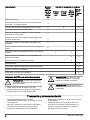
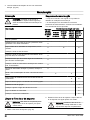
Maintenance schedule
* Clean at a more regular interval if the product is used
in conditions with much dust.
** Maintenance is only necessary if operation problems
occur. Speak to an approved servicing dealer.
10 1628 - 003 - 26.01.2022

Maintenance Daily
mainte-
nance
before
operation
Maintenance interval in hours
20 hours
or each
month
50 hours
or each 3
months
100
hours or
each 6
months
300
hours or
1 time
each
year
Clean the product. X
Make sure that all nuts and screws are tight and are not
damaged. X
Clean the air filter. Replace it if it is necessary. X X* X**
Do a check of the engine oil level. X
Do a check of the oil level of the gearbox. Fill oil if it is
necessary. X
Make sure that there is no leakage of fuel, engine oil and
lubrication. X
Do a check of the fuel level. Fill fuel if it is necessary. X
If there is too much vibration in the product, do a check
of the cause. X
Replace the oil and lubrication of the engine and the
gearbox. X X
Clean the fuel filter and the area around the fuel filter. X X**
Clean the spark plug and the spark plug cap. X
Replace the spark plug. X
Do a check and adjust the play of the engine valves. X**
Clean the combustion chamber. X**
Do a check of the fuel circuit. X**
To clean the foam air filter
CAUTION: Do not use compressed air to
clean the foam air filter as this can cause
damage.
1. Remove the foam air filter. (Fig. 56)
2. Examine the foam air filter. Clean the foam air filter
with warm soap water.
CAUTION: Replace a foam air filter that
is damaged or cannot be fully cleaned.
CAUTION: Make sure that the foam air
filter is dry before you install it.
Transportation and storage
• For transportation shorter distances, refer to
To
move the product with the wheel kit on page 10
.
• Let the product become cool before you put it in
storage.
• Always use approved containers for storage and
transportation of fuel.
• Keep the product in a dry and frost-free area.
• Make sure that there are no leaks or fumes from the
product. Sparks or open flames, for example from
electrical devices or boilers, can start a fire.
• Put a cover on the product and safely attach the
product during transportation to prevent damage
and accidents. Use an approved vehicle for
transportation of the product.
• Do not lift the product.
1628 - 003 - 26.01.2022 11

• Be careful when you move the product on or off a
vehicle for transportation. Use an approved ramp.
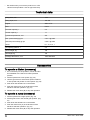
Technical data
Tilling width, mm 1100
Tilling depth, mm 150-300
Engine WM177F/P
Fuel Petrol
Fuel tank capacity, l 6.0
Oil tank capacity, l 1.1
Cylinder displacement, cm3270
Max. power kW/hp @ rpm 5.5/7.4 @ 3600
Nominal power kW/hp @ rpm 5.0/6.7 @ 3600
Gears H, L, R, N, 2, 1
Oil capacity gearbox, l 2.0
Gross weight, kg 145
Net weight, kg 130
Package dimensions, mm 1030×690×850
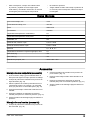
Accessories
To operate a ditcher (accessory)
1. If it is necessary for the operation, loosen and turn
the handlebar to the side for a better operation
position.
2. Set the speed lever to low speed. (Fig. 48)
3. Use the gear lever to select drive speed. Position 1
is slow speed and position 2 is fast speed. (Fig. 46)
4. Push down the throttle lock on the handle.
5. Push the clutch lever (A) in the direction of the
handle to start the operation. (Fig. 47)
6. Release the clutch lever (B) to stop the operation.
To operate a pump (accessory)
1. Set the speed lever to high speed. (Fig. 45)
2. Put the gear lever in the neutral gear position. (Fig.
41)
3. Push down the throttle lock on the handle.
4. Push the clutch lever (A) in the direction of the
handle to start the operation. (Fig. 47)
5. Release the clutch lever (B) to stop the operation.
12 1628 - 003 - 26.01.2022

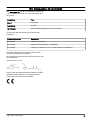
EU Declaration of conformity
We, Husqvarna AB, SE-561 82 Huskvarna, Sweden, tel:
+46-36-146500, declare on our sole responsibility that
the product:
Description Tiller
Brand Husqvarna
Type/Model TF 545P
Identification Serial numbers dating from 2017 and onwards
complies fully with the following EU directives and
regulations:
Directive/Regulation Description
2006/42/EC "relating to machinery"
2014/30/EU "relating to electromagnetic compatibility"
2011/65/EU "relating to restrictions of use of certain hazardous substances"
and that the following harmonized standards and/or
technical specifications are applied;
EN 709:1997+A4:2009, EN 709:1997+A4/AC:2012, EN
ISO 14982:2009
Huskvarna 2017-12-22
Claes Losdal, Development Manager/Garden Products
(Authorized representative for Husqvarna AB and
responsible for technical documentation)
1628 - 003 - 26.01.2022 13

Contenido
Introducción.................................................................. 14
Seguridad..................................................................... 15
Montaje......................................................................... 17
Funcionamiento............................................................ 18
Mantenimiento.............................................................. 19
Transporte y almacenamiento...................................... 20
Datos técnicos.............................................................. 21
Accesorios.................................................................... 21
Declaración de conformidad UE................................... 22
Introducción
Descripción del producto
(Fig. 1)
1. Motor
2. Cubierta de las cuchillas
3. Manillar
4. Extensiones de la cubierta
5. Cuchillas
6. Barra de arrastre
7. Cubierta superior
8. Palanca de bloqueo
9. Parachoques
10. Maneta del embrague
11. Acelerador
12. Maneta de marcha atrás
13. Cubierta lateral
14. Cubierta de cables
15. Articulación de unión
16. Soporte de cuchillas (principal)
17. Soporte de cuchillas (auxiliar)
18. Soporte de la cubierta de las cuchillas, delantero
19. Palanca de cambios
20. Juego de ruedas
21. Soporte de la cubierta de las cuchillas, trasero
22. Soporte de goma
23. Abrazadera de unión
24. Interruptor de encendido/apagado.
25. Bolsa de tornillería
26. Bolsa de tornillería (solo para cuchillas)
27. Bolsa de herramientas
Símbolos que aparecen en el producto
(Fig. 2) ADVERTENCIA: Tenga cuidado y utilice
el producto correctamente. Este producto
puede ocasionar lesiones graves o mortales
tanto al operador como a cualquier otra
persona.
(Fig. 3) Lea detenidamente el manual de usuario y
asegúrese de que entiende las instrucciones
antes de usar la máquina.
(Fig. 4) Utilice protectores auriculares homologados
y protección ocular homologada.
(Fig. 5) Rápido.
(Fig. 6) Lento.
(Fig. 7) Detenga el motor y desconecte el cable
de encendido antes de realizar tareas de
mantenimiento o reparación.
(Fig. 8) Advertencia: Piezas giratorias. Mantenga
alejados las manos y los pies.
(Fig. 9) Respete las distancias de seguridad.
(Fig. 10) Punto muerto.
(Fig. 11) Marcha atrás.
(Fig. 12) Avance rápido.
(Fig. 13) Avance lento.
(Fig. 14) Velocidad baja.
(Fig. 15) Velocidad alta.
(Fig. 16) Este producto cumple con las directivas
vigentes de la UE.
Nota: Los demás símbolos y etiquetas que aparecen en
el producto corresponden a requisitos de homologación
específicos en otras zonas comerciales.
14 1628 - 003 - 26.01.2022

Placa de identificación
Husqvarna AB
SE-561 82 Huskvarna
SWEDEN
Serial No.
Article No.
Model
Tilling scope
Tilling depth
Gear shifting
Engine displacement
Engine oil quality
Engine oil capacity
Gearbox oil quality
Gearbox oil capacity
Nominal power
Net weight
Fuel (octan/cetan)
Product
Seguridad
Definiciones de seguridad
Las advertencias, precauciones y notas se utilizan
para destacar información especialmente importante del
manual.
ADVERTENCIA: Indica un riesgo de
lesiones o incluso de muerte del usuario o
de las personas cercanas si no se respetan
las instrucciones del manual.
PRECAUCIÓN: Indica un riesgo de daños
en el producto, otros materiales o el
área adyacente si no se respetan las
instrucciones del manual.
Nota: Se usa para proporcionar más información
necesaria en una situación determinada.
Instrucciones generales de seguridad
ADVERTENCIA: Lea y comprenda las
siguientes instrucciones de advertencia
antes de utilizar el producto.
• Lea todas las instrucciones de este manual de
usuario y del producto antes de ponerlo en
funcionamiento. Asegúrese de comprender y seguir
las instrucciones.
• Si tiene problemas o dudas sobre el producto,
póngase en contacto con su distribuidor de
Husqvarna para obtener más información.
• El operario es responsable de cualquier situación
de inseguridad o riesgo a la que puedan estar
expuestas las personas o su propiedad.
• Este producto genera un campo electromagnético
durante el funcionamiento. Este campo magnético
puede, en determinadas circunstancias, interferir
con implantes médicos activos o pasivos. Para
reducir el riesgo de que se den condiciones que
provocarían lesiones graves o letales, las personas
que utilizan implantes médicos deben consultar con
su médico y con el fabricante del implante antes de
poner en marcha este producto.
• Nos reservamos el derecho a modificar las
especificaciones y diseños sin previo aviso para
implementar mejoras. Tenga en cuenta que no se
pueden realizar reclamaciones legales válidas en
base a la información de este manual. Utilice solo
piezas originales para las reparaciones. La garantía
no es válida si no se utilizan piezas originales.
Instrucciones de seguridad para el
funcionamiento
ADVERTENCIA: Lea y comprenda las
instrucciones de advertencia siguientes
antes de utilizar el producto.
• Utilice el producto únicamente para la finalidad para
la que se ha diseñado: arar la tierra. No utilice el
producto para otras tareas. Esto puede ser peligroso
o causar daños.
• Aprenda a utilizar el producto y sus funciones de
forma segura, así como a detenerlo con rapidez.
Identifique y comprenda también las etiquetas de
seguridad.
• Antes de poner el producto en funcionamiento,
compruebe siempre que en la zona de trabajo
no hay obstáculos ni personas y que tiene los
pies firmemente asentados. Tenga cuidado con
los posibles obstáculos que puedan provocar de
1628 - 003 - 26.01.2022 15

movimientos repentinos. Proceda con sumo cuidado
al trabajar en pendientes.
• No deje que utilicen el producto personas que no
estén familiarizados con su uso.
• No permita nunca que los niños ni personas sin
formación utilicen el producto o realicen tareas de
mantenimiento. La legislación local regula la edad
del usuario.
• Mantenga alejadas a las personas no autorizadas.
Los niños, animales, curiosos y ayudantes deben
permanecer fuera de la zona de seguridad de 20 m.
Detenga el producto inmediatamente si alguien se
acerca.
• No utilice nunca el producto si está cansado, si ha
ingerido alcohol o si ha consumido otras drogas, o si
toma medicamentos que puedan afectarle a la vista,
la capacidad de decisión o la coordinación.
• Preste especial atención en terrenos duros.
• El producto tiende a ser mucho menos estable en
terrenos cultivados.
• No utilice nunca el producto estando descalzo. Lleve
siempre calzado de seguridad o botas de protección,
preferiblemente con puntera de acero. Nunca lleve
ropa floja, joyas u otros objetos que puedan quedar
atrapados en las piezas móviles. Utilice protectores
auriculares para reducir al mínimo el riesgo de sufrir
daños crónicos en el oído.
• No utilice nunca el producto para transportar
personas.
• El cumplimiento estricto de las condiciones de
uso, mantenimiento y reparación conforme a lo
especificado por el fabricante también es un aspecto
esencial del uso previsto.
• Detenga el motor cuando el producto no esté en
uso.
• Camine con el producto, no corra.
• Tenga mucho cuidado al tirar del producto hacia
usted o al invertir el sentido de rotación.
• Guarde una distancia de seguridad con respecto
a las cuchillas giratorias; esta distancia viene
determinada por la longitud de la columna de
dirección. Mantenga alejados las manos y los pies
de las cuchillas giratorias.
• El motor y el sistema de escape pueden calentarse
mucho durante el funcionamiento. Riesgo de
lesiones por quemaduras si se tocan.
• Utilice el producto únicamente con la luz del día o en
áreas con buena iluminación.
• No utilice el producto en pendientes de más de 20°.
• En pendientes, trabaje siempre de lado, no suba ni
baje por ellas.
• Está totalmente prohibido modificar el diseño original
del producto sin la aprobación previa del fabricante.
Utilice siempre piezas de repuesto originales. Las
modificaciones o la utilización de accesorios no
autorizados pueden ocasionar daños graves o
incluso la muerte del usuario o de otras personas.
La garantía no es válida si no se utilizan piezas
originales.
• Detenga el motor inmediatamente si ocurre lo
siguiente: Vibración o ruido excesivos, atasco
mecánico que impide que el motor gire, dificultad
para embragar o desembragar, colisión contra un
objeto extraño o deterioro del cable de parada del
motor.
• Si el cable de parada del motor está roto, use el
control de arranque para detener el motor. Deje que
el producto se enfríe. Desconecte la pipa de la bujía.
Compruebe que el producto no esté dañado. Si el
producto está dañado, póngase en contacto con un
taller de servicio autorizado para su reparación.
• Utilice siempre el equipo con cuidado y sentido
común. Evite todas aquellas situaciones que
considere que sobrepasan sus capacidades. Si,
después de leer estas instrucciones, no está seguro
del procedimiento que debe seguir, consulte a un
experto antes de continuar. Póngase en contacto
con un taller de servicio autorizado.
• No modifique el equipo de seguridad. Compruébelo
con regularidad para asegurarse de que funciona
correctamente.
• Si el montaje de este producto no se efectúa
correctamente, pueden producirse lesiones graves.
Siga todas las instrucciones estrictamente.
Seguridad en el uso del combustible
ADVERTENCIA: Lea y comprenda las
instrucciones de advertencia siguientes
antes de utilizar el producto.
• El combustible es muy inflamable. Proceda con
precaución y reposte al aire libre. Está prohibido
encender fuego, llamas abiertas o fumar.
• Tenga en cuenta los riesgos de incendio, explosión
e intoxicación respiratoria. Si derrama combustible
sobre sí mismo o la ropa, cámbiese de ropa.
• El motor emite monóxido de carbono, un gas
incoloro y tóxico. No utilice la máquina en espacios
cerrados.
Instrucciones de seguridad para el
mantenimiento
ADVERTENCIA: Lea y comprenda las
siguientes instrucciones de advertencia
antes de utilizar el producto.
• Detenga siempre el motor antes de llevar a cabo
trabajos de reparación, limpieza o mantenimiento,
y cuando vaya a cambiar las herramientas del
producto. Nunca realice ajustes con el producto en
marcha.
• Llevar a cabo las tareas de mantenimiento periódico
es fundamental para garantizar la seguridad y
mantener el nivel de rendimiento.
• Use guantes resistentes al cambiar las herramientas
del producto.
16 1628 - 003 - 26.01.2022

• Para la sustitución de la cuchilla giratoria, es
necesario sustituir todo el conjunto de la cuchilla
para mantener un equilibrio correcto. Utilice siempre
piezas de repuesto originales.
• Compruebe que los tornillos y las tuercas estén
apretados.
• No utilice nunca un producto con un silenciador
defectuoso. Póngase en contacto con un taller de
servicio autorizado.
• Por su propia seguridad, no modifique las
características del producto. No modifique la
configuración de régimen del motor ni mantenga
en marcha el motor a regímenes excesivamente
elevados.
• Utilice siempre piezas de repuesto originales.
• Cuando la vida útil de este producto haya llegado
a su fin y haya dejado de utilizarse, debe llevarse
al distribuidor o a un centro autorizado para su
reciclaje.
• Tenga cuidado de no cortar los cables ni arañar la
máquina al cortar los bordes de la caja.
Montaje
Introducción
ADVERTENCIA: Asegúrese de leer y
comprender el capítulo sobre seguridad
antes de montar el producto.
Instalación de las cuchillas
• Consulte la ilustración para obtener una visión
general de los pernos, los tornillos, las tuercas y las
arandelas necesarios para montar las cuchillas. (Fig.
17)
• Siga las instrucciones de las siguientes
ilustraciones.
Nota: En las ilustraciones solo se muestra el
montaje de las cuchillas del lado derecho. Las
mismas instrucciones son válidas para el lado
izquierdo. Asegúrese de que los bordes afilados de
las cuchillas de los lados derecho e izquierdo están
orientados en la misma dirección.
(Fig.
18)
(Fig.
19)
(Fig.
20)
(Fig.
21)
(Fig.
22)
(Fig.
23)
Montaje del producto
1. Consulte la ilustración para obtener una visión
general de los pernos, los tornillos, las tuercas y las
arandelas necesarios para montar el producto. (Fig.
17)
2. Instale la articulación de unión. (Fig. 24)
3. Instale la barra de tiro. (Fig. 25)
4. Instale el manillar. (Fig. 26)
5. Ajuste la altura del manillar y apriete los pomos.
(Fig. 27)
6. Ajuste el manillar hacia la izquierda o la derecha y
apriete los pomos. (Fig. 28)
7. Gire la maneta del embrague hacia el lado correcto.
Monte el perno. (Fig. 29)
8. Instale la cubierta de los cables.
a) Instale los cables correctamente.
b) Instale el soporte de goma. (Fig. 30)
c) Instale la cubierta de los cables y apriete el
tornillo. (Fig. 31)
9. Instale la cubierta de las cuchillas:
PRECAUCIÓN: Instale los 4 pernos
y las tuercas antes de apretarlos por
completo.
a) (Fig. 32)
b) (Fig. 33)
c) (Fig. 34)
d) (Fig. 35)
e) (Fig. 36)
10. Instale la palanca de cambios. (Fig. 37)
11. Después del montaje, vuelva a apretar todos los
pernos y las tuercas.
PRECAUCIÓN: No desmonte el producto.
Póngase en contacto con un taller de
servicio autorizado para realizar esa tarea.
Instalación de la conexión de la TDF
para accesorios
• Realice la instalación como se muestra en la
ilustración. (Fig. 38)
1628 - 003 - 26.01.2022 17

Funcionamiento
Introducción
ADVERTENCIA: Asegúrese de leer y
comprender el capítulo sobre seguridad
antes de usar el producto.
Pasos por seguir antes de poner en
funcionamiento el producto
• Inspeccione la zona de trabajo. Retire todos los
objetos sueltos que puedan salir despedidos del
producto y causar daños graves al usuario u otras
personas. Estos elementos pueden ser piedras,
vidrio o alambres.
• Compruebe el nivel de aceite de motor y repóngalo
en caso necesario.
• Compruebe el nivel de aceite de la caja de cambios
y repóngalo en caso necesario.
• Compruebe el nivel de combustible y repóngalo en
caso necesario.
• Realice una inspección general del producto.
a) Sustituya las piezas desgastadas o deterioradas.
b) Compruebe si hay fugas de combustible.
c) Asegúrese de que todas las protecciones y
cubiertas están correctamente instaladas.
d) Compruebe todas las tuercas y los tornillos.
e) Asegúrese de que los cables eléctricos no estén
dañados.
Repostaje de combustible
PRECAUCIÓN: No utilice gasolina con un
octanaje inferior a 90 octanos RON (87 AKI).
Esto puede provocar daños en el producto.
1. Detenga el motor y deje que el producto se enfríe.
2. Coloque el producto en una zona bien ventilada.
3. Llene el depósito de combustible.
PRECAUCIÓN: Asegúrese de que no
haya demasiado combustible en el
depósito, ya que este se expande
cuando se calienta.
4. Apriete el tapón del depósito de combustible con
cuidado para evitar el riesgo de incendio.
5. Si se ha derramado combustible, limpie el producto
y la zona circundante.
6. Aparte el producto 3 m (10 pies) o más del lugar y la
fuente de repostaje antes de arrancar el motor.
Arranque del producto
1. Abra el paso de combustible. (Fig. 39)
2. Abra el estrangulador con el control del
estrangulador. (Fig. 40)
3. Coloque la palanca de cambios en la posición de
punto muerto. (Fig. 41)
4. Abra el acelerador al máximo. (Fig. 42)
5. Coloque el interruptor de encendido/apagado en la
posición ON (encendido). (Fig. 43)
6. Tire de la empuñadura de la cuerda de arranque.
ADVERTENCIA: Asegúrese de que no
haya personas ni animales en la zona de
seguridad de 20 m cuando el producto
se ponga en marcha.
7. Al arrancar el producto, coloque el estrangulador en
la posición de estrangulamiento. (Fig. 44)
Manejo del producto hacia adelante
1. Coloque la palanca de velocidad en la posición de
alta velocidad. (Fig. 45)
2. Utilice la palanca de cambios para seleccionar la
velocidad de avance. La posición 1 es velocidad
lenta y la posición 2 es velocidad rápida. (Fig. 46)
3. Presione hacia abajo el fiador del acelerador en el
manillar.
4. Empuje la palanca de embrague (A) hacia el
manillar para que las cuchillas giren. (Fig. 47)
5. Suelte la palanca de embrague (B) para detener las
cuchillas.
Manejo del producto marcha atrás
ADVERTENCIA: Antes de mover el
producto marcha atrás, debe soltar la
palanca de embrague para evitar lesiones.
1. Asegúrese de que no haya obstáculos detrás del
producto.
2. Suelte la palanca de embrague.
3. Reduzca el régimen del motor.
4. Coloque la palanca de velocidad en la posición de
baja velocidad. (Fig. 48)
5. Coloque la palanca de cambios en la posición de
punto muerto. (Fig. 41)
6. Presione la maneta de marcha atrás contra el
manillar. (Fig. 49)
7. Presione hacia abajo el fiador del acelerador en el
manillar.
8. Empuje la palanca de embrague (A) hacia el
manillar para que las cuchillas giren. (Fig. 47)
9. Suelte la palanca de embrague (B) para detener las
cuchillas.
18 1628 - 003 - 26.01.2022

Parada del producto
1. Suelte la palanca de embrague. (Fig. 50)
2. Coloque la palanca de cambios en la posición N
(punto muerto). (Fig. 41)
3. Ponga el acelerador en la posición MIN. (Fig. 51)
4. Coloque el interruptor de encendido/apagado en la
posición OFF (apagado). (Fig. 52)
5. Cierre el paso de combustible. (Fig. 53)
Desplazamiento del producto con el
juego de ruedas
1. Pare el motor. Consulte la sección
Parada del
producto en la página 19
.
2. Sustituya las cuchillas por las ruedas. (Fig. 54)
3. Levante la barra de tiro del suelo con el manillar.
(Fig. 55)
Mantenimiento
Introducción
ADVERTENCIA: Asegúrese de leer y
comprender el capítulo sobre seguridad
antes de realizar tareas de mantenimiento
en el producto.
Programa de mantenimiento
* Limpie el producto con más frecuencia si se utiliza en
un entorno con mucho polvo.
** El mantenimiento solamente es necesario si se
producen problemas de funcionamiento. Acuda a un
centro de servicio autorizado.
1628 - 003 - 26.01.2022 19

Mantenimiento Manteni-
miento
diario an-
tes de la
puesta
en mar-
cha
Intervalo de mantenimiento en horas
20 horas
o cada
mes
50 horas
o cada
3 meses
100 ho-
ras o ca-
da 6 me-
ses
300 ho-
ras o
1 vez al
año
Limpie el producto. X
Compruebe que todas las tuercas y loa tornillos están
apretados y no presentan daños. X
Limpie el filtro de aire. Sustitúyalos si fuera necesario. X X* X**
Compruebe el nivel de aceite del motor. X
Compruebe el nivel de aceite de la caja de cambios.
Repóngalo si es necesario. X
Asegúrese de que no hay fugas de combustible, aceite
de motor ni lubricante. X
Compruebe el nivel de combustible. Repóngalo si es
necesario. X
Si hay demasiada vibración en el producto, investigue la
causa. X
Cambie el aceite y el lubricante del motor y de la caja de
cambios. X X
Limpie el filtro de combustible y la zona alrededor del
filtro de combustible. X X**
Limpiar la bujía y el sombrerete de la bujía. X
Cambie la bujía. X
Compruebe y ajuste la holgura de las válvulas del motor. X**
Limpie la cámara de combustión. X**
Compruebe el circuito de combustible. X**
Limpieza del filtro de aire de espuma
PRECAUCIÓN: No utilice aire comprimido
para limpiar el filtro de aire de espuma, ya
que podría dañarlo.
1. Retire el filtro de aire de espuma. (Fig. 56)
2. Examine el filtro de aire de espuma. Limpie el filtro
de aire de espuma con agua jabonosa tibia.
PRECAUCIÓN: Si el filtro de aire de
espuma está dañado o no se puede
limpiar por completo, sustitúyalo.
PRECAUCIÓN: Asegúrese de que el
filtro de aire de espuma esté seco antes
de instalarlo.
Transporte y almacenamiento
• Para desplazamientos cortos, consulte
Desplazamiento del producto con el juego de ruedas
en la página 19
.
• Deje que el producto se enfríe antes de guardarlo.
• Use siempre recipientes homologados para el
transporte y almacenamiento de combustible.
• Mantenga el producto en un lugar seco y al abrigo
de las heladas.
• Asegúrese de que no haya fugas ni humos en
el producto. Las chispas o llamas abiertas, por
ejemplo, de dispositivos eléctricos o calderas,
pueden provocar un incendio.
20 1628 - 003 - 26.01.2022
A página está carregando...
A página está carregando...
A página está carregando...
A página está carregando...
A página está carregando...
A página está carregando...
A página está carregando...
A página está carregando...
A página está carregando...
A página está carregando...
A página está carregando...
A página está carregando...
-
 1
1
-
 2
2
-
 3
3
-
 4
4
-
 5
5
-
 6
6
-
 7
7
-
 8
8
-
 9
9
-
 10
10
-
 11
11
-
 12
12
-
 13
13
-
 14
14
-
 15
15
-
 16
16
-
 17
17
-
 18
18
-
 19
19
-
 20
20
-
 21
21
-
 22
22
-
 23
23
-
 24
24
-
 25
25
-
 26
26
-
 27
27
-
 28
28
-
 29
29
-
 30
30
-
 31
31
-
 32
32


em outras línguas
- español: Husqvarna TF 545P Manual de usuario
- English: Husqvarna TF 545P User manual