
DOP420*
Le guide d’utilisation de votre four
User Manual for Your Oven
Betriebsanleitung des Backofens
De gebruikshandleiding van uw oven
B
rugervejledning til ovnen
La guía de utilización del horno
O guia de utilização do seu forno
FR
GB
DE
NL
DK
ES
PT
99633771 ML.qxd 08/09/04 09:03 Page 1

2
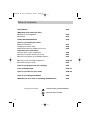
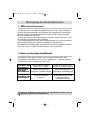
Tout au long de la notice,
vous signale les consignes de sécurité,
vous signale les conseils et les astuces
Edito P.3
Comment se présente votre four ?
Descriptif de l’appareil P.4
Accessoires P.5
Conseils de sécurité P.6
Comment installer votre four ?
Raccordement électrique P.7
Changement du câble d’alimentation P.8
Dimensions utiles pour encastrer votre four P.9
Comment utiliser votre four ?
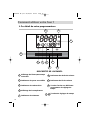
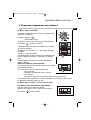
Le détail de votre programmateur P.10
Comment mettre à l’heure l’horloge du four ? P.11
Comment faire une cuisson immédiate ? P.12
Comment programmer une cuisson ? P.13-14
Comment utiliser le minuteur ? P.14
Comment faire une cuisson Eco ? P.15
Modes de cuisson du four P.16-17
Comment entretenir votre four ? P.18-19
Comment changer les ampoules ? P.20
Que faire en cas d’anomalies de fonctionnement P.20
Qui contacter ?
P.21
Sommaire
99633771 ML.qxd 08/09/04 09:03 Page 2
A página está carregando...

4
C
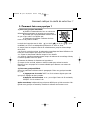
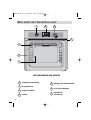
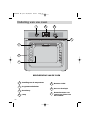
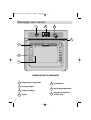
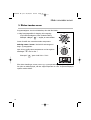
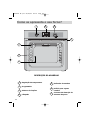
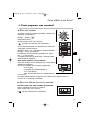
omment se présente votre four ?
1
3
5
SET
ECO
1
2 3
4
5
7
6
1
2
5
6
7
3
4
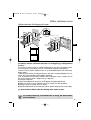
Réglage de la température
Programmateur
Sélecteur de fonctions
Lampe
Indicateur de gradin
Trou pour tourne broche
Contact de détection
d’ouverture de porte
DESCRIPTIF DE L’APPAREIL
99633771 ML.qxd 08/09/04 09:03 Page 4
A página está carregando...
A página está carregando...

7
FR
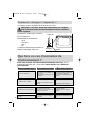
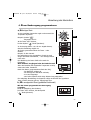
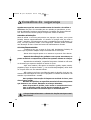
Comment installer votre four ?
Compteur 20A Mono
220-240 V ~ 50 Hz
Prise de courant
2 pôles + terre
norme CEI 60083
Ligne Mono 220-240 V ~
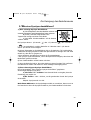
Raccordement électrique
Câble
d'alimentation
longueur 1,50 m
environ
Disjoncteur différentiel ou
fusible 16A
Avant d'effectuer le branchement, s'assurer que les fils de votre
installation électrique sont d'une section suffisante pour alimen-
ter normalement l'appareil.
Le fusible de votre installation doit être de 16 Ampères.
Le raccordement électrique est à réaliser avant la mise en place de l'appareil
dans le meuble.
• Le four doit être branché avec un câble d'alimentation (normalisé) à 3 conduc-
teurs de 1,5 mm
2
(1 ph +1 N + terre) qui doivent être raccordés sur réseau
220-240 V ~ monophasé par l'intermédiaire d'une prise de courant 1 ph +1 N +
terre normalisée CEI 60083 ou conformément aux règles d’installation. Le fil de
protection (vert-jaune)
est relié à la borne de l'appareil et doit être relié à la
terre de l'installation.
• Dans le cas d’un branchement avec prise de courant,
celle-ci doit rester accessible après l’installation de l’appareil.
• Le neutre du four (fil bleu) doit être raccordé au neutre du réseau.
99633771 ML.qxd 08/09/04 09:03 Page 7
A página está carregando...
A página está carregando...

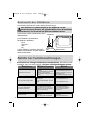
10
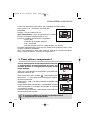
SET
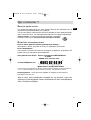
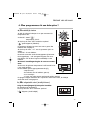
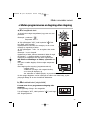
Comment utiliser votre four ?
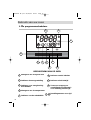
1. L
e détail de votre programmateur
1
7
6
3
5
4
8
9
10
2
1
3
4
5
6
7
10
8
2
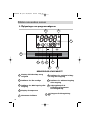
Affichage de l’heure,des temps
et durées
Indicateur de porte verrouillée
Indicateur de cuisson ECO
Affichage de la température
Indicateur du minuteur
Indicateur de durée de cuisson
Indicateur de fin de cuisson
Touche d’accès aux différents
programmes de réglage du
temps
Touches de réglages du temps
DESCRIPTIF DE L’APPAREIL
9
99633771 ML.qxd 08/09/04 09:03 Page 10
A página está carregando...
A página está carregando...
A página está carregando...
A página está carregando...
A página está carregando...
A página está carregando...

FR
17
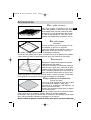
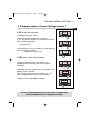
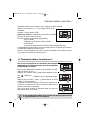
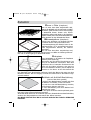
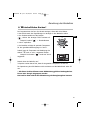
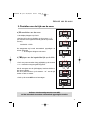
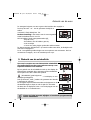
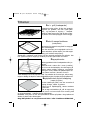
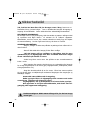
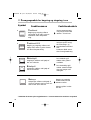
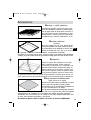
Recommandations
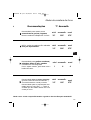
Modes de cuisson du four
Recommandé pour garder le moelleux
des viandes blanches, poissons,
légumes
Pour les cuissons multiples jusqu’à 3
niveaux.
Recommandé pour griller les
côtelettes, saucisses, tranches de
pain, gambas posées sur la grille.
Avec le tourne-broche, vous cuisez
volailles et rôtis.
Nota : toutes les cuissons se font sans
préchauffage.
Recommandé pour les plats humides
(quiches, tartes aux fruits juteux...
La pâte sera bien cuite dessous.
Recommandé pour les préparations qui
lèvent (cake, brioche, kouglof...) et pour les
soufflés qui ne seront pas bloqués par une
croûte dessus.
Préco T°
mini
préco
maxi
35°
225°
275°
mini
préco
maxi
35°
200°
275°
1
mini
préco
maxi
35°
165°
275°
mini
préco
maxi
4
mément à la norme européenne EN 50304 et selon la directive Européenne 2002/40/CE.
onction
4
99633771 ML.qxd 08/09/04 09:04 Page 17
A página está carregando...
A página está carregando...
A página está carregando...
A página está carregando...

22
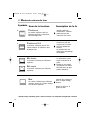
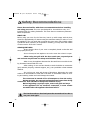
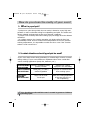
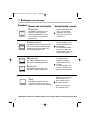
Throughout the manual,
indicates safety recommendations,
indicates advice and tips
Introduction P.23
What does your oven look like?
Description of the appliance P.24
Accessories P.25
Safety Recommendations P.26
How do you install your oven?
Electrical connection P.27
Changing the power cable P.28
Useful dimensions for installing your oven P.29
How does your oven work?
Close-up view of your programmer P.30
How do you set the clock on the oven? P.31
How do you program for immediate cooking? P.32
How do you set a cooking programme? P.33-34
How does the timer work? P.34
How do you program for Eco cooking? P.35
Oven cooking modes P.36-37
How do you care for your oven? P.38-39
How do you change the bulbs? P.40
What do you do in case of operating malfunctions? P.40
Table of Contents
99633771 ML.qxd 08/09/04 09:04 Page 22
A página está carregando...

24
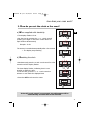
W
hat does your oven look like?
1
3
5
SET
ECO
1
2 3
4
5
7
6
1
2
5
6
7
3
4
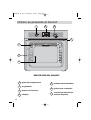
Temperature setting
Programmer
Function selector
Light
Shelf support indicator
Hole for rotisserie
Contact for open door
detector
DESCRIPTION OF THE APPLIANCE
99633771 ML.qxd 08/09/04 09:04 Page 24
A página está carregando...
A página está carregando...
A página está carregando...
A página está carregando...

29
GB
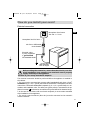
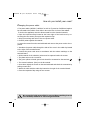
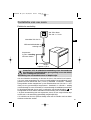
How do you install your oven?
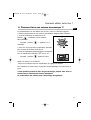
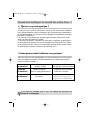
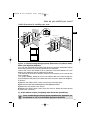
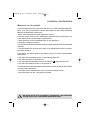
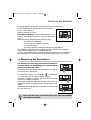
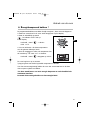
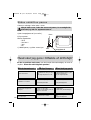
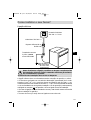
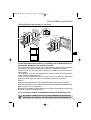
To be certain that you have properly installed your appliance, do
not hesitate to call on a household appliance specialist.
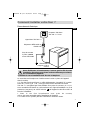
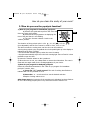
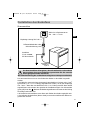
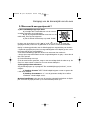
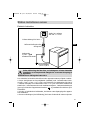
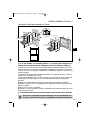
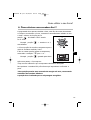
Useful dimensions for installing your oven
The oven can be installed under a work top or in a column of cabinetry
(open* or closed) having the appropriate dimensions for built-in instal-
lation (see adjacent diagram).
Your oven has optimised air circulation that allows it to achieve remarkable cooking
and cleaning results if the following guidelines are respected:
• Centre the oven in the cabinet so as to guarantee a minimum distance of 5 mm
between the appliance and the neighbouring cabinet.
• The material of the built-in cabinetry must be heat resistant (or be covered with
such a material).
• For greater stability, attach the oven in the cabinet with two screws through the
holes provided for this purpose on either side of the front inner panel (see diagram).
To do this:
1) Remove the rubber screw covers to access the mounting holes.
2) Drill a Ø 3 mm hole in the cabinet panel to avoid splitting the wood.
3) Attach the oven with the two screws.
4) Replace the rubber screw covers (they also serve to absorb the shock caused
by closing the oven door).
(*) If the cabinet is open, its opening must be 70 mm (maximum).
70
550
Location of
retaining screw
50 x 50 mm cut-out
Location of
retaining screw
99633771 ML.qxd 08/09/04 09:04 Page 29

30
SET
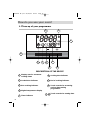
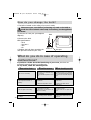
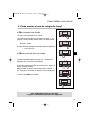
How do you use your oven?
1. C
lose-up of your programmer
1
7
6
3
5
4
8
9
10
2
1
3
4
5
6
7
10
8
2
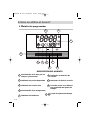
Display area for clock and
cooking times
Locked door indicator
ECO cooking indicator
Digital temperature display
Timer indicator
Cooking time indicator
End of cooking indicator
Touch controls for accessing
various time setting
programmes
Touch controls for setting time
DESCRIPTION OF THE DEVICE
9
99633771 ML.qxd 08/09/04 09:04 Page 30
A página está carregando...
A página está carregando...
A página está carregando...
A página está carregando...
A página está carregando...
A página está carregando...

GB
37
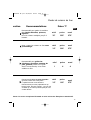
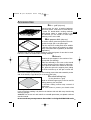
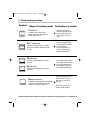
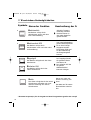
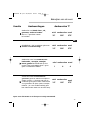
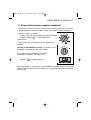
Recommendations
Oven cooking modes
Recommended for preserving tenderness
in white meats, fish, vegetables
For cooking multiple items on up to
three levels.
Recommended for grilling chops,
sausages, toast and prawns placed on
the grid. With the rotisserie, you can cook
poultry and roasts.
Note: All cooking is done
without preheating.
Recommended for moist dishes (quiches,
juicy fruit tarts, etc) The crust will be
thoroughly cooked on the bottom.
Recommended for dishes that rise (cake,
buns, breads, etc...) and for soufflés that will
not be stuck by a crust formed on the top.
Recomm. Temp.
mini
recomm
maxi
35°
225°
275°
mini
recomm
maxi
35°
200°
275°
1
mini
recomm
maxi
35°
165°
275°
mini
recomm
maxi
4
4
with European standard EN 50304 and in accordance with European Directive 2002/40/CE.
ng mode
99633771 ML.qxd 08/09/04 09:05 Page 37
A página está carregando...
A página está carregando...
A página está carregando...

41
99633771 ML.qxd 08/09/04 09:05 Page 41

42
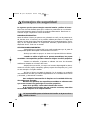
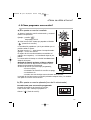
In der gesamten Betriebsanleitung,
Sicherheitshinweise
Tips und Tricks
Vorwort S.43
Wie sieht der Backofen aus?
Beschreibung des Geräts S.44
Zubehör S.45
Ratschläge zur Sicherheit S.46
Installation des Backofens
Stromanschluss S.47
Austausch des Stromkabels S.48
Nutzabmessungen für den Einbau des Backofens S.49
Benutzung des Backofens
Die Details des Programmierers S.50
Einstellung der Backofenuhr S.51
Das sofortige Backen S.52
Einen Backvorgang programmieren S.53-54
Benutzung des Zeitschalters S.54
Wirtschaftliches Backen S.55
Verschiedene Backmöglichkeiten S.56-57
Die Pflege des Backofens S.58-59
Austausch der Glühbirne S.60
Abhilfe bei Funktionsstörungen S.60
Inhalt
99633771 ML.qxd 08/09/04 09:05 Page 42
A página está carregando...

44
W
ie sieht der Backofen aus?
1
3
5
SET
ECO
1
2 3
4
5
7
6
1
2
5
6
7
3
4
Temperatureinstellung
Programmierer
Funktionswähler
Lampe
Anzeiger der Einschubleiste
Loch für Drehspiess
Kontakt für
Türöffnung
BESCHREIBUNG DES GERÄTS
99633771 ML.qxd 08/09/04 09:05 Page 44
A página está carregando...
A página está carregando...
A página está carregando...
A página está carregando...
A página está carregando...

50
SET
Benutzung des Backofens
1. D
etails des Programmierers
1
7
6
3
5
4
8
9
10
2
1
3
4
5
6
7
10
8
2
Anzeige der Uhrzeit, der Zeiten
und der Gardauern
Anzeige der gesperrten Tür
Anzeiger für das wirtschaftliche
Backen
Temperaturanzeige
Anzeiger des Zeitschalters
Anzeiger der Gardauer
Anzeiger des Backendes
Taste für den Zugriff zu den
einzelnen Programmen für die
Zeiteinstellung
Tasten für die Zeiteinstellungen
BESCHREIBUNG DES GERÄTS
9
99633771 ML.qxd 08/09/04 09:06 Page 50
A página está carregando...
A página está carregando...
A página está carregando...
A página está carregando...
A página está carregando...
A página está carregando...

DE
57
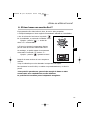
Empfehlungen
Verschiedene Backmöglichkeiten
Wird zur Erhaltung der vollen Qualität
von weissem Fleisch, Fisch, und
Gemüse empfohlen.
Für Koch- und Backvorgänge auf bis zu
3 Ebenen.
Wird für das Grillen von Koteletts,
Würstchen, Brotscheiben und
Gambas auf dem Grillgitter empfohlen.
Mit dem Drehspiess werden Geflügel und
Braten zubereitet.
Hinweis: alle Garvorgänge ohne
Vorheizen.
Empfohlen für feuchte Gerichte
(Speckkuchen, saftige Obsttorten ...)
Der Teig wird gut von unten gebacken.
Empfohlen für das Gehen von Teigen
(Kuchen, Brioche, Napfkuchen ...) und für
Soufflés, die von keiner Oberkruste
blockiert werden.
empf. T°
mind.
empf.
max.
35°
225°
275°
mind.
empf.
max.
35°
200°
275°
1
mind.
empf.
max.
35°
165°
275°
mind.
empf.
max.
4
4
äischen Norm EN 50304 und gemäss der Europäischen Richtlinie 2002/40/EG.
unktion
99633771 ML.qxd 08/09/04 09:06 Page 57
A página está carregando...
A página está carregando...
A página está carregando...

61
99633771 ML.qxd 08/09/04 09:07 Page 61

62
In deze gebruikshandleiding, geeft
de veiligheidsaanwijzingen aan,
geeft u tips en praktische richtlijnen
Inleiding P.63
Indeling van uw oven
Beschrijving van de oven P.64
Oventoebehoren P.65
Veiligheidsaanwijzingen P.66
Installatie van uw oven
Elektrische aansluiting P.67
De voedingskabel verwisselen P.68
Nuttige afmetingen voor de inbouw van uw oven P.69
Gebruik van de oven
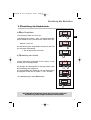
De programmaschakelaar P.70
Instellen van de tijd van de oven P.71
Onmiddellijk bakken P.72
Hoe programmeer ik een bakcyclus ? P.73-74
Gebruik van de schakelklok P.74
ECO-bakken (energiebesparend) P.75
Bakwijzen van de oven P.76-77
Het onderhoud van uw oven P.78-79
Vervanging van de ovenlamp P.80
Problemen en oplossingen P.80
Inhoud
99633771 ML.qxd 08/09/04 09:07 Page 62
A página está carregando...

64
I
ndeling van uw oven
1
3
5
SET
ECO
1
2 3
4
5
7
6
1
2
5
6
7
3
4
Instelling van de temperatuur
Programmaschakelaar
Keuzeknop
Lamp
BESCHRIJVING VAN DE OVEN
Nummer richel
Gat voor draaispit
Detectiecontact voor
openen en sluiten van
de ovendeur
99633771 ML.qxd 08/09/04 09:07 Page 64
A página está carregando...
A página está carregando...

67
NL
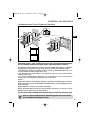
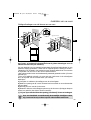
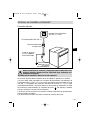
Installatie van uw oven
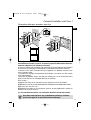
20A Teller Mono
220-240 V ~ 50 Hz
Stopcontact
2 polen + aarding
CEI-norm 60083
Monokabel 220-240 V ~
Elektrische aansluiting
Voedingskabel
lengte :
ongeveer 1,50 m
Differentieelschakelaar of
zekering 16A
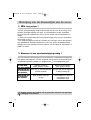
Controleer vóór de elektrische aansluiting of de doorsnede van
de elektrische installatiedraden groot genoeg is voor de elektri-
sche voeding van het fornuis.
De zekering van uw installatie moet 16 Ampère zijn.
Voer de elektrische aansluiting uit alvorens de oven in het meubel in te bouwen.
• De oven moet aangesloten zijn met een voedingskabel (genormaliseerd) met 3
geleiders met een doorsnede van 1,5 mm
2
(1 fasedraad +1 nulleider + aarding).
Deze geleiders worden aangesloten op een elektriciteitsnet van 220-240 V ~ mon-
ofasig via een genormaliseerd stopcontact 1 fasedraad +1 nulleider + aarding
overeenkomstig de norm CEI 60083 of overeenkomstig de installatievoorschriften.
De beschermingsdraad (groen-geel) is verbonden met de aardingsklem van
het apparaat en moet worden verbonden met de aarding van de installatie.
• In geval van aansluiting met een stopcontact, moet u ervoor zorgen dat het stop-
contact ook na de aansluiting gemakkelijk toegankelijk blijft.
• De nulleider van de oven (blauwe draad) moet met de nulleider van het elektri-
citeitsnet verbonden worden.
99633771 ML.qxd 08/09/04 09:07 Page 67
A página está carregando...
A página está carregando...
A página está carregando...
A página está carregando...
A página está carregando...
A página está carregando...
A página está carregando...
A página está carregando...
A página está carregando...
A página está carregando...
A página está carregando...
A página está carregando...
A página está carregando...
A página está carregando...
A página está carregando...
A página está carregando...
A página está carregando...
A página está carregando...
A página está carregando...
A página está carregando...
A página está carregando...
A página está carregando...
A página está carregando...
A página está carregando...
A página está carregando...
A página está carregando...
A página está carregando...
A página está carregando...
A página está carregando...
A página está carregando...
A página está carregando...
A página está carregando...
A página está carregando...
A página está carregando...
A página está carregando...
A página está carregando...
A página está carregando...
A página está carregando...
A página está carregando...
A página está carregando...
A página está carregando...
A página está carregando...
A página está carregando...
A página está carregando...
A página está carregando...
A página está carregando...
A página está carregando...
A página está carregando...
A página está carregando...
A página está carregando...
A página está carregando...
A página está carregando...
A página está carregando...
A página está carregando...
A página está carregando...
A página está carregando...
A página está carregando...
A página está carregando...
A página está carregando...
A página está carregando...
A página está carregando...
A página está carregando...
A página está carregando...
A página está carregando...
A página está carregando...
A página está carregando...
A página está carregando...
A página está carregando...
A página está carregando...
A página está carregando...
A página está carregando...
A página está carregando...
A página está carregando...
-
 1
1
-
 2
2
-
 3
3
-
 4
4
-
 5
5
-
 6
6
-
 7
7
-
 8
8
-
 9
9
-
 10
10
-
 11
11
-
 12
12
-
 13
13
-
 14
14
-
 15
15
-
 16
16
-
 17
17
-
 18
18
-
 19
19
-
 20
20
-
 21
21
-
 22
22
-
 23
23
-
 24
24
-
 25
25
-
 26
26
-
 27
27
-
 28
28
-
 29
29
-
 30
30
-
 31
31
-
 32
32
-
 33
33
-
 34
34
-
 35
35
-
 36
36
-
 37
37
-
 38
38
-
 39
39
-
 40
40
-
 41
41
-
 42
42
-
 43
43
-
 44
44
-
 45
45
-
 46
46
-
 47
47
-
 48
48
-
 49
49
-
 50
50
-
 51
51
-
 52
52
-
 53
53
-
 54
54
-
 55
55
-
 56
56
-
 57
57
-
 58
58
-
 59
59
-
 60
60
-
 61
61
-
 62
62
-
 63
63
-
 64
64
-
 65
65
-
 66
66
-
 67
67
-
 68
68
-
 69
69
-
 70
70
-
 71
71
-
 72
72
-
 73
73
-
 74
74
-
 75
75
-
 76
76
-
 77
77
-
 78
78
-
 79
79
-
 80
80
-
 81
81
-
 82
82
-
 83
83
-
 84
84
-
 85
85
-
 86
86
-
 87
87
-
 88
88
-
 89
89
-
 90
90
-
 91
91
-
 92
92
-
 93
93
-
 94
94
-
 95
95
-
 96
96
-
 97
97
-
 98
98
-
 99
99
-
 100
100
-
 101
101
-
 102
102
-
 103
103
-
 104
104
-
 105
105
-
 106
106
-
 107
107
-
 108
108
-
 109
109
-
 110
110
-
 111
111
-
 112
112
-
 113
113
-
 114
114
-
 115
115
-
 116
116
-
 117
117
-
 118
118
-
 119
119
-
 120
120
-
 121
121
-
 122
122
-
 123
123
-
 124
124
-
 125
125
-
 126
126
-
 127
127
-
 128
128
-
 129
129
-
 130
130
-
 131
131
-
 132
132
-
 133
133
-
 134
134
-
 135
135
-
 136
136
-
 137
137
-
 138
138
-
 139
139
-
 140
140


De Dietrich DOP420BE1 Manual do proprietário
- Categoria
- Microondas
- Tipo
- Manual do proprietário
em outras línguas
- español: De Dietrich DOP420BE1 El manual del propietario
- français: De Dietrich DOP420BE1 Le manuel du propriétaire
- English: De Dietrich DOP420BE1 Owner's manual
- Nederlands: De Dietrich DOP420BE1 de handleiding
- Deutsch: De Dietrich DOP420BE1 Bedienungsanleitung
- dansk: De Dietrich DOP420BE1 Brugervejledning
Artigos relacionados
-
De Dietrich DOP340BE1 Manual do proprietário
-
 De Dietrich DOD1198B Manual do proprietário
-
De Dietrich DOE405XE1 Manual do proprietário
-
Groupe Brandt DOD1198B Manual do proprietário
-
De Dietrich DOP470XE1 Manual do proprietário
-
-
 De Dietrich DOP320BE1 Manual do proprietário
-
 De Dietrich DOP320BE1 Manual do proprietário
-
 De Dietrich DOP320BE1 Manual do proprietário
-
 De Dietrich DOP320BE1 Manual do proprietário


