Le guide d’utilisation de votre four
Using your oven
Bedienungsanleitung Ihres Backofens
Gebruiksaanwijzing van uw oven
Betjeningsvejledning til ovnen
Instrucciones de uso de su horno
O guia de utilização do seu forno
DOP320*
FR
GB
DE
NL
DK
ES
PT
99624982_ML_A.qxd 20/03/03 10:02 Page 1

2
Tout au long de la notice,
vous signale les consignes de sécurité,
vous signale les conseils et les astuces
Edito P.3
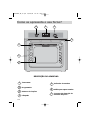
Comment se présente votre four ?
Descriptif de l’appareil P.4
Accessoires P.5
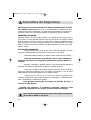
Conseils de sécurité P.6
Comment installer votre four ?
Raccordement électrique P.7
Changement du câble d’alimentation P.8
Dimensions utiles pour encastrer votre four P.9
Comment utiliser votre four ?
Le détail de votre programmateur P.10
Comment mettre à l’heure l’horloge du four ? P.11
Comment faire une cuisson immédiate ? P.12
Comment programmer une cuisson ? P.13-14
Comment utiliser la minuteur ? P.15
Modes de cuisson du four P.16-17
Comment faire une cuisson Eco ? P.18
Comment entretenir votre four ? P.20-21
Comment changer les ampoules ? P.22
Que faire en cas d’anomalies de fonctionnement P.23
Qui contacter ?
P.24
Sommaire
99624982_ML_A.qxd 20/03/03 10:02 Page 2
A página está carregando...

4
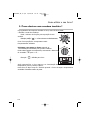
C
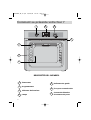
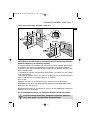
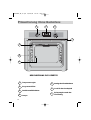
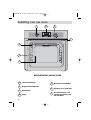
omment se présente votre four ?
1
3
5
SET
ECO
1
2 3
4
5
7
6
1
2
5
6
7
3
4
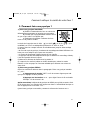
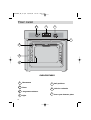
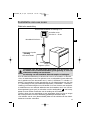
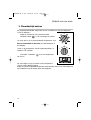
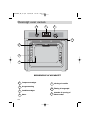
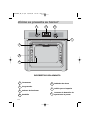
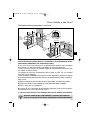
Thermostat
Programmateur
Sélecteur de fonctions
Lampe
Indicateur de gradin
Trou pour tourne broche
Contact de détection
d’ouverture de porte
DESCRIPTIF DE L’APPAREIL
99624982_ML_A.qxd 20/03/03 10:02 Page 4
A página está carregando...
A página está carregando...
A página está carregando...
A página está carregando...
A página está carregando...

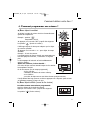
10
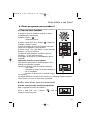
SET
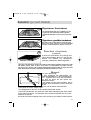
Comment utiliser votre four ?
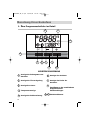
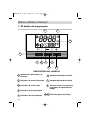
1. L
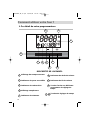
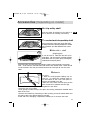
e détail de votre programmateur
1
6
7
3
5
4
8
9
10
2
1
3
4
5
6
7
10
8
2
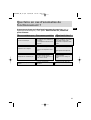
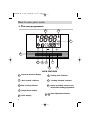
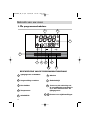
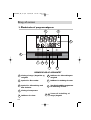
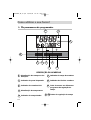
Affichage des temps et durées
Indicateur de porte verrouillée
Indicateur de cuisson ECO
Affichage température
Indicateur du minuteur
Indicateur de durée de cuisson
Indicateur de fin de cuisson
Touche d’accès aux différents
programmes de réglage du
temps
Touches de réglages du temps
DESCRIPTIF DE L’APPAREIL
9
99624982_ML_A.qxd 20/03/03 10:02 Page 10
A página está carregando...
A página está carregando...
A página está carregando...
A página está carregando...
A página está carregando...
A página está carregando...

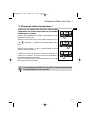
17
FR
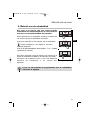
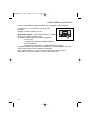
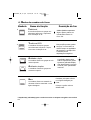
mément à la norme européenne EN 50304 et selon la directive Européenne 2002/40/CE.
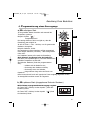
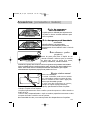
onction
Recommandations
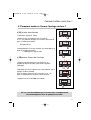
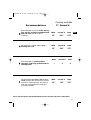
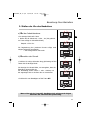
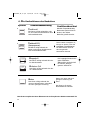
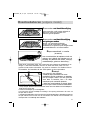
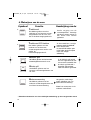
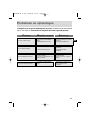
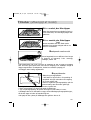
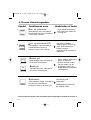
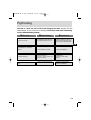
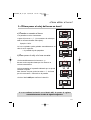
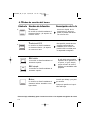
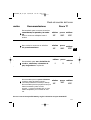
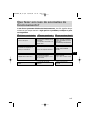
Modes de cuisson du four
Recommandé pour garder le moelleux
des viandes blanches, poissons,
légumes
Pour les cuissons multiples jusqu’à 3
niveaux.
Recommandé pour griller les
côtelettes, saucisses, tranches de
pain, gambas posées sur la grille.
-
Nota : toutes les cuissons se font sans
préchauffage.
Recommandé pour les plats humides
(quiches, tartes aux fruits juteux...
La pâte sera bien cuite dessous.
Recommandé pour les préparations qui
lèvent
(cake, brioche, kouglof...) et pour les souf-
flés qui ne seront pas bloqués par une
croûte dessus.
Préco T°
mini
préco
maxi
35°
225°
275°
mini
préco
maxi
35°
200°
275°
1
mini
préco
maxi
35°
165°
275°
mini
préco
maxi
2
99624982_ML_A.qxd 20/03/03 10:03 Page 17
A página está carregando...

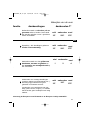
19
FR
99624982_ML_A.qxd 20/03/03 10:03 Page 19
A página está carregando...
A página está carregando...

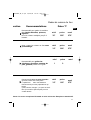
22
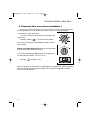
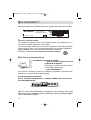
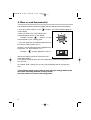
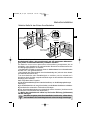
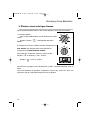
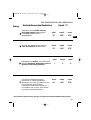
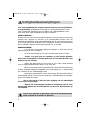
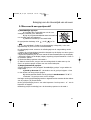
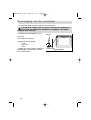
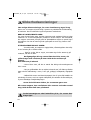
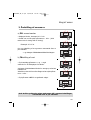
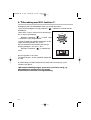
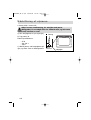
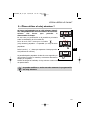
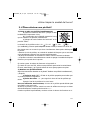
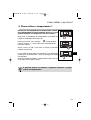
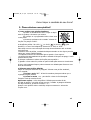
Comment changer l’ampoule ?
• L’ampoule se situe au plafond de la cavité de votre four.
a) Dévissez le hublot (voir ci-contre).
b) Tirez l'ampoule .
Caractéristiques de l'ampoule :
- 25 W
- 220-240 V
- 300°C
c) Changez l'ampoule puis remonter le
hublot et rebrancher votre four.
Débrancher votre four avant toute intervention sur l'ampoule
pour eviter tout risque de choc électrique et laisser refroidir si
besoin l’appareil.
Ampoule
Dévissez
Hublot
99624982_ML_A.qxd 20/03/03 10:03 Page 22
A página está carregando...
A página está carregando...

25
GB
99624982_ML_A.qxd 20/03/03 10:03 Page 25

26
Throughout this manual,
indicates safety recommendations,
indicates advice to help you make the
best use of your oven
Introduction P.27
Your oven
How it works P.28
Accessories P.29
Safety recommendations P.30
How to install your oven
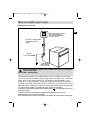
Electrical connections P.31
Changing cables P.32
Dimensions for installation use P.33
How to use your oven
The oven programmer P.34
How to set the clock P.35
How to cook straightaway P.36
How to programme the cooking P.37-38
How to use the timer P.39
Cooking methods P.40-41
How to cook Economically P.42
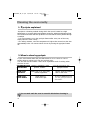
Cleaning the oven cavity P.44-45
Changing bulbs P.46
Troubleshooting P.47
Contents
99624982_ML_A.qxd 20/03/03 10:03 Page 26
A página está carregando...

28
Your oven
1
3
5
SET
ECO
1
2 3
4
5
7
6
1
2
5
6
7
3
4
Thermostat
Timer
Programme selector
Light
Rail positions
Hole for rotisserie
Door-open detector plate
OVEN FEATURES
99624982_ML_A.qxd 20/03/03 10:03 Page 28
A página está carregando...
A página está carregando...
A página está carregando...
A página está carregando...
A página está carregando...

34
SET
How to use your oven
1. T
he oven programmer
1
6
7
3
5
4
8
9
10
2
1
3
4
5
6
7
10
8
2
Time and duration display
"Door locked" indicator
ECO cooking indicator
Temperature display
Timer display
Cooking time indicator
"Cooking finished" indicator
Button providing access to the
various time setting programmes
Time adjustment buttons
OVEN FEATURES
9
99624982_ML_A.qxd 20/03/03 10:03 Page 34
A página está carregando...
A página está carregando...
A página está carregando...
A página está carregando...
A página está carregando...
A página está carregando...

41
GB
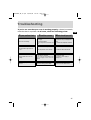
rdance with European Standard EN50304 and the European Directive 2002/40/EC.
Recommendations
Cooking methods
Recommended to prevent meat drying
out, and for cooking vegetables and
fish and food placed on up to
3 shelves.
Recommended for grilling chops,
sausages, and large prawns and for
making toast.
NB. All food is cooked without pre-
heating the oven
Recommended for dishes with a lot of
liquid (quiches and fruit pies) as the pas-
try base is cooked through. Use also for
food that rises (bread and cakes) and
uncovered soufflés.
Cº Recom’d
min.
recom’d
max.
35°
225°
275°
min.
recom’d
max.
35°
200°
275°
1
min.
recom’d
max.
35°
165°
275°
min.
recom’d
max.
2
4
99624982_ML_A.qxd 20/03/03 10:04 Page 41
A página está carregando...

43
GB
99624982_ML_A.qxd 20/03/03 10:04 Page 43
A página está carregando...
A página está carregando...

46
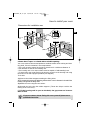
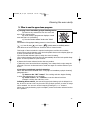
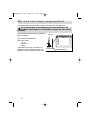
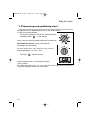
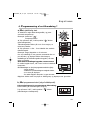
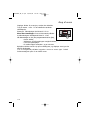
Changing a bulb
•The light bulb is housed in the ceiling of your oven.
a) Unscrew the protective shade
(see diagram).
b) Pull the bulb out.
A bulb is used:
- 25 W
- 220-240 V
- 300°C
c) Change the bulb, replace the shade and
switch your oven back on at the mains.
Warning! Switch off the power at the main switch before
attempting to change the bulb. Leave the oven to cool if necessary.
bulb fitting
unscrew
cover
99624982_ML_A.qxd 20/03/03 10:04 Page 46
A página está carregando...

48
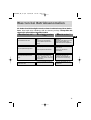
Copy here the details that are on your oven manufacturer's plate:
MADE IN FRANCE
220 - 240V ~ 50 Hz
BRANDT APPLIANCES SAS
7 rue Henri Becquerel
92500 RUEIL MALMAISON
De Dietrich
99624982_ML_A.qxd 20/03/03 10:04 Page 48

49
DE
99624982_ML_A.qxd 20/03/03 10:04 Page 49

50
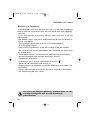
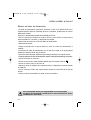
In der Gebrauchsanweisung
geben Ihnen die Zeichen,
Sicherheitshinweise und,
Ratschläge und Tips.
Vorwort S.51
Präsentierung Ihres Backofens
Beschreibung des Gerätes S.52
Zubehör S.53
Sicherheitshinweise S.54
Backofeninstallation?
Stromanschluss S.55
Austausch des Stromzuführungskabels S.56
Nützliche Maße für den Einbau Ihres Backofens S.57
Benutzung Ihres Backofens
Ihre Programmschaltuhr im Detail S.58
Stellen der Uhr des Backofens S.59
Starten eines sofortigen Garens? S.60
Programmierung eines Garvorgangs S.61-62
Benutzung des Kurzzeitweckers S.63
Die Garfunktionen des Backofens S.64-65
Durchführung eines sparsamen Garvorgangs S.66
Reinigung des Garraums Ihres Backofens S.68-69
Wie wird eine lampe ausgewechselt S.70
Was bei Betriebsanomalien tun S.71
Inhalt
99624982_ML_A.qxd 20/03/03 10:04 Page 50
A página está carregando...

52
Präsentierung Ihres Backofens
1
3
5
SET
ECO
1
2 3
4
5
7
6
1
2
5
6
7
3
4
Temperaturregler
Programmwähler
Funktionswählschalter
Lampe
Anzeige der Einschubebene
Loch für den Drehspieß
Erfassungskontakt der
Türöffnung
BESCHREIBUNG DES GERÄTES
99624982_ML_A.qxd 20/03/03 10:04 Page 52
A página está carregando...
A página está carregando...

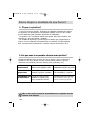
55
DE
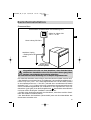
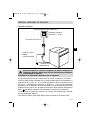
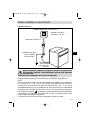
Backofeninstallation
Zähler 20 A Mono 220-
240 V ~ 50 Hz
Steckdose 2-polig
+ Erdung Norm CEI
60083
Mono-Leitung 220-240 ~
Stromanschluss
Etwa 1,50 m
langes Strom-
zuführungskabel
Differentieller Überlastschalter oder Sicherung 16 A
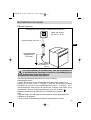
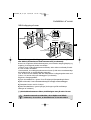
Vergewissern Sie sich vor dem Anschluss, dass die Kabel Ihrer
elektrischen Installation einen für die normale Versorgung Ihres
Gerätes ausreichenden Querschnitt aufweisen.
Ihr Gerät muss mit einer Sicherung von 16 Ampere ausgestattet sein.
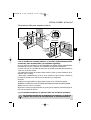
Der elektrische Anschluss muss erfolgen, bevor das Gerät im Möbel montiert wird.
• Der Backofen muss anhand eines (normalisierten) Stromzuführungskabels mit 3
Leitern à 1,5 mm² (1 Ph + 1N + Erde) angeschlossen sein. Die drei Leiter müssen
an ein einphasiges Netz von ~ 220-240 V, anhand einer normalisierten CEI 60083
Steckdose 1 Ph + 1 N = Erdung oder einer omnipolaren Stromunterbrechung mit
einem Kontaktöffnungsabstand von mindestens 3 mm angeschlossen sein. Der
Schutzleiter (grün-gelb) ist an die Erdungsklemme des Gerätes anzuschliessen
und muss mit der Erdung der Installation verbunden sein.
• Im Falle eines Anschlusses anhand einer Steckdose, muss diese nach der Instal-
lation des Gerätes erreichbar bleiben.
• Der Neutralleiter des Backofens (blaues Kabel) muss mit dem Neutralleiter des
Stromnetzes verbunden sein.
99624982_ML_A.qxd 20/03/03 10:04 Page 55
A página está carregando...
A página está carregando...

58
SET
B
enutzung Ihres Backofens
1.
Ihre Programmschaltuhr im Detail
1
6
7
3
5
4
8
9
10
2
1
3
4
5
6
7
10
8
2
Anzeige der Zeitangaben und
Gardauer
Anzeige der Türverriegelung
Anzeige Eco-Garen
Temperaturanzeige
Anzeige der Zeitberechnung
Anzeige der Gardauer
Anzeige des Endes der
Gardauer
Zugrifftaste zu den verschiedenen
Programmen der
Zeiteinstellungen
Zeiteinstelltasten
GERÄTEBESCHREIBUNG
9
99624982_ML_A.qxd 20/03/03 10:05 Page 58
A página está carregando...
A página está carregando...
A página está carregando...
A página está carregando...
A página está carregando...
A página está carregando...
A página está carregando...
A página está carregando...
A página está carregando...
A página está carregando...
A página está carregando...
A página está carregando...
A página está carregando...
A página está carregando...
A página está carregando...
A página está carregando...
A página está carregando...
A página está carregando...
A página está carregando...
A página está carregando...
A página está carregando...
A página está carregando...
A página está carregando...
A página está carregando...
A página está carregando...
A página está carregando...
A página está carregando...
A página está carregando...
A página está carregando...
A página está carregando...
A página está carregando...
A página está carregando...
A página está carregando...
A página está carregando...
A página está carregando...
A página está carregando...
A página está carregando...
A página está carregando...
A página está carregando...
A página está carregando...
A página está carregando...
A página está carregando...
A página está carregando...
A página está carregando...
A página está carregando...
A página está carregando...
A página está carregando...
A página está carregando...
A página está carregando...
A página está carregando...
A página está carregando...
A página está carregando...
A página está carregando...
A página está carregando...
A página está carregando...
A página está carregando...
A página está carregando...
A página está carregando...
A página está carregando...
A página está carregando...
A página está carregando...
A página está carregando...
A página está carregando...
A página está carregando...
A página está carregando...
A página está carregando...
A página está carregando...
A página está carregando...
A página está carregando...
A página está carregando...
A página está carregando...
A página está carregando...
A página está carregando...
A página está carregando...
A página está carregando...
A página está carregando...
A página está carregando...
A página está carregando...
A página está carregando...
A página está carregando...
A página está carregando...
A página está carregando...
A página está carregando...
A página está carregando...
A página está carregando...
A página está carregando...
A página está carregando...
A página está carregando...
A página está carregando...
A página está carregando...
A página está carregando...
A página está carregando...
A página está carregando...
A página está carregando...
A página está carregando...
A página está carregando...
A página está carregando...
A página está carregando...
A página está carregando...
A página está carregando...
A página está carregando...
A página está carregando...
A página está carregando...
A página está carregando...
A página está carregando...
A página está carregando...
A página está carregando...
A página está carregando...
A página está carregando...
A página está carregando...
-
 1
1
-
 2
2
-
 3
3
-
 4
4
-
 5
5
-
 6
6
-
 7
7
-
 8
8
-
 9
9
-
 10
10
-
 11
11
-
 12
12
-
 13
13
-
 14
14
-
 15
15
-
 16
16
-
 17
17
-
 18
18
-
 19
19
-
 20
20
-
 21
21
-
 22
22
-
 23
23
-
 24
24
-
 25
25
-
 26
26
-
 27
27
-
 28
28
-
 29
29
-
 30
30
-
 31
31
-
 32
32
-
 33
33
-
 34
34
-
 35
35
-
 36
36
-
 37
37
-
 38
38
-
 39
39
-
 40
40
-
 41
41
-
 42
42
-
 43
43
-
 44
44
-
 45
45
-
 46
46
-
 47
47
-
 48
48
-
 49
49
-
 50
50
-
 51
51
-
 52
52
-
 53
53
-
 54
54
-
 55
55
-
 56
56
-
 57
57
-
 58
58
-
 59
59
-
 60
60
-
 61
61
-
 62
62
-
 63
63
-
 64
64
-
 65
65
-
 66
66
-
 67
67
-
 68
68
-
 69
69
-
 70
70
-
 71
71
-
 72
72
-
 73
73
-
 74
74
-
 75
75
-
 76
76
-
 77
77
-
 78
78
-
 79
79
-
 80
80
-
 81
81
-
 82
82
-
 83
83
-
 84
84
-
 85
85
-
 86
86
-
 87
87
-
 88
88
-
 89
89
-
 90
90
-
 91
91
-
 92
92
-
 93
93
-
 94
94
-
 95
95
-
 96
96
-
 97
97
-
 98
98
-
 99
99
-
 100
100
-
 101
101
-
 102
102
-
 103
103
-
 104
104
-
 105
105
-
 106
106
-
 107
107
-
 108
108
-
 109
109
-
 110
110
-
 111
111
-
 112
112
-
 113
113
-
 114
114
-
 115
115
-
 116
116
-
 117
117
-
 118
118
-
 119
119
-
 120
120
-
 121
121
-
 122
122
-
 123
123
-
 124
124
-
 125
125
-
 126
126
-
 127
127
-
 128
128
-
 129
129
-
 130
130
-
 131
131
-
 132
132
-
 133
133
-
 134
134
-
 135
135
-
 136
136
-
 137
137
-
 138
138
-
 139
139
-
 140
140
-
 141
141
-
 142
142
-
 143
143
-
 144
144
-
 145
145
-
 146
146
-
 147
147
-
 148
148
-
 149
149
-
 150
150
-
 151
151
-
 152
152
-
 153
153
-
 154
154
-
 155
155
-
 156
156
-
 157
157
-
 158
158
-
 159
159
-
 160
160
-
 161
161
-
 162
162
-
 163
163
-
 164
164
-
 165
165
-
 166
166
-
 167
167
-
 168
168


De Dietrich DOP320BE1 Manual do proprietário
- Tipo
- Manual do proprietário
em outras línguas
- español: De Dietrich DOP320BE1 El manual del propietario
- français: De Dietrich DOP320BE1 Le manuel du propriétaire
- English: De Dietrich DOP320BE1 Owner's manual
- Nederlands: De Dietrich DOP320BE1 de handleiding
- Deutsch: De Dietrich DOP320BE1 Bedienungsanleitung
- dansk: De Dietrich DOP320BE1 Brugervejledning