HAEGER Premium Warm gas stove Manual do usuário
- Categoria
- Aquecedores de ambiente
- Tipo
- Manual do usuário

Gas room Heater / Aquecedor de sala a Gás
Calentador de sala de gas / Appareil de chauffage à gaz
GH-42B.002A
User instructions / Instruções de uso
Instrucciones de uso / Mode d’emploi
This product is not suitable for primary heating purposes.
Este produto não é adequado para fins de aquecimento principal.
Este producto no es adecuado para calefacción primaria.
Ce produit ne peut pas être utilisé comme chauffage principal.
2531CS-0008

A
B
1
2
3
4

GB
Instructions for use 1
Dear customer
Thank you for having chosen a HÆGER product.
The HÆGER products have been produced to think about the welfare of the
consumer privileging the most raised standards of quality, functionality and
assign. We are sure you will be happy with this appliance.
We assume that the user is familiar with the common procedures of handling
household appliances.
Before using the appliance for the first time please read carefully and
thoroughly through these operating instructions and the safety advice,
completely familiarising yourself with the appliance. Retain these instructions for
future reference and pass them on to whoever might acquire the appliance at
a future date.
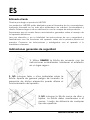
General Safety Precautions
1. Always use Heater in accordance with user’s
instructions supplied with each heater. Keep these
instructions in a safe place.
2. DO NOT place clothes or other material on the
heater. As apart from danger of fire, their presence
could affect the efficiency of the appliance.
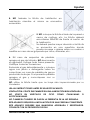
3. DO NOT position Heater close to
armchairs, fabrics, bed linen and other
furniture.

English
2 Instructions for use
4. DO NOT move Heater from room to room when
operating.
5. DO NOT position Heater alongside a wall or
near curtains and other flammable materials.
The following minimum distances should be
respected: 20cm from sides, 150cm from
front. ALWAYS face Heater towards center of
room. Special care should be taken if the
heater is on a surface where it can twist on its
castors if knocked by a child or dog etc.
6. In the event of gas leakage, the heater’s
gas supply needs to be turned off. DO NOT
disconnects the regulator. Extinguish all
naked lights. Check all connections. Slowly
turn the gas on and brush the connections
with soapy water or liquid detergents, a gas
leakage point will form bubbles. If a leak is
found, turn the gas off and inform your gas
supplier. DO NOT uses the Heater again until
it has been checked and maintained by
your dealer.
READ THE INSTRUCTIONS BEFORE USING THIS APPLIANCE.
VENTILATION: USE ONLY IN A WELL-VENTILATED ROOM.
DO NOT USE IN LEISURE VEHICLES SUCH AS CARAVANS OR
AUTOCARAVANS.
DO NOT CHANGE GAS CYLINDER IN THE PRESENCE OF NAKED LIGHT.
THIS APPLIANCE REQUIRES INSTALLATION BY A COMPETENT PERSON.
THIS APPLIANCE REQUIRES AN APPROVED HOSE AND REGUALATOR.
CHECK WITH YOUR GAS SUPPLIER.

English
Instructions for use 3
– This appliance requires a rubber tube and a pressure regulator in
accordance with current regulations; if they are not supplied as
standard, contact your local gas supplier or your authorized dealer.
– This appliance MUST NOT be used in a basement, high-rise
apartments, bathrooms or bedrooms and in rooms that have a
volume of less than 15m3 (30m3 in living rooms).
– Ensure that the installation complies with local regulations.
– Do not install the appliance in a room that may contain gas, oil or
sulfur, or near sources of heat.
– The heater in its possession is equipped with safety devices that act
in case of failure when the appliance is in use. If the pilot (positioned
in front of the burner) accidentally extinguishes, or if the room is not
sufficiently ventilated, the safety device will block the flow of gas,
causing the heater to shut down.
– DO NOT USE on recreational vehicles (campers and caravans).
– Do not use the heater on a high mountain.
• The appliance is not intended for use by persons (including children)
with reduced mental, sensory or mental capacities, or lack of
experience and knowledge, unless they have received supervision
or instructions regarding use of the appliance by a person
responsible for their safety. Children should be supervised to ensure
that they do not play with the appliance.
• Remove the packing and make sure that the appliance is intact. In
case of doubt do not use the appliance and contact our after-sales
service. Do not leave packaging materials like bags and staples
within reach of children.
This symbol show: WARNING: In order to avoid overheating,
do not cover the heater with cloths.

English
4 Instructions for use
Ventilation
Your heater consumes oxygen while it is in operation. For that reason,
adequate ventilation should be provided in rooms in which the heater is used.
This ensures the removal of products of combustion and allows the entry of
replacement air.
Adequate ventilation should considerably reduce the possibility of
condensation occurring. The following table shows the smallest sizes of room
suitable for each heat setting and the ventilation surface, which should be
provided.
Required volume of room and ventilation surface:
VOLUME OF LIVING ROOM
VENTILATION SURFACE
Low Level
High Level
84 m3
105cm2
105 cm2
Assembling the heater and connecting the gas cylinder
1. After removing the heater from its packaging, check it for damage: if you
are unsure, do not use the appliance and contact qualified service
personnel. The packing materials should not be left within the reach of
children because they are potentially dangerous; dispose of them in
conformity with the law.
2. Remove from the cabinet the cover on the gas cylinder, and unscrew.
3. This device must only be powered with LPG gas in a 15-kg cylinder and this
must be equipped with a pressure regulator and flexible tube. The pressure
regulator must have a fixed calibration of 30 mbar conforming to EN12864
and the flexible rubber tube, with a length of 50 cm (and not longer than
60 cm); the latter must be attached with metal bands of suitable size and
needs to be replaced by the date stamped on it.
4. The flexible hose must be an approved hose (BS3212 type 2 or BSEN1763
Class B) checked regularly whenever the cylinder is replaced to be sure it
has no scratches or cuts and it is in a perfect state. We recommend
replacing the gas hose every 3 years.
5. Connect the flexible tube to the hose union of the pressure regulator and
to that of the tap, checking that the metal bands are tight and paying
particular attention not to tamper with or damage any component or
fitting.
6. Before connecting the cylinder, make sure that its tap is closed and that
there are no open flames (lit oven, etc.) in the room, where the stove is

English
Instructions for use 5
placed. Screw the pressure regulator onto the cylinder, keeping these
warnings in mind:
a) check that the gasket seal is in good condition,
b) attach the regulator to the tap, screwing the nut tightly
counterclockwise,
c) carefully check that there is no gas leaking from the connection,
using soapy water: if there is a leak, bubbles will form; tighten the
connection more or seek professionally qualified service.
Warning: do not check for gas leaks when the appliance is hot but
wait until it is cold.
7. Place the cylinder in its compartment, taking care that the tube is not
twisted or choked and isn't touching hot parts.
8. Hook the rear cylinder cover on the cabinet, fixes it with the screws
supplied.
9. The appliance has to be installed with the cover of the gas cylinder fixed
to the cabinet. Use the stove only with a 15kg cylinder placed in its
compartment.
10. To replace the cylinder, make sure that its tap is closed and that there are
no open flames (lit oven, etc.) or sources of heat in the place where you
are working; we recommend that you check that the gasket seals of the
regulator and flexible rubber tube are in good condition and replace
them, if necessary.
11. Do not mishandle the connections or other components.
12. Do not turn the cylinder upside down to completely use its contents: this
releases liquid residues left in the tank that will irreparably damage the
heater.
13. Do not disconnect the pressure regulator from the cylinder when the
cylinder tap is open.
14. The manufacturer will not be responsible if one of the above points is
disregarded.
Installation
1. Use the heater only in well-aired rooms. In the room where the heater is
placed there must be as much air as it is necessary for the combustion.
The room must have two breaches of 105cm² for the air change.
2. The heater must be installed on a flat, stable surface.
3. Do not install or use the heater in bathrooms; in bedrooms; in basement
floors, in upper floors or in rooms with a volume less than 15m3; in places
with the risk of fire (garage).

English
6 Instructions for use
4. Do not use the stove in bedroom while sleeping.
5. The heater must not be close to other sources of heat (minimum distance
1 meter), inflammable materials or explosives and must not be directed
towards objects which could be damaged or catch fire (it must not be
directed towards curtains, armchairs and furniture, for example).
6. Face the heater so that the heat is directed towards the centre of the
room and towards an open space; the frontal part (radiating) must be
placed at least 2 meters away from curtains, couches, furniture or other
objects. The sides and the rear part of the stove must have a free space
of at least 50cm.
7. Special attention as to be attached if the stove is in a room where
children or animals can enter.
8. Do not use the stove on the mountain.
9. Use the stove only with the gas cylinder in its compartment. Use the stove
and the gas cylinder only in vertical position.
10. Use only 15kg gas cylinder. Check the right gas for your stove.
11. In case of defective functioning or damage, switch the appliance off
and let it check by qualified personnel.
Operations
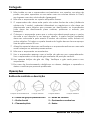
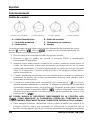
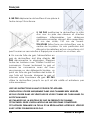
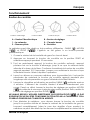
Control Buttons
A – Piezoelectric button B – Control button
1 – The front grill 2 – Ceramic burner
3 – Pilot flame 4 – Castors
The heater can be regulated to three different heat settings: LOW (1 ), MEDIUM
(2 ) and HIGH (3 ). The ignition is operated by piezo electric push button.
1. Open the valve on the gas cylinder one turn and half.
2. Turn the control knob to START position, press down and hold it for 10
seconds.
Lighting Position Minimum Position Medium Position Maximum Position

English
Instructions for use 7
3. Whilst still pressing down the control knob, press several times on the
ignition button until the pilot flame ignited at the bottom of the burner.
Continue to hold the control knob down for another 15-20 seconds. When
releasing the button and if the pilot flame goes out, repeat the operation.
4. When first igniting a new heater, it may be necessary to hold the control
knob down for a longer time in order to allow gas to flow to the pilot
burner.
5. When the heater is burning at the LOW (1 ) stage, please wait for around 4
minutes. The heating element will start glowing and will become red. After
that you can turn the control knob to the MEDIUM (2 ) position, again
wait around 4 minutes in this position. Finally, you can turn the control knob
to the HIGH (3 ) position.
NEVER PUT THE APPLIANCE DIRECTLY ON THE HIGH (3 ) POSITION. AS A RESULT
OF THIS THE HEATER MIGHT NOT BE ABLE TO DIGEST THE GAS IN A PROPER WAY
AND THERE MIGHT BE EXCESSIVE FLAMING COMBUSTION.
6. In order to shut off the heater, you need to turn back the control knob to
the start position and close the cylinder valve fully (in clockwise). The
heater can only be shut off by closing the gas cylinder valve fully. It cannot
be turned off by the control knob.
Safety devices (FFD, ODS, Anti-Tilting)
The heater incorporates several safety devices that will shut down the heater in
unsafe conditions.
1. In case of accidental flame failure, the heater will shut down
automatically.
2. The heater will shut down if the ventilation in the room is not sufficient or
when the heater is placed in a small room. Turn off the heater, ventilate
the room well, and wait 5-10 minutes before re-lighting the heater.
3. This heater incorporates an “anti-tilt” switch that automatically shuts off the
burner in the event of tipping. Ensure the heater is in the vertical position.
Changing the gas cylinder
• Gas cylinders must be replaced in a flame free environment.
• Do not smoke while changing the gas cylinder.
• Turn off the gas cylinder valve or regulator fully (clockwise) and take the
empty cylinder out of the heater.
• Do not attempt to remove the regulator while the heater is still running.
• Make sure that the heater is extinguished completely.
• Remove the regulator from the empty cylinder.

English
8 Instructions for use
• Following the steps described under “Assembling the heater and
connecting the gas cylinder” for connecting a new cylinder.
Cleaning
• Maintenance and cleaning must be carried out with the gas supply turned
off and the heater must be cold. Do not attempt to clean the heater while
it is in use.
• Your heater should be checked annually by a qualified person for safe
operation and to detect any faults.
• Stop using the heater and contact your dealer for advice if any faults are
detected in use.
• Periodically clean the exterior and rear cylinder, storage area of your
heater to remove dust, which may affect the operation of the heater.
• Light vacuuming with a soft brush will remove any dust build-up on the
surfaces of the ceramic elements. Do not scrape these elements as they
may become very fragile with use.
• Do not use abrasive products to clean the heater.
• Watch the pilot flame while it is in operation. It should burn steadily, if it
flickers or is yellow tipped, the heater should be checked for correct
operation.
• If any parts need replacement, they must be replaced only with genuine
original parts supplied by the manufacturer. The use of incorrect or
substitute the parts may be dangerous and will void any warranty.
When the heater is not in use for a period of time, for instance, over the
summer, we recommend that it be kept covered or replaced in its
carton to minimize the accumulation of dust and dirt that may occur.
Troubleshooting guide
The heater doesn’t light:
• Check the gas cylinder if it is full
• Check the regulator if it is properly attached and the cylinder valve is
turned on.
• Check if the instructions have been followed correctly.
The heat doesn’t light after the cylinder has been changed it could be
due to:

English
Instructions for use 9
• There is some air present in the cylinder, hold the control knob down for a
longer period of time until the pilot and main burner light. Switch to the 3
High setting.
• The cylinder may have been excessively cold. Allow the cylinder to reach
room temperature before attempting to start the heater.
The heater turns off by itself:
• If the heater goes out on continuous working, repeat the operation,
following the instruction.
• If it goes out soon after lighting, check for drafts or for the gas cylinder
running out of gas.
• If it goes out after 30 minutes or so, it is signaling that it is operating in a
badly ventilated area. Open a window or door to ventilate the area and
reignite.
• Avoid bumping the heater in operation. Don’t move the heater while in
operation.
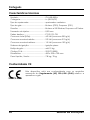
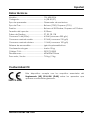
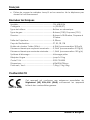
Technical Data
Model: ................................................... GH-42B.002A
Category: ............................................. I3+ (28-30/37)
Burner type: .......................................... Ceramic burner
Gas Type: .............................................. Butane (G30), Propane (G31)
Pressure: ................................................ Butane at 28-20mbar, Propane at 37mbar
Injector size: .......................................... 0,59mm
Countries of Destination: .................... PT, ES, FR, GB
Total heat input (ΣQn): ....................... 4.2 kW (consumption 305 g/h)
Nominal medium heat input: ............ 2.9 kW (consumption 210 g/h)
Nominal minimum heat input: .......... 1.5 kW (consumption 109 g/h)
Ignition system: .................................... Piezo ignition
Gas container: ..................................... up to 15kg
P.I.N Code: ........................................... 2531CS-0008
Dimensions: ........................................... 420 x 290 x 720 mm
Net / Gross Weight: ............................. 7.8 kg / 9 kg

English
10 Instructions for use
Conformity CE
This device complies with the essential requirements of the Gas
Appliances Regulation (EU) 2016/426 (GAR) for appliances
burning gaseous fuels.
Environment
Please consider our environment
Do not dispose of the appliance in your normal domestic waste. This
product is subject to the European guideline 2012/19/EU.
Dispose of the appliance through an approved disposal centre or at your
community waste facility. Observe the currently applicable regulations. In case
of doubt, please contact your waste disposal centre.
Dispose of all packaging materials in an environmentally responsible manner.
When you wish to dispose of the appliance, remove the cable and dispose it in
an environmentally friendly way (e.g. recycling plant).
Guarantee
This unit is covered by a 24 months (*) warranty, from the purchase date, and
covers the repair free of charges of the damaged due to the manufacturer
fault or defected components. The distributor reserves the right to change the
unit for an equivalent model.
The warranty does not cover any damaged caused by incorrect use, lightning,
incorrect installation, external factors or any intentional damaged. The warranty
does not cover damage thus attributable to falls, blows, spill, exposure to
extreme environmental conditions or deterioration caused by normal use of
plastic parts or keyboards, as well as by the use of batteries other than those
specified in this manual.
For the repairing, during the warranty period, the unit shall be sent to the
distributor or reseller, or to the address indicated by them, and must be jointed
the warranty certificated and the respective original invoice or selling ticket,
where the buying date is expressed indicated.
The consumer is protected by the guarantee provided by Directive 1999/44/CE
of European Parliament and Council of 25 May.
(*) Only for European Union countries
2531CS-0008

PT
Manual de Instruções 11
Estimado Cliente
Obrigado por ter escolhido um produto HÆGER.
Os produtos HÆGER foram concebidos a pensar no bem-estar do consumidor,
privilegiando os mais elevados padrões de qualidade, funcionalidade e
designe. Estamos certos da sua satisfação pela aquisição deste produto.
Partimos do princípio de que o utilizador possui conhecimentos gerais sobre o
manuseamento com eletrodomésticos.
Antes da primeira utilização, leia cuidadosa e totalmente estas instruções de
utilização e de segurança e familiarize-se com as funções do aparelho.
Guarde estas instruções e, se necessário, entregue-as a terceiros.
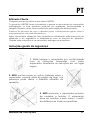
Instruções gerais de segurança
1. Utilize sempre o aquecedor em conformidade
com as instruções fornecidas com cada
aquecedor. Mantenha as instruções em um lugar
seguro.
2. NÃO ponha roupas ou outros materiais sobre o
aquecedor, porque, além do perigo de fogo, sua
presença pode afetar o trabalho eficiente do
aparelho.
3. NÃO posicione o aquecedor próximo
de cadeiras e tecidos. O aquecedor
deve ser mantido a pelo menos 1 metro
de distância de todas as superfícies.

Português
12 Manual de Instruções
4. NÃO mova o aquecedor de uma sala a outra
quando estiver ligado.
5. NÃO posicione o aquecedor junto a uma
parede ou perto de cortinas e outros
materiais inflamáveis. As seguintes distâncias
mínimas devem ser respeitadas: 20cm de
lados, 150cm da frente. Posicione SEMPRE o
aquecedor no centro da sala. Deve ter
cuidado especial se o aquecedor estiver
sobre uma superfície onde ele possa mover-se ou girar nas suas rodas
se sofrer uma colisão por parte de uma criança ou um cão, etc.
6. Se houver suspeita de um vazamento,
desligue o gás no cilindro. NÃO desligue o
regulador. Apague todas as luzes. Verifique
todas as ligações. Lentamente ligue o gás
e escove os conectores com água e
sabão ou detergente líquido – um
vazamento de gás provocará a formação
de bolhas. Se for detetado um vazamento
desligue o gás e informe o Fornecedor.
NÃO use o aquecedor novamente até que
seja inspecionado pelo Fornecedor.
LEIA AS INSTRUÇÕES ANTES DE USAR ESTE APARELHO.
VENTILAÇÃO: UTILIZE SOMENTE EM UM QUARTO BEM VENTILADO.
NÃO UTILIZE EM VEÍCULOS DE LAZER COMO CARAVANAS OU
AUTOCARAVANAS.
NÃO MUDE O CILINDRO DE GÁS NA PRESENÇA DE LUZ.
ESTE APARELHO EXIGE A INSTALAÇÃO POR UMA PESSOA COMPETENTE.
ESTE APARELHO EXIGE UMA MANGUEIRA E REGULADOR APROVADOS.
VERIFIQUE COM O SEU FORNECEDOR DE GÁS.

Português
Manual de Instruções 13
– Este aparelho requer um tubo em borracha e um regulador de
pressão em conformidade com as normas vigentes. Se não forem
fornecidos de série, dirija-se ao fornecedor de gás local ou ao
revendedor autorizado.
– Este aparelho NÃO DEVE ser usado em uma cave, apartamentos de
edifício alto, casas de banho ou quartos e nas salas que tenham
volume menor que 15 m3 (30m3 em salas de estar).
– Assegure-se de que a instalação está em conformidade com as
normais locais.
– Não instale o aparelho em uma sala que possa conter gás, óleo ou
súlfur, ou próximo de fontes de calor.
– O aquecedor está equipado com dispositivos de segurança que
agem em caso de avaria quando o aparelho estiver em uso. Se o
piloto (posicionado em frente ao queimador) se apagar
acidentalmente, ou se a sala não estiver suficientemente ventilada,
o dispositivo de segurança bloqueará o fluxo de gás, fazendo com
que o aquecedor se apague.
– NÃO USE em veículos recreativos (roulottes e caravanas).
– Não utilize o aquecedor em alta montanha.
– O aparelho não é destinado ao uso por pessoas (incluindo crianças)
com capacidades psíquicas, sensoriais ou mentais reduzidas, ou
falta de experiência e conhecimento, a menos que tenham
recebido supervisão ou instruções relativas ao uso do aparelho por
uma pessoa responsável pela sua segurança. As crianças devem
ser vigiadas para garantir que elas não brinquem com o aparelho.
– Remova a embalagem e verifique se o aparelho está intacto. Em
caso de dúvida, não use o aparelho e entre em contato com nosso
serviço pós-venda. Não deixe materiais de embalagem como sacos
e grampos ao alcance de crianças.
Este símbolo mostra: AVISO: para evitar o
sobreaquecimento, não cubra o aquecedor com panos.

Português
14 Manual de Instruções
Ventilação
O seu aquecedor consome oxigénio enquanto está em uso. Por esse motivo,
deve-se fornecer ventilação adequada nos locais onde o aquecedor é
utilizado. Isso garante a remoção de produtos de combustão e permite a
entrada de ar de substituição.
Uma ventilação adequada deve reduzir consideravelmente a possibilidade de
ocorrência de condensação. A tabela a seguir mostra os tamanhos mais
pequenos de sala adequados para cada ajuste de calor e a superfície de
ventilação, que deve ser fornecida.
Volume requerido de sala e superfície de ventilação:
VOLUME DA SALA DE ESTAR
SUPERFÍCIE DE VENTILAÇÃP
Nível baixo
Nível alto
84 m3
105cm2
105 cm2
Montagem do aquecedor e ligação da botija de gás
1. Depois de remover o aquecedor da embalagem, verifique se há danos.
Se não tiver certeza, não use o aparelho e entre em contato com pessoal
de serviço qualificado. Os materiais de embalagem não devem ser
deixados ao alcance das crianças porque são potencialmente perigosos;
elimine-os de acordo com a lei.
2. Retire da cabine a capa protetora da botija de gás desenroscando-a.
3. Este dispositivo só deve ser alimentado com gás GPL em botija de 15kg e
este deve estar equipado com um regulador de pressão e um tubo
flexível. O regulador de pressão deve ter uma calibração fixa de 30mbar
de acordo com EN12864 e o tubo de borracha flexível, com um
comprimento de 50 cm (e não superior a 60 cm).
4. A mangueira flexível deve ser uma mangueira aprovada (BS3212 tipo 2 ou
BSEN1763 Classe B) verificada regularmente sempre que a botija seja
substituída para ter certeza de que não possui arranhões ou cortes e está
em perfeito estado. Recomendamos substituir a mangueira de gás a
cada 3 anos.
5. Ligue o tubo flexível à união da mangueira do regulador de pressão e ao
da torneira, verificando se as juntas metálicas estão apertadas e
prestando especial atenção para não manipular ou danificar qualquer
componente ou encaixe.
6. Antes de ligar a botija de gás, certifique-se de que a torneira está
fechada e que não há chamas abertas (forno aceso, etc.) na sala, onde

Português
Manual de Instruções 15
o aquecedor é colocado. Aperte o regulador de pressão na botija, tendo
em mente estes avisos:
a) verifique se a vedação da junta está em boas condições,
b) prenda o regulador na torneira, aparafusando a porca firmemente
no sentido anti-horário,
c) verifique cuidadosamente se não há vazamento de gás, usando
água com sabão. Se houver vazamento, formarão bolhas. Aperte
mais a ligação ou procure um serviço profissionalmente qualificado.
Aviso: não verifique se há vazamentos de gás quando o aparelho
está quente, mas espere até ficar frio.
7. Coloque a botija de gás no compartimento, tendo em atenção que o
tubo não está torcido ou sufocado e não está a tocar partes quentes.
8. Encaixe a tampa de proteção traseira da botija de gás na cabine,
corrige-a com os parafusos fornecidos.
9. O aparelho deve ser instalado com a tampa de proteção da botija de
gás fixada no armário. Use o aquecedor apenas com botijas de 15kg
colocada no compartimento.
10. Para substituir a botija de gás, certifique-se de que a torneira está
fechada e que não há chamas abertas (forno aceso, etc.) ou fontes de
calor no local onde está a trabalhar. Recomendamos que verifique se as
vedações da junta do regulador e do tubo de borracha flexível estão em
boas condições e substituí-las, se necessário.
11. Não mexa nas ligações ou outros componentes.
12. Não vire a botija para baixo para usar completamente o seu conteúdo
pois isso liberta resíduos líquidos deixados no tanque que irão danificar de
forma irreparável o aquecedor.
13. Não desligue o regulador de pressão da botija quando a torneira estiver
aberta.
14. O fabricante não será responsável se um dos pontos acima mencionados
for desconsiderado.
Instalação
1. Use o aquecedor apenas em salas bem arejadas. Na sala onde o
aquecedor é colocado, deve haver tanto ar quanto necessário para a
combustão. A sala deve ter duas brechas de 105cm² para a mudança de
ar.
2. O aquecedor deve ser instalado em uma superfície plana e estável.

Português
16 Manual de Instruções
3. Não instale ou use o aquecedor nos banheiros, nos quartos, em pisos de
porão, nos pisos superiores ou em salas com um volume inferior a 15m3;
em lugares com risco de incêndio (garagem).
4. Não use o aquecedor no quarto enquanto dorme.
5. O aquecedor não deve estar perto de outras fontes de calor (distância
mínima de 1 metro), materiais inflamáveis ou explosivos e não deve ser
direcionado para objetos que possam ser danificados ou incendiados
(não deve ser direcionado para cortinas, poltronas e móveis, por
exemplo).
6. Coloque o aquecedor para que o calor seja direcionado para o centro
da sala e em direção a um espaço aberto; A parte frontal (radiante)
deve ser colocada a pelo menos 2 metros de cortinas, sofás, móveis ou
outros objetos. Os lados e a parte traseira do fogão devem ter um espaço
livre de pelo menos 50 cm.
7. Atenção especial deve ser verificada se o aquecedor estiver em uma sala
onde crianças ou animais possam entrar.
8. Não use o aquecedor na montanha.
9. Use o aquecedor apenas com a botija de gás em seu compartimento.
Use o aquecedor e a botija de gás somente na posição vertical.
10. Use apenas botijas de gás de 15kg. Verifique o gás certo para o seu
aquecedor.
11. Em caso de funcionamento defeituoso ou danos, desligue o aparelho e
deixe-o verificar por pessoal qualificado.
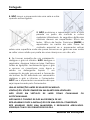
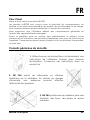
Operações
Botões de controlo e descrição
A – Botão de ignição piezoelectrico B – Botão de controlo
1 – Grelha frontal 2 – Queimadores cerâmicos
3 – Chamada piloto 4 – Rodas
Posição de acendimento Posição Mínima Posição Média Posição Máxima

Português
Manual de Instruções 17
O aquecedor pode ser regulado para três posições de calor: MÍNIMO (1 ),
MÉDIO (2 ) e MÁXIMO (3 ). A ignição é feita através do botão piezoelétrico.
1. Abra a válvula da botija de gás, uma volta e meia.
2. Gire o botão de comando para a posição START, pressione e mantenha-o
assim durante 10 segundos.
3. Enquanto ainda pressiona o botão de controlo (B), prima várias vezes o
botão de ignição (A) até a chama do piloto se ligar na parte inferior do
queimador. Continue a pressionar o botão de comando durante mais 10
a 15 segundos. Se quando largar o botão a chama-piloto desaparecer,
repita a operação.
4. Ao efetuar pela primeira vez a ignição de um aquecedor novo, pode ser
necessário pressionar o botão de comando por um período mais
prolongado, para permitir que o gás chegue ao queimador do piloto.
5. Quando o aquecedor estiver a funcionar na posição MÍNIMA (1 ), espere
cerca de 4 minutos. O elemento de aquecimento começa a ficar
incandescente e torna-se vermelho. Depois, pode rodar o botão de
comando para a posição MÉDIO (2 ) e esperar novamente cerca de 4
minutos nesta posição. Por fim, pode colocar o botão de controlo na
posição MÁXIMO (3 ).
NUNCA COLOQUE O APARELHO DIRECTAMENTE NA POSIÇÃO MÁXIMA
(3 ). COMO RESULTADO, O AQUECEDOR PODE NÃO CONSEGUIR UM
ABASTECIMENTO ADEQUADO DO GÁS E PODE HAVER UMA COMBUSTÃO DE
CHAMA EXCESSIVA.
6. Para desligar o aquecedor, é necessário rodar o botão de controlo de
volta à posição inicial START e fechar completamente a válvula da botija
de gás (no sentido dos ponteiros do relógio); o aquecedor apenas pode
ser desligado quando se fecha completamente a válvula da botija de
gás. Não pode ser desligado apenas no botão de comando.
Dispositivos de segurança (FFD, ODS, Anti Inclinação)
O aquecedor integra diversos dispositivos de segurança que desligarão o
aquecedor em caso de condições de falta de segurança.
1. Em caso de falha acidental de chama, o aquecedor desligar-se-á
automaticamente.
2. O aquecedor desligar-se-á em caso de ventilação insuficiente da divisão
ou se o aquecedor for colocado numa divisão pequena. Antes de ligar
novamente o aquecedor, desligue o aquecedor, ventile bem a divisão e
aguarde 5-10 minutos.
3. Este aquecedor integra um interruptor “anti inclinação” que desliga
automaticamente o queimador em caso de tombo. Assegure-se de que o
aquecedor se encontra na posição vertical.

Português
18 Manual de Instruções
Mudança da botija de gás
• As botijas de gás devem ser mudadas em ambientes isentos de chamas.
• Não fume enquanto muda a botija de gás.
• Feche completamente a válvula ou o regulador da botija de gás (no
sentido dos ponteiros do relógio) e retire a botija de dentro do aquecedor.
• Não tente retirar o regulador enquanto o aquecedor estiver a funcionar.
• Assegure-se de que o aquecedor está completamente apagado.
• Retire o regulador da botija vazia.
• Siga os passos da secção “Montagem do aquecedor e ligações da botija
de gás” para instalar uma botija nova.
Limpeza
A manutenção e limpeza devem ser efetuadas com o fornecimento de gás
desligado e o aquecedor frio. Não tente limpar o aquecedor enquanto este
estiver a funcionar.
• O seu aquecedor deve ser verificado anualmente por um técnico
qualificado para garantir um funcionamento seguro e detetar avarias.
• Se for detetada alguma avaria, pare de usar o aquecedor e contacte o
seu fornecedor ou a assistência técnica.
• Limpe periodicamente o exterior e a parte de trás da botija e a área de
armazenamento do aquecedor para remover o pó, que poderá afetar o
funcionamento do aquecedor.
• Aspire levemente com uma escova macia para remover as partículas de
pó da superfície dos elementos de cerâmica. Não esfregue esses
elementos, pois poderão tornar-se bastante frágeis com o uso.
• Não use produtos abrasivos para limpar o aquecedor.
• Observe a chama-piloto enquanto estiver a funcionar. Deverá queimar
com estabilidade; se oscilar ou ficar amarela na ponta, o aquecedor
deverá ser verificado para voltar a funcionar corretamente.
• Se alguma peça necessitar de ser substituída, deverá ser substituída apenas
por material de origem fornecido pelo fabricante. O uso de peças
incorretas ou uma substituição malfeita podem ser perigosos e irão invalidar
a garantia.
Se o aquecedor não for usado durante algum tempo, por exemplo
durante o Verão, recomendamos que o mantenha-o tapado ou
então o guarde-o na sua caixa original, de maneira a minimizar a
acumulação de pó e sujidade.
A página está carregando...
A página está carregando...
A página está carregando...
A página está carregando...
A página está carregando...
A página está carregando...
A página está carregando...
A página está carregando...
A página está carregando...
A página está carregando...
A página está carregando...
A página está carregando...
A página está carregando...
A página está carregando...
A página está carregando...
A página está carregando...
A página está carregando...
A página está carregando...
A página está carregando...
A página está carregando...
A página está carregando...
A página está carregando...
A página está carregando...
A página está carregando...
A página está carregando...
A página está carregando...
A página está carregando...
A página está carregando...
-
 1
1
-
 2
2
-
 3
3
-
 4
4
-
 5
5
-
 6
6
-
 7
7
-
 8
8
-
 9
9
-
 10
10
-
 11
11
-
 12
12
-
 13
13
-
 14
14
-
 15
15
-
 16
16
-
 17
17
-
 18
18
-
 19
19
-
 20
20
-
 21
21
-
 22
22
-
 23
23
-
 24
24
-
 25
25
-
 26
26
-
 27
27
-
 28
28
-
 29
29
-
 30
30
-
 31
31
-
 32
32
-
 33
33
-
 34
34
-
 35
35
-
 36
36
-
 37
37
-
 38
38
-
 39
39
-
 40
40
-
 41
41
-
 42
42
-
 43
43
-
 44
44
-
 45
45
-
 46
46
-
 47
47
-
 48
48


HAEGER Premium Warm gas stove Manual do usuário
- Categoria
- Aquecedores de ambiente
- Tipo
- Manual do usuário
em outras línguas
Artigos relacionados
Outros documentos
-
Infiniton HG-FL3 Manual do proprietário
-
EAS ELECTRIC EHG43 Manual do usuário
-
Tristar KA-5339 Manual do usuário
-
Tristar KA-5340 Manual do usuário
-
-
QLIMA PGF1211 Manual do usuário
-
-
Create 131199-271795 Manual do usuário
-
Tectro TGH 242 R Gas Room Heater Manual do usuário
-