
User instructions / Instruções de uso
Instrucciones de uso / Mode d’emploi
Οδηγίες χρήστη
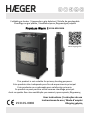
Foldable gas heater / Aquecedor a gás dobrável / Estufa de gas plegable
Chauffage au gaz pliable / Αναδιπλούμενος θερμαντήρας αερίου
Premium Warm II * GH-42B.004A
This product is not suitable for primary heating purposes.
Este produto não é adequado para fins de aquecimento principal.
Este producto no es adecuado para calefacción primaria.
Ce produit ne peut pas être utilisé comme chauffage principal.
Αυτό το προϊόν δεν είναι κατάλληλο για σκοπούς πρωτογενούς θέρμανσης.
2531CS-0008
Download
Multi-language file

A
B
1
2
3
4

1
English
Dear customer
Thank you for having chosen a HÆGER product.
The HÆGER products have been produced to think about the welfare of the consumer
privileging the most raised standards of quality, functionality and assign. We are sure you
will be happy with this appliance.
We assume that the user is familiar with the common procedures of handling household
appliances.
Before using the appliance for the first time please read carefully and thoroughly through
these operating instructions and the safety advice, completely familiarising yourself with
the appliance. Retain these instructions for future reference and pass them on to whoever
might acquire the appliance at a future date.
General Safety Precautions
1. Always use Heater in accordance with user’s instructions
supplied with each heater. Keep these instructions in a safe
place.
2. DO NOT place clothes or other material on the heater. As
apart from danger of fire, their presence could affect the
efficiency of the appliance.
3. DO NOT position Heater close to armchairs,
fabrics, bed linen and other furniture.
4. DO NOT move Heater from room to room when
operating.

2
5. DO NOT position Heater alongside a wall or near
curtains and other flammable materials. The
following minimum distances should be respected:
20cm from sides, 150cm from front. ALWAYS face
Heater towards center of room. Special care should
be taken if the heater is on a surface where it can
twist on its castors if knocked by a child or dog etc.
6. In the event of gas leakage, the heater’s gas
supply needs to be turned off. DO NOT disconnect
the regulator. Extinguish all naked lights. Check all
connections. Slowly turn the gas on and brush the
connections with soapy water or liquid detergents,
a gas leakage point will form bubbles. If a leak is
found, turn the gas off and inform your gas
supplier. DO NOT use the Heater again until it has
been checked and maintained by your dealer.
• READ THE INSTRUCTIONS BEFORE USING THIS APPLIANCE.
• VENTILATION: USE ONLY IN A WELL-VENTILATED ROOM.
• DO NOT USE IN LEISURE VEHICLES SUCH AS CARAVANS OR
AUTOCARAVANS.
• DO NOT CHANGE GAS CYLINDER IN THE PRESENCE OF NAKED LIGHT.
• THIS APPLIANCE REQUIRES INSTALLATION BY A COMPETENT PERSON.
• THIS APPLIANCE REQUIRES AN APPROVED HOSE AND REGUALATOR. CHECK
WITH YOUR GAS SUPPLIER.
• This appliance requires a rubber tube and a pressure regulator in accordance
with current regulations; if they are not supplied as standard, contact your local
gas supplier or your authorized dealer.
• This appliance MUST NOT be used in a basement, high-rise apartments,
bathrooms or bedrooms and in rooms that have a volume of less than 15m3
(30m3 in living rooms).
• Ensure that the installation complies with local regulations.
• Do not install the appliance in a room that may contain gas, oil or sulfur, or
near sources of heat.
• The heater in its possession is equipped with safety devices that act in case of
failure when the appliance is in use. If the pilot (positioned in front of the

3
burner) accidentally extinguishes, or if the room is not sufficiently ventilated,
the safety device will block the flow of gas, causing the heater to shut down.
• DO NOT USE on recreational vehicles (campers and caravans).
• Do not use the heater on a high mountain.
• The appliance is not intended to be used by children under the age of 8. It can
be used by children over the age of 8, as long as they are given continuous
supervision.
• This appliance can be used by children aged 8 and above, and persons with
reduced physical, sensory or mental capabilities or lack of experience and
knowledge, as long as they have been given supervision or instruction
concerning the use of the appliance in a safe way and understand the hazards
involved. Children shall not play with the appliance.
• Supervise young children to make sure that they do not play with the
appliance. Close supervision is necessary when the appliance is being used by
or near children.
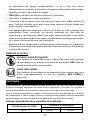
WARNING SYMBOLS
CAUTION: HOT SURFACE! DO NOT TOUCH!
This symbol on the device warns the user that in order to avoid
burning or scalding to the user this part of the heater must NOT be
touched when it is in operation.
WARNING: DO NOT COVER
This symbol on the top part of the heater warns the user that in order
to avoid overheating and a fire hazard, DO NOT COVER the heater.
Ventilation
Your heater consumes oxygen while it is in operation. For that reason, adequate ventilation
should be provided in rooms in which the heater is used. This ensures the removal of
products of combustion and allows the entry of replacement air.
Adequate ventilation should considerably reduce the possibility of condensation
occurring. The following table shows the smallest sizes of room suitable for each heat
setting and the ventilation surface, which should be provided.
Required volume of room and ventilation surface:
VOLUME OF LIVING ROOM
VENTILATION SURFACE
Low Level
High Level
84 m3
105cm2
105 cm2

4
Assembling instructions and connecting the gas cylinder
After removing the heater from its packaging, check it for damage: if you are unsure, do
not use the appliance and contact qualified service personnel. The packing materials
should not be left within the reach of children because they are potentially dangerous;
dispose of them in conformity with the law.
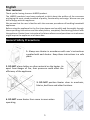
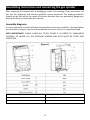
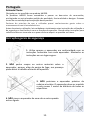
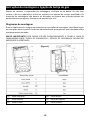
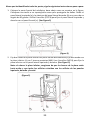
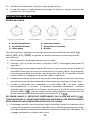
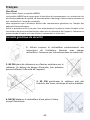
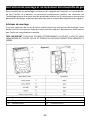
Assembly diagrams
It’s very important to read and follow the assembly instructions carefully. You must follow
the instructions step by step as indicated below to ensure the unit is completely fixed.
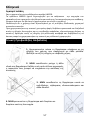
VERY IMPORTANT!! PLEASE CAREFULLY STUDY FIGURE 1 IN ORDER TO FAMILIARISE
YOURSELF TO WHERE ALL THE SECURING SCREWS AND NUTS MUST BE FITTED AND
TIGHTENED.
(a) Left side panel
(b) Right side panel
(c) Bottom plate
(d) Top panel
(e) Front panel
(f) Back panel
(Figure 1)

5
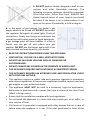
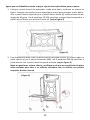
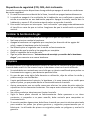
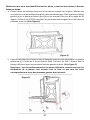
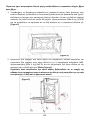
Now that you have identified all the parts, follow the below instructions step by step:
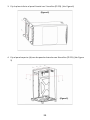
1. Lay the heater upside down on the front as shown. Put on a towel or soft mat/cloth
to protect from damage. Fold the (a) left side panel and (b) right side panel opening
very close to 90-degree angle. Use 6pcs screw (ST4*8) to fix the left and right-side
panel with (e) front panel. (See Figure 2)
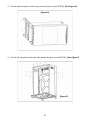
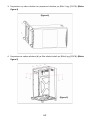
2. Fix two wheels to the bottom of front panel directly and fix two wheels with the (c)
bottom plate by 2 provided nuts (M8). Use 4pcs screw (M5*8) to fix the bottom plate
with left and right-side panel. (See Figure 3)
Note: when positioning the bottom plate, make sure that the recesses on the plate
are facing upwards and the holes matches the holes on the left, right and front
panels.
(Figure 2)
(Figure 3)

6
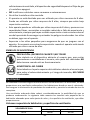
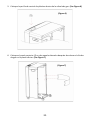
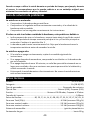
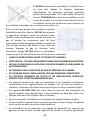
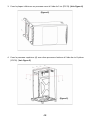
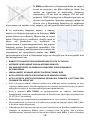
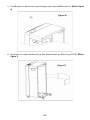
3. Fix the bottom plate to the front panel by 2pcs screw (ST4*8). (See Figure 4)
4. Fix the (d) top panel with two side panels by 8pcs screw (ST4*8). (See Figure 5)
(Figure 4)
(Figure 5)

7
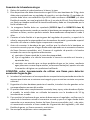
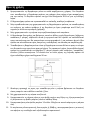
5. Put the plastic control knob inside the gas valve. (See Figure 6)
6. Put the (f) back panel on two side panels after you place gas cylinder on the bottom
plate. (See Figure 7)
(Figure 6)
(Figure 7)

8
Connecting gas cylinder
1. Remove from the cabinet the cover on the gas cylinder, and unscrew.
2. This device must only be powered with LPG gas in a 15-kg cylinder and this must be
equipped with a pressure regulator and flexible tube. The pressure regulator must
have a fixed calibration of 30 mbar conforming to EN12864 and the flexible rubber
tube, with a length of 50 cm (and not longer than 60 cm); the latter must be attached
with metal bands of suitable size and needs to be replaced by the date stamped on
it.
3. The flexible hose must be an approved hose (BS3212 type 2 or BSEN1763 Class B)
checked regularly whenever the cylinder is replaced to be sure it has no scratches or
cuts and it is in a perfect state. We recommend replacing the gas hose every 3 years.
4. Connect the flexible tube to the hose union of the pressure regulator and to that of
the tap, checking that the metal bands are tight and paying particular attention not
to tamper with or damage any component or fitting.
5. Before connecting the cylinder, make sure that its tap is closed and that there are no
open flames (lit oven, etc.) in the room, where the stove is placed. Screw the pressure
regulator onto the cylinder, keeping these warnings in mind:
a) check that the gasket seal is in good condition,
b) attach the regulator to the tap, screwing the nut tightly counterclockwise,
c) carefully check that there is no gas leaking from the connection, using soapy
water: if there is a leak, bubbles will form; tighten the connection more or seek
professionally qualified service.
Warning: do not check for gas leaks when the appliance is hot but wait
until it is cold.
6. Place the cylinder in its compartment, taking care that the tube is not twisted or
choked and isn't touching hot parts.
7. Hook the rear cylinder cover on the cabinet, fixes it with the screws supplied.
8. The appliance has to be installed with the cover of the gas cylinder fixed to the
cabinet. Use the stove only with a 15kg cylinder placed in its compartment.
9. To replace the cylinder, make sure that its tap is closed and that there are no open
flames (lit oven, etc.) or sources of heat in the place where you are working; we
recommend that you check that the gasket seals of the regulator and flexible rubber
tube are in good condition and replace them, if necessary.
10. Do not mishandle the connections or other components.
11. Do not turn the cylinder upside down to completely use its contents: this releases
liquid residues left in the tank that will irreparably damage the heater.
12. Do not disconnect the pressure regulator from the cylinder when the cylinder tap is
open.
13. The manufacturer will not be responsible if one of the above points is disregarded.

9
Before use
1. Use the heater only in well-aired rooms. In the room where the heater is placed there
must be as much air as it is necessary for the combustion. The room must have two
breaches of 105cm² for the air change.
2. The heater must be installed on a flat, stable surface.
3. Do not install or use the heater in bathrooms; in bedrooms; in basement floors, in
upper floors or in rooms with a volume less than 15m3; in places with the risk of fire
(garage).
4. Do not use the stove in bedroom while sleeping.
5. The heater must not be close to other sources of heat (minimum distance 1 meter),
inflammable materials or explosives and must not be directed towards objects which
could be damaged or catch fire (it must not be directed towards curtains, armchairs
and furniture, for example).
6. Place the heater so that the heat is directed towards the centre of the room and
towards an open space; the frontal part (radiating) must be placed at least 2 meters
away from curtains, couches, furniture or other objects. The sides and the rear part
of the stove must have a free space of at least 50cm.
7. Special attention as to be attached if the stove is in a room where children or animals
can enter.
8. Do not use the stove on the mountain.
9. Use the stove only with the gas cylinder in its compartment. Use the stove and the
gas cylinder only in vertical position.
10. Use only 15kg gas cylinder. Check the right gas for your stove.
11. In case of defective functioning or damage, switch the appliance off and let it check
by qualified personnel.

10
Instructions for use
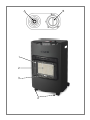
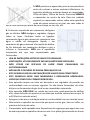
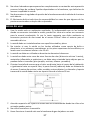
Control Buttons
A – Piezoelectric button B – Control button
1 – The front grill 2 – Ceramic burner
3 – Pilot flame 4 – Castors
The heater can be regulated to three different heat settings: LOW (1 ), MEDIUM (2 ) and
HIGH (3 ). The ignition is operated by piezo electric push button.
1. Open the valve on the gas cylinder one turn and half.
2. Turn the control knob to START position, press down and hold it for 10 seconds.
3. Whilst still pressing down the control knob, press several times on the ignition button
until the pilot flame ignited at the bottom of the burner. Continue to hold the control
knob down for another 15-20 seconds. When releasing the button and if the pilot
flame goes out, repeat the operation.
4. When first igniting a new heater, it may be necessary to hold the control knob down
for a longer time in order to allow gas to flow to the pilot burner.
5. When the heater is burning at the LOW (1 ) stage, please wait for around 4 minutes.
The heating element will start glowing and will become red. After that you can turn
the control knob to the MEDIUM (2 ) position, again wait around 4 minutes in this
position. Finally, you can turn the control knob to the HIGH (3 ) position.
NEVER PUT THE APPLIANCE DIRECTLY ON THE HIGH (3 ) POSITION. AS A RESULT OF
THIS THE HEATER MIGHT NOT BE ABLE TO DIGEST THE GAS IN A PROPER WAY AND
THERE MIGHT BE EXCESSIVE FLAMING COMBUSTION.
6. In order to shut off the heater, you need to turn back the control knob to the start
position and close the cylinder valve fully (in clockwise). The heater can only be shut
off by closing the gas cylinder valve fully. It cannot be turned off by the control knob.
Safety devices (FFD, ODS, Anti-Tilting)
The heater incorporates several safety devices that will shut down the heater in unsafe
conditions.
1. In case of accidental flame failure, the heater will shut down automatically.
Lighting Position Minimum Position Medium Position Maximum Position

11
2. The heater will shut down if the ventilation in the room is not sufficient or when the
heater is placed in a small room. Turn off the heater, ventilate the room well, and
wait 5-10 minutes before re-lighting the heater.
3. This heater incorporates an “anti-tilt” switch that automatically shuts off the burner
in the event of tipping. Ensure the heater is in the vertical position.
Changing the gas cylinder
• Gas cylinders must be replaced in a flame free environment.
• Do not smoke while changing the gas cylinder.
• Turn off the gas cylinder valve or regulator fully (clockwise) and take the empty
cylinder out of the heater.
• Do not attempt to remove the regulator while the heater is still running.
• Make sure that the heater is extinguished completely.
• Remove the regulator from the empty cylinder.
• Following the steps described under “Assembling instructions and connecting the
gas cylinder” for connecting a new cylinder.
Cleaning
• Maintenance and cleaning must be carried out with the gas supply turned off and the
heater must be cold. Do not attempt to clean the heater while it is in use.
• Your heater should be checked annually by a qualified person for safe operation and
to detect any faults.
• Stop using the heater and contact your dealer for advice if any faults are detected in
use.
• Periodically clean the exterior and rear cylinder, storage area of your heater to
remove dust, which may affect the operation of the heater.
• Light vacuuming with a soft brush will remove any dust build-up on the surfaces of
the ceramic elements. Do not scrape these elements as they may become very fragile
with use.
• Do not use abrasive products to clean the heater.
• Watch the pilot flame while it is in operation. It should burn steadily, if it flickers or
is yellow tipped, the heater should be checked for correct operation.
• If any parts need replacement, they must be replaced only with genuine original parts
supplied by the manufacturer. The use of incorrect or substitute the parts may be
dangerous and will void any warranty.
When the heater is not in use for a period of time, for instance, over the summer, we
recommend that it be kept covered or replaced in its carton to minimize the
accumulation of dust and dirt that may occur.

12
Troubleshooting guide
The heater doesn’t light:
• Check the gas cylinder if it is full
• Check the regulator if it is properly attached and the cylinder valve is turned on.
• Check if the instructions have been followed correctly.
The heat doesn’t light after the cylinder has been changed it could be due to:
• There is some air present in the cylinder, hold the control knob down for a longer
period of time until the pilot and main burner light. Switch to the 3 High setting.
• The cylinder may have been excessively cold. Allow the cylinder to reach room
temperature before attempting to start the heater.
The heater turns off by itself:
• If the heater goes out on continuous working, repeat the operation, following the
instruction.
• If it goes out soon after lighting, check for drafts or for the gas cylinder running out
of gas.
• If it goes out after 30 minutes or so, it is signaling that it is operating in a badly
ventilated area. Open a window or door to ventilate the area and reignite.
• Avoid bumping the heater in operation. Don’t move the heater while in operation.
Technical Data
Model: ..............................................................................................................GH-42B.004A
Category: ........................................................................................................ I3+ (28-30/37)
Burner type: ................................................................................................. Ceramic burner
Gas Type: ................................................................................. Butane (G30), Propane (G31)
Pressure: ............................................................ Butane at 28-20mbar, Propane at 37mbar
Injector size: ............................................................................................................. 0,59mm
Countries of Destination: ............ BE, FR, IT, LU, LV, IE, GB, GR, PT, ES, CY, CZ, LT, SK, CH, SI
Total heat input (ΣQn): ......................................................... 4.2 kW (consumption 305 g/h)
Nominal medium heat input: ............................................... 2.9 kW (consumption 210 g/h)
Nominal minimum heat input: ............................................. 1.5 kW (consumption 109 g/h)
Ignition system: ................................................................................................ Piezo ignition
Gas container: ...................................................................................................... up to 15kg
P.I.N Code: ....................................................................................................... 2531CS-0008
Dimensions: .......................................................................................... 420 x 290 x 720 mm
Net / Gross Weight: ........................................................................................... 7.8 kg / 9 kg

13
Conformity CE
This device complies with the essential requirements of the Gas
Appliances Regulation (EU) 2016/426 (GAR) for appliances burning
gaseous fuels and EN 449:2002 +A1:2007
Disposal – Environment policy
Packing
The packaging material is entirely recyclable and marked with the recycling
symbol. Follow local regulations for scrapping. Keep the packaging materials
(plastic bags, polystyrene parts, etc.) out of reach of children, as they are
potentially dangerous.
Disposal
This appliance is marked according to the European directive 2012/19/EU on Waste
Electrical and Electronic Equipment (WEEE).
By ensuring this product is disposed of correctly, you will help prevent potential negative
consequences for the environment and human health, which could otherwise be caused
by inappropriate waste handling of this product.
This symbol on the product, or on the documents accompanying the product,
indicates that this appliance may not be treated as household waste. Instead, it
shall be handed over to the applicable collection point for the recycling of
electrical and electronic equipment.
Disposal must be carried out in accordance with local environmental regulations for waste
disposal. For more detailed information about treatment, recovery and recycling of this
product, please contact your local city office, your household waste disposal service or the
shop where you purchased the product.
2531CS-0008

14
Warranty
Warranty Terms and Conditions
1. The product is guaranteed for the period stipulated by the legislation where it is placed on the market,
starting from the date of purchase, against manufacturing defects and/or workmanship. The lack of
conformity manifested in this period is presumed to exist at the date of purchase. After this period, it is for
the customer to prove that the lack of conformity already existed at the time of delivery.
2. If, during the warranty period, the product is defective in normal use, the buyer should contact the selling
establishment and send the appliance to the place indicated by the seller.
3. The warranty is only valid upon presentation of the invoice proving the purchase and the completed
warranty certificate (indicating the date of purchase, the name of the dealer, the reference of the model,
and it is also recommended to indicate the serial number and lot number).
4. The importer/seller reserves the right to refuse warranty assistance in the event that such information has
been deleted or altered after the original purchase of the product.
5. The responsibility of the importer/seller includes in particular the costs of repairing and/or replacing the unit
covered by the warranty with the reservation of the right to replace it with an equivalent product, in cases
where it is not possible to repair it.
6. The warranty does not apply to problems that are not directly related to defects in material, design or
workmanship.
7. This product is an appliance and is intended for home use only. The warranty will be void if the product is
used for professional purposes.
8. The warranty does not cover damage caused by misuse, improper installation, spillage, external factors, or
intentional damage.
9. The warranty does not cover damage resulting from falls, use of excessive force, blows, exposure to extreme
environmental conditions or deterioration caused by the normal use of plastic parts or keyboards, as well as
the use of batteries other than those specified in this manual.
10. The warranty does not cover installation and programming by the dealer. In particular, no claim for
installation and free programming by the reseller may be accepted.
11. The warranty does not cover deficiencies that insignificantly impair the operation of the appliance. Other
costs, such as installation, transportation and travel of the technician are expressly excluded from the
warranty.
12. The applicability of the warranty presupposes that the appliance is sent to the seller or place indicated by
him, complete and in well-protected packaging (if possible, in its original packaging) and accompanied by its
sheet or warranty card duly filled out and proof of purchase.
13. If after verification, it is found that there are no reasons for the claim, or that the product is not defective,
the inherent costs will be imputed to the customer, and the dealer is authorized to charge those costs to the
customer.
14. The warranty will be void when it shows signs that an unauthorized person has attempted to carry out repairs,
modifications or replacement of parts on the appliance.
15. Repairs carried out after the end of the warranty period are subject to costs.
16. This warranty does not affect your legal rights that you may have as a consumer under applicable national
law governing the purchase of products where the product is sold.
17. Warranty Period:
European Union countries - European Directives (EU) 2019/771 and (EU) 2019/770 apply on certain aspects
of contracts for the purchase and sale of movable property and transposed into the national laws of their
countries.
Other countries - national legislation on consumer rights in their country applies. In the case of no official
legislation, the guarantee shall be applied at the discretion of the importer placing the product on the market
or the seller establishment.

15
Português
Estimado Cliente
Obrigado por ter escolhido um produto HÆGER.
Os produtos HÆGER foram concebidos a pensar no bem-estar do consumidor,
privilegiando os mais elevados padrões de qualidade, funcionalidade e designe. Estamos
certos da sua satisfação pela aquisição deste produto.
Partimos do princípio de que o utilizador possui conhecimentos gerais sobre o
manuseamento com eletrodomésticos.
Antes da primeira utilização, leia cuidadosa e totalmente estas instruções de utilização e
de segurança e familiarize-se com as funções do aparelho. Guarde estas instruções para
referência futura e transmita-as a quem venha a adquirir o aparelho no futuro.
Instruções gerais de segurança
1. Utilize sempre o aquecedor em conformidade com as
instruções fornecidas com cada aquecedor. Mantenha as
instruções em um lugar seguro.
2. NÃO ponha roupas ou outros materiais sobre o
aquecedor, porque, além do perigo de fogo, sua presença
pode afetar o trabalho eficiente do aparelho.
3. NÃO posicione o aquecedor próximo de
cadeiras e tecidos. O aquecedor deve ser mantido
a pelo menos 1 metro de distância de todas as
superfícies.
4. NÃO mova o aquecedor de uma sala a outra quando
estiver ligado.

16
5. NÃO posicione o aquecedor junto a uma parede ou
perto de cortinas e outros materiais inflamáveis. As
seguintes distâncias mínimas devem ser respeitadas:
20cm de lados, 150cm da frente. Posicione SEMPRE
o aquecedor no centro da sala. Deve ter cuidado
especial se o aquecedor estiver sobre uma superfície
onde ele possa mover-se ou girar nas suas rodas se
sofrer uma colisão por parte de uma criança ou um cão, etc.
6. Se houver suspeita de um vazamento, desligue o
gás no cilindro. NÃO desligue o regulador. Apague
todas as luzes. Verifique todas as ligações.
Lentamente ligue o gás e escove os conectores com
água e sabão ou detergente líquido – um
vazamento de gás provocará a formação de bolhas.
Se for detetado um vazamento desligue o gás e
informe o Fornecedor. NÃO use o aquecedor
novamente até que seja inspecionado pelo
Fornecedor.
• LEIA AS INSTRUÇÕES ANTES DE USAR ESTE APARELHO.
• VENTILAÇÃO: UTILIZE SOMENTE EM UM QUARTO BEM VENTILADO.
• NÃO UTILIZE EM VEÍCULOS DE LAZER COMO CARAVANAS OU
AUTOCARAVANAS.
• NÃO MUDE O CILINDRO DE GÁS NA PRESENÇA DE LUZ.
• ESTE APARELHO EXIGE A INSTALAÇÃO POR UMA PESSOA COMPETENTE.
• ESTE APARELHO EXIGE UMA MANGUEIRA E REGULADOR APROVADOS.
VERIFIQUE COM O SEU FORNECEDOR DE GÁS.
• Este aparelho requer um tubo em borracha e um regulador de pressão em
conformidade com as normas vigentes. Se não forem fornecidos de série,
dirija-se ao fornecedor de gás local ou ao revendedor autorizado.
• Este aparelho NÃO DEVE ser usado em uma cave, apartamentos de edifício
alto, casas de banho ou quartos e nas salas que tenham volume menor que 15
m3 (30m3 em salas de estar).
• Assegure-se de que a instalação está em conformidade com as normais locais.
• Não instale o aparelho em uma sala que possa conter gás, óleo ou súlfur, ou
próximo de fontes de calor.
• O aquecedor está equipado com dispositivos de segurança que agem em caso
de avaria quando o aparelho estiver em uso. Se o piloto (posicionado em frente

17
ao queimador) se apagar acidentalmente, ou se a sala não estiver
suficientemente ventilada, o dispositivo de segurança bloqueará o fluxo de gás,
fazendo com que o aquecedor se apague.
• NÃO USE em veículos recreativos (roulottes e caravanas).
• Não utilize o aquecedor em alta montanha.
• O aparelho não se destina a ser utilizado por crianças com idade inferior a 8
anos. Pode ser utilizado por crianças com idade superior a 8 anos, desde que
sejam vigiadas continuamente.
• Este aparelho pode ser usado por crianças com 8 anos ou mais e pessoas com
capacidades físicas, sensoriais ou mentais reduzidas ou com falta de
experiência e conhecimento, desde que sejam supervisionadas ou instruídas
sobre o uso do aparelho de forma segura e compreender os perigos envolvidos.
As crianças não devem brincar com o aparelho.
• Supervisione as crianças para se certificar de que não brincam com o aparelho.
É necessária uma supervisão atenta quando o aparelho está a ser utilizado por
ou perto de crianças.
SÍMBOLOS DE ALERTA
CUIDADO: SUPERFÍCIE QUENTE!
Este símbolo no dispositivo avisa o usuário que, para evitar queimas
ou queimaduras no próprio, esta parte do aquecedor NÃO deve ser
tocada quando estiver em operação.
AVISO: NÃO COBRIR
Este símbolo na parte superior do aquecedor avisa o usuário que, para
evitar superaquecimento e risco de incêndio, NÃO CUBRA o
aquecedor.
Ventilação
O seu aquecedor consome oxigénio enquanto está em uso. Por esse motivo, deve-se
fornecer ventilação adequada nos locais onde o aquecedor é utilizado. Isso garante a
remoção de produtos de combustão e permite a entrada de ar de substituição.
Uma ventilação adequada deve reduzir consideravelmente a possibilidade de ocorrência
de condensação. A tabela a seguir mostra os tamanhos mais pequenos de sala adequados
para cada ajuste de calor e a superfície de ventilação, que deve ser fornecida.
Volume requerido de sala e superfície de ventilação:
VOLUME DA SALA DE ESTAR
SUPERFÍCIE DE VENTILAÇÃP
Nível baixo
Nível alto
84 m3
105cm2
105 cm2

18
Instruções de montagem e ligação da botija de gás
Depois de remover o aquecedor da embalagem, verifique se há danos. Se não tiver
certeza, não use o aparelho e entre em contato com pessoal de serviço qualificado. Os
materiais de embalagem não devem ser deixados ao alcance das crianças porque são
potencialmente perigosos; elimine-os de acordo com a lei.
Diagramas de montagem
É muito importante ler e seguir atentamente as instruções de montagem. Você deve seguir
as instruções passo a passo, conforme indicado abaixo, para garantir que a unidade esteja
completamente montada.
MUITO IMPORTANTE!! POR FAVOR, ESTUDE CUIDADOSAMENTE A FIGURA 1 PARA SE
FAMILIARIZAR ONDE TODOS OS PARAFUSOS E PORCAS DE SEGURANÇA DEVEM SER
MONTADOS E APERTADOS.
(a) Painel esquerdo
(b) Painel direito
(c) Painel inferior
(d) Painel de superior
(e) Painel frontal
(f) Painel traseiro
(Figura 1)
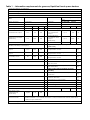
Nome das peças
Quantidade
A página está carregando...
A página está carregando...
A página está carregando...
A página está carregando...
A página está carregando...
A página está carregando...
A página está carregando...
A página está carregando...
A página está carregando...
A página está carregando...
A página está carregando...
A página está carregando...
A página está carregando...
A página está carregando...
A página está carregando...
A página está carregando...
A página está carregando...
A página está carregando...
A página está carregando...
A página está carregando...
A página está carregando...
A página está carregando...
A página está carregando...
A página está carregando...
A página está carregando...
A página está carregando...
A página está carregando...
A página está carregando...
A página está carregando...
A página está carregando...
A página está carregando...
A página está carregando...
A página está carregando...
A página está carregando...
A página está carregando...
A página está carregando...
A página está carregando...
A página está carregando...
A página está carregando...
A página está carregando...
A página está carregando...
A página está carregando...
A página está carregando...
A página está carregando...
A página está carregando...
A página está carregando...
A página está carregando...
A página está carregando...
A página está carregando...
A página está carregando...
A página está carregando...
A página está carregando...
A página está carregando...
A página está carregando...
A página está carregando...
A página está carregando...
-
 1
1
-
 2
2
-
 3
3
-
 4
4
-
 5
5
-
 6
6
-
 7
7
-
 8
8
-
 9
9
-
 10
10
-
 11
11
-
 12
12
-
 13
13
-
 14
14
-
 15
15
-
 16
16
-
 17
17
-
 18
18
-
 19
19
-
 20
20
-
 21
21
-
 22
22
-
 23
23
-
 24
24
-
 25
25
-
 26
26
-
 27
27
-
 28
28
-
 29
29
-
 30
30
-
 31
31
-
 32
32
-
 33
33
-
 34
34
-
 35
35
-
 36
36
-
 37
37
-
 38
38
-
 39
39
-
 40
40
-
 41
41
-
 42
42
-
 43
43
-
 44
44
-
 45
45
-
 46
46
-
 47
47
-
 48
48
-
 49
49
-
 50
50
-
 51
51
-
 52
52
-
 53
53
-
 54
54
-
 55
55
-
 56
56
-
 57
57
-
 58
58
-
 59
59
-
 60
60
-
 61
61
-
 62
62
-
 63
63
-
 64
64
-
 65
65
-
 66
66
-
 67
67
-
 68
68
-
 69
69
-
 70
70
-
 71
71
-
 72
72
-
 73
73
-
 74
74
-
 75
75
-
 76
76


em outras línguas
- español: HAEGER GH-42B.004A Manual de usuario
- français: HAEGER GH-42B.004A Manuel utilisateur
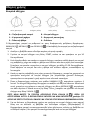
Artigos relacionados
Outros documentos
-
Infiniton HG-FL3 Manual do proprietário
-
EAS ELECTRIC EHG43 Manual do usuário
-
Tristar KA-5339 Manual do usuário
-
Tristar KA-5340 Manual do usuário
-
QLIMA PGC3009 Manual do usuário
-
-
Perel FT15C/FR Manual do usuário
-
Perel FT5130 Manual do usuário
-
Desa 125-R Manual do usuário
-
Stanley ST-150V-GFA-E Manual do proprietário