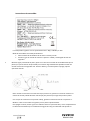
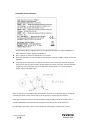
Infiniton HG-FL3 Manual do proprietário
- Categoria
- Aquecedores de ambiente
- Tipo
- Manual do proprietário

MANUAL DE USUARIO
USER'S MANUAL
MANUAL DE USUÁRIO
HG-FL3
ean: 8445639002087
Conserve el manual para futuras consultas.
Este producto no es adecuado para calentar la casa.
Please keep the manual for future reference.
This product is not suitable for primary heating purposes.
Favor guardar o manual para referência futura.
Este produto não é adequado para fins de aquecimento primário.
ESTUFA DE GAS
Gas heater
Aquecedor a gás

INSTRUCCIONES DE INSTALACIÓN
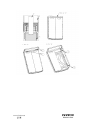
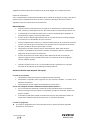
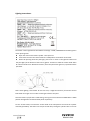
LISTA DE EQUIPAMIENTO DE LAS PIEZAS DE REPUESTO DENTRO DE LA CAJA:
A. El panel frontal incluye el quemador
B. Panel izquierdo
C. Panel derecho
D. Panel superior
E. Panel inferior
F. Panel trasero
G. 4 ruedas
H. 11 piezas de tornillos M4*8
I. 4 tornillos M5*8
J. Llave inglesa
K. Paquete de accesorios: incluye G,H,I,J
OBSERVACIÓN:
NO.1 a NO.11: utilizar tornillo M4*8
NO. 12 a NO.15: usar tornillo M5*8


Instrucciones de encendido:
La estufa puede regularse en tres ajustes diferentes: 1-Bajo, 2-Medio y 3-Alto.
Modo de encendido: encendido piezoeléctrico.
•Abra la válvula de la bombona de la estufa 1 vuelta y media.
•Presione y gire el mando de control a la posición 1-LOW y manténgalo durante 10
segundos.
•Mientras sigue presionando el piloto, pulse una o dos veces el botón de encendido hasta que el
piloto (en la parte inferior del quemador) se encienda. Siga manteniendo pulsado el botón de
control durante 10-15 segundos más. Suelte el botón y, si la llama piloto se apaga, repita la
operación anterior.
Nota: cuando se enciende una estufa nueva por primera vez, puede ser necesario mantener el
mando de control pulsado durante más tiempo para permitir que el gas fluya hacia el piloto
Una vez que la estufa esté en la posición 1-Bajo, girando el mando de control a la posición 2-
Medio o 3-Alto se encenderá el segundo y tercer panel respectivamente.
Para apagar la estufa, vuelva a girar el mando de control a la posición OFF y cierre completamente
la válvula de la bombona (en el sentido de las agujas del reloj). El calentador sólo puede ser

apagado cerrando la válvula de la bombona. No se puede apagar con el mando de control.
Cambio de la bombona:
Cierre completamente la válvula de la bombona (en el sentido de las agujas del reloj) y deje que la
estufa se enfríe completamente antes de retirar y cambiar la bombona. No intente retirar el
regulador mientras la estufa esté en funcionamiento.
Mantenimiento:
•Antes de realizar el mantenimiento y la limpieza, el suministro de la estufa de gas debe
estar cerrado y la estufa debe estar fría. No intente limpiar la estufa mientras esté en uso.
•La estufa debe ser revisada anualmente por un técnico cualificado para comprobar su
funcionamiento seguro y detectar posibles fallos.
•En caso de que se detecte algún fallo durante su uso, deje de utilizar la estufa y póngase
en contacto con su distribuidor para que le asesore.
•Limpie periódicamente el exterior y la zona de almacenamiento de su estufa para eliminar
el polvo y las pelusas que se acumulan en las superficies de los componentes cerámicos.
•No utilice productos abrasivos para limpiar la estufa.
•Compruebe la luz piloto mientras está en funcionamiento. Debe arder de forma
constante. Si parpadea o hay una llama amarilla, el calentador debe ser revisado para
asegurarse de que funciona correctamente.
•En caso de que haya que sustituir alguna pieza, debe hacerlo sólo con piezas del
fabricante original. El uso de piezas incorrectas o de repuestos puede ser peligroso y
anulará cualquier garantía.
•Cuando la estufa no esté en uso, se recomienda cubrirla o guardarla en su caja para
minimizar la acumulación de suciedad que pueda producirse.
Asistencia técnica antes de pedir más ayuda
La estufa no se enciende:
•Compruebe la bombona de gas para asegurarse de que está llena.
•Compruebe el regulador para asegurarse de que está bien colocado y la válvula de la
bombona está abierta.
•Compruebe que se han seguido correctamente las instrucciones.
Si esto ocurre después de haber cambiado la bombona podría deberse a:
•Aire en la bombona. Mantenga el mando de control pulsado durante un periodo de
tiempo más largo hasta que el piloto y el quemador principal se enciendan. Cambie a la
posición 3-HIGH.
•La bombona puede haber estado excesivamente fría. Deje que la bombona alcance la
temperatura ambiente antes de intentar poner en marcha el calentador.
La estufa se apaga sola:
Si la estufa se apaga durante su funcionamiento normal, repita la operación siguiendo
fielmente las instrucciones.

Si se apaga pronto, después de unos 30 minutos, significa que está funcionando en una zona
mal ventilada. Abra una ventana o una puerta para ventilar la zona y vuelva a encenderla.
Evite golpear la estufa durante su funcionamiento. No mueva la estufa mientras esté en
funcionamiento. El interruptor antivuelco puede activarse y apagar el calefactor.
Consejos importantes
Lea atentamente las instrucciones de este manual. Incluye información importante tanto para el
funcionamiento del aparato como para su seguridad.
•No utilice productos defectuosos.
•El mantenimiento y las reparaciones deben ser realizados únicamente por un técnico
cualificado.
•Su estufa debe ser revisada anualmente por un técnico cualificado para comprobar su
funcionamiento seguro y detectar posibles fallos.
•Conserve estas instrucciones para futuras consultas. Si es necesario, puede solicitar un
nuevo ejemplar a su distribuidor.
Información de seguridad
La cubierta de protección de este producto es para evitar el riesgo de incendio o lesiones
por quemaduras y no debe quitarse ninguna parte de la misma de forma permanente.
NO OFRECE UNA PROTECCIÓN TOTAL PARA LOS NIÑOS PEQUEÑOS O LAS PERSONAS CON
PROBLEMAS DE SALUD.
Este es un calefactor sin llama. Asegúrese de que la habitación esté ventilada mientras la
estufa. No lo haga funcionar en un dormitorio, caravana, barco o cualquier habitación
con una temperatura inferior a 80cum.
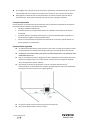
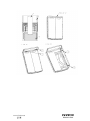
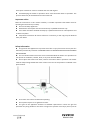
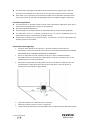
No coloque la estufa cerca de paredes, cortinas o muebles mientras esté en
funcionamiento. La estufa debe estar siempre orientada hacia el centro de la habitación.
La posición correcta se indica en la imagen siguiente:
La estufa no debe moverse mientras esté en funcionamiento.
No coloque objetos sobre o contra la estufa.

La rejilla de este producto cumple con los requisitos de la norma. No ofrece una
protección total para los niños pequeños o personas enfermas. La rejilla es para prevenir
el riesgo de lesiones y ninguna parte de ella debe ser retirada o alterada.
Es necesario comprobar la estanqueidad de este producto antes de utilizarlo por primera
vez y siempre que se vuelva a conectar la bombona después de haberla llenado. NO
UTILICE NUNCA UNA LLAMA VIVA PARA COMPROBAR POSIBLES FUGAS.
Cierre siempre la válvula de la bombona de gas cuando no utilice la estufa.
Instalación
Su estufa es una forma segura y eficiente de calefacción cuando se utiliza exactamente de
acuerdo con estas instrucciones.
Lea y comprenda completamente estas instrucciones antes de utilizar su estufa. Si no
comprende las instrucciones, póngase en contacto con su distribuidor para que le asesore
antes de utilizar la estufa.
Se debe adquirir una bombona de gas adecuada para esta estufa. Es necesario purgar la
bombona la primera vez para asegurar el correcto funcionamiento de la estufa. Esto debe ser
realizado directamente por el distribuidor de gas. Una estación de servicio autorizada deberá
comprobar el funcionamiento seguro de la bombona cada vez que se llene.
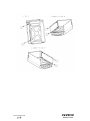
Ajuste de la estufa de gas
1. Una vez que la estufa ha sido sacada de su embalaje, retire el panel trasero del interior de la
cavidad trasera.
2. Coloque la bombona de gas llena en la parte trasera del calefactor con la salida de la válvula
hacia el exterior.
3. Enrosque el regulador correcto en la salida de la válvula de la bombona de gas en el sentido
de las agujas del reloj. Gire sólo con la mano. No utilice una llave inglesa. Atornille hasta que la
tuerca esté completamente en su sitio.
4. IMPORTANTE: Realice una prueba de estanqueidad:
Esta prueba debe realizarse en un área bien ventilada, sin llamas abiertas ni otras fuentes de
ignición. Con el regulador conectado a la bombona, abra la válvula de la bombona de gas una
vuelta y media en sentido antihorario.
Cepille todas las conexiones de las mangueras, las conexiones de las tuberías a la válvula de
gas, la conexión del regulador a la bombona y la válvula de la bombona de gas con una
solución de 50: 50 de detergente y agua. La formación de un chorro de burbujas es una
indicación de que hay una fuga. Si se encuentra una fuga, cierre la válvula de la bombona (en
el sentido de las agujas del reloj), desconecte el regulador de la bombona de gas y retire la
bombona de gas a un lugar fresco y bien ventilado. Póngase en contacto con su distribuidor o
proveedor de gas para obtener ayuda
NO UTILICE LA ESTUFA SI SE ENCUENTRA UNA FUGA.
NO UTILICE UNA LLAMA DESNUDA PARA COMPROBAR LAS FUGAS.
NO UTILICE NINGÚN EQUIPO ELÉCTRICO EN PRESENCIA DE UNA FUGA DE GAS.
5. Una vez realizada la prueba de estanqueidad de forma satisfactoria, coloque el panel
trasero en la estufa. Puede ser necesario girar ligeramente la bombona para permitir que el
regulador y la manguera encajen dentro del panel trasero sin que se doble la manguera.

Nota: La estufa incorpora varios dispositivos de seguridad que apagarán la estufa en
situaciones poco seguras. En caso de fallo accidental de la llama, el calentador de gas se
apagará automáticamente. Estos dispositivos apagarán la estufa si se vuelca, si esto se activa,
ponga la estufa en posición vertical, compruebe si hay daños evidentes y vuelva a esperar 5-10
minutos antes de intentar encender la estufa. Este dispositivo también puede funcionar si el
calefactor se golpea contra él o si se le da un golpe.

PROCEDIMIENTO EN CASO DE AVERÍA DE UN PRODUCTO INFINITON
Estimados clientes, para solicitar la asistencia técnica o reparación de su producto Infiniton,
disponen de nuestra página web, funcionando las 24 horas al día y 7 días a la semana:
Alternativamente, si lo desean, pueden solicitar la asistencia técnica vía correo electrónico:
Para agilizar todos los trámites, siempre se deben de indicar los siguientes datos:
•Nombre y apellidos
•Teléfono 1
•Teléfono 2
•Dirección completa
•Código postal
•Población
•Marca
•Modelo del producto
•Número de serie
•Avería que presenta el producto
Si lo desean, pueden solicitar la asistencia técnica a través del número 958 087 169,
disponible únicamente para los productos de gama blanca (a excepto microondas de libre
instalación).

MANUAL DE USUARIO
USER'S MANUAL
MANUAL DE USUÁRIO
HG-FL3
ean: 8445639002087
Conserve el manual para futuras consultas.
Este producto no es adecuado para calentar la casa.
Please keep the manual for future reference.
This product is not suitable for primary heating purposes.
Favor guardar o manual para referência futura.
Este produto não é adequado para fins de aquecimento primário.
ESTUFA DE GAS
Gas heater
Aquecedor a gás

INSTALL INSTRUCTION
PACKING LIST OF SPARE PART INSIDE THE PACKAGE:
A. Front panel include burner
B. Left panel
C. Right panel
D. Top panel
E. Bottom panel
F. Back panel
G. 4 wheels
H. 11 pcs screws M4*8
I. 4 pcs screws M5*8
J. Wrench
K. Accessories package: include G,H,I,J
REMARK:
NO.1 to NO.11: use M4*8 screw
NO. 12 to NO.15: use M5*8 screw


Lighting Instructions:
The heater can be regulated to three different settings: 1-LOW, 2-MEDIUM and 3-HIGH. Ignition
mode: piezo ignition.
Open the valve on the heater cylinder 1 and 1/2 turns.
Press down and turn the control knob to 1-LOW position and hold for 10 seconds.
While still pressing down the pilot light, press once or twice on the ignition button until
the pilot light (at the bottom of the burner) ignites. Continue to hold the control knob down
for 10-15 seconds more. Release the button, and if the pilot flame goes out, repeat the above
operation.
Note: when lighting a new heater for the first time, it might be necessary to hold the control
knob down for longer time in order to allow gas to flow to the pilot
Once the heater in/on/at the 1-LOW setting, turning the control knob to 2-MEDIUM or 3-HIGH
position will light the second and third panel respectively.
To turn off the heater, turn back the control knob to the OFF position and close the cylinder
valve fully(clockwise). The heater can only be turned off by closing the cylinder valve. It can not

be turned off by the control knob.
Changing the cylinder:
Turn off the cylinder valve fully (clockwise) and allow the heater to fully cool before removing
and replacing the cylinder. Do not attempt to remove the regulator while the heater is still
running.
Maintenance:
Before maintenance and cleaning, gas heater supply must be turned off, the heater should
be cold. Don't attempt to clean the heater while it is in use.
The heater should be checked annually by a qualified technician for safe operation and in
order to detect any faults.
In case any faults are detected while in use, stop using the heater and contact your dealer
for advice.
Periodically clean the exterior and storage area of your heater to remove dust and fuzz
build upon the surfaces of the ceramic components.
Do not use abrasive products to clean the heater.
Check the pilot light while it is operating. It should burn steadily. If it flickers or there is a
yellow flame, the heater should be checked to make sure it is properly functioning.
In case any parts need replacement, they must be replaced only with parts from the
original manufacturer. The use of incorrect or substitute parts might be dangerous and will void
any warranty.
When the heater is not in use, we recommend that it is covered, or kept in its carton to minimise
the accumulation of dirt that may occur.
Technical assistance before calling for further help
The heater doesn't light:
Check the gas cylinder to make sure that it is full.
Check the regulator to make sure that it is properly attached and the cylinder valve is
turned on.
Check that the instructions have been followed correctly.
If this happens after the cylinder has been changed it would be due to:
Air in the cylinder. Hold the control knob down for a longer period of time until the pilot
and main burner light. Switch to the 3-HIGH setting.
The cylinder may have been excessively cold. Allow the cylinder to reach room
temperature before attempting to start the heater.
The heater turns off by itself:
If the heater goes out on continuous working, repeat the operation, following the
instructions faithfully.
If it goes out soon after 30 minutes or so, it means that it is operated in a badly ventilated

area. Open a window or a door to ventilate the area and reignite.
Avoid bumping the heater in operation. Don't move the heater while in operation. The
tip-over switch may be activated and turn the heater off.
Important advice
Read the instructions in this manual carefully. It includes important information both for
operating the device and your safety.
Do not use faulty appliances.
Maintenance and repairs must be carried out by a qualified technician only.
Your heater should be checked annually by a qualified technician for safe operation and
to detect any faults.
Keep these instructions for future reference. If necessary, a new copy may be obtained
from your dealer.
Safety Information
The guard on this appliance is to prevent risk of fire or injury from burns and no part of it
should be permanently removed. IT DOES NOT GIVE FULL PROTECTION FOR YOUNG CHILDREN
OR THE INFIRM.
This is a flueless heater. Ensure the room is ventilated while the heater is in operation. Do
not operate in a bedroom, caravan, boat, or any room less than 80cum.
Do not place the heater near walls, curtains of furniture while in operation. The heater
must be always facing towards the center of the room. The correct position is indicated in the
picture below:
The heater must not be moved while operating.
Do not place objects on or against the heater.
The grid on this appliance conforms to standard requirements. It does not give full
protection for young children or the infirm. The grid is to prevent risk of injury and no part of

it should be removed or altered.
This appliance needs testing for leak before initial use and whenever the cylinder has been
reconnected after filled. NEVER USE A NAKED FLAMETO TEST FOR POSSIBLE LEAKS.
Always close the gas cylinder valve whenever the heater is not in use
Installation
Your heater is a safe and efficient form of heating when used exactly according to these
instructions.
Read and fully understand these instructions before operating your heater. If you do not
understand the instructions, please contact your dealer for advice before using the heater.
A suitable gas cylinder should be purchased for this heater. The cylinder will require purging the
first time to ensure the correct operation of the heater. This should be carried out by the gas
filling station. Your cylinder should be checked for safe operation each time when it is filled by
an authorized filling station.
Heater set-up
1. After the heater has been removed from its package, remove the back panel from inside the
back cavity.
2. Place the filled gas cylinder into the back of the heater with the valve outlet facing outwards.
3. Screw the correct regulator onto the outlet of the gas cylinder valve clockwise. Turn by hand
only. Do not use a spanner. Screw on until the nut is fully home.
4. IMPORTANT TEST for leaks:
This must be carried out in a well-ventilated area, free from any open flames or other sources
of ignition. With the regulator connected to the cylinder, turn on the gas cylinder valve 1 and
1/2 turns anti-clockwise.
Brush all hose connections, pipe connections to the gas valve, regulator connection to the
cylinder and gas cylinder valve with a 50: 50 solution of detergent and water. A stream of
bubbles forming is an indication of a leak. If a leak is found, turn off the cylinder valve (clockwise),
disconnect the regulator from the gas cylinder and remove the gas cylinder to a cool, outdoor
well-ventilated area. Contact your dealer or gas supplier for assistance.
DO NOT USE THE HEATER IF A LEAK IS FOUND.
DO NOT USE A NAKED FLAME FOR LEAK TESTING.
DO NOT OPERATE ANY ELECTRICAL EQUIPMENT IN THE PRESENCEOF A GAS LEAK.
5. After leak-testing is satisfactorily carried out, fit the rear panel onto the heater. It may be
necessary to twist the cylinder slightly to allow the regulator and hose to fit inside the back
panel without kinking the hose.
Note: The heater incorporates several safety devices that will shut down the heater in unsafe
conditions. In case of accidental flame failure, the gas heater will shut down automatically.
These con-devices will turn off the heater if it is tipped over, if this activate, set the heater
upright, check for obvious damage and again wait 5-10 minutes before attempting to tore-light
the heater. This device may also operate if the heater is knocked against or bumped.
A página está carregando...
A página está carregando...
A página está carregando...
A página está carregando...
A página está carregando...
A página está carregando...
A página está carregando...
A página está carregando...
A página está carregando...
A página está carregando...
A página está carregando...
A página está carregando...
A página está carregando...
A página está carregando...
A página está carregando...
A página está carregando...
-
 1
1
-
 2
2
-
 3
3
-
 4
4
-
 5
5
-
 6
6
-
 7
7
-
 8
8
-
 9
9
-
 10
10
-
 11
11
-
 12
12
-
 13
13
-
 14
14
-
 15
15
-
 16
16
-
 17
17
-
 18
18
-
 19
19
-
 20
20
-
 21
21
-
 22
22
-
 23
23
-
 24
24
-
 25
25
-
 26
26
-
 27
27
-
 28
28
-
 29
29
-
 30
30
-
 31
31
-
 32
32
-
 33
33
-
 34
34
-
 35
35
-
 36
36


Infiniton HG-FL3 Manual do proprietário
- Categoria
- Aquecedores de ambiente
- Tipo
- Manual do proprietário
em outras línguas
- español: Infiniton HG-FL3 El manual del propietario
- English: Infiniton HG-FL3 Owner's manual