Weston 83-0750-W Guia de usuario
- Categoria
- Fatiadores
- Tipo
- Guia de usuario

MEAT SLICER
83-0750-W
7½”
DUE TO CONSTANT FACTORY IMPROVEMENTS, THE PRODUCT PICTURED MIGHT DIFFER
SLIGHTLY FROM THE PRODUCT IN THIS BOX.

TABLE OF CONTENTS / ÍNDICE / TABLE DES MATIÈRES
2
IMPORTANT SAFEGUARDS
COMPONENT LIST
OTHER CONSUMER SAFETY INFORMATION
DIRECTIONS FOR USE
CLEANING INSTRUCTIONS
FOOD SAFETY
WARRANTY
SALVAGUARDIAS IMPORTANTES
LISTA DE COMPONENTES
OTRA INFORMACIÓN DE SEGURIDAD PARA EL CLIENTE
INSTRUCCIONES DE USO
INSTRUCCIONES DE LIMPIEZA
SEGURIDAD DE LOS ALIMENTOS
INFORMACIÓN DE GARANTÍA WESTON
PRÉCAUTIONS IMPORTANTES
DESCRIPTION DE LA PIÈCE
AUTRES CONSIGNES DE SÉCURITÉ POUR LE CONSOMMATEUR
NOTICES D’EMPLOI
INSTRUCTIONS DE NETTOYAGE
SÉCURITÉ ALIMENTAIRE
INFORMATION SUR LA GARANTIE
3
4-5
6
7-8
9
10
12
14
16-17
18
19-20
21
22
24
26
28-29
30
31-32
33
34
36

1. Read all instructions.
2. This appliance is not intended
for use by persons with reduced
physical, sensory, or mental
capabilities, or lack of experience and
knowledge, unless they are closely
supervised and instructed concerning
use of the appliance by a person
responsible for their safety.
3. This appliance should not be used
by children. Keep the appliance
and its cord out of reach of children.
Close supervision is necessary when
the appliance is used near children.
Children should be supervised to
ensure they do not play with the
appliance.
4. To protect against risk of electrical
shock, do not put the meat slicer
assembly, cord or plug in water or
other liquid.
5. Unplug from outlet when not in
use, before putting on or taking off
parts, and before cleaning.
6. Avoid contacting moving parts.
Personal injury may occur. The blade
continues to spin after the meat slicer
has been turned off. Never try to stop
the blade in any way whatsoever.
7. Do not operate any appliance with
a damaged supply cord or plug, or
after the appliance malfunctions or
has been dropped or damaged in any
manner. Supply cord replacement
and repairs must be conducted by
the manufacturer, its service agent,
or similarly qualied persons in order
to avoid a hazard. Call the provided
customer service number for
information on examination, repair, or
adjustment.
8. The use of attachments not
recommended by the manufacturer
may cause re, electrical shock, or
injury.
9. Blade is sharp. Handle carefully,
especially when assembling,
disassembling, or cleaning. It is
recommended that cut-proof Kevlar
gloves be worn when handling the
blade.
10. Never feed food by hand. Always
use completely assembled slicer with
the food carriage and food pusher.
11. Do not use outdoors.
12. Do not let cord hang over edge
of table or counter, or touch hot
surfaces, including the stove.
13. Do not place on or near a hot
gas or electric burner or in a heated
oven.
14. Check that the control is OFF( )
before plugging cord into wall outlet.
To disconnect cord, turn the control
to OFF( ); then remove plug from
wall outlet.
15. Do not use appliance for other
than intended purpose.
16. Do not leave meat slicer
unattended while it is operating.
17. Keep hands, hair, clothing,
and any loose items away from the
moving blade.
18. Operate the meat slicer only
when the blade-locking screw is
properly engaged and tightened.
IMPORTANT SAFEGUARDS
SAVE THESE INSTRUCTIONS
3
ENGLISH INSTRUCTIONS
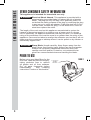
WHEN USING ELECTRICAL APPLIANCES, BASIC SAFETY
PRECAUTIONS SHOULD ALWAYS BE FOLLOWED TO REDUCE THE
RISK OF FIRE, ELECTRIC SHOCK, AND/OR INJURY TO PERSONS,
INCLUDING THE FOLLOWING:

ENGLISH INSTRUCTIONS
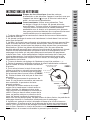
4
2
1
4
3
5
6
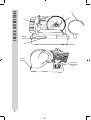
Power
Switch
Thickness
Adjustment
Knob
Sliding
Shaft
Body/Motor
7

ENGLISH INSTRUCTIONS
5
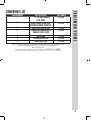
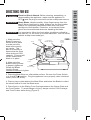
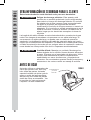
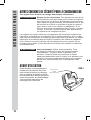
COMPONENT LIST
DIAGRAM NUMBER PART DESCRIPTION PART NUMBER
1
7½” (19 CM) STAINLESS
STEEL BLADE
83-0702
2
BLADE LOCKING SCREW,LOCK
WASHER,RETAINING SCREWS(3)
83-0723
3
GAUGE PLATE WITH SCREW
83-0726
4
SLIDING FOOD CARRIAGE WITH
STAINLESS STEEL COVER
83-0727
5
FOOD PUSHER 83-0728
6
SUCTION CUP FOOT (4) 83-0729
7
BLADE PROTECTOR 83-0705
If any components of this unit are broken, the unit does not operate properly or you
need a replacement instruction manual, visit us on the web at
WestonSupply.com
Or call Weston Brands, LLC Toll Free at 1-800-814-4895
Monday thru Friday 8:00am-5:00pm ET. Outside the U.S. call 1-216-901-6801

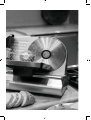
Before using your Meat Slicer for the
rst time, wash all parts thoroughly,
taking particular care to remove
all grease and oil from surfaces.
Dry all parts thoroughly before
reassembling. See “Cleaning
Instructions” section of this booklet.
PRIOR TO USE
FIGURE 1
CAUTION!
SHARP
BLADE!
ENGLISH INSTRUCTIONS
6
This appliance is intended for household use only.
OTHER CONSUMER SAFETY INFORMATION
Electrical Shock Hazard.
This appliance is provided with a
polarized plug (one wide blade) to reduce the risk of electric
shock. The plug fits only one way into a polarized outlet. Do
not defeat the safety purpose of the plug by modifying the plug
in any way or by using an adapter. If the plug does not fit fully
into the outlet, reverse the plug. If it still does not fit, have an
electrician replace the outlet.
The length of the cord used on this appliance was selected to reduce the
hazards of becoming tangled in or tripping over a longer cord. If a longer
cord is necessary, an approved extension cord may be used. The electrical
rating of the extension cord must be equal to or greater than the rating of the
appliance. Care must be taken to arrange the extension cord so that it will not
drape over the countertop or tabletop where it can be pulled on by children or
accidentally tripped over.
Sharp Blade. Handle carefully. Keep fingers away from the
blade. Never feed food by hand. Always use the food pusher.
Always use completely assembled meat slicer with food
carriage and food pusher. Protective, cut-resistant Kevlar
gloves are recommended whenever handling the blade.
w WARNING
w CAUTION

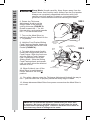
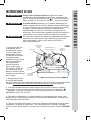
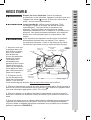
1. Make sure the
Blade Protector is
secure and in place
to make sure the
blade sits correctly
as it spins. This
part is necessary to
ensure that the meat
slicer works at 100%
capacity. This part will
not be visible when
blade is in place.
2. Make sure the
Blade Locking Screw
is properly tightened.
Rotate the Blade
Locking Screw
counter-clockwise to tighten.
3. Place the Meat Slicer on a at stable surface. Be sure the Power Switch
is in the OFF( ) position. Plug the appliance into a properly rated electrical
outlet (120V AC, 60Hz).
4. Place a tray or plate behind the Meat Slicer and below the Blade to collect
the sliced food as it exits the Blade area.
5. Place food on to the Sliding Food Carriage between the Gauge Plate and
the Food Pusher. To avoid danger of injury, always use the Food Carriage
and Food Pusher while slicing (Figure 2).
DIRECTIONS FOR USE
FIGURE 2
Food
Pusher
Sliding
Food Carriage
CAUTION!
SHARP BLADE!
Food
Blade
Locking
Screw
Gauge
Plate
PRIOR TO USE
ENGLISH INSTRUCTIONS
7
Electrical Shock Hazard. Before cleaning, assembling, or
disassembling the appliance, make sure the appliance is
OFF( ) and the plug is removed from the outlet/power source.
Sharp Blade. Handle carefully. Keep fingers away from the
blade. Never feed food by hand. Always use the food pusher.
Always use completely assembled meat slicer with food
carriage and food pusher. Protective, cut-resistant Kevlar
gloves are recommended whenever handling the blade.
w WARNING
w CAUTION
It is important to follow the food safety guidelines outlined in
this manual. For the most up-to-date instruction, visit the USDA
website at http://www.usda.gov/.
w CAUTION

NOTE: Do not operate the appliance continuously for more than
10 minutes. Be sure to allow the appliance to cool down for 30-60
minutes before operating again. Failure to allow the slicer motor to
cool down may result in damage to the motor.
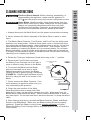
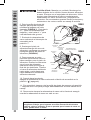
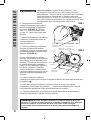
6. Rotate the Thickness
Adjustment Knob to set the
Gauge Plate to the desired
cutting thickness (FIGURE 3).
Rotate towards the “-” for the
thinnest slice, and rotate towards
the “+” for the thickest slice.
7. Turn on the Meat Slicer by
switching the Power Switch to the
“I” on position.
8. Hold the Food Pusher/Sliding
Food Carriage Handle; keep your
hands protected behind the Food
Pusher (FIGURE 4).
9. To begin slicing, push food in
toward the Gauge Plate with the
Food Pusher. Slide the food over
with the Sliding Food Carriage
until it reaches the end of the
Sliding Shaft. Slide the Sliding
Food Carriage back and repeat
until you have sliced the desired
amount of food.
10. When nished, turn off the
Meat Slicer by switching the
Power Switch to the OFF( )
position.
11. For safety, always rotate the Thickness Adjustment Knob all the way to
the “-” position after use to properly shield the sharp edge of Blade.
12. Always disconnect Meat Slicer from power source when the Meat Slicer is
not in use.
FIGURE 3
Thickness
Adjustment
Knob
FIGURE 4
Hold
Here
CAUTION!
SHARP BLADE!
Food
Pusher
Sliding
Food Carriage
Gauge
Plate
Sliding
Shaft
ENGLISH INSTRUCTIONS
8
Sharp Blade. Handle carefully. Keep fingers away from the
blade. Never feed food by hand. Always use the food pusher.
Always use completely assembled meat slicer with food
carriage and food pusher. Protective, cut-resistant Kevlar
gloves are recommended whenever handling the blade.
w CAUTION

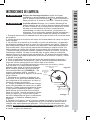
CLEANING INSTRUCTIONS
1. Always disconnect the Meat Slicer from the power source before cleaning.
2. Never immerse the Motor Assembly of the Meat Slicer in water or other
liquid.
3. The Blade, Blade Protector, Food Pusher, and Food Tray can all be hand
washed in hot soapy water. Because these parts come in contact with food,
they should be sanitized properly. Allow sanitized parts to air dry. Do not use
harsh abrasives to clean any part of the Meat Slicer. Use extreme caution
when handling or cleaning the Blade, as it is extremely sharp! Do not leave
Blade underwater; trying to handle sharp objects in water can be hazardous.
It is highly recommended to wear cut-resistant Kevlar Gloves when removing,
cleaning and re-installing the Blade.
4. Rotate the Thickness Adjustment Knob all the way to the “-” position.
5. Remove the Food Pusher and rotate
the Sliding Food Carriage out of the way in
order to allow for easy access to the Blade.
6. To remove the Blade hold the Blade
with one hand and use a coin or small
athead screwdriver to unlock the Blade
Locking Screw by gently turning it clockwise
(FIGURE 5). Carefully pull the Blade off and
hold it by using the hole in the center of the
Blade.
7. Gently remove the Blade Protector. If too
much pressure is applied to either end, you
may risk breaking the protector.
8. Clean the outer surface of the Meat
Slicer Body/Motor with a damp cloth. Mild
detergent or water can be used to dampen the cloth. Wipe away from the
Blade, Never wipe toward the Blade. Never immerse Body/Motor in water or
any other liquid. Do not use steel wool, abrasive cleaners, or sharp utensils to
clean.
9. After cleaning and drying, reinstall the Blade Protector, Blade, and Blade
Screw to the Body/Motor. Make sure the Blade Locking Screw is properly
tightened. Rotate the Blade Locking Screw counter-clockwise to tighten.
Rotate the Sliding Food Carriage back to its proper position and re-install the
Food Pusher.
CAUTION SHARP
Blade
Blade
Locking
Screw
FIGURE 5
ENGLISH INSTRUCTIONS
9
Electrical Shock Hazard. Before cleaning, assembling, or
disassembling the appliance, make sure the appliance is
OFF( ) and the plug is removed from the outlet/power source.
Sharp Blade. Handle carefully. Keep fingers away from the
blade. Never feed food by hand. Always use the food pusher.
Always use completely assembled meat slicer with food
carriage and food pusher. Protective, cut-resistant Kevlar
gloves are recommended whenever handling the blade.
w WARNING
w CAUTION

There are basic rules to follow when handling food.
They are COOK, SEPARATE, CLEAN, and CHILL.
COOK
It’s crucial to cook food to a safe internal temperature to destroy bacteria that is present.
The safety of hamburgers and other foods made with ground meat has been receiving a lot
of attention lately, and with good reason. When meat is ground, the bacteria present on the
surface is mixed throughout the ground mixture. If this ground meat is not cooked to at least
160
o
F to 165
o
F (71
o
C to 74
o
C), bacteria will not be destroyed and there’s a good chance you
will get sick.
Solid pieces of meat like steaks and chops don’t have dangerous bacteria like E. coli on the
inside, so they can be served more rare. Still, any beef cut should be cooked to an internal
temperature of at least 145
o
F (63
o
C) (medium rare). The safe temperature for poultry is 165
o
F
(75
o
C) and solid cuts of pork should be cooked to 145
o
F (63
o
C).
SEPARATE
Foods that will be eaten uncooked and foods that will be cooked before eating MUST
ALWAYS be separated. Cross-contamination occurs when raw meats or eggs come in
contact with foods that will be eaten uncooked. This is a major source of food poisoning.
Always double-wrap raw meats and place them on the lowest shelf in the refrigerator so
there is no way juices can drip onto fresh produce. Then use the raw meats within 1-2 days
of purchase, or freeze for longer storage. Defrost frozen meats in the refrigerator, not on the
counter.
When grilling or cooking raw meats or sh, make sure to place the cooked meat on a clean
platter. Don’t use the same platter you used to carry the food out to the grill. Wash the utensils
used in grilling after the food is turned for the last time on the grill, as well as spatulas and
spoons used for stir-frying or turning meat as it cooks.
Make sure to wash your hands after handling raw meats or raw eggs. Washing hands with
soap and water, or using a pre-moistened antibacterial towelette is absolutely necessary after
you have touched raw meat or raw eggs. Not washing hands and surfaces while cooking is a
major cause of cross-contamination.
CLEAN
Wash your hands and work surfaces frequently when you are cooking. Washing with soap
and warm water for at least 15 seconds, then dry with a paper towel.
CHILL
Chilling food is very important. The danger zone where bacteria multiply is between 40
o
F and
140
o
F (4
o
C and 6
o
C). Your refrigerator should be set to 40
o
F (4
o
C) or below; your freezer should
be 0
o
F (-17
o
C) or below. Simple rule: serve hot foods hot, cold foods cold. Use chang dishes
or hot plates to keep food hot while serving. Use ice water baths to keep cold foods cold. Never
let any food sit at room temperature for more than 2 hours - 1 hour if the ambient temperature
is 90
o
F (32
o
C) or above. When packing for a picnic, make sure the foods are already chilled
when they go into the insulated hamper. The hamper won’t chill food - it just keeps food cold
when properly packed with ice. Hot cooked foods should be placed in shallow containers and
immediately refrigerated so they cool rapidly. Make sure to cover foods after they are cool.
NOTE: Special considerations must be made when using venison or other wild game, since it
can become heavily contaminated during eld dressing. Venison is often held at temperatures
that could potentially allow bacteria to grow, such as when it is being transported. Refer to
the USDA Meat and Poultry Department for further questions or information on meat and
food safety.
FOOD SAFETY
ENGLISH INSTRUCTIONS
10


Weston Brands, LLC warrants to the ORIGINAL RETAIL PURCHASER of this product that if operated in accordance
with the printed instruction accompanying it, then for a period of 1 year from the date of purchase, the product shall be free
from defects in material and workmanship.
The Warranty Card, along with a copy of the original receipt, must be received by Weston Brands, LLC within 30 days
from purchase date for the warranty to apply. Failure to send the completely lled out Warranty Card, along with a copy of
the original receipt, will void the warranty.
The product must be delivered to or shipped freight prepaid to Weston Brands, LLC for warranty services, in either
its original packaging or similar packaging affording an equal degree of protection. Damage due to shipping is not the
responsibility of the company. Weston Brands, LLC charges a $35.00 per hour bench charge. NOTE: No repairs will
be started without the authorization of the customer. The return shipping cost to the customer will be added to the repair
invoice.
Prior to returning the product for Warranty Repair, the product must be thoroughly cleaned and free from any food
particles or other debris. Failure of the purchaser to comply with this standard will result in the unit being returned without
repair. In some cases, a $50 cleaning surcharge may apply.
Weston Brands, LLC will repair (or at its discretion, replace) the product free of charge, if in the judgment of the
company, it has been proven to be defective as to seller’s labor and material, within the warranty period.
New or rebuilt replacements for factory defective parts will be supplied for one (1) year from the date of purchase.
Replacement parts are warranted for the remainder of the original warranty period.
For non-warranty repairs, contact Weston Brands, LLC’s Customer Service at 1-800-814-4895 M-F 8am-5pm ET
(outside of the United States 1-216-901-6801) to obtain a Return Merchandise Authorization Number (RMA Number).
Weston Brands, LLC will refuse all returns that do not contain this number. DO NOT RETURN THE UNIT WITHOUT
PROPER AUTHORIZATION FROM WESTON BRANDS, LLC.
LIMITATIONS: The warranty is void if the product is used for any purpose other than that for which it is designed.
The product must not have been previously altered, repaired, or serviced by anyone else other than Weston Brands,
LLC. If applicable, the serial number must not have been altered or removed. The product must not have been subjected
to accident in transit or while in the customer’s possession, misused, abused, or operated contrary to the instructions
contained in the instruction manual. This includes failure caused by neglect of reasonable and necessary maintenance,
improper line voltage and acts of nature. This warranty is not transferable and applies only to U.S. and Canadian sales.
Except to the extent prohibited by applicable law, no other warranties whether expressed or implied, including
warranty merchantability and tness for a particular purpose, shall apply to this product. Under no circumstances shall
Weston Brands, LLC be liable for consequential damages sustained in connection with said product and Weston Brands,
LLC neither assumes nor authorizes any representative or other person to assume for it any obligation or liability other than
such as is expressly set forth herein. Any applicable implied warranties are also limited to the one (1) year period of the
limited warranty.
This warranty covers only the product and its specic parts, not the food or other products processed in it. Weston is
not responsible for missing or damaged parts on discounted/clearance, resale or nal sale items where the seller may not
be able to guarantee full functionality or completeness of the unit.
WESTON WARRANTY INFORMATION
SAVE THIS WARRANTY INFORMATION FOR YOUR RECORDS!
12

REBANADORA DE CARNE
83-0750-W
DE 7½”
DEBIDO A CONSTANTES MEJORAS EN LA FÁBRICA, EL PRODUCTO QUE SE MUESTRA PUEDE
SER LIGERAMENTE DIFERENTE DEL PRODUCTO EN ESTA CAJA.

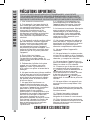
SALVAGUARDIAS IMPORTANTES
14
INSTRUCCIONES EN ESPAÑOL
¡GUARDE ESTAS INSTRUCCIONES!
CUANDO UTILICE ARTEFACTOS ELÉCTRICOS, SIEMPRE DEBEN
SEGUIRSE PRECAUCIONES DE SEGURIDAD BÁSICAS A FIN DE REDUCIR
EL RIESGO DE INCENDIO, DESCARGA ELÉCTRICA, Y/O LESIONES A
PERSONAS, INCLUYENDO LAS SIGUIENTES:
1. Lea todas las instrucciones.
2. Este electrodoméstico no
está diseñado para ser utilizado
por personas con capacidades
físicas, sensoriales o mentales
reducidas, o por falta de experiencia
y conocimiento, a menos que
sean supervisadas e instruidas
estrechamente por una persona
responsable de su seguridad con
respecto al uso del artefacto.
3. Este aparato no debe ser usado
por niños. Mantenga el aparato y
su cable fuera del alcance de los
niños. Se necesita una estrecha
supervisión cuando el aparato se usa
cerca de niños. Los niños deben ser
supervisados para asegurarse de
que no jueguen con el aparato.
4. Para protegerse contra el riesgo
de descarga eléctrica, no coloque el
ensamblaje de la cortadora de carne,
el cable o el enchufe en agua u otro
líquido.
5. Desenchúfelo de la toma de
corriente cuando no esté en uso,
antes de poner o quitar piezas y
antes de limpiarlo.
6. Evite contactar partes móviles.
Lesiones personales pueden ocurrir
La cuchilla continúa girando después
de que la cortadora de carne ha sido
apagada. Nunca intente detener la
cuchilla de ninguna manera.
7. No opere ningún artefacto con
un cable o enchufe de suministro
dañado, ni después de que el
electrodoméstico funcione mal o
se haya caído o dañado de alguna
manera. El reemplazo del cable de
suministro y las reparaciones deben
ser realizadas por el fabricante,
su agente de servicio o personas
calicadas similarmente para evitar
un peligro. Llame al número de
servicio al cliente proporcionado
para obtener información sobre el
examen, la reparación o el ajuste.
8. El uso de accesorios no
recomendados por el fabricante
puede provocar incendios,
descargas eléctricas o lesiones.
9. La cuchilla es losa. Maneje
con cuidado, especialmente al
ensamblar, desmontar o limpiar. Se
recomienda usar guantes Kevlar
resistentes al corte cuando se
maneja la cuchilla.
10. Nunca alimente alimentos
a mano. Utilice siempre una
máquina de cortar completamente
ensamblada con el carro de
alimentos y el empujador de
alimentos.
11. No lo use al aire libre.
12. No permita que el cable cuelgue
del borde de la mesa o mostrador, ni
toque supercies calientes, incluida
la estufa.
13. No lo coloque sobre o cerca
de un quemador de gas o eléctrico
caliente o en un horno caliente.
14. Verique que el control esté
en OFF( ) antes de enchufar el
cable a la toma de corriente. Para
desconectar el cable, gire el control
a OFF( ); luego retire el enchufe de
la toma de corriente.
15. No use el aparato para otro
propósito que no sea el previsto.
16. No deje desatendida la
rebanadora de carne mientras está
en funcionamiento.
17. Mantenga las manos, el cabello,
la ropa y cualquier objeto suelto lejos
de la cuchilla en movimiento.
18. Opere la rebanadora de carne
solo cuando el tornillo de bloqueo
de la cuchilla esté correctamente
enganchado y apretado.


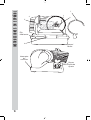
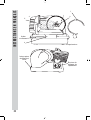
2
1
4
3
5
6
Interruptor
de
corriente
Grosor
Perilla de
Ajuste
Eje
deslizante
Cuerpo/
Motor
7
16
INSTRUCCIONES EN ESPAÑOL

LISTA DE COMPONENTES
NÚMERO DE DIAGRAMA DESCRIPCIÓN DE LA PIEZA NÚMERO DE PIEZA
1
7½” (19 CM) CUCHILLA DE
ACERO INOXIDABLE
83-0702
2
TORNILLO DE BLOQUEO DE LA
CUCHILLA, ARANDELA DE
BLOQUEO, TORNILLOS DE
RETENCIÓN (3)
83-0723
3
PLACA MEDIDORA CON TORNILLO
83-0726
4
CARRO DE DESLIZAMIENTO DE
ALIMENTOS CON TAPA
DE ACERO INOXIDABLE
83-0727
5
PISÓN PARA ALIMENTOS 83-0728
6
PATA CON COPA DE SUCCIÓN (4) 83-0729
7
PROTECTOR DE LA CUCHILLA 83-0705
Si cualquier componente de esta unidad está roto, si no funciona debidamente, o si necesita
un instructivo de repuesto, visítenos en la Web en
WestonSupply.com
O llame a Weston Brands, LLC larga distancia sin costo 1-800-814-4895
De lunes a viernes, de 8:00 am a 5:00 pm tiempo del ET. Fuera de Estados Unidos llame
al 1-216-901-6801
17
INSTRUCCIONES EN ESPAÑOL

18
INSTRUCCIONES EN ESPAÑOL
Antes de utilizar su rebanadora de
carne por primera vez, lave muy
bien todas las partes, teniendo
especial cuidado de quitar toda la
grasa y aceite de las supercies.
Seque muy bien todas las piezas
antes de volver a ensamblar. Ver
la sección de “Instrucciones de
Limpieza” de este cuadernillo.
ANTES DE USAR
FIGURA 1
ADVERTENCIA
¡NAVAJA
FILOSA!
La longitud del cable utilizado en este electrodoméstico se seleccionó para
reducir los riesgos de enredarse o tropezarse con un cable más largo. Si
es necesario un cable más largo, se puede usar un cable de extensión
aprobado. La clasicación eléctrica del cable de extensión debe ser igual o
mayor que la clasicación del dispositivo. Se debe tener cuidado para colocar
el cable de extensión de modo que no cuelgue sobre el mostrador o sobre la
mesa donde los niños puedan tirar de él o tropezarse accidentalmente.
OTRA INFORMACIÓN DE SEGURIDAD PARA EL CLIENTE
Peligro de descarga eléctrica. Este aparato está
provisto de un enchufe polarizado (una cuchilla ancha)
para reducir el riesgo de descarga eléctrica. El enchufe
se adapta solo de una manera a una toma polarizada.
No anule el propósito de seguridad del enchufe
modificando el enchufe de ninguna manera o usando un
adaptador. Si el enchufe no encaja completamente en la
toma de corriente, invierta el enchufe. Si todavía no se
ajusta, haga que un electricista reemplace la toma de
corriente.
Cuchilla afilada. Manejar con cuidado. Mantenga los
dedos alejados de la cuchilla. Nunca alimente alimentos
a mano. Siempre use el empujador de alimentos. Utilice
siempre una rebanadora de carne completamente
ensamblada con carro de alimentos y empujador de
alimentos. Se recomiendan guantes Kevlar protectores y
resistentes a los cortes cuando se maneja la cuchilla.
w ADVERTENCIA
w PRECAUCIÓN
Este electrodoméstico está diseñado solo para uso doméstico.

19
INSTRUCCIONES EN ESPAÑOL
1.Asegúrese de que
el protector de la
cuchilla esté seguro
y en su lugar para
asegurarse de que
la cuchilla se asienta
correctamente a
medida que gira. Esta
parte es necesaria
para garantizar
que la máquina
para cortar carne
funcione al 100% de
su capacidad. Esta
parte no estará visible
cuando la cuchilla esté
en su lugar.
2. Asegúrese de que
el tornillo de bloqueo
de la cuchilla esté adecuadamente apretado. Rote el tornillo de bloqueo de la
cuchilla en la dirección contraria a las manecillas del reloj para apretar.
3. Coloque la rebanadora de carne sobre una supercie plana y estable.
Asegúrese de que el botón de encendido se encuentre en la posición “
”, apagado. Conecte la máquina en un tomacorriente con la clasicación
apropiada (120 V AC, 60 Hz).
4. Coloque una bandeja o un plato detrás de la rebanadora de carne y por
debajo de la cuchilla para recolectar los alimentos rebanados a medida que
salen del área de la cuchilla.
5 Coloque los alimentos sobre el carro de alimentos deslizable entre la placa
medidora y el pisón de alimentos. Para evitar daños o lesiones, siempre
utilice el carro de alimentos y el pisón de alimentos mientras rebana (FIGURA
2).
INSTRUCCIONES DE USO
FIGURA 2
Pisón de
Alimentos
Carro de
alimentos
deslizable
¡ADVERTENCIA!
¡NAVAJA FILOSA!
Alimentos
Navaja
Tornillo de
bloqueo
Medidor de
presión
Placa
ANTES DE USAR
Peligro de descarga eléctrica. Antes de limpiar,
ensamblar o desensamblar el artefacto, asegúrese de
que el artefacto esté APAGADO( ) y que el enchufe se
haya retirado de la toma de corriente / fuente de poder.
Cuchilla afilada. Manejar con cuidado. Mantenga los
dedos alejados de la cuchilla. Nunca alimente alimentos
a mano. Siempre use el empujador de alimentos. Utilice
siempre una rebanadora de carne completamente
ensamblada con carro de alimentos y empujador de
alimentos. Se recomiendan guantes Kevlar protectores y
resistentes a los cortes cuando se maneja la cuchilla.
Es importante seguir las pautas de seguridad alimentaria
descritas en este manual. Para obtener la instrucción
más actualizada, visite el sitio web del USDA en
http://www.usda.gov/.
w ADVERTENCIA
w PRECAUCIÓN
w PRECAUCIÓN

20
INSTRUCCIONES EN ESPAÑOL
6. Rote la perilla de ajuste del
espesor para ajustar la placa
medidora al espesor de corte
deseado (FIGURA 3). Rote hacia
el “-” para una rebanada más
delgada, y rote hacia el “+” para
una rebanada más gruesa.
7. Encienda la rebanadora de
carne colocando el interruptor de
encendido en la
posición “I”.
8. Sostenga el pisón de
alimentos/mango del carro de
alimentos; mantenga sus manos
protegidas detrás del pisón de
alimentos (FIGURA 4).
9. Para comenzar a cortar,
presione los alimentos hacia la
placa medidora con el pisón de
alimentos. Deslice los alimentos
con el carro de alimentos
deslizante hasta que llegue al
nal del eje deslizante. Deslice
el carro de alimentos deslizante
hacia atrás y repita hasta que
haya rebanado la cantidad de
alimentos deseada.
10. Cuando haya terminado,
apague la rebanadora de carne colocando el botón de encendido en la
posición “ ” (apagado).
11. Por seguridad, siempre rote la perilla de ajuste de espesor a la posición
“-” después de su uso para proteger adecuadamente el borde alado de la
navaja.
12. Desconecte siempre la rebanadora de carne de la fuente de energía
cuando la rebanadora de carne no esté en uso.
FIGURA 3
Grosor
Perilla de
ajuste
FIGURA 4
Sostenga
Aquí
ADVERTENCIA
¡NAVAJA FILOSA!
Alimentos
Pisón
Carro de
alimentos
deslizable
Medidor de
presión
molido
Eje
deslizable
Cuchilla afilada. Manejar con cuidado. Mantenga los
dedos alejados de la cuchilla. Nunca alimente alimentos
a mano. Siempre use el empujador de alimentos. Utilice
siempre una rebanadora de carne completamente
ensamblada con carro de alimentos y empujador de
alimentos. Se recomiendan guantes Kevlar protectores y
resistentes a los cortes cuando se maneja la cuchilla.
w PRECAUCIÓN
NOTA: No opere el artefacto continuamente por más de 10 minutos.
Asegúrese de dejar que el aparato se enfríe durante 30-60 minutos
antes de volver a utilizarlo. Si no se permite que el motor de corte se
enfríe, puede dañar el motor.
A página está carregando...
A página está carregando...
A página está carregando...
A página está carregando...
A página está carregando...
A página está carregando...
A página está carregando...
A página está carregando...
A página está carregando...
A página está carregando...
A página está carregando...
A página está carregando...
A página está carregando...
A página está carregando...
A página está carregando...
A página está carregando...
A página está carregando...
A página está carregando...
-
 1
1
-
 2
2
-
 3
3
-
 4
4
-
 5
5
-
 6
6
-
 7
7
-
 8
8
-
 9
9
-
 10
10
-
 11
11
-
 12
12
-
 13
13
-
 14
14
-
 15
15
-
 16
16
-
 17
17
-
 18
18
-
 19
19
-
 20
20
-
 21
21
-
 22
22
-
 23
23
-
 24
24
-
 25
25
-
 26
26
-
 27
27
-
 28
28
-
 29
29
-
 30
30
-
 31
31
-
 32
32
-
 33
33
-
 34
34
-
 35
35
-
 36
36
-
 37
37
-
 38
38


Weston 83-0750-W Guia de usuario
- Categoria
- Fatiadores
- Tipo
- Guia de usuario
em outras línguas
- español: Weston 83-0750-W Guía del usuario
- français: Weston 83-0750-W Mode d'emploi
- English: Weston 83-0750-W User guide
Artigos relacionados
Outros documentos
-
Orbegozo MS 4580 Manual do proprietário
-
 Elma CFD 250 XL Manual do proprietário
-
STARLYF 18292 Manual do usuário
-
Berkel HSBGS0U000000 Guia de usuario
-
 Elma premium Ø 220 mm Manual do proprietário
-
 Elma CFD 220 XL Manual do usuário
-
 Elma doméstica Ø 190 mm Manual do proprietário
-
Kenwood SL250 Manual do proprietário
-
Hamilton Beach Professional 70815 Guia de usuario
-
 BQ Platon Series User Platón Manual do usuário


