

English

Digital Send
Setup and Problem Solving Guide
English

Copyright and License
© 2007 Copyright Hewlett-Packard
Development Company, L.P.
Reproduction, adaptation, or translation
without prior written permission is prohibited,
except as allowed under the copyright laws.
Edition 1, 10/2007
Part number: 5851-3398
The information contained herein is subject
to change without notice.
The only warranties for HP products and
services are set forth in the express warranty
statements accompanying such products
and services. Nothing herein should be
construed as constituting an additional
warranty. HP shall not be liable for technical
or editorial errors or omissions contained
herein.
Trademark Credits
Microsoft®, Windows®, and Windows NT®
are U.S. registered trademarks of Microsoft
Corporation.
English

Table of contents
1 Advantages of digital sending technology
2 Set up Send to Folder using Scan Setup Wizard
3 Set up Digital Sending using Embedded Web Server
4 Configure Send-to-Folder
Set up a shared folder .......................................................................................................................... 7
Configure Send-to-Folder destinations ............................................................................................... 11
Configuration for sending a file to a folder on your PC ...................................................... 11
Configuration for sending a file to a network folder ........................................................... 12
Configuration for sending a file to an FTP site ................................................................... 12
5 Configure Send-to-Email
Configure Send-to-Email in the EWS ................................................................................................. 15
Configure the address book ............................................................................................................... 16
Use Import/Export to Establish an Address Book .............................................................................. 16
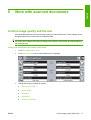
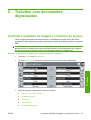
6 Work with scanned documents
Control image quality and file size ...................................................................................................... 17
Settings for the smallest possible file size ......................................................................... 18
Setting for the best possible image quality ........................................................................ 18
General purpose settings ................................................................................................... 20
Edit the text in a scanned document .................................................................................................. 21
Use the digital-send log ...................................................................................................................... 21
Send a 2-sided paper document ........................................................................................................ 21
7 Problem Solving
ENWW iii
English

iv ENWW
English

1 Advantages of digital sending
technology
Digital sending technology offers a fast, simple, and reliable way to capture valuable information from
paper-based documents and convert it to a digital format that can be processed and routed.
Using digital sending to scan and convert documents, you can do the following:
●
Send files directly to e-mail destinations
●
Fax files from existing local area networks (LAN), Internet, Microsoft® Windows®, or other network
fax solutions
●
Archive files on a local computer or network storage by using Send-to-Folder technology
With the correct digital sending solution in place, an organization can expect to:
●
Improve productivity and be more competitive
●
Merge paper and electronic data so both are easier to share, edit, print, store, and retrieve
●
Streamline business processes to reduce costs
ENWW 1
English

2 Chapter 1 Advantages of digital sending technology ENWW
English

2 Set up Send to Folder using Scan Setup
Wizard
If you want to quickly set up a desktop folder to scan document to, you should use Scan Setup Wizard
software. This tool is designed for our customers who do not have IT administrators and would like to
set up Send to Folder feature quickly.
The following are the steps to run Scan Setup Wizard:
1. Open the Embedded Web Server by opening a Web browser and typing the product IP address
or hostname in the URL window. The IP address can be found on the Configuration Page.
2. Click the Digital Sending tab.
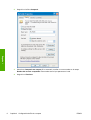
3. In the left column, click Send to Folder.
4. On the Send to Folder page, click the Enable Scan Setup Wizard checkbox.
5. Click the Apply button.
6. Insert the Printing System CD into your computer.
7. At the Welcome screen, click Scan Setup Wizard.
8. Follow the steps in the setup tool. A network folder connected to your device will be created. You
are now ready to scan documents to the folder you created.
If you have completed the above steps, you do not have to use Embedded Web Server to set up folders,
unless you desire some advanced features. However, for Email setup, you will still need to use
Embedded Web Server.
ENWW 3
English

4 Chapter 2 Set up Send to Folder using Scan Setup Wizard ENWW
English

3 Set up Digital Sending using Embedded
Web Server
Although most digital sending activities can be carried out using the device control panel, some critical
digital sending settings must be set up initially using the Embedded Web Server (EWS). The EWS is a
set of device features and tools embedded in the device that can be accessed by using a Web browser
(for example, Internet Explorer) as long as the device is turned on.
In order to set up the digital sending configurations, you will need to get the following information:
1. Device IP address: Go to the device control panel, and touch Network address on the control
panel screen. An example of the IP address is: 16.88.158.182.
2. Your SMTP Server name or IP address: SMTP server is your email server. All your e-mails pass
through your SMTP server on the network and then are delivered to your email box by identifying
your email address. If you don’t have an in-house SMTP server, your Internet Service Provider
(ISP) should be able to provide you with the SMTP server name or SMTP server IP address. An
example of the SMTP server name is: smtp.msn.net. It could also be an IP address.
3. SMTP server Authentication: Authentication is typically carried out by specifying the user name
and password. Only your Internet Service Provider knows your SMTP server needs user name/
password authentication or not. If it does, get your SMTP server’s user name and password for
later use.
4. Your Windows domain, user name, password and your computer name. Right click My
Computer on the desktop, then click Properties. Click My Computer tab. You will find your
computer name and the domain on that page. Please make sure to write down the Full Computer
Name in the format of JoesComputer.USA.msn.net. Your windows user name and password are
those that you use to log into your computer.
When you collect the above information, you are ready to go into the Embedded Web Server to set up
the Digital Sending features.
The following instructions will show you how to access the device Embedded Web Server:
1. Open a Web browser (for example, Internet Explorer)
2. Type in the Device IP address you collected earlier in the Web browser’s address bar and press
Enter. The device embedded Web page will open up.
3. Click Digital Sending tab. The left column of the Digital Sending page contains the links for Send
to Folder, Send to Email and other setup information.
Now you are ready to perform the Digital Sending tasks in the Embedded Web Server.
ENWW 5
English

6 Chapter 3 Set up Digital Sending using Embedded Web Server ENWW
English

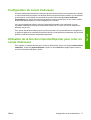
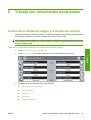
4 Configure Send-to-Folder
Set up a shared folder
Before you can use the scan-to-folder feature you must share the folder to which you want to send the
scanned documents. Use the following instructions to set up a shared folder in Windows XP.
NOTE: To learn how to share a folder in other Windows operating systems, open the Help
documentation and search for the term “share a folder”.
Share a folder in Windows XP
1. In Windows Explorer or My Computer, right-click the folder to be shared and choose Sharing and
Security.
NOTE: If you do not see Sharing and Security when right-clicking the folder, you might not have
installed the Microsoft File and printer Sharing for Microsoft Networks component. To check,
right-click My Network Places, select Properties, right-click Local Area Connection, and select
Properties. File and printer Sharing for Microsoft Networks should appear in the dialog box. If
it does not, install the component. Either search Microsoft Help for information about folder sharing
and security, or contact Microsoft directly.
NOTE: For network folders, a network administrator usually must give folder permissions to the
necessary users.
ENWW Set up a shared folder 7
English

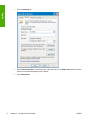
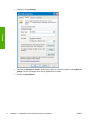
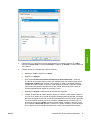
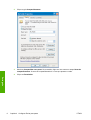
2. Click the Sharing tab.
3. Select Share this folder. If necessary, type a the new name in the Share name field. The share
name is the name that appears on the network.
4. Click Permissions.
8 Chapter 4 Configure Send-to-Folder ENWW
English

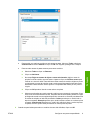
●
To allow anyone on the network to access the folder, click Everyone, select Full Control in
the Allow column, and click OK. Then proceed with step 5.
●
To give only certain users access to the folder:
a. Select Everyone and click Remove.
b. Click Add.
c. In the Enter the object names to select field, type the name of the first user account
that will have access to the folder and then click Check Names to verify the name is
valid. To add multiple user accounts, type a semicolon after the first account name and
then repeat from step b for each account that is added. Each user account appears and
is separated from others by a semicolon.
d. Click OK when the account list is complete.
e. Change the permissions for each user account that has access to this folder. Click once
on the name of the user account. While it is selected, allow or deny privileges according
to the available options by selecting or clicking to clear the check boxes next to the
permissions. Read allows the user to read the files in the folder. Change allows the user
to add, alter, or delete files in the folder. Full Control allows the user to read, add, alter,
and delete files in the folder as well as to adjust these permissions or take ownership of
the folder.
5. When the permissions for all users have been set, click OK.
ENWW Set up a shared folder 9
English

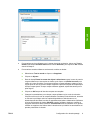
6. Click the Security tab and click Add.
NOTE: If you do not see a Security tab, the task is complete. Proceed with the job.
7. On the Security tab, add all of the user accounts added in step 4.
a. In the Enter the object names to select field, type the name of each user account that will
have access to the folder and click Check Names. Each account appears in the format of
ComputerName\UserName, and the accounts are separated by a semicolon.
b. Click OK when finished.
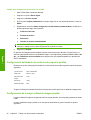
8. Click Apply, and then click OK. The folder icon changes to look like a folder resting in a hand:
Any user who was given permissions to access the folder can now use the Scan-to-Folder feature to
scan to the shared folder.
10 Chapter 4 Configure Send-to-Folder ENWW
English

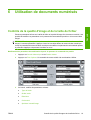
Configure Send-to-Folder destinations
After setting up a shared folder, you need to configure the Send-to-Folder settings in the EWS. The
exact settings depend on where you intend to send a scanned document.
Configuration for sending a file to a folder on your PC
1. Verify that you have properly set up a shared folder. See Set up a shared folder on page 7 for
instructions.
2. Open the EWS for the desired product.
3. Click the Digital Sending tab.
4. Click Send to Folder.
5. In the Predefined Folder section of the page, click Add.
6. Select Shared Folder, and then click OK.
7. In the Folder Path field, provide the path the shared folder you have already created. The path
must be in one of the following formats:
\\MyComputerName\SharedFolderName
\\MyComputerIPAddress\SharedFolderName
TIP: To find your computer name, right-click My Computer on the Desktop, click Properties,
and then click Computer Name. Be sure to use the name displayed in the Full computer name
field.
TIP: To find your computer IP address, open a Windows Command prompt, type ipconfig /
all, and press Enter.
8. In the Access Credentials list box, select Use Public Credentials. Type your Windows domain,
user name, and password to access the shared folder.
TIP: To discover your Windows domain, right-click on My Computer and look on the Computer
Name tab.
9. Click Test Folder Access to verify that the settings are correct.
You can now send a file to a folder on your PC. Other settings on the screen are optional.
ENWW Configure Send-to-Folder destinations 11
English

Configuration for sending a file to a network folder
1. Verify that the network folder gives intended users full permissions. If not, right-click the folder and
set the permissions on the Security tab.
NOTE: In most cases the network administrator must perform this task.
2. Find the IP address of the network location:
a. First find out the network drive name by opening My Computer and looking at the list of drives.
Network drive names are displayed in single quotation marks, such as
'NetworkDriveName'.
b. After discovering the network-drive name, open a Windows Command Prompt, type
nslookup [NetworkDriveName], and press Enter. The IP address of the network drive
is displayed.
3. Open the EWS for the desired product.
4. Click the Digital Sending tab.
5. Click Send to Folder.
6. In the Predefined Folder section of the page, click Add.
7. Select Shared Folder, and then click OK.
8. In the Folder Path field, type the network drive IP address followed by the full network path to the
shared folder, using the following format: \\NetworkIPaddress\MySharedFolderPath.
NOTE: MySharedFolderPath has to include the full network path to the network folder. For
example, assume that you intend to scan a file to the network folder Archive. From My
Computer, you can see the network path to that folder is MyPath\Archive on
'MyNetworkName' If the IP address of MyNetworkName is 0.0.0.0, then you will need to type \
\0.0.0.0\MyPath\Archive in the Folder Path field.
9. Choose Use Public Credentials in the Access Credentials box. Specify your Windows domain,
user name, and password to access the shared folder.
TIP: To discover your Windows domain, right-click on My Computer and look on the Computer
Name tab.
10. Click Test Folder Access to verify that the settings are correct.
You can now send a file to the network folder. Other settings on the screen are optional.
Configuration for sending a file to an FTP site
1. Open the EWS for the desired product.
2. Click the Digital Sending tab.
3. Click Send to Folder.
4. Select the Enable Send to Folder check box.
5. Click Add.
6. Select FTP Site, and then click OK.
12 Chapter 4 Configure Send-to-Folder ENWW
English

7. Provide the FTP connection settings.
8. Click Test FTP Credentials to verify that the settings are correct.
ENWW Configure Send-to-Folder destinations 13
English

14 Chapter 4 Configure Send-to-Folder ENWW
English
A página está carregando...
A página está carregando...
A página está carregando...
A página está carregando...
A página está carregando...
A página está carregando...
A página está carregando...
A página está carregando...
A página está carregando...
A página está carregando...
A página está carregando...
A página está carregando...
A página está carregando...
A página está carregando...
A página está carregando...
A página está carregando...
A página está carregando...
A página está carregando...
A página está carregando...
A página está carregando...
A página está carregando...
A página está carregando...
A página está carregando...
A página está carregando...
A página está carregando...
A página está carregando...
A página está carregando...
A página está carregando...
A página está carregando...
A página está carregando...
A página está carregando...
A página está carregando...
A página está carregando...
A página está carregando...
A página está carregando...
A página está carregando...
A página está carregando...
A página está carregando...
A página está carregando...
A página está carregando...
A página está carregando...
A página está carregando...
A página está carregando...
A página está carregando...
A página está carregando...
A página está carregando...
A página está carregando...
A página está carregando...
A página está carregando...
A página está carregando...
A página está carregando...
A página está carregando...
A página está carregando...
A página está carregando...
A página está carregando...
A página está carregando...
A página está carregando...
A página está carregando...
A página está carregando...
A página está carregando...
A página está carregando...
A página está carregando...
A página está carregando...
A página está carregando...
A página está carregando...
A página está carregando...
A página está carregando...
A página está carregando...
A página está carregando...
A página está carregando...
A página está carregando...
A página está carregando...
A página está carregando...
A página está carregando...
A página está carregando...
A página está carregando...
A página está carregando...
A página está carregando...
A página está carregando...
A página está carregando...
A página está carregando...
A página está carregando...
A página está carregando...
A página está carregando...
A página está carregando...
A página está carregando...
A página está carregando...
A página está carregando...
A página está carregando...
A página está carregando...
A página está carregando...
A página está carregando...
A página está carregando...
A página está carregando...
A página está carregando...
A página está carregando...
A página está carregando...
A página está carregando...
A página está carregando...
A página está carregando...
A página está carregando...
A página está carregando...
A página está carregando...
A página está carregando...
A página está carregando...
A página está carregando...
A página está carregando...
A página está carregando...
A página está carregando...
A página está carregando...
A página está carregando...
A página está carregando...
A página está carregando...
A página está carregando...
-
 1
1
-
 2
2
-
 3
3
-
 4
4
-
 5
5
-
 6
6
-
 7
7
-
 8
8
-
 9
9
-
 10
10
-
 11
11
-
 12
12
-
 13
13
-
 14
14
-
 15
15
-
 16
16
-
 17
17
-
 18
18
-
 19
19
-
 20
20
-
 21
21
-
 22
22
-
 23
23
-
 24
24
-
 25
25
-
 26
26
-
 27
27
-
 28
28
-
 29
29
-
 30
30
-
 31
31
-
 32
32
-
 33
33
-
 34
34
-
 35
35
-
 36
36
-
 37
37
-
 38
38
-
 39
39
-
 40
40
-
 41
41
-
 42
42
-
 43
43
-
 44
44
-
 45
45
-
 46
46
-
 47
47
-
 48
48
-
 49
49
-
 50
50
-
 51
51
-
 52
52
-
 53
53
-
 54
54
-
 55
55
-
 56
56
-
 57
57
-
 58
58
-
 59
59
-
 60
60
-
 61
61
-
 62
62
-
 63
63
-
 64
64
-
 65
65
-
 66
66
-
 67
67
-
 68
68
-
 69
69
-
 70
70
-
 71
71
-
 72
72
-
 73
73
-
 74
74
-
 75
75
-
 76
76
-
 77
77
-
 78
78
-
 79
79
-
 80
80
-
 81
81
-
 82
82
-
 83
83
-
 84
84
-
 85
85
-
 86
86
-
 87
87
-
 88
88
-
 89
89
-
 90
90
-
 91
91
-
 92
92
-
 93
93
-
 94
94
-
 95
95
-
 96
96
-
 97
97
-
 98
98
-
 99
99
-
 100
100
-
 101
101
-
 102
102
-
 103
103
-
 104
104
-
 105
105
-
 106
106
-
 107
107
-
 108
108
-
 109
109
-
 110
110
-
 111
111
-
 112
112
-
 113
113
-
 114
114
-
 115
115
-
 116
116
-
 117
117
-
 118
118
-
 119
119
-
 120
120
-
 121
121
-
 122
122
-
 123
123
-
 124
124
-
 125
125
-
 126
126
-
 127
127
-
 128
128
-
 129
129
-
 130
130
-
 131
131
-
 132
132
-
 133
133
-
 134
134


HP LaserJet M5035 Multifunction Printer series Guia de usuario
- Tipo
- Guia de usuario
- Este manual também é adequado para
em outras línguas
Artigos relacionados
-
HP 9250C DIGITAL SENDER Guia rápido
-
-
HP LaserJet M5025 Multifunction Printer series Guia rápido
-
HP LaserJet M5035 Multifunction Printer series Guia rápido
-
-
-
-
-
-
HP LaserJet M4345 Multifunction Printer series Guia rápido