Elma Digit Zero Manual do proprietário
- Categoria
- Selantes a vácuo
- Tipo
- Manual do proprietário

Envasadora al vacío /
Vacuum sealer /
Machine à emballer sous vide /
Máquina de embalar a vácuo /
www.elma.es
02...
10...
18...
26...
ESPAÑOLENGLISHFRANÇAISPORTUGUÊS
DIGIT ZERO

2
01. DESCRIPCIÓN
El modelo Digit Zero 15.13.2 es un producto diseñado para el envasado al
vacío en el ámbito doméstico. Sus prestaciones técnicas la hacen recomenda-
ble para usuarios exigentes que vayan a realizar envasados frecuentemente y
necesiten unos resultados duraderos y seguros.
1.1. Características técnicas
Envasadora al vacío Digit Zero
Referencia 15.13.2
Dimensiones 396 x 212 x 95 mm
Peso 2,90 Kg
Potencia 200 W
Voltaje 220 - 240 V / 50 Hz
Ruido < 80 dB (A)
Material de cuerpo Plástico ABS
Barra de sellado 300 mm.
Vacío máximo -800 mbar
Succión 15 l/min
02. ANTES DE PONER EN MARCHA
-Lee atentamente esta hoja de instrucciones cada vez que vayas a
usar la máquina.
-Conserva esta hoja de instrucciones para un futuro.
-Comprueba que la máquina se encuentra en buenas condiciones,
prestando especial atención a las partes móviles. En caso de detectar alguna
anomalía, ponte en contacto con el distribuidor donde adquiriste el producto.
-Antes de conectar la máquina a la red eléctrica, comprueba que el voltaje
indicado en la máquina corresponde con el voltaje de la red eléctrica local.
-Nunca dejes el aparato desatendido mientras esté en marcha.
-No sumerjas el aparato en agua u otros líquidos. De lo contario, existe peligro
de muerte por descarga eléctrica.
-Desenchufa el aparato después de cada uso.
-Mantén el aparato fuera del alcance de los niños.
FUNCIÓN DE LA ENVASADORA
Esta máquina puede usarse sólo para envasar alimentos al vacío.

3
Español
CONDICIONES DE LA INSTALACIÓN
Se recomienda colocar la envasadora en una supercie rígida y horizontal,
para evitar oscilaciones y vibraciones durante su funcionamiento. La máquina
debe instalarse en zonas lejanas a humedades, fuentes de calor, así como de
zonas con material inamable.
03. INSTRUCCIONES DE USO
TIEMPO DE CONSERVACIÓN
El tiempo de conservación de los alimentos se puede incrementar entre 2 y 4
veces más respecto a condiciones normales; el tiempo de conservación está
fuertemente ligado a las condiciones en la que se encontraba el producto al
envasarse y la cantidad de agua que tuviese el mismo.
Los alimentos, en cualquiera de los casos, deben consumirse
dentro de los límites de fecha que se indican en el envase original.
IMPORTANTE
Si se efectúan envasados con rapidez, puede darse el efecto pre-sellado que
impide la extracción del aire de las bolsas. Espera unos segundos a que la
barra de sellado anti-adherente de la envasadora se enfríe para
seguir envasando.
Tipo de bolsas: Esta envasadora sólo funciona con bolsas gofradas
especiales para el envasado al vacío. Se aconseja utilizar bolsas originales
Elma para un mejor resultado.
PARA ENCENDER LA ENVASADORA
-Conecta el cable eléctrico en la toma de corriente y enchufa la máquina a la
red.
-Pulsa el botón “On/Off” del panel de mandos.
PARA APAGAR LA ENVASADORA
-Estando la máquina en reposo, pulsa el botón “On/Off”.

4
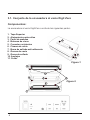
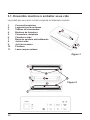
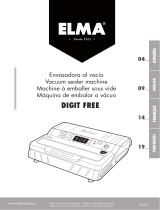
1. Tapa Superior
2. Alojamiento porta rollos
3. Panel de mandos
4. Botones de cierre
5. Conector recipientes
6. Cámara de vacío
7. Barra de sellado anti-adherente
8. Gomas de vacío
9. Goma de sellado
10. Anclajes
11. Cutter
3.1. Conjunto de la envasadora al vacío Digit Zero
Componentes:
La envasadora al vacío Digit Zero consta de las siguientes partes:
8
Figura 1.
Figura 2.
3
1
4
5
10
9
2
11
6
7
Figura 2.

5
Español
3.2. Instrucciones para envasado al vacío con bolsas
1. Conecta la envasadora a la red eléctrica.
2. Se recomienda esperar unos 15 segundos a que se caliente la máquina
antes de comenzar con el primer envasado.
3. Introduce el producto que desees envasar en una bolsa gofrada de
tamaño adecuado, dejando unos 5 cm entre el borde de la bolsa y el alimento.
4. Levanta la tapa superior (1) de la máquina. Coloca la bolsa correctamente
extendida sobre la barra de sellado anti-adherente (7), procurando dejarla
centrada dentro de los márgenes de la cámara de vacío (6).
5. Baja la tapa superior y presiona apoyando las manos sobre los
laterales, primero en un lado y luego en el otro, al mismo tiempo que
pulsas los botones de cierre (4) para anclarla. Con la presión ejercida por
el sistema de cierre, la bolsa queda bloqueada dentro de la cámara de
vacío. En caso de que se desee abrir la tapa superior una vez haya
quedado cerrada, presiona la tapa en sus dos extremos para desbloquear
los botones de cierre, quedará desbloqueada cuando escuches un clic
por cada extremo. Ahora puedes tirar suavemente hacia arriba de la tapa.
6. Para que se inicie el proceso de envasado, pulsa el botón “Start”. Con la
presión ejercida por el “sistema de cierre fácil” de la máquina es suciente
para que la bolsa comience a comprimirse al activarse la bomba de vacío.
Puede darse la situación de que las gomas de vacío (8) estén deterioradas
y la bolsa no quede correctamente bloqueada dentro de la cámara de vacío.
En ese caso, aconsejamos presionar la tapa superior durante los primeros 10
segundos del envasado y proceder a la sustitución de las gomas de vacío.
7. Este modelo de envasadora está diseñado para funcionar en
modo automático. Pulsando el botón “Start”, la envasadora realiza el cambio
de fase entre aspiración a soldadura de la bolsa automáticamente. La envasa-
dora está equipada con un sensor de medición de vacío, que ejecuta el inicio
de la soldadura cuando el vacuómetro ha alcanzado un nivel de vacío superior
a - 750 mbar. En caso de querer cancelar el proceso de aspiración, pulsar el
botón “Cancel”.
8. También se puede activar el proceso de sellado de la bolsa manualmente
pulsando el botón “Pulse”. Con esta acción puedes sellar la bolsa en el
momento que desees, pulsando el botón de sellado “Seal”.

6
Es una función especialmente útil cuando se envasen alimentos frágiles o que no
interesa que se aplasten, como por ejemplo: bollos, hojaldres, pescados, etc…
9. El display digital de la envasadora informa del proceso de envasado:
-Cuando la envasadora está en reposo el display muestra el tiempo de sellado
programado.
- Una vez se pulsa el botón “Start”, se inicia una cuenta atrás en el que se
muestra el tiempo estimado que resta para terminar con la fase de aspiración.
- A continuación, comienza la cuenta atrás de la fase de sellado.
10. Apertura automática de la tapa: una vez nalizado el sellado de la bolsa,
la máquina se detiene automáticamente. La propia máquina liberará la tapa
superior tras un pitido, es entonces cuando se puede tirar suavemente hacia
arriba de la tapa.
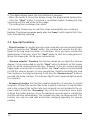
3.3. Funciones especiales
- Función Pulse: para una mayor precisión a la hora de envasar manualmente
alimentos delicados, presionando la tecla “Pulse” la envasadora aspirará el
aire contenido en la bolsa mientras la tecla esté presionada. Una vez alcanzado
el nivel de vacío deseado, pulsar la tecla “Seal” para que comience la fase de
sellado. Al nalizar esta fase, la tapa se abrirá automáticamente.
- Función “Vacuum Level”: esta función permite regular el nivel de vacío de
la envasadora. Se recomienda utilizar por defecto la opción “High”, ya que se
extraerá más aire de la bolsa. Sin embargo, si se están envasando alimentos
frágiles o que contengan huesos, se recomienda seleccionar la opción “Low”
para que el envasado sea más progresivo, evitando así que se deteriore el
alimento o que se rasgue la bolsa. Por cada pulsación de la tecla “Vacuum
Level”, se cambiará de modo. La luz led de cada modo se iluminará cuando
esté seleccionado.
- Función Accesory: mediante esta función se puede realizar el vacío en
recipientes especiales. Conecta el tubo de aspiración en el conector para
recipientes (5) de la envasadora y conecta el otro extremo al
recipiente (no se incluyen tubos de aspiración ni recipientes). Una vez realizada
la conexión, pulsa la tecla “Accesory” y el proceso de aspiración comenzará. Al
llegar al nivel óptimo de vacío, la envasadora se detendrá automáticamente. Es
entonces cuando se puede proceder a desconectar el recipiente. Esta función
sólo debe usarse junto con accesorios diseñados especícamente para el
envasado al vacío. El proceso puede pararse en cualquier momento pulsando
el botón “Cancel”.

7
Español
3.4. Utilizar la envasadora con rollos
Esta envasadora viene equipada con un alojamiento porta rollos (2)
compatible con rollos para envasar al vacío Elma de los siguientes ta-
maños: 15 x 600 cm, 20 x 600 cm y 30 x 600 cm. Para introducir el ro-
llo para envasar al vacío en su alojamiento, tira hacia arriba con sua-
vidad de la tapa superior. A continuación, introduce el rollo en el
alojamiento, desenrolla aproximadamente 20 cm de rollo, levanta el cutter (11),
haciendo pasar el borde del rollo por la abertura. Estira el rollo hasta obtener
la longitud de la bolsa que desees crear, vuelve a cerrar el cutter y desliza de
derecha a izquierda la tijera para cortar el trozo de rollo que deseas extraer.
A continuación, introduce uno de los bordes del trozo del rollo en la
cámara de vacío. Debe quedar centrado en la cámara de vacío y
correctamente extendido sobre la barra de sellado. Ancla la tapa y pulsa la
tecla “Seal” y la máquina sellará el trozo de rollo por ese borde, creando así
una bolsa. A partir de este punto, sigue las instrucciones descritas en el aparta-
do 3.2 Instrucciones para envasar con bolsas.
3.5. Conguración del tiempo de sellado
La envasadora Digit Zero permite congurar el tiempo de sellado por medio
del display digital. Estando la máquina en reposo, pulsa las teclas +/- para
aumentar o disminuir el tiempo de sellado. Por cada pulsación de las teclas, el
tiempo variará 1 segundo. Se recomienda ajustar el tiempo de sellado tenien-
do en cuenta el grosor de la bolsa y la temperatura a la que se encuentre la
barra de sellado. Elma recomienda seleccionar 5 segundos de sellado.
04. LIMPIEZA
Después de utilizar la máquina, se recomienda limpiar con jabón neutro
tanto la carcasa del aparato, como la cámara de vacío con el objetivo de
garantizar la higiene y una correcta conservación de la envasadora.
Del mismo modo, es importante que la barra y goma de sellado (9) se
encuentren limpias en todo momento para asegurar un correcto sellado
de la bolsa, así como las gomas de vacío. Comprueba periódicamente que
la cámara de vacío se encuentra libre de residuos o impurezas para evitar
obstrucciones en el proceso de vaciado del aire.

8
REPUESTOS Y RECAMBIOS
Sólo pueden usarse REPUESTOS ORIGINALES que sean autorizados
y aprobados por Udom S.A. Se recomienda que los componentes o piezas
deteriorados se reemplacen de inmediato para garantizar un mejor
funcionamiento, ahorro de energía, e incluso la prevención de averías mayores
en la envasadora.
PRECAUCIONES
Los líquidos deben ser congelados antes de poder ser envasados, ya
que si son aspirados pueden dañar gravemente la bomba de vacío. Así
mismo, si se va a envasar carne, se recomienda secarla con un paño para
evitar la aspiración de su jugo por el motivo antes descrito. Los productos en
polvo o en grano se deben envolver con una servilleta antes de envasarlos para
evitar que sean aspirados y dañen los conductos internos.
ALMACENAMIENTO
Es importante que la envasadora se almacene en un lugar seco y fresco,
alejado de productos químicos agresivos o fuentes de calor. Para alargar la
vida de las gomas de vacío, al guardar la envasadora cierra la tapa sin llegar a
activar el sistema de cierre.
PETICIÓN DE ASISTENCIA
Las peticiones de asistencia técnica deben de hacerse después de un
cuidadoso análisis (detección de averías y posibles causas). En el caso de
una petición por escrito, aconsejamos que se especiquen los siguientes
términos: tipo de máquina, número de referencia, descripción detallada de
la avería, tipo de pruebas que se han realizado y ajustes realizados y
sus efectos.
05. MANTENIMIENTO Y ADVERTENCIAS
NORMAS DE MANTENIMIENTO
Para la limpieza y mantenimiento de la máquina o reposición de piezas, es
necesario desenchufar la máquina.
INFORMACIÓN
Para cualquier tipo de mantenimiento, revisión o reparación contactar con
Udom S.A.

9
Español
06. DECLARACIÓN DE
CONFORMIDAD
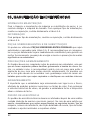
07. ELIMINACIÓN DE RESIDUOS DE APARATOS
ELÉCTRICOS Y ELECTRÓNICOS
El símbolo de la eliminación de residuos de máquinas eléctricas y electrónicas
por parte de usuarios domésticos de la Unión Europea en el producto o en el
embalaje, indica que no se puede desechar el producto junto con los residuos
domésticos. Los usuarios de aparatos eléctricos y electrónicos domésticos,
deberán entregarlos en puntos autorizados, cuando se deshagan de ellos,
para que sean gestionados correctamente. Si desea información adicional
sobre los lugares donde puede depositar estos aparatos para su reciclado,
póngase en contacto con las autoridades locales de su ciudad o en el punto de
venta donde usted adquirió el producto.
UDOM S.A. declara que el producto con referencia 15.13.2 y descripción
“Envasadora al vacío Digit Zero” cumple con los siguientes requisitos del
marcado CE:
EN 55 014-1:2006 + A1:2009 + A2:2011 /
EN 55014-2:1997 + A1:2001 + A2:2008 /
EN 61 000-3-2:2014 / EN 61000-3-3:2013 /
EN 60 335-2-45:2002 + A1:2008 + A2: 2012 /
EN 60335-1:2012 + A11:2014 /
EN 62233: 2008

10
01. DESCRIPTION
The Digit Zero 15.13.2 model is a product designed to vacuum pack food
at home. Its technical features make it most suitable for demanding users
who are going to pack food frequently and need long-lasting, safe results.
Digit Zero Vacuum sealer
Reference 15.13.2
Measurements 396 x 212 x 95 mm
Weight 2,90 Kg
Power 200 W
Voltage 220 - 240V / 50 Hz
Noise < 80 dB (A)
Body´s material ABS plastic
Sealing bar 300 mm.
Max. Vacuum degree -800 mbar
Suction 15 l/min
02. BEFORE USE
- Read these instructions carefully each time you use the machine.
- Save this instruction sheet for future use.
- Check that the machine is in good condition, paying special attention to the
moving parts.
- Should you detect any faults, contact the distributor that supplied the product.
- Before connecting the machine to the mains, check that the voltage indicated
on the characteristics plate corresponds to the local mains voltage.
- Never leave the appliance unattended when in use.
- Do not immerse the appliance in water or any other liquids as there is a danger
of death by electric shock.
- Unplug the appliance after using it.
- Keep the appliance out of the reach of children.

English
11
INSTALLATION CONDITIONS
It is recommended that the vacuum sealer be placed on a rm and horizontal
surface, to avoid rocking and vibrations during its operation. The machine must
be installed in areas free of humidity, heat sources, and ammable materials.
Do not submerge the vacuum sealer in water or any other liquid.
03. INSTRUCTIONS FOR USING
CONSERVATION TIME
Foods can be conserved 2 to 4 times longer than in normal conditions; the
conservation time is strongly linked to the conditions the product is in when it is
packed and the amount of water it contains. Regardless of this, vacuum sealed
foods must be consumed before the date indicated on the original packaging
of the food.
TO START THE MACHINE
- Connect the power cable to the intake socket and plug into the power supply.
- Press the “On/Off” button on the control panel.
TO TURN OFF
- Press the “On/Off” button with the machine at rest.
IMPORTANT
If you package items too quickly, the bag may be sealed prematurely, hindering
extraction of the air from the bags. Wait a few seconds for the non-stick sealing
bar of the vaccum sealer to cool to continue with the next item to package.
Type of bags: this vaccum sealer only works with special vacuum
packaging bags. We recommend using original Elma bags for best results.
FUNCTION OF THE VACUUM SEALER
This machine is designed to vacuum pack foods.

12
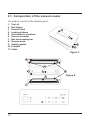
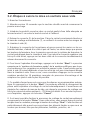
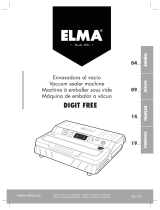
3.1. Composition of the vacuum sealer
The product consists of the following parts:
1. Top Lid
2. Roll holder
3. Control Panel
4. Locking buttons
5. Connector for canisters
6. Vacuum chamber
7. Non stick sealing bar
8. Vacuum seals
9. Sealing gasket
10. Fastener
11. Cutter
8
Figure 1.
Figura 2.
10
9
2
11
6
7
Figure 2.
3
1
4
5

English
13
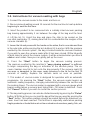
3.2. Instructions for vacuum sealing with bags
1. Connect the vacuum sealer to the mains and turn on.
2. We recommend waiting around 15 seconds for the machine to heat up before
beginning to seal the rst item.
3. Insert the product to be conserved into a suitably sized vacuum packing
bag leaving approximately 5 cm between the edge of the bag and the food.
4. Lift the lid (1). Unroll the bag and place the strip to be sealed on the
non-stick sealing bar (7), making sure that it is centred within the margins of the
vacuum chamber (6).
5. Lower the lid and press with the hands on the sides, rst in one side and then
in the oder side, while pressing the lock buttons (4) to anchor . With the pressure
exerted by the closure system , the bag is locked inside the vacuum chamber.
If you wish to open the vacuum sealer after it has been closed, lift the lid gently
at both sides to unlock the closure system, it will be unlocked when you hear a
click on each sides. Now you can gently pull up the cover.
6. Press the “Start” button to begin the vacuum sealing process.
The pressure exerted by the machine’s “easy closing system” is sufcient
to begin compressing the bag on activation of the vacuum pump. The va-
cuum chamber may fail to lock onto the bag properly if the vacuum seals (8)
are worn or damaged. In this case, apply pressure to the lid for the rst 10
seconds of sealing. Replace the vacuum seals as soon as possible.
7. This model of vaccum sealer is designed for operation with an automatic
programme. On pressing the “Start” button, the vacuum sealer begins an
automatic sealing sequence, changing automatically between the suction and
the sealing stages. The vaccum sealer is equipped with a vacuum gauge which
begins sealing when a vacuum level higher than -750 mbar is detected. Press
the “Cancel” button if you wish to cancel the suction process.
8. The bag sealing process can also be started manually by pressing the “Pulse”
button. With this action you can seal the bag at the time you want by pressing the
”Seal” button. This option enables a bag to be sealed before the maximum va-
cuum level has been reached. This function is especially useful when packing
fragile products or foods that must not be crushed such as cakes, pastry, sh, etc.

14
9. The digital display keeps the user informed of progress:
- When the sealer is at rest the display shows the programmed sealing time.
- Once the “Start” button is pressed a countdown begins showing the time
remaining until the end of the suction stage.
- The sealing time countdown then starts.
10. Automatic lid opening: the machine stops automatically once sealing is
nished. The lid can be raised gently after the “beep” which signals that it has
been automatically realesed.
3.3. Special functions
- Pulse Function: for greater precision when manually vacuum packing fragile
foods, by pressing the “Pulse” button, the machine will vacuum the air con-
tained in the bag while the button is held down. Once you have reached the
desired level of vacuum, press the “Seal” button to start the sealing process.
When this stage ends, the lid opens automatically.
- “Vacuum selector” Function: this function allows you to adjust the vacuum
degree. It is recommended to use the “High” option by default, as this means
more air will be removed from the bag . However, if you are vacuum packing
fragile foods or foods which contain bones, the “Low” option is recommended
so that the vacuum process is more progressive, thereby preventing the food
from spoiling or the bag from tearing. Each time the “Vacuum Level” button is
pressed, the mode changes. The indicator light for each mode will light up when
it is selected.
- Accessory function: this function enables production of vacuums in special
recipients. Connect the suction tube to the recipient connector (5) and the other
end to the recipient (the suction tube and recipients are not included in the va-
cuum sealer). Press the “Accessory” key once the connections are in place
to begin the suction process. Once the maximum vacuum level is reached the
machine will stop automatically. The recipient may then be disconnected. This
function can only be used with accessories designed especially for vacuum
packing.

English
15
3.4. Use the vacuum sealer with rolls
This vacuum sealer is equipped with a roll holder (2) compatible with Elma
vacuum sealing rolls of the following sizes: 15 x 600 cm, 20 x 600 cm and 30 x
600 cm. To insert the vacuum sealing roll in its holder, gently pull the top lid up.
Next, insert the roll in the holder, unroll approximately 20 cm of material, lift the
cutter (11), passing the edge of the roll through the opening. Pull out enough roll
until you have the length of the bag you wish to make, close the cutter and slide
the blade from right to left to cut the piece of roll you wish to remove. Next insert
one of the sides of the piece of roll in the vacuum chamber. It must be centered
in the vacuum chamber and properly spread out over the sealing bar . Lower the
lid, press the “Seal” button and the machine will seal the piece of roll along that
edge, thereby creating a bag. From here, follow the instructions in section 3.2
Instructions for vacuum packing with bags.
04. CLEANING
After using the machine, it is recommended to clean the machine case and the
vacuum chamber with neutral soap in order to guarantee hygiene and proper
maintenance of the vacuum sealer . Similarly, it is important that both the sealing
bar and the sealing gasket (9), as well as the vacuum seals (8), are clean at all
times to ensure the bag is properly sealed. Check periodically that the vacuum
chamber is free of any residues or impurities to avoid blockages in the air va-
cuum process.
3.5. Setting sealing time
The Digit Zero vacuum sealer enables sealing time to be set by using the di-
gital display. With the machine at rest press the +/- keys to increase or de-
crease the sealing time. The variation interval is 1 second per pulse.
Sealing time should be adjusted according to bag thickness and the sea-
ling bar temperature. Elma recommends a sealing time of 5 seconds.

16
PRECAUTIONS
Liquids must be frozen before being vacuum packed, as they can cause serious
damage if they come into contact with the vacuum pump. For the same reason,
when packing meat, please dry it off with a cloth to prevent the aspiration of
its juices. Powdered or granular products must be wrapped in a napkin before
vacuum packing to prevent their aspiration, as they may damage the internal
conduits.
STORAGE
It is important that the vacuum sealer is stored in a dry and cool place, away
from aggressive chemical products and sources of heat. To extend the life of
the vacuum gaskets, when storing the vacuum sealer close the lid without acti-
vating the closing system.
REQUEST FOR SUPPORT
Technical support requests must be submitted following careful analysis (fault
detection and their possible causes). When submitting a request in writing, we
recommend you specify the following information: type of machine, referen-
ce number, detailed fault description, types of test performed and adjustments
made and their effects.
05. MAINTENANCE AND WARNINGS
MAINTENANCE REGULATIONS
The machine must be disconnected for cleaning, maintenance or replacement
of parts.
INFORMATION
Contact Udom S.A. directly regarding any type of maintenance, inspection or
repair.
REPLACEMENT PARTS
Only ORIGINAL SPARES can be used that have been authorized and appro-
ved by Udom S.A. It is recommended that worn components or parts be re-
placed immediately to ensure optimum performance, energy savings, and to
prevent even more serious faults with the vacuum sealer.

English
17
UDOM S.A. declares that the product with reference number 15.13.2 and description
“Vacuum sealer Digit Zero” complies with the following CE marking requirements:
06. DECLARATION OF
CONFORMITY
07. DISPOSAL OF WASTE FROM ELECTRICAL
AND ELECTRONIC EQUIPMENT.
The symbol for the disposal of waste from electrical and electronic equipment
by domestic users in the European Union indicates that the products should not
be mixed with general household waste. The users of electric and electronic
equipment must take them to designated collection points when disposing of
them, where they will be correctly processed. Should you require additional
information regarding the locations where you can deposit such equipment for
recycling, please contact the local authorities in your town or the sales outlet
where you acquired the product.
EN 55 014-1:2006 + A1:2009 + A2:2011 /
EN 55014-2:1997 + A1:2001 + A2:2008 /
EN 61 000-3-2:2014 / EN 61000-3-3:2013 /
EN 60 335-2-45:2002 + A1:2008 + A2: 2012 /
EN 60335-1:2012 + A11:2014 /
EN 62233: 2008

18
01. DESCRIPTION
Le modèle Digit Zero 15.13.2 est un produit conçu pour l’ensachage sous vide à
usage domestique. Ses prestations techniques en font un appareil recomman-
dé pour les usagers exigeants ayant à effectuer souvent des ensachages et qui
ont besoin de résultats durables et sûrs.
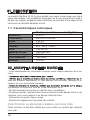
1.1. Caractéristiques techniques
02. AVANT LA MISE EN MARCHE
Machine à emballer sous vide Digit Zero
Référence 15.13.2
Dimensions 396 x 212 x 95 mm
Poids 2,90 Kg
Puissance 200 W
Tension 220 - 240 V / 50 Hz
Bruit < 80 dB (A)
Matériau du bâti Plastique ABS
Barre de scellage 300 mm
Vide maximum -800 mbar
Succion 15 l/min
- Lisez attentivement les instructions suivantes avant chaque utilisation de la ma-
chine.
-
veau des éléments détachables. Si vous détectez une anomalie, contactez le re-
vendeur où vous avez acheté le produit.
signalétique correspond à celle du réseau électrique local.
- Ne laissez jamais la machine en marche sans surveillance.
- Ne plongez jamais l´appareil dans l’eau ou dans tout autre liquide. Dans le cas
contraire, vous vous exposez à un danger d’électrocution.
- Débranchez-la après chaque usage.
- Maintenez l’appareil hors de portée des enfants.
FONCTION DE LA MACHINE À EMBALLER SOUS VIDE
Cette machine ne doit être utilisée que pour mettre en sachets des aliments
sous vide.

19
Français
CONDITIONS D’INSTALLATION
Placer l’ensacheuse sur une surface rigide et horizontale pour éviter oscillations et
vibrations pendant son fonctionnement. La machine doit être installée dans un en-
droit sec et éloignée de sources de chaleur et de zones comportant des matériaux
inammables. Ne pas plonger l’ensacheuse électrique dans l’eau ou n’importe quel
autre liquide.
03. INSTRUCTIONS D’UTILISATION
TEMPS DE CONSERVATION
Le temps de conservation des aliments peut être multiplié par 2 ou 4 par rapport
aux conditions normales ; le temps de conservation est fortement lié aux conditions
dans lesquelles se trouve le produit au moment de l’ensachage et de la quantité
d’eau qu’il contient. Quoi qu’il en soit, les aliments doivent être consommés dans la
date limite indiquée sur l’emballage original.
IMPORTANT
Si les ensachages se succèdent rapidement, il peut se produire un effet de pré-
scellage qui empêche l’extraction de l’air des poches. Attendre quelques secondes
pour que la barre de scellage anti-adhérente de l’ensacheuse refroidisse avant de
continuer.
Types de sachets: Cette ensacheuse ne fonctionne qu’avec des sachets gaufrés
spéciaux pour l’ensachage à vide. Il est conseillé d’utiliser des sachetsoriginaux
Elma pour un meilleur résultat.
POUR
ALLUMER LA MACHINE
- Branchez le câble électrique sur la prise de courant et connectez la machine
au réseau.
- Appuyez sur le bouton “On/Off” du tableau de commandes.
POUR ÉTEINDRE LA MACHINE
- Lorsque la machine est en veille, appuyez sur e bouton “On/Off”.

20
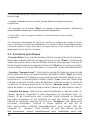
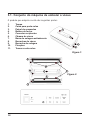
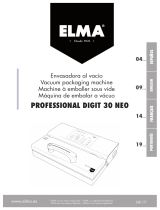
3.1. Ensemble machine à emballer sous vide
Le produit que vous avez acheté comporte les éléments suivants:
1. Couvercle supérieur
2. Logement porte-rouleaux
3. Tableau de commandes
4. Boutons de fermeture
5. Connecteur récipients
6. Chambre à vide
7. Barre de soudure anti-adhérente
8. Joints à vide
9. Joint de soudure
10. Fixations
11. Lame coupe-rouleaux
8
Figure 1.
Figura 2.
10
9
2
11
6
7
Figure 2.
3
1
4
5
A página está carregando...
A página está carregando...
A página está carregando...
A página está carregando...
A página está carregando...
A página está carregando...
A página está carregando...
A página está carregando...
A página está carregando...
A página está carregando...
A página está carregando...
A página está carregando...
A página está carregando...
A página está carregando...
A página está carregando...
A página está carregando...
A página está carregando...
A página está carregando...
A página está carregando...
A página está carregando...
-
 1
1
-
 2
2
-
 3
3
-
 4
4
-
 5
5
-
 6
6
-
 7
7
-
 8
8
-
 9
9
-
 10
10
-
 11
11
-
 12
12
-
 13
13
-
 14
14
-
 15
15
-
 16
16
-
 17
17
-
 18
18
-
 19
19
-
 20
20
-
 21
21
-
 22
22
-
 23
23
-
 24
24
-
 25
25
-
 26
26
-
 27
27
-
 28
28
-
 29
29
-
 30
30
-
 31
31
-
 32
32
-
 33
33
-
 34
34
-
 35
35
-
 36
36
-
 37
37
-
 38
38
-
 39
39
-
 40
40


Elma Digit Zero Manual do proprietário
- Categoria
- Selantes a vácuo
- Tipo
- Manual do proprietário
em outras línguas
- español: Elma Digit Zero El manual del propietario
- français: Elma Digit Zero Le manuel du propriétaire
- English: Elma Digit Zero Owner's manual
Artigos relacionados
-
 Elma Digit One Manual do proprietário
-
 Elma V Plus Manual do proprietário
-
 Elma Digit Free Manual do proprietário
-
 Elma Digit Free Manual do proprietário
-
 Elma Digit 30 Neo Manual do proprietário
-
 Elma Chamber Pro Digit 300 Manual do proprietário
-
 Elma V Start Mini Manual do proprietário
-
 Elma Pro Digit 306 S Manual do proprietário
-
 Elma V Start Manual do proprietário
-
 Elma Digit 40 Neo Manual do proprietário


