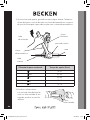
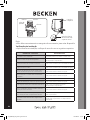
Becken BAC3403 AC 9 12 BTU Manual do proprietário
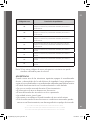
- Categoria
- Condicionadores de ar de sistema split
- Tipo
- Manual do proprietário

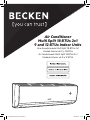
Aire Acondicionado Multi Split 18 BTUs 2x1
Unidad Interior de 9 y 12 BTUs
Ar Condicionado Multi Split 18 BTUs 2x1
Unidade Interior de 9 e 12 BTUs
Air Conditioner
Multi Split 18 BTUs 2x1
9 and 12 BTUs Indoor Units
AF_Manual_AC_061217_EN.indd 1 15/12/2017 11:26

Dear client,
Thank you for purchasing this product.
The quality of this appliance has been certied by several
laboratory tests. This instructions manual is provided to
simplify the use of the appliance as well as to guarantee
a safe use.
Please read carefully the instructions and safety measures
described in this manual.
We sincerely hope you will be satised when using your new
appliance.
AF_Manual_AC_061217_EN.indd 2 15/12/2017 11:26

3
EN
Air Conditioner Multi Split 18 BTUs 2x1 9 and 12 BTUs Indoor Units
Aire Acondicionado Multi Split 18 BTUs 2x1 Unidad Interior de 9 y 12 BTUs
Ar Condicionado Multi Split 18 BTUs 2x1 Unidade Interior de 9 e 12 BTUs
INDEX
1. SAFETY INSTRUCTIONS 4
1.1. Power Supply 5
1.2. Power Cord and Other Cables 5
1.3. Humidity and Water 5
1.4. Cleaning 6
1.5. General Precautions 6
2. OPERATING INSTRUCTIONS 10
2.1. Product Description 10
2.2. Product Usage 18
2.3. Maintenance 34
2.4. Troubleshooting 36
3. POSTSALE SERVICE 40
4. ENVIRONMENTAL PROTECTION 41
AF_Manual_AC_061217_EN.indd 3 15/12/2017 11:26

4
1. SAFETY INSTRUCTIONS
Important Warnings
Before using your appliance read these instructions manual carefully
and keep it in a safe place as you may need to consult it in the future.
Before turning on your appliance, and to ensure a safe and correct
operation, do not use if:
• It has fallen to the ground;
• You notice any evidence of damage;
• Any anomaly occurs during its operation.
To avoid hazards or deterioration of your appliance through incorrect
use it is advisable to read these instructions thoroughly.
Your appliance may not be used for other purposes than the ones
intended and solely for household use. Any damage resulting from
using the appliance outside this scope, any incorrect use, as well as
any manual modifications to the product will not be covered and
automatically voids the warranty.
WARNING
RISK OF ELECTRIC SHOCK
DO NOT OPEN
Warning: to avoid the risk of electric shock, do not
remove the cover. The interior does not contain any parts
that can be repaired by the user. Ask for the Customer
Support Service.
AF_Manual_AC_061217_EN.indd 4 15/12/2017 11:26

5
EN
Air Conditioner Multi Split 18 BTUs 2x1 9 and 12 BTUs Indoor Units
Aire Acondicionado Multi Split 18 BTUs 2x1 Unidad Interior de 9 y 12 BTUs
Ar Condicionado Multi Split 18 BTUs 2x1 Unidade Interior de 9 e 12 BTUs
Assistance
In case of malfunction, take your appliance to the Customer Support
Service for assistance.
This appliance can be used by children from the age of 8 and by
people with reduced physical, sensorial or mental capabilities and/or
lack of experience and knowledge if they have been given instructions
on using the appliance safely and if they understand the hazards
involved. Children may not play with the appliance. Cleaning and
maintenance must not be carried out by children without supervision.
These instructions are also available at www.suporteworten.pt
1.1. Power Supply
Make sure the main voltage is compatible with the appliance’s. If this is
not the case, please consult the Customer Support Service.
1.2. Power Cord and Other Cables
Do not tangle the cord or pull it to disconnect the appliance. Also, keep
the cord away from warm surfaces.
Never use the appliance if it has a damaged cable or socket.
Take it to the Customer Support Service for replacement.
1.3. Humidity and Water
Do not use your appliance in humid places. Do not allow the appliance
to become wet under any circumstances as this may be dangerous.
To avoid re hazard or electric shock do not expose your appliance
to humidity or water. Furthermore, do not place your appliance under
water (e.g. for cleaning).
AF_Manual_AC_061217_EN.indd 5 15/12/2017 11:26

6
1.4. Cleaning
Before cleaning, be sure to switch o the appliance and remove the
plug from the main power supply. Always allow the unit to cool down
before cleaning.
To clean the exterior of the product, use a dry soft cloth only.
1.5. General Precautions
• Please follow the instructions in the user manual which help to
properly install and operate this product and enjoy its advanced
features. Please keep the instructions for future reference.
• Read all instructions before using the product.
• Maintenance and service operations are only to be carried out by
authorized professionals.
• Any damage caused by manual modications to the product is not
covered by the warranty.
• If this product is used for other purposes than the ones originally
intended, or if it is not correctly connected, the product may become
damaged and the warranty will be voided.
• Do not connect this air conditioner to multi-purpose sockets.
Otherwise, it may cause a re hazard.
• Please disconnect the air conditioner from the power supply when
cleaning. Otherwise, it may cause an electric shock.
• If the supply cord is damaged, it must be replaced by the
manufacturer, its service agent or similarly qualied professionals in
order to avoid a hazard.
• Do not wash the air conditioner with water to avoid an electric shock.
AF_Manual_AC_061217_EN.indd 6 15/12/2017 11:26

7
EN
Air Conditioner Multi Split 18 BTUs 2x1 9 and 12 BTUs Indoor Units
Aire Acondicionado Multi Split 18 BTUs 2x1 Unidad Interior de 9 y 12 BTUs
Ar Condicionado Multi Split 18 BTUs 2x1 Unidade Interior de 9 e 12 BTUs
• Do not spray water on the indoor unit, as it may cause an electric
shock or malfunction.
• After removing the lter, do not touch the ns to avoid an injury.
• Do not use re or a hair dryer to dry the lter to avoid deformation or
a re hazard.
• Do not repair the air conditioner by yourself, as it may cause an
electric shock or damage. Please contact your dealer when you need
to repair it.
• Do not put your ngers or any objects into the air inlet or air outlet,
as it may cause a personal injury or damage.
• Do not block the air outlet or air inlet, since it may cause malfunction.
• Do not spill water on the remote control, as this may damage the
remote control. When below phenomenon occurs, please turn o
the air conditioner and disconnect the power immediately, and then
contact your dealer or qualied professionals for service:
• The power cord is overheating or damaged.
• There is an abnormal sound during operation.
• The circuit break trips o frequently.
• The air conditioner gives o a burning smell.
• The indoor unit is leaking. If the air conditioner operates under abnormal
conditions, it may cause a malfunction, electric shock or re hazard.
• When turning the unit on or o using the emergency operation switch,
please press this switch with an insulating object other than metal.
AF_Manual_AC_061217_EN.indd 7 15/12/2017 11:26

8
• Do not step or place heavy objects on the top panel of the outdoor
unit. This may cause damage or personal injury.
• The installation must be performed by qualied professionals.
Otherwise, it may cause personal injury or damage.
• Please follow the electric safety regulations when installing the unit.
• According to the local safety regulations, use a qualied power
supply circuit and circuit breaker.
• Please install the circuit breaker. If not, it may cause malfunction.
• An all-pole disconnection switch with a contact separation of at least
3 mm regarding all poles should be connected in your xed wiring.
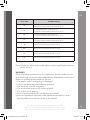
• When including a circuit breaker with suitable capacity, please note
the following table. The air switch should include a magnet buckle
and heating buckle function, as it can protect against a circuit-short
and overload.
• The Air Conditioner should be properly grounded. Incorrect
grounding may cause an electric shock.
• Do not use an unqualied power cord.
• Make sure the power supply matches the requirement of the air
conditioner in order to avoid unstable power supply or incorrect
wiring or malfunction. Please install proper power supply cables
before using the air conditioner.
• Properly connect the power socket’s live wire, neutral wire and
grounding wire.
• Be sure to cut o the power supply before performing any work
related to electricity and safety.
AF_Manual_AC_061217_EN.indd 8 15/12/2017 11:26

9
EN
Air Conditioner Multi Split 18 BTUs 2x1 9 and 12 BTUs Indoor Units
Aire Acondicionado Multi Split 18 BTUs 2x1 Unidad Interior de 9 y 12 BTUs
Ar Condicionado Multi Split 18 BTUs 2x1 Unidade Interior de 9 e 12 BTUs
• Do not turn the power on before nishing the installation.
• If the supply cord is damaged, it must be replaced by the
manufacturer, its service agent or similarly qualied professionals in
order to avoid a hazard.
• If the refrigerant circuit’s temperature is high, please keep the
interconnection cable away from the copper tube.
• The appliance must be installed in accordance with national wiring
regulations.
• The installation must be performed by authorized personnel only in
accordance with NEC and CEC requirements.
• This air conditioner is a rst-class electric appliance. It must be
properly grounded by a professional with a specialized grounding
device. Please make sure it is always eectively grounded, otherwise
it may cause an electric shock.
• The yellow-green wire in the air conditioner is a grounding wire,
which cannot be used for other purposes.
• The grounding resistance should comply with national electric safety
regulations.
• The appliance must be positioned so that the plug is accessible.
• All wires of the indoor and outdoor units should be connected by a
professional.
• If the length of the power connection wire is insuicient, please contact
the supplier for a new one. Avoid extending the wire by yourself.
• For an air conditioner with plug, the plug should be reachable after
nishing the installation.
AF_Manual_AC_061217_EN.indd 9 15/12/2017 11:26

10
• For an air conditioner without plug, a circuit breaker must be
installed in the line.
• If you need to relocate the air conditioner to another place, only
qualied professionals can perform the work. Otherwise, it may cause
a personal injury or damage.
• Select a location that is out of reach for children and far away from
animals or plants. If this cannot be avoided, please add a fence for
safety purposes.
• The indoor unit should be installed close to the walk.
2. OPERATING INSTRUCTIONS
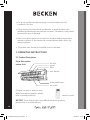
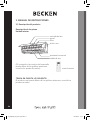
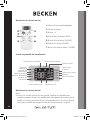
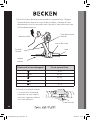
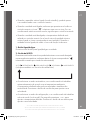
2.1. Product Description
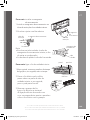
Parts Description
Indoor Unit air inlet
panel
lter
aux. button
horizontal louver
air outlet
remote control
(Display content or position may
dier from above graphics, please
refer to actual products)
NOTICE: The actual product may dier from above graphics,
please refer to actual products.
AF_Manual_AC_061217_EN.indd 10 15/12/2017 11:26

11
EN
Air Conditioner Multi Split 18 BTUs 2x1 9 and 12 BTUs Indoor Units
Aire Acondicionado Multi Split 18 BTUs 2x1 Unidad Interior de 9 y 12 BTUs
Ar Condicionado Multi Split 18 BTUs 2x1 Unidade Interior de 9 e 12 BTUs
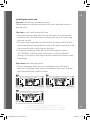
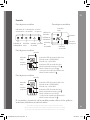
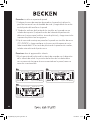
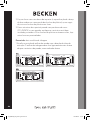
Display
For some models: For some models:
For some models:
display
temp.
indicator
receiver
window
LED color power indicator:
Green status - ON
Red status - OFF
LED color mode indicator:
White/W Cool Mode
Red/R Heat Mode (only for heating model)
Orange/O Dry Mode
Display content or position may dier from above graphics; please refer
to actual products.
cooling
indicator
power
indicator
receiver
window
displaydrying
indicator
temp.
indicator
heating
indicator
heating
indicator
cooling
indicator
power
indicator
drying
indicator
receiver
window
display
temp.
indicator
For some models:
display
temp.
indicator
receiver
window
LED color power indicator:
Green status - ON
Red status - OFF
LED color mode indicator:
White/W Cool Mode
Red/R Heat Mode (only for heating model)
Green/G Dry Mode
AF_Manual_AC_061217_EN.indd 11 15/12/2017 11:26

12
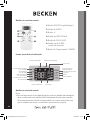
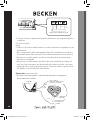
Buttons on remote control
1. ON/OFF button
2. MODE button
3. +/- button
4. FAN button
5. SWING button
6. SLEEP button
7. TIMER button
Icons on display screen
Timer on Timer o
Sending signal
swing operation
sleep operation
set speed
lock
Set timeSet temperature
auto operation
cool operation
fan operation
dry operation
heat operation
Buttons on remote control
Note:
• This is a general use remote control, and it could be used for air
conditioners with multifunction; For some functions that the model
does not have, pressing the corresponding button on the remote
control will make the unit keep the original running status.
AF_Manual_AC_061217_EN.indd 12 15/12/2017 11:26

13
EN
Air Conditioner Multi Split 18 BTUs 2x1 9 and 12 BTUs Indoor Units
Aire Acondicionado Multi Split 18 BTUs 2x1 Unidad Interior de 9 y 12 BTUs
Ar Condicionado Multi Split 18 BTUs 2x1 Unidade Interior de 9 e 12 BTUs
• When power is connected (standby status), you can operate the air
conditioner through the remote control.
• When unit is on, each time you press the button on the remote
control, the sending signal icon “ “ on the remote’s display will
blink once. If the air conditioner gives out a beeping sound, it means
the signal has been sent.
• When unit is o, the set temperature will be displayed on the
remote control (if the indoor unit’s display light is turned on, the
corresponding icon will be displayed); When the unit is on, it will
display the icon for on-going function.
1 - ON/OFF button
Press this button to turn the unit on/o.
2 - MODE button
Pressing this button once can select your required mode in a loop
sequence as below (the corresponding icon “ “ will light up as soon
as the mode is selected):
AUTO COOL DRY FAN HEAT
(Only for models with
heating function)
• When selecting auto mode, the air conditioner will operate
automatically according to ambient temperature. The set
temperature cannot be adjusted and will not be displayed either.
Press the FAN button to adjust the fan speed.
• When selecting cool mode, the air conditioner will operate under cool
mode. Afterwards, press + or - button to adjust the set temperature.
Press the FAN button to adjust the fan speed.
AF_Manual_AC_061217_EN.indd 13 15/12/2017 11:26

14
• When selecting dry mode, the air conditioner will operate at low
fan speed under dry mode. In dry mode, the fan speed cannot be
adjusted.
• When selecting fan mode, the air conditioner will operate in fan
mode only. Afterwards, press the FAN button to adjust the fan speed.
• When selecting heat mode, the air conditioner will operate under
heat mode. Afterwards, press + or - button to adjust the set
temperature. Press the FAN button to adjust the fan speed.
(A cooling only unit cannot receive a heating mode signal. If you set
the HEAT mode via the remote control, pressing the ON/OFF button
cannot turn the air conditioner on).
3 - + / - buttons
• Pressing + or - buttons once will increase or decrease the set
temperature by 1 °F (°C). Hold + or - button for 2 sec. and the set
temperature on the remote control will quickly change. Release the
button after your required set temperature is reached.
• When setting Timer On or Timer O, press + or - button to adjust
the time. (See TIMER Button for setting details)
4 - FAN button
Pressing this button can select the fan speed in a loop sequence as follows:
AUTO, SPEED 1 ( ), SPEED 2 ( ), SPEED 3 ( ), SPEED 4 ( ).
AUTO
Note:
• Under Auto speed, the air conditioner will automatically select a proper
fan speed according to ambient temperature.
• The fan speed cannot be adjusted under Dry mode.
AF_Manual_AC_061217_EN.indd 14 15/12/2017 11:26

15
EN
Air Conditioner Multi Split 18 BTUs 2x1 9 and 12 BTUs Indoor Units
Aire Acondicionado Multi Split 18 BTUs 2x1 Unidad Interior de 9 y 12 BTUs
Ar Condicionado Multi Split 18 BTUs 2x1 Unidade Interior de 9 e 12 BTUs
5 - SWING button
Press this button to turn the up&down air swing on.
6 - SLEEP button
Under Cool, Heat and Dry modes, press this button to turn the Sleep
function on. Press this button again to cancel the Sleep function. Under
Fan and Auto modes, this function is unavailable.
7 - TIMER button
• When the unit is on, press this button to set Timer O. T-OFF and H
icon will be blinking. Within 5 sec., press + or - button to adjust the time
for Timer O. Pressing + or - buttons once will increase or decrease the
time by 0.5 h. Hold + or - button for 2 sec. and time will quickly change.
Release the button after your required set time is reached. Then press
the TIMER button to conrm it. T-OFF and H icon will stop blinking.
• When the unit is o, press this button to set Timer On. T-ON and H icon
will be blinking. Within 5 sec., press + or - button to adjust the time for
Timer On. Pressing + or - buttons once will increase or decrease the time
by 0.5 h. Hold + or - button for 2s, time will change quickly. Release the
button after your required set time is reached. Then press the TIMER
button to conrm it. T-ON and H icon will stop blinking.
• Cancel Timer On/O: If the Timer function is setup, press the TIMER
button once to review the remaining time. Within 5 sec., press the TIMER
button again to cancel this function.
Note:
• The time setting range is: 0.5 ~ 24 h
• The interval between two actions cannot exceed 5 sec., otherwise the
remote control will exit the setting status.
Combination buttons
Child lock function
Pressing “+” and “-” buttons simultaneously can turn the child lock function
AF_Manual_AC_061217_EN.indd 15 15/12/2017 11:26

16
on or o. When the child lock function is setup, the LOCK indicator on the
remote control is ON. If you operate the remote control, it will not send any
signals.
Temperature display switchover function
Under OFF status, pressing “-” button and “MODE” button simultaneously
can switch between °C and °F.
Light function
Under switch-on or switch-o state, you may hold “+”and “FAN” buttons
simultaneously for 3 seconds to set the lamp on or o and send the code.
After being energized the lamp will be on by default.
Operation guide
1. After switching the power on, press the “ON/OFF” button on the remote
control to turn the air conditioner on.
2. Press the “MODE” button to select your required mode: AUTO, COOL,
DRY, FAN, HEAT.
3. Press “+” or “-” button to set your required temperature. (Temperature
cannot be adjusted under auto mode).
4. Press the “FAN” button to set your required fan speed: auto, low,
medium and high speed.
5. Press the “SWING” button to select a fan blowing angle.
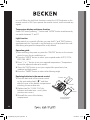
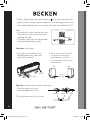
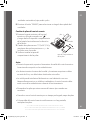
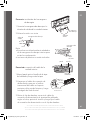
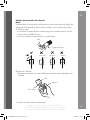
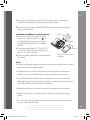
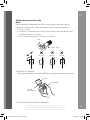
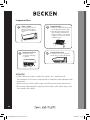
Replacing batteries in the remote control
1. Press the back side of the remote control
on the spot marked with “ “, and then
slide the cover of the battery compartment
out along the arrow direction.
2. Replace two No. 7 (AAA 1.5 V) dry
batteries and make sure + and - polar
positions are correct.
3. Reinstall the cover of the battery
compartment.
battery
reinstall
remove
cover of battery
compartment
AF_Manual_AC_061217_EN.indd 16 15/12/2017 11:26

17
EN
Air Conditioner Multi Split 18 BTUs 2x1 9 and 12 BTUs Indoor Units
Aire Acondicionado Multi Split 18 BTUs 2x1 Unidad Interior de 9 y 12 BTUs
Ar Condicionado Multi Split 18 BTUs 2x1 Unidade Interior de 9 e 12 BTUs
Notice
• During operation, point the remote control’s signal sender at the
receiving window on the indoor unit.
• The distance between the signal sender and the receiving window
should be no more than 8 m, and there should be no obstacles between
them.
• The signal may be easily interfered in a room with a uorescent lamp or
wireless telephone; the remote control should be close to the indoor unit
during operation.
• Replace the batteries for new ones of the same kind when replacement
is required.
• When you do not use the remote control for a long time, please take out
the batteries.
• If the display on the remote control is fuzzy or there is no display, please
replace the batteries.
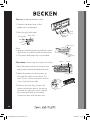
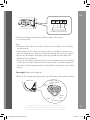
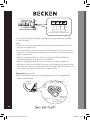
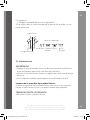
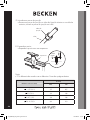
Emergency operation
If the remote control is lost or damaged, please use the auxiliary button
to turn the air conditioner on or o. Please check the detailed operation
below: As shown in the gure, open the panel and press the aux. button to
turn the air conditioner on or o. When the air conditioner is turned on, it
will operate under auto mode.
WARNING:
Use an insulated object to press the auto button.
panel aux. button
AF_Manual_AC_061217_EN.indd 17 15/12/2017 11:26

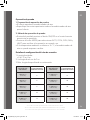
18
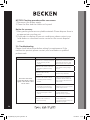
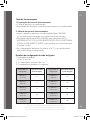
2.2. Product usage
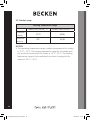
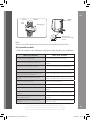
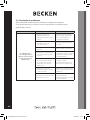
Working temperature range
Indoor side DB/WB (°C) Outdoor side DB/WB (°C)
Maximum
cooling 32/23 43/26
Maximum
heating 27/- 24/18
NOTICE:
• The operating temperature range (outdoor temperature) for cooling
is -15 ºC ~ 43 ºC; The heating temperature range for the model with-
out an electric heating belt for chassis is -15 ºC ~ 24 ºC; The heating
temperature range for the model with an electric heating belt for
chassis is -20 ºC ~ 24 ºC.
AF_Manual_AC_061217_EN.indd 18 15/12/2017 11:26

19
EN
Air Conditioner Multi Split 18 BTUs 2x1 9 and 12 BTUs Indoor Units
Aire Acondicionado Multi Split 18 BTUs 2x1 Unidad Interior de 9 y 12 BTUs
Ar Condicionado Multi Split 18 BTUs 2x1 Unidade Interior de 9 e 12 BTUs
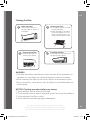
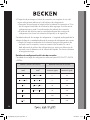
Safety precautions for installing
and relocating the unit
To ensure safety, please consider
the following precautions.
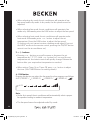
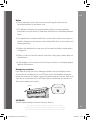
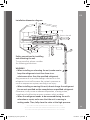
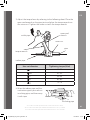
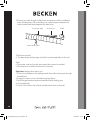
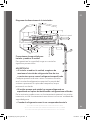
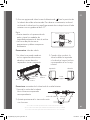
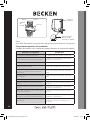
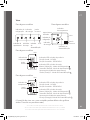
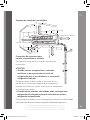
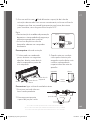
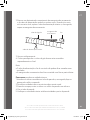
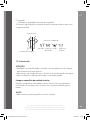
Installation dimension diagram
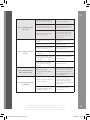
WARNING
• When installing or relocating the unit, make sure to
keep the refrigerant circuit free from air or
substances other than the specified refrigerant.
Any presence of air or other foreign substances in the
refrigerant circuit will increase the system’s pressure or
cause a compressor rupture, resulting in an injury.
• When installing or moving this unit, do not charge the refrigerant
for one not specified on the nameplate or unqualified refrigerant.
Otherwise, it may cause an abnormal operation, a wrong action,
a mechanical malfunction or even a serious safety accident.
• When the refrigerant needs to be recovered during the unit’s
relocation or repair, make sure that the unit is running in
cooling mode. Then, fully close the valve at the high-pressure
At least 15cm
At least 15cm
At least 15cm
At least 300cm
Space to the wall
Space to the wall
Space to the ceiling
At least 250cm
Space to the obstruction
Space to the oor
AF_Manual_AC_061217_EN.indd 19 15/12/2017 11:26

20
side (liquid valve). About 30-40 seconds later, fully close the
valve at the low-pressure side (gas valve), immediately stop the
unit and switch the power o. Please note that the refrigerant
recovery should not exceed 1 minute.
If the refrigerant recovery takes too much time, air may be sucked in
and cause the pressure to rise or a compressor rupture, resulting in an
injury.
• During the refrigerant recovery, make sure that the liquid valve
and gas valve are fully closed, and power is switched o before
detaching the connection pipe.
If the compressor starts running when the stop valve is open, and the
connection pipe is not yet connected, air will be sucked in and cause
the pressure to rise or a compressor rupture, resulting in an injury.
• When installing the unit, make sure that the connection pipe is
securely connected before the compressor starts running.
If the compressor starts running when the stop valve is open, and the
connection pipe is not yet connected, air will be sucked in and cause
the pressure to rise or a compressor rupture, resulting in an injury.
• It is forbidden to install the unit in a place where there may be
leaked corrosive gas or flammable gas.
If there is leaked gas around the unit, it may cause an explosion and
other accidents.
• Do not use extension cords for electrical connections. If the elec-
tric wire is not long enough, please contact an authorized local
service centre and ask for a proper electric wire.
Poor connections may lead to an electric shock or fire.
• Use the specified types of wires for electrical connections be-
tween the indoor and outdoor units. Firmly clamp the wires so
that their terminals receive no external stresses.
Electric wires with insuicient capacity, wrong wire connections and
insecure wire terminals may cause an electric shock or fire.
AF_Manual_AC_061217_EN.indd 20 15/12/2017 11:26
A página está carregando ...
A página está carregando ...
A página está carregando ...
A página está carregando ...
A página está carregando ...
A página está carregando ...
A página está carregando ...
A página está carregando ...
A página está carregando ...
A página está carregando ...
A página está carregando ...
A página está carregando ...
A página está carregando ...
A página está carregando ...
A página está carregando ...
A página está carregando ...
A página está carregando ...
A página está carregando ...
A página está carregando ...
A página está carregando ...
A página está carregando ...
A página está carregando ...
A página está carregando ...
A página está carregando ...
A página está carregando ...
A página está carregando ...
A página está carregando ...
A página está carregando ...
A página está carregando ...
A página está carregando ...
A página está carregando ...
A página está carregando ...
A página está carregando ...
A página está carregando ...
A página está carregando ...
A página está carregando ...
A página está carregando ...
A página está carregando ...
A página está carregando ...
A página está carregando ...
A página está carregando ...
A página está carregando ...
A página está carregando ...
A página está carregando ...
A página está carregando ...
A página está carregando ...
A página está carregando ...
A página está carregando ...
A página está carregando ...
A página está carregando ...
A página está carregando ...
A página está carregando ...
A página está carregando ...
A página está carregando ...
A página está carregando ...
A página está carregando ...
A página está carregando ...
A página está carregando ...
A página está carregando ...
A página está carregando ...
A página está carregando ...
A página está carregando ...
A página está carregando ...
A página está carregando ...
A página está carregando ...
A página está carregando ...
A página está carregando ...
A página está carregando ...
A página está carregando ...
A página está carregando ...
A página está carregando ...
A página está carregando ...
A página está carregando ...
A página está carregando ...
A página está carregando ...
A página está carregando ...
A página está carregando ...
A página está carregando ...
A página está carregando ...
A página está carregando ...
A página está carregando ...
A página está carregando ...
A página está carregando ...
A página está carregando ...
A página está carregando ...
A página está carregando ...
A página está carregando ...
A página está carregando ...
A página está carregando ...
A página está carregando ...
A página está carregando ...
A página está carregando ...
A página está carregando ...
A página está carregando ...
A página está carregando ...
A página está carregando ...
A página está carregando ...
A página está carregando ...
A página está carregando ...
A página está carregando ...
A página está carregando ...
A página está carregando ...
A página está carregando ...
A página está carregando ...
A página está carregando ...
A página está carregando ...
A página está carregando ...
A página está carregando ...
-
 1
1
-
 2
2
-
 3
3
-
 4
4
-
 5
5
-
 6
6
-
 7
7
-
 8
8
-
 9
9
-
 10
10
-
 11
11
-
 12
12
-
 13
13
-
 14
14
-
 15
15
-
 16
16
-
 17
17
-
 18
18
-
 19
19
-
 20
20
-
 21
21
-
 22
22
-
 23
23
-
 24
24
-
 25
25
-
 26
26
-
 27
27
-
 28
28
-
 29
29
-
 30
30
-
 31
31
-
 32
32
-
 33
33
-
 34
34
-
 35
35
-
 36
36
-
 37
37
-
 38
38
-
 39
39
-
 40
40
-
 41
41
-
 42
42
-
 43
43
-
 44
44
-
 45
45
-
 46
46
-
 47
47
-
 48
48
-
 49
49
-
 50
50
-
 51
51
-
 52
52
-
 53
53
-
 54
54
-
 55
55
-
 56
56
-
 57
57
-
 58
58
-
 59
59
-
 60
60
-
 61
61
-
 62
62
-
 63
63
-
 64
64
-
 65
65
-
 66
66
-
 67
67
-
 68
68
-
 69
69
-
 70
70
-
 71
71
-
 72
72
-
 73
73
-
 74
74
-
 75
75
-
 76
76
-
 77
77
-
 78
78
-
 79
79
-
 80
80
-
 81
81
-
 82
82
-
 83
83
-
 84
84
-
 85
85
-
 86
86
-
 87
87
-
 88
88
-
 89
89
-
 90
90
-
 91
91
-
 92
92
-
 93
93
-
 94
94
-
 95
95
-
 96
96
-
 97
97
-
 98
98
-
 99
99
-
 100
100
-
 101
101
-
 102
102
-
 103
103
-
 104
104
-
 105
105
-
 106
106
-
 107
107
-
 108
108
-
 109
109
-
 110
110
-
 111
111
-
 112
112
-
 113
113
-
 114
114
-
 115
115
-
 116
116
-
 117
117
-
 118
118
-
 119
119
-
 120
120
-
 121
121
-
 122
122
-
 123
123
-
 124
124
-
 125
125
-
 126
126
-
 127
127
-
 128
128


Becken BAC3403 AC 9 12 BTU Manual do proprietário
- Categoria
- Condicionadores de ar de sistema split
- Tipo
- Manual do proprietário
em outros idiomas
Artigos relacionados
Outros documentos
-
Hisense AP10CR1W Guia de instalação
-
mundoclima MUEX-H6 “MultiSplit System” Guia de instalação
-
-
-
-
-