
Quick Start Guide
www.imoulife.com
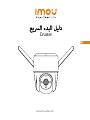
Cruiser

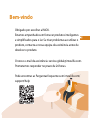
Welcome
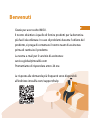
Thank you for choosing IMOU.
We are devoted to providing you easy smart home products.
If you have problems using the product, please contact
our service team before returning your product.
Our service mail: service.global@imoulife.com
Frequently asked questions can be found at
imoulife.com/support/help

Note:
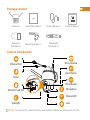
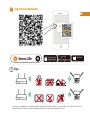
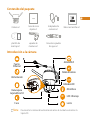
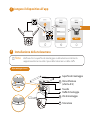
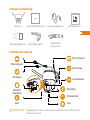
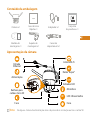
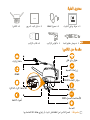
Package content
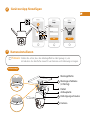
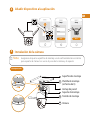
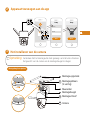
Camera introduction
Mounting
Template ×1
Camera ×1 Quick Start Guide ×1 Screw Package ×1Power Adapter ×1
Waterproof
Connector ×1
Mounting Bracket ×1
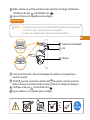
Lens
IR
LED Indicator
Spotlight
Reset Button
Micro SD Card Slot
Ethernet Port
Power
Wi-Fi Antenna
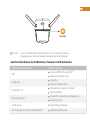
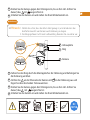
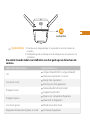
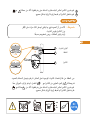
Disconnect the camera from the power before installation or taking out its SD card.
Infrared LED
Microphone

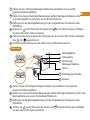
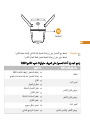
Note:
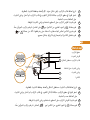
1. Press and hold the reset button for 10 s to reset the camera.
2. Double-press the reset button to enable camera’s hotspot.
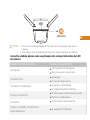
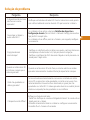
See the table below for definitions of camera’s LED behaviors.
LED Indicator Status
Device Status
Pairing falied
Ready for network configuration
Power off/LED turned off
Rebooting after reset
off
Solid red
Flashing red
Flashing green
Solid green
Flashing green and red alternately
Operating properly
Updating firmware
Ready to pair
Booting
Device malfunction
Network connection failed
Speaker

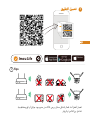
Tips
i
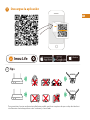
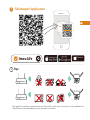
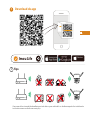
To ensure the best possible wireless performance, please make sure there are no obstacles and
electromagnetic interference between the camera and router.
Windows
Imou Life
1
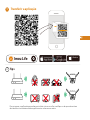
Download the APP

Note:
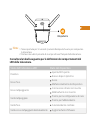
Make sure that the mounting surface is strong enough to hold at least three
times the weight of the camera and the bracket.
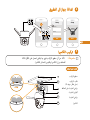
Setup
WIFI Name
Password
Next
Setup
Done
2
3
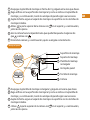
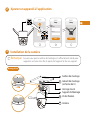
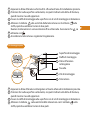
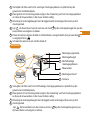
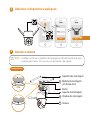
Installing Camera
Ceiling Mount
Camera
Mounting Screw
Mounting Bracket
Mounting Template
(U-shaped)
Wall Anchor
Mounting Surface
1
2
3
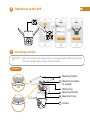
Add device to the APP

1
2
3
4
Camera
1
2
3
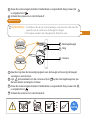
Wall Mount
Mounting Screw
Rectangular
Mounting Template
Wall Anchor
Mounting Bracket
Mounting Surface
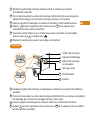
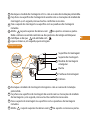
Peel off the U-shaped mounting template and stick it to the desired installation
area.
Drill holes into the mounting surface as the mounting template marks and then
insert wall anchors as needed.
Secure the mounting bracket to the surface with included mounting screws.
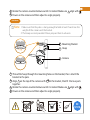
Align on the top of the camera with on the bracket, then fit the two parts
together.
Rotate the camera counterclockwise until it is locked. Make sure align with .
Power on the camera and then adjust its angle properly.
1
2
3
4
5
6
Peel off the rectangular mounting template and stick it to the desired installation
area.
Drill holes into the mounting surface as the mounting template marks and then
insert wall anchors as needed.
Secure the mounting bracket to the surface with included mounting screws.
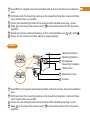
Align on the top of the camera with on the bracket, then fit the two parts
together.

1
2
3
4
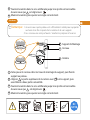
Thread the hoop through the mounting holes on the bracket, then attach the
bracket to the pole.
Align on the top of the camera with on the bracket, then fit the two parts
together.
Rotate the camera counterclockwise until it is locked. Make sure align with .
Power on the camera and then adjust its angle properly.
Camera
1
3
2
Pole Mount
Mounting Bracket
Hoop
Note:
1. Make sure that the pole is strong enough to hold at least three times the
weight of the camera and the bracket.
2. The hoops are not provided. Please prepare them in advance.
+60
-30
DC
12V1A
Rotate the camera counterclockwise until it is locked. Make sure align with .
Power on the camera and then adjust its angle properly.
5
6

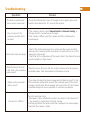
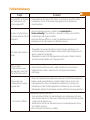
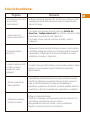
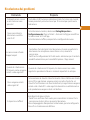
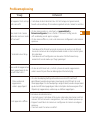
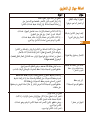
Troubleshooting
How to connect the
camera to another Wi-Fi
network?
• Check the LED indicator status. If the light is not in green, press and hold the reset button for 10 s to reset the camera.
• If you have activated the cloud storage and installed a micro SD card, \
the recordings will be both saved to the card and cloud. If the cloud
storage is deactivated, the recordings are saved to the SD card. Videos
recorded during live view or playback is saved on your phone.
Check the indicator status:
• Solid green: Check whether the router can connect to the Internet. If
the network is connected, restart the camera.
• Flashing red: Reset the camera, and then configure the camera again.
• Solid red: The camera is faulty.
• If the camera is online, select Device Details > Network Config to
change the Wi-Fi connection on the app.
• If the camera is offline, reset the camera, and then configure the
camera again.
• Check if the distance between the camera and the router, and that
between the camera and the smart phone is both within 5 m (16.4 ft)
during the connection.
• Check the Wi-Fi configuration of the router: Select the channel to auto,
and the mode to 11bgn mixed.
• When the micro SD card is full, the system will overwrite the previous
recorded videos. Save the important information in time.
The device cannot boot
up or work as expected?
Connection takes too long?
When the micro SD card
is full, how is the recorded
video saved?
Where are the recorded
videos saved?
The device is offline?
Question Answer

Kurzanleitung
www.imoulife.com
Cruiser

Willkommen
Vielen Dank, dass Sie sich für IMOU entschieden haben.
Wir sind bestrebt, einfachere Produkte für das intelligente
Heim anzubieten. Wenn Sie Probleme bei der Verwendung
des Produkts haben, wenden Sie sich bitte an unser
Serviceteam.
Unsere Service-Mail lautet: [email protected]
Häufig gestellte Fragen finden Sie unter imoulife.com/
support/help

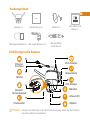
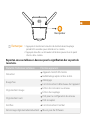
Packungsinhalt
Einführung in die Kamera
Montageschablone ×1
Kamera ×1 Kurzanleitung ×1 Schrauben und
Dübe ×1
Netzteil ×1
Wasserdichter
Anschluss ×1
Montagehalterung ×1
Objektiv
IR
LED-Anzeige
Scheinwerfer
Infrarot-LED
Mikrofon
Rücksetztaste
MicroSD-
Kartensteckplatz
Ethernet-
Anschluss
Wi-Fi Antenne
Trennen Sie die Kamera von der Stromversorgung, bevor Sie die SD-Karte
einsetzen oder herausnehmen.
Hinweis:
Netzteil

1. Halten Sie die Rücksetz-/Kopplungstaste 10 Sekunden lang gedrückt, um
die Kamera zurückzusetzen.
2. Drücken Sie zweimal die Reset-Taste, um den Hotspot der Kamera zu
aktivieren.
Hinweis:
Informationen zur Bedeutung der LED-Signale entnehmen Sie bitte der
folgenden Tabelle.
LED-Anzeigestatus
Gerätestatus
Kopplung fehlgeschlagen
Bereit zur Netzwerkkonfiguration
Gerät/LED ausgeschaltet
Gerät fährt nach Rücksetzung hoch
Aus
Rot leuchtend
Rot blinkend
Grün blinkend
Grün leuchtend
Abwechselnd grün und rot blinkend
Ordnungsgemäßer Betrieb
Firmware wird aktualisiert
Bereit zum Koppeln
Gerät fährt hoch
Gerätestörung
Netzwerkverbindung fehlgeschlagen
Lautsprecher

Tips
i
Um die bestmögliche Funkübertragung zu gewährleisten, stellen Sie sicher, dass zwischen Kamera und
Router keine Hindernisse und elektromagnetische Störungen vorhanden sind.
1
App herunterladen
Windows
Imou Life

Stellen Sie sicher, dass die Montagefläche stabil genug ist, um
mindestens das dreifache Gewicht von Kamera und Halterung zu tragen.
Hinweis:
2
3
Kamerainstallieren
Deckenmontage
Kamera
Befestigungsschraube
Anbauplatte
Montageschablone
(U-förmig)
Dübel
Montagefläche
1
2
3
Gerät zur App hinzufügen
Setup
WIFI Name
Password
Next
Setup
Done

Ziehen Sie die rechteckige Montageschablone ab und kleben Sie sie auf die
gewünschte Montagefläche.
Bohren Sie entsprechend den Markierungen auf der Montageschablone Löcher in die
Montagefläche und setzen Sie bei Bedarf Dübel ein.
Befestigen Sie die Montagehalterung mit den mitgelieferten Schrauben an der
Oberfläche.
Richten Sie an der Oberseite der Kamera mit an der Halterung aus und fügen
Sie dann die beiden Teile zusammen.
Ziehen Sie die U-förmige Montageschablone ab und kleben Sie sie auf die
gewünschte Montagefläche.
Bohren Sie entsprechend den Markierungen auf der Montageschablone Löcher
in die Montagefläche und setzen Sie bei Bedarf Dübel ein.
Befestigen Sie die Montagehalterung mit den mitgelieferten Schrauben an der
Oberfläche.
Richten Sie an der Oberseite der Kamera mit an der Halterung aus und fügen
Sie dann die beiden Teile zusammen.
Drehen Sie die Kamera gegen den Uhrzeigersinn, bis sie fest sitzt. Achten Sie darauf,
dass mit ausgerichtet ist.
Schalten Sie die Kamera ein und stellen Sie ihren Winkel korrekt ein.
1
2
3
4
5
6
1
2
3
4
Wandmontage
Kamera
1
2
3
Befestigungsschraube
Rechteckige
Montageschablone
Dübel
Anbauplatte
Montagefläche

Guía de inicio rápido
www.imoulife.com
Cruiser

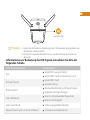
Führen Sie den Ring durch die Montagelöcher der Halterung und befestigen Sie
die Halterung am Mast.
Richten Sie an der Oberseite der Kamera mit an der Halterung aus und
fügen Sie dann die beiden Teile zusammen.
Drehen Sie die Kamera gegen den Uhrzeigersinn, bis sie fest sitzt. Achten Sie
darauf, dass mit ausgerichtet ist.
Schalten Sie die Kamera ein und stellen Sie ihren Winkel korrekt ein.
Drehen Sie die Kamera gegen den Uhrzeigersinn, bis sie fest sitzt. Achten Sie
darauf, dass mit ausgerichtet ist.
Schalten Sie die Kamera ein und stellen Sie ihren Winkel korrekt ein.
1
2
3
4
Kamera
1
3
2
Masthalterung
Anbauplatte
Ring
Hinweis:
1. Stellen Sie sicher, dass der Mast stabil genug ist, um mindestens das
dreifache Gewicht von Kamera und Halterung zu tragen.
2. Die Ringe gehören nicht zum Lieferumfang. Bereiten Sie sie vorher vor.
5
6
+60
-30
DC
12V1A

Wie kann ich die Kamera
mit einem anderen WLAN
verbinden?
• Überprüfen Sie die Status-LED. Wenn sie nicht grün leuchtet, halten
Sie die Reset-Taste 10 Sekunden lang gedrückt, um die Kamera
zurückzusetzen.
• Wenn Sie Cloudspeicherung aktiviert und eine microSD-Karte eingesetzt
haben, werden die Aufnahmen sowohl auf der Karte als auch in der
Cloud gespeichert. Wenn Cloudspeicher deaktiviert ist, werden die
Aufnahmen auf der SD-Karte gespeichert. Während Live-Ansicht oder
Wiedergabe aufgezeichnete Videos werden auf Ihrem Handy gespeichert.
Überprüfen Sie die Status-LED:
• Grün leuchtend: Prüfen Sie, ob der Router eine Verbindung mit dem
Internet herstellen kann. Wenn eine Verbindung zum Netzwerk besteht,
starten Sie die Kamera neu.
• Rot blinkend: Setzen Sie die Kamera zurück und konfigurieren Sie sie
anschließend erneut.
• Rot leuchtend: Die Kamera ist defekt.
• Wenn die Kamera online ist, wählen Sie Gerätedetails >
Netzwerkkonfig (Device Details > Network Config), um die WLAN-
Verbindung in der App zu ändern.
• Wenn die Kamera offline ist, setzen Sie die Kamera zurück und
konfigurieren Sie die Kamera anschließend erneut.
• Überprüfen Sie, ob der Abstand zwischen Kamera und Router und
zwischen Kamera und Smartphone während des Verbindungsversuchs
jeweils maximal 5m beträgt.
• Überprüfen Sie die WLAN-Konfiguration des Routers: Stellen Sie Kanal
auf Auto und den Modus auf 11bgn gemischt.
• Wenn die microSD-Karte voll ist, überschreibt das System früher
aufgezeichnete Videos. Speichern Sie wichtige Informationen
rechtzeitig.
Das Gerät fährt nicht hoch
oder funktioniert nicht
erwartungsgemäß?
Das Verbinden dauert zu
lange?
Wie wird die
Videoaufzeichnung
gespeichert, wenn die
microSD-Karte voll ist?
Wo werden die
Videoaufzeichnungen
gespeichert?
Das Gerät ist offline?
Frage Antwort
Fehlerbehebung

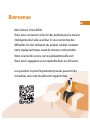
Bienvenido
Gracias por elegir IMOU
Nuestra misión es proporcionar productos fáciles de usar
para un hogar inteligente. Si tiene problemas usando el
producto, por favor diríjase a nuestro equipo de atención al
cliente antes de devolver su producto.
Nuestro correo electrónico de servicio:
Nos comprometemos a contestarle en 24 horas.
Puede encontrar respuesta a las preguntas más frecuentes
en imoulife.com/support/help
A página está carregando ...
A página está carregando ...
A página está carregando ...
A página está carregando ...
A página está carregando ...
A página está carregando ...
A página está carregando ...
A página está carregando ...
A página está carregando ...
A página está carregando ...
A página está carregando ...
A página está carregando ...
A página está carregando ...
A página está carregando ...
A página está carregando ...
A página está carregando ...
A página está carregando ...
A página está carregando ...
A página está carregando ...
A página está carregando ...
A página está carregando ...
A página está carregando ...
A página está carregando ...
A página está carregando ...
A página está carregando ...
A página está carregando ...
A página está carregando ...
A página está carregando ...
A página está carregando ...
A página está carregando ...
A página está carregando ...
A página está carregando ...
A página está carregando ...
A página está carregando ...
A página está carregando ...
A página está carregando ...
A página está carregando ...
A página está carregando ...
A página está carregando ...
A página está carregando ...
A página está carregando ...
A página está carregando ...
A página está carregando ...
A página está carregando ...
A página está carregando ...
A página está carregando ...
A página está carregando ...
A página está carregando ...
A página está carregando ...
A página está carregando ...
A página está carregando ...
A página está carregando ...
A página está carregando ...
-
 1
1
-
 2
2
-
 3
3
-
 4
4
-
 5
5
-
 6
6
-
 7
7
-
 8
8
-
 9
9
-
 10
10
-
 11
11
-
 12
12
-
 13
13
-
 14
14
-
 15
15
-
 16
16
-
 17
17
-
 18
18
-
 19
19
-
 20
20
-
 21
21
-
 22
22
-
 23
23
-
 24
24
-
 25
25
-
 26
26
-
 27
27
-
 28
28
-
 29
29
-
 30
30
-
 31
31
-
 32
32
-
 33
33
-
 34
34
-
 35
35
-
 36
36
-
 37
37
-
 38
38
-
 39
39
-
 40
40
-
 41
41
-
 42
42
-
 43
43
-
 44
44
-
 45
45
-
 46
46
-
 47
47
-
 48
48
-
 49
49
-
 50
50
-
 51
51
-
 52
52
-
 53
53
-
 54
54
-
 55
55
-
 56
56
-
 57
57
-
 58
58
-
 59
59
-
 60
60
-
 61
61
-
 62
62
-
 63
63
-
 64
64
-
 65
65
-
 66
66
-
 67
67
-
 68
68
-
 69
69
-
 70
70
-
 71
71
-
 72
72
-
 73
73


em outros idiomas
- español: imou H.265 Guía del usuario
- français: imou H.265 Mode d'emploi
- italiano: imou H.265 Guida utente
- Nederlands: imou H.265 Gebruikershandleiding
- Deutsch: imou H.265 Benutzerhandbuch
