Becken Ferro com Caldeira Bss-1439 Manual do proprietário
- Categoria
- Ferros
- Tipo
- Manual do proprietário

Instructions Manual
Manual de Instrucciones
Manual de Instruções
Steam Station
Centro de Planchado
Ferro com Caldeira

2
Dear client,
Thank you for purchasing this product.
The quality of this appliance has been certified by
several laboratory tests. This instructions manual is
provided to simplify the use of the appliance as well
as to guarantee a safe use.
Please read carefully the instructions and safety
measures described in this manual.
We sincerely hope you will be satisfied when using
your new appliance.

3
EN
Steam Generator Iron | Centro de Planchado | Ferro com Caldeira
INDEX
1. SAFETY INSTRUCTIONS 4
1.1. Power Supply 5
1.2. Power Cord and Other Cables 5
1.3. Humidity and Water 5
1.4. Cleaning 5
1.5. General Precautions 5
2. OPERATING INSTRUCTIONS 7
2.1. Product Description 7
2.2. Using the Product 8
2.3. Maintenance 9
2.4. Troubleshooting 10
3. POST-SALE SERVICE 11
4. ENVIRONMENTAL PROTECTION 11

4
1. SAFETY INSTRUCTIONS
Important Warnings
Before using your appliance read this instrucons manual carefully and keep it in a
safe place as you may need to consult it in the future.
Before turning on your appliance, and to ensure a safe and correct operaon, do not
use if:
• It has fallen to the ground;
• You noce any evidence of damage;
• Any anomaly occurs during its operaon.
To avoid hazards or deterioraon of your appliance through incorrect use it is advisable
to read these instrucons thoroughly.
Your appliance may not be used for other purposes than the ones intended and solely
for household use. Any damage resulng from using the appliance outside this scope,
any incorrect use, as well as any manual modicaons to the product will not be
covered and automacally voids the warranty.
Assistance
In case of malfuncon, take your appliance to a qualied technician for assistance.
This appliance can be used by children from the age
of 8 and by people with reduced physical, sensorial
or mental capabilies and/or lack of experience and
knowledge if they have been given instrucons on
using the appliance safely and if they understand
the hazards involved. Children may not play with the
appliance. Cleaning and maintenance must not be
carried out by children without supervision.
These instrucons are also available at www.suporteworten.pt
WARNING
RISK OF ELECTRIC SHOCK.
DO NOT OPEN
Attention: to avoid the risk of electric shock, do
not remove the cover. The interior does not contain
any parts that may be repaired by the user. Ask for
assistance to qualified personnel.

5
EN
Steam Generator Iron | Centro de Planchado | Ferro com Caldeira
1.1. Power Supply
Make sure the main voltage is compable with the appliance’s. If this is not the case
please consult the Customer Support Service.
1.2. Power Cord and Other Cables
Do not tangle the cord or pull it to disconnect the appliance. Also, keep the cord away
from warm surfaces.
Never use the appliance if it has a damaged cable or socket.
Take it to the Technical Support Service for replacement.
1.3. Humidity and Water
Do not use your appliance in humid places. Do not allow the appliance to become wet
under any circumstances as this may be dangerous. To avoid re hazard or electric
shock do not expose your appliance to humidity or water. Furthermore, do not place
your appliance under water (e.g. for cleaning).
1.4. Cleaning
Before cleaning, be sure to switch o the appliance and remove the plug from the
main power supply.
Always allow the unit to cool down before cleaning.
1.5. General Precautions
• Please follow the instrucons in the user manual which help to properly install
and operate this product and enjoy its advanced features. Please keep the
instrucons for future reference.
• Read all instrucons before using the product.
• Maintenance and service operaons are only to be carried out by authorized
professionals.
• Any damage caused by manual modicaons to the product is not covered by the
warranty.
• If this product is used for other purposes than the ones originally intended, or if it
is not correctly connected, the product may become damaged and the warranty
will be voided.
• Do not operate this device close to water taps, bathtubs, washbasins, showers or
other containers of water.
• Do not put the device or its plug in water or any other liquids.
• If the iron accidentally falls in water, immediately unplug it and have it checked by
an authorized servicing center. Never dip your hands in the water to recover the
device. Failure to follow these rules could cause an electric shock.
• Do not operate the device with wet hands or when the oor is damp or the device
itself is damp.
• Do not touch the plug with wet or damp hands.
• Never aempt to repair it yourself, to avoid all risks related to electricity.
• Do not let the cable rest on sharp edges and keep it away from heang sources
and bare ames.
• Pull the plug out of the wall socket holding the plug and not by pulling the cable.
• Make sure that the voltage of the place where the iron is to be used matches the

6
voltage indicated on the product label.
• This device is not intended for professional use.
• Never leave the device unaended while using it.
• The plug must be removed from the power socket before the water tank is lled.
• Children are not aware of the dangers of the improper use of electric devices;
for this reason, do not allow them to use electric appliances without supervision.
• Always unplug the appliance from the power socket when not in use or before
cleaning it.
• The voltage indicated persists as long as the device remains connected to the
power socket.
• Turn o the appliance before unplugging it.
• Do not hold the device by the cable. Do not use extension cables.
• Do not use this appliance in a corrosive and explosive atmosphere in order to
avoid short-circuits and explosions.
• Using non-original accessories may prejudice the funconality of the device and
will void the guarantee.
• The appliance must not be le unaended while it is connected to the power
supply.
• When placing the iron on its stand, ensure that the surface on which the stand is
placed is stable.
• The iron is not to be used if it has been dropped, if there are visible signs of
damage or if it is leaking.
• While operang, the iron and the steam staon reach very high temperatures,
be very careful, danger of burns. Do not touch the metal parts of the iron when
it is hot.
• Before replacing or cleaning, unplug the device from the power socket and wait
unl it has completely cooled down.
• Do not use the device outdoors.
• Do not use the device close to curtains, furniture or other inammable objects.
• The steam is very hot, danger of burns. Never direct the steam jet towards
persons, animals or objects that could be damaged or burned.
• Use only tap water or demineralized water to ll the steam staon. Other liquids
could damage components and gaskets causing the guarantee for the product to
be voided. Do not overll the steam staon.
• Do not put other liquids or other materials or addives in the steam staon.
• If the cap will not open easily, do not try to open it.
• Always place the iron on a stable, at and heat-resistant surface.
• Do not place heavy objects on the steam hose and do not squash it.
• Do not wind the cable around the appliance.
• Check carefully that the label of the fabric to iron matches the seng and the
temperature of the iron.
• Always place the iron on its seat on the steam staon, do not leave the iron on
fabrics or elsewhere.

7
EN
Steam Generator Iron | Centro de Planchado | Ferro com Caldeira
2. OPERATING INSTRUCTIONS
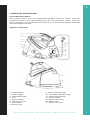
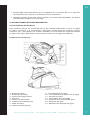
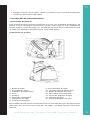
2.1. Product Description
This product allows easy and professional-standard ironing at home. Using the
consistent steam at the right temperature, you can iron sheets, towels, jeans etc.
faster. The holes in the p of the iron release a jet of steam which gently eliminates
even the toughest creases.
Appliance components
1 - Steam Buon
2 - Steam Trigger
3 - Temperature Dial
4 - Iron
5 - Steam Staon
6 - Self-Clean Cover
7 - Steam Hose
8 - Power Cord
9 - Steam Indicator Light
10 - Low Water Indicator Light
11 - Steam Control Knob
12 - Power Switch
13 - Water Inlet Cover
14 - Water Tank
15 - Water Tank Lock

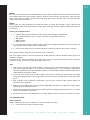
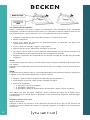
8
For the models below, only the steam buon or steam trigger is slightly dierent to
the iron above; the product is operated in the same way.
2.2. Using the Product
Take the device out of the box and remove the packing. In order to ensure sucient
venlaon, the distance between the iron and the wall or other objects should be at
least 15 cm at the back and 15 cm on the side.
• Place the device on a stable and heat-resistant surface.
• Take o the tank.
• Fill with tap water or demineralized water. The water tank capacity is 1.6 liters.
• Insert the plug in the power socket and turn on the switch.
• Wait unl the steam indicator light turns on.
• Turn on the iron by pressing the power switch which will light. The iron operang
indicator will also light.
• Adjust the temperature dial to the type of fabric you want to iron.
Note:
If you want to use steam ironing, we suggest you set the temperature dial to MAX.
When the iron operang light goes out, the appliance is ready for use.
Note:
During use, the iron operang light indicator will go on and o at dierent intervals,
this is normal.
• Adjust the steam jet by turning the temperature dial.
• Press the steam buon to release the steam jet.
• Aer ironing:
> 1. Put the iron on the stand.
> 2. Switch the appliance o.
> 3. Remove the mains plug from the power socket and let the iron cool down.
To obtain a connuous steam jet, press the steam buon. If the steam stops, this is
probably because there is no more water in the tank. In order to connue ironing, add
water.
Steaming Fabrics
Follow the instrucons.
Place the iron vercally at a minimum distance of 20-30 cm from curtains or fabrics,
and press the steam buon. Then steam the fabrics in a circular movement.

9
EN
Steam Generator Iron | Centro de Planchado | Ferro com Caldeira
Note:
Be very careful about the compability of the fabric label with this kind of treatment.
The water tank has super-large capacity and can be used for a long me. The iron will
buzz when out of water (this sound will stop aer 30 seconds). You can pull out the
water tank easily to ll it.
Note:
When you use the appliance for the rst me or aer de-scaling, a lot of water will
be pumped from the detachable water tank into the steam staon. Rell the tank, if
necessary.
Setting the Temperature
• 1. Check the garment label for the required ironing temperature:
> ● Synthec fabrics (e.g. acrylic, viscose, polyamide) and silk
> ●● Wool
> ●●● Coon
> MAX Linen
• 2. Set the temperature dial to the required ironing temperature by turning it to
the appropriate temperature indicaon.
• 3. Insert the plug into an earthed power socket and press the power switch.
The steam staon and the iron will now start heang.
The iron takes about 1 minute to heat up to ●● and the steam staon takes approx. 2
minutes to heat.
As soon as the steam staon has reached its maximum pressure level and is ready for
steam ironing, the steam indicator light turns on.
Tips
• If the item consists of various bers, always select the temperature required by
the most delicate ber, i.e. the lowest temperature. If, for example, the fabric
consists of 60% polyester and 40% coon, it should be ironed at the temperature
indicated for polyester (●●).
• If you do not know what kind of fabric the item is made of, determine the right
ironing temperature by ironing a part that will not be visible when you wear the
item.
• Silk, woolen and synthec materials: iron on the reverse side of the fabric to
prevent shiny patches.
• Fabrics that tend to get shiny patches should be ironed in one direcon only while
applying very lile pressure.
• Start ironing the items that require the lowest ironing temperature rst, i.e. those
made of synthec materials.
• To make the iron cool down faster, simply apply steam or iron on a piece of cloth.
2.3. Maintenance
After each use
Never immerse the iron in water or rinse it under the tap.
• 1. Clean the iron with a damp cloth.

10
• 2. Wipe scale and any other deposits o the soleplate with a damp cloth and a
non-abrasive cleaning agent.
De-scaling
Never remove the de-scaling cover and unscrew the de-scaling nut inside when the
steam staon is hot.
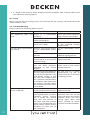
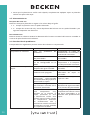
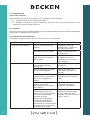
2.4. Troubleshooting
Please check the following before repair.
Problem Possible cause(s) Solution
The appliance does not
heat
There is a connecon
problem.
Check the mains cord the
plug and the wall socket.
The steam staon has not
been switched on.
Turn on the power switch.
The temperature dial has
been set to MIN.
Set the temperature dial
to the required ironing
temperature
The iron does not produce
any steam.
There is not enough water
in the detachable water
tank.
Fill the detachable water
tank
The steam indicator light is
sll o.
Wait unl the steam
indicator light goes on.
The selected ironing
temperature is too low for
steam ironing.
Set the temperature
higher than ●●
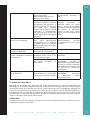
The detachable water tank
has not been properly
aached to the steam
staon.
Aach the detachable
water tank to the steam
staon properly.
When the iron has been set
to a very high temperature,
the steam produced is dry
and hardly visible. It will
be even less visible when
the ambient temperature
is relavely high and it will
be enrely invisible when
the temperature has been
set to MAX.
Set the iron to a lower
temperature, e.g. ●●, to
check if the iron is actually
producing steam.
Water droplets come out
of the soleplate.
The selected temperature
is too low for steam ironing.
Set the temperature
higher than ●●.
When you start steam
ironing and when you have
stopped steam ironing
for a while the steam
that was sll present in
the hose will have cooled
down and condensed into
water which causes water
droplets to come out of
the soleplate.
This is perfectly normal.
Hold the iron over an old
cloth and press the steam
acvator when you start
ironing again. Wait unl
steam instead of water
comes out of the soleplate.

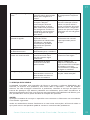
11
EN
Steam Generator Iron | Centro de Planchado | Ferro com Caldeira
Smoke comes out of
the new iron when it is
switched on.
Some parts of the
appliance have been lightly
greased in the factory and
may inially give o some
smoke when heated.
This phenomenon is
perfectly normal and will
cease aer a short while.
The appliance produces a
pumping sound.
Water is being pumped
into the steam staon.
This is normal.
The steam staon buzzes
all the me.
The detachable water tank
is empty or there is not
enough water.
Fill the detachable water
tank with water.
The posion of the
detachable water tank is
wrong.
Shake the steam staon, or
press the detachable water
tank into the steam staon.
Aach the water tank to
the steam staon properly.
Dirty water comes out of
the soleplate.
Too much scale
and minerals have
accumulated inside the
steam staon.
Rinse the steam staon.
See the “Maintenance”
secon.
3. POSTSALE SERVICE
BECKEN has designed this appliance in order to guarantee maximum reliability.
However, if a problem occurs do not aempt to open the appliance - there is a risk of
electrical shock. If you are not able to solve the problem, please contact the Costumer
Support Service of any Worten, Modelo or Connente store in order to be assisted.
Worten Equipamentos para o Lar provides a 2-year warranty for manufacturing
defects from the date of purchase of the appliance.
WARNING:
Any aempt to repair the appliance without contacng the manufacturer or seller will
void the warranty.
All users must be familiar with these instrucons. Knowing what could go wrong can
help prevent problems from occurring.
4. ENVIRONMENTAL PROTECTION
In order to protect the environment we strive to reduce the volume of packaging
used, liming it to three easily sorted materials: cardboard, paper and plasc. The
appliance is manufactured using recyclable materials aer disassembled by a
specialized company. Please comply with local regulaons concerning the recycling
of all materials.

12
Estimado cliente:
Gracias por adquirir este producto.
Este aparato ha sido sometido a diversas pruebas que
avalan su calidad. Este manual de instrucciones está
destinado a facilitar el uso del aparato y garantizar un
uso seguro.
Lea atentamente las instrucciones así como las
medidas de seguridad descritas en este manual.
Esperamos sinceramente que esté satisfecho con su
nuevo aparato.

13
ES
Steam Generator Iron | Centro de Planchado | Ferro com Caldeira
INDEX
1. INSTRUCCIONES DE SEGURIDAD 14
1.1. Alimentación 15
1.2. Cable de alimentación y otros cables 15
1.3. Humedad y agua 15
1.4. Limpieza 15
1.5. Precauciones generales 15
2. INSTRUCCIONES DE FUNCIONAMIENTO 17
2.1. Descripción del producto 17
2.2. Utilización del producto 18
2.3. Mantenimiento 20
2.4. Resolución de problemas 20
3. SERVICIO POSVENTA 21
4. PROTECCIÓN MEDIOAMBIENTAL 22

14
1. INSTRUCCIONES DE SEGURIDAD
Avisos importantes
Antes de usar el aparato, lea atentamente este manual de instrucciones y guárdelo en
un lugar seguro, pues puede tener que consultarlo en el futuro.
Antes de encender el aparato, y a n de garanzar su ulización de forma correcta y
segura, no lo ulice si:
• Se ha caído al suelo;
• Nota alguna señal de daño;
• Se produce alguna anomalía durante su funcionamiento.
Para evitar posibles peligros y el deterioro del aparato debido a un uso incorrecto, se
recomienda que lea atentamente las instrucciones.
Este aparato no deberá ser ulizado para otros nes que no sean los previstos en el
manual y únicamente para uso domésco. Cualquier daño derivado del uso del aparato
fuera de este ámbito de aplicación, cualquier uso incorrecto, así como cualquier
modicación manual del producto, no estará cubierto y anulará automácamente la
garana.
Asistencia
En caso de avería, acuda a un servicio técnico cualicado.
Este aparato podrá ser ulizado por niños de
ocho años o más y por personas con discapacidad
sica, sensorial o mental, o personas con falta de
experiencia o conocimientos, siempre que cuenten
con supervisión o se les haya proporcionado
instrucciones para usar este aparato de un modo
seguro, y enendan los riesgos que conlleva. Los
niños no deben jugar con el aparato. La limpieza y
mantenimiento no deben ser realizados por niños
sin supervisión.
Estas instrucciones también están disponibles en www.
suporteworten.pt
ATENCIÓN
PELIGRO DE
ELECTROCUCIÓN. NO ABRIR
Atención: Para evitar el riesgo de electrocución,
no abra esta unidad. No conene elementos que
deba reemplazar el usuario. Solicite la asistencia
de personal especializado.

15
ES
Steam Generator Iron | Centro de Planchado | Ferro com Caldeira
1.1. Alimentación
Compruebe que la tensión de la red eléctrica es compable con la indicada en el
aparato. En caso de que no sea compable, consulte al Servicio de Atención al Cliente.
1.2. Cable de alimentación y otros cables
No enrolle el cable de alimentación ni re de él para desenchufar el aparato. Asimismo,
manténgalo alejado de supercies calientes.
Nunca ulice este aparato si el cable o el enchufe están dañados.
En su lugar, llévelo a un servicio técnico autorizado para que proceda a su sustución.
1.3. Humedad y agua
No ulice el aparato en lugares húmedos. No deje que el aparato se moje en ninguna
circunstancia, pues puede ser peligroso. Para evitar el peligro de incendio o descarga
eléctrica, no exponga el aparato al agua o la humedad. Asimismo, no sumerja el
aparato (por ejemplo, para limpiarlo).
1.4. Limpieza
Antes de proceder a la limpieza del aparato, apáguelo y desconecte el cable de la
corriente.
Deje siempre que el aparato se enfríe antes de efectuar cualquier operación de
limpieza.
1.5. Precauciones generales
• Siga las instrucciones de este manual, que le ayudarán a instalar y poner en
funcionamiento correctamente este producto y disfrutar de sus caracteríscas
avanzadas. Guarde las instrucciones para referencia futura.
• Lea todas las instrucciones antes de usar el aparato.
• Las operaciones de reparación o mantenimiento deben ser realizadas únicamente
por profesionales autorizados.
• Cualquier daño provocado por modicaciones manuales al producto no estará
cubierto por la garana.
• Si usa el producto para otros nes que no sean para los que ha sido originalmente
diseñado, o si no está correctamente conectado, el producto podrá sufrir daños y
la garana quedará anulada.
• No ulice este aparato cerca de grifos de agua, bañeras, lavabos, duchas u otros
recipientes con agua.
• No sumerja el aparato o su enchufe en agua u otros líquidos.
• Si la plancha se cae accidentalmente en el agua, desenchúfela inmediatamente
y llévela a un centro de servicio autorizado. Nunca sumerja las manos en el agua
para recuperar el aparato. El incumplimiento de estas normas puede ocasionar
una descarga eléctrica.
• No ulice el aparato con las manos húmedas o cuando el suelo o el propio aparato
estén húmedos.
• No toque el enchufe con las manos mojadas o húmedas.
• Nunca intente repararlo usted mismo a n de evitar los riesgos relacionados con
la electricidad.
• No deje el cable sobre esquinas aladas y manténgalo alejado de fuentes de calor
o llamas.

16
• Desconecte el aparato de la toma de corriente sujetando el enchufe, y no rando
del cable.
• Compruebe que la tensión del lugar donde se va a ulizar la plancha coincide con
la indicada en la equeta del producto.
• Este aparato no ha sido diseñado para uso profesional.
• Nunca deje el aparato desatendido cuando lo esté ulizando.
• Desconecte el enchufe de la corriente antes de proceder a llenar el depósito de agua.
• Los niños no son conscientes de los peligros derivados del uso inadecuado de los
disposivos eléctricos; por ello, no deje que ulicen aparatos eléctricos sin supervisión.
• Desenchufe siempre el aparato de la toma de corriente cuando no esté ulizándolo
y antes de proceder a su limpieza.
• La tensión indicada se manene mientras el disposivo permanece conectado a
la toma de corriente.
• Apague el aparato antes de desenchufarlo.
• No sujete el aparato por el cable. No ulice cables alargadores.
• No ulice este aparato en una atmósfera corrosiva y explosiva, a n de evitar
cortocircuitos y explosiones.
• El uso de accesorios no originales puede dañar el funcionamiento del aparato y
anulará la garana.
• El aparato no debe dejarse desatendido mientras esté conectado a la corriente.
• Cuando coloque la plancha en posición vercal, asegúrese de que la supercie
sobre la que la coloca es estable.
• No debe ulizar la plancha si ha sufrido una caída, si presenta señales visibles de
daño o si gotea.
• Durante su funcionamiento, la plancha y el centro de planchado alcanzan
temperaturas muy elevadas, por lo que deberá extremar las precauciones por el
riesgo de sufrir quemaduras. No toque las piezas metálicas de la plancha mientras
esté caliente.
• Antes de proceder a su sustución o limpieza, desconecte el aparato de la
alimentación y espere hasta que se haya enfriado completamente.
• No ulice este aparato en exteriores.
• No ulice el aparato cerca de cornas, muebles u otros objetos inamables.
• El vapor está muy caliente, por lo que existe peligro de quemaduras. Nunca dirija
el chorro de vapor hacia personas, animales u objetos que puedan sufrir daños
o quemaduras.
• Ulice únicamente agua del grifo o desmineralizada para llenar el centro de
planchado. El uso de otros líquidos podría dañar los componentes y juntas y
anular la garana del producto. No llene el centro de planchado por encima del
nivel máximo.
• No añada otros líquidos, materiales ni adivos en el centro de planchado.
• Si la tapa no se abre fácilmente, no intente abrirla.
• Coloque siempre la plancha sobre una supercie estable, plana y resistente al calor.
• No coloque objetos pesados sobre el tubo de vapor ni lo aplaste.
• No enrolle el cable alrededor del aparato.

17
ES
Steam Generator Iron | Centro de Planchado | Ferro com Caldeira
• Compruebe minuciosamente que la equeta de la prenda que va a planchar
corresponde con el ajuste y la temperatura de la plancha.
• Coloque siempre la plancha sobre su base en el centro de planchado y no deje la
plancha sobre tejidos o en otro lugar.
2. INSTRUCCIONES DE FUNCIONAMIENTO
2.1. Descripción del producto
Este producto ofrece un planchado fácil y de calidad profesional en casa. Si uliza
el vapor constante a la temperatura adecuada, podrá planchar sábanas, toallas,
vaqueros, etc., más rápido. Los oricios situados en el extremo de la plancha liberan
un chorro de vapor que elimina suavemente incluso las arrugas más diciles.
Componentes del aparato
1 - Botón de vapor
2 - Acvador de vapor
3 - Control de temperatura
4 - Plancha
5 - Centro de planchado
6 - Cubierta de autolimpieza
7 - Tubo de vapor
8 - Cable de alimentación
9 - Luz indicadora de vapor
10 - Luz indicadora de bajo nivel de agua
11 - Control de vapor
12 - Interruptor de encendido
13 - Cubierta de la entrada de agua
14 - Depósito de agua
15 - Bloqueo del depósito de agua

18
En los siguientes modelos, aunque el botón de vapor o el acvador de vapor son
ligeramente diferentes de los indicados en la plancha anterior, el funcionamiento del
aparato es el mismo.
2.2. Utilización del producto
Saque el aparato de la caja y rere el embalaje. A n de garanzar una venlación
suciente, la distancia entre la plancha y la pared u otros objetos deberá ser de al
menos 15 cm en la parte posterior y de 15 cm en los lados.
• Coloque siempre el aparato sobre una supercie estable y resistente al calor.
• Saque el depósito.
• Llene el depósito con agua del grifo o desmineralizada. La capacidad del depósito
de agua es de 1,6 litros.
• Inserte el enchufe en la toma de corriente y encienda el interruptor.
• Espere hasta que la luz indicadora de vapor se encienda.
• Encienda la plancha presionando en el interruptor de encendido, que se iluminará.
El indicador de funcionamiento de la plancha también se iluminará.
• Ajuste el control de temperatura según el po de tejido que va a planchar.
Nota:
si desea ulizar el planchado a vapor, le recomendamos que ajuste el control de
temperatura en la posición de MAX.
Cuando se apague el indicador de funcionamiento de la plancha, el aparato estará
listo para usarse.
Nota:
durante su uso, es normal que la luz indicadora de funcionamiento de la plancha se
encienda y apague en diferentes intervalos.
• Ajuste el chorro de vapor girando el control de temperatura.
• Pulse el botón de vapor para liberar el chorro de vapor.
• Después del planchado:
> 1. Coloque la plancha sobre la base.
> 2. Apague el aparato.
> 3. Desconecte el cable de alimentación de la corriente y deje que la plancha
se enfríe.
Para obtener un chorro de vapor connuo, pulse el botón de vapor. Si el vapor se
deene, probablemente se deba a que no queda más agua en el depósito. Para seguir
planchando, añada agua.

19
ES
Steam Generator Iron | Centro de Planchado | Ferro com Caldeira
Aplicación de vapor a tejidos
Siga las instrucciones.
Coloque la plancha en posición vercal a una distancia mínima de 20 a 30 cm de
cornas o tejidos y pulse el botón de vapor. A connuación, aplique el vapor a los
tejidos mediante un movimiento circular.
Nota:
asegúrese de comprobar la compabilidad del tejido con este po de tratamiento
consultando su equeta. El depósito de agua posee una gran capacidad y puede
ulizarse durante un largo periodo de empo. La plancha emirá un zumbido cuando
no tenga agua (este sonido se detendrá pasados treinta segundos). Puede extraer
fácilmente el depósito de agua para llenarlo.
Nota:
cuando ulice el aparato por primera vez o después de descalcicarlo, se bombeará
una gran candad de agua del depósito de agua extraíble al centro de planchado.
Vuelva a llenar el depósito en caso necesario.
Ajuste de la temperatura
• 1. Compruebe la equeta de la prenda para conocer la temperatura de planchado
necesaria:
> ● Tejidos sintécos (acrílico, viscosa o poliamida) y seda
> ●● Lana
> ●●● Algodón
> MAX Lino
• 2. Ajuste el control de temperatura a la temperatura de planchado necesaria
girándolo hasta la indicación de temperatura adecuada.
• 3. Inserte el enchufe en una toma de corriente con conexión a erra y pulse el
interruptor de encendido.
El centro de planchado y la plancha empezarán a calentarse.
La plancha tarda cerca de un minuto en calentarse hasta ●● y el centro de planchado
necesita unos dos minutos para calentarse.
Cuando que el centro de planchado alcanza su nivel máximo de presión y está listo
para el planchado a vapor, la luz indicadora de vapor se ilumina.
Consejos
• Si la prenda está compuesta de diferentes bras, seleccione siempre la
temperatura necesaria para la bra más delicada, es decir, la temperatura más
baja. Si, por ejemplo, la prenda está compuesta de un 60% de poliéster y un 40%
de algodón, deberá plancharse a la temperatura indicada para el poliéster (●●).
• Si no conoce el po de tejido con el que está hecha la prenda, determine la
temperatura de planchado adecuada planchando una parte que no sea visible al
llevarla puesta.
• Materiales de seda, lana y sintécos: plánchelos del revés para evitar manchas
de brillo.
• Los tejidos que son propensos a presentar manchas de brillo deben plancharse
únicamente en una misma dirección sin aplicar demasiada presión.
• Empiece a planchar primero las prendas que requieran las temperaturas de
planchado más bajas como, por ejemplo, las compuestas de materiales sintécos.

20
• Para que la plancha se enfríe más rápido, simplemente aplique vapor o planche
sobre una pieza de ropa.
2.3. Mantenimiento
Después de cada uso
Nunca sumerja la plancha en agua ni la aclare bajo el grifo.
• 1. Limpie la plancha con un paño húmedo.
• 2. Limpie los restos de cal y otros depósitos de la base con un paño húmedo y un
agente limpiador no abrasivo.
Descalcificación
Nunca rere la cubierta ancal ni desatornille la tuerca ancal del interior cuando el
centro de planchado esté caliente.
2.4. Resolución de problemas
Compruebe los siguientes puntos antes de solicitar su reparación.
Problema Posibles causas Solución
El aparato no calienta. Hay un problema de
conexión.
Compruebe el cable de
alimentación el enchufe y
la toma de corriente.
No ha encendido el centro
de planchado.
Pulse el interruptor de
encendido.
El control de temperatura
se ha congurado en el
MIN.
Ajuste el control de
temperatura a la tempera-
tura de planchado necesaria.
La plancha no produce
vapor.
No hay suciente agua en el
depósito de agua extraíble.
Llene el depósito de agua
extraíble.
La luz indicadora de vapor
todavía está apagada.
Espere hasta que la luz
indicadora de vapor se
encienda.
La temperatura de
planchado seleccionada
es demasiado baja para el
planchado a vapor.
Seleccione una temperatura
superior a ●●.
El depósito de agua extraíble
no está bien colocado en el
centro de planchado.
Coloque correctamente el
depósito de agua extraíble
en el centro de planchado.
Cuando se ha seleccionado
una temperatura muy
elevada en la plancha el
vapor producido es seco
y dicilmente visible. Será
todavía menos visible cuando
la temperatura ambiente
es relavamente alta y
totalmente invisible cuando la
temperatura se haya ajustado
en la posición de MAX.
Congure la plancha a una
temperatura inferior como
●● para comprobar si la
plancha está produciendo
vapor.
A página está carregando...
A página está carregando...
A página está carregando...
A página está carregando...
A página está carregando...
A página está carregando...
A página está carregando...
A página está carregando...
A página está carregando...
A página está carregando...
A página está carregando...
A página está carregando...
A página está carregando...
A página está carregando...
A página está carregando...
A página está carregando...
-
 1
1
-
 2
2
-
 3
3
-
 4
4
-
 5
5
-
 6
6
-
 7
7
-
 8
8
-
 9
9
-
 10
10
-
 11
11
-
 12
12
-
 13
13
-
 14
14
-
 15
15
-
 16
16
-
 17
17
-
 18
18
-
 19
19
-
 20
20
-
 21
21
-
 22
22
-
 23
23
-
 24
24
-
 25
25
-
 26
26
-
 27
27
-
 28
28
-
 29
29
-
 30
30
-
 31
31
-
 32
32
-
 33
33
-
 34
34
-
 35
35
-
 36
36


Becken Ferro com Caldeira Bss-1439 Manual do proprietário
- Categoria
- Ferros
- Tipo
- Manual do proprietário
em outras línguas
Artigos relacionados
Outros documentos
-
UFESA PL14 Instruções de operação
-
-
Polti La Vaporella XT100C Manual do proprietário
-
Polti La Vaporella XB60C Manual do proprietário
-
Polti VAPORELLA EXPRESS VE 30.10 Manual do proprietário
-
-
Rowenta DG9030 Manual do proprietário
-
AEG DBS7135 Manual do usuário
-
AEG DBS3340 Manual do usuário
-