Sub-Zero CSO24TE/S/TH Guia de usuario
- Categoria
- Medindo, testando
- Tipo
- Guia de usuario

CONVECTION STEAM OVEN
USE AND CARE GUIDE
CLEANING, MAINTENANCE, AND MORE

2
|
Wolf Customer Care 800.222.7820
CONVECTION STEAM OVEN
Customer Care
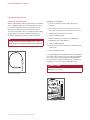
The model and serial number are printed on the enclosed
product registration card. Both numbers are also listed on
the product rating plate. Refer to page 5 for rating plate
location. For warranty purposes, you will also need the date
of installation and name of your authorized Wolf dealer.
Record this information below for future reference.
SERVICE INFORMATION
Model Number
Serial Number
Date of Installation
Certied Service Name
Certied Service Number
Authorized Dealer
Dealer Number
If your product ever needs attention, be sure to use a
Wolf Factory Certied Service provider recommended
by our Customer Care Center, or select one from our list
of providers available at wolfappliance.com/locator. All
Factory Certied Service providers are carefully selected
and thoroughly trained by us.
Important Note
To ensure this product is installed and operated as safely
and efciently as possible, take note of the following types
of highlighted information throughout this guide:
IMPORTANT NOTE highlights information that is especially
important.
CAUTION indicates a situation where minor injury or product
damage may occur if instructions are not followed.
WARNING states a hazard that may cause serious injury or
death if precautions are not followed.
IMPORTANT NOTE: Throughout this guide, dimensions in
parentheses are millimeters unless otherwise specied.
Contents
4 Safety Precautions
6 Convection Steam Oven Features
7 Convection Steam Oven Operation
16 Care Recommendations
17 Troubleshooting
19 Wolf Warranty

wolfappliance.com
|
3
SAFETY PRECAUTIONS
SAFETY PRECAUTIONS
This oven was built to achieve recognized standards
in technology and safety regulations and is designed
for use in the home for preparing food. It is not
intended for use by persons with reduced physical,
sensory, or mental capabilities or lack of experience
and knowledge, unless supervised or unless they
have been given instruction concerning the use of
the appliance by a person responsible for their safety.
Proper use is essential to avoid damage or accidents.
Installation and connection to power supply must be
performed by a qualied electrician in accordance
with provided installation instructions.
Before rst use, ll the water tank and perform related
duties as outlined in the Prior to Use section.
Please retain this guide for future reference. If you
sell the appliance or pass it on to a third party, ensure
these instructions accompany the appliance with the
instructions on installation.
WARNING
PROPOSITION 65 FOR CALIFORNIA RESIDENTS
Cancer and Reproductive Harm—
www.P65Warnings.ca.gov

4
|
Wolf Customer Care 800.222.7820
IMPORTANT SAFEGUARDS
When using electrical appliances, basic safety
precautions should always be followed including the
following:
• Read all instructions.
• Do not touch hot surfaces. Use handles or knobs.
• To protect against electrical shock, do not immerse
cord or plug in water or other liquid.
• Close supervision is necessary when any appliance
is used by or near children.
• Unplug the appliance from outlet when not in use
and before cleaning. Allow the appliance to cool
before putting on or taking off parts.
• Do not operate any appliance with a damaged cord
or plug or after the appliance malfunctions or has
been damaged in any manner. Return appliance
to the nearest Factory Certied Service facility for
examination, repair, or adjustment.
SAFETY PRECAUTIONS
• The use of accessory attachments not recom-
mended by the appliance manufacturer may cause
injuries.
• Do not use outdoors.
• Do not let the cord hang over the edge of the table
or counter or touch hot surfaces.
• Do not place on or near a hot gas or electric burner
or in a heated oven.
• Extreme caution must be used when moving an
appliance containing hot oil or other hot liquids.
• Always attach plug to appliance rst, then plug
the cord into the wall outlet. To disconnect, turn all
controls off and then remove the plug from the wall
outlet.
• Do not use the appliance for other than intended
use.
• Save these instructions.

wolfappliance.com
|
5
Getting Started
We know you are eager to start cooking, but before you
do, please take some time to read this use and care guide.
Whether you are an occasional cook or an expert chef, it
will be to your benet to familiarize yourself with the safety
practices, features, operation, and care recommendations of
your Wolf Convection Steam Oven.
To ensure the best results, review cooking modes and
special features on page 11.
RETRACTABLE HANDLE MODELS
For models with a retractable handle, the handle will extend
automatically when the control panel is activated and
retract when the unit is turned off and has cooled below
175°F
(80°C).
CAUTION
Do not open or close the retractable handle manually.
CONVECTION STEAM OVEN FEATURES
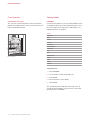
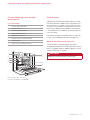
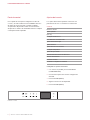
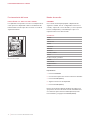
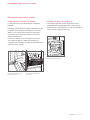
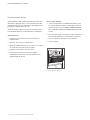
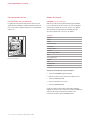
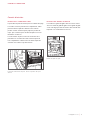
Convection Steam Oven Features
FEATURES
1
Product Rating Plate
2
Control Panel
3
Control Panel Display
4
Adjustable Oven Racks
5
Convection Fan
6
Temperature Probe Receptacle
7
Halogen Lighting
8
Water Tank Access Door
Convection Steam Oven (CSO30TM shown)
2
5
3
8
1
4
6
7

6
|
Wolf Customer Care 800.222.7820
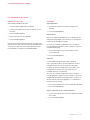
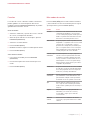
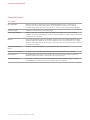
OVEN OPERATION
Control Panel
Use the control panel to set cooking modes and access all
the features of the convection steam oven for exceptional
results. The control panel will become inactive after 15 min-
utes of inactivity. Touch any control to activate the display.
User Settings
The user settings allow the user to select preferences as
listed in the chart below.
SETTING
Set Language
Adjust Display
Set Clock
Congure Notications
Descale Appliance
Set Water Hardness
Set Loudness
Set Assistance Functions
Congure Temperature
Set Childproof Lock
Display Appliance Info
Demo Mode
Check Connection
Restore Factory Settings
Setting user settings:
1 With the oven on, touch SETTINGS.
2 Use the arrows to select the desired setting.
3 Touch ENTER.
4 Follow the instructions on the display.
5 Touch ENTER.
Control panel

wolfappliance.com
|
7
OVEN OPERATION
Oven Operation
COOKING MODES
Select Cooking Mode:
1 Touch QUICK START.
2 Use the arrows to select the desired cooking mode.
3 Touch ENTER.
4 Review the information on the display.
5 Touch ENTER.
The unit will start 20 seconds after the last key touch. To
start the mode immediately, use the arrows to select Start
Operation, then touch ENTER.
OPTIONS
Set Temperature:
1 Use the arrows to select the desired temperature.
2 Touch ENTER.
Set Duration:
The oven heats immediately and turns off after the specied
duration. The oven light illuminates three minutes prior to
the end time.
If the temperature probe is used, the probe overrides the
switch-off time and turns the oven off when set temperature
is reached.
1 Use the arrows to select the desired cooking duration.
2 Touch ENTER.
Set End:
The set end feature automatically turns the oven on and off
at specied times. The oven remains idle until the desired
start time and turns off at the desired switch-off time. The
clock must be set to the correct time for delayed start to
function properly.
If the temperature probe is used, the probe overrides the
switch-off time and turns the oven off when set temperature
is reached. If the probe temperature is not reached before
the switch-off time, it will not extend operating time.
1 Use the arrows to select the desired end time.
2 Touch ENTER.
Set Food Probe Temp:
1 Use the arrows to select the desired probe temperature.
2 Touch ENTER.

8
|
Wolf Customer Care 800.222.7820
Oven Operation
Prior to use, use the test strip provided to determine the
water hardness. The oven defaults to hard water. Refer to
User Settings on page 6 to adjust water hardness.
Follow the steps below to ensure all residual oil from the
manufacturing process has been removed.
Prior to Use:
1 Clean the oven thoroughly with hot water and a mild
detergent.
2 Rinse and dry with a soft cloth.
3 Turn on cooking ventilation. Some smoke and odor is
normal.
4 Fill and install the water tank.
5 Select Convection Steam and adjust the temperature to
410°F
(210°C). Heat the oven (empty) for 30 minutes.
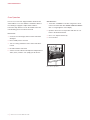
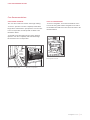
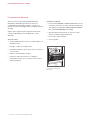
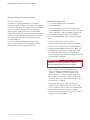
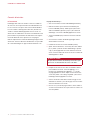
Door at-rest position
OVEN OPERATION
After Each Use:
1 Touch OFF or POWER. For modes using steam, do not
remove the water tank until “WATER IS BEING PUMPED
OFF” no longer appears on the display.
2 Open the door to the at-rest position and allow to cool.
Refer to the illustration below.
3 Once cool, wipe the interior dry.
4 Close the door.

wolfappliance.com
|
9
TIMER
The timer can be set for a maximum of 9 hours and 59 min-
utes. Once the timer is set, the countdown appears on the
display. The timer is independent from the oven. Setting the
timer does not affect operating time or switch-off time.
Setting Timer:
1 Touch TIMER.
2 Use the arrows to set the desired duration.
3 Touch ENTER.
To adjust the timer, use the arrows to adjust the duration. To
cancel the timer, use the left arrow to decrease the duration
to 0, then touch ENTER.
OVEN OPERATION
Oven Operation
WATER TANK
Touch WATER to remove the water tank.
The water tank holds enough water for 1
1
/2 hours of con-
tinuous steam, typically enough for 4–5 cooking sessions.
Use fresh, cold tap water. Do not use demineralized, ltered,
or distilled water.
When the oven is turned off, water is pumped back into the
tank once the water temperature is below 175°F
(80°C). If the
tank needs to be lled during cooking, limit the amount of
water to less than two cups to prevent overow when water
is pumped back into the tank.

10
|
Wolf Customer Care 800.222.7820
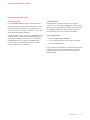
Oven Operation
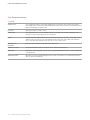
TEMPERATURE PROBE
Use only the black temperature probe shipped with this
appliance. Refer to the illustration below. The temperature
probe measures the internal temperature of food while
cooking. It can be used with all cooking modes except
More Gourmet. When the temperature probe is installed, the
actual probe temperature will be displayed.
CAUTION
Use only the probe shipped with this oven. Do not use
a probe from any other appliance.
Temperature probe
OVEN OPERATION
Setting controls:
1 Place the probe in the thickest part of the food.
2 Place the food in the oven and insert the connector into
the receptacle. Refer to the illustration below.
3 Select the desired cooking mode.
4 Touch ENTER.
5 Use the arrows to select Set Food Probe Temperature.
6 Touch ENTER.
7 Use the arrows to select the desired probe temperature.
8 Touch ENTER.
The probe temperature set point appears on the display
above the icon. To adjust the probe temperature, select
Set Food Probe Temp, use the arrows to select the desired
temperature, then touch ENTER.
CAUTION
The probe and probe receptacle will be very hot.
Handle with care.
Probe receptacle

wolfappliance.com
|
11
OVEN OPERATION
Cooking Modes
MODE INDICATOR RANGE PROBE USES
Steam 90 – 210°F
(30 – 100°C)
•
For foods typically boiled and foods that benet from gentle handling such
as seafood, vegetables, and rice.
Convection
90 – 440°F
(30 – 230°C)
•
For foods that benet from even browning such as chicken, potatoes, bis-
cuits, and roasts. The convection fan distributes heat evenly for consistent
browning. Cooking temperatures may be 25° less and cooking times may
be 25% faster.
Convection Steam
180 – 440°F
(80 – 230°C)
•
For foods that are tender inside and roasted or crisped outside. Steam,
along with the convection fan, transfer energy to food more efciently,
which helps the food retain moisture. Cooking temperatures may be 25°
less and cooking times may be 25% faster.
Convection Humid
90 – 440°F
(30 – 230°C)
•
For foods that already have enough moisture such as cakes, casseroles,
grain dishes, and lasagna. The oven does not produce steam, but the
cavity remains sealed so the moisture created while cooking remains in the
oven. Cooking temperatures may be 25° less and cooking times may be
25% faster.
Reheat 180 – 390°F
(80 – 200°C)
•
For foods typically reheated in an oven or microwave. Steam and hot air
gently rehydrate the food.
Gourmet — — Use to prepare specied foods (refer to page 12), fresh, refrigerated, or
frozen. Select the food and desired doneness, and the sensor adjusts
time, temperature, and humidity so no baking instructions are required.
The preset temperature and range are dependent on the food and desired
doneness.

12
|
Wolf Customer Care 800.222.7820
OVEN OPERATION
Cooking Modes
GOURMET
Use Gourmet to prepare any of the foods listed below, fresh
or refrigerated. Select the food and desired doneness, and
the sensor adjusts time, temperature, and humidity so no
baking instructions are required.
FOOD
Vegetables
Meat
Poultry
Potatoes
Fresh Pizza
One Dish Meals
Side Dishes
Fish
Eggs
Baked Goods
Grains
Fruit
Yogurt
Desserts
Setting Gourmet:
1 Touch GOURMET.
2 Use the arrows to select the desired food.
3 Touch ENTER.
4 Follow instructions on the display.
5 Touch ENTER.
The unit will start 20 seconds after the last key touch. To
start the mode immediately, use the arrows to select Start
Operation, then touch ENTER.
Oven Operation
OVEN RACK POSITION
The oven racks can be placed in any of the four positions
labeled on the right front face of the convection steam oven.
Refer to the illustration below.
Rack position

wolfappliance.com
|
13
OVEN OPERATION
Favorites
Commonly used cooking modes or foods can be saved in
the system for easy access through the FAVORITES func-
tion. Up to 24 favorites can be stored at a time.
Creating a Favorite:
1 Select the desired food and doneness or cooking mode
and temperature.
2 Before the cooking mode starts, touch FAVORITES.
3 Select an open le.
4 Touch ENTER.
5 Using the arrows, enter a name for the le.
6 Touch ENTER.
Selecting a Favorite:
1 With the oven on, touch FAVORITES.
2 Use the arrows to select the le to be used.
3 Touch ENTER.
More Cooking Modes
Touch MORE to access additional Gourmet items and
cooking modes. Use the arrows to choose the option you
want and touch ENTER.
MODE USES
Recipes Allows the user to store individual cooking modes
and temperatures or cooking sequences used
to prepare custom foods. Up to 24 different user
recipes can stored in the system for easy access.
More Gourmet Use to prepare specied foods; fresh, refrigerated,
or frozen. Select the food and desired doneness
and the sensor adjusts time, temperature, and
humidity so no instructions are required. The
preset temperature and range are dependent on
the food and desired doneness.
Auto Steam
Bake
By heating with steam rst, then using convec-
tion heat to nish baking, baked goods acquire a
tender interior and an exterior with natural shine,
without the need for an egg wash. Use for breads,
buns, cakes, and pastries whether fresh, par-
baked, or frozen. Do not preheat.
Slow Roast Use to keep meats tender by slow roasting. Insert
the temperature probe into the prepared meat,
select a Slow Roast setting and completion time.
Auto Reheat Reheat mode uses steam and hot air to rehydrate
food gently. Use to reheat any food you would
have reheated in the oven, range, or microwave.
Spa Spa uses combinations of gentle convection and
steam heat to warm towels, wraps, or stones for
use in massages or relaxation.
Sanitize Cleanse uses steam to clean baby bottles and
canning jars and is faster and safer than conven-
tional methods.
Keep Warm Keep Warm uses a combination of convection
and steam heat to keep foods warm.

14
|
Wolf Customer Care 800.222.7820
CARE RECOMMENDATIONS
Care Recommendations
DESCALE
Descale lasts approximately 45 minutes. Depending on
water conditions, the oven may need to be descaled every
6–18 months. When the oven needs to be descaled, “Boiler
scaled up—please descale” appears on the display. The
duration between notications is based on the water hard-
ness specied in user settings. To adjust water hardness
levels, refer to page 6.
Use only Durgol
®
Swiss Steamer descaling solution and
follow the manufacturers instructions. Durgol
®
can be
ordered online at subzerowolfstore.com.
Setting Descale:
1 With the oven off, touch SETTINGS.
2 Use the arrows to select Descale, then touch ENTER.
“Add 1 pt
(0.5 L) descaler—and touch ENTER” appears
on the display.
3 Touch WATER and remove the water tank from the unit.
4 Pour the entire Durgol
®
Swiss Steamer descaling solu-
tion into the tank.
4 Install the tank and touch ENTER.
5 After approximately 30 minutes, “Pour away descaler—
Add 2 pt
(1 L) water” appears on the display. Remove
the water tank, turn on the sink faucet, and pour the
descaler down the drain.
CAUTION
Failure to dilute the descaling solution before dis-
carding may discolor the sink and drain.
6 Fill the tank with warm tap water and install the tank.
“Descale appliance—1st rinsing cycle” appears on the
display. After approximately 45 minutes, “Pour away
water—Descaling completed” appears on the display.
7 Depending on the level of soil in the rinse water, the
oven determines whether additional rinse cycles are
necessary. Follow instructions on the display.
8 Once the rinse cycles are complete, remove, empty, and
dry the water tank. Wipe all stainless steel surfaces.

wolfappliance.com
|
15
Care Recommendations
OVEN DOOR REMOVAL
The oven door can be removed for a thorough cleaning.
To remove, open the oven door completely. Rotate both
hinge latches forward to the open position. Close the door
to the at-rest position, then lift up and out. Refer to the
illustrations below.
To reinstall, insert door hinges into the frame openings.
Open the oven door completely and rotate both hinge
latches back to the closed position.
CARE RECOMMENDATIONS
RACK GUIDE REMOVAL
To remove rack guides, unscrew the knurled nut on the
front of the rack guide. Pull the rack guide to the side of
the threaded stud and remove from the front. Refer to the
illustration below.
RACK GUIDE
KNURLED NUT
Rack guide removal
OPEN
POSITION
CLOSED
POSITION
Oven door hinge latch
Door at-rest position

16
|
Wolf Customer Care 800.222.7820
CARE RECOMMENDATIONS
Care Recommendations
CLEANING
Stainless steel Use a nonabrasive stainless steel cleaner and apply with a soft lint-free cloth. To bring out the natural
luster, lightly wipe the surface with a water-dampened microber cloth followed by a dry polishing chamois.
Always follow the grain of stainless steel.
Door front Spray glass cleaner on a cloth to clean.
Control panel Use a spray degreaser to remove ngerprints and food soil. Spray on a cloth before wiping the control
panel. Do not spray cleaners directly on the control panel.
Interior For general cleaning, initiate Steam mode at 175°F
(80°C) for 30 minutes. This will loosen fat and cooking
debris from the oven. Turn the oven off and wipe the interior with a cloth. Use a damp cloth and lemon
juice to wipe away water and blue tarnish spots. Do not use a steam cleaner.
Oven racks and
rack guides
Oven racks and rack guides can be cleaned in the dishwasher.
Stainless steel pans The solid and perforated stainless steel pans can be cleaned in the dishwasher.
Water tank Water marks and calcium build-up can be removed using a standard descaler. Do not clean the water tank
in the dishwasher.
Temperature probe Wipe with a cloth and water. Mild detergent may be used for tough stains. Do not submerge the probe in
water or clean in the dishwasher.

wolfappliance.com
|
17
TROUBLESHOOTING
Troubleshooting
OPERATION
Oven does not operate.
• Verify power is on.
• Verify electrical power to the oven and home circuit
breaker is on.
Oven temperature issue.
• Contact Wolf Customer Care at 800-222-7820 for
recommendations.
Illumination is not working.
• The light bulb is defective, call Wolf Factory Certied
Service.
Oven starts making noise during operation.
• The oven may emit switching and pumping sounds
during operation. These sounds are normal.
Oven pans are difcult to remove.
• Some combinations of heat, moisture, and food place-
ment may cause the oven pans to warp, pans will return
to their original shape when cool.
“Do not remove water tank” appears on the display.
• Water in the boiler is not pumped off until the water
temperature drops below 175°F
(80°C).
“Boiler scaled up, please descale!” appears on the
display.
• Descale the oven. Refer to page 14.
“Appliance blocked, descaling necessary” appears on the
display.
• Descale the oven. Refer to page 14. If the message does
not disappear after descaling, contact Wolf Factory
Certied Service.

18
|
Wolf Customer Care 800.222.7820
TROUBLESHOOTING
Service
• Maintain the quality built into your product by contacting
Wolf Factory Certied Service. For the name of the
nearest Wolf Factory Certied Service, check the contact
and support section of our website, wolfappliance.com,
or call Wolf Customer Care at 800-222-7820.
• When contacting service, you will need the model and
serial number of your product. Both numbers are listed
on the product rating plate. Refer to page 5 for rating
plate location.
• For warranty purposes, you will also need the date of
installation and name of your authorized Wolf dealer. This
information should be recorded on page 2 of this guide.
Sub-Zero, Sub-Zero & Design, Sub-Zero & Snowake Design, Dual Refrigeration, The Living Kitchen, Great American Kitchens The Fine Art of Kitchen Design, Wolf, Wolf &
Design, Wolf Gourmet, W & Design, red colored knobs, Cove, and Cove & Design are registered trademarks and service marks of Sub-Zero Group, Inc. and its subsidiaries.
All other trademarks are property of their respective owners in the United States and other countries.

Wolf Appliance Residential Limited Warranty
FOR RESIDENTIAL USE
FULL TWO YEAR WARRANTY*
For two years from the date of original installation, this Wolf Appliance product warranty covers all parts
and labor to repair or replace, under normal residential use, any part of the product that proves to be
defective in materials or workmanship. All service provided by Wolf Appliance under the above warranty
must be performed by Wolf factory certied service, unless otherwise specied by Wolf Appliance, Inc.
Service will be provided during normal business hours.
LIMITED FIVE YEAR WARRANTY
For ve years from the date of original installation, Wolf Appliance will repair or replace the following
parts that prove to be defective in materials or workmanship: gas burners (excludes appearance), electric
heating elements, blower motors (ventilation hoods), electronic control boards, magnetron tubes and
induction generators. If the owner uses Wolf factory certied service, the service provider will repair or
replace these parts with the owner paying for all other costs, including labor. If the owner uses non-certi-
ed service, the owner must contact Wolf Appliance, Inc. (using the information below) to receive repaired
or replacement parts. Wolf Appliance will not reimburse the owner for parts purchased from non-certied
service or other sources.
TERMS APPLICABLE TO EACH WARRANTY
The warranty applies only to products installed for normal residential use. The warranty applies only to
products installed in any one of the fty states of the United States, the District of Columbia or the ten
provinces of Canada. This warranty does not cover any parts or labor to correct any defect caused by
negligence, accident or improper use, maintenance, installation, service or repair.
THE REMEDIES DESCRIBED ABOVE FOR EACH WARRANTY ARE THE ONLY ONES THAT WOLF APPLIANCE,
INC. WILL PROVIDE, EITHER UNDER THIS WARRANTY OR UNDER ANY WARRANTY ARISING BY OPERATION
OF LAW. WOLF APPLIANCE, INC. WILL NOT BE RESPONSIBLE FOR ANY CONSEQUENTIAL OR INCIDEN-
TAL DAMAGES ARISING FROM THE BREACH OF THIS WARRANTY OR ANY OTHER WARRANTY, WHETHER
EXPRESS, IMPLIED OR STATUTORY.
Some states do not allow the exclusion or limitation of incidental or consequential damages, so the above
limitation or exclusion may not apply to you. This warranty gives you specic legal rights and you may also
have other legal rights that vary from state to state.
To receive parts and/or service and the name of Wolf factory certied service nearest you, contact Wolf
Appliance, Inc., P.O. Box 44848, Madison, WI 53744; check the contact & support section of our website,
wolfappliance.com, email us at [email protected] or call 800-222-7820.
*Stainless steel (doors, panels, handles, product frames and interior surfaces) are covered by a limited
60-day parts and labor warranty for cosmetic defects.
*Replacement lters for ventilation hood recirculating kits are not covered by the product warranty.

2
|
Atención al cliente de Wolf 800.222.7820
HORNO DE VAPOR DE CONVECCIÓN
Atención al cliente
El modelo y número de serie están impresos en la tarjeta
de registro del producto adjunta. Los dos números también
aparecen en la placa de datos del producto. Consulte la
página 5 para encontrar la placa de datos. Para nes de la
garantía, usted también necesitará la fecha de instalación y
el nombre de su distribuidor autorizado de Wolf. Guarde la
siguiente información para futuras referencias.
INFORMACIÓN DE SERVICIO
Número de modelo
Número de serie
Fecha de la instalación
Nombre de servicio certicado
Número de servicio certicado
Distribuidor autorizado
Número de distribuidor
Si su producto alguna vez necesita servicio, asegúrese
de acudir a un proveedor de servicios certicado por
Wolf y recomendado por nuestro centro de atención al
cliente o seleccione uno de nuestra lista de proveedores
en wolfappliance.com/locator. Todos los proveedores de
servicios certicados son seleccionados cuidadosamente y
rigurosamente capacitados por nosotros.
Aviso importante
Para garantizar que este producto se instale y opere de
la forma más segura y eciente posible, tome nota de los
siguientes tipos de información resaltada en este manual:
AVISO IMPORTANTE señala la información que es
especialmente importante.
PRECAUCIÓN indica una situación en la que se pueden
sufrir heridas leves o provocar daños al producto si no se
siguen las instrucciones.
ADVERTENCIA indica peligro de que se produzcan heridas
graves o incluso la muerte si no se siguen las precauciones.
AVISO IMPORTANTE:en toda esta guía, las dimensiones
entre paréntesis son milímetros, a menos que se especique
lo contrario.
Contenido
4 Precauciones de seguridad
6 Funcionalidades del horno de vapor de convección
7 Funcionamiento del horno de vapor de convección
16 Recomendaciones para el cuidado
17 Resolución de problemas
19 Garantía de Wolf
A página está carregando...
A página está carregando...
A página está carregando...
A página está carregando...
A página está carregando...
A página está carregando...
A página está carregando...
A página está carregando...
A página está carregando...
A página está carregando...
A página está carregando...
A página está carregando...
A página está carregando...
A página está carregando...
A página está carregando...
A página está carregando...
A página está carregando...
A página está carregando...
A página está carregando...
A página está carregando...
A página está carregando...
A página está carregando...
A página está carregando...
A página está carregando...
A página está carregando...
A página está carregando...
A página está carregando...
A página está carregando...
A página está carregando...
A página está carregando...
A página está carregando...
A página está carregando...
A página está carregando...
A página está carregando...
A página está carregando...
A página está carregando...
-
 1
1
-
 2
2
-
 3
3
-
 4
4
-
 5
5
-
 6
6
-
 7
7
-
 8
8
-
 9
9
-
 10
10
-
 11
11
-
 12
12
-
 13
13
-
 14
14
-
 15
15
-
 16
16
-
 17
17
-
 18
18
-
 19
19
-
 20
20
-
 21
21
-
 22
22
-
 23
23
-
 24
24
-
 25
25
-
 26
26
-
 27
27
-
 28
28
-
 29
29
-
 30
30
-
 31
31
-
 32
32
-
 33
33
-
 34
34
-
 35
35
-
 36
36
-
 37
37
-
 38
38
-
 39
39
-
 40
40
-
 41
41
-
 42
42
-
 43
43
-
 44
44
-
 45
45
-
 46
46
-
 47
47
-
 48
48
-
 49
49
-
 50
50
-
 51
51
-
 52
52
-
 53
53
-
 54
54
-
 55
55
-
 56
56


Sub-Zero CSO24TE/S/TH Guia de usuario
- Categoria
- Medindo, testando
- Tipo
- Guia de usuario
em outras línguas
- español: Sub-Zero CSO24TE/S/TH Guía del usuario
- français: Sub-Zero CSO24TE/S/TH Mode d'emploi
- English: Sub-Zero CSO24TE/S/TH User guide
Artigos relacionados
-
Wolf SO24TE/S/TH Manual do usuário
-
Sub-Zero IR304TE/S/TH Guia de usuario
-
Sub-Zero DF606F Guia de usuario
-
Sub-Zero DO30PM/S/PH Guia de usuario
-
-
Sub-Zero GR484CG Guia de usuario
-
-
Sub-Zero MDD24TE/S/TH Guia de usuario
-
-