
STEAMER MODULE
USE AND CARE GUIDE
CLEANING, MAINTENANCE, AND MORE

2
|
Wolf Customer Care 800.222.7820
Contents
4 Safety Precautions
5 Steamer Module Features
6 Steamer Module Operation
13 Care Recommendations
14 Troubleshooting
15 Wolf Warranty
STEAMER MODULE

wolfappliance.com
|
3
Customer Care
The model and serial number are printed on the enclosed
product registration card. Both numbers are also listed on
the product rating plate. Refer to page 5 for rating plate
location. For warranty purposes, you will also need the date
of installation and name of your authorized Wolf dealer.
Record this information below for future reference.
SERVICE INFORMATION
Model Number
Serial Number
Date of Installation
Certied Service Name
Certied Service Number
Authorized Dealer
Dealer Number
If your product ever needs attention, be sure to use a Wolf
Factory Certied Service provider recommended by our
customer care center, or select one from our list of providers
available at wolfappliance.com/locator. All Factory Certi-
ed Service providers are carefully selected and thoroughly
trained by us.
STEAMER MODULE
Important Note
To ensure this product is installed and operated as safely
and efciently as possible, take note of the following types
of highlighted information throughout this guide:
IMPORTANT NOTE highlights information that is especially
important.
CAUTION indicates a situation where minor injury or product
damage may occur if instructions are not followed.
WARNING states a hazard that may cause serious injury or
death if precautions are not followed.
IMPORTANT NOTE: Throughout this guide, dimensions in
parentheses are millimeters unless otherwise specied.

4
|
Wolf Customer Care 800.222.7820
SAFETY PRECAUTIONS
IMPORTANT INSTRUCTIONS
IMPORTANT NOTE: Read all safety instructions
before using this appliance.
• Read this guide carefully before using this appli-
ance to reduce risk of re, electric shock or injury.
• This appliance must be properly installed and ser-
viced by a qualied installer, service agency or gas
supplier and grounded by a qualied technician.
WARNING
PROPOSITION 65 FOR CALIFORNIA RESIDENTS
Cancer and Reproductive Harm—
www.P65Warnings.ca.gov
GENERAL SAFETY PRECAUTIONS
• Always use dry pot holders. Wet or damp pot
holders can cause steam burns. Do not use a towel
or bulky cloth in place of pot holders.
• Do not leave children alone or unattended in the
area where this appliance is in use. Never allow
children to sit or stand on the appliance.
• Never leave this appliance unattended when in
use. Boilovers and greasy spills may smoke or
ignite.
• Do not use water on grease res. Smother
the ame or use a dry chemical or foam-type
extinguisher.
• Do not repair or replace any part of this appli-
ance unless specically recommended in literature
accompanying this appliance.
• Do not store or use gasoline or other ammable
vapors and liquids in the vicinity of this or any other
appliance.
• Do not heat unopened food containers, such as
baby food jars and cans. Pressure build-up may
cause the container to burst and cause injury.
SAVE THESE INSTRUCTIONS

wolfappliance.com
|
5
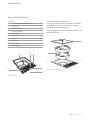
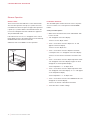
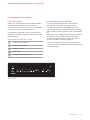
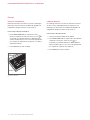
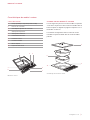
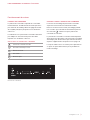
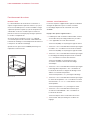
STEAMER MODULE ASSEMBLY
For storage, position the solid insert pan on top and place
both insert pans into the steamer basin with handles
aligned. Refer to the illustration below.
For stacked alignment, rotate the solid insert pan 90° to the
perforated insert pan.
STEAMER MODULE
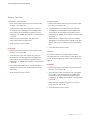
Steamer Module Features
FEATURES
1
Product Rating Plate (bottom of module)
2
Control Panel
3
Control Panel Lock
4
Temperature Display
5
Timer Display
6
Drain Control
7
Glass Lid
8
Insert Pans
9
Steamer Basin
10
Water Level Lines
Steamer module
6
1
7
4
3
Steamer module assembly
9
10
8
7
2
5

6
|
Wolf Customer Care 800.222.7820
STEAMER MODULE OPERATION
Getting Started
We know you are eager to start cooking, but before you
do, please take some time to read this use & care guide.
Whether you are an occasional cook or an expert chef, it
will be to your benet to familiarize yourself with the safety
practices, features, operation and care recommendations
of your Wolf steamer module.
To ensure all residual oil from the manufacturing process
has been removed, clean the steamer module thoroughly
with hot water and a mild detergent prior to use. Rinse and
dry with a soft cloth. Refer to care recommendations on
page 13.
Sabbath
This appliance is certied by Star-K to meet strict religious
regulations in conjunction with specic instructions found
on www.star-k.org.

wolfappliance.com
|
7
STEAMER MODULE OPERATION
Steamer Operation
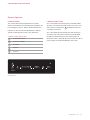
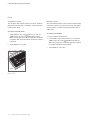
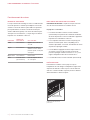
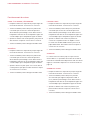
CONTROL PANEL
The control panel features illuminated touch controls.
A power level indicator for the heating element displays the
heat setting from LO to HI. Refer to the illustration below.
Indicators on the control panel will illuminate to indicate
specic module operation. Refer to the chart below.
CONTROL PANEL INDICATORS
Control Panel Locked
Automatic Drain Open
Element On
Hot Water
Timer Set
CONTROL PANEL LOCK
The control panel lock feature prevents unwanted module
operation. Touch and hold LOCK for three seconds to lock
and unlock the control panel.
will illuminate when the
control panel is locked.
The control panel will automatically lock after 10 minutes
of inactivity. This automatic lock feature can be disabled
through the extended options menu. Refer to page 10.
When the module is powered up for the rst time and after a
power outage, the module will default to lock mode.
Control panel

8
|
Wolf Customer Care 800.222.7820
STEAMER MODULE OPERATION
Steamer Operation
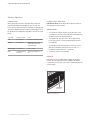
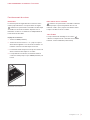
POWER LEVEL
When the heating element is activated, the power level
indicator will illuminate indicating the level of heat. The
lowest heat is represented by the small ame, varying levels
of heat by additional indicators (dots), and the highest heat
by all indicators including the large ame. Refer to the chart
below.
SETTING POWER LEVEL USES
Low 1–6 indicators Proong, melting chocolate.
Medium 6–7 indicators Warming foods, use as
chang dish, defrosting,
steaming bread.
Medium High 7-8 indicators Slow-cooking.
High 8–10 (large ame)
indicators
Steaming vegetables, rice,
etc.
POWER LEVEL INDICATOR
IMPORTANT NOTE:
Always ll the basin with water prior to
activating the steamer module.
Setting controls:
1 To activate the steamer module, touch ON/OFF on the
control panel. The power level indicator and all indicators
will ash. Refer to the illustration below.
2 To complete the activation, touch HI for highest heat,
LO for lowest heat, or touch the desired preset power
level indicator.
3 To change the heat setting while the unit is on, touch or
slide to the desired preset power level or touch + or –
to adjust the temperature in 1° increments.
4 To turn the unit off, touch ON/OFF.
PREHEAT
Preheat the steamer module until the water temperature
reaches the set temperature before adding food. Always
cook food in an insert pan, never place food directly into the
steamer basin.
Power level indicator
POWER LEVEL
INDICATOR

wolfappliance.com
|
9
STEAMER MODULE OPERATION
HOT WATER INDICATOR
will illuminate on the control panel and will remain on
until the water temperature is below 140°F
(60°C). It may
remain illuminated even when the steamer module is off.
ALL OFF
When the heating element is activated, will illuminate on
the control panel. To turn the element off, touch ALL OFF.
Steamer Operation
TIMER
The timer can be set in one-minute increments up to 99
minutes. Once a time is set,
will illuminate on the control
panel and the countdown is visible on the timer display.
Refer to the illustration below. The timer is independent from
module operation.
Setting timer:
1 Touch TIMER.
2 Touch and hold + or – until the desired time is shown
on the timer display. Timer will begin the countdown in
minutes.
3 Timer will chime with one minute left and complete the
countdown in seconds.
4 When complete, timer will chime and continue to chime
until TIMER is touched.
Timer control

10
|
Wolf Customer Care 800.222.7820
STEAMER MODULE OPERATION
Steamer Operation
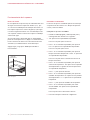
WATER LEVEL
There are two water level indicators on the steamer basin.
The lower line represents 10 cups
(2.4 L) and is the recom-
mended level for the insert pans. The upper line represents
5 quarts
(4.7 L) of water. Refer to the illustration below. Do
not use the solid pan if the basin is lled to the upper line.
The pan will ll with water.
If the water level is too low, ‘Lo’ will appear on the control
panel display. Power to the heating element is automatically
disabled and the unit will enter lock mode.
Add water, then touch TIMER to resume operation.
EXTENDED OPTIONS
The extended options feature allows the user to set prefer-
ences for volume, tone, control panel lock and Sabbath
feature.
Setting extended options:
1 While unit is off and unlocked, touch and hold ALL OFF
for ve seconds.
2 ‘VO’ will appear on the timer display.
Touch LO or HI to adjust volume.
3 Touch + on the timer control to adjust tone. ‘Fr’ will
appear on the timer display.
Touch LO or HI to adjust tone.
4 Touch + on the timer control to adjust the automatic
control panel lock. ‘Lo’ will appear on the timer display.
Touch LO or HI to turn the automatic lock feature off or
on.
5 Touch + on the timer control to adjust temperature offset.
‘OF’ will appear on the timer display. Degrees of offset
will appear on the temperature display.
Touch temperature + or - to adjust offset.
6 Touch + on the timer control to adjust temperature units.
‘Un’ will appear on the timer display. ‘F’ or ‘C’ will appear
on the temperature display.
Touch temperature + or - to adjust units.
7 Touch + on the timer control to enter Sabbath mode. ‘SA’
will appear on the timer display.
Touch LO to activate or deactivate the feature.
8 Touch ALL OFF to conrm settings.
WATER LEVEL
LINES
Water level

wolfappliance.com
|
11
STEAMER MODULE OPERATION
Steamer Operation
STEAMING | DEFROSTING
1 Fill the steamer basin with water to the minimum water
level line. Cover with the lid.
2 Touch ON/OFF on the control panel, then select the
desired power level. During preheat, the display alter-
nates between the actual water temperature and set
temperature. An audible chime indicates set temperature
is reached.
3 Add food to the perforated pan, then place in the
steamer basin and cover with the lid.
4 Touch ON/OFF to turn the unit off.
PROOFING
1 Fill the steamer basin with water to the minimum water
level line. Cover with the lid.
2 Touch ON/OFF on the control panel, then select the
desired power level. During preheat, the display alter-
nates between the actual water temperature and set
temperature. An audible chime indicates set temperature
is reached.
3 Place bowl with bread dough, uncovered, in the perfo-
rated pan, then place in the steamer basin and cover
with the lid.
4 Touch ON/OFF to turn the unit off.
SLOW-COOKING
1 Fill the steamer basin with water to the minimum water
level line. Cover with the lid.
2 Touch ON/OFF on the control panel, then select the
desired power level. During preheat, the display alter-
nates between the actual water temperature and set
temperature. An audible chime indicates set temperature
is reached.
3 Add food to the solid pan and cover food completely
with liquid. Cover the pan with heavy plastic wrap, then
with foil. Place in the steamer basin and cover with the
lid.
4 Touch ON/OFF to turn the unit off.
SABBATH
The steamer will remain on until the water level drops,
causing the water level safety feature to automatically turn
the unit off without adjusting controls. Refer to water level,
page 10.
WARMING
1 Fill the steamer basin with water to the minimum water
level line. Cover with the lid.
2 Touch ON/OFF on the control panel, then set tempera-
ture to 160°F
(70°C). During preheat, the display alter-
nates between the actual water temperature and set
temperature. An audible chime indicates set temperature
is reached.
3 Add food to the solid pan, then place in the steamer
basin and cover with the lid.
4 Touch ON/OFF to turn the unit off.

12
|
Wolf Customer Care 800.222.7820
STEAMER MODULE OPERATION
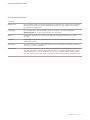
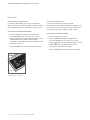
Drain
AUTOMATIC DRAIN
The automatic drain requires a drain connection. The drain
will operate only if the unit is off and the water temperature
is below 140°F
(60°C).
To activate automatic drain:
1 Touch DRAIN on the control panel for 3 seconds. An
audible chime will sound,
will illuminate and the
drain valve will open for 2 minutes. Repeat as needed to
completely drain the steamer basin. Refer to the illustra-
tion below.
2 Touch DRAIN to close valve.
MANUAL DRAIN
The manual drain requires a heat resistant receptacle with
a minimum 2 gallon
(7.6 L) capacity. The drain will operate
only if the unit is off and the water temperature is below
140°F
(60°C).
To activate manual drain:
1 Place receptacle under the unit.
2 Touch DRAIN on the control panel for 3 seconds. An
audible chime will sound,
will illuminate and the
drain valve will open for 2 minutes. Repeat as needed
to completely drain the steamer basin.
3 Touch DRAIN to close valve.
Drain control
DRAIN

wolfappliance.com
|
13
Care Recommendations
CLEANING
Stainless steel Use a nonabrasive stainless steel cleaner and apply with a soft lint-free cloth. To bring out the natural luster,
lightly wipe surface with a water-dampened microber cloth followed by a dry polishing chamois. Always
follow the grain of stainless steel.
Control panel Use a spray degreaser to remove ngerprints and food soil. Spray on a cloth before wiping panel.
IMPORTANT NOTE: Do not spray cleaners directly on the control panel.
Glass lid The glass lid is dishwasher safe, or wash by hand with warm water and mild detergent. Rinse and dry
thoroughly.
Insert pans Solid and perforated insert pans are dishwasher safe, or wash by hand with warm water and mild
detergent. Rinse and dry.
Drain strainer The strainer should remain in the drain outlet during normal use and cleaning. Lift the strainer out and rinse
after each use to remove food particles.
Steamer basin Drain water from steamer basin. Refer to page 12. Pour warm water with mild detergent into the empty basin.
Scrub with a nylon brush. Rinse well, drain and dry thoroughly. For hard water calcium deposits, clean with
white vinegar and water or a cleaner designed to remove minerals. Let mixture stand in the steamer basin,
then scrub with a nylon brush. Rinse well. For soft water salt deposits, wipe out with a wet cloth. Rinse well.
CARE RECOMMENDATIONS

14
|
Wolf Customer Care 800.222.7820
TROUBLESHOOTING
SERVICE
• Maintain the quality built into your product by contacting
Wolf Factory Certied Service. For the name of the
nearest Wolf Factory Certied Service, check the contact
& support section of our website, wolfappliance.com or
call Wolf customer care at 800-222-7820.
• When contacting service, you will need the model and
serial number of your product. Both numbers are listed
on the product rating plate. Refer to page 5 for rating
plate location.
• For warranty purposes, you will also need the date of
installation and name of your authorized Wolf dealer. This
information should be recorded on page 3 of this guide.
Troubleshooting
OPERATION
Steamer module does not operate.
• Verify power is on.
• Verify electrical power to module and home circuit
breaker is on.
• Module is in lock mode. Touch and hold LOCK for three
seconds to unlock control panel.
• Module will automatically turn off after 12 hours of
continuous use when set at 180°F
(80°C) or higher.
‘LO’ appears on the control panel display.
• Water level is too low. Power to the heating element is
automatically turned off. Refer to water level, page 10.
Module temperature issue.
• Contact Wolf customer care at 800-222-7820 for
recommendations.
Sub-Zero, Sub-Zero & Design, Sub-Zero & Snowake Design, Dual Refrigeration, The Living Kitchen, Great American Kitchens The Fine Art of Kitchen Design, Wolf, Wolf &
Design, Wolf Gourmet, W & Design, red colored knobs, Cove, and Cove & Design are registered trademarks and service marks of Sub-Zero Group, Inc. and its subsidiaries.
All other trademarks are property of their respective owners in the United States and other countries.

Wolf Appliance Residential Limited Warranty
FOR RESIDENTIAL USE
FULL TWO YEAR WARRANTY*
For two years from the date of original installation, this Wolf Appliance product warranty covers all parts
and labor to repair or replace, under normal residential use, any part of the product that proves to be
defective in materials or workmanship. All service provided by Wolf Appliance under the above warranty
must be performed by Wolf factory certied service, unless otherwise specied by Wolf Appliance, Inc.
Service will be provided during normal business hours.
LIMITED FIVE YEAR WARRANTY
For ve years from the date of original installation, Wolf Appliance will repair or replace the following
parts that prove to be defective in materials or workmanship: gas burners (excludes appearance), electric
heating elements, blower motors (ventilation hoods), electronic control boards, magnetron tubes and
induction generators. If the owner uses Wolf factory certied service, the service provider will repair or
replace these parts with the owner paying for all other costs, including labor. If the owner uses non-certi-
ed service, the owner must contact Wolf Appliance, Inc. (using the information below) to receive repaired
or replacement parts. Wolf Appliance will not reimburse the owner for parts purchased from non-certied
service or other sources.
TERMS APPLICABLE TO EACH WARRANTY
The warranty applies only to products installed for normal residential use. The warranty applies only to
products installed in any one of the fty states of the United States, the District of Columbia or the ten
provinces of Canada. This warranty does not cover any parts or labor to correct any defect caused by
negligence, accident or improper use, maintenance, installation, service or repair.
THE REMEDIES DESCRIBED ABOVE FOR EACH WARRANTY ARE THE ONLY ONES THAT WOLF APPLIANCE,
INC. WILL PROVIDE, EITHER UNDER THIS WARRANTY OR UNDER ANY WARRANTY ARISING BY OPERATION
OF LAW. WOLF APPLIANCE, INC. WILL NOT BE RESPONSIBLE FOR ANY CONSEQUENTIAL OR INCIDEN-
TAL DAMAGES ARISING FROM THE BREACH OF THIS WARRANTY OR ANY OTHER WARRANTY, WHETHER
EXPRESS, IMPLIED OR STATUTORY.
Some states do not allow the exclusion or limitation of incidental or consequential damages, so the above
limitation or exclusion may not apply to you. This warranty gives you specic legal rights and you may also
have other legal rights that vary from state to state.
To receive parts and/or service and the name of Wolf factory certied service nearest you, contact Wolf
Appliance, Inc., P.O. Box 44848, Madison, WI 53744; check the contact & support section of our website,
wolfappliance.com, email us at [email protected] or call 800-222-7820.
*Stainless steel (doors, panels, handles, product frames and interior surfaces) are covered by a limited
60-day parts and labor warranty for cosmetic defects.
*Replacement lters for ventilation hood recirculating kits are not covered by the product warranty.

2
|
Atención al cliente de Wolf 800.222.7820
Contenido
4 Precauciones de seguridad
5 Características del módulo de la vaporera
6 Funcionamiento del módulo de la vaporera
13 Recomendaciones sobre el cuidado
14 Resolución de problemas
15 Garantía de Wolf
MÓDULO DE LA VAPORERA

wolfappliance.com
|
3
Atención al cliente
El modelo y número de serie están impresos en la tarjeta
de registro del producto adjunta. Los dos números también
aparecen en la placa de datos del producto. Consulte la
página 5 para encontrar la placa de datos. Para nes de la
garantía, usted también necesitará la fecha de instalación y
el nombre de su distribuidor autorizado de Wolf. Anote esta
información abajo para referencia futura.
INFORMACIÓN PARA SERVICIO
Número de modelo
Número de serie
Fecha de instalación
Nombre de servicio certicado
Número de servicio certicado
Distribuidor autorizado
Número de distribuidor
Si su producto alguna vez necesita servicio use un
proveedor de servicios certicado por Wolf y recomendado
por nuestro centro de atención al cliente, o seleccione uno
de nuestra lista de proveedores en wolfappliance.com/
locator. Todos los proveedores de los centros de servicio
autorizados han sido cuidadosamente seleccionados y
entrenados a fondo por nosotros.
MÓDULO DE LA VAPORERA
Aviso importante
Para garantizar que este producto se instale y opere de
la forma más segura y eciente posible, tome nota de los
siguientes tipos de información resaltada en este manual:
AVISO IMPORTANTE señala la información que es
especialmente importante.
PRECAUCIÓN indica una situación en la que se pueden
sufrir heridas leves o provocar daños al producto si no se
siguen las instrucciones.
ADVERTENCIA indica peligro de que se produzcan heridas
graves o incluso la muerte si no se siguen las precauciones.
AVISO IMPORTANTE: En toda esta guía, las dimensiones
entre paréntesis son milímetros, a menos que se especique
lo contrario.

4
|
Atención al cliente de Wolf 800.222.7820
PRECAUCIONES DE SEGURIDAD
INSTRUCCIONES IMPORTANTES
AVISO IMPORTANTE: Lea las instrucciones en su
totalidad antes de usar el electrodoméstico.
• Lea este manual con atención antes de usar
este electrodoméstico para reducir el riesgo de
incendio, descarga eléctrica o lesiones.
• Este electrodoméstico lo deben instalar, conectar
a tierra y reparar un técnico calicado, una agencia
de servicio o un proveedor de gas.
ADVERTENCIA
PROPUESTA 65 PARA RESIDENTES DE
CALIFORNIA
Cáncer y Daño Reproductivo—
www.P65Warnings.ca.gov
PRECAUCIONES GENERALES DE SEGURIDAD
• Use siempre guantes de cocina secos. Los
guantes de cocina húmedos o mojados pueden
provocar quemaduras por vapor. No use toallas ni
paños gruesos en lugar de los guantes de cocina.
• No deje a los niños solos o sin supervisión en el
área donde se usa este electrodoméstico. Nunca
permita que los niños se sienten o paren sobre el
electrodoméstico.
• Nunca deje de supervisar este electrodoméstico
cuando se encuentre en uso. El rebosamiento por
ebullición y los derrames de grasa pueden generar
humo o incendiarse.
• No use agua en incendios causados por grasas.
Sofoque el fuego o use un extinguidor químico
seco o de espuma.
• No intente reparar ni cambiar parte alguna
de este electrodoméstico a menos que
esté especícamente recomendado en
la documentación que acompaña a este
electrodoméstico.
• No almacene ni use gasolina u otros vapores o
líquidos ignífugos en las proximidades de este o
cualquier otro electrodoméstico.
• No caliente recipientes de comida cerrados, como
frascos de alimentos para bebés o enlatados.
La acumulación de presión puede hacer que el
recipiente explote y cause lesiones.
GUARDE
ESTAS
INSTRUCCIONES

wolfappliance.com
|
5
INSTALACIÓN DEL MÓDULO DE LA VAPORERA
Para guardarlo, coloque la bandeja maciza en la parte
superior y las dos bandejas dentro del recipiente de la
vaporera con las manijas alineadas. Consulte la siguiente
ilustración.
Para apilar y alinear las bandejas, gire 90° la bandeja maciza
hacia la bandeja perforada.
MÓDULO DE LA VAPORERA
Características del módulo de la vaporera
CARACTERÍSTICAS
1
Placa de datos del producto (parte inferior del módulo)
2
Panel de control
3
Bloqueo del panel de control
4
Pantalla de temperatura
5
Pantalla de temporizador
6
Control de drenaje
7
Tapa de vidrio
8
Bandejas de inserción
9
Recipiente de la vaporera
10
Líneas del nivel de agua
Instalación del módulo de la vaporera
9
10
8
7
Módulo de la vaporera
6
1
7
4
3
2
5

6
|
Atención al cliente de Wolf 800.222.7820
FUNCIONAMIENTO DEL MÓDULO DE LA VAPORERA
Primeros pasos
Sabemos que está ansioso por empezar a cocinar, pero
antes de hacerlo, dedique un poco de tiempo a leer
este manual de uso y cuidado. Si usted es un cocinero
ocasional o un chef experto, se beneciará al conocer las
prácticas de seguridad, características, funcionamiento y
recomendaciones de cuidado del módulo de la vaporera
de Wolf.
Para eliminar todo el aceite residual del proceso de
fabricación, limpie a fondo el módulo de la vaporera con
agua caliente y un detergente suave antes de usarlo.
Enjuague y seque con un paño suave. Consulte las
recomendaciones sobre el cuidado en la página 13.
Shabat
Este electrodoméstico lleva el certicado Star-K que indica
que cumple con estrictas normas religiosas junto con
instrucciones especícas que aparecen en www.star-k.org.
A página está carregando...
A página está carregando...
A página está carregando...
A página está carregando...
A página está carregando...
A página está carregando...
A página está carregando...
A página está carregando...
A página está carregando...
A página está carregando...
A página está carregando...
A página está carregando...
A página está carregando...
A página está carregando...
A página está carregando...
A página está carregando...
A página está carregando...
A página está carregando...
A página está carregando...
A página está carregando...
A página está carregando...
A página está carregando...
A página está carregando...
A página está carregando...
-
 1
1
-
 2
2
-
 3
3
-
 4
4
-
 5
5
-
 6
6
-
 7
7
-
 8
8
-
 9
9
-
 10
10
-
 11
11
-
 12
12
-
 13
13
-
 14
14
-
 15
15
-
 16
16
-
 17
17
-
 18
18
-
 19
19
-
 20
20
-
 21
21
-
 22
22
-
 23
23
-
 24
24
-
 25
25
-
 26
26
-
 27
27
-
 28
28
-
 29
29
-
 30
30
-
 31
31
-
 32
32
-
 33
33
-
 34
34
-
 35
35
-
 36
36
-
 37
37
-
 38
38
-
 39
39
-
 40
40
-
 41
41
-
 42
42
-
 43
43
-
 44
44


em outras línguas
- español: Sub-Zero SM15TF/S Guía del usuario
- français: Sub-Zero SM15TF/S Mode d'emploi
- English: Sub-Zero SM15TF/S User guide
Artigos relacionados
-
Sub-Zero CW24/B Guia de usuario
-
Wolf GM15TF/S Manual do usuário
-
-
Sub-Zero CSO30CM/B/TH Guia de usuario
-
Sub-Zero MS24 Guia de usuario
-
-
Sub-Zero CI304TF/S Guia de usuario
-
-
-
Sub-Zero MDD24TE/S/TH Guia de usuario