Dremel 8000 Instructions Manual
- Categoria
- Poder multi-ferramentas
- Tipo
- Instructions Manual

Dremel European Sales Office - The Netherlands 2 610 919 963/06/03
800
(F013800066)
GB
D
F
NL
S
N
FIN
DK
I
E
P
GR
H
CZ
PL
TR
RU
http://www.dremel.com
INSTRUCTIONS Page 11-16
BEDIENUNGSANLEITUNG Seite 17-23
INSTRUCTIONS Page 24-30
INSTRUCTIES Pagina 31-37
INSTRUKTIONER Sida 38-43
INSTRUKSJONER Side 44-49
OHJEET Sivu 50-55
VEJLEDNING Side 56-61
ISTRUZIONI Pagina 62-68
INSTRUCCIONES Página 69-75
INSTRUÇÕES Página 76-82
√¢∏°π∂™ √ÂÏ›‰·
83-89
HASZNÁLATI UTASÍTÁS Oldal
90-95
NÁVOD Strana
96-101
INSTRUKCJA Strona
102-108
TAL∑MATLAR Safya
109-114
ИНСТРУКЦИИ Cтраница
115-121
8000

2
E
2
ABCDEFGHI J
Shaft Lock Battery Release Indicator
GB Collet Nut Button Switch Collet Pack Tab Hanger Alignment Light Charger
Überwurf- Wellenarre- Entriege-
Ausrichtungs-
Anzeige-
D mutter tierungstaste Schalter Spannzange Akku lungstaste Aufhänger
marken
leuchte Ladegerät
Bouton de
blocage Pince Pack Ergot de Anneau de Témoin
F Virole d’arbre Interrupteur porte-outil batterie verrouillage suspension Détrompeurs lumineux Chargeur
Moer Asvergren- Accu Ontgrendeling Controle-
NL spantang deling Knop Schakelaar Spantang Pak Etiket Hanger Uitlijning lampje Oplader
Axellås- Batterie Indikator
S Nosmutter knapp Brytare Spännhylsa paket Flik Hängare Riktning lampa Laddare
Spennhylse- Spindellås- Batteri- Utløser- Indikator-
N mutter knapp Brytere Spennhylse pakke knapp Oppheng Justering lampe Lader
Istukkahylsyn Lukitus- Akku- Irrotus- Merkki-
FIN mutteri painike Kytkin Istukkahylsy yksikkö painike Ripustus Kohdistus valo Laturi
Spænde- Knap til Spænde- Batteri- Frigørelses- Indikator-
DK møtrik aksellås Kontakt patron pakke knap Bøjle Styr lys Oplader
Ghiera di Bloccaggio Gruppo Linguetta Spia Carica
I serraggio Albero Interruttore Pinza Batterie di bloccaggio Supporto Allineamento Luminosa batterie
Tuerca de Botón fiador Conjunto Lengüeta Gancho de Luz
E la boquilla del eje Interruptor Boquilla de la batería de liberación suspensión Alineación indicadora Cargador
Botão de
Porca de bloqueio Conj. de Patilha de Argola para Alinha- Luz Carre-
P aperto do veio Interruptor Bucha bateria desbloqueio pendurar mento indicadora gador
∫Ô˘Ì›
ÎÏÂȉÒÌ·ÙÔ˜ ¶·Î¤ÙÔ ¶Ï‹ÎÙÚÔ °¿ÓÙ˙Ô˜ ∂˘ı˘ÁÚ¿Ì- ∂Ó‰ÂÈÎÙÈ΋
GR
™ÊÈÁÎÙ‹Ú·˜ ÙÔ˘ ¿ÍÔÓ· ¢È·ÎfiÙ˘ ºˆÏÈ¿ Ì·Ù·ÚÈÒÓ ÂÏ¢ı¤ÚˆÛ˘ ·Ó¿ÚÙËÛ˘ ÌÈÛË Ï˘¯Ó›· ºÔÚÙÈÛÙ‹˜
Befo- Tengelybizto- Befogó- Akkumulátor Záró Jelzœ-
H
góanya sító gomb Kapcsoló hüvely egység Fül Akasztó Vezetœsín lámpa Töltœ
Aretaãní
Matice tlaãítko UvolÀovací
CZ kle‰tiny vfietena Spínaã Kle‰tina Sada baterií tlaãítko Závûs Vedení Kontrolka Nabíjeã
Nakr´tka tulei Przycisk Tuleja Zestaw Klapka Lampka
PL zaciskowej blokady wa∏u Prze∏àcznik zaciskowa baterii zwalniajàca Wieszak Ustawienie wskaênika ¸adowarka
Açma
Mil Kilitleme Kapama Akü Ç∂karma Ωarj Akü Ωarj
TR Mandren Butonu Düπmesi Penset Grubu Kulbu Ask∂ Hizalama Göstergesi cihaz∂
Кнопка Аккумулято-
Цанговая блокировки Выключа- рный Напра- Световой Зарядное
RU гайка вала тель Цанга блок Фиксатор Подвес вляющие индикатор устройство
AB
C
E
D
G
H
I
J
F

3
KLMNOP
Voltage No load Collet Amperage Charge
GB Model No Rating Speed Capacities Rating Time
Nenn- Leerlauf- Spannzangen- Nennstrom-
D Modellnr. spannung drehzahl durchmesser aufnahme Ladezeit
Tension Vitesse Capacité pince Ampérage Temps de
F N° modèle nominale à vide porte-outil nominal charge
Spanning Geen lading Spantang Stroomsterkte Lading
NL Modelnr. Belasting Snelheid Capaciteit Belasting Tijd
Modell- Maximal Varvtal Spännhylsans Högsta Uppladd-
S nummer spänning obelastad vidder strömstyrka ningstid
Voltage Tomgangs- Spennhylse- Charge
N Modellnr. Spenning turtall kapasitet Amperage Ladetid
Nimellis- Kuormitta- Istukkahylsyn Nimellis- Lataus-
FIN Mallinro jännite maton nopeus ominaisuudet virta aika
Mærke- Hastighed Patron- Mærke- Opladnings-
DK Model-nr. spænding uden belast. kapaciteter strøm tid
Tensionedi Velocità Capacità Assorbimento Tempo
I N° Modello alimentazione A vuoto Pinza di corrente di carica
E Voltaje Velocidad Capacidades Amperaje Tiempo
N.˚ modelo nominal sin carga de la boquilla nominal de carga
Amplit. de
Tensão Veloc. aperto da Intensidade Tempo
P N.˚ do mod. nominal em vazio bucha nominal de carga
∞ÚÈı. √ÓÔÌ·ÛÙÈ΋ ∆·¯‡ÙËÙ· ªÂÁ¤ıË √ÓÔÌ·ÛÙÈ΋ ÃÚfiÓÔ˜
GR
ÌÔÓÙ¤ÏÔ˘ Ù¿ÛË ¯ˆÚ›˜ ÊÔÚÙ›Ô ÙÛÔÎ ¤ÓÙ·ÛË ÊfiÚÙÈÛ˘
Névleges Töltési Befogóhüvely Névleges Töltési
H Típusszám feszültség sebesség kapacitás áram idœ
âíslo Otáãky bez Rozmûry Doba
CZ modelu Napûtí zatíÏení kle‰tin Proud nabíjení
Pr´dkoÊç WielkoÊç Pràd
Napi´cie bez tulei znamionowy Czas
PL Nr modelu znamionowe obcià˝enia zaciskowej w amperach ∏adowania
Devir
Voltaj Ayarlar∂ Penset Amper
TR Model No Say∂s∂ Kapasitesi Say∂s∂ Süresi Ωarj
Максимально Скорость Максимально
допустимое холостого Размеры допустимый Время
RU № модели напряжение хода цанг ток зарядки
K 800
L 10.8 V
M no 5,000-35,000/min
N 0.08 cm, 0.16 cm, 0,24 cm, 0.32 cm
K 856
L 230-240 V
50-60 Hz
O 375 mA
P 3 h
3

44
GB-Speed F-Vitesse S-Hastighet FIN-Nopeudet I-Velocità P-Velocidade H-Sebességi PL-
Pr´dkoÊç
RU-
Скорость
D-Geschwindigkeit NL-Snelheid N-Hastighet DK-Hastighed E-Velocidad GR-
∆·¯‡ÙËÙ·
CZ-Rychlost TR-Hiz
AA BB CC DD EE FF GG HH II
GB
D
F
NL
S
N
FIN
DK
I
E
P
GR
H
CZ
PL
TR
RU
CATALOG
NUMBER
KATALOG
NUMMER
RÉFÉRENCE
CATALOGUE
CATALOGUS-
NUMMER
KATALOG-
NUMMER
KATALOG-
NUMMER
LUETTELO-
NUMERO
KATALOG-
NUMMER
NUMERO DI
CODICE
NÚMERO DE
CATÁLOGO
NÚMERO DO
CATÁLOGO
∞ƒπ£ª√™
∫∞∆∞§√°√À
KATALÓGUS
SZÁM
KATALOGOVÉ
âÍSLO
NUMER
KATALOGOWY
KATALOG
NUMARAS
НОМЕР ПО
КАТАЛОГУ
SOFT
WOOD
WEICHHOLZ
BOIS TENDRE
ZACHTHOUT
MJUKA-
TRÄSLAG
FURU/GRAN
PEHMEÄ PUU
BLØDT TRÆ
LEGNO DOLCE
MADERA
BLANDA
MADEIRA
MACIA
ª∞§∞∫√
•À§√
PUHA
FA
MùKKÉ
D¤EVO
MI¢KKIE
DREWNO
YUMUΩAK
AHΩAP
МЯГКОЕ
ДЕРЕВО
HARD
WOOD
HARTHOLZ
BOIS DUR
HARDHOUT
HÅRDA
TRÄSLAG
LØVTRE
KOVA PUU
HÅRDT TRÆ
LEGNO DURO
MADERA DURA
MADEIRA
DURA
™∫§∏ƒ√
•À§√
KEMÉNY
FA
TVRDÉ
D¤EVO
TWARDE
DREWNO
SERT
AHΩAP
ТВЕРДОЕ
ДЕРЕВО
LAMINATES
PLASTIC
LAMINIERTER
KUNSTSTOFF
STRATIFIÉS
PLASTIQUES
LAMINAAT
PLASTIC
PLASTLAMINAT
LAMINATPLAST
LAMINAATIT,
MUOVI
LAMINATER
KUNSTSTOF
PLASTICA PER
LAMINATI
LAMINADOS DE
PLÁSTICO
LAMINADOS DE
PLÁSTICO
∫√¡∆ƒ∞¶§∞∫∂
¶§∞™∆π∫√
RÉTEGELT LEMEZ
MÆANYAG
LAMINÁTY
PLAST
LAMINATY
TWORZYWO SZTUCZNE
LAM∑NANT
PLAST∑K
ЛАМИНАТЫ
ПЛАСТИК
STEEL
STAHL
ACIER
STAAL
STÅL
STÅL
,
TERÄS
STÅL
ACCIAIO
ACERO
AÇO
Ã∞§Àµ∞™
ACÉL
OCEL
STAL
ÇEL∑K
СТАЛЬ
ALUMINUM,
BRASS, ETC.
ALUMINUM,
MESSING, ETC.
ALUMINIUM,
LAITON, ETC.
ALUMINIUM,
KOPER, ENZ.
ALUMINIUM,
MÄSSING ETC.
ALUMINUM,
MESSING OSV
ALUMINUM,
MESSINKI, JNE.
ALUMINUM,
MESSING OSV.
ALLUMINIO,
OTTONE, ECC.
ALUMINIO,
LATÓN,ETC.
ALUMÍNIO,
LATÃO, ETC.
∞§√Àªπ¡π√,
√ƒ∂πÃ∞§∫√™, ∫∆§.
ALUMÍNIUM,
RÉZ, STB.
HLINÍK,
MOSAZ A POD.
ALUMINIUM,
MOSIÑDZ, ITP.
ALÜM∑NYUM,
PR∑NÇ, VB.
АЛЮМИНИЙ,
ЛАТУНЬ И Т. П.
SHELL/
STONE
MUSCHEL/
STEIN
COQUILLE/
PIERRE
SCHELP/
STEEN
MUSSLA/
STEN
SKJELL
STEIN
SIMPUKKA,
KIVET
MUSLING/
STONE
CONCHIGLIA/
PIETRA
CAPARAZON/
PIEDRA
ALUMÍNIO,
PEDRA
√™∆ƒ∞∫√/
¶∂∆ƒ∞
HÉJAZAT/
KŒ
LASTURA/
KÁMEN
SZELAK/
KAMIE¡
SERT ÜRÜN/
TAΩ
КИРПИЧ/
КАМЕНЬ
CERAMIC
KERAMIK
CÉRAMIQUE
KERAMIEK
KERAMIK
KERAMIKK
,
KERAMIIKKA
KERAMIK
CERAMICA
CERÁMICA
CERÂMICA
∫∂ƒ∞ªπ∫√
KERÁMIA
KERAMIKA
MAT.
CERAMICZNY
SERAM∑K
КЕРАМИКА
GLASS/OTHER
GLAS/SONSTIGE
VERRE/AUTRES
GLAS/ANDERE
GLAS/ANDRA
GLASS/ANNEN
,
LASI/MUU
GLAS/ANDET
VETRO/ALTRI
VIDRIO/OTROS
VIDRO/OUTROS
°À∞§π/∞§§∞
ÜVEG/EGYÉB
SKLO/OSTATNÍ
SZK¸O/INNY
CAM/D∑∏ER
СТЕКЛО/ДР

55
8-108-108-10
AA
BB
CC
DD
EE
FF
GG
HH
II
100, 121, 131
114, 124, 134, 144
190
118, 191, 192, 193, 194
116, 117, 125, 196
115
198
199
8-10
8-10
8-10
8-10*
8-10*
8-10*
6
4
4
6*
4*
4*
2
2
2
2
2
2
4
4
4
4
4
4
8-10
8-10
8-10
8-10
8-10
8-10
8-10
8-10
8-10
4
8-10
8-10
4
8-10
6
6
4
2
2
2
2
2
2
2
4
4
6
4
4
4
4
4
6
4
8-10
8-10
4
4
4
4
105, 108
106, 109
107, 110
111
112
113
8-10
8-10
8-10
8-10*
8-10*
8-10*
7103, 7105, 7117, 7120,
7122, 7123, 7134, 7144
8-10 6
9931, 9932, 9933, 9934,
9935, 9936
8-10 6 2
4
9901, 9902, 9903, 9904,
9905, 9906, 9912
8-10 6 2 8-10 4
9909, 9910, 9911
8-10 8-106
8-10 8-10
6

6
D*Für Gipskarton. Optimale Ergebnisse bei 30.000/min.
F*A utiliser sur parois en placoplâtre. On obtient les meilleurs résultats à 30 000 t/m.
NL*Voor gebruik op gipskarton. Gebruik voor het beste resultaat een toerental van 30.000 omw/min.
S*För användning på kallmur. Används vid 30 000 varv/min för bästa resultat.
N*For bruk på gipsvegger. For best resultat, bruk ved 30 000 o/min.
FIN*Käytetään kiviseinään. Saat parhaan tuloksen nopeudella 30 000 kierr./min.
DK*Til brug på tørmur. Skal anvendes ved 30.000 o/min for at opnå optimale resultater.
I*Per utilizzo su muratura. Per risultati ottimali, usare a 30.000 giri/min.
E*Para utilizar sobre muros de piedra en seco. Para obtener mejores resultados, utilice a 30.000 rpm.
6
6-8
6
4-8
2
2
2
8-10
8-10
8-10
8-10
4-6
8-10
4-6
8-10
409, 420, 426, 540
542
545
560
561
562
8-10
6-8
4-8
83142, 83322, 83702,
84922, 85422, 85602,
85622
903, 911, 921, 932, 941,
945, 952, 953, 954, 971,
997, 8153, 8175, 8193,
8215
4
8-10
2
24
4 8-10 8-10
612, 640
615, 617, 618, 650, 652
654
8-10*
8-10*
8-10*
8-10 8-108-10 6
6•
8-10•
6•
516, 517, 518
500
2-4
2-4
2-4
2-4
6
4-6
4
2-4
AA
BB
CC
DD
EE
FF
GG
HH
II
541
453, 454, 455
24
8-10 8-108-10 6
8-10
*For use on drywall. For best results, use at 30,000 rpm.*For use on drywall. For best results, use at 30,000 rpm.
P*Para utilização em painéis de gesso. Para obter melhores resultados, usar a 30.000 r.p.m.
GR*°È· ¯Ú‹ÛË Û ÍËÚ‹ ÙÔȯÔÔÈ›·. °È· ηχÙÂÚ· ·ÔÙÂϤÛÌ·Ù· ¯ÚËÛÈÌÔÔț٠ÙÔ ÂÚÁ·ÏÂ›Ô ÛÙȘ 30.000
ÛÙÚÔʤ˜ ·Ó¿ ÏÂÙfi.
H*Szárazfalazaton használható. Legjobb teljesítményhez, használjon 30.000 ford/perc fordulatszámot.
CZ*Pro pouÏití pfii suchém zdûní. Nejlep‰ích v˘sledkÛ se dosáhne pfii 30 000 ot/min.
PL*Do stosowania na suchym murze. Aby uzyskaç najlepsze wyniki, nale˝y stosowaç przy 30.000 obr/min.
TR*Kuru duvarda kullan∂m içindir. En iyi sonuç için, 30,000 rpm'de kullan∂n∂z.
RU*Для сухой кладки. Оптимальное использование на скорости 30 000об/мин.

77
D**Zur Fugenkittentfernung bei Wand- und Bodenfliesen
F**A utiliser sur les mortiers de murs et de sols
NL**Voor gebruik op muur- en vloervoegen
S**Används på vägg- och golvputs
N**Brukes på fugemasse på gulv og vegg
FIN**Käytetään seinä- ja lattialaastiin.
461, 462, 463
414, 422, 429
425, 427
423
403, 404, 405
530, 531, 532
428, 442, 443
535, 536, 537
6
4
6
4-6
4
2
2
2
2
2
2
2
2
2
2
2
2
6
4
6
4-6
4
2
2
6
4
4-6
6
4
4-6
2
6
4
4-6
AA
BB CC
DD
EE
FF
GG
HH
II
430, 431, 438
439, 440, 444
407, 408, 432
411, 412, 413
502, 503, 504, 505 8-10 8-10 8-1062
2-10
2-10
2-10
6
2-10
2-10
2-10
2-10
2-10
2-10
2-10
2-10
2-10
6
2-4
2-4
2-4
2
8-10
8-10
8-10
8-10
8-10
8-10
2
569, 570 **For Use on Wall and Floor Grout
150 8-10 4
4-6
8-10 2
511 4 4 442
DK**Til brug på væg- og gulvcement
I**Per utilizzo sulla malta delle fughe su pareti e pavimenti
E**Para utilizar sobre muros de piedra en seco y enlechado del suelo
P**Para utilização em reboco e revestimento de pisos
GR
**°È· ¯Ú‹ÛË Û ÛÔ‚¿ ÙÔ›¯Ô˘ Î·È ÙÛÈÌÂÓÙÔÎÔÓ›· ‰·¤‰Ô˘
H
**Fal- és padlókitöltœ habarcshoz használható
CZ**Pro pouÏití u mazaniny zdí a podlah
PL**Do stosowania na zaprawie na Êcianie i pod∏odze
TR**Duvar ve Yer S∂vas∂nda kullan∂l∂r
RU**Для цементных стен и полов

888
CE DECLARATION OF CONFORMITY
We declare under our sole responsibility that this product is in conformity with
the following standards or standardized documents:
EN 50 260, EN 60 335, EN 55 014, in accordance with the regulations
73/23/EEC, 89/336/EEC, 98/37/EEC.
01
DREMEL Europe
J. P. Houben
INFORMATION ON NOISE/VIBRATION
The noise level when working can exceed 85 dB(A).
Wear ear protection!
Measured in accordance with EN 50 260 the sound pressure level of this tool
is 65 dB(A), and the vibration 5,1 m/s
2
(hand-arm method).
GB
CE TODISTUS STANDARDINMUKAISUUDESTA
Todistamme täten ja vastaamme yksin siitä, että tämä tuote en
allalueteltujen standardien ja standardoimisasiakirjojen vaatimusten
mukainen EN 50 260, EN 60 335, EN 55 014, seuraavien sääntöjen
mukaisesti 73/23/EWG, 89/336/EWG, 98/37/EWG.
01
DREMEL Europe
J. P. Houben
MELU- /TÄRINÄTIETO
Työskenneltäessä melutaso saattaa ylittää 85 dB(A).
Käytä kuulosuojaimia!
Mitattuna EN 50 260 mukaan työkalun melutaso on 65 dB(A), ja tärinän
voimakkuus 5,1 m/s
2
(käsi-käsivarsi metodi).
FIN
CE MINÖSÉGI TANUSÍTVÁNY
Teljes felelösségünk tudatában kijelentjük,hogy jelen termék a
következö szabványoknak vagy kötelezö hatósági elöírásoknak
megfelel:EN 50 260, EN 60 335, EN 55 014, a 73/23/EWG,
89/336/EWG,98/37/EWG elöírásoknak megfelelöen.
01
DREMEL Europe
J. P. Houben
ZAJ-ÉS REZGÉSINFORMÁCIÓK
A zajszint bizonyos munkavégzéseknél 85 db(A)fölé emelkedhet.
Használjon zajvédöt!
Az EN 50 260 alapján végzett mérések szerint ezen készülék
hangnyomás szintje 65 dB(A),a kézre ható rezgésszám 5,1 m/s
2
.
H
CE KONFORMITÄTSERKLÄRUNG
Wir erklären in alleiniger Verantwortung, daß dieses Produkt mit den
folgenden Normen oder normativen Dokumenten übereinstimmt:
EN 50 260, EN 60 335, EN 55 014, gemäß den Bestimmungen der
Richtlinien 73/23/EWG, 89/336/EWG, 98/37/EWG.
01
DREMEL Europe
J. P. Houben
GERÄUSCH- /VIBRATIONSINFORMATION
Der Geräuschpegel beim Arbeiten kann 85 dB(A) überschreiten.
Gehörschutz tragen!
Gemessen gemäß EN 50 260 beträgt der Schalldruckpegel dieses Gerätes
65 dB(A), und die Vibration 5,1 m/s
2
(Hand-Arm Methode).
D
CE KONFORMITETSERKLÆRING
Vi erklærer under almindeligt ansvar, at dette produkt er i overensstemmelse
med følgende normer eller normative dokumenter: EN 50 260, EN 60 335,
EN 55 014, i henhold til bestemmelserne i direktiverne 73/23/EØF,
89/336/EØF, 98/37/EØF.
01
DREMEL Europe
J. P. Houben
STØJ- /VIBRATIONSINFORMATION
Under arbejde med værktøjet kan lydniveauet overstige 85 dB(A).
Brug høreværn!
Måles efter EN 50 260 er lydtrykniveau af dette værktøj
65 dB(A), og vibrationsniveauet 5,1 m/s
2
(hånd-arm metoden).
DK
PROHLÁ·ENÍ O SHODù CE
Prohla‰ujeme na na‰i plnou odpovûdnost, Ïe tento v˘robek vyhovuje
následujícím standardÛm nebo standardizovan˘m dokumentÛm:
EN 50 260, EN 60 335, EN 55 014 v souladu se smûrnicemi 73/23/EEC,
89/336/EEC, 98/37/EEC.
01
DREMEL Europe
J. P. Houben
INFORMACE O HLUâNOSTI/VIBRACÍCH
Za provozu mÛÏe hluãnost pfiekroãit 85 dB (A).
PouÏívejte ochranu sluchu!
Akustick˘ tlak tohoto nástroje, pfii mûfiení v souladu s EN 50 260,
je 65 dB(A) a hladina vibrací je 5,1 m/s
2
(metoda ruka-rameno).
CZ
CE DÉCLARATION DE CONFORMITÉ
Nous déclarons sous notre propre responsabilité que ce produit est en
conformité avec les normes ou documents normalisés suivants: EN 50 260,
EN 60 335, EN 55 014, conforme aux réglementations
73/23/EEC, 89/336/EEC, 98/37/EEC.
01
DREMEL Europe
J. P. Houben
BRUIT/VIBRATION
Le niveau sonore en fonctionnement peut dépasser 85 dB(A).
Munissez-vous de casques anti-bruit!
Mesuré selon EN 50 260 le niveau de la pression sonore de cet outil est
65 dB(A), et la vibration 5,1 m/s
2
(méthode main-bras).
F
CE DICHIARAZIONE DI CONFORMITÀ
Dichiaramo, assumendo la piena responsabilità di tale dichiarazione, che
il prodotto è conforme alle seguenti normative e ai relativi documenti:
EN 50 260, EN 60 335, EN 55 014, in base alle prescrizioni delle direttive
CEE 73/23, CEE 89/336, CEE 98/37.
01
DREMEL Europe
J. P. Houben
INFORMAZIONI SULLA RUMOROSITÀ/VIBRAZIONE
Durante le operazioni di lavoro il livello di rumorosità può superare 85 dB(A).
Utilizzare le cuffie di protezione!
Misurato in conformità al EN 50 260 il livello di pressione acustica di
questo utensile è 65 dB(A), e la vibrazione 5,1 m/s
2
(metodo mano-braccio).
I
CE DECLARACION DE CONFORMIDAD
Declaramos bajo nuestra sola responsabilidad que este producto está en
conformidad con las normas o documentos normalizados siguientes: EN 50
260, EN 60 335, EN 55 014, de acuerdo con las regulaciones 73/23/CEE,
89/336/CEE, 98/37/CEE.
01
DREMEL Europe
J. P. Houben
INFORMES DE RUIDOS Y VIBRACIONES
El nivel de ruido, con la herramienta trabajando, podrá sobrepasar 85 dB(A).
Usar protectores auditivos!
Medido según EN 50 260 el nivel de la presión acústica de esta herramienta
se eleva a 65 dB(A), y la vibración a 5,1 m/s
2
(método brazo-mano).
E
CE DECLARAÇÃO DE CONFIRMIDADE
Declaramos sob nossa exclusiva responsabilidade que este producto
cumpre as seguintes normas ou documentos normativos: EN 50 260,
EN 60 335, EN 55 014, conforme as disposições das directivas 73/23/CEE,
89/336/CEE, 98/37/CEE.
01
DREMEL Europe
J. P. Houben
INFORMAÇÕES SOBRE RUÍDO E VIBRAÇÕES
O nível de ruído durante o trabalho pode exceder 85 dB(A).
Utilize protectores auriculares!
Medido segundo EN 50 260 o nível de pressão acústica desta
ferramenta é 65 dB(A), e a vibração 5,1 m/s
2
(método braço-mão).
P
¢◊§ø™∏ ¶π™∆Ÿ∆∏∆∞˜ ∂∫
ªÂ ·ÔÎÏÂÈÛÙÈ΋ Ì·˜ ¢ı‡ÓË ‰ËÏÒÓÔ˘ÌÂ, fiÙÈ ·˘Ùfi ÙÔ ÚÔ˚fiÓ ·ÓÙ·ÔÎÚ›ÓÂ-
Ù·È Ì ٷ ·ÎfiÏÔ˘ı· ÚfiÙ˘· ‹ ÂÓ·ÚÌÔÓÈṲ̂ӷ ÚfiÙ˘·:
EN 50 260, EN 60 335, EN 55 014, Û‡Ìʈӷ Ì ÙȘ Ô‰ËÁ›Â˜ 73/23/∂√∫,
89/336/∂√∫, 98/37/∂√∫.
01
DREMEL Europe
J. P. Houben
¶§∏ƒ√º√ƒÿ∂˜ £ŸƒÀµ√À/∫ƒ∞¢∞™ªfl¡
∏ ÛÙ¿ıÌË ÙÔ˘ ıÔÚ‡‚Ô˘ ηٿ ÙËÓ ÂÚÁ·Û›· ÌÔÚ› Ó· ÍÂÂÚ¿ÛÂÈ Ù· 85 dB(A).
ºÔÚ¿Ù ˆÙÔ·Û›‰Â˜!
∏ ÛÙ¿ıÌË Ë¯ËÙÈ΋˜ ›ÂÛ˘ ·˘ÙÔ‡ ÙÔ˘ ÂÚÁ·Ï›Ԣ Â›Ó·È 65 dB(A), ÌÂÙÚË̤ÓË
Û‡Ìʈӷ Ì ÙÔ ÚfiÙ˘Ô EN 50 260, Î·È Ë ÂÈÙ¿¯˘ÓÛË ÎÚ·‰·ÛÌÒÓ 5,1 m/s
2
(̤ıÔ‰Ô˜ ¯¤ÚÈ-‚Ú·¯›ÔÓ·˜).
GR
DEKLARACJA ZGODNOÂCI CE
Deklarujemy na swojà wy∏àcznà odpowiedzialnoÊç, ˝e produkt ten zgodny
jest z nast´pujàcymi normami lub dokumentami normatywnymi:
EN 50 260, EN 60 335, EN 55 014, wed∏ug przepisów 73/23/EEC,
89/336/EEC, 98/37/EEC.
01
DREMEL Europe
J. P. Houben
INFORMACJE DOTYCZÑCE HA¸ASU/WIBRACJI
Poziom ha∏asu podczas pracy mo˝e przekroczyç 85 dB(A).
Nale˝y nosiç ochraniacze na uszy!
Przy pomiarze zgodnie z EN 50 260, poziom ciÊnienia akustycznego tego
narz´dzia wynosi 65 dB(A), a wibracje 5,1 m/s
2
(metoda r´ka-rami´).
PL
CE ONAY BEYAN∂
Bu ürünün, aµaπ∂daki standartlar ve standart belgeleri ile uyumluluπu
konusundaki sorumluluk bütünüyle bize aittir: 73/23/EEC, 89/336/EEC,
98/37/EEC düzenlemelerine uygun olarak
EN 50 260, EN 60 335, EN 55 014.
01
DREMEL Europe
J. P. Houben
GÜRÜLTÜ VE T∑TREΩ∑M ÖNLEME HAKKINDA B∑LG∑
Çal∂µma esnas∂nda ses emisyonu 85 dB(A) üzerine ç∂kabilir.
Kulak zararlar∂ korumas∂!
Bu cihaz∂n ses EN 50 260 standartlar∂na uygun olarak ölçülmüµ ses emisy-
onu, 65 dB(A), ve titreµim seviyesi 5,1 m/s'dir
2
(el-kol yöntemi).
TR
Декларация соответствия Еи
Мы ответственно заявляем, что данное изделие удовлетворяет
требованиям следующих стандартов или нормативных документов:
EN 50 260, EN 60 335, EN 55 014, в соответствии с правилами
73/23/EEC, 89/336/EEC, 98/37/EEC.
01
DREMEL Europe
J. P. Houben
Ћнформация по шумам и вибрации
Уровень шума в процессе работы может превышать 85 дБ (A).
Одевайте защитные наушники!
Уровень звукового давления данного инструмента, измеренный в
соответствии с требованиями EN 50 260, составляет 65 dB(A), а уровень
вибрации - 5,1 м/с
2
(по методу «рука-плечо»).
RU
CE CONFORMITEITSVERKLARING
Wij verklaren, dat dit product voldoet aan de volgende normen
of normatieve documenten:
EN 50 260, EN 60 335, EN 55 014, overeenkomstig de bepalingen van de
richtlijnen 73/23/EEG, 89/336/EEG, 98/37/EEG.
01
DREMEL Europe
J. P. Houben
INFORMATIE OVER GELUID/VIBRATIE
Tijdens het werken kan het geluidsniveau 85 dB(A) overschrijden.
Draag oorbeschermers!
Gemeten volgens EN 50 260 bedraagt het geluidsdrukniveau van deze
machine 65 dB(A), en de vibratie 5,1 m/s
2
(hand-arm methode).
NL
CE KONFORMITETSFÖRKLARING
Vi intygar och ansvarar för, att denna produkt överensstämmer med följande
norm och dokument: EN 50 260, EN 60 335, EN 55 014, enl. bestämmelser
och riktlinjema 73/23/EWG, 89/336/EWG, 98/37/EWG.
01
DREMEL Europe
J. P. Houben
LJUD- /VIBRATIONSDATA
Ljudnivån vid arbete kan överskrida 85 dB(A).
Använd hörselskydd!
Ljudtrycksnivån som uppmätts enligt EN 50 260 är på denna
maskin 65 dB(A), och vibration 5,1 m/s
2
(hand-arm metod).
S
CE SAMSVARSERKLÆRING
Vi erklærer at det er under vårt ansvar at dette produkt er i samsvar med
følgende standarder eller standard- dokumenter:
EN 50 260, EN 60 335, EN 55 014, i samsvar med reguleringer
73/23/EWG, 89/336/EWG, 98/37/EWG.
01
DREMEL Europe
J. P. Houben
STØY- /VIBRASJONSINFORMASJON
Støynivået under arbeid kan overskride 85 dB(A).
Bruk hørselvern!
Målt ifølge EN 50 260 er lydtrykknivået av dette verktøyet
65 dB(A), og vibrasjonsnivået 5,1 m/s
2
(hånd-arm metode).
N

99
This DREMEL product has been carefully inspected before leaving the factory and carries a guarantee of 2 years (“BASIC” : 1 year) from the date of
purchase during which period any defect caused by faulty material or manufacture will be corrected without charge. Damage due to normal wear and tear,
overload or improper handling will be excluded from the guarantee. In case of a complaint, please, send the tool undismantled together with proof of
purchase to the nearest DREMEL Service Station, postal charges prepaid. DREMEL reserves the right to decline responsibility in case of repairs made
by persons other than DREMEL service staff. In no event compensation can be claimed in case of damage to the workpiece or injury to the tool user. This
guarantee does not affect your statutory rights (UK only). Information on guarantee in instruction manual herewith expires.
Ce produit DREMEL a été contrôlé avec soin avant son départ d’usine et est garanti pour une durée de 2 ans (”BASIC” : 1 an) à compter du jour de
l’achat. Pendant cette période, tout dommage causé par des défectuosités du matériel ou défauts de fabrication sera réparé sans frais. Tout dommage dû
à l’usure normale, à une surcharge ou à une mauvaise utilisation de l’outil, sera exclu de la garantie. En cas de problème, vous devez retourner l’outil non-
demonté à la station-service agréée DREMEL la plus proche, en joignant la preuve d’achat, port payé. DREMEL se réserve le droit de décliner toute
responsabilité lorsque des réparations ont étés effectuées par des personnes autres que le personnel de la station-service agréée DREMEL. Toute
demande de dommages et intérêts en cas de dommages matériels ou corporels liés à l’utilisation de l’outil sera refusée. Information sur la garantie dans le
manual d’instruction ainsi n’est plus valable.
Für dieses DREMEL-Erzeugnis, das vor dem Versand sorgfältig kontrolliert wurde, gewähren wir 2 Jahre (“BASIC” : 1 Jahr) Garantie ab Liefertag um
Schäden, die durch Material- oder Herstellerfehler entstanden sind, zu beseitigen. Schäden, die auf natürliche Abnutzung, Überlastung oder unsach-
gemäße Behandlung zurückzuführen sind, bleiben von der Garantie ausgeschlossen. Bei Beanstandung senden Sie bitte das Werkzeug unzerlegt, zu-
sammen mit dem Kaufbeleg, an die nächste DREMEL-Vertragswerkstätte; der Versand muß frei erfolgen. DREMEL behält sich das Recht vor, jede
Verantwortung abzulehnen, wenn das Werkzeug durch Nicht-DREMEL-Vertragswerkstätten repariert wurde. Auf keinen Fall kann auf Schadenersatz
geklagt werden im Falle des Schadens am Werkstück oder der Verletzung des Werkzeugbenutzers. Garantie-information in der Bedienungsanleitung wird
hiermit ungül only). Information on guarantee in instruction manual herewith expires.
Dit DREMEL-product is zorgvuldig geïnspecteerd voor het de fabriek verliet en wij garanderen gedurende 2 jaar (“BASIC” : 1 jaar) vanaf de datum van
aankoop dat ieder defekt, dat te wijten is aan materiaal- of fabrikagefouten, gratis zal worden hersteld. Schade veroorzaakt door normale slijtage,
overbelasting of onachtzaam gebruik is van deze garantie uitgesloten. In geval van een klacht wordt u verzocht het produkt ongedemonteerd, samen met
het aankoopbewijs, franko naar het dichtstbijzijnde DREMEL Service Station op te sturen. DREMEL behoudt zich het recht voor verantwoordelijkheid af te
wijzen wanneer anderen dan DREMEL service-personeel reparaties hebben verricht. In geen geval kan aanspraak gemaakt worden op schadevergoeding
bij schade aan het werkstuk of verwonding van de gereedschapgebruiker. Informatie over garantie in de gebruiksaanwijzing vervalt hiermede.
Din DREMEL produkt har genomgått en fullständig kontroll innan den lämnade fabriken och du har 2 års (“BASIC” : 1 år) garanti från leveransdagen att
kostnadsfritt reparera alla fel som uppstår pga material- eller fabrikationsfel. Skador som orsakats av normalt slitage, överbelastning eller fel hantering
omfattas ej av garantin. Vid fel på maskinen, sänd in maskinen i odemonterat skick tillsammans med inköpskvitto, till närmaste DREMEL
serviceverkstad, med frakten betald. DREMEL fråntar sig allt ansvar, om reparationen har utförts av annan person än personal från DREMEL:s ser-
viceverkstäder. Inte i några fall kan ersättning krävas vid skada på arbetsstycket eller på användaren av maskinen. Vid försäljning till konsument i Sverige,
gäller konsumentköplagen (1990:932). Information på garanti i instruktionsbok utgår härmed.
DREMEL garanterer at dette produkt tilfredsstillende opfylder de funktioner til hvilket det er fremstillet. I 2 år (“BASIC” : 1 år) fra købsdato vil værktøjet blive
repareret uden beregning, hvis defekten skyldes materiale- eller fabrikationsfejl. Garantien dækker ikke normal slidtage, overbelastning eller fejlagtig
anvendelse af værktøjet. I tilfælde af en klage, send venligst det udremelte værktøj sammen med et køb-bevis til nærmeste autoriseret DREMEL service
værksted; porto/fragt bedes forudbetalt. DREMEL forbeholder sig retten til at frasige sig ansvaret, i tilfælde af reparationer foretaget af andre end
DREMEL’s autoriserede service værksteder. Godtgørelse kan i intet tilfælde kræves, hvis der sker skade enten på emnet der arbejdes med eller på
brugeren af værktøjet. Information om garanti i instruktionsbogen forfalder hermed.
Dette DREMEL produkt er nøye kontrollert før det ble sendt fra fabrikken og vi garanterer at skader oppstått på grunn av material- eller produksjonsfeil i 2
år (“BASIC” : 1 år) fra kjøpsdato blir godtgjort uten kostnader (eks. transportkostnader til servicestasjonen). Skader som kan tilbakeføres til naturlig slitasje,
overbelastning eller usakkyndig behandling er utelukket fra garantien. I tilfelle klage send verktøyet i montert tilstand med kjøpsbevis med frakt betalt til
nærmeste DREMEL serviceverksted. DREMEL reserverer seg rett til a avslå garanti erstatning dersom reparasjon er utført av personer som ikke er
autorisert av DREMEL. Kompensasjon kan ikke i noe tilfelle kreves ved skade på arbeidsstykket eller ved skade på brukeren av verktøyet. Informasjon om
garanti i instruksjonsboken bortfaller herved.
Tämä DREMEL-tuote on huolellisesti tarkastettu ennen tehtaalta lähtöä ja siinä on voimassa 2 vuoden (“BASIC” : 1 vuoden) takuu ostopäivästä lukien.
Mahdolliset takuuaikana sattuneet valmistus- ja raaka-ainevirheet korjataan kuluitta. Normaalin kulumisen, väärän käsittelyn tai käytön aiheuttamia
vaurioita takuu ei korvaa. Takuutapauksissa purkamattoman koneen mukana on lähetettävä ostokuitti DREMEL-huoltoliikkeeseen, postimaksu
maksettuna. DREMEL pidättää oikeuden kieltäytyä vastuusta tapauksissa, joissa korjausta on yrittänyt henkilö, joka ei kuulu DREMEL-henkilökuntaan.
Takuu ei kata työkohteeseen tulletta vaurioita tai henkilövahinkoja. Nämä poikkeavat takuutiedot korvaavat käyttöohjekirjassa mainitut.
Este producto de DREMEL ha sido cuidadosamente inspeccionado antes de salir de fábrica y tiene una garantía de 2 años (“BASIC” : 1 año) a partir de la
fecha de su adquisición, periodo en el cual cualquier fallo ya sea por defecto del material o fabricación sera corregido sin cargo. Las averías ocasionadas
por desgaste natural, rotura por sobrecarga o utilización indebida seran excluidas de la garantía. En caso de reclamación, rogamos envie esta
herramienta a portes pagados, sin desmontar, y junto con el justificante de la compra al servicio técnico autorizado de DREMEL más proximo.
DREMEL no se hace cargo de ninguna reparación efectuada por personal ageno a DREMEL o sus servicios técnicos autorizados. Bajo ningún concepto
se podrá reclamar compensación en caso de daño a la pieza a trabajar o al usuario de la herramienta. Informes de garantía en el manuel de
instrucciones con la presente expiran.
GUARANTEE
F
GB
GARANTIE
GARANTIE
GARANTIE
GARANTI
GARANTI
GARANTI
TAKUU
GARANTIA
NL
S
DK
N
FIN
E
D

1010
Esta ferramenta DREMEL foi cuidadosamente inspeccionada antes de sair da fábrica e tem uma garantia de 2 anos (“BASIC” : 1 ano) contados a partir
da data de compra, periodo durante o qual serão reparadas sem quaisquer encargos todas as avarias causadas por defeito de fabrico ou de material.
Avarias devidas ao desgaste normal, sobrecarga ou utilização incorrecta não estão abrangidas pela garantia. No caso de reclamação, por favor envie a
ferramenta, sem ser desmontada, acompanhada do comprovativo da compra, para o Posto de Assistência DREMEL mais próximo, com os portes
pagos. A DREMEL reserva-se a declinar responsabilidade nos casos em que se verifique ter havido tentativa de reparação por pessoas que não façam
parte do quadro técnico da DREMEL. Em nenhum dos casos os termos desta garantia dão lugar a indemnização por danos causados na peça de
trabalho ou ao utilizador. Informação sobre garantia no manual de instruções é substituida por esta.
Questo prodotto DREMEL è stato attentamente ispezionato prima di lasciare la fabbrica ed è garantito per 2 anni (“BASIC” : 1 anno) dalla data di acquisto
per ogni difetto di materiale o di lavorazione. Guasti derivanti da usura naturale, sovraccarico o uso improprio dell’utensile sono esclusi dalla garanzia. In
caso di lamentele, consegnare l’utensile non smontato insieme al documento fiscale comprovante l’acquisto al più vicino centro assistenza autorizatto
DREMEL, spese postali anticipate. La DREMEL declina ogni responsabilità in caso di riparazioni effettuate non dai propri centri assistenza. In nessun
caso è possibile richiedere un risarcimento in caso di danni al pezzo lavorato o all’utilizzatore dell’utensile. La presente sostituisce informazioni sulla
garanzia contenute nel manuale di istruzione.
Ezen DREMEL termékre,melyet kiszállítás elött gondosan ellenöriztünk,a szállítás napjától számított 2 év (“BASIC”:1 év)garanciát nyújtunk olyan
meghibásodásokra,melyek anyag vagy gyártási hibákra vezethetök vissza.A garancia nem vonatkozik a természetes kopásból,túlterhelésböl vagy
szakszerütlen kezelésböl adódó hibákra. Meghibásodás esetén a készüléket ne próbálja szétszedni,hanem a garanciajeggyel együtt vigye el vagy küldje
be a legközelebbi DREMEL márkaszervizbe. A DREMEL fenntartja magának a jogot minden felelösség elhárítására abban az esetben,ha a javítás nem
DREMEL márkaszervizben történik.A kártérítés igénye nem terjed ki a munkadarab vagy a gép kezelöjének sérülésére.A minöség tanúsitása a 2/1984.
(III.10)BKM-IPM együttes rendelet értelmében. Mint forgalombahozó tanusitjuk,hogy jelen termékünk minösége a vásárlási tájékoztatóban közölteknek
megfelel.A garanciaszintre vonatkozó információkat a használati utasítás tartalmazza.
Tento v˘robek firmy DREMEL byl pfiedtím, neÏ opustil v˘robní závod, peãlivû zkontrolován a vztahuje se nûj záruka v trvání 2 roky (ZÁKLADNÍ: 1 rok)
od data zakoupení, pfiiãemÏ bûhem tohoto období budou bezplatnû opraveny ve‰keré závady zpÛsobené vadami pouÏitého materiálu nebo nespráv-
n˘m v˘robním zpracováním. Po‰kození vypl˘vající z normálního opotfiebení, pfietíÏení nebo nesprávného zacházení jsou ze záruky vylouãeny. V pfií-
padû reklamace ode‰lete nástroj ve smontovaném stavu spolu s dokladem o nákupu vyplacenû nejbliωí servisní stanici DREMEL. Firma DREMEL
si vyhrazuje právo na odmítnutí odpovûdnosti za ‰kody v pfiípadû, Ïe byla provedena oprava jin˘mi osobami neÏ pracovníky servisu DREMEL. V Ïád-
ném pfiípadû není nárok na od‰kodnûní v pfiípadû po‰kození obrobku nebo zranûní uÏivatele nástroje. Tato záruka nemá vliv na va‰e zákonná práva
(pouze Velká Británie). Informace o záruce v návodu k obsluze pfiitom ztrácejí platnost.
∞˘Ùfi ÙÔ ÚÔ˚fiÓ DREMEL ¤¯ÂÈ ÂÏÂÁ¯ı› ÚÔÛÂÎÙÈο ÚÔÙÔ‡ Ó· ÂÁηٷÏ›„ÂÈ ÙÔ ÂÚÁÔÛÙ¿ÛÈÔ Î·È ¤¯ÂÈ ÌÈ· ÂÁÁ‡ËÛË 2 ÂÙÒÓ ("BASIC" : 1 ¤ÙÔ˜) ·fi ÙËÓ
ËÌÂÚÔÌËÓ›· ·ÁÔÚ¿˜. ∫·Ù¿ ÙË ‰È¿ÚÎÂÈ· ·˘Ù‹˜ Ù˘ ¯ÚÔÓÈ΋˜ ÂÚÈfi‰Ô˘ οı ‚Ï¿‚Ë, ÔÊÂÈÏfiÌÂÓË Û ÂÏ·Ùو̷ÙÈÎfi ˘ÏÈÎfi ‹ Û ÂÏ·Ùو̷ÙÈ΋ ηٷÛ΢‹,
ı· ‰ÈÔÚıÒÓÂÙ·È ‰ˆÚ¿Ó. √È ˙ËÌȤ˜ Ô˘ ÔÊ›ÏÔÓÙ·È Û ηÓÔÓÈ΋ ÊıÔÚ¿, ˘ÂÚÊfiÚÙˆÛË ‹ ÂÛÊ·Ï̤ÓÔ ¯ÂÈÚÈÛÌfi ·ÔÎÏ›ÔÓÙ·È ·fi ÙËÓ ÂÁÁ‡ËÛË. ™Â ÂÚ›-
ÙˆÛË ‰È·Ì·ÚÙ˘Ú›·˜, ÛÙ›ÏÂÙ ·Ú·Î·ÏÒ ÙÔ ÂÚÁ·ÏÂ›Ô Û˘Ó·ÚÌÔÏÔÁË̤ÓÔ Ì·˙› Ì ÙËÓ ·fi‰ÂÈÍË ·ÁÔÚ¿˜ ÛÙÔ ÏËÛȤÛÙÂÚÔ Û˘ÓÂÚÁÂ›Ô Û¤Ú‚È˜ Ù˘
DREMEL, Ì ÚÔÏËڈ̤ӷ Ù· Ù·¯˘‰ÚÔÌÈο Ù¤ÏË. ∏ DREMEL ‰È·ÙËÚ› ÙÔ ‰Èη›ˆÌ· Ó· ÌËÓ ·Ô‰Â¯Ù› ÙËÓ Â˘ı‡ÓË, ÛÙËÓ ÂÚ›ÙˆÛË Ô˘ ¤¯Ô˘Ó Á›ÓÂÈ
ÂÈÛ΢¤˜ ·fi ¿ÙÔÌ· Ô˘ ‰ÂÓ ·Ó‹ÎÔ˘Ó ÛÙÔ ÚÔÛˆÈÎfi ۤڂȘ Ù˘ DREMEL. ™Â η̛· ÂÚ›ÙˆÛË ‰ÂÓ ÌÔÚ› Ó· ··ÈÙËı› ÌÈ· ·Ô˙ËÌ›ˆÛË ÁÈ· Ù˘¯fiÓ
˙ËÌȤ˜ ÛÙÔ ÂÂÍÂÚÁ·˙fiÌÂÓÔ ÎÔÌÌ¿ÙÈ ‹ ÙÚ·˘Ì·ÙÈÛÌÔ‡ ÙÔ˘ ¯Ú‹ÛÙË ÙÔ˘ ÂÚÁ·Ï›Ԣ. ∞˘Ù‹ Ë ÂÁÁ‡ËÛË ‰ÂÓ ÂËÚ¿˙ÂÈ Ù· ÓÔÌÈο Û·˜ ‰ÈηÈÒÌ·Ù· (ÌfiÓÔ ÛÙË
ªÂÁ¿ÏË µÚÂÙ·Ó›·). ªÂ ·˘Ùfi Ï‹ÁÔ˘Ó ÔÈ ÏËÚÔÊÔڛ˜ ÁÈ· ÙËÓ ÂÁÁ‡ËÛË ÛÙȘ Ô‰ËÁ›Â˜ ¯Ú‹Û˘.
Bu DREMEL ürünü, fabrika ç∂k∂µ∂ndan önce dikkatle incelenmiµ olup 2 y∂ll∂k garantiye sahiptir. ("TEMEL" : 1 y∂l) sat∂n al∂nd∂π∂ tarihten itibaren baµlayan
bu süre içinde, malzeme veya imalattan kaynaklanan ar∂zalar ücretsiz olarak giderilecektir. Kullan∂m sonucu oluµan aµ∂nma, aµ∂r∂ yüklemeye veya uygun-
suz kullan∂ma baπl∂ hasarlar garanti kapsam∂ d∂µ∂ndad∂r. Herhangi bir µikayetiniz olduπunda, lütfen cihaz∂ sökmeden sat∂n alma belgesi ile birlikte en yak∂n
DREMEL Servis ∑stasyonu'na götürünüz, nakliye ücretleri size aittir. DREMEL, DREMEL servis elemanlar∂n∂n yapmad∂π∂ tamir iµlemleri için sorumluluk
kabul etmeme hakk∂n∂ sakl∂ tutar. Çal∂µma alan∂nda oluµabilecek hasarlar veya kullan∂c∂ yaralanmalar∂ için tazminat talep edilemez. Bu garanti, yasal tüke-
tici haklar∂n∂z∂ baπlamaz (sadece ∑ngiltere için). Kullan∂m K∂lavuzundaki garanti bilgileri için, buradakilerin önceliπi vard∂r.
Данное изделие DREMEL было тщательно проверено перед отправкой с завода и снабжено гарантией на 2 года («БАЗОВОЙ»: на 1 год), считая
с даты приобретения. В течение этого срока дефекты материалов или изготовления будут исправлены бесплатно. Повреждения, связанные с
нормальным износом и амортизацией, избыточной нагрузкой или неправильной эксплуатацией, гарантией не покрываются. В случае
возникновения претензий следует отослать неразобранный инструмент и свидетельство его приобретения в ближайший сервис-центр DRE-
MEL с оплатой почтовых расходов. Компания DREMEL оставляет за собой право отказа от ответственности в случае, если ремонт изделия
производился кем-либо кроме обслуживающего персонала компании DREMEL. Компенсация ущерба, причиненного обрабатываемым
изделиям, и травм, полученных пользователями инструмента, не предоставляется ни в каком случае. Настоящая гарантия не затрагивает
Ваших законных прав (только для Великобритании). Настоящая гарантия отменяет информацию о гарантии, содержащуюся в инструкции по
эксплуатации.
Ten produkt firmy DREMEL zosta∏ przed opuszczeniem fabryki dok∏adnie sprawdzony i posiada on gwarancj´ na 2 lata (GWARANCJA
PODSTAWOWA : 1 rok) od daty zakupu, w czasie tego okresu ka˝de uszkodzenie spowodowane przez wadliwy materia∏ lub produkcj´ zostanie bez-
p∏atnie usuni´te. Z gwarancji wy∏àczone jest uszkodzenie z powodu zwyk∏ego zu˝ycia, przecià˝enia lub niew∏aÊciwego u˝ytkowania. W przypadku
reklamacji, prosz´ przes∏aç narz´dzie nie rozebrane razem z dowodem zakupu do najbli˝szego oÊrodka serwisowego firmy DREMEL, z zap∏acony-
mi z góry op∏atami pocztowymi. Firma DREMEL zastrzega sobie prawo odmowy przyj´cia odpowiedzialnoÊci w przypadku napraw dokonywanych
przez osoby inne ni˝ pracownicy serwisu firmy DREMEL. W ˝adnym razie nie mo˝na ˝àdaç odszkodowania w przypadku uszkodzenia obrabianego
przedmiotu czy obra˝eƒ cia∏a u˝ytkownika narz´dzia. Gwarancja ta nie wp∏ywa na prawa ustawowe (tylko WB). Wraz z niniejszym przestajà obowià-
zywaç informacje na temat gwarancji podane w instrukcji obs∏ugi.
GARANTIA
I
P
GARANZIA
GARANCIA
ZÁRUKA
∂°°À∏™∏
GARANT∑
ГА РАНТИЯ
GWARANCJA
CZ
GR
TR
RU
PL
H

1111
General Operating Tips:
SAFETY INSTRUCTIONS
When using electric tools, the following basic safety
precautions should always be followed to reduce the risk
offire, electric shock, and personal injury.Readall these
instructions before attempting to operate this product.
Save these instructions.
1. Check voltage indicated on nameplate
2. Keep work area clean. Cluttered areas and
benches invite injuries
3. Consider work area environment. Do not
expose power tools to rain. Do not use power
tools in damp or wet locations. Keep work area
well lit. Do not use power tools in presence of
flammable liquids or gasses.
4. Guard against electric shock. Avoid body con-
tact with earthed surfaces (e.g. pipes, radiators,
ranges, refrigerators).
5. Keep children away. Do not letvisitors contact tool
or cord; they should be kept away from work area.
6. Store idle tools. When not in use, tools should
be stored in a dry and locked-up place, out of the
reach of children.
7. Do not force the tool. It will do the job better and
safer at the rate for which it was intended.
8. Use the right tool. Do not force small tools or
attachments to do the job of a heavy-duty tool. Do
not use tools for purposes not intended (e.g. do
not use a circular saw for cutting tree limbs or
logs).
9. Dress properly. Do not wear loose clothing or
jewelry; they can be caught in moving parts.
Rubber gloves and non-skid footwear are rec-
ommended when working outdoors. Wear pro-
tective hair covering to contain long hair.
10. Use safety glasses. Also use face or dust mask,
if cutting operation is dusty.
11. Connect dust extraction equipment. If devices
are provided for the connection of dust extrac-
tion and collection facilities, ensure these are
connected and properly used.
12. Do not abuse the cord. Never carry the tool by
the cord, never yank the cord to disconnect it
from the socket, and keep the cord away from
heat, oil and sharp edges.
13. Secure work. Use clamps or a vise to hold the
work; it is safer than using your hand and it frees
both hands to operate the tool.
14. Do not overreach. Keep proper footing and bal-
ance at all times.
15. Maintain tools with care. Keep tools sharp and
clean for better and safer performance. Follow
instructions for maintenance and changing
accessories. Inspect tool cords and plugs peri-
odically and if damaged, have them repaired by a
qualified person. Inspect extension cords period-
ically and replace them, if damaged. Keep handles
dry, clean and free from oil and grease.
16. Disconnect tools. Disconnect tool when not in
use, before servicing or when changing acces-
sories such as blades, bits and cutters.
17. Remove tool keys. Form the habit of checking to
see that keys and adjusting wrenched are
removed from the tool before turning it on.
18. Avoid unintentional starting. Do not carry a
plugged-in tool with a finger on the switch. Be
sure the switch is off when plugging it in.
19. Outdoor use extension cords. When tool is used
outdoors, use only extension cords intended for
use outdoors and so marked.
20. Stay alert. Watch what you are doing, use com-
mon sense and do not operate tool when you are
tired.
21. Check damaged parts. Before you use the tool,
always carefully check the guarding and other
parts to determine that they will operate proper-
ly and perform their intended functions. Check
for alignment of moving parts, binding of mov-
ing parts and breakage of parts. Check for prop-
er mounting of all parts and any other conditions
that may affect their operation. A guard, switch,
or other part that is damaged or defective should
be properly repaired or replaced by a qualified
person. Do not use tool, if switch does not turn
it on and off.
22. Warning! Use the tool and its accessories in
accordance with these safety instructions and in
the manner intended for the particular tool, tak-
ing into account the working conditions and the
work to be performed. Use of the tool for opera-
tions, different from those normally expected to
be performed by the particular tool, could result
in a hazardous situation.
23. Have the tool repaired by a qualified person.
This electric tool is in accordance with the rele-
vant safety rules. Repairs should only be carried
out by qualified persons using original spare
parts, otherwise this may result in considerable
danger for the user.
24. If the supply cord is damaged, it must be
replaced by the manufacturer or its service agent
or a similarly qualified person in order to avoid a
hazard.
DREMEL TOOL SAFETY
• Read and save this instruction manual and the
enclosed safety instructions
• When you put away the tool, switch off the
motor and ensure that all moving parts have
come to a complete standstill
• In case of electrical or mechanical malfunction,
immediately switch off the tool or disconnect
charger
• Only use the original DREMEL accessories which
can be obtained from your DREMEL dealer

1212
• Before using accessories always compare the
maximum allowed r.p.m. of that specific accessory
with the r.p.m. of the tool
• This tool should not be used by people under
the age of 16 years
• Never use grinding wheels over 1 1/4” (32 mm) Ø
• Never use drill bits over 1/8” (3.2 mm) Ø
• Never use shaft lock while tool is running
• Store tool in locations where temperature will
not exceed 40°C
• Ensure that the collet size corresponds with the
shaft size of the accessory
• Keep the air vent openings clean and uncovered
• Handle and store grinding/cutting discs careful-
ly to avoid chipping and cracking
• Do not use damaged, deformed or vibrating
grinding/cutting discs
• Formounting/usingnon-Dremelaccessories observe
the instructions of the manufacturer concerned
• Before using the tool
• ensure that accessory is correctly mounted
and firmly tightened
• check if accessory runs freely by turning it by
hand
• test-run tool for at least 30 seconds at highest
no-load speed in a safe position
• stop immediately in case of considerable
vibration or other defects and check tool to
determine the cause
•! Never use a cutting disc for side grinding
• When grinding metal, sparks are generated;
keep other persons and combustible material
from work area
•Wear protective glasses and gloves, hearing
protection, a dust mask, and sturdy shoes; when
necessary also wear an apron
• Apply wire of bristle brush lightly to the work as
only the tips of the wire/bristles do the work.
•! The accessory continues to rotate for a short
time after the tool has been switched off
DREMEL CORDLESS TOOL SAFETY
•A battery operated tool with a separate battery
pack must be recharged only with the specified
charger for the battery.
•Use battery operated tool only with the specifi-
cally designated battery pack. Use of any other
batteries may create a risk of fire.
•Avoid accidental starting. Be sure switch is in the
off position before inserting the battery pack.
• Disconnect battery pack from tool or place the
switch in the off position before making any
adjustments, changing accessories, or storing
the tool.
• When the battery pack is not in use, keep it away
fromothermetal objectslike:paperclips,coins, keys,
nails, screws, or other small metal objects that can
make a connection from one terminal to another.
• Always hold the tool firmly in your hands during
the start-up.
BATTERY / CHARGER SAFETY
• Before using the battery charger, read all
instructions and cautionary markings on the 856
battery charger, 855 battery pack, and 800 product
using battery.
• Use only the charger which accompanied your
product or direct replacement as listed in the
catalog or this manual.
• Do not disassemble charger or operate the
charger if it has received a sharp blow, been
dropped or otherwise damaged in any way.
• Do not recharge battery in damp or wet environ-
ment. Do not expose charger to rain or snow. If
battery case is cracked or otherwise damaged,
do not insert into charger.
• Charge only Dremel No. 855 rechargeable bat-
teries with charger 856.
• Charge battery pack in temperatures above 0°C
and below 40°C. Store tool and battery pack in
locations where temperatures will not exceed
40°C or drop below 0°C .
• When damaged and under extreme usage and
temperature conditions, batteries in battery pack
may start to leak. If liquid comes into contact
with the skin, wash quickly with soap and water,
then with lemon juice or vinegar. If liquid gets
into eyes, flush eyes with clean water for a min-
imum of 10 minutes and seek immediate med-
ical attention.
• Place charger on flat, non-flammable surfaces
and away from flammable materials when
recharging battery pack.
• Use of an attachment not recommended or sold
by Dremel may result in risk of fire, electric
shock or injury to persons.
• Never charge battery pack outdoors.
BATTERY DISPOSAL
• Do not attempt to disassemble the battery or
remove any component projecting from the bat-
tery terminals
• At the end of the battery’s useful life, do not
throw out the battery. Please bring your battery
to a proper battery disposal location or return
your batteries to one of the DREMEL service sta-
tions (address are listed on the service diagram
supplied with the tool)

1313
Assembly
ALWAYS BE SURE THE TOOL IS
IN THE “0” POSITION BEFORE
CHANGING ACCESSORIES, CHANGING COLLETS OR
SERVICING YOUR CORDLESS ROTARY TOOL.
SHAFT
LOCK
BUTTON
TO LOOSEN
TO TIGHTEN
COLLET
NUT
COLLET
COLLET
NUT
IDENTIFICATION
RINGS
480 0.32 cm
COLLET
481 0.24 cm
COLLET
482 0.16 cm
COLLET
483 0.08 cm
COLLET
!
WARNING
COLLET IDENTIFICATION CHART — Collet sizes can
be identified by the rings on the back end of collet.
0.08 cm Collet has one (1) ring.
0.16 cm Collet has two (2) rings.
0.24 cm Collet has three (3) rings.
0.32 cm Collet has no rings.
COLLET
WRENCH
COLLET — To loosen, first press shaft lock button and
rotate the shaft by hand until the lock engages the shaft
preventing further rotation.
Do not engage lock while the
Rotary Tool is running.
With the shaft lock engaged use the collet wrench to
loosen the collet nut if necessary. Change accessories
by inserting the new one into the collet as far as possi-
ble to minimize runout and unbalance. With the shaft
lock engaged, finger tighten the collet nut until the
accessory shank is gripped by the collet. Avoid exces-
sive tightening of the collet nut.
COLLETS — Four different size collets (see illus-
tration), to accommodate different shank sizes, are
available for your Cordless Rotary Tool. To install a dif-
ferent collet, remove the collet nut and remove the old
collet. Insert the unslotted end of the collet in the hole
in the end of the tool shaft. Replace collet nut on the
shaft. Always use the collet which matches the shank
size of the accessory you plan to use. Never force a
larger diameter shank into a collet.
BALANCING ACCESSORIES — For precision work, it is
important that all accessories be in good balance
(much the same as the tyres on your car). To true up or
balance an accessory, slightly loosen collet nut and
give the accessory or collet a 1/4 turn. Retighten collet
nut and run the Tool. You should be able to tell by the
sound and feel if your accessory is running in balance.
Continue adjusting in this fashion until best balance is
achieved. To maintain balance on abrasive wheel
points, before each use, with the wheel point secured
in the collet, turn on the Cordless Rotary Tool and run
the 415 Dressing Stone lightly against the revolving
wheel point. This removes high spots and trues up the
wheel point for good balance.
Operation Instructions
!
CAUTION
Introduction
The Cordless Rotary Tool is a handful of high-speed
power. It serves as a carver, a grinder, polisher, sander,
cutter, power brush, drill and more.
Your Cordless Rotary Tool has a small, powerful electric
motor, is comfortable in the hand, and is made to accept
a large variety of accessories including abrasive wheels,
drill bits, wire brushes, polishers, engraving cutters,
router bits, and cutting wheels. Accessories come in a
variety of shapes and permit you to do a number of
different jobs. As you become familiar with the range of
accessories and their uses, you will learn just how
versatile your Cordless Rotary Tool is. You’ll see dozens
of uses you hadn’t thought of before now.
The real secret of the Cordless Rotary Tool is its speed.
To understand the advantages of its high speed, you
have to know that the standard portable electric drill
runs at speeds up to 2,800 revolutions per minute. The
typical electric drill is a low-speed, high torque tool; the
Cordless Rotary Tool is just the opposite — a high-
speed, low torque tool. The chief difference to the user
is that in the high speed tools, the speed combined with
the accessory mounted in the collet does the work. You
don’t apply pressure to the tool, but simply hold and
guide it. In the low speed tools, you not only guide the
tool, but also apply pressure to it, as you do, for example,
when drilling a hole.
13

14
It is this high speed, along with its compact size and
wide variety of special accessories and attachments that
makes your Cordless Rotary Tool different from other
power tools. The speed enables it to do jobs low speed
tools cannot do, such as cutting hardened steel, en-
graving glass, etc.
Getting the most out of your Cordless Rotary Tool is a
matter of learning how to let this speed work for you.
Read the next sections carefully. They will help you use
your Cordless Rotary Tool correctly and help you select
the correct accessory for your job.
Charging the Tool
The Cordless Rotary Tool is not fully charged. The tool
is equipped with a removable battery pack. Be sure to
charge pack prior to initial use.
To charge the tool:
1. Put the switch in the “OFF” position.
2. Squeeze release tabs on both sides of battery pack,
and remove pack from back of tool as shown on page 2.
3. Align exterior shape of battery pack with exterior
shape of charger (alignment arrows on battery columm
will point to the two arrows located on charger),
squeeze release tabs, insert battery pack into charger as
shown and release pressure on tabs so it locks in place.
4. Plug charger into the power source. The green LED
light indicates connection has been made and the
battery pack is charging. Under normal usage the tool
normally requires 3 hours charging time to reach full
capacity. When charging is complete, LED on charger
will turn off.
5. When charging is completed, squeeze release tabs on
battery pack and remove pack from charger.
6. Align exterior shape of battery pack with exterior
shape of the housing of tool as shown. Squeeze release
tabs, insert battery pack into back of tool, and release
pressure on tabs so it locks in place.
Important Charging Notes
1. The battery pack accepts only about 80% of its
maximum capacity with its first few charge cycles.
However, after the first few charge cycles, the battery
will charge to full capacity.
2. The charger was designed to fast charge the bat-
tery only when the battery temperature is between
40˚F (4˚C) and 105˚F (41˚C).
3. A substantial drop in operating time per charge
may mean that the battery pack is nearing the end of
its life and should be replaced.
4. If battery does not charge properly:
a. Check for voltage at outlet by plugging in
some other electrical device.
b. Check to see if outlet is connected to a light
switch which turns power “off” when lights are
turned off.
c. Check battery pack terminals for dirt. Clean
with cotton swab and alcohol if necessary.
d. If you still do not get proper charging, take or
send tool, battery pack and charger to your
Dremel Service Centre.
Note: Use of chargers or battery packs not sold by
Dremel may void the warranty.
Using the Cordless Rotary Tool
The first step in learning to use the Cordless Rotary Tool
is to get the “feel” of it. Hold it in your hand and feel its
weight and balance. Feel the taper of the housing. This
taper permits the tool to be grasped much like a pen or
pencil.
When you turn on the tool for the first time, hold it away
from your face. Accessories can be damaged during
handling, and can fly apart as they come up to speed.
This is not common, but it does happen.
Practice on scrap materials first to see how the Cordless
Rotary Tool cuts. Keep in mind that the work is done by
the speed of the tool and by the accessory in the collet.
You should not lean on or push the tool into the work.
Instead, lower the spinning accessory lightly to the
work and allow it to touch the point at which you want
cutting (or sanding or etching, etc.) to begin. Con-
centrate on guiding the tool over the work using very lit-
tle pressure from your hand. Allow the accessory to do
the work.
Usually, it is best to make a series of passes with the
tool rather than attempt to do all the work in one pass.
To make a cut, for example, pass the tool back and forth
over the work, much as you would a small paint brush.
1414

15
Cut a little material on each pass until you reach the
desired depth. For most work, the deft, gentle touch is
best. With it, you have the best control, are less likely to
make errors, and will get the most efficient work out of
the accessory.
15
For best control in close work, grip the Rotary Tool
like a pencil between your thumb and forefinger.
The “handgrip” method of holding the tool is used for
operations such as grinding a flat surface or using
cutoff wheels.
Operating Speeds For Accessories
Set the speed indicator to fit the job to achieve the
best job results when working with different
materials.
To select the right speed for each job, use a practice
piece of material. Vary speed to find the best speed
for the accessory you are using and the job to be
done.
Your Cordless RotaryTool is equipped with a variable
speed control dial. To turn the tool ON, rotate dial to
desired number to select the operating speed needed
from 5,000 – 35,000 RPM. To turn tool OFF, rotate
dial to the “0” off position.
You can refer to the charts on page 5, 6, and 7 to
determine the proper speed, based on the material
being worked and the type of accessory being used.
These charts enable you to select both the correct
accessory and the optimum speed at a glance.
Needs for Slower Speeds
Certain materials, however, (some plastics, for ex-
ample) require a relatively slow speed because at high
speed the friction of the tool generates heat and caus-
es the plastic to melt.
Most work is done at high speed on your Cordless
Rotary Tool. Lower speeds are needed only for certain
tasks.
The speed of Model 800 is controlled by rotating this
dial to desired setting on dial.
Switch Setting Speed Range
0 OFF Position
*2 5,000 – 11,000 RPM
4 12,000 – 20,000 RPM
6 21,000 – 25,000 RPM
8 26,000 – 30,000 RPM
10 31,000 – 35,000 RPM
*2 is the maximum speed setting for wire brushes.

1616
Operating Speeds for Accessories - (cont.)
To aid you in determining the optimum operational
speed for different materials and different accessories,
we have constructed a series of tables that appear on
page 9, 10 and 11. By referring to these tables, you can
discover the recommended speeds for each type of
accessory. Look these tables over and become familiar
with them.
Ultimately, the best way to determine the correct speed
for work on any material is to practice for a few min-
utes on a piece of scrap, even after referring to the
chart. You can quickly learn that a slower or faster
speed is more effective just by observing what happens
as you make a pass or two at different speeds. When
working with plastic, for example, start at a slow rate of
speed and increase the speed until you observe that the
plastic is melting at the point of contact. Then reduce
the speed slightly to get the optimum working speed.
Some rules of thumb in regard to speed:
1. Plastic and materials that melt at low temperatures
should be cut at low speeds.
2. Polishing, buffing and cleaning with a wire brush
must be done at speeds below 15,000 RPM to
prevent damage to the brush.
3. Wood should be cut at high speed.
4. Iron or steel should be cut at top speed if using
tungsten carbide accessory, but at slower speeds
if using high speed steel cutters. If a high speed
steel cutter starts to chatter — this normally
means it is running too slowly.
5. Aluminium, copper alloys, lead alloys, zinc alloys
and tin may be cut at various speeds, depending
on the type of cutting being done. Use paraffin or
other suitable lubricant on the cutter to prevent
the cut material from adhering to the cutter teeth.
Increasing the pressure on the tool is not the answer
when it is not cutting as you think it should. Perhaps
you should be using a different cutter, and perhaps an
adjustment in speed would solve the problem. But
leaning on the tool seldom helps.
Using the Cordless Rotary Tool
with Attachments
Your 10.8v Cordless Rotary Tool can be used wit all
screw-on attachments for added versatility. A few
older attachments, such as 2217 Tool Holder, 330
Router, and 231 Shaper / Router Table are not
compatible with the 10.8v Cordless Rotary Tool.
The 212 Drill Press requires a free adapter kit
(available April 2004) which you can get by calling the
service station in your country to get your free
adapter. (addresses are listed on the service station
list supplied with the tool).
• Keep tool, battery pack and charger clean (some
household cleaning products and solvents can
damage plastic parts; these products include
among others benzine, trichloroethelene, chloride,
amonium
• Excessive sparking mostly indicates worn-out carbon
brushes, therefor your tool should be brought to a
service station.
• In case of an electrical or mechanical defect, hand
in tool at one the DREMEL Service Stations for
repair (addresses are listed on the service diagram
supplied with the tool)
MAINTENANCE AND REPAIR

17
Allgemeine Hinweise zur Verwendung:
SICHERHEITSHINWEISE
Bei der Benutzung von Elektrowerkzeugen stets die
folgenden Sicherheitsmaßnahmen beachten, um der
Gefahr von Bränden, Stromschlägen und Verletzungen
vorzubeugen. Bitte lesen Sie diese Hinweise voll-
ständig durch, bevor Sie das Gerät in Betrieb neh-
men.
Diese Hinweise bitte aufbewahren.
1. Spannungsangabe auf dem Typenschild kon-
trollieren.
2. Arbeitsbereich stets sauber und ordentlich hal-
ten. Unübersichtliche Arbeitsflächen und Werk-
bänke erhöhen die Verletzungsgefahr.
3. Auf die Umgebungsbedingungen im Arbeits-
bereich achten. Setzen Sie Elektrowerkzeuge
niemals dem Regen aus. Verwenden Sie Elektro-
werkzeuge nie in feuchten oder nassen Berei-
chen. Sorgen Sie für ausreichende Beleuchtung
des Arbeitsbereichs. Verwenden Sie Elektro-
werkzeuge nicht in der Nähe von entflammbaren
Flüssigkeiten oder Gasen.
4. Vorsicht vor Stromschlägen. Vermeiden Sie
Körperkontakt mit geerdeten Metallflächen (z. B.
Rohre, Heizkörper, Herd, Kühlschrank).
5. Kinder fern halten. Lassen Sie Besucher das
Werkzeug oder seine Zuleitung nicht anfassen
und halten Sie sie vom Arbeitsbereich fern.
6. Werkzeuge bei Nichtbenutzung richtig aufbe-
wahren. Bewahren Sie nicht benutzte Werk-
zeuge an einem trockenen, abgeschlossenen Ort
außerhalb der Reichweite von Kindern auf.
7. Keine Gewalt auf das Werkzeug ausüben. Das
Werkzeug arbeitet besser und sicherer, wenn es
mit der vorgesehenen Drehzahl betrieben wird.
8. Geeignete Werkzeuge verwenden. Verwenden
Sie keine zu kleinen Werkzeuge oder Vorsatz-
geräte für Arbeiten, die ein Hochleistungs-
werkzeug erfordern. Setzen Sie jedes Werkzeug
nur für seine jeweils vorgesehene Aufgabe ein
(Beispiel: Verwenden Sie keine Lochsäge zum
Abtrennen von Ästen oder zum Kürzen von
Holzbrettern).
9. Zweckmäßige Kleidung tragen. Tragen Sie
keine lockeren Kleidungs- oder Schmuckstücke,
die sich in rotierenden Teilen verfangen können.
Bei Arbeiten im Freien wird empfohlen,
Gummihandschuhe und rutschfeste Schuhe zu
tragen. Schützen Sie lange Haare durch eine ent-
sprechende Kopfbedeckung.
10. Schutzbrille tragen. Tragen Sie bei besonders
staubträchtigen Arbeiten zusätzlich eine
Gesichts- oder Staubschutzmaske.
11. Staub absaugen. Wenn Vorrichtungen für den
Anschluss von Staubabsaug- und -auffangvor-
richtungen vorhanden sind, achten Sie darauf,
dass diese angeschlossen sind und richtig ein-
gesetzt werden.
12. Auf das Anschlusskabel keine Gewalt ausüben.
Heben Sie das Werkzeug niemals am Kabel an;
reißen Sie niemals am Kabel, um den Stecker zu
ziehen. Schützen Sie das Kabel vor Hitze, Öl und
scharfen Kanten.
13. Werkstück sichern. Fixieren Sie das Werkstück
mit Schraubzwingen oder einem Schraubstock;
dies ist sicherer, als wenn es in der Hand gehal-
ten wird, und Sie haben beide Hände zur
Bedienung des Werkzeugs frei.
14. Nicht zu weit vorbeugen. Achten Sie stets auf
sicheren Stand und stabiles Gleichgewicht.
15. Werkzeuge pfleglich behandeln. Halten Sie die
Werkzeuge gut geschärft und sauber, damit sie
einwandfrei und sicher arbeiten können. Folgen
Sie bei Wartungsarbeiten und beim Wechseln
der Zubehörteile den entsprechenden Anwei-
sungen. Kontrollieren Sie die Zuleitungen und
Stecker der Werkzeuge in regelmäßigen
Abständen und lassen Sie Schäden von einer
entsprechend geschulten Person beheben.
Kontrollieren Sie Verlängerungskabel in regel-
mäßigen Abständen. Beschädigte Kabel müssen
ersetzt werden. Halten Sie die Handgriffe tro-
cken, sauber und öl- und fettfrei.
16. Werkzeuge nicht im angeschlossenen Zustand
aufbewahren. Trennen Sie das Werkzeug bei
Nichtbenutzung, vor Wartungsarbeiten oder
beim Wechseln von Zubehörteilen wie Säge-
blättern, Bits und Fräsmessern von der Strom-
versorgung.
17. Werkzeugschlüssel abnehmen. Gewöhnen Sie
sich an, die zum Anbringen und Einstellen der
Werkzeuge vorgesehenen Schlüssel vor dem
Einschalten abzunehmen.
18. Unbeabsichtigtes Anlaufen verhindern. Tragen
Sie keine an das Stromnetz angeschlossenen
Werkzeuge, während Sie den Finger am
Einschalter haben. Vergewissern Sie sich vor
dem Anschließen des Netzsteckers, dass das
Gerät ausgeschaltet ist.
19. Verlängerungskabel für den Außenbereich.
Wenn Sie das Werkzeug im Freien einsetzen, ver-
wenden Sie ausschließlich Verlängerungskabel,
die für die Verwendung im Freien vorgesehen
und entsprechend gekennzeichnet sind.
20. Konzentriert arbeiten. Arbeiten Sie aufmerksam
und umsichtig und verwenden Sie das Werkzeug
nicht, wenn Sie übermüdet sind.
21. Teile auf Schäden kontrollieren. Bevor Sie mit
dem Werkzeug arbeiten, kontrollieren Sie stets
die Schutzabdeckung und ähnliche Komponenten
gründlich darauf, ob sie ihre vorgesehene
Funktion erfüllen. Prüfen Sie die beweglichen
Teile auf korrekte Ausrichtung, freie Beweglich-
keit und Beschädigungen. Prüfen Sie sämtliche
Teile auf ordnungsgemäße Befestigung und kon-
trollieren Sie, ob ihre Funktion aus anderen

18
Gründen beeinträchtigt sein könnte. Schutzab-
deckungen, Schalter oder andere Teile, die
beschädigt oder defekt sind, müssen von einer
entsprechend qualifizierten Person ordnungsge-
mäß instand gesetzt oder ersetzt werden.
Benutzen Sie das Werkzeug nicht, wenn es sich
nicht am Schalter ein- und ausschalten lässt.
22. Achtung! Verwenden Sie dieses Werkzeug und
seine Zubehörteile ausschließlich gemäß diesen
Sicherheitshinweisen und auf die vorgesehene
Weise. Berücksichtigen Sie dabei die
Arbeitsbedingungen und die Art der auszufüh-
renden Arbeiten. Der Einsatz des Werkzeugs für
Arbeiten, für die es normalerweise nicht vorge-
sehen ist, kann gefährlich sein.
23. Werkzeug nur von qualifizierten Personen
instand setzen lassen. Dieses Elektrowerkzeug
entspricht den geltenden Sicherheitsbestimm-
ungen. Reparaturen dürfen nur von qualifizierten
Personen unter Verwendung von Originalersatz-
teilen durchgeführt werden; andernfalls können
erhebliche Gefahren für den Benutzer entstehen.
24. Ein beschädigtes Netzkabel muss vom Her-
steller, seinem Kundendienstbeauftragten oder
einer ähnlich qualifizierten Person ersetzt wer-
den, um Gefährdungen zu vermeiden.
SICHERHEITSHINWEISE FÜR DREMEL-WERKZEUGE
• Lesen Sie diese Bedienungsanleitung durch und
bewahren Sie die Anleitung und die zugehörigen
Sicherheitshinweise auf.
• Schalten Sie vor dem Ablegen des Werkzeugs
den Motor aus und vergewissern Sie sich, dass
sämtliche beweglichen Teile vollständig zum
Stillstand gekommen sind.
• Im Falle einer elektrischen oder mechanischen
Funktionsstörung schalten Sie das Werkzeug
sofort aus bzw. ziehen Sie den Stecker des
Ladegeräts.
•Verwenden Sie ausschließlich Original-DRE-
MEL-Zubehörteile, die Sie über Ihren DREMEL-
Händler beziehen können.
• Achten Sie vor der Arbeit mit Zubehörteilen stets
darauf, dass am Werkzeug keine höhere
Drehzahl eingestellt ist als die für das betreffen-
de Zubehörteil angegebene zulässige Maximal-
drehzahl.
• Das Werkzeug darf nicht von Personen unter 16
Jahren verwendet werden.
•Verwenden Sie niemals Schleifscheiben mit
über 32 mm (1 1/4") Ø
•Verwenden Sie niemals Bohrer mit über 3,2 mm
(1/8") Ø
• Betätigen Sie niemals bei laufendem Werkzeug
die Wellenarretierung.
• Bewahren Sie das Werkzeug ausschließlich in
Bereichen auf, in denen die Temperatur 40 °C
nicht überschreitet.
• Achten Sie darauf, dass der Durchmesser der
Spannzange dem Wellendurchmesser des
Zubehörteils entspricht.
• Halten Sie die Belüftungsöffnungen sauber und
achten Sie darauf, dass sie nicht abgedeckt
werden.
• Handhaben und lagern Sie Schleif-/Trenn-
scheiben mit Vorsicht, damit sie nicht splittern
oder Risse bekommen.
•Verwenden Sie keine Schleif-/Trennscheiben,
die Schäden oder Verformungen aufweisen oder
während des Betriebs vibrieren.
• Beachten Sie beim Anbringen und bei der
Verwendung von Zubehörteilen, die nicht von
Dremel geliefert wurden, die Anleitung des betref-
fenden Herstellers.
•Vor der Verwendung des Werkzeugs
• sicherstellen, dass das Zubehörteil richtig ein-
gesetzt und fest eingespannt ist.
• kontrollieren, ob sich das Zubehörteil von
Hand frei drehen lässt.
• Das Werkzeug in einer ungefährlichen Stellung
mindestens 30 Sekunden lang lastfrei mit
maximaler Drehzahl laufen lassen
• Bei starken Vibrationen oder anderen
Störungen das Werkzeug sofort ausschalten
und überprüfen, um die Ursache festzustellen.
•!Trennscheiben niemals zum seitlichen
Beschleifen einsetzen !
• Beim Schleifen von Metall entstehen Funken;
andere Personen und brennbares Material vom
Arbeitsbereich fern halten
•Schutzbrille und -handschuhe, Gehörschutz,
Staubmaske und festes Schuhwerk sowie bei
Bedarf eine Schürze tragen.
• Die Drähte von Borstenbürsten nur leicht auf-
drücken, da nur die Spitzen der Drahtborsten die
Arbeit leisten.
•!Nach dem Ausschalten des Werkzeugs läuft
das Zubehörteil noch kurze Zeit weiter.
SICHERHEITSHINWEISE FÜR
DREMEL-AKKUWERKZEUGE
• Akkubetriebene Werkzeuge mit separatem Akku
dürfen nur mit dem für diesen Akku vorgeschrie-
benen Ladegerät aufgeladen werden.
• Betreiben Sie akkubetriebene Werkzeuge nur mit
dem ausdrücklich dafür vorgesehenen Akku. Bei
Verwendung anderer Akkus kann Brandgefahr
bestehen.
•Vorsicht vor unbeabsichtigtem Anlaufen.
Vergewissern Sie sich vor dem Einsetzen des
Akkus, dass das Werkzeug ausgeschaltet ist.
• Nehmen Sie den Akku vom Werkzeug ab oder
schalten Sie das Werkzeug aus, bevor Sie
Einstellungen vornehmen, Zubehörteile wech-
seln oder das Werkzeug für die Aufbewahrung
vorbereiten.

19
• Während der Akku nicht in Benutzung ist, halten
Sie ihn von Metallgegenständen wie
Büroklammern, Münzen, Schlüsseln, Nägeln,
Schrauben oder anderen metallischen Kleinteilen
fern, die einen Kurzschluss zwischen den
Kontakten verursachen können.
• Halten Sie das Werkzeug während des
Hochlaufens immer gut fest.
SICHERHEITSHINWEISE FÜR DAS AKKULADEGERÄT
• Lesen Sie vor der Verwendung des
Akkuladegeräts sämtliche Sicherheitsinforma-
tionen durch und beachten Sie alle auf dem
Akkuladegerät 856, auf dem Akku 855 sowie auf
dem Dremel-Akkuwerkzeug 800 angegebenen
Warnhinweise.
•Verwenden Sie ausschließlich das mit dem
Werkzeug gelieferte Ladegerät oder ein im
Katalog oder dieser Anleitung ausdrücklich
genanntes Ersatzgerät.
• Zerlegen oder verwenden Sie das Ladegerät
nicht, wenn es einem heftigen Schlag ausgesetzt
war, fallen gelassen wurde oder anderweitig
Schäden erlitten haben könnte.
• Laden Sie den Akku nicht in einer feuchten oder
nassen Umgebung. Schützen Sie das Ladegerät
vor Regen oder Schnee. Wenn das Akkugehäuse
Risse oder andere Schäden aufweist, setzen Sie
den Akku nicht in das Ladegerät ein.
•Verwenden Sie das Ladegerät 856 ausschließlich
zum Laden von Dremel-Akkus Nr. 855.
• Laden Sie den Akku ausschließlich bei
Umgebungstemperaturen zwischen 0 °C und
40 °C. Bewahren Sie das Werkzeug und den
Akku nur in Bereichen auf, in denen die
Umgebungstemperatur nicht über 40 °C anstei-
gen bzw. unter 0 °C absinken kann.
• Bei Beschädigung sowie bei extremen
Belastungen und Umgebungstemperaturen kön-
nen die Zellen des Akkus undicht werden. Falls
Akkuflüssigkeit auf die Haut gerät, muss sie
sofort mit Wasser und Seife abgewaschen wer-
den; anschließend zur Neutralisierung mit
Zitronensaft oder Essig nachbehandeln. Falls
Akkuflüssigkeit in die Augen gerät, Augen sofort
mindestens 10 Minuten lang mit frischem
Wasser ausspülen und unverzüglich einen Arzt
aufsuchen.
• Stellen Sie das Ladegerät während des
Ladevorgangs auf eine flache, nicht brennbare
Oberfläche mit genügend Abstand zu brennba-
ren Materialien.
• Die Verwendung eines nicht von Dremel dafür
vorgesehenen oder vertriebenen Vorsatzgeräts
kann zur Gefahr von Bränden, Stromschlägen
oder Verletzungen führen.
• Akkus niemals im Freien aufladen.
ENTSORGUNG DER AKKUS
•Versuchen Sie nicht, den Akku zu zerlegen oder
an den Kontakten hervorstehende Teile zu ent-
fernen.
• Den Akku am Ende seiner Lebensdauer nicht mit
dem Hausmüll wegwerfen. Bitte bringen Sie den
Akku zu einer dafür vorgesehenen Entsorgungs-
stelle oder zu einer der DREMEL-Kundendienst-
stationen (die Adressen sind auf dem Kunden-
dienstdiagramm aufgeführt, das dem Werkzeug
beiliegt).
Montage
VERGEWISSERN SIE SICH
STETS, DASS DER SCHALTER IN
STELLUNG "0" STEHT, BEVOR SIE AM AKKUWERK-
ZEUG ZUBEHÖRTEILE ODER SPANNZANGEN WECH-
SELN ODER WARTUNGSARBEITEN DURCHFÜHREN.
WELLEN-
ARRETIERUNGS-
TASTE
LOCKERN
FESTZIEHEN
ÜBERWURF-
MUTTER
SPANN-
ZANGE
ÜBERWURF-
MUTTER
KENNZEICH-
NUNGSRINGE
481 SPANN-
ZANGE 0,24 cm
482 SPANNZANGE
0,16 cm
483 SPANN-
ZANGE 0,08 cm
!
VORSICHT
KENNZEICHNUNG DER SPANNZANGEN –
Der Durchmesser der Spannzangen ist durch
Ringe am hinteren Spannzangenende angegeben.
Die 0,08-cm-Spannzange trägt einen (1) Ring.
Die 0,16-cm-Spannzange trägt zwei (2) Ringe.
Die 0,24-cm-Spannzange trägt drei
(3) Ringe.
Die 0,32-cm-Spannzange
trägt keine Ringe.
SPANNZANGEN-
SCHLÜSSEL
480 SPANNZANGE
0,32 cm

20
SPANNZANGE – Zum Lockern zunächst die
Wellenarretierungstaste drücken und die Welle von
Hand drehen, bis die Arretierung greift und sich die
Welle nicht weiterdrehen lässt.
Die Wellenarretierung nicht bei
laufendem Werkzeug betätigen.
Sobald die Welle arretiert ist, können Sie bei Bedarf
den Spannzangenschlüssel verwenden, um die Über-
wurfmutter zu lockern. Schieben Sie das neue
Zubehörteil für den Wechsel so weit wie möglich in
die Spannzange ein, um Unrundheit und Unwucht zu
minimieren. Ziehen Sie die Überwurfmutter bei betä-
tigter Wellenarretierung fingerfest an, bis die
Spannzange den Schaft des Zubehörteils erfasst und
festhält. Die Überwurfmutter nicht zu fest anziehen.
SPANNZANGEN – Für das Dremel-Akkuwerkzeug ste-
hen vier unterschiedlich große Spannzangen für die
verschiedenen Schaftdurchmesser zur Verfügung
(siehe Abbildung). Um eine andere Spannzange ein-
zusetzen, die Überwurfmutter lösen und die alte
Spannzange herausziehen. Das ungeschlitzte Ende
der Spannzange in die Öffnung am Ende der
Werkzeugwelle einsetzen. Die Überwurfmutter wieder
auf die Welle aufsetzen. Verwenden Sie stets die für
den Schaftdurchmesser des vorgesehenen Zubehör-
teils passende Spannzange. Setzen Sie niemals mit
Gewalt ein Zubehörteil mit zu großem Schaftdurch-
messer in eine Spannzange ein.
ZUBEHÖRTEILE AUSWUCHTEN – Für Präzisions-
arbeiten ist es unerlässlich, dass alle Zubehörteile
einwandfrei ausgewuchtet sind (wie die Räder am
Auto). Um ein Zubehörteil auszuwuchten, lockern Sie
die Überwurfmutter geringfügig und drehen Sie das
Zubehörteil bzw. die Spannmutter um 1/4 Um-
drehung weiter. Ziehen Sie die Überwurfmutter wie-
der fest und schalten Sie das Werkzeug ein. Anhand
des Betriebsgeräuschs und der Laufruhe können Sie
nun beurteilen, ob das Zubehörteil noch eine
Unwucht aufweist. Setzen Sie diesen Justiervorgang
fort, bis die Unwucht minimal ist. Zum Auswuchten
von Schleifsteinen fixieren Sie vor jeder Verwendung
den Schleifstein in der Spannzange, schalten Sie das
Dremel-Akkuwerkzeug ein und drücken Sie den
Abrichtstein 415 leicht gegen den rotierenden
Schleifstein. Dadurch werden Unrundheiten entfernt,
so dass der Schleifstein optimal ausgewuchtet wird.
Bedienungsanleitung
!
VORSICHT
Einführung
Das Dremel-Akkuwerkzeug ist ein kompaktes
Hochleistungsgerät, das zum Schnitzen, Schleifen,
Polieren, Schmirgeln und Schneiden/Trennen sowie
als Motorbürste, Bohrmaschine und vieles mehr ein-
gesetzt werden kann.
Das Dremel-Akkuwerkzeug ist mit einem kleinen, aber
leistungsstarken Elektromotor ausgerüstet, liegt gut
in der Hand und kann mit einer Vielzahl von
Zubehörteilen verwendet werden: Schleifsteine,
Bohrer, Drahtbürsten, Polierscheiben, Graviermesser,
Fräserbits und Trennscheiben. Die Zubehörteile sind
in vielen verschiedenen Formen für zahlreiche unter-
schiedliche Arbeiten lieferbar. Mit der Zeit werden Sie
mit den Zubehörteilen und ihren Verwendungs-
möglichkeiten vertraut werden und feststellen, wie
vielseitig das Dremel-Akkuwerkzeug ist. Sie werden
eine Vielzahl von neuen Einsatzmöglichkeiten erken-
nen, an die Sie bisher überhaupt nicht gedacht hatten.
Das eigentliche Geheimnis des Dremel-
Akkuwerkzeugs ist seine hohe Drehzahl. Um die
Vorteile einer hohen Werkzeugdrehzahl zu verstehen,
müssen Sie sich bewusst machen, dass konventionel-
le elektrische Handbohrmaschinen mit Drehzahlen von
bis zu 2.800/min arbeiten. Die typische Bohrmaschine
ist ein Werkzeug für niedrige Drehzahl und großes
Drehmoment, das Dremel-Akkuwerkzeug ist das
genaue Gegenteil: ein Werkzeug für hohe Drehzahl und
kleines Drehmoment. Für den Benutzer liegt der
Hauptunterschied darin, dass bei hochtourigen
Werkzeugen die Drehzahl und das Zubehörteil in der
Spannzange die eigentliche Arbeit leisten. Sie selbst
müssen auf das Werkzeug keinen Druck ausüben,
sondern es nur halten und führen. Bei mit niedriger
Drehzahl arbeitenden Werkzeugen müssen Sie das
Werkzeug nicht nur führen, sondern auch Druck dar-
auf ausüben, zum Beispiel beim Herstellen von
Bohrungen.
Durch diese hohe Drehzahl in Verbindung mit der
kompakten Größe und der großen Vielzahl der spe-
ziellen Zubehörkomponenten und Vorsatzgeräte
unterscheidet sich das Dremel-Akkuwerkzeug von
anderen Elektrowerkzeugen. Durch die hohe Drehzahl
lassen sich Aufgaben bewältigen, bei denen nieder-
tourige Werkzeugen passen müssen, z. B. Schneiden
von gehärtetem Stahl, Gravieren von Glas etc.
Um Ihr Dremel-Akkuwerkzeug optimal nutzen zu kön-
nen, müssen Sie in erster Linie lernen, wie Sie diese
hohe Drehzahl für sich arbeiten lassen können.
A página está carregando...
A página está carregando...
A página está carregando...
A página está carregando...
A página está carregando...
A página está carregando...
A página está carregando...
A página está carregando...
A página está carregando...
A página está carregando...
A página está carregando...
A página está carregando...
A página está carregando...
A página está carregando...
A página está carregando...
A página está carregando...
A página está carregando...
A página está carregando...
A página está carregando...
A página está carregando...
A página está carregando...
A página está carregando...
A página está carregando...
A página está carregando...
A página está carregando...
A página está carregando...
A página está carregando...
A página está carregando...
A página está carregando...
A página está carregando...
A página está carregando...
A página está carregando...
A página está carregando...
A página está carregando...
A página está carregando...
A página está carregando...
A página está carregando...
A página está carregando...
A página está carregando...
A página está carregando...
A página está carregando...
A página está carregando...
A página está carregando...
A página está carregando...
A página está carregando...
A página está carregando...
A página está carregando...
A página está carregando...
A página está carregando...
A página está carregando...
A página está carregando...
A página está carregando...
A página está carregando...
A página está carregando...
A página está carregando...
A página está carregando...
A página está carregando...
A página está carregando...
A página está carregando...
A página está carregando...
A página está carregando...
A página está carregando...
A página está carregando...
A página está carregando...
A página está carregando...
A página está carregando...
A página está carregando...
A página está carregando...
A página está carregando...
A página está carregando...
A página está carregando...
A página está carregando...
A página está carregando...
A página está carregando...
A página está carregando...
A página está carregando...
A página está carregando...
A página está carregando...
A página está carregando...
A página está carregando...
A página está carregando...
A página está carregando...
A página está carregando...
A página está carregando...
A página está carregando...
A página está carregando...
A página está carregando...
A página está carregando...
A página está carregando...
A página está carregando...
A página está carregando...
A página está carregando...
A página está carregando...
A página está carregando...
A página está carregando...
A página está carregando...
A página está carregando...
A página está carregando...
A página está carregando...
A página está carregando...
A página está carregando...
-
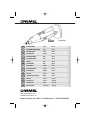 1
1
-
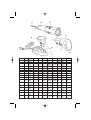 2
2
-
 3
3
-
 4
4
-
 5
5
-
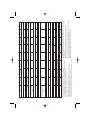 6
6
-
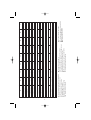 7
7
-
 8
8
-
 9
9
-
 10
10
-
 11
11
-
 12
12
-
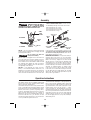 13
13
-
 14
14
-
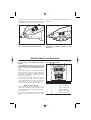 15
15
-
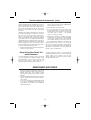 16
16
-
 17
17
-
 18
18
-
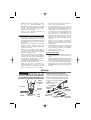 19
19
-
 20
20
-
 21
21
-
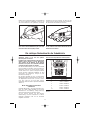 22
22
-
 23
23
-
 24
24
-
 25
25
-
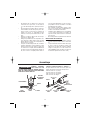 26
26
-
 27
27
-
 28
28
-
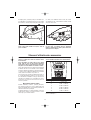 29
29
-
 30
30
-
 31
31
-
 32
32
-
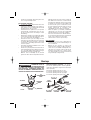 33
33
-
 34
34
-
 35
35
-
 36
36
-
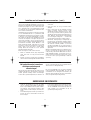 37
37
-
 38
38
-
 39
39
-
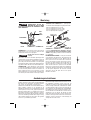 40
40
-
 41
41
-
 42
42
-
 43
43
-
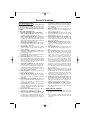 44
44
-
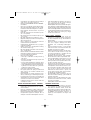 45
45
-
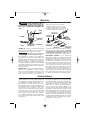 46
46
-
 47
47
-
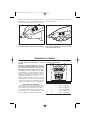 48
48
-
 49
49
-
 50
50
-
 51
51
-
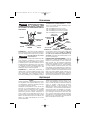 52
52
-
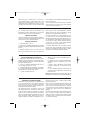 53
53
-
 54
54
-
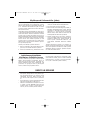 55
55
-
 56
56
-
 57
57
-
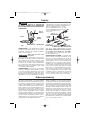 58
58
-
 59
59
-
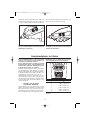 60
60
-
 61
61
-
 62
62
-
 63
63
-
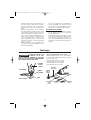 64
64
-
 65
65
-
 66
66
-
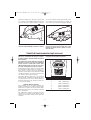 67
67
-
 68
68
-
 69
69
-
 70
70
-
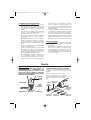 71
71
-
 72
72
-
 73
73
-
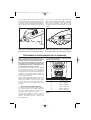 74
74
-
 75
75
-
 76
76
-
 77
77
-
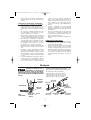 78
78
-
 79
79
-
 80
80
-
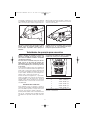 81
81
-
 82
82
-
 83
83
-
 84
84
-
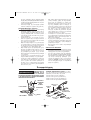 85
85
-
 86
86
-
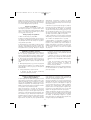 87
87
-
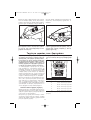 88
88
-
 89
89
-
 90
90
-
 91
91
-
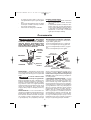 92
92
-
 93
93
-
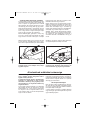 94
94
-
 95
95
-
 96
96
-
 97
97
-
 98
98
-
 99
99
-
 100
100
-
 101
101
-
 102
102
-
 103
103
-
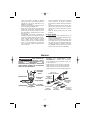 104
104
-
 105
105
-
 106
106
-
 107
107
-
 108
108
-
 109
109
-
 110
110
-
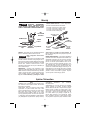 111
111
-
 112
112
-
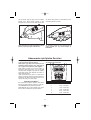 113
113
-
 114
114
-
 115
115
-
 116
116
-
 117
117
-
 118
118
-
 119
119
-
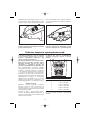 120
120
-
 121
121


Dremel 8000 Instructions Manual
- Categoria
- Poder multi-ferramentas
- Tipo
- Instructions Manual
em outras línguas
- español: Dremel 8000
- français: Dremel 8000
- italiano: Dremel 8000
- English: Dremel 8000
- русский: Dremel 8000
- Nederlands: Dremel 8000
- Deutsch: Dremel 8000
- dansk: Dremel 8000
- čeština: Dremel 8000
- svenska: Dremel 8000
- polski: Dremel 8000
- Türkçe: Dremel 8000
- suomi: Dremel 8000
Artigos relacionados
-
Dremel 780 Manual do proprietário
-
-
-
Dremel 335 Operating/Safety Instructions Manual
-
Dremel 3D20 Idea Builder Original Instructions Manual
-
-
-
-
-