Infiniton HN-870N Manual do proprietário
- Categoria
- Fogões
- Tipo
- Manual do proprietário

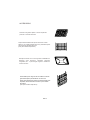
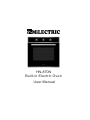
HN-870N
Built-in Electric Oven
User Manual

AGRADECIMIENTOS
Le agradecemos la compra de nuestro producto. Esperamos que saque
el máximo provecho de todas las características y funciones que ofrece.
Antes de utilizar el producto, por favor, lea con detenimiento y en su
totalidad este Manual de Instrucciones. Conserve este manual en un
lugar seguro para futuras consultas. Asegúrese asimismo de que las
personas que también vayan a utilizar el producto estén familiarizadas
con estas instrucciones.
ATENCIÓN
La primera vez que encienda el horno, puede que desprenda un
olor desagradable. Ello es debido al agente adhesivo utilizado en los
paneles aislantes del interior del horno. Es totalmente normal y, si
ocurre, sólo tiene que esperar a que desaparezca el olor antes de
introducir alimentos en el horno.
El horno y sus zonas accesibles se calentarán durante su uso.
Tome precauciones para evitar tocar las resistencias del horno.
Mantener alejados del horno a los niños menores de 8 años a no ser
que estén bajo la vigilancia constante
de un adulto.
Este horno no puede ser utilizado por niños mayores de 8 años o
por personas con facultades físicas, sensoriales o mentales
reducidas, o con falta de experiencia y conocimientos, a menos que
sea bajo la supervisión o siguiendo indicaciones sobre su uso de
forma segura y de que comprendan los peligros relacionados.
Deberá asegurarse de que los niños no jueguen con el horno. La
limpieza y el mantenimiento del horno no deberá ser realizada
por los niños sin supervisión.
ES-2

No utilizar limpiadores abrasivos o rascadores metálicos
afilados para limpiar el cristal del horno, ya que podrían rallar
la superficie y dañar el cristal.
Durante su uso el horno se calienta mucho. Tome
precauciones para evitar tocar las resistencias del interior del
horno.
Impida que los niños se acerquen al horno durante su uso.
Asegúrese de que el horno esté desconectado antes de cambiar
la bombilla interior para evitar el riesgo de descarga eléctrica.
Deberá implementarse un medio de desconexión en la instalación
eléctrica fija de acuerdo con las especificaciones eléctricas
correspondientes.
Este horno ha sido diseñado para su uso domestico en interior. En
caso de que fuera utilizado para otros fines, o se le diera un mal
uso, la garantía de dos años quedaría anulada.
ES-3

No utilice el horno descalzo/a. No toque el horno si tiene las
manos o los pies mojados o húmedos.
No abra frecuentemente la puerta del horno durante la cocción de la
comida.
El horno deberá ser instalado y puesto a punto por un técnico
cualificado. El fabricante no se responsabiliza de ningún daño que
pueda haber sido causado por su instalación en un lugar
inadecuado o por parte de personal no cualificado.
No deje nada encima de la puerta del horno cuando ésta se
encuentra abierta, ya que podría volcar el horno o romper la puerta.
Algunos componentes del horno pueden mantener el calor durante
mucho tiempo; espere a que se enfríe completamente antes de
tocar los puntos expuestos directamente al calor.
SLQRYDDXWLOL]DUHOKRUQRGXUDQWHPXFKRWLHPSROHUHFRPHQGDPRV
TXHORGHVHQFKXIH
6L HO FDEOH GH DOLPHQWDFLyQ UHVXOWD GDxDGR pVWH GHEHUi VHU
VXVWLWXLGRSRUHOIDEULFDQWHRSRUVXVHUYLFLRWpFQLFRDXWRUL]DGRSDUD
HYLWDUFXDOTXLHUULHVJR
5HWLUHORVUHVWRVH[FHVLYRVGHVXFLHGDGDQWHVGHOLPSLDUORFRQVXOWH
ORV SURGXFWRV TXe pueden utilizarse dentro del horno durante su
limpieza.
Utilice sólo la sonda de temperatura recomendada para este horno.
No utilice un limpiador a vapor.
INDICADORES DE SEGURIDAD
ES-4

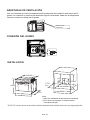
INSTALACIÓN DEL HORNO EN SU ESPACIO EN LA
COCINA Coloque el horno en el espacio reservado para este
electrodoméstico en la cocina; puede colocarse debajo de una
superficie de trabajo o en un armario vertical. Fije el horno en su
lugar mediante dos tornillos utilizando los dos agujeros de fijación
situados en el marco del horno. Para acceder a los agujeros de
fijación, abra la puerta del horno. Para garantizar una ventilación
adecuada, respete las medidas y las distancias de instalación
indicadas.
IMPORTANTE
Para que el horno funcione adecuadamente, el espacio para el
alojamiento del horno deberá ser el adecuado. Las superficies de la
cocina contiguas al horno deberán ser de un material resistente al
calor. Asegúrese de que los adhesivos de superficies hechas de
paneles de madera barnizada pueden resistir temperaturas de al
menos 120ºC. Los plásticos o los adhesivos que no puedan soportar
esas temperaturas se fundirán y se deformarán.
Una vez que el horno esté instalado en su lugar, aísle
completamente todos los componentes eléctricos. Se trata de
un requisito legal sobre seguridad. Todos los elementos de
protección deberán estar firmemente fijados en su lugar, de forma
que no puedan retirarse sin utilizar herramientas. Retire la parte
trasera del armario o espacio destinado al horno para garantizar una
ventilación adecuada. Entre la parte posterior del horno y la pared o
superficie contigua deberá haber un mínimo de 45 mm.
ES-5

DECLARACIÓN DE CONFORMIDAD
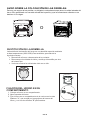
Una vez desempaquetado el horno, asegúrese de
que no presente ningún tipo de daño. Si tuviera
alguna duda sobre ello, no lo utilice y contacte
con un servicio técnico cualificado.
Mantenga los materiales de embalaje como
bolsas de plástico, poliestireno o clavos fuera del
alcance de los niños.
ES-6

ES-7
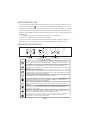
DESCRIPCIÓN DEL PRODUCTO
FUNCIONES TEMPORIZADOR TEMPERATURA
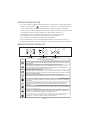
INSTRUCCIONES DE USO
Símbolo Descripción de las funciones
Lámpara del horno: que permite al usuario observar el progreso de la cocción sin abrir la
puerta. La lámpara del horno se encenderá para todas las funciones de cocción. excepto
la función ECO.
Descongelación: la circulación de aire a temperatura ambiente permite una
descongelación más rápida de los alimentos congelados (sin el uso de calor). Es una
forma suave pero rápida de acelerar el tiempo de descongelación y descongelación de
platos preparados y productos rellenos de crema, etc.
Calentador inferior: el calor se aplica solo por el lado inferior del horno. Use esta opción
para dorar el lado inferior de la comida. Esta función es adecuada para recetas de cocción
lenta o para calentar comidas.
Cocción convencional: los calentadores de la parte superior e inferior calientan
uniformemente los alimentos expuestos. Hornear y asar solo es posible en un solo nivel.
Convención con ventilador: el elemento calefactor superior y el elemento calefactor inferior
funcionan con ventilador. El aparato a cocinar se cocina de manera uniforme y rápida por
todas partes.
Grill pequeño: este método de cocción consiste en asar normalmente, utilizando solo la
parte interna del elemento calentador superior, que dirige el calor hacia abajo sobre los
alimentos.
Doble grill: el elemento de calentamiento interno y el elemento de calentamiento externo
en la parte superior del horno están funcionando. Adecuado para asar grandes cantidades
Doble grill con ventilador (en el panel posterior): el elemento de calentamiento interno y
el elemento de calentamiento externo en la parte superior del horno funcionan con
ventilador. Es adecuado para asar grandes cantidades de carne.
•Si no es necesario configurar el tiempo de cocción, cuando gire en sentido antihorario la
perilla del temporizador a " ", el temporizador no volverá a "0" automáticamente y el
horno se mantendrá en el estado de encendido. Si necesita configurar el tiempo de
cocción, gire en sentido horario la perilla del temporizador al tiempo que necesite. Cuando
se alcanza el tiempo de cocción establecido, el temporizador volverá a "0"
automáticamente con el sonido de "Ding, Ding, Ding" y el horno se apagará.
•Para configurar funciones gire la perilla de función al nivel deseado.
•Para configurar la temperatura gire la perilla de temperatura.
•El horno comenzará a cocinar automáticamente después de configurar la función, el
tiempo y la temperatura. Si el horno no está en uso, ajuste siempre todas las perillas a "0".
Para cocinar con ahorro de energía. Cocinar los ingredientes seleccionados de una
manera suave, y el calor proviene de la parte superior e inferior.

ACCESORIOS
Parrillas: Para gratinar platos o colocar recipientes
para asar u hornear alimentos.
Soporte desmontable: Este soporte se sitúa en el lado
derecho y en el lado izquierdo del horno, pudiéndose quitar
para limpiar las paredes del horno.
(sólo para modelos específicos).
Bandeja universal: Para cocinar grandes cantidades de
alimentos como bizcochos, repostería, alimentos
congelados, etc... o para recoger la grasa o vertidos de
cocción de carne.
Guías telescopicas: Algunos de los modelos contienen
guías telescópicas para facilitar el uso del horno.
Estas guías telescópicas podrían ser desmontadas para
limpiarlas, desenroscando los tornillos que se utilizan
para fijarlo.
(sólo para modelos específicos)
ES-8

O
SUSTITUCIÓN DE LA BOMBILLA
La bombilla de iluminación del horno es una bombilla especial resistente
a altas temperaturas (240V-25W).Para sustituirla, proceder de la
siguiente manera:
Desenchufe el horno o desconecte de la corriente.
Desenrosque la cubierta de vidrio y sustituya la bombilla por otra
del mismo tipo.
Vuelva a enroscar la cubierta de vidrio en su sitio.
FIJACIÓN DEL HORNO EN SU
COMPARTIMIENTO
1. Coloque el horno en su compartimento.
2. Abra la puerta del horno.
3. Fije el horno en su compartimento de la cocina con los dos
fijadores "A", que encajan en los agujeros del marco del
horno, y con los dos tornillos "B" para madera.
AVISO SOBRE LA COLOCACIÓN DE LAS PARRILAS:
Para un uso seguro de las parrillas, es obligatorio colocarlas siempre entre los raíles laterales del
horno. Ello garantizará una correcta retirada de la parrilla y que los alimentaros calientes no se
deslicen ni se caigan.
ES-9

NOTA: El número de de accesorios incluidos dependerá del modelo del horno que haya adquirido.
INSTALACIÓN
C575
B595
A595
G560
F570
min. H560
D606
E600
80
250
100
Nota :
1.Solo son admisibles las desviaciones expuestas.
2.En el hueco de encastre no está incluido el
interruptor principal.
CONEXIÓN DEL HORNO
Aberturas de
ventilación
L
N
ABERTURAS DE VENTILACIÓN
Una vez finalizado la cocción,la temperatura de las aberturas de ventilación será mayor de 70
grados. La ventilación a través de las aberturas seguirá funcionando, hasta que la temperatura
comience a estar por debajo de 60 grados.
ES-10

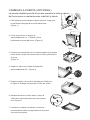
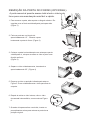
CAMBIAR LA PUERTA (OPCIONAL)
La puerta extraíble permite el acceso completo a todo el interior
del horno para un mantenimiento más fácil y rápido.
1.
2.
3.
4.
5.
6.
7.
Para quitar la puerta, ábrala al ángulo máximo. Luego jale
la hebilla de la bisagra de la puerta hacia atrás.
(Figura 1)
Cierre la puerta en un ángulo de
aproximadamente 15 °. Levanta y retira
lentamente la puerta del horno. (Figura 2)
Coloque la puerta plana con la cubierta superior de la puerta
hacia usted, coloque las manos sobre el vidrio y jálelo hacia
el horno.
(Figura 3)
Separe el vidrio con cuidado levantándolo
aproximadamente 25 ° (Figura 4)
Empuje el vidrio a la posición indicada por la flecha en
la Figura 5. Extraiga suavemente el vidrio del zócalo.
Después de sacar el vidrio interior, saque el
vidrio de la capa intermedia como se muestra
en la Figura 6.
Cuando se complete la limpieza, invierta los
procedimientos anteriores para devolver la puerta
a su posición original.
15˚
Figure 1
Figure 2
Figure 3
Figure 4
Figure 5
Figure 6
Cristal
Goma

LIMPIEZA Y MANTENIMIENTO
Para un buen aspecto y funcionamiento, debe de mantener el horno limpio. El moderno diseño
del horno facilita su mantenimiento, reduciéndolo al mínimo. Los elementos del horno que entren
en contacto con los alimentos deberán ser limpiados regularmente.
Antes de realizar cualquier tarea de limpieza o mantenimiento, desenchufe el horno.
Sitúe todos los mandos en posición OFF.
Espere a que el interior del horno se enfríe hasta estar ligeramente caliente; la limpieza es más
fácil si el horno está un poco caliente.
Limpie las superficies con un trapo, una esponja o un estropajo suave y húmedo, y a
continuación, séquelas con un trapo. En caso de que esté muy sucio, utilice agua caliente y un
producto de limpieza no abrasivo.
No utilice limpiadores abrasivos o rascadores metálicos afilados para limpiar el cristal del
horno, ya que podrían rallar la superficie y dañar el cristal.
Evite el contacto con sustancias ácidas ( zumo de limón, vinagre, etc...) con los elementos de
acero inoxidable.
No utilice un limpiador de alta presión para limpiar el horno.
Las bandejas para horno pueden lavarse con un detergente suave.
Este aparato electrodoméstico está etiquetado de acuerdo a la Directiva
europea 2012/19/EU de Residuos de Aparatos Eléctricos y Electrónicos.
Al garantizar el desechado correcto de este producto, ayudará a evitar
posibles consecuencias negativas para el medio ambiente y la salud
humana. Este símbolo en el producto indica que no debe desecharse junto
con los residuos domésticos. Debe ser depositado en un punto de recogida
de residuos destinado al reciclado de equipos eléctricos y electrónicos. Su
eliminación debe realizarse de acuerdo con la normativa legal de respeto
al medio ambiente. Para más información sobre el tratamiento, el reciclaje
y la recuperación de este producto, póngase en contacto con el
ayuntamiento o el servicio de recogida de basuras de su localidad o con el
comercio en el que adquirió el producto.
CERTIFICACION CE
Se ha determinado que este producto cumple con la Directiva de Baja Tension
(2006/95/EC), la Directiva de Compatibilidad Electromagnetica (2004/108/EC) y la Directiva
RoHS (2011/65/UE).
Para más información relacionada con las declaraciones y certificados de conformidad, póngase con nosotros
a través del correo [email protected] o en la web: www.infiniton.es
ES-11

HN-870N
Built-in Electric Oven
User Manual

ACKNOWLEDGMENT
Thank you for purchasing our product. We hope you enjoy using the many features and benefits it
provides. Before using this product please study this entire Instruction Manual carefully. Keep this
manual in a safe place for future reference. Ensure that other people using the product are familiar
with these instructions as well.
WARNING
When the oven is first switched on, it may give off
an unpleasant smell. This is due to the bonding
agent used for the insulating panels within the oven.
Please run up the new empty product with the
conventional cooking function, 250 ℃, 90 minutes
to clean oil impurities inside the cavity.
During the first use, it is completely normal that
there will be a slight smoke and odors. If it does
occur, you merely have wait for the smell to clear
before putting food into the oven.
Please use the product under the open environment.
The appliance and its accessible parts become hot
during use. Care should be taken to avoid touching
heating elements. Children less than 8 years of age
shall be kept away unless continuously supervised.
If the surface is cracked, switch off the appliance to
avoid the possibility of electric shock.
This appliance can be used by children aged from 8
years and above and persons with reduced
physical, sensory or mental capabilities or lack of
experience and knowledge if they have been given
2

supervision or instruction concerning use of the
appliance in a safe way and understand the
hazards involved. Children shall not play with the
appliance. Cleaning and user maintenance shall not
be made by children without supervision.
During use, the appliance becomes very hot. Care
should be taken to avoid touching heating elements
inside the oven.
Do not allow children to go near the oven when it is
operating, especially when the grill is on.
Ensure that the appliance is switched off before
replacing the oven lamp to avoid the possibility of
electric shock.
The means for disconnection must be incorporated
in the fixed wiring in accordance with the wiring
specifications.
Children should be supervised to ensure that they
do not play with the appliance.
This appliance is not intended for use by persons
(including children) with reduced physical, sensory
or mental capabilities, or lack of experience and
knowledge, unless they have been given
supervision or instruction concerning use of the
appliance by person responsible for their safety.
Accessible parts may become hot during use.
Young children should be kept away.
An all-pole disconnection means must be
incorporated in the fixed wiring in accordance with
the wiring rules.
3

If the supply cord is damaged, it must be replaced
by the manufacturer, its service agent or similarly
qualified persons in order to avoid a hazard.
Do not use harsh abrasive cleaners or sharp metal
scrapers to clean the oven door glass since they
can scratch the surface, which may result in
shattering of the glass.
A steam cleaner is not to be used.
The appliances are not intended to be operated by
means of an external timer or separate remote-
control system.
The instructions for ovens that have shelves shall
include details indicating the correct installations of
the shelves.
4

SAFETY HINTS
Do not use the oven unless you are wearing something on your feet. Do not touch the oven
with wet or damp hands or feet.
For oven: Oven door should not be opened often during the cooking period.
The appliance must be installed by an authorized technician and put into use. The producer is
not responsible for any damage that might be caused by defective placement, and installation
by unauthorized personnel.
When the door or drawer of oven is open do not leave anything on it, you may unbalance your
appliance or break the door.
Some parts of appliance may keep its heat for a long time; it is required to wait for it to cool
down before touching onto the points that are exposed to the heat directly.
If you will not use the appliance for a long time, it is advised to plug i off.
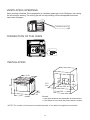
FITTING THE OVEN INTO THE KITCHEN UNIT
Fit the oven into the space provided in the kitchen unit; it may be fitted underneath a work top or into
an upright cupboard. Fix the oven in position by screwing into place, using the two fixing holes in the
frame. To locate the fixing holes, open the oven door and look inside. To allow adequate ventilation,
the measurements and distances adhered to when fixing the oven.
IMPORTANT
If the oven is to work properly, the kitchen housing must be suitable. The panels of the kitchen unit
that are next to the oven must be made of a heat resistant material. Ensure that the glues of units
that are made of veneered wood can withstand temperatures of at least 120 ºC. Plastics or glues
that cannot withstand such temperatures will melt and deform the unit, once the oven has been
lodged inside the units, electrical parts must be completely insulated. This is a legal safety
requirement. All guards must be firmly fixed into place so that it is impossible to remove them without
using special tools. Remove the back of the kitchen unit to ensure an adequate current of air
circulates around the oven. The hob must have a rear gap of at least 45 mm.
DECLARATION OF COMPLIANCE
When you have unpacked the oven, make sure that it has not been
damaged in any way. If you have any doubts at all, do not use it:
contact a professionally qualified person. Keep packing materials
such as plastic bags, polystyrene, or nails out of the reach of children
because these are dangerous to children.
5
t

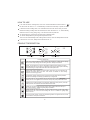
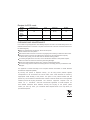
PRODUCT DESCRIPTION
Function Knob Timer knob Temperature Knob
HOW TO USE
6
Convention with fan: The top heating element and the bottom heating element are
working with fan. The appliance to be cooked is evenly and quickly cooked all around.
Symbol Function description
Oven Lamp: Which enables the user to observe the progress of cooking without opening
the door. Oven lamp will light for all cooking functions. except ECO function.
Conventional cooking: Heaters from the upper and the lower side uniformly heat the
exposed food. Baking and roasting is possible only at single level.
Bottom heater: Heat is applied only by the bottom side of the oven. Use this option for
browning the bottom side of the food. This function is suitable for slow cooking
recipes or for warming up meals.
Defrost: The circulation of air at room temperature enables quicker thawing of frozen
food (without the use of any heat). It's a gentle but quick way to speed up the defrosting
time and thawing of ready-made dishes and cream filled produce etc.
Grill-small: This cooking method is normal grilling, utilizing the inner part only of the top
heating element, which directs heat downwards onto the food.
Double grill: The inner heating element and the outer heating element in the top of
the oven are working . Suitable for grilling larger quantities.
Double grill with fan (at the rear panel): The inner heating element and the outer heating
element in the top of the oven are working with fan. It is suitable for grilling large
amount of meat.
",
If no need to set the cooking time, when turn counterclockwise the timer knob to "
the timer will not return to " 0 " automatically and the oven will keep in power-on state.
If need to set the cooking time, turn clockwise the timer knob to the time you need.
When the setting cooking time was reached, the timer will return to " 0 " automatically
with the sound of " Ding, Ding, Ding " and the oven will be power-off.
To set functions by turning the function knob to desired level.
To set the temperature by turning the temperature knob.
The oven will automatically start cooking after function, time and temperature are set.
If the oven is not in use, always set all the knobs to " 0 ".
For energy-saved cooking. Cooking the selected ingredients in a gentle manner, and the
heat comes from the top and the bottom.

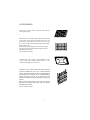
ACCESSORIES
7
Wire shelf : For grill, dishes, cake pan with items for
roasting and grilling.
Slider bracket : For cooking larger size food, these shelf
support rails on the right and left sides of the oven can
be removed, dishes and tray can be put on the oven
floor, using functions as Radiant grilling, Double grilling,
Double grill with fan.
NOTE: When placing dishes on the oven floor, please
DO NOT use functions with bottom heater to prevent
heat gathering at bottom.
(only for specific models)
Universal pan: For cooking large quantities of food
such as moist cakes, pastries, frozen food etc, or for
collecting fat/spillage and meat juices.
Telescopic runner: Some models might with telescopic
runners to facilitate the use of oven. These telescopic
runners and slider brackets could be disassembled by
unscrewing the screws used to fix it. After disassembled,
dishes and tray can be put on the oven floor, using
funcstions as Radiant grilling, Double grilling, Double grill
with fan.
NOTE: When placing dishes on the oven floor, please
DO NOT use functions with bottom heater to prevent
heat gathering at bottom.
(only for specific models)
8
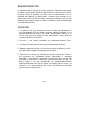
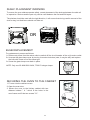
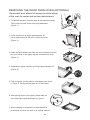
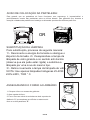
BULB REPLACEMENT
For replacement, process as follows:
1> Disconnect power from the mains outlet or switch off the circuit breaker of the unit's mains outlet.
2> Unscrew the glass lamp cover by turning it counter-clockwise (note, it may be stiff) and replace
the bulb with a new one of the same type.
3> Screw the glass lamp cover back in place.
NOTE: Only use 25-40W/220V-240V, T300°C halogen lamps.
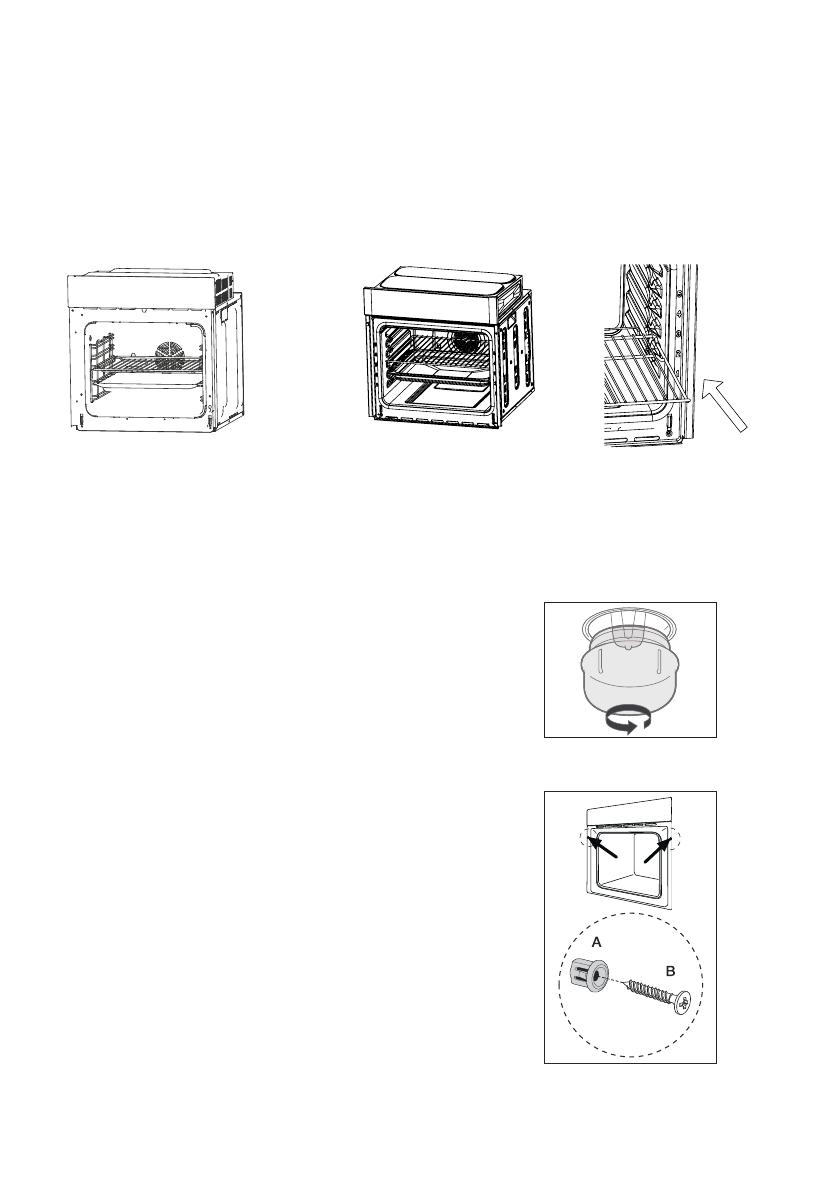
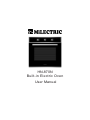
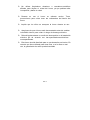
SECURING THE OVEN TO THE CABINET
1. Fit oven into the cabinet recess.
2. Open the oven door.
3. Secure the oven to the kitchen cabinet with two
distance holders " A " which fit the holes in the
oven frame and fit the two screws " B ".
SHELF PLACEMENT WARNING:
To ensure the oven shelves operate safely, correct placement of the shelves between the side rail
is imperative. Shelves and the pan only can be used between the first and fifth layers.
The shelves should be used with the right direction, it will ensure that during careful removal of the
shelf or tray, hot food items should not slide out.
OR
A página está carregando...
A página está carregando...
A página está carregando...
A página está carregando...
A página está carregando...
A página está carregando...
A página está carregando...
A página está carregando...
A página está carregando...
A página está carregando...
A página está carregando...
A página está carregando...
A página está carregando...
A página está carregando...
A página está carregando...
A página está carregando...
A página está carregando...
A página está carregando...
A página está carregando...
A página está carregando...
-
 1
1
-
 2
2
-
 3
3
-
 4
4
-
 5
5
-
 6
6
-
 7
7
-
 8
8
-
 9
9
-
 10
10
-
 11
11
-
 12
12
-
 13
13
-
 14
14
-
 15
15
-
 16
16
-
 17
17
-
 18
18
-
 19
19
-
 20
20
-
 21
21
-
 22
22
-
 23
23
-
 24
24
-
 25
25
-
 26
26
-
 27
27
-
 28
28
-
 29
29
-
 30
30
-
 31
31
-
 32
32
-
 33
33
-
 34
34
-
 35
35
-
 36
36
-
 37
37
-
 38
38
-
 39
39
-
 40
40


Infiniton HN-870N Manual do proprietário
- Categoria
- Fogões
- Tipo
- Manual do proprietário
em outras línguas
- español: Infiniton HN-870N El manual del propietario
- English: Infiniton HN-870N Owner's manual
Artigos relacionados
Outros documentos
-
EAS ELECTRIC EMV70DGN Manual do usuário
-
Jocel JFE014610 Manual do usuário
-
Jocel JFE014658 Manual do usuário
-
CORBERO CCSF503VW Manual do usuário
-
-
Jocel JFE014641 Manual do usuário
-
Indesit KN6C61A(W)/P Guia de usuario
-
Daewoo KBE-U6RC Manual do proprietário
-
-
Miele H 2265-1 B Instruções de operação