
NODE-BT SOLAR PANEL
INSTALLATION GUIDE
SP-NODE-BT
NODE-BT Solar Panel

2
➊
➋
➍
➌
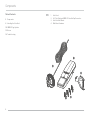
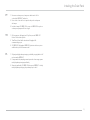
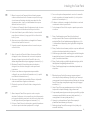
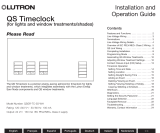
EN 1. Solar Panel
2. 40' (12 m) Cable and NODE-BT Solar End Cap Connection
3. Solar Panel Ball Mount
4. Wall-Mount Hardware
Components
Table of Contents
2 Components
4 Installing the Solar Panel
10 NODE-BT App Updates
12 Notices
14 Troubleshooting

3
IT
PT
TR
PL
DE
ES
FR
1. Pannello Solare
2. Cavo da 12 m e coperchio con connessione per pannello
solare NODE-BT
3. Supporto a sfera per pannello solare
4. Hardware per il montaggio a parete
1. Painel Solar
2. Cabo de 12 m (40 pés) e conexão de tampa solar do NODE-BT
3. Suporte articulado para painel solar
4. Equipamento de montagem na parede
1. Güneş Paneli
2. 40' (12 m) Kablo ve NODE-BT Güneş Paneli Alt Kapağı Bağlantısı
3. Güneş Paneli Küresel Montajı
4. Duvara Montaj Donanımı
1. Panel Słoneczny
2. Kabel 12 m (40') i nakładka NODE-BT Solar
3. Mocowanie kulkowe do panelu słonecznego
4. Osprzęt do montażu na ścianie
1. Solarpanel
2. 12 m (40') Kabel und NODE-BT Solar-Anschlusskappe
3. Solarpanel Montagegelenk
4. Zubehör zur Wandmontage
1. Panel Solar
2. Cable de 40' (12 m) y conexión de tapa de solar del NODE-BT
3. Soporte esférico para panel solar
4. Accesorios de montaje en pared
1. Panneau Solaire
2. Câble de 12 m (40') et raccord à capuchon d'extrémité solaire
NODE-BT
3. Fixation articulée pour panneau solaire
4. Accessoires de xation
Components

4
+
+
EN
DE
FR
IT
ES
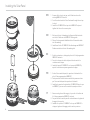
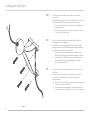
1. Remove the lock nut, end cap, and 9 V batteries from the
existing NODE-BT Controller.
2. Feed the entire bundle of Solar Panel wire through the end cap
lock nut.
3. Install the SP-NODE-BT end cap in the NODE-BT body and
tighten the lock nut to secure in place.
1. Entfernen Sie den Schraubring, die Kappe des Batteriefachs
und die 9-V-Batterien des NODE-BT Steuergeräts.
2. Führen Sie das gesamte Kabelbündel des Solarmoduls durch
den Schraubring.
3. Installieren Sie die SP-NODE-BT Anschlusskappe am NODE-BT
Gehäuse und ziehen Sie den Schraubring fest.
1. Retirez l'écrou autobloquant, le capuchon d'extrémité et les
piles 9 V du programmateur NODE-BT.
2. Faites passer la totalité du faisceau de ls du panneau solaire
par l'écrou autobloquant du capuchon d'extrémité.
3. Installez le capuchon d'extrémité du SP-NODE-BT dans le corps
du NODE-BT, puis serrez l'écrou autobloquant pour le xer.
1. Rimuovere la ghiera di bloccaggio, il coperchio e le batterie da
9 V dal programmatore NODE-BT esistente.
2. Far passare tutti i cavi del pannello solare attraverso la ghiera di
ssaggio del coperchio.
3. Installare il coperchio SP-NODE-BT sul corpo del NODE-BT e
stringere la ghiera di ssaggio per bloccarlo in posizione.
1. Retire la contratuerca, la tapa y las pilas de 9 V del programador
NODE-BT existente.
2. Pase todo el mazo de cables del panel solar a través de la
contratuerca de la tapa.
3. Instale la tapa del SP-NODE-BT en el cuerpo del NODE-BT y
apriete la contratuerca para asegurarla en su lugar.
Installing the Solar Panel

5
PT
TR
1. Remova a contraporca, a tampa e as baterias de 9 V do
controlador NODE-BT existente.
2. Passe todo o feixe de os do painel solar pela contraporca
da tampa.
3. Instale a tampa SP-NODE-BT no corpo do NODE-BT e aperte a
contraporca para prendê-la no lugar.
1. Kilit somununu, alt kapağı ve 9 V pilleri; mevcut NODE-BT
Kontrol Ünitesinden çıkarın.
2. Tüm Güneş Paneli kablo demetini alt kapağın kilit
somunundan geçirin.
3. SP-NODE-BT alt kapağını NODE-BT gövdesine takın ve yerine
sabitlemek için kilit somununu sıkın.
Installing the Solar Panel
PL 1. Zdejmij nakrętkę zabezpieczającą, nakładkę i wyjmij baterie 9 V
ze sterownika NODE-BT.
2. Przeprowadź całą wiązkę przewodu panelu słonecznego przez
nakrętkę zabezpieczającą nakładkę.
3. Zamontuj nakładkę SP-NODE-BT w korpusie NODE-BT i dokręć
nakrętkę zabezpieczającą, aby zabezpieczyć całość.

6
EN
DE
ES
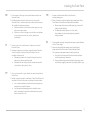
1. Feed the red and black wires up through the Solar Panel
ball mount.
2. Install the ball mount where the Solar Panel will be located. The
Solar Panel ball mount can be installed in multiple ways:
a. Use the four included screws and anchors for drilling into a
wall or at surface.
b. Use hose clamps or zip ties to attach to any round surface
(e.g., pole, post, stake, pipe).
1. Führen Sie den roten und den schwarzen Draht durch das
Montagegelenk des Solarpanels.
2. Installieren Sie das Montagegelenk dort, wo das Solarpanel
angebracht werden soll. Das Solarpanel-Montagegelenk kann
auf verschiedene Arten montiert werden:
a. Verwenden Sie die vier mitgelieferten Schrauben und
Dübel zum Anbringen an einer Wand oder ebenen Fläche.
b. Verwenden Sie Schlauchklemmen oder Kabelbinder zur
Befestigung an jeder runden Oberäche (z. B. Mast,
Pfosten, Erdspieß, Rohr).
1. Pase los cables rojo y negro a través del soporte esférico del
Panel Solar.
2. Instale el soporte esférico donde se ubicará el Panel Solar.
El soporte esférico del Panel Solar se puede instalar de
varias maneras:
a. Utilice los cuatro tornillos y anclajes incluidos para taladrar
en una pared o supercie plana.
b. Use abrazaderas para mangueras o bridas para unirlas a
cualquier supercie redonda (p. ej., poste, estaca, tubería).
Installing the Solar Panel

7
IT
PT
FR
1. Passe os os vermelho e preto através do suporte articulado do
Painel Solar.
2. Instale o suporte articulado onde cará o Painel Solar. O suporte
articulado do Painel Solar pode ser instalado de várias formas:
a. Use os quatro parafusos e buchas incluídos para perfurar
uma parede ou superfície plana.
b. Use abraçadeiras para mangueira ou de plástico para
xá-lo em qualquer superfície arredondada (como poste,
haste, estaca, tubo, etc.).
1. Passare i cavi rossi e neri attraverso il supporto a sfera del
Pannello Solare.
2. Installare il supporto a sfera dove sarà posizionato il Pannello
Solare. Il supporto a sfera per Pannelli Solari può essere
installato in diversi modi:
a. Utilizzare le quattro viti e i tasselli inclusi per ssarlo ad
una parete o ad una supercie piana.
b. Utilizzare delle fascette per ssarlo a qualsiasi supercie
rotonda (ad es. palo, paletto, tubo).
1. Faites passer les ls rouge et noir par la xation articulée du
Panneau Solaire.
2. Installez la xation articulée à l'endroit où se trouvera le
Panneau Solaire. La xation articulée du Panneau Solaire peut
être installée de plusieurs manières :
a. Utilisez les quatre vis et chevilles incluses pour percer un
mur ou une surface plane.
b. Utilisez les colliers de serrage ou les attaches en plastique
sur une surface arrondie (ex : poteau, mât, piquet,
canalisation).
Installing the Solar Panel
TR 1. Kırmızı ve siyah kabloları Güneş Paneli küresel
montajından geçirin.
2. Güneş Panelinin yerleştirileceği küresel montajı kurun. Güneş
Paneli küresel montajı birden fazla şekilde kurulabilir:
a. Duvara veya düz bir yüzeye delik açmak için, verilen dört
vidayı ve dübeli kullanın.
b. Herhangi bir yuvarlak yüzeye (ör. direk, kazık,
boru) takmak için hortum kelepçeleri veya plastik
kelepçe kullanın.
PL 1. Przeprowadź czerwony i czarny przewód przez uchwyt kulkowy
Panelu Słonecznego.
2. Zamontuj uchwyt kulkowy w miejscu, w którym będzie
znajdował się Panel Słoneczny. Uchwyt kulkowy Panelu
Słonecznego można zamontować na wiele sposobów:
a. Użyj czterech dołączonych śrub i kotew do wiercenia w
ścianie lub płaskiej powierzchni.
b. Użyj zacisków lub opasek zaciskowych, aby przymocować
do dowolnej okrągłej powierzchni (np. słupka, palika, rury).

8
Installing the Solar Panel
EN
DE
ES
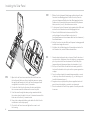
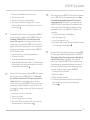
1. Open the Solar Panel cover and attach the Solar Panel over
the ball mount. Make sure the red and black wires are coming
through the ball mount into the Solar Panel housing and have
enough slack to reach the (+) and (–) terminals.
2. Position the Solar Panel in the desired location and tighten
three screws around the ball mount to secure it in place.
3. Feed the wires through the waterproof grommet and attach
the red wire from the cable to the red (+) terminal screw and the
black wire to the black (–) terminal screw.
4. Ensure the rechargeable battery pack within the Solar Panel is
installed and connected properly.
5. Close the Solar Panel cover and tighten the screw to seal
the housing.
1. Önen Sie die Solarpanel-Abdeckung und befestigen Sie das
Panel auf dem Montagegelenk. Stellen Sie sicher, dass die
roten und schwarzen Drähte durch das Montagegelenk in das
Gehäuse des Solarmoduls führen und ausreichend Spielraum
haben, um die (+) und (–) Anschlüsse zu erreichen.
2. Positionieren Sie das Solarpanel an der gewünschten Stelle und
ziehen Sie drei Schrauben um das Montagegelenk fest.
3. Führen Sie die Drähte durch die wasserdichte Tülle
und befestigen Sie das rote Kabel an der roten (+)
Anschlussklemme und das schwarze Kabel an der schwarzen (–)
Anschlussklemme.
4. Stellen Sie sicher, dass der Akku im Solarpanel ordnungsgemäß
installiert und angeschlossen ist.
5. Schließen Sie die Abdeckung des Solarmoduls und ziehen Sie
die Schraube fest, um das Gehäuse abzudichten.
1. Abra la cubierta del panel solar y coloque el Panel Solar sobre el
soporte esfércio. Asegúrese de que los cables rojo y negro pasen
por el soporte esférico hacia la carcasa del Panel Solar y que
tengan suciente holgura para llegar a los terminales (+) y (–).
2. Coloque el Panel Ssolar en la ubicación deseada y apriete los
tres tornillos alrededor del soporte esférico para asegurarlo en
su lugar.
3. Pase los cables a través de la arandela impermeable y conecte
el cable rojo al tornillo del terminal rojo (+), y el cable negro al
tornillo del terminal negro (–).
4. Asegúrese de que el paquete de pilas recargables dentro del
panel solar esté instalado y conectado correctamente.
5. Cierre la cubierta del Panel Solar y apriete el tornillo para sellar
la carcasa.

9
Installing the Solar Panel
FR 1. Ouvrez le couvercle du Panneau Solaire et xez le panneau
solaire sur la xation articulée. Assurez-vous que les ls rouge
et noir traversent la xation articulée jusque dans le boîtier
du panneau solaire, et qu'ils ont susamment de mou pour
atteindre les bornes (+) et (–).
2. Positionnez le Panneau Solaire à l'emplacement voulu, et serrez
les trois vis autour de la xation articulée pour tout xer.
3. Insérez les ls dans le passe-câble étanche, et connectez le l
rouge à la vis de la borne (+) rouge, puis le l noir à la vis de la
borne (–) noire.
4. Assurez-vous que le bloc-batterie rechargeable du Panneau
Solaire est bien installé et connecté.
5. Fermez le couvercle du panneau solaire et serrez les vis pour
sceller le boîtier.
IT
PT
1. Aprire il coperchio del Pannello Solare e ssare quest'ultimo
sul supporto a sfera. Assicurarsi che i cavi rossi e neri passino
attraverso il supporto a sfera no al Pannello Solare e che
abbiano lunghezza suciente per raggiungere i terminali (+) e (-).
2. Orientare il Pannello Solare nella posizione desiderata e
stringere le tre viti intorno al supporto a sfera per ssarlo
in posizione.
3. Passare i cavi attraverso la guarnizione impermeabile e
collegare il cavo rosso alla vite del terminale rosso (+) e quello
nero alla vite del terminale nero (–).
4. Assicurarsi che la batteria ricaricabile all'interno del pannello
solare sia installata e collegata correttamente.
5. Chiudere il coperchio del Pannello Solare e stringere la vite
per ssarlo.
1. Abra a tampa do Painel Solar e prenda-o sobre o suporte
articulado. Verique se os os vermelho e preto estão passando
pelo suporte articulado, para dentro do invólucro do painel solar
e se há folga suciente para chegar aos terminais (+) e (–).
2. Coloque o Painel Solar no local desejado e aperte três parafusos
ao redor do suporte articulado para prendê-lo no lugar.
TR 1. Güneş Paneli kapağını açın ve Güneş Panelini küresel
montajın üzerine takın. Kırmızı ve siyah kabloların küresel
montajdan Güneş Paneli muhafazasına geldiğinden ve (+) ile
(–) terminallerine ulaşmak için yeterli gevşeklikte olduğundan
emin olun.
2. Güneş Panelini istenen konuma yerleştirin ve yerine sabitlemek
için küresel montajın etrafındaki üç vidayı sıkın.
3. Kabloları su geçirmez halka contadan geçirin ve kablodan gelen
kırmızı kabloyu kırmızı (+) terminal vidasına, siyah kabloyu da
siyah (–) terminal vidasına takın.
4. Güneş Paneli içindeki şarj edilebilir pil paketinin doğru şekilde
takıldığından ve bağlandığından emin olun.
5. Güneş Paneli kapağını kapatın ve muhafazayı kapatmak için
vidayı sıkın.
PL 1. Otwórz pokrywę Panelu Słonecznego i przymocuj panel
słoneczny do uchwytu kulkowego. Upewnij się, że czerwony i
czarny przewód przechodzą przez uchwyt kulkowy do obudowy
Panelu Słonecznego i mają wystarczający luz, aby dosięgnąć
zacisków (+) i (-).
2. Umieść Panel Słoneczny w wybranym miejscu i dokręć trzy
śruby wokół uchwytu kulkowego, aby go zamocować.
3. Przeprowadź przewody przez wodoodporną przelotkę i podłącz
czerwony przewód kabla do czerwonej śruby zacisku (+), a
czarny przewód do czarnej śruby zacisku (-).
4. Upewnij się, że akumulator w Panelu Słonecznym jest
prawidłowo zainstalowany i podłączony.
5. Zamknij pokrywę Panelu Słonecznego i dokręć śrubę, aby
uszczelnić obudowę.
3. Passe os os pelo anel impermeável e conecte o o vermelho
do cabo ao parafuso do terminal vermelho (+) e o o preto ao
parafuso do terminal preto (–).
4. Conrme se a bateria recarregável está instalada e conectada
corretamente dentro do painel solar.
5. Feche a tampa do Painel Solar e aperte o parafuso para vedar
o invólucro.

10
NODE-BT App Updates
EN
DE
ES
FR
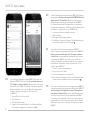
To use the Solar Panel with an existing NODE-BT Controller, rst
update the NODE-BT Bluetooth® App. You must have app version
5.1.0 or higher to use the Solar Panel. Once updated, open the app
and connect to your NODE-BT Controller. You may be prompted to
update the rmware to the controller. Once the rmware update
completes, designate the system as “Solar Powered” for
the NODE-BT:
1. Scan and Connect to the controller.
2. Select More icon.
3. Select Controller Settings.
4. Toggle the Solar Powered button on. The Dashboard battery
icon will now be changed to a Solar battery icon .
Um das Solarpanel mit einem vorhandenen NODE-BT Steuergerät
zu verwenden, aktualisieren Sie zunächst die NODE-BT Bluetooth-
App auf Version 5.1.0 oder höher. Önen Sie die App nach der
Aktualisierung und stellen eine Verbindung zu Ihrem NODE-BT
her. Möglicherweise werden Sie aufgefordert, die Firmware des
Steuergeräts zu aktualisieren. Sobald dieses Update abgeschlossen
ist, wählen Sie „Solarbetrieb“ für dieses NODE-BT aus:
1. Scannen und mit dem Steuergerät verbinden.
2. „Mehr“ anklicken.
3. Steuergerät-Einstellungen auswählen.
4. Schaltäche „Solarbetrieb“ aktivieren. Im Dashboard wechselt
nun das Batteriesymbol in ein Solarsymbol .
Para utilizar el Panel Solar con un programador NODE-BT
existente, primero actualice la aplicación Bluetooth del NODE-BT.
Debe tener la versión de la aplicación 5.1.0 o superior para usar
el Panel Solar. Una vez actualizada, abra la aplicación y conéctese
a su programador NODE-BT. Es posible que se le solicite que
actualice el rmware del programador. Una vez que se complete
la actualización del rmware, designe el sistema como "Solar
Powered" para el NODE-BT:
1. Escanee y conéctese al programador.
2. Seleccione el ícono de "más".
3. Seleccione Conguración del programador.
4. Active el botón de Energía Solar. El ícono de la batería del panel
de control ahora se cambiará a un ícono de batería Solar .
Pour utiliser le Panneau Solaire avec un programmateur NODE-BT,
commencez par mettre à jour l'application Bluetooth du NODE-BT.
Vous devez disposer de l'application version 5.1.0 ou supérieure
pour utiliser le Panneau Solaire. Une fois l'application mise à jour,
ouvrez-la et connectez-vous à votre programmateur NODE-BT.
Il se peut que vous soyez invité à mettre à jour le micrologiciel du
programmateur. Une fois la mise à jour du micrologiciel eectuée,
dénissez le système comme "alimenté à l'énergie solaire" pour le
NODE-BT :

11
NODE-BT App Updates
IT
PT
Per utilizzare il Pannello Solare con un programmatore NODE-BT
esistente, per prima cosa, aggiornare l'app NODE-BT Bluetooth.
Per utilizzare il Pannello Solare, è necessario disporre della
versione 5.1.0 o superiore. Una volta aggiornata, aprire l'app e
collegarsi al proprio programmatore NODE-BT. Verrà richiesto di
aggiornare il rmware del programmatore. Una volta completato
l'aggiornamento del rmware, designare il sistema di NODE-BT
come "Alimentazione Solare".
1. Eseguire la scansione e collegarsi al programmatore.
2. Selezionare l'icona Altro.
3. Selezionare Impostazioni del programmatore.
4. Attivare il pulsante Alimentazione Solare. L'icona della batteria
del Pannello di controllo verrà quindi cambiata nell'icona della
batteria dell'Alimentazione Solare .
Para usar o Painel Solar com um controlador NODE-BT já existente,
primeiro atualize o aplicativo NODE-BT Bluetooth. É necessário
que o aplicativo esteja na versão 5.1.0 ou mais recente para usar
o Painel Solar. Quando estiver atualizado, abra o aplicativo e
conecte-se ao seu controlador NODE-BT. Talvez você receba uma
solicitação para atualizar o rmware do controlador. Nesse caso,
após atualizá-lo, congure o sistema como "Movido a energia solar"
para p NODE-BT:
1. Faça a busca e conecte-o ao controlador.
2. Selecione o ícone Mais.
3. Selecione "Congurações do controlador".
4. Ative o botão "Movido a energia Solar". O ícone da bateria do
painel mudará para o ícone de bateria Solar .
TR Güneş Panelini mevcut bir NODE-BT Kontrol Ünitesi ile kullanmak
için önce NODE-BT Bluetooth Uygulamasını güncelleyin. Güneş
Panelini kullanmak için uygulama sürümü 5.1.0 veya üzerine
sahip olmanız gerekir. Güncellendikten sonra uygulamayı açın
ve NODE-BT Kontrol Ünitesine bağlanın. Ürün yazılımını kontrol
ünitesine güncellemeniz istenebilir. Ürün yazılımı güncellemesi
tamamlandıktan sonra, sistemi NODE-BT için "Güneş Enerjili"
olarak atayın:
1. Kontrol Ünitesini Tarayın ve cihaza Bağlanın.
2. Daha Fazla simgesini seçin.
3. Kontrol Ünitesi Ayarları'nı seçin.
4. Güneş Enerjili düğmesini açın. Gösterge Panelindeki pil simgesi,
bir Solar pil simgesi olarak değiştirilir .
PL Aby używać Panelu Słonecznego z obecnym sterownikiem NODE-
BT, należy najpierw zaktualizować aplikację Bluetooth NODE-BT.
Aby korzystać z Panelu Słonecznego, musisz posiadać aplikację
w wersji 5.1.0 lub nowszej. Po aktualizacji, otwórz aplikację i
połącz się ze sterownikiem NODE-BT. Możesz otrzymać prośbę
o zaktualizowanie oprogramowania układowego sterownika. Po
zakończeniu aktualizacji oprogramowania sprzętowego oznacz
system jako „Zasilany energią słoneczną” dla NODE-BT:
1. Zeskanuj i podłącz do sterownika.
2. Wybierz ikonę Więcej.
3. Wybierz Ustawienia sterownika.
4. Przełącz przycisk Zasilanie energią Słoneczną na WŁ. Ikona
baterii na pulpicie zostanie zmieniona na ikonę baterii
Słonecznej .
1. Détectez le programmateur et connectez-vous-y.
2. Sélectionnez l'icône Plus.
3. Sélectionnez Paramètres du programmateur.
4. Activez le bouton Alimenté à l'énergie solaire. L'icône de
batterie du tableau de bord se transformera alors en icône de
batterie Solaire .

12
Batteries should be recycled or disposed of
separately from household waste and according to
local environmental laws and guidelines.
Batterien müssen getrennt vom Hausmüll und
gemäß den örtlichen Umweltgesetzen und
-richtlinien recycelt oder entsorgt werden.
Las pilas deben reciclarse o eliminarse por separado
de los residuos domésticos y de acuerdo con las
leyes y directrices medioambientales locales.
Les batteries ne doivent pas être recyclées ou
mises au rebut avec les ordures ménagères, mais
conformément aux législations et directives
environnementales locales.
Le batterie devono essere riciclate o smaltite
separatamente dai riuti domestici e in base alle
leggi e le linee guida ambientali locali.
As baterias devem ser recicladas ou descartadas
separadamente do lixo doméstico, de acordo com as
leis e diretrizes ambientais locais.
Piller, evsel atıklardan ayrı olarak ve yerel çevre
yasaları ile yönergelerine göre geri dönüştürülmeli
veya atılmalıdır.
Baterie powinny być poddawane recyklingowi lub
być utylizowane oddzielnie od odpadów domowych,
zgodnie z lokalnymi przepisami i wytycznymi
dotyczącymi ochrony środowiska.
Notices
EN
DE
ES
FR
IT
PT
TR
PL

13
hunter.help/NODEBT
Scan to access helpful information about your product, including installation tips,
controller programming, and more.
Troubleshooting
SCAN
for help

14
Notes

15
Notes

HUNTER INDUSTRIES | Built on Innovation®
1940 Diamond Street, San Marcos, CA 92078 USA
hunterindustries.com
© 2023 Hunter Industries Inc. Hunter, the Hunter logo, and other
marks are trademarks of Hunter Industries Inc., registered in the
U.S. and certain other countries. Please recycle.
Helping our customers succeed is what drives us. While our passion for innovation and engineering
is built into everything we do, it is our commitment to exceptional support that we hope will keep you
in the Hunter family of customers for years to come.
Denise Mullikin, President,
Landscape Irrigation and Outdoor Lighting
RC-108-IG MULTI 7/23
-
 1
1
-
 2
2
-
 3
3
-
 4
4
-
 5
5
-
 6
6
-
 7
7
-
 8
8
-
 9
9
-
 10
10
-
 11
11
-
 12
12
-
 13
13
-
 14
14
-
 15
15
-
 16
16


em outras línguas
- español: Hunter NODE-BT Guía de instalación
- français: Hunter NODE-BT Guide d'installation
- italiano: Hunter NODE-BT Guida d'installazione
- polski: Hunter NODE-BT Instrukcja instalacji
- Türkçe: Hunter NODE-BT Yükleme Rehberi
Artigos relacionados
Outros documentos
-
Blackmagic DaVinci Advanced Panel Keycaps Installation Manual do usuário
-
SICK MLG-2 ProNet Automation light grid Quickstart
-
Corsair iCUE 220T Manual do usuário
-
-
Bluesound Node Quick Setup Manual
-
Bluesound Node 2 Guia de instalação rápida
-
 Lutron Electronics QS Timeclock Quick Installation And Operation Manual
-
-
 Lutron Electronics QS Timeclock Instruções de operação
-
AVENTICS Series 501 Pneumatic Valve System - Cabinet Mounting - ATEX Manual do proprietário

