
MANUAL DE INSTRUCCIONES
MONTAJE, INSTALACIÓN, PUESTA EN
MARCHA Y FUNCIONAMIENTO
MANUEL D’INSTRUCTIONS
MONTAGE, INSTALLATION, MISE EN
MARCHE ET FONCTIONNEMENT
BEDIENUNGSANLEITUNG
MONTAGE, ANBRINGUNG, INBETRIEBNAHME
UND FUNKTIONSWEISE
MANUAL DE INSTRUÇÕES
MONTAGEM, INSTALAÇÃO, LIGAÇÃO
E FUNCIONAMENTO
INSTRUCTIONS MANUAL
MOUNTING, INSTALLATION,
STARTING AND OPERATION

2
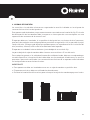
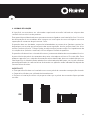
This user’s manual will guarantee you many years of use. Please read it carefully
before using the heated towel raid and keep it in a safe place for future reference.
The correct operation of the heated towel raid shall mean a significant energy
saving.
Este manual de usuario es para garantizarle muchos años
de uso. Léalo detalladamente antes de utilizar el secatoallas y guárdelo en
un lugar seguro, le será de utilidad para cualquier consulta.
El perfecto manejo del secatoallas se convertirá en un importante ahorro
energético.
Ce mode d’emploi vous est délivré pour garantir de longues
années d’utilisation. Lisez-le atttentivement avant de mettre en marche le
sèche-serviettes et conservez-le, il pourra être utile à tout moment.
Une utilisation adaptée du sèche-serviette garantira d’importantes économies
d’énergie.
Este manual de utilizador garante-lhe uma utilização por muito tempo.
Leia-o detalhadamente antes de utilizar o seca toalhas e guarde-o num lugar
seguro, utilizando-o em qualquer consulta.
O manuseamento completo do seca toalhas torna-se numa importante poupança de
energia.
Dieses Handbuch soll Ihnen eine langjährige Nutzungsdauer
garantieren. Lesen Sie es vor der Benutzung des Handtuchtrockners genau durch
und bewahren Sie es an einem sicheren Ort auf, um es bei Bedarf zu Rate zu
ziehen.
Der richtige Gebrauch des Handtuchtrockners bedeutet maximale
Energieeinsparung.

3
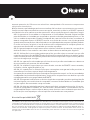
ENGLISH
TABLE OF CONTENTS
1. Description of the T Series Towel Rail ..................................................................................... 4
1.1. Front Panel Parts ............................................................................................................... 4
1.2. Switching On & Off (stand-by) ...........................................................................................5
1.3. Setting the day and time ....................................................................................................6
1.4. Locking the Control Panel ................................................................................................. 6
1.5. Selection of Temperature .................................................................................................. 6
1.6. Manual/Automatic Mode .................................................................................................... 6
1.7. Two-hour Boost Mode (2H) ................................................................................................ 6
1.8. Open window function .................................................................................................. 7
1.9. Screen brightness function................................................................................................ 7
2. Programming the T Series Towel Rail ..................................................................................... 8
2.1. Adjusting the time and day .................................................................................................8
2.2. Programming the towel rail .............................................................................................. 8
3. Mounting Instructions ............................................................................................................ 10
4. Connecting Instructions ......................................................................................................... 12
4.1. Specific Regulations for Bathrooms ............................................................................... 13
5. Maintenance & Cleaning ......................................................................................................... 13
5.1. Safety ................................................................................................................................ 13
6. Guarantee ................................................................................................................................ 13

4
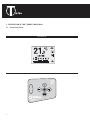
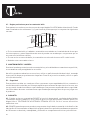
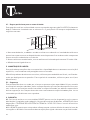
1. DESCRIPTION OF THE T SERIES TOWEL RAIL
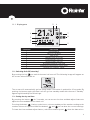
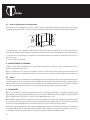
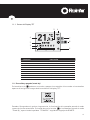
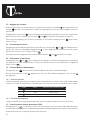
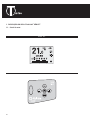
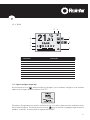
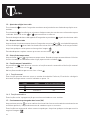
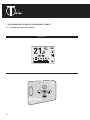
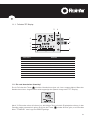
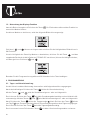
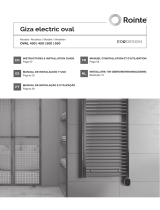
1.1. Front Panel Parts

5
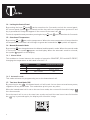
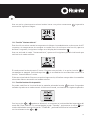
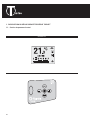
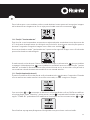
1.2. Switching On & Off (stand-by)
By pressing the key , we switch the towel rail on or off.The following image will appear on
the screen when switched on:
The screen will automatically go into sleep mode if no button is pushed for 10 seconds. By
pushing the button again the towel rail will go into standby mode with the word “Standby”
appearing followed by the Rointe logo.
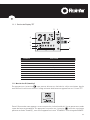
1.3. Setting the day and time
By pressing the button for 3 seconds, we can access the time and date adjust feature to
adjust the time and date of our towel rail.
Pressing the button , flashes up the hours, minutes and days of the week according to the
number of times it is pressed. With the buttons and we can alter the current settings.
To leave the time and date adjust feature, wait 30 seconds or press after the date select.
3
7
4
2
5 6
1
9
8
1 PROGRAMMING
2 DAYS OF THE WEEK
3 TIME OF DAY
4 TEMPERATURE SELECTED
5 OPEN WINDOW FUNCTION
6 HEATED TOWEL RAIL ON
7 AUTOMATIC/MANUAL FUNCTION
8 COMFORT/ECONOMY/ANTI-FROST MODE
9 LOCKING THE CONTROL PANEL

6
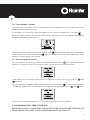
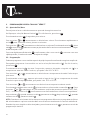
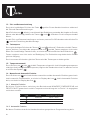
1.4. Locking the Control Panel
By pressing the keys and at the same time for 3 seconds, we lock the control panel,
the control panel symbol is activated, and the keys will not respond when pressed. If one
key is pressed this image will appear in the screen of the towel rail:
To unlock, repeat the same procedure pressing the keys and at the same time for 3 seconds.
1.5. Selection of Temperature
By pressing or we set the temperature. When the room temperature is lower than the
set temperature, the towel rail will begin to generate heat and the symbol will appear.
1.6. Manual/Automatic Mode
By pressing we change between the Manual and Automatic mode. When the manual mode
is selected,
the symbol appears on the display. When the automatic mode is selected,
the symbol appears on the display.
This enables to choose between the modes of operation COMFORT, ECO and ANTI-FROST,
changing the temperature as indicated in Section 1.5.
This mode activates the programming set on the heated towel rail.
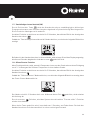
1.7. Two-hour Boost Mode (2H)
By pressing the key , the heated towel rail will work for two hours at maximum power,
regardless of any other mode. This mode takes priority over any other.
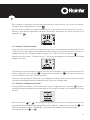
When the heated towel rail is set on the two-hour mode, the screen will show this image:
for a few seconds.
Once the towel rail is set on the two-hour mode, and until the two hours have finished or
the key is pressed again, the display will show this image:
SYMBOL MODE TEMPERATURE RANGE
COMFORT 20ºC TO 30ºC
ECO 15ºC TO 19.5ºC
ANTI-FROST 8ºC

7
1.8. “Open Window” function
This function is activated when the probe detects a reduction of 4º in respect of the set
temperature during 30 minutes.
On activation, the following image will appear on the towel rail display for 5 seconds:
When the “Open window” function is activated, the following screen will appear showing that
the anti-frost mode is activated:
This function will be active for 2 hours. If the button is pushed during this period the towel
rail will switch off. Pushing the button again will switch on the towel rail without the “Open
window” function being switched on.
1.9. Screen brightness function
You can change the brightness of the screen by pushing the button for 3 seconds when the
product is in manual mode. Entering this mode you will see the following screen:
In ON mode you can increase or decrease the brightness of the screen by using the and
buttons.
You can change the “Standby” mode brightness by pushing the button to move the frame to the
“STAND-BY” position. You can then adjust the brightness by pushing the same and keys.
To finish the programming wait for 10 seconds without pressing any buttons.
2. PROGRAMMING THE T SERIES TOWEL RAIL

8
2.1. Adjusting the time and day
In order to adjust the time and day of the week, please follow the steps below. First we choose
the hour, then the minutes, then the day of the week:
To enter the time and day adjust mode, press and hold for 3 seconds the button.The hours
will start flashing.
Select the hour using the and buttons to move the hour up or down.
Press once and the minutes will start to flash.
In the same way as with the hours, use and to increase or decrease the minutes to
select the correct time.
Once the minutes are correct press again so that the day flashes.
This represents Monday. With the button we can advance through to day 2 (Tuesday), day
3 (Wednesday) etc. until we reach the required day. Press again to confirm the day and to
leave the time and date adjust mode.
2.2. Programming the towel rail
It is possible to programme the towel rail using the control panel.
In order to start the programming please ensure that the screen shows automatic mode with
the symbol .
If the screen shows an symbol, please press the button to change modes.
By pressing and holding for 3 seconds the button we enter programming mode.
The first thing you will see is the sun symbol flashing, representing the comfort mode. The
comfort mode temperature will also be displayed.
Using the and buttons we can increase and decrease the temperature desired within
the comfort mode, from 20ºC to 30ºC.
This temperature will be applied later when programming an hour with the comfort mode setting.
Once the comfort mode temperature is selected, press the button so that the moon symbol
appears flashing. This symbol represents the economy (eco) mode. The economy mode
temperature will also be displayed.
Using the and buttons we can increase or decrease the eco mode temperature, from
15ºC to 19,5ºC. The selected temperature will be applied later when programming an hour
with the eco mode setting.
Next we press the button to move to selecting the days of the week that we wish to program
from (Monday) to (Sunday). These numbers will initially be flashing and they will also be
represented by Sel1, Sel2, Sel3,... etc.
Pressing the on/off button will select a day, which will stop flashing.

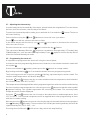
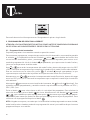
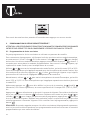
1
2
3
4
5
6
6
7
8
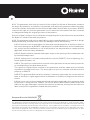
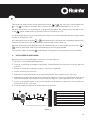
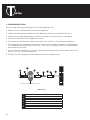
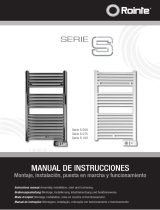
10 mm Rawl Plug
Plastic Fastener
Screw 2.9 x 9.5 mm
Screw 6.3 x 50 mm
Plastic Fastener
Profile of Heated Towel Rail
Screw 3/8” x 40 mm
Cover
Cross section of the towel rail
9
To select another day to be programmed, use and to change the day (we can move
directly from day to day and day to day , if required) and select each day by pressing
the on/off button so that it stops flashing.
Repeat this until all the days you wish to be programmed have stopped flashing.
Once you are ready, we can move on to programming hour by hour by pressing the button.
At this stage, it is possible that you have programmed the towel rails previously and
you are now changing the programming. When the days selected have different programming,
they will all change by default to the programming of the last day selected, which also happens
when programming with the remote control.
From the numbers we can see the selected hour in 24 hour display (0h is midnight, 01h, 02h,...).
On the hourly programming bar at the bottom of the screen you will see the programming
for the whole day and the selected hour flashing.
Use the button to change between COMFORT ( symbol), ECO ( symbol) and OFF for every hour.
Move through the hours using or and change each hour’s programming using the
button every time you wish to change the setting.
If you do not wish to change the programming of a particular hour, continue to the next hour
you wish to change. Once all of the hours are programmed, or left blank without programming,
press the button to exit, or leave the unit for 30 seconds without pressing anything.
3. MOUNTING INSTRUCTIONS
Inside the box you will find a mounting kit.
1. Choose the right part of the wall.
2. Place the mounting stencil on the wall, marking the places for the holes.
3. Remove the stencil and make the holes in the wall.
4. Insert the rawl plugs in the holes made.
5. Screw the plastic fastener to the wall with the 6.3 x 50 mm screw.
6. Screw the two brackets for supporting the heated towel rail and the plastic fastener to the
horizontal tube of the heated towel rail like in Figure 1 with the 3/8” x 40 mm screw.
7.
Insert what you have assembled in Section 6 into the plastic piece and fix well with the
2.9 x 9.5 mm stud bolt.
8. Place the cover on the piece supporting the heated towel rail.

10
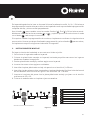
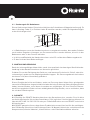
4. CONNECTING INSTRUCTIONS
Connection to the mains must be made observing the voltage stated on the product technical
data label.
This appliance is designed to be permanently installed connected to fixed facilities. The heated
towel rail power supply circuit must have an all-pole circuit breaker switch with a separation
of at least 3 mm between the contacts.
The appliance must be installed, if possible, away from any source of draughts (windows,
doors) or any other thing which may affect its functioning. In this way, the temperature will
not be affected. Place any object which might prevent the air flow (furniture, armchairs) 50
cm away from the front of the appliance.
The heater must never be installed immediately below a power point.
The lower part of the control panel must be placed at least 15 cm from the floor.
For any appliance, if the power cable is damaged, it must be replaced by a specific cable.
The replacement of the cable must be done by the maker, its after-sales service or qualified
personnel. The technical specifications of your appliance appear on the technical data label.
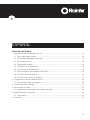
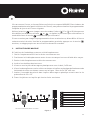
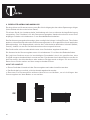
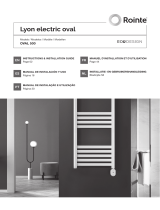
• This device must never be installed with its control panel at the top.
• This device must not be installed horizontally.
• During installation, use wedges so that the control panel will not be in contact with the floor.
OK

11
H1
H2
H1
H2
H1
H2
H1
H2
V1
V1
V1
V1
V2
V2
V2
V2
V3
V3
V3
V3
Spirit Level
Spirit Level
Spirit Level
Spirit Level
TI030
***
500 mm 300 mm 800 mm 640 mm 49 mm
TI050
***
500 mm 300 mm 1,200 mm 1,040 mm 49 mm
TI075
***
500 mm 300 mm 1,600 mm 1,360 mm 128 mm
TI100
***
500 mm 300 mm 1,800 mm 1,360 mm 325 mm
TI030SEB T.WHITE 030 300 W 230V~ 800 mm 500 mm 50 mm 100 mm 11 kg
TI050SEB T.WHITE 050 500 W 230V~ 1,200 mm 500 mm 50 mm 100 mm 15 kg
TI075SEB T.WHITE 075 750 W 230V~ 1,600 mm 500 mm 50 mm 100 mm 22 kg
TI100SEB T.WHITE 100 1,000 W 230V~ 1,800 mm 500 mm 50 mm 100 mm 28 kg
TI030SEM T.METALLIC 030 300 W 230V~ 800 mm 500 mm 50 mm 100 mm 11 kg
TI050SEM T.METALLIC 050 500 W 230V~ 1,200 mm 500 mm 50 mm 100 mm 15 kg
TI075SEM T.METALLIC 075 750 W 230V~ 1,600 mm 500 mm 50 mm 100 mm 22 kg
TI100SEM T.METALLIC 100 1,000 W 230V~ 1,800 mm 500 mm 50 mm 100 mm 28 kg
TI030SEC T.CHROME 030 300 W 230V~ 800 mm 500 mm 50 mm 100 mm 11 kg
TI050SEC T.CHROME 050 300 W 230V~ 1,200 mm 500 mm 50 mm 100 mm 15 kg
TI075SEC T.CHROME 075 500 W 230V~ 1,600 mm 500 mm 50 mm 100 mm 22 kg
TI100SEC T.CHROME 100 750 W 230V~ 1,800 mm 500 mm 50 mm 100 mm 28 kg

12
4.1. Specific Regulations for Bathrooms
This device is in compliance with CLASS II safety regulations (double insulation). It can be
installed in areas 2 and 3, position A and B whenever it observes the following regulations:
•
In bathrooms, the radiator-heated towel rail must never be installed in such a way that the
switches and other control devices may be touched by someone in the bathtub or having a shower.
•
In a kitchen or bathroom, the body of the heated towel rail shall be placed at least 25 cm
from the floor.
• It must not be earthed.
5. MAINTENANCE & CLEANING
Thanks to the high standard of its materials and surface treatment, your heated towel rail is
protected against corrosion.
Don’t use abrasive or corrosive products. Use a cloth with alcohol, taking the precaution to
switch off the device beforehand. For the control panel, use a dry cloth (without any solvents).
5.1. Safety
This product is not intended to be used by persons (including children) with reduced physical,
mental capacities, or who have no knowledge of the product, except if they are supervised or
instructed in the use of the product by a person who is responsible for his or her safety. Children
must be supervised at all times to ensure that they do not play with the product.
6. GUARANTEE
6.1. If you need to invoke the guarantee service, contact the dealer / installer where it was
purchased. In the event of any problems, you can contact ROINTE on its TECHNICAL ASSISTANCE
HELPLINE 0208 953 5363 or e-mail us at support@rointe.co.uk
6.2. ROINTE guarantees this product is free from defects in materials, design and workmanship
at the time of its purchase and for the immediately following period of 120 months regarding
aluminium and leaktightness, and 24 months for electric and electronic parts.
6.3. If during the guarantee period the heated towel rail fails to work properly, due to defects
in design, materials or workmanship, ROINTE shall repair or replace the radiator, whichever
it considers to be more advisable, in the terms and conditions stated below:

13
The guarantee shall only be covered if the original Certificate of Guarantee issued to
the buyer by the dealer or installer is presented, and when the guarantee states the towel
rail serial number and model (on the technical data label) and its date of purchase. ROINTE
reserves the right to refuse the guarantee service when this information has been removed
or changed following the original purchase of the product.
Only the original receipt or invoice shall be accepted as proof of purchase when presented to
the dealer or installer that sold the product.
The guarantee shall only be applicable to cases regarding defects in materials, design
and workmanship, and shall never cover any damages due to the following:
Incorrect use of the product for other than normal purposes or failure to observe
the instructions given by ROINTE regarding the use and maintenance of the heated towel
rail, as well as the installation or use of the product in a way that fails to comply with the
applicable technical safety standards.
Repairs made by unauthorized repair shops or the opening of the heated towel rail
by unauthorized persons.
Unforeseen circumstances beyond the control of ROINTE, such as lightning, fire,
floods, public disorder, etc.
The repairs or replacements covered in this guarantee do not permit any extension
or new beginning of the guarantee period.
The repairs or replacements covered in this guarantee shall be made with functionally
equivalent reconditioned units. The faulty parts or pieces removed shall become the
property of ROINTE.
This guarantee does not affect the buyer’s statutory rights under the current national
laws, or the buyer’s rights against those of the dealer or installer arising from the contract
of sale.
In the event of there being no national legislation applicable, this guarantee shall
be the buyer’s sole protection. ROINTE, its offices, dealers and installers shall not be held
liable for any type of damages, whether fortuitous or accidental, arising from the failure to
observe any of the regulations related with this product.
Under the European Directive 2002/96/EC on waste electrical and electronic equipment (WEEE),
the apparatus cannot be disposed in the usual council bins and containers. They must be sepa-
rated to optimize the recovery and recycling of all of the components and materials and reducing
the impact to human health and the environment. The symbol of the container crossed out over a
horizontal line marks all of ROINTE’s products to remind the consumer of the obligation to sepa-
rate them on disposal. The consumer should contact the local authority or original point of sale
to learn more about the correct disposal of this product.

14

15
ESPAÑOL
ÍNDICE DE CONTENIDOS
1. Descripción del Secatoallas “Serie T” .................................................................................. 16
1.1. Partes del panel frontal ................................................................................................... 16
1.2. Encendido y apagado (stand-by) ..................................................................................... 17
1.3. Ajuste día y hora ............................................................................................................... 18
1.4. Bloqueo de teclado .......................................................................................................... 18
1.5. Selección de Temperatura .............................................................................................. 18
1.6. Función manual/automático ........................................................................................... 18
1.7. Funcionamiento intenso dos horas (2H) ......................................................................... 18
1.8. Función “Ventana abierta” .............................................................................................. 19
1.9. Función iluminación de pantalla ..................................................................................... 19
2. Programación del secatoallas Serie T ..................................................................................20
2.1. Programación del secatoallas ........................................................................................20
3. Instrucciones de montaje ....................................................................................................... 21
4. Normas de conexión ...............................................................................................................23
4.1. Reglas particulares para los cuartos de baño ............................................................... 24
5. Mantenimiento y Limpieza ..................................................................................................... 24
5.1. Seguridad .......................................................................................................................... 24
6. Garantía ...................................................................................................................................24

16
1. DESCRIPCIÓN DEL SECATOALLAS “SERIE T”
1.1. Partes del panel frontal

17
1.2. Encendido y apagado (stand-by)
Pulsando la tecla podemos encender o apagar el secatoallas. Al encender el secatoallas
aparecerá la siguiente imagen de bienvenida en el display TFT:
Pasados 10 segundos sin pulsar ninguna tecla, la iluminación de la pantalla pasará al modo
reposo de forma automática. Pulsando de nuevo la tecla el secatoallas pasará al modo
“Stand By”, apareciendo la palabra “STAND BY” seguido del logotipo de ROINTE.
3
7
4
2
5 6
1
1 FRANJA DE PROGRAMACIÓN
2 DÍAS DE LA SEMANA
3 HORA
4 TEMPERATURA
5 FUNCIÓN VENTANA ABIERTA
6 SECATOALLAS EN CONSUMO
7 FUNCIÓN AUTOMÁTICO/MANUAL
8 MODO CONFORT/ECONÓMICO/ANTIHIELO
9 BLOQUEO DE TECLADO
9
8

18
1.3. Ajustar día y hora
Asegúrese de estar en la función manual, de manera que la pantalla muestra el símbolo .
Pulse la tecla 3 segundos, para acceder al ajuste hora y día desde el propio secatoallas.
Pulsando la tecla parpadea hora, minutos y día de la semana en función del número de
pulsaciones efectuadas. Con las teclas y modificamos los valores.
Para salir del ajuste hora y día, esperar 30 segundos o pulsar después de elegir día.
1.4. Bloqueo de teclado
Pulsando simultáneamente durante 3 segundos las teclas y bloqueamos el teclado
encendiéndose el icono de bloqueo de teclado . Al pulsar cualquier tecla aparecerá la
siguiente imagen:
Para desbloquear pulsar de nuevo las teclas y durante 3 segundos.
1.5. Selección de Temperatura
Pulsando o variamos la temperatura. Cuando la temperatura de la estancia es inferior
a la seleccionada, el secatoallas entra en consumo, apareciendo el símbolo .
1.6. Función manual/automático
Pulsando alternaremos entre la función Manual y Automático.
En función manual aparece en el display el icono . En función automático aparece en el
display el icono .
1.6.1. Función manual
Esta función ajusta manualmente la temperatura, tal como se indicó en el punto 1.5. Según la
temperatura seleccionada verá uno de estos símbolos en pantalla:
SÍMBOLO MODO RANGO DE TEMPERATURAS
CONFORT 20ºC A 30ºC
ECO 15ºC A 19,5ºC
ANTIHIELO 8ºC
1.6.2. Función automático
Esta función activa la programación que tenga grabada el secatoallas.
1.7. Funcionamiento intenso dos horas (2H)
Pulsando , el secatoallas funcionará a máxima potencia de forma continuada durante dos
horas, independientemente del estado en que se encuentre. Esta función tiene prioridad sobre
cualquier otra.
Para indicar que el secatoallas activa el funcionamiento intenso dos horas, el display mostrará
la siguiente imagen:

19
Una vez activo y hasta que terminen las dos horas o se pulse nuevamente la pantalla
mostrará la siguiente imagen:
1.8. Función “Ventana abierta”
Esta función se activa cuando la temperatura leída por la sonda detecta un descenso de 4ºC
respecto a la temperatura de consigna en media hora. Al activarse esta función, aparece
durante 5 segundos, la siguiente imagen en el display del secatoallas:
Una vez activado el modo “Ventana abierta”, aparecerá la siguiente pantalla indicando que
está activo el modo antihielo:
El modo estará activo durante 2 horas. Durante este periodo, si se pulsa la tecla el
secatoallas se apagará. Volviendo a pulsar , el secatoallas se encenderá de nuevo sin la
función “Ventana abierta” activa.
Si durante el periodo de 2 horas no se pulsa ninguna tecla, al finalizar este periodo el secatoallas
volverá de manera automática al estado anterior.
1.9. Función iluminación de pantalla
Se puede modificar la iluminación de la pantalla pulsando la tecla durante 3 segundos
estando el producto en modo manual. Al activar este modo, se visualizará la siguiente pantalla:
Con las teclas y podemos disminuir o aumentar la luminosidad de la pantalla del
modo ON. Para modicar la luminosidad del modo “Standby”, pulsaremos la tecla y el
cuadro delimitador marcará la opción “STAND-BY”, pudiendo modificar la luminosidad
con las mismas teclas y .

20
Para salir de esta función esperaremos 10 segundos sin pulsar ningún botón.
2. PROGRAMACIÓN DEL SECATOALLAS SERIE T
2.1. Programación del secatoallas
Se puede programar el secatoallas usando su panel de control.
Para comenzar a programar, compruebe que está en función Automático, mostrando la pantalla
el símbolo . Si la pantalla muestra el símbolo , pulse para cambiar de función.Una
vez en función Automático, pulse y mantenga durante
3 segundos para entrar en el
modo de programación. Verá el símbolo parpadeando, que representa el modo Confort,
junto con la temperatura de dicho modo.
Use y para variar la temperatura del modo Confort, dentro del rango entre los 20ºC
y 30ºC. Esta será la temperatura que se aplicará cuando elija el modo Confort más adelante.
Una vez conforme con la selección, pulse . El símbolo pasará a parpadear, lo que
representa que está dentro del ajuste de la temperatura del modo Eco (economía).
Nuevamente, use y para variar la temperatura del modo Económico, dentro del rango
entre los 15ºC y los 19,5ºC. Esta será la temperatura que se aplicará cuando elija el modo Eco
más adelante.
Ahora pulse para moverse entre los días de la semana, del (lunes) al (domingo). Sus
símbolos estarán parpadeando, y también estarán representados en la pantalla con SEL 1,
SEL 2, SEL 3,etc.
Pulse el botón para seleccionar un día, el cual dejará de parpadear. Para eliminar la
selección de ese día, pulse el botón de nuevo. Muévase entre los días del al usando
y , y por cada día que quiera programar pulse de manera que dejará de parpadear.
Repita este paso hasta que todos los días que quiera programar dejen de parpadear. Para
continuar con la programación pulse el botón
Llegado a este punto, recuerde que si el secatoallas ha sido programado con anterioridad,
todos los días seleccionados perderán su programación actual y se modificarán por la nueva
programación que va a realizar.
A página está carregando...
A página está carregando...
A página está carregando...
A página está carregando...
A página está carregando...
A página está carregando...
A página está carregando...
A página está carregando...
A página está carregando...
A página está carregando...
A página está carregando...
A página está carregando...
A página está carregando...
A página está carregando...
A página está carregando...
A página está carregando...
A página está carregando...
A página está carregando...
A página está carregando...
A página está carregando...
A página está carregando...
A página está carregando...
A página está carregando...
A página está carregando...
A página está carregando...
A página está carregando...
A página está carregando...
A página está carregando...
A página está carregando...
A página está carregando...
A página está carregando...
A página está carregando...
A página está carregando...
A página está carregando...
A página está carregando...
A página está carregando...
A página está carregando...
A página está carregando...
A página está carregando...
A página está carregando...
A página está carregando...
A página está carregando...
A página está carregando...
A página está carregando...
-
 1
1
-
 2
2
-
 3
3
-
 4
4
-
 5
5
-
 6
6
-
 7
7
-
 8
8
-
 9
9
-
 10
10
-
 11
11
-
 12
12
-
 13
13
-
 14
14
-
 15
15
-
 16
16
-
 17
17
-
 18
18
-
 19
19
-
 20
20
-
 21
21
-
 22
22
-
 23
23
-
 24
24
-
 25
25
-
 26
26
-
 27
27
-
 28
28
-
 29
29
-
 30
30
-
 31
31
-
 32
32
-
 33
33
-
 34
34
-
 35
35
-
 36
36
-
 37
37
-
 38
38
-
 39
39
-
 40
40
-
 41
41
-
 42
42
-
 43
43
-
 44
44
-
 45
45
-
 46
46
-
 47
47
-
 48
48
-
 49
49
-
 50
50
-
 51
51
-
 52
52
-
 53
53
-
 54
54
-
 55
55
-
 56
56
-
 57
57
-
 58
58
-
 59
59
-
 60
60
-
 61
61
-
 62
62
-
 63
63
-
 64
64


em outras línguas
- español: Rointe Serie T El manual del propietario
- français: Rointe Serie T Le manuel du propriétaire
- English: Rointe Serie T Owner's manual
- Deutsch: Rointe Serie T Bedienungsanleitung
Artigos relacionados
-
 Rointe RC609ZCC1 Manual do proprietário
-
 Rointe Giza Oval Manual do proprietário
-
 Rointe Serie S Manual do proprietário
-
 Rointe Lyon OVAL Manual do proprietário
-
 Rointe Comando a distância Air Control Manual do proprietário
-
 Rointe Tovare OVAL Manual do proprietário
-
 Rointe Circe Oval electric Manual do proprietário
-
 Rointe Loira OVAL Manual do proprietário
-
 Rointe Sygma impar Manual do proprietário
-
 Rointe Comando a distãncia Basic Control Manual do proprietário


Outros documentos
-
Atlantic Nefertiti V2 électrique seul décembre 2009 à juillet 2013 Installation and User Manual
-
-
-
-
Haverland TE Manual do proprietário
-
Uponor I-35 Manual do usuário
-
Taurus Alpatec CHTA 500 - 1000 - 1500 - 2000 Manual do proprietário
-
Fagor REIN-1004PV Manual do proprietário
-
-
Blyss DBBX1600WT152BS Manual do usuário