
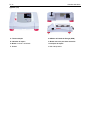
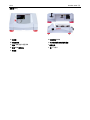
Guardian 5000 Series
Hotplate-Stirrer, e-G51HSRDM
Hotplate-Stirrer, e-G51HS07C
Hotplate, e-G51HP07C
Stirrer, e-G51ST07C
Hotplate-Stirrer, e-G51HS10C
Instruction Manual
EN
ES
FR
DE
IT
PT
SE
NL
DA
FI
NO
PL
CZ
HU
CN
KR


Guardian 5000 Series EN-1
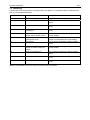
Table of Contents
1 INTRODUCTION ............................................................................................................................................... 2
1.1. Safety Information .................................................................................................................................. 2
1.2. Intended Use .......................................................................................................................................... 2
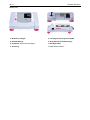
1.3. Package Contents .................................................................................................................................. 3
1.4. Installation .............................................................................................................................................. 3
1.5. Overview ................................................................................................................................................ 4
1.5.1 Dimensions ......................................................................................................................................... 4
1.5.2 Device Setup ...................................................................................................................................... 9
1.5.3 Display (Hotplate-Stirrers) ................................................................................................................ 13
1.5.4 Display (Hotplate) ............................................................................................................................. 14
1.5.5 Display (Stirrer) .............................................................................................................................. 155
2 OPERATION ................................................................................................................................................. 166
2.1 Getting Ready .................................................................................................................................... 166
2.2 Standby Mode .................................................................................................................................... 166
2.3 Controlling the Stirrer ......................................................................................................................... 177
2.4 Controlling the Top Plate Heater ........................................................................................................ 188
2.5 Using the External Probe ..................................................................................................................... 20
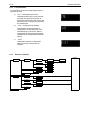
2.6 The Settings Menu ............................................................................................................................... 21
2.6.1 Accessing / Exiting ......................................................................................................................... 221
2.6.2 Features ......................................................................................................................................... 221
2.6.3 Structure & Defaults ......................................................................................................................... 22
2.7 Using the Single Point Calibration Feature ........................................................................................... 23
2.8 Enabling / Disabling the Beeper ........................................................................................................... 27
2.9
Changing the Power Recovery Setting ................................................................................................. 28
2.10
Reset to Factory Default Settings ......................................................................................................... 29
3 MAINTENANCE ............................................................................................................................................ 331
3.1 Troubleshooting ................................................................................................................................. 331
3.2 Service Information .............................................................................................................................. 32
4 TECHNICAL DATA ......................................................................................................................................... 32
5 COMPLIANCE ................................................................................................................................................. 33

EN-2 Guardian 5000 Series
1. INTRODUCTION
This manual contains installation, operation and maintenance instructions for the Ohaus Guardian 5000 Series.
Please read the manual completely before using.
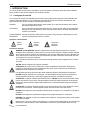
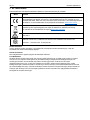
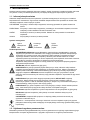
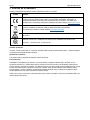
1.1. Safety Information
Safety notes are marked with signal words and warning symbols. These show safety issues and warnings. Ignoring
the safety notes may lead to personal injury, damage to the instrument, malfunctions and false results.
WARNING For a hazardous situation with medium risk, possibly resulting in severe injuries or death if not
avoided.
CAUTION For a hazardous situation with low risk, resulting in damage to the device or the property or in loss
of data, or minor or medium injuries if not avoided.
A
TTENTION For important information about the product. May lead to equipment damage if not avoided.
NOTE For useful information about the product.
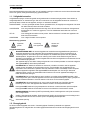
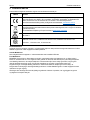
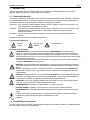
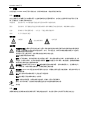
Warning Symbols
General
hazard
Caution, hot
surface
Electrical shock
hazard
Safety Precautions
WARNING! DO NOT use the Hotplate-Stirrer / Hotplate / Stirrer in explosive atmospheres or with
materials that could cause a hazardous environment from processing. Keep in mind the material flash
point relative to the target temperature that has been set. Also, the user should be aware that the
protection provided by the equipment may be impaired if used with accessories not provided by the
manufacturer.
Always operate unit on a level surface for best performance and maximum safety.
DO NOT lift unit by the top plate.
CAUTION! To avoid electrical shock, completely cut off power to the unit by disconnecting the power
cord from the wall outlet. Disconnect unit from the power supply prior to maintenance and servicing.
Spills should be removed promptly after the unit has cooled down. DO NOT immerse the unit for
cleaning. Alkalis spills, hydrofluoric acid or phosphoric acid spills may damage the unit and lead to
thermal failure.
CAUTION! The top plate can reach 500°C; DO NOT touch the heated surface. Use caution at all times.
Keep the unit away from explosive vapors and clear of papers, drapery, and other flammable materials.
Keep the power cord away from the heater plate.
CAUTION! The rear panel of the 10x10-120V unit runs hot to the touch. Avoid contact during operation.
Allow unit to cool before touching the rear panel.
DO NOT operate the unit at high temperatures without a vessel/sample on the top plate.
DO NOT operate the unit if it shows sign of electrical or mechanical damage.
WARNING! Units are NOT explosion proof. Use caution when heating volatile materials.
Earth Ground – Protective Conductor Terminal. Protective earthing of the equipment is achieved via
connection of the provided power cord to a compatible grounded power outlet.
Alternating Current
1.2. Intended Use
The Ohaus Hotplate-Stirrer / Hotplate / Stirrer are intended for general laboratory use. Safety cannot be
guaranteed if used outside of the intended use.

Guardian 5000 Series EN-3
1.3. Package Contents
• Hotplate-Stirrer / Hotplate / Stirrer Unit
• Power Cord (pre-attached for 10x10-120V units)
• Stir Bars (40 x 8mm and 28.6 x 8mm)
1.4. Installation
Upon receiving the Ohaus Hotplate-Stirrer / Hotplate / Stirrer check to ensure that no damage has occurred during
shipment. It is important that any damage that occurred in transport is detected at the time of unpacking. If you do
find such damage, the carrier must be notified immediately.
After unpacking, place the Hotplate-Stirrer / Hotplate / Stirrer on a level bench or table, away from explosive
vapors. Ensure that the surface on which the unit is placed will withstand typical heat produced by the unit and
place the unit a minimum of six (6) inches from vertical surfaces. Do not position the equipment such that it is
difficult to disconnect the power cord during use. Always place the unit on a sturdy work surface.
The Hotplate-Stirrer / Hotplate / Stirrer is supplied with a 3 conductor, grounded power cord that should be plugged
into a matching standard grounded outlet. If the cord supplied does not meet your needs, please use an approved
power cord that has ratings equal or exceeding those of the originally provided cord and that complies with the
local/national regulations of the country in which the equipment is to be used. Replacement of the plug must be
made by a qualified electrician.

EN-4 Guardian 5000 Series
1.5. Overview
1.5.1 Dimensions
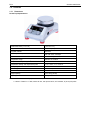
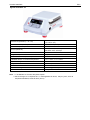
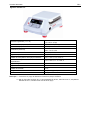
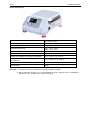
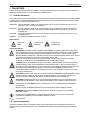
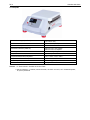
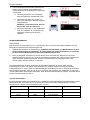
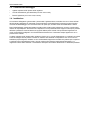
Round Top Hotplate-Stirrer
Note: + 2” diameter center of top plate
++ 800 mL of water in 1 L flask, 38 mm stir bar, 150 rpm and 50°C, 23°C ambient, 8” (20 cm) SS probe
Overall dimensions (L x W x H)
26.7 x 17.3 x 12.7 cm
(10.5 x 6.8 x 5”)
Top plate dimensions: Ø 13.5 cm (5.3”)
Top plate material: Aluminum
Electrical (50/60 Hz):
120 volts ±10%: 8.3 amps
230 volts ±10%: 4.6 amps
Fuses: 10A time-delay, 5x20mm, 250VAC
Temperature range: Ambient +5° to 380°C
Temperature stability of top plate
+
:
± 3% > 100°C, ± 2% ≤ 100°C
Temperature stability with temperature probe
++
:
± 1% > 100°C, ± 1°C ≤ 100°C
Stir capacity: 20 L
Speed range: 60 to 1600 rpm
Speed stability: ± 2%
Weight capacity: Up to 20 kg (44 lbs)
Ship weight: 2.8 kg

Guardian 5000 Series EN-5
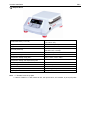
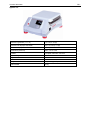
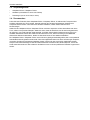
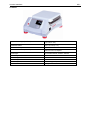
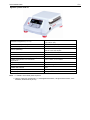
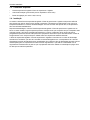
7×7 Hotplate-Stirrer
Overall dimensions (L x W x H)
30.7 x 22.4 x 12.2 cm
(
12.1 x 8.8 x 4.8”
)
Top plate dimensions: 17.8 x 17.8 cm (7 x 7”)
Top plate material: Ceramic
Electrical (50/60 Hz):
120 volts ±10%: 10.0 amps
230 volts ±10%: 6.0 amps
Fuses: 10A time-delay, 5x20mm, 250VAC
Temperature range: Ambient +5° to 500°C
Temperature stability of top plate
+
:
± 3% > 100°C, ± 2% ≤ 100°C
Temperature stability with temperature probe
++
:
± 1% > 100°C, ± 1°C ≤ 100°C
Stir capacity: 15 L
Speed range: 60 to 1600 rpm
Speed stability: ± 2%
Weight capacity: Up to 15 kg (33 lbs)
Ship weight: 2.8 kg
Note: + 2” diameter center of top plate
++ 800 mL of water in 1 L flask, 38 mm stir bar, 150 rpm and 50°C, 23°C ambient, 8” (20 cm) SS probe

EN-6 Guardian 5000 Series
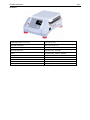
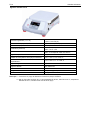
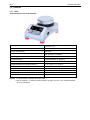
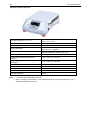
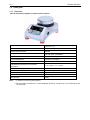
7x7 Hotplate
Overall dimensions (L x W x H)
30.7 x 22.4 x 12.2 cm
(12.1 x 8.8 x 4.8”)
Top plate dimensions: 17.8 x 17.8 cm (7 x 7”)
Top plate material: Ceramic
Electrical (50/60 Hz):
120 volts ±10%: 10.0 amps
230 volts ±10%: 6.0 amps
Fuses: 10A time-delay, 5x20mm, 250VAC
Temperature range: Ambient +5° to 500°C
Temperature stability of top plate
+
:
± 3% > 100°C, ± 2% ≤ 100°C
Temperature stability with temperature probe
++
:
± 1% > 100°C, ± 1°C ≤ 100°C
Weight capacity: Up to 15 kg (33 lbs)
Ship wei
g
ht: 2.8 k
g
Note: + 2” diameter center of top plate
++ 800 mL of water in 1 L flask and 50°C, 23°C ambient, 8” (20 cm) SS probe

Guardian 5000 Series EN-7
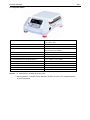
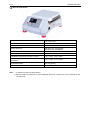
7x7 Stirrer
Overall dimensions (L x W x H)
30.7 x 22.4 x 12.2 cm
(12.1 x 8.8 x 4.8”)
Top plate dimensions: 17.8 x 17.8 cm (7 x 7”)
Top plate material: Ceramic
Electrical (50/60 Hz):
120 volts ±10%: 1.0 amps
230 volts ±10%: 0.5 amps
Fuses: 5A quick-acting, 5x20mm, 250VAC
Stir capacity:
15 L
Speed range: 60 to 1600 rpm
Speed stability:
± 2%
Weight capacity: Up to 15 kg (33 lbs)
Ship weight: 2.8 kg

EN-8 Guardian 5000 Series
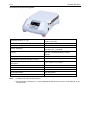
10X10 Hotplate-Stirrer
Overall dimensions (L x W x H)
42.2 x 28.6 x 12.2 cm
(16.6 x 11.25 x 4.8”)
Top plate dimensions: 25.4 x 25.4 cm
(
10 x 10”
)
Top plate material: Ceramic
Electrical (50/60 Hz):
120 volts ±10%: 11.2 amps
230 volts ±10%: 7.0 amps
Fuses:
120 volts: 15A quick-acting, 6.3x32mm, 125VAC
230 volts: 10A time-delay, 5x20mm, 250VAC
Temperature range: Ambient +5° to 500°C
Temperature stability of top plate+: ± 3% > 100°C, ± 2% ≤ 100°C
Temperature stability with temperature probe++: ± 1% > 100°C, ± 1°C ≤ 100°C
Stir capacity: 18 L
Speed range: 60 to 1600 rpm
Speed stability: ± 2%
Weight capacity: Up to 18 kg (39 lbs)
Ship weight: 5.4 kg
Note: + 2” diameter center of top plate
++ 800 mL of water in 1 L flask, 38 mm stir bar, 150 rpm and 50°C, 23°C ambient, 8” (20 cm) SS probe

Guardian 5000 Series EN-9
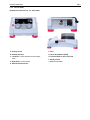
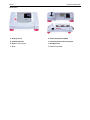
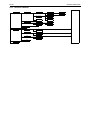
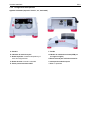
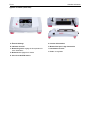
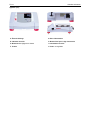
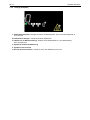
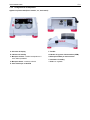
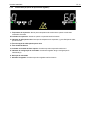
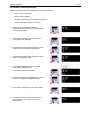
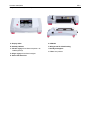
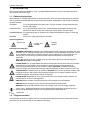
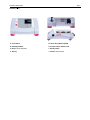
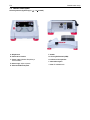
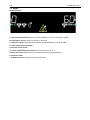
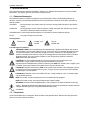
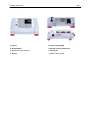
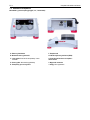
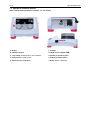
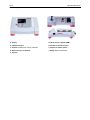
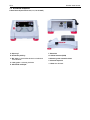
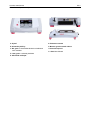
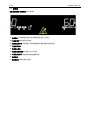
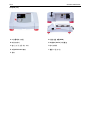
1.5.2 Device Setup
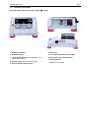
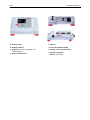
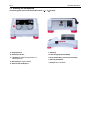
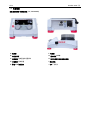
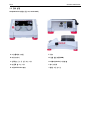
Hotplate-Stirrer (Round Top, 7x7, 10x10-230V)
A. Display Screen
B. Standby Indicator
C. Left Knob: Controls temperature and settings
menu
D. Right Knob: Controls speed
E. External RTD Probe Port
F. Fuse
G. Power Entry Module (PEM)
H. Threaded Knob for Accessory Rod
I. Standby Switch
J. Feet: Not adjustable

EN-10 Guardian 5000 Series
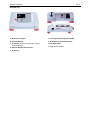
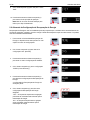
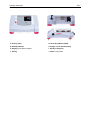
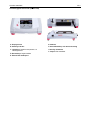
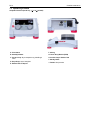
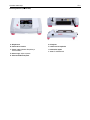
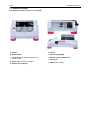
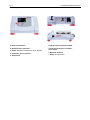
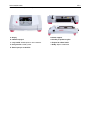
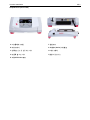
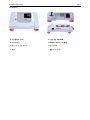
Hotplate-Stirrer (10x10-120V)
A. Display Screen
B. Standby Indicator
C. Left Knob: Controls temperature and settings menu
D. Right Knob: Controls speed
E. External RTD Probe Port
G. Power Cord
H. Threaded Knob for Accessory Rod
I. Standby Switch
J. Feet: Not adjustable

Guardian 5000 Series EN-11
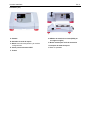
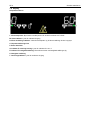
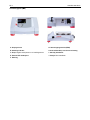
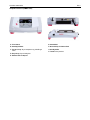
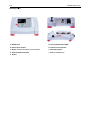
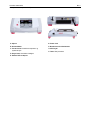
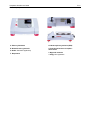
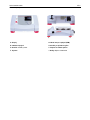
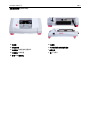
Hotplate (7x7)
A. Display Screen
B. Standby Indicator
C. Knob: Controls temperature and settings menu
E. External RTD Probe Port
F. Fuse
G. Power Entry Module (PEM)
H. Threaded Knob for Accessory Rod
I. Standby Switch
J. Feet: Not adjustable

EN-12 Guardian 5000 Series
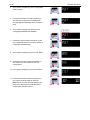
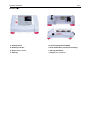
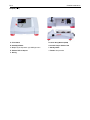
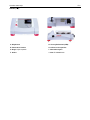
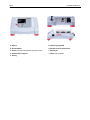
Stirrer (7x7)
A. Display Screen
B. Standby Indicator
D. Knob: Controls speed
F. Fuse
G. Power Entry Module (PEM)
H. Threaded Knob for Accessory Rod
I. Standby Switch
J. Feet: Not adjustable

Guardian 5000 Series EN-13
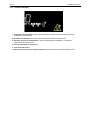
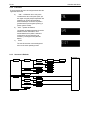
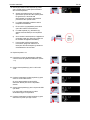
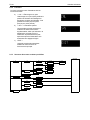
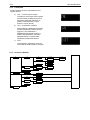
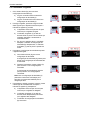
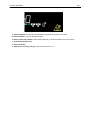
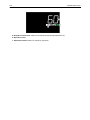
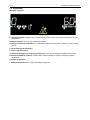
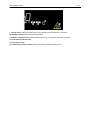
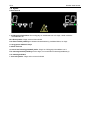
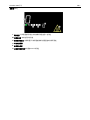
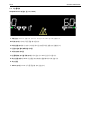
1.5.3 Display (Hotplate-Stirrers)
L. Heater Temperature: Switches to external probe temperature when the probe is plugged in and P is
illuminated.
M. Heater Indicator: Illuminates when heater is running.
N. Heat Setting Indicator: Switches Heater Temperature (L) to Heat Setting when illuminated.
O. Single Point Calibration Icon
P. External Probe Icon
Q. Hot Top Caution Indicator: Illuminates when the heater is ≥ 40°C.
R. Speed Setting Indicator: Illuminates until stirrer reaches the Speed Setting (S).
S. Speed Setting
T. Stirrer Indicator: Illuminates when stirrer is running

EN-14 Guardian 5000 Series
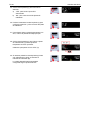
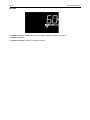
1.5.4 Display (Hotplate)
L. Heater Temperature: Switches to external probe temperature when the probe is plugged in and P is
illuminated.
M. Heater Indicator: Illuminates when heater is running.
N. Heat Setting Indicator: Switches Heater Temperature (L) to Heat Setting when illuminated.
O. Single Point Calibration Icon
P. External Probe Icon
Q. Hot Top Caution Indicator: Illuminates when the heater is ≥ 40°C.

Guardian 5000 Series EN-15
1.5.5 Display (Stirrer)
R. Speed Setting Indicato
r
: Illuminates until stirrer reaches the Speed Setting (S).
S. Speed Setting
T. Stirrer Indicator: Illuminates when stirrer is running

EN-16 Guardian 5000 Series
2 OPERATION
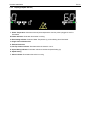
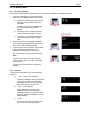
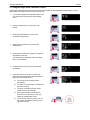
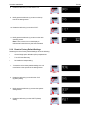
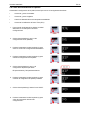
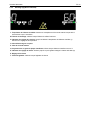
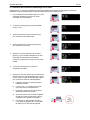
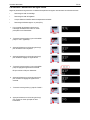
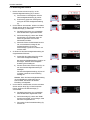
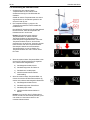
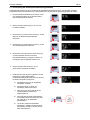
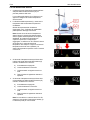
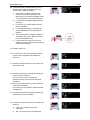
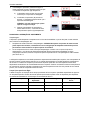
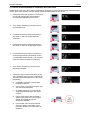
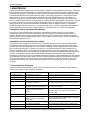
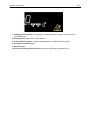
2.1 Getting Ready
To get ready:
1. Plug the female end of the provided power cord into
PEM (G) on the rear side of the unit.
Note: For the 10x10-120V unit, this end of the power
cord is fixed to the rear side of the unit.
2. Plug the male end of the power cord into a matching
standard grounded outlet.
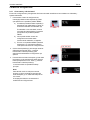
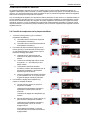
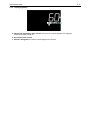
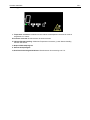
3. The unit will beep once and the screen will illuminate
with three displays:
a) The first will display the unit type (left) and the
software version (right).
b) The second will display the unit’s electrical
power (left) and frequency (right).
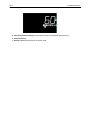
c) The third will be the unit’s main operating
screen.
Note: If the third screen is blank and the red
standby indicator (B) to the left of the screen is
illuminated, the unit is in standby mode.
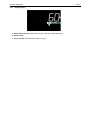
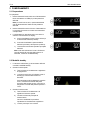
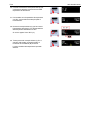
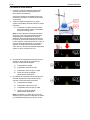
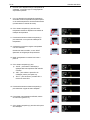
2.2 Standby Mode
1. The rocker switch (I) on the right side of the unit
controls standby mode.
2. When the unit is switched off:
a) All heating and stirring functions will turn off.
b) The screen will be blank and the standby
indicator (B) to the left of the screen will be
illuminated.
If the heater temperature is above 40°C, the
hot top caution indicator will remain
illuminated as well as the current top plate
temperature and “HOT”.
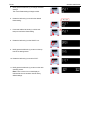
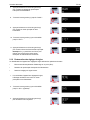
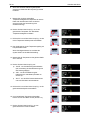
3. When the unit is switched on:
a) All heating and stirring functions will remain
off.
b) The main operating screen will return.
Previous heating and stirring settings will be
displayed.
c) The unit is ready for normal use.

Guardian 5000 Series EN-17
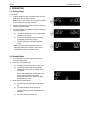
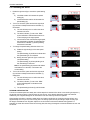
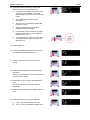
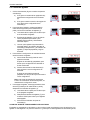
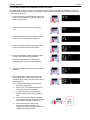
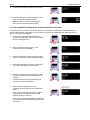
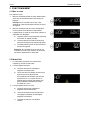
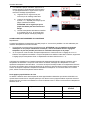
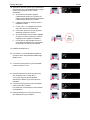
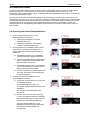
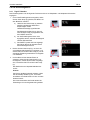
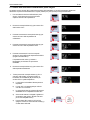
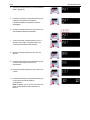
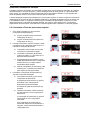
2.3 Controlling the Stirrer
STIRRING OPERATING TIPS
The stirrer increases speed at a steady rate until the setpoint is reached. If the stirrer is not reaching its setpoint: 1)
the stir bar may be too large, 2) the liquid may be too viscous, 3) the setpoint speed may need to be reduced.
Additionally, the magnetic strength of stir bars reduce over time and may need to be replaced.
When heating and stirring a reaction vessel within an oil bath or similar set-up, the stirring function will stir up to
approximately one inch (2.5 cm) from the top plate. The stirring speed will vary according to liquid viscosity, spin
bar length, and distance from top plate. Adjust one or all of these to achieve the desired stirring speed. For
example: the closer the reaction vessel is to the top plate, the strong the magnetic connection between the unit and
the stir bar.
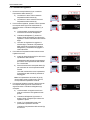
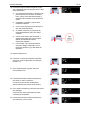
1. Rotate the right knob (D) to control the speed setting
(S).
a) Clockwise rotation will increase the speed
setting (S).
b) Counterclockwise rotation will decrease the
speed setting (S).
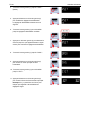
2. To turn on the stirrer, press and hold the right knob
(D) until the unit beeps and the stirrer indicator (T)
illuminates.
a) The unit will beep once to confirm the stirrer
has been turned on.
b) The stirrer indicator (T) next to the “RPM”
symbol will blink to indicate that the stirrer is
on and ramping to the target speed.
c) Once the stirrer has reached the target speed,
the speed setting indicator (R) will disappear
and the stirrer indicator (T) will stop blinking
and remain illuminated.
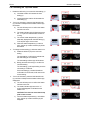
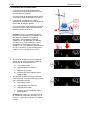
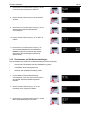
3. To change the speed setting while the stirrer is on:
a) Rotate the right knob (D) to the new speed
setting.
The speed setting (S) will blink to indicate that
the speed setting is not confirmed.
b) Briefly press the right knob (D) to confirm the
new speed setting.
The speed setting (S) will stop blinking once
the new setting is confirmed.
Note: If the speed setting (S) remains idle without
confirmation for 6 seconds, it will reset to the
current setting.
4. To turn off the stirrer, press and hold the right knob
(D) until the unit beeps and the stirrer indicator (T)
disappears.
a) The unit will beep once to confirm the stirrer
has been turned off.
b) The stirrer indicator (T) next to the “RPM”
symbol will disappear to indicate that the
stirrer is off.
c) The speed setting indicator (R) will illuminate.

EN-18 Guardian 5000 Series
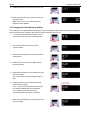
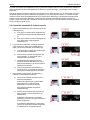
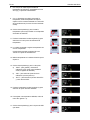
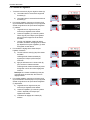
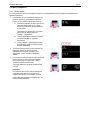
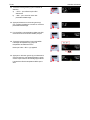
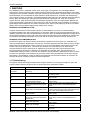
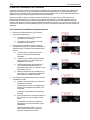
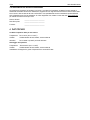
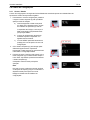
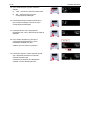
2.4 Controlling the Top Plate Heater
1. Rotate the left knob (C) to control the heat setting (L).
a) Clockwise rotation will increase the heat
setting (L).
b) Counterclockwise rotation will decrease the
heat setting (L).
2. To turn on the heater, press and hold the left knob
(C) until the unit beeps and the heater indicator (M)
illuminates.
a) The unit will beep once to confirm the heater
has been turned on.
b) The heater indicator (M) will illuminate next to
the “°C” symbol to indicate that the heater is
running.
c) The current heater temperature (L) will be
alternately displayed with the heat setting (L)
in the top left region of the screen.
d) When the heater temperature (L) is above
40°C, the hot top caution indicator (Q) will be
illuminated.
3. To change the heat setting (L) while the heater is on:
a) Rotate the left knob (C) to the new heat
setting.
The heat setting (L) will blink to indicate that
the heat setting is not confirmed.
The heat setting indicator (N) will illuminate.
b) Briefly press the left knob (C) to confirm the
new heat setting.
The heat setting (L) will stop blinking once the
new setting is confirmed.
If the heat setting (L) remains idle without
confirmation for 6 seconds, it will reset to the
current setting.
4. To turn off the heater, press and hold the left knob
(C) until the unit beeps and the heater indicator (M)
disappears.
a) The unit will beep once to confirm the heater
has been turned off.
b) The heater indicator (M) next to the “°C”
symbol will disappear to indicate that the
heater is off.
CAUTION: This does not mean that the top
plate is safe to touch.
c) Once the heater temperature (L) cools below
40°C, the hot top caution indicator (Q) will
disappear.
A página está carregando...
A página está carregando...
A página está carregando...
A página está carregando...
A página está carregando...
A página está carregando...
A página está carregando...
A página está carregando...
A página está carregando...
A página está carregando...
A página está carregando...
A página está carregando...
A página está carregando...
A página está carregando...
A página está carregando...
A página está carregando...
A página está carregando...
A página está carregando...
A página está carregando...
A página está carregando...
A página está carregando...
A página está carregando...
A página está carregando...
A página está carregando...
A página está carregando...
A página está carregando...
A página está carregando...
A página está carregando...
A página está carregando...
A página está carregando...
A página está carregando...
A página está carregando...
A página está carregando...
A página está carregando...
A página está carregando...
A página está carregando...
A página está carregando...
A página está carregando...
A página está carregando...
A página está carregando...
A página está carregando...
A página está carregando...
A página está carregando...
A página está carregando...
A página está carregando...
A página está carregando...
A página está carregando...
A página está carregando...
A página está carregando...
A página está carregando...
A página está carregando...
A página está carregando...
A página está carregando...
A página está carregando...
A página está carregando...
A página está carregando...
A página está carregando...
A página está carregando...
A página está carregando...
A página está carregando...
A página está carregando...
A página está carregando...
A página está carregando...
A página está carregando...
A página está carregando...
A página está carregando...
A página está carregando...
A página está carregando...
A página está carregando...
A página está carregando...
A página está carregando...
A página está carregando...
A página está carregando...
A página está carregando...
A página está carregando...
A página está carregando...
A página está carregando...
A página está carregando...
A página está carregando...
A página está carregando...
A página está carregando...
A página está carregando...
A página está carregando...
A página está carregando...
A página está carregando...
A página está carregando...
A página está carregando...
A página está carregando...
A página está carregando...
A página está carregando...
A página está carregando...
A página está carregando...
A página está carregando...
A página está carregando...
A página está carregando...
A página está carregando...
A página está carregando...
A página está carregando...
A página está carregando...
A página está carregando...
A página está carregando...
A página está carregando...
A página está carregando...
A página está carregando...
A página está carregando...
A página está carregando...
A página está carregando...
A página está carregando...
A página está carregando...
A página está carregando...
A página está carregando...
A página está carregando...
A página está carregando...
A página está carregando...
A página está carregando...
A página está carregando...
A página está carregando...
A página está carregando...
A página está carregando...
A página está carregando...
A página está carregando...
A página está carregando...
A página está carregando...
A página está carregando...
A página está carregando...
A página está carregando...
A página está carregando...
A página está carregando...
A página está carregando...
A página está carregando...
A página está carregando...
A página está carregando...
A página está carregando...
A página está carregando...
A página está carregando...
A página está carregando...
A página está carregando...
A página está carregando...
A página está carregando...
A página está carregando...
A página está carregando...
A página está carregando...
A página está carregando...
A página está carregando...
A página está carregando...
A página está carregando...
A página está carregando...
A página está carregando...
A página está carregando...
A página está carregando...
A página está carregando...
A página está carregando...
A página está carregando...
A página está carregando...
A página está carregando...
A página está carregando...
A página está carregando...
A página está carregando...
A página está carregando...
A página está carregando...
A página está carregando...
A página está carregando...
A página está carregando...
A página está carregando...
A página está carregando...
A página está carregando...
A página está carregando...
A página está carregando...
A página está carregando...
A página está carregando...
A página está carregando...
A página está carregando...
A página está carregando...
A página está carregando...
A página está carregando...
A página está carregando...
A página está carregando...
A página está carregando...
A página está carregando...
A página está carregando...
A página está carregando...
A página está carregando...
A página está carregando...
A página está carregando...
A página está carregando...
A página está carregando...
A página está carregando...
A página está carregando...
A página está carregando...
A página está carregando...
A página está carregando...
A página está carregando...
A página está carregando...
A página está carregando...
A página está carregando...
A página está carregando...
A página está carregando...
A página está carregando...
A página está carregando...
A página está carregando...
A página está carregando...
A página está carregando...
A página está carregando...
A página está carregando...
A página está carregando...
A página está carregando...
A página está carregando...
A página está carregando...
A página está carregando...
A página está carregando...
A página está carregando...
A página está carregando...
A página está carregando...
A página está carregando...
A página está carregando...
A página está carregando...
A página está carregando...
A página está carregando...
A página está carregando...
A página está carregando...
A página está carregando...
A página está carregando...
A página está carregando...
A página está carregando...
A página está carregando...
A página está carregando...
A página está carregando...
A página está carregando...
A página está carregando...
A página está carregando...
A página está carregando...
A página está carregando...
A página está carregando...
A página está carregando...
A página está carregando...
A página está carregando...
A página está carregando...
A página está carregando...
A página está carregando...
A página está carregando...
A página está carregando...
A página está carregando...
A página está carregando...
A página está carregando...
A página está carregando...
A página está carregando...
A página está carregando...
A página está carregando...
A página está carregando...
A página está carregando...
A página está carregando...
A página está carregando...
A página está carregando...
A página está carregando...
A página está carregando...
A página está carregando...
A página está carregando...
A página está carregando...
A página está carregando...
A página está carregando...
A página está carregando...
A página está carregando...
A página está carregando...
A página está carregando...
A página está carregando...
A página está carregando...
A página está carregando...
A página está carregando...
A página está carregando...
A página está carregando...
A página está carregando...
A página está carregando...
A página está carregando...
A página está carregando...
A página está carregando...
A página está carregando...
A página está carregando...
A página está carregando...
A página está carregando...
A página está carregando...
A página está carregando...
A página está carregando...
A página está carregando...
A página está carregando...
A página está carregando...
A página está carregando...
A página está carregando...
-
 1
1
-
 2
2
-
 3
3
-
 4
4
-
 5
5
-
 6
6
-
 7
7
-
 8
8
-
 9
9
-
 10
10
-
 11
11
-
 12
12
-
 13
13
-
 14
14
-
 15
15
-
 16
16
-
 17
17
-
 18
18
-
 19
19
-
 20
20
-
 21
21
-
 22
22
-
 23
23
-
 24
24
-
 25
25
-
 26
26
-
 27
27
-
 28
28
-
 29
29
-
 30
30
-
 31
31
-
 32
32
-
 33
33
-
 34
34
-
 35
35
-
 36
36
-
 37
37
-
 38
38
-
 39
39
-
 40
40
-
 41
41
-
 42
42
-
 43
43
-
 44
44
-
 45
45
-
 46
46
-
 47
47
-
 48
48
-
 49
49
-
 50
50
-
 51
51
-
 52
52
-
 53
53
-
 54
54
-
 55
55
-
 56
56
-
 57
57
-
 58
58
-
 59
59
-
 60
60
-
 61
61
-
 62
62
-
 63
63
-
 64
64
-
 65
65
-
 66
66
-
 67
67
-
 68
68
-
 69
69
-
 70
70
-
 71
71
-
 72
72
-
 73
73
-
 74
74
-
 75
75
-
 76
76
-
 77
77
-
 78
78
-
 79
79
-
 80
80
-
 81
81
-
 82
82
-
 83
83
-
 84
84
-
 85
85
-
 86
86
-
 87
87
-
 88
88
-
 89
89
-
 90
90
-
 91
91
-
 92
92
-
 93
93
-
 94
94
-
 95
95
-
 96
96
-
 97
97
-
 98
98
-
 99
99
-
 100
100
-
 101
101
-
 102
102
-
 103
103
-
 104
104
-
 105
105
-
 106
106
-
 107
107
-
 108
108
-
 109
109
-
 110
110
-
 111
111
-
 112
112
-
 113
113
-
 114
114
-
 115
115
-
 116
116
-
 117
117
-
 118
118
-
 119
119
-
 120
120
-
 121
121
-
 122
122
-
 123
123
-
 124
124
-
 125
125
-
 126
126
-
 127
127
-
 128
128
-
 129
129
-
 130
130
-
 131
131
-
 132
132
-
 133
133
-
 134
134
-
 135
135
-
 136
136
-
 137
137
-
 138
138
-
 139
139
-
 140
140
-
 141
141
-
 142
142
-
 143
143
-
 144
144
-
 145
145
-
 146
146
-
 147
147
-
 148
148
-
 149
149
-
 150
150
-
 151
151
-
 152
152
-
 153
153
-
 154
154
-
 155
155
-
 156
156
-
 157
157
-
 158
158
-
 159
159
-
 160
160
-
 161
161
-
 162
162
-
 163
163
-
 164
164
-
 165
165
-
 166
166
-
 167
167
-
 168
168
-
 169
169
-
 170
170
-
 171
171
-
 172
172
-
 173
173
-
 174
174
-
 175
175
-
 176
176
-
 177
177
-
 178
178
-
 179
179
-
 180
180
-
 181
181
-
 182
182
-
 183
183
-
 184
184
-
 185
185
-
 186
186
-
 187
187
-
 188
188
-
 189
189
-
 190
190
-
 191
191
-
 192
192
-
 193
193
-
 194
194
-
 195
195
-
 196
196
-
 197
197
-
 198
198
-
 199
199
-
 200
200
-
 201
201
-
 202
202
-
 203
203
-
 204
204
-
 205
205
-
 206
206
-
 207
207
-
 208
208
-
 209
209
-
 210
210
-
 211
211
-
 212
212
-
 213
213
-
 214
214
-
 215
215
-
 216
216
-
 217
217
-
 218
218
-
 219
219
-
 220
220
-
 221
221
-
 222
222
-
 223
223
-
 224
224
-
 225
225
-
 226
226
-
 227
227
-
 228
228
-
 229
229
-
 230
230
-
 231
231
-
 232
232
-
 233
233
-
 234
234
-
 235
235
-
 236
236
-
 237
237
-
 238
238
-
 239
239
-
 240
240
-
 241
241
-
 242
242
-
 243
243
-
 244
244
-
 245
245
-
 246
246
-
 247
247
-
 248
248
-
 249
249
-
 250
250
-
 251
251
-
 252
252
-
 253
253
-
 254
254
-
 255
255
-
 256
256
-
 257
257
-
 258
258
-
 259
259
-
 260
260
-
 261
261
-
 262
262
-
 263
263
-
 264
264
-
 265
265
-
 266
266
-
 267
267
-
 268
268
-
 269
269
-
 270
270
-
 271
271
-
 272
272
-
 273
273
-
 274
274
-
 275
275
-
 276
276
-
 277
277
-
 278
278
-
 279
279
-
 280
280
-
 281
281
-
 282
282
-
 283
283
-
 284
284
-
 285
285
-
 286
286
-
 287
287
-
 288
288
-
 289
289
-
 290
290
-
 291
291
-
 292
292
-
 293
293
-
 294
294
-
 295
295
-
 296
296
-
 297
297
-
 298
298
-
 299
299
-
 300
300
-
 301
301
-
 302
302
-
 303
303
-
 304
304
-
 305
305
-
 306
306
-
 307
307


em outras línguas
- español: Ohaus e-G51HP07C El manual del propietario
- français: Ohaus e-G51HP07C Le manuel du propriétaire
- italiano: Ohaus e-G51HP07C Manuale del proprietario
- Deutsch: Ohaus e-G51HP07C Bedienungsanleitung
Artigos relacionados
Outros documentos
-
 Thermo Fisher Scientific Cimarec+ Hotplates-Stirrers Manual do proprietário
-
IKA C-MAG HS 7 Manual do usuário
-
 VELP Scientific F20500011 Manual do proprietário
-
 Hach sensION+ pH3 Manual do usuário
-
 Hach sensION+ MM374 Manual do usuário
-
 Hach sensION+ EC7 Manual do usuário
-
 Hach sensION MM340 Manual do usuário
-
 Hach sensIONTM+ pH31 Manual do usuário
-
Silvercrest SHFR 1450 A1 Instruções de operação
-
Vaisala HUMICAP HMT120 Series Manual do usuário


