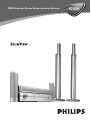
Philips LX9000R Manual do usuário
- Categoria
- Leitores de DVD
- Tipo
- Manual do usuário
Este manual também é adequado para

DVD Recorder Home Entertainment System
LX9000R
LX9000R

2
Italia
DICHIARAZIONE DI CONFORMITA’
Si dichiara che l’apparecchio LX 9000R Philips
risponde alle prescrizioni dell’art. 2 comma 1 del D. M.
28 Agosto 1995 n. 548.
Fatto a Eindhoven
Philips Consumer Electronics
Philips, Glaslaan 2
5616 JB Eindhoven,The Netherlands
Norge
Typeskilt finnes på apparatens bakside.
Observer: Nettbryteren er sekundert innkoplet. Den
innebygde netdelen er derfor ikke frakoplet nettet
så lenge apparatet er tilsluttet nettkontakten.
For å redusere faren for brann eller elektrisk støt, skal
apparatet ikke utsettes for regn eller fuktighet.

Technical data ––––––––––––––––––––––––––––––– 5
General information
Introduction ––––––––––––––––––––––––––––––––––– 6
Supplied Accessories –––––––––––––––––––––––––––– 6
Setup –––––––––––––––––––––––––––––––––––––––– 6
Maintenance ––––––––––––––––––––––––––––––––––– 6
Disc handling –––––––––––––––––––––––––––––––––– 6
Environmental information –––––––––––––––––––––––– 6
Which discs can be used? –––––––––––––––––––––––– 7
Region code ––––––––––––––––––––––––––––––––––– 7
Trademark and license information ––––––––––––––––– 7
Remote Control
Inserting the batteries ––––––––––––––––––––––––––– 8
Using the remote control –––––––––––––––––––––––– 8
Remote control keys –––––––––––––––––––––––––––– 9
Controls and connections
Controls on the front –––––––––––––––––––––––––– 10
Connections on the front ––––––––––––––––––––––– 10
Connections on the rear –––––––––––––––––––––––– 11
Speaker setup –––––––––––––––––––––––––––––– 12
Connecting …
Connecting the speakers –––––––––––––––––––––––– 12
Connecting the tuner antennas ––––––––––––––––––– 13
MW antenna –––––––––––––––––––––––––––––– 13
FM antenna ––––––––––––––––––––––––––––––– 13
Connecting the TV antenna –––––––––––––––––––––– 13
Connecting the TV ––––––––––––––––––––––––––––– 13
Connecting additional video appliances ––––––––––––– 14
Connecting additional audio appliances ––––––––––––– 14
Analogue connections ––––––––––––––––––––––– 14
Digital connections –––––––––––––––––––––––––– 14
Connecting a camcorder to CAM 1 or CAM 2 ––––––– 15
Connecting headphones –––––––––––––––––––––––– 15
Mains ––––––––––––––––––––––––––––––––––––––– 15
Initial installation
Basic settings ––––––––––––––––––––––––––––––––– 16
Advanced settings ––––––––––––––––––––––––––––– 17
System settings
When adding appliances or changing the
connections of appliances ––––––––––––––––––––––– 18
After changing the connection of the TV ––––––––– 18
After changing the connections of the VCR,
satellite receiver or game console –––––––––––––– 18
After changing the connections of the
CD recorder, CD player or tape deck ––––––––––– 19
System settings
When changing the speaker setup ––––––––––––––––– 19
Setting which speakers are connected ––––––––––– 19
Setting the distance of your listening position to
the speakers ––––––––––––––––––––––––––––––– 19
Searching TV channels –––––––––––––––––––––––––– 20
Autom. Search ––––––––––––––––––––––––––––– 20
Manual search ––––––––––––––––––––––––––––– 20
Changing the order of TV channels and
deleting TV channels ––––––––––––––––––––––––––– 21
Follow TV ––––––––––––––––––––––––––––––––– 21
Sort TV channels ––––––––––––––––––––––––––– 21
Additional TV channel settings –––––––––––––––––––– 22
TV channel name ––––––––––––––––––––––––––– 22
TV system –––––––––––––––––––––––––––––––– 22
NICAM –––––––––––––––––––––––––––––––––– 22
Fine tuning –––––––––––––––––––––––––––––––– 22
Setting the time and date –––––––––––––––––––––––– 23
Using a connected decoder to decode a TV channel ––– 23
Source selection
Selecting a source ––––––––––––––––––––––––––––– 24
Selecting another source while recording ––––––––– 24
Switching between recorded and original
video and sound quality –––––––––––––––––––––– 24
Volume and sound
Adjusting the volume of all speakers ––––––––––––––– 25
Adjusting the volume of the rear speakers and the
subwoofer ––––––––––––––––––––––––––––––––––– 25
Adjusting bass and treble –––––––––––––––––––––––– 25
Loudness –––––––––––––––––––––––––––––––––––– 25
Setting the volume balance between the speakers –––– 25
Surround sound
Selecting a surround effect ––––––––––––––––––––––– 26
Adjusting 3D Surround and Natural Surround ––––––– 27
Clear Voice ––––––––––––––––––––––––––––––––––– 27
Night mode –––––––––––––––––––––––––––––––––– 27
Various
Demo mode ––––––––––––––––––––––––––––––––– 27
Radio tuner
Selecting a preset radio station ––––––––––––––––––– 28
Tuning to a radio station –––––––––––––––––––––––– 28
Storing radio stations ––––––––––––––––––––––––––– 28
Automatic searching and storing ––––––––––––––– 28
Manual searching and storing –––––––––––––––––– 28
Changing the order of stored radio stations ––––––––– 29
Switching between mono and stereo radio reception –– 29
RDS – Radio Data System ––––––––––––––––––––––– 29
Contents
3
English

Playback
Loading discs
_________________________________
30
Playing a DVD-Video disc
_______________________
30
Region code information
_____________________
30
Disc menu
________________________________
30
Playing a (Super) Video CD
______________________
31
PBC (Playback Control)
______________________
31
What to do if PBC is deactivated?
______________
31
Playing a DVD+R or DVD+RW disc
_______________
31
Playing a write protected DVD+R or DVD+RW disc
__
31
Playing a DVD+R or DVD+RW disc that
is not write protected
_______________________
31
Playing an audio CD
____________________________
32
Some words about MP3
________________________
32
Making your own MP3-CD
___________________
32
Data rate
_________________________________
32
Recording an MP3-CD
_______________________
32
Supported formats
__________________________
32
Playing an MP3-CD
____________________________
32
Playback features
Selecting a title/chapter
_________________________
33
Selecting a title directly
_______________________
33
Selecting a chapter directly
____________________
33
Searching
____________________________________
33
Searching via the menu bar
___________________
33
Searching by keying in a time
_____________________
34
Scan
________________________________________
34
Repeat and playback in random order
______________
34
Repeating a specific sequence (not on MP3-CDs)
_____
34
Still picture
___________________________________
35
Frame by frame playback
________________________
35
Slow motion
_________________________________
35
Slow motion via the menu bar
_________________
35
Zoom
______________________________________
36
Camera angle
_________________________________
36
Changing the audio language
_____________________
37
Subtitles
_____________________________________
37
Recording
Copyright protection
___________________________
38
Discs for recording
_____________________________
38
Before you start recording
_______________________
38
Quick recording from the TV
_____________________
38
Recording from the TV or from another
additional appliance
____________________________
39
Safe record
__________________________________
40
Recording with automatic stop (OTR -
One Touch Recording)
__________________________
40
Lining up recordings within a title -
assemble cut (DVD+RW discs only)
_______________
40
Selecting the recording mode
____________________
41
Selecting the recording mode via the menu
_______
41
Automatic recording from a satellite receiver
________
42
Direct Record
________________________________
43
Switching Direct Record on or off
______________
43
Starting Direct Record
_______________________
43
Timer recording
VPS and PDC
________________________________
44
NexTView Link
_______________________________
44
Programming a recording with the
ShowView
®
system
____________________________
45
Programming a recording without the
ShowView
®
system
____________________________
46
Checking, changing or deleting a timer recording
______
47
Advanced features
Editing the name of the recording
_________________
48
Erasing an entire recording/title
___________________
48
Disc info screen (DVD+R, DVD+RW discs only)
_____
49
How to display the disc info screen
________________
49
Changing the disc name
(DVD+R, DVD+RW discs only)
__________________
49
Activating or deactivating the write protection
(DVD+R, DVD+RW discs only)
__________________
50
Making edits compatible (DVD+RW discs only)
______
50
Finalising DVD+R discs
_________________________
51
Erasing an entire DVD+RW disc
__________________
51
Favorite Scene Selection menu
___________________
52
Inserting chapter markers
_______________________
52
Deleting chapter markers
_______________________
52
Hiding chapters
_______________________________
53
Playing the entire title including hidden chapters
___
53
Changing the index picture
______________________
54
Dividing titles (on DVD+RW discs only)
____________
54
User preferences
Picture
______________________________________
55
Language
____________________________________
56
Features
_____________________________________
57
Remote control settings
_________________________
57
Record settings
_______________________________
58
Installation
___________________________________
58
Access control
Child lock (DVD-Video discs, (Super) Video CDs,
DVD+R discs, DVD+RW discs only)
_______________
59
Activating and deactivating the child lock
_________
59
Authorising a disc
___________________________
59
Locking authorised discs
______________________
59
Filter function and parental control
(DVD-Video discs only)
_________________________
60
Activating and deactivating the filter function
______
60
Changing the country code (DVD-Video discs only)
___
61
Changing the 4-digit code (DVD-Video discs, (Super)
Video CDs, DVD+R discs, DVD+RW discs only)
_____
61
If you have forgotten your 4-digit code
__________
61
Troubleshooting
_________________________
62–65
Contents
4
English

Subject to modification without notice.
General
Power supply rating ––––––––––––––––––– 230V / 50 Hz
Power consumption
Active ––––––––––––––––––––––––––––––– < 100 W
Standby –––––––––––––––––––––––––––––––– < 5 W
Record timer standby –––––––––––––––––––– < 17 W
Dimensions (w x h x d) –––– 435 mm x 96 mm x 405 mm
Weight –––––––––––––––––––––––––––––––––––– 9 kg
Amplifier
Output power
Stereo mode (1 kHz, 10% THD) –––––– 2 x 70 W RMS
Surround mode (1 kHz, 10% THD)
Front ––––––––––––––––––––––––– 2 x 81 W RMS
Centre ––––––––––––––––––––––––––– 81 W RMS
Surround –––––––––––––––––––––– 2 x 81 W RMS
Subwoofer –––––––––––––––––––––––– 81 W RMS
Total Harmonic Distortion ––––––––––– 10%, 1 kHz, 66 W
S/N ratio (unweighted) ––––––––––––––––––––– ≥ 92 dB
(A-weighted) –––––––––––––––––––––––––– 100 dBA
Stereo separation (1 kHz) –––––––––––––––––– ≥ -50 dB
Crosstalk (1 kHz) ––––––––––––––––––––––––– ≥ -90 dB
Tuner
Tuning range
FM ––––––––––––––––––––––––– 87.5 MHz–108 Mhz
MW –––––––––––––––––––––––– 531 kHz–1602 kHz
Stereo sensitivity ––––––––––––––––––––––––––– 41 dBf
DVD
Disc diameter –––––––––––––––––––––––– 12 cm / 8 cm
Video DAC ––––––––––––––––––––––––––––––– 10 bits
Signal system ––––––––––––––––––––––––– PAL / NTSC
Video format –––––––––––––––––––––––––––– 4:3 / 16:9
Laser
Laser type
DVD ––––––––––––––––––––––––––––––– InGaAIP
CD––––––––––––––––––––––––––––––––– AIGaAs
Wavelength
DVD ––––––––––––––––––––––––––––––– 660 nm
CD––––––––––––––––––––––––––––––––– 780 nm
Output power (out of objective)
DVD+RW writing –––––––––––––––––––– 20 mW
DVD reading –––––––––––––––––––––––– 0.8 mW
CD reading ––––––––––––––––––––––––– 0.3 mW
Beam divergence
DVD –––––––––––––––––––––––––––– 82 degrees
CD ––––––––––––––––––––––––––––– 54 degrees
Input connections
Analogue LINE IN 1, 2 ––––––––––––––– 900 mV / 47 kΩ
Analogue CAM 1 (front) ––––––––––––––– 2.2 V / 10 kΩ
Digital optical –––––––––––––––––––––––––––––– toslink
Digital coaxial ––––––––––––––––––––– 75 Ω acc. IEC958
Scart EXT 1, 2
TV antenna –––––––––––––––––––––––––––––––– 75 Ω
FM antenna –––––––––––––––––––––––––––––––– 75 Ω
MW antenna –––––––––––––––––––––––––––––– 300 Ω
S-Video CAM 1 (front) ––––––––––––––––––– 1 V / 75 Ω
Video CAM 1 (CVBS, front) ––––––––––––––– 1 V / 75 Ω
Digital CAM 2 (DV IN, front) ––––– acc. IEEE 1394 MPEG2
Output connections
Analogue LINE OUT –––––––––––––– 1.5 V / 2 kΩ / 0 dB
Digital coaxial ––––––––––––––– 0.5 V / 75 Ω acc. IEC958
TV antenna –––––––––––––––––––––––––––––––– 75 Ω
Speakers ––––––––––––––––––––––––––––––––––– 4 Ω
Subwoofer –––––––––––––––––––––––––––––––––– 8 Ω
Headphone (3.5 mm, 8–600 Ω) –––– 2.8V EMF, R
i
= 80 Ω
Loudspeakers
Front and rear speakers
System –––––––––––––––– 2 way shielded, Closed Box
Impedance –––––––––––––––––––––––––––––––– 4 Ω
Speaker drivers –––––– 3 x 2" woofers, 1 x 3/4" tweeter
Dimensions (w x h x d) –– 73 mm x 282 mm x 73 mm
Centre speaker
System –––––––––––––––– 2 way shielded, Closed Box
Impedance –––––––––––––––––––––––––––––––– 4 Ω
Speaker drivers –––––– 4 x 2" woofers, 1 x 3/4" tweeter
Dimensions (w x h x d) – 435 mm x 73.5 mm x 65 mm
Subwoofer
System ––––––––––––––––––––––––––––– Bass Reflex
Impedance –––––––––––––––––––––––––––––––– 8 Ω
Speaker driver –––––––––––––––––––––––– 4" woofer
Dimensions base (w x h) ––––––––– 30 mm x 240 mm
Dimensions tube (w x h) –––––––– 115 mm x 940 mm
Technical data
5
English
CAUTION
VISIBLE AND INVISIBLE LASER RADIATION WHEN
OPEN.AVOID EXPOSURE TO BEAM.
Note:This warning is located inside the enclosure.

Introduction
Record your own DVDs and enjoy the digital surround
sound and some of the best features of home cinema
technology with your DVD recorder system.
This set complies with the radio interference
requirements of the European Community.
CAUTION
Use of controls or adjustments or performance of
procedures other than herein may result in hazardous
radiation exposure or other unsafe operation.
Supplied Accessories
Your DVD recorder system is delivered with
– 2 front, 1 centre and 2 rear speakers
– 2 subwoofers integrated in the speaker stands
– 7 speaker cables
– 1 SCART cable
– 1 cinch audio cable
– 1 TV antenna cable
– 1 FM antenna cable
– 1 MW loop antenna
– 1 AC power cable
– 1 remote control with 2 AA batteries
– 1 blank Philips DVD+RW disc
Setup
Place the set on a flat, hard and stable surface.
Do not position the set on top of other equipment that
might heat it up (e.g. receiver or amplifier).
Allow at least 10 cm clearance from the rear and the
top of the set and 5 cm from the left and right to prevent
overheating.
Do not block the ventilation openings.
Do not expose the set to dripping or splashing.
Do not place any sources of danger (e. g. lighted candles,
objects filled with liquid) on the set.
Active mobile phones near the set may cause malfunctions.
Maintenance
Clean the set with a soft, slightly
dampened, lint-free cloth. Do not
use any cleaning agents as they
may have a corrosive effect.
Do not expose the set, batteries
or discs to humidity, rain, sand or
excessive heat (caused by heating
equipment or direct sunlight).
Always keep the tray of your DVD recorder system closed
to protect the lens from dust. Do not use any commonly
available lens cleaning discs, as they may damage the optical
unit of the set.
The lens may cloud over when the set is moved from cold
to warm surroundings. Playing or recording a disc is not
possible then. Leave the set in a warm environment until
the moisture evaporates.
Disc handling
DVD+Rs and DVD+RWs are very
delicate. Please take special care
when handling the discs.To take a
disc out of its box easily, press the
centre spindle while lifting it.After
use, always take the disc out of the
DVD recorder system and store it in the disc case.
Never attach a sticker to a disc. If you want to provide a
disc with an inscription use a soft felt-tipped pen and write
only on the printed side.
To clean a disc, wipe it in a straight
line from the centre towards the
edge using a soft, lint-free cloth.
Any cleaning agents may damage
the disc!
Environmental information
All redundant packing material has been omitted.We have
done our utmost to make the packaging easily separable into
three mono materials: cardboard (box), polystyrene foam
(buffer) and polyethylene (bags, protective foam sheet).
Your set consists of materials which can be recycled if
disassembled by a specialized company. Please observe the
local regulations regarding the disposal of packing materials,
exhausted batteries and old equipment.
General information
6
English
10 cm
10 cm
5 cm
5 cm

Which discs can be used?
There is a great number of disc types and you can use
many of them on your DVD recorder system. Some can be
used for playback only, others for playback and recording,
but there are a few types of discs which cannot be used
with this DVD recorder system.To determine which discs
you can use on this DVD recorder system, refer to the
logos shown below and look for these logos on your discs.
Discs for playback only
– DVD-Video
– DVD-R
plays only if it contains
DVD Video and if
finalised.
– DVD-RW
plays only if it contains
DVD Video and if
finalised.
– Video CD,
Super Video CD
– Audio CD
– Audio CDR,Audio CDRW
plays only if finalised.
– CDR, CDRW
plays only Audio CD
tracks and MP3 files
if finalised.
Discs for playback and recording
– DVD+R
can be recorded once and played
on standard DVD players and
DVD recorders, if finalised.
– DVD+RW
can be recorded, erased and
re-recorded many times and played on
DVD+RW compatible DVD players
and DVD recorders if finalised.
Discs unsuited for playback or recording
– DVD-RAM
– DVD-Audio
Region code
DVDs and DVD players are released for specific regions
around the world. DVDs must be labelled for ALL regions
or for region 2 in order to play them on this DVD recorder
system.You cannot play DVDs that are labelled for other
regions.
Trademark and license
information
ShowView is a registered
trademark of Gemstar
Development Corporation.
The ShowView system is manufactured under license from
Gemstar Development Corporation.
Manufactured under license from
Dolby Laboratories.“Dolby”,
“Pro Logic”, and the double-D symbol
are trademarks of Dolby Laboratories.
Manufactured under license from
Digital Theater Systems, Inc. US Pat. No.
5,451,942, 5,956,674, 5,974,380, 5,978,762
and other world-wide patents issued
and pending.“DTS” and “DTS Digital Surround” are
registered trademarks of Digital Theater Systems, Inc.
Copyright 1996, 2000 Digital Theater Systems, Inc.
All Rights reserved.
See license, trademark and warning notice on the
bottom of the set.
General information
7
English

Inserting the batteries
1 Open the battery compartment of the remote control and
insert 2 alkaline batteries, type AA (R06, UM-3).
2 Close the battery compartment.
Do not use old and new or different types of batteries in
combination.
Remove batteries if they are empty or if the remote control
will not be used for a long time.
Batteries contain chemical substances, so they should
be disposed of properly.
Using the remote control
With this remote control you can control the
DVD recorder system as well as other Philips appliances
such as a Philips TV,VCR or CD player.
To control a Philips appliance, briefly press the
corresponding source key (TV, SAT, CAM 1/2, CD, CDR or
VCR) on the remote control. Some of the remote control
keys, e. g. 2, 0–9, CH+, CH
–
, 4, ¢, 9, 2; can be used
to control the appliance then.To control the DVD recorder
system with these keys, press TUNER or DVD/MON.
To select a source on the DVD recorder system, keep the
source key (TV, SAT, CAM 1/2, CD, CDR or VCR) on the
remote control pressed for 1 second.
To select CAM 2 (or TAPE, GAME), first select CAM 1 (or
CDR,VCR), then keep the corresponding key pressed for
1 second.
To control the DVD recorder system, please point the
remote control at the DVD recorder system and not at
theTV.
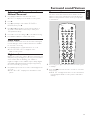
Remote Control
8
English
TV
CDR/TAPE
CAM 1/2
CD
TUNER
SAT
MENU
REC MODE
DISC DISPLAY
CLEAR RETURNEDIT
PLAY MODE
TREBLE
TIMER
LOUDNESS
VCR/GAME
DVD/MON
BASS
SUBWOOFER
REAR
NIGHT
VOICE
TV VOL
REC/OTR
CHVOL
MUTE
SELECT
SURR.
+
-
AUDIODISC
É
É
É
É
0
OK
H
§
T/C
SURR.
2
;
∞
9
1
3
2
4
6
5
79
8
SYSTEM
2
1
2
3
4
7
8
9
!
%
(
)
^
£
≤
§
•
ª
&
*
¡
™
∞
≥
5
6
$
@
0
#
º

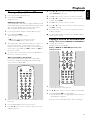
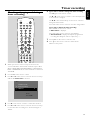
Remote control keys
1 2
switches the DVD recorder system and a Philips appliance
on or to standby
2 REC/OTR
starts recording the TV channel or video source selected
on the DVD recorder system
3 DVD/MON
selects the disc in the tray or the TV channel selected on
the DVD recorder system
TV
selects the TV
TUNER
selects the radio tuner, selects the waveband and switches
between FM mono and FM stereo
SAT
selects a connected satellite receiver
CAM 1/2
selects the camcorder inputs on the front
CD
selects a connected CD player
CDR/TAPE
selects a connected CD recorder, tape deck or similar
VCR/GAME
selects a connected VCR or game console
4 0–9 to key in numbers 0–9
5 DISC MENU
enters the disc menu
6 SYSTEM MENU
enters the system menu of the DVD recorder system
7 AUDIO MENU / SELECT
enters the audio menu of the DVD recorder system and
selects an option in the system menu
8 OK
confirms menu options
9 Arrow keys 1, 3, 2, 4
to move in a menu
0 VOL +,VOL
–
increases/decreases the volume of the DVD recorder
system
! H
mutes the sound of the DVD recorder system
@ CH+, CH
–
selects a TV channel on the DVD recorder system and
selects a preset radio station
# 4 /
–
TV VOL
skips to the beginning of the current or previous
chapter/title/track of the inserted disc, searches backwards,
tunes to a radio station with a lower frequency and
decreases the volume of a Philips TV
$ ¢ / TV VOL +
skips to the beginning of the next chapter/title/track of the
inserted disc, searches forwards,
tunes to a radio station with a higher frequency and
increases the volume of a Philips TV
% 2;
starts/pauses playback and closes the disc tray
^ 9
stops playback or recording
& REC MODE
selects a recording mode: HQ, SP, SP+, LP, EP or EP+
* PLAY MODE
selects different playback modes like REPEAT or SHUFFLE
( DISPLAY
selects various display information
) T/C / DISC
switches between title, track and chapter and
changes discs on a Philips CD changer
¡ TIMER
enters the timer recording menu
™ EDIT
enters the menu Favorite Scene Selection
£ SURR. / RETURN
selects the different surround modes and
returns to the previous menu on a (Super) Video CD
≤ CLEAR
clears an entry (eg. timer preset)
∞ SUBWOOFER
(
in combination with VOL+ or VOL
−)
adjusts the subwoofer volume
§ LOUDNESS
switches loudness on and off
≥ REAR
(
in combination with VOL+ or VOL
−)
adjusts the volume of the rear speakers
• VOICE / NIGHT
switches Clear Voice or Night mode on or off
ª TREBLE
(
in combination with VOL+ or VOL
−)
adjusts the treble
º BASS
(
in combination with VOL+ or VOL
−)
adjusts the bass
Remote Control
9
English

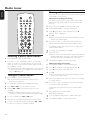
Controls on the front
1 2 STANDBY·ON
switches the set on or to standby
2 SOURCE
selects a source
3 4 SEARCH
skips to the beginning of the current or previous
chapter/title/track of the inserted disc, searches backwards
4 SEARCH ¢
skips to the beginning of the next chapter/title/track
of the inserted disc, searches forwards
5 STOP 9
stops playback or recording
6 PLAY/PAUSE 2;
starts/pauses playback
7 display/DVD recorder drawer
8 OPEN/CLOSE /
opens/closes the DVD recorder drawer
9 SURR.
selects the different surround modes
0 INSTANT – RECORD (status light)
indicates if immediate recording is possible
! RECORD
starts recording a TV channel or an external
video source selected on the DVD recorder system
(the key is illuminated while recording is in progress)
@ VOLUME
adjusts the volume
Connections on the front
# PHONES
3.5 mm headphone socket
$ DV IN / CAM 2
connect to the i.Link output of your Digital Video (DV) or
Digital 8 camcorder
% S-VIDEO / CAM 1
connect to the S-video output of your Hi-8 or S-VHS
camcorder
^ VIDEO / CAM 1
connect to the video (CVBS) output of your camcorder
& AUDIO LEFT/RIGHT / CAM 1
connect to the audio output of your camcorder
Controls and connections
10
English
1
23456 7
0! @ #
%
&
^
8
9
$

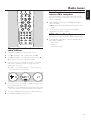
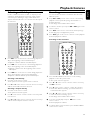
Connections on the rear
1 connect to the supplied speakers
2 RADIO / MW
connect to the MW antenna
3 RADIO / FM
connect to the FM antenna
4 MAINS ~
After all other connections have been made,
connect the mains lead to the wall socket.
5 TV ANTENNA / IN
connect to the TV antenna
6 TV ANTENNA / TV OUT
connect to the TV antenna input of your TV
7 EXT 2 / AUX I/O
connect to the SCART socket of an external video
appliance
8 EXT 1 / TO TV I/O
connect to the SCART socket of the TV
9 LINE IN 1 L/R
connect to the analogue audio output of an external
appliance (e. g. tape deck, CD changer, …)
0 LINE IN 2 L/R
connect to the analogue audio output of an external
appliance (e. g. tape deck, CD changer, …)
! LINE OUT L/R
connect to the analogue audio input of an external
appliance (e. g. tape deck, …)
@ DIGITAL IN
connect to the digital coaxial output of a digital appliance
# OPTICAL IN
connect to the digital optical output of a digital appliance
$ DIGITAL OUT
connect to the digital coaxial input of a digital appliance
Before starting with the connections, make sure all
appliances that you want to connect as well as the
DVD recorder system are disconnected from the
power sockets.
Controls and connections
11
English
TV ANTENNA
IN
TV OUT
EXT 2
EXT 1
MW FM
AUX I/0
TO TV I/0
L
R
L
R
DIGITAL OUT
DIGITAL IN
OPTICAL IN
LINE IN 1 LINE IN 2 LINE OUT
MAINS ~
RADIO
CENT.
4 Ω
SURR
LEFT
4 Ω
SURR
RIGHT
4 Ω
SUB
LEFT
8 Ω
FRONT
LEFT
4 Ω
FRONT
RIGHT
4 Ω
SUB
RIGHT
8 Ω
2 3
4
5 76 8 @ # $9 0 !
1

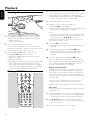
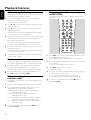
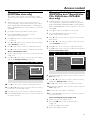
Speaker setup
1 First, assemble the speakers as described in the supplied
”Quick use guide”.You can place the subwoofers either in
the front or in the rear.
2 Place the front left and right speakers at equal distances
from your TV.The distance between the listener´s position
and the front speakers should be approximately equal to
the distance between the two front speakers.
3 Place the centre speaker above or below the TV set.
4 Place the rear speakers to the left and right of your
preferred listening position.
Notes:
Keep the speakers away from the corners of the room.
Position the speakers at ear level.
Connecting the speakers
Connect the supplied speakers using the supplied speaker
cables. Match the colours of the speaker sockets and the
speaker cables:
Speaker
++ −−
Front Left white black
Front Right red black
Centre green black
Subwoofer Left violet black
Subwoofer Right violet black
Rear Left blue black
Rear Right grey black
Note: If you placed the subwoofers in the rear, the colours of
the cables will no longer match the speaker sockets on the
subwoofers.
We recommend connecting all speakers.At least the front
speakers and the subwoofers must be connected.
● Press down the clip of the speaker and fully insert the
stripped portion of the speaker cable into the socket, then
release the clip.
Speaker setup/Connecting …
12
English
front R,
subwoofer R
front L,
subwoofer L
rear L rear R
centre

Connecting the tuner antennas
MW antenna
● Assemble the supplied MW loop antenna as shown below
and connect it to RADIO MW.
Notes:
After finishing the hookup and the initial setup, move the
MW antenna in various directions to achieve best reception.
Keep the antenna as far away as possible from the TV,VCR
or other electronic appliances.
For better reception connect an outdoor antenna or a cable
TV system.
The supplied antenna is for indoor use only.
FM antenna
● Connect the FM antenna socket of an outdoor FM antenna
or that of your cable TV system to RADIO FM on the DVD
recorder system with the supplied FM antenna cable.
Connecting the TV antenna
1 Disconnect the antenna cable from the TV´s antenna input
and connect it to TV ANTENNA IN on the DVD recorder
system.
2 Connect TV ANTENNA TV OUT on the DVD recorder
system to the TV´s antenna input with the supplied antenna
cable.
If you connect an appliance or change its connection after
the initial installation, you need to “install” it on the DVD
recorder system, i. e. you have to tell the DVD recorder
system to which socket the appliance is connected.
Otherwise the appliance will not be available on the DVD
recorder system. Please see “When adding appliances or
changing the connections of appliances”.This is not
necessary for appliances connected to CAM 1 and CAM 2.
Connecting the TV
Consult the user´s manuals of your TV on which SCART
sockets are available and how to connect them to other
video appliances.
If several SCART sockets are available on your TV, select
one that is suited for RGB input to achieve the best picture
quality.
If your Philips TV supports EasyLink, please select the
SCART socket number 2 on the TV (EXT2, EXTERNAL 2
or similar) which supports EasyLink.
Connect the TV directly to the DVD recorder system
without a VCR or any other appliance in between.
Otherwise, not all functions of the DVD recorder system
may be available.
1 Connect the SCART socket of the TV
(EUROCONNECTOR, EURO-AV or similar) to
EXT 1TO TV I/O on the DVD recorder system with the
supplied SCART cable.
2 If you have a digital TV with a digital audio output, connect
either
– its digital coaxial output to DIGITAL IN on the DVD
recorder system with a digital cinch cable or
– its digital optical output to OPTICAL IN on the DVD
recorder system with a digital optical cable.
Connecting …
13
English
MW
RADIO
TV ANTENNA
IN
TV OUT
EXT 2
EXT 1
MW FM
AUX I/0
TO TV I/0
L
R
L
R
DIGITAL OUT
DIGITAL IN
OPTICAL IN
LINE IN 1 LINE IN 2 LINE OUT
MAINS ~
RADIO
EXT IN
ANTENNA IN
TV
OPTICAL
OUT
TV ANTENNA
IN
TV OUT
EXT 2
EXT 1
MW FM
AUX I/0
TO TV I/0
L
R
L
R
DIGITAL OUT
DIGITAL IN
OPTICAL IN
LINE IN 1 LINE IN 2 LINE OUT
MAINS ~
RADIO
EXT IN
ANTENNA IN
TV
OPTICAL
OUT
to antenna, cable TV or VCR

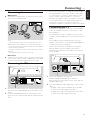
Connecting additional video
appliances
You can connect several video appliances with a SCART
socket to EXT2 AUX I/O by connecting them in a “chain”:
In the illustration below, a satellite receiver is connected to
a VCR and the VCR to the DVD recorder system.
Please keep in mind that the appliance closest to the
DVD recorder system will provide the input signal if several
appliances in the chain are switched on.Therefore:When
selecting a video appliance connected to EXT2 AUX I/O,
make sure that all other appliances connected to
EXT2 AUX I/O are switched off or to standby.
Consult the user´s manuals of the video appliances you
wish to connect on which SCART sockets are available and
how to connect them to other video appliances.
1 Connect the SCART socket of a video appliance to
EXT2 AUX I/O on the DVD recorder system with a
SCART cable. If the appliance has several SCART sockets,
use the one labelled TO TV or similar.
Note: Use RGB capable SCART cables only. Some other SCART
cables are only partially wired, resulting in a moderate picture
quality and less functionality of the SCART connection.
2 Connect another video appliance to the free SCART
socket on the video appliance which is already connected
to the DVD recorder system.
3 If a digital video appliance (e. g. satellite receiver or game
console) supports digital surround sound, connect either
– the digital coaxial output of the appliance to DIGITAL IN
on the DVD recorder system with a digital cinch cable,
– the digital optical output of the appliance to
OPTICAL IN on the DVD recorder system with a digital
optical cable.
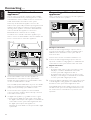
Connecting additional audio
appliances
Please consult the user´s manual of your audio appliances
on which connections are possible.
Analogue connections
1 Connect the left and right analogue output sockets of
your tape deck, CD player or similar to LINE IN 1 L/R or
LINE IN 2 L/R on the DVD recorder system with an
audio cinch cable.
Note:You cannot connect a turntable to LINE IN 1 or 2.
2 Connect the left and right analogue input sockets of a
tape deck or similar recording appliance to LINE OUT L/R
on the DVD recorder system with an audio cinch cable.
Digital connections
1 Connect either
– the digital coaxial output socket of your CD recorder,
CD player or similar to DIGITAL IN on the DVD
recorder system with a digital cinch cable or
– the digital optical output socket of your CD recorder,
CD player or CD changer to OPTICAL IN on the DVD
recorder system with a digital optical cable.
2 Connect the digital coaxial input socket of your CD recorder
or similar digital recording appliance to DIGITAL OUT on
the DVD recorder system with a digital cinch cable.
Note: DIGITAL OUT provides digital 2-channel stereo sound.
The DVD recorder system converts digital multichannel sound
into 2-channel stereo sound without loss of relevant sound
information.
Connecting …
14
English
TV ANTENNA
IN
TV OUT
EXT 2
EXT 1
MW FM
AUX I/0
TO TV I/0
L
R
L
R
DIGITAL OUT
DIGITAL IN
OPTICAL IN
LINE IN 1 LINE IN 2 LINE OUT
MAINS ~
RADIO
EXT. IN
TO TV
TO TV
OPTICAL
OUT
TV OUT
ANTENNA
EXT IN
ANTENNA IN
VCR
SAT Receiver
TV
TV ANTENNA
IN
TV OUT
EXT 2
EXT 1
MW FM
AUX I/0
TO TV I/0
L
R
L
R
DIGITAL OUT
DIGITAL IN
OPTICAL IN
LINE IN 1 LINE IN 2 LINE OUT
MAINS ~
RADIO
CD player
LL
R
DIGITAL OUT
Tape deck
OUT IN
R

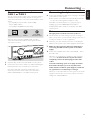
Connecting a camcorder to
CAM 1 or CAM 2
You can connect 2 camcorders to the connections CAM 1
and CAM 2.The picture quality depends on the type of
connection between the camcorder and the DVD recorder
system:
– good quality: Composite Video (Video CVBS)
– better quality: S-Video
– best quality: i.Link (IEEE 1394, Fire Wire)
Select the best connection available. Only one video
connection between the DVD recorder system and the
camcorder is needed.
1 Open the flap on the front of the DVD recorder system.
2 Connect the camcorder to CAM 1 or CAM 2 following the
instructions in the user´s manual of your camcorder.
Note: If the camcorder connected to CAM 1 has mono
sound only, connect the audio output of the camcorder to
CAM 1 AUDIO RIGHT on the DVD recorder system.
Connecting headphones
● Connect the headphones with an 3.5 mm plug to PHONES
on the DVD recorder system.
➜ The speakers are switched off automatically. Sound will
be reproduced through the headphones only.
Note:With connected headphones, no surround sound is
available. If you press SURROUND, DISCONNECT
HEADPHONES will be scrolled on the display of the DVD
recorder system.
Mains
The type plate is located on the rear of the set.
1 Check whether the mains voltage as shown on the type
plate corresponds to your local mains voltage. If it does not,
consult your dealer or service organisation.
2 Make sure your TV is switched on before connecting the
DVD recorder system to the mains supply for the first time.
3 Make sure all connections have been made before
connecting the DVD recorder system to the mains
supply.
4 Connect the supplied mains cable to AC MAINS ~ and to
the wall socket.
When the set is switched to standby, it is still consuming
some power.To disconnect the set from the mains
completely, remove the mains plug from the wall
socket.
To avoid overheating of the set a safety circuit has
been built in.Therefore your set may disconnect
under extreme conditions. If this happens, switch the
set off and let it cool down before reusing it.
When you connect the DVD recorder system to the mains
supply for the first time, you need to perform some basic
settings. See “Initial installation”.
Connecting …
15
English
S-Video
Video, CVBS,
Composite Video
i.Link
(IEEE 1394, Firewire,…)

During the initial installation, you will perform some basic
settings of the DVD recorder system.You can change all
settings of the initial installation later on.To change these
settings please see the chapters of “System settings” and
t Picture and u Language in “User preferences”.
Basic settings
Please observe the screen of your TV and the display of the
DVD recorder system.
1 Switch on your TV.
2 Connect the supplied mains cable to AC MAINS ~ and to
the wall socket. If the DVD recorder system is in demo
mode, press 2 to cancel the demo mode.
➜ IS TV ON? is displayed on the DVD recorder system.
3 If necessary set the TV to the correct audio/video channel
for the DVD recorder system. Such channels may be called
AUX or AUXILIARY IN, AUDIO/VIDEO or A/V IN, EXT1,
EXT2 or EXTERNAL IN, etc.These channels are often near
channel 00.
Note: If your TV supports EasyLink, the TV and the DVD
recorder system exchange information via the SCART cable.
In this case, EasyLink loading data from TV, please
wait will appear on the TV. Some of the following settings will
be done automatically then.
4 ➜ The menu Menu Language appears on the TV screen.
Press 3 or 4 to select the language in which the display
messages should appear on the TV screen.Then press OK.
5 ➜ The menu Audio language appears.
Press 3 or 4 to select the language in which DVDs should
preferably be played, if the language is available on the disc.
Then press OK.
6 ➜ The menu Subtitle Language appears.
Press 3 or 4 to select the language in which subtitles
should preferably be displayed, if subtitles in the language
are available on the disc.Then press OK.
Note: Some DVDs may override your audio and subtitle
language selection. In this case, you have to select the audio
and subtitle language in the DVDs Disc Menu.
7 ➜ The menu TV Shape appears.
Press 3 or 4 to select the screen format.This setting will
have an effect only with DVDs supporting different screen
formats.
➜ 4:3 letterbox: for a wide-screen picture (cinema
format) on a conventional 4:3 TV set with black borders
at the top and bottom of the screen.
➜ 4:3 panscan: for a full-height picture with cropped
edges.
➜ 16:9: for a wide-screen TV set.
Then press OK.
8 ➜ The menu Country appears.
Press 3 or 4 to select the country where the
DVD recorder system is used. If your country does not
appear, select Other.Then press OK.
9 ➜ If you have connected the antenna - press OK
appears.
If you connected the DVD recorder system to a TV antenna
or a cable TV system, press OK.
If not, connect the antenna as described in “Connecting
the TV antenna”, then press OK.
➜ Searching for TV channels appears and the
automatic search for TV channels starts.This may take
several minutes.As soon as the search is complete,
Autom. search complete appears.
10 ➜ Time, Year, Month and Date appear.
If the settings are correct continue with step 13, else press 4
repeatedly to select either Time, Year, Month or Date.
11 Press 1 or 2 or 0–9 repeatedly to set the correct value.
12 If necessary, repeat steps 10 and 11 until all settings of the
time and date are correct.
13 Press OK.
➜ CONTINUE WITH SPECIAL AUDIO SETTINGS is
scrolled on the DVD recorder system.
14 Continue with “Advanced settings”.
Initial installation
16
English
TV
CDR/TAPE
CAM 1/2
CD
TUNER
SAT
MENU
VCR/GAME
DVD/MON
REC/OTR
SELECT
AUDIODISC
É
É
0
OK
H
1
3
2
4
6
5
79
8
SYSTEM
2
É
É

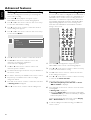
Advanced settings
You will be asked
– about the distances between the speakers and your
preferred listening position and
– to which input sockets on the DVD recorder system you
connected other appliances.
If you want to skip the advanced settings and to use
standard settings for the speaker distances and the
connections (see “Quick use guide”):
Press 4 to select NO, and continue with step 11 below.
If you want to continue with the advanced settings:
Press OK.
➜ SPEAKER DISTANCES is scrolled.
1 ➜ FRONT and 3,0M are displayed.
Press 3 or 4 repeatedly to set the distance of your
preferred listening position to the front speakers.
Then press OK to confirm.
2 ➜ CENTER and 3,0M are displayed.
Repeat step 1 for the centre speaker.
3 ➜ REAR and 1,5M are displayed.
Repeat step 1 for the rear speakers.
➜ SOURCE SETUP is scrolled.
4 ➜ DIGITAL AUDIO FROM TV? is scrolled.
Press 4 repeatedly to select
➜ NO if there is no digital audio connection between the TV
and the DVD recorder system,
➜ DIG if you connected the TV´s digital coaxial output to
DIGITAL IN on the DVD recorder system,
➜ OPT if you connected the TV´s digital optical output to
OPTICAL IN on the DVD recorder system.
Press OK to confirm.
5 ➜ VCR CONNECTED? is scrolled and YES is displayed.
If you did not connect a VCR to the DVD recorder
system:
Press 4 to select NO, then press OK.
If you connected a VCR:
Press OK.
➜ WHICH INPUT? is scrolled.
Press 4 repeatedly to select
➜ EXT2 if you connected the VCR to EXT 2 AUX I/O or
➜ EXT1 if you connected the VCR to EXT 1 TO TV I/O on
the DVD recorder system.
Press OK to confirm.
➜ DIGITAL AUDIO? is scrolled.
Press 4 repeatedly to select
➜ NO if there is no digital audio connection between the
VCR and the DVD recorder system,
➜ DIG if you connected the digital coaxial output of the
VCR to DIGITAL IN on the DVD recorder system,
➜ OPT if you connected the digital optical output of the
VCR to OPTICAL IN on the DVD recorder system.
Press OK to confirm.
6 ➜ SAT CONNECTED? is scrolled and YES is displayed.
Repeat step 5 for a satellite receiver.
7 ➜ GAME CONNECTED? is scrolled and YES is displayed.
Repeat step 5 for a game console.
8 ➜ CD CONNECTED? is scrolled and YES is displayed.
If you did not connect a CD player to the DVD
recorder system:
Press 4 to select NO, then press OK.
If you connected a CD player:
Press OK.
➜ WHICH INPUT? is scrolled.
Press 4 repeatedly to select
➜ LIN1 or LIN2 if you connected the analogue audio
output of the CD player to LINE IN 1 or LINE IN 2 on
the DVD recorder system,
➜ DIG if you connected the digital coaxial output of the
CD player to DIGITAL IN on the DVD recorder system,
➜ OPT if you connected the digital optical output of the
CD player to OPTICAL IN on the DVD recorder
system.
Press OK to confirm.
9 ➜ CDR CONNECTED? is scrolled and YES is displayed.
Repeat step 8 for a CD recorder or similar.
10 ➜ TAPE CONNECTED? is scrolled and YES is displayed.
Repeat step 8 for a tape deck or similar.
➜ SOURCE SETUP COMPLETE is scrolled.
11 Press OK.
➜ AUTOINSTALL is displayed.The DVD recorder system
searches for available radio stations and stores them in its
memory.
➜ After the search INSTALLATION COMPLETE is
scrolled and a radio station is played.The DVD recorder
system is ready to play.
Initial installation
17
English

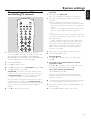
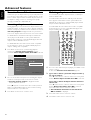
When adding appliances or
changing the connections of
appliances
If you have connected additional appliances or changed the
connections after the initial installation, you need to tell the
DVD recorder system to which socket on the rear of the
DVD recorder system the appliance is connected.
After changing the connection of the TV e
1 Press AUDIO MENU to enter the audio menu.
2 Press 4 repeatedly to select INPUTS, then press 2.
3 Turn SOURCE on the DVD recorder system or keep TV on
the remote control pressed for 1 second.
➜ e and AUDIO -> are displayed.
4 Press 4 repeatedly to select
➜ EXT1 if you connected the TV to EXT 1 only
(no digital audio connection between the TV and the
DVD recorder system),
➜ DIG if you connected the digital coaxial output of the TV
to DIGITAL IN,
➜ OPT if you connected the digital optical output of the TV
to OPTICAL IN on the DVD recorder system.
5 Press OK to store the setting.
6 Press AUDIO MENU to exit the audio menu.
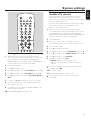
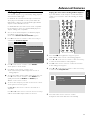
After changing the connections of the VCR j,
satellite receiver i or game console r
1 Press AUDIO MENU to enter the audio menu.
2 Press 4 repeatedly to select INPUTS, then press 2.
3 Turn SOURCE on the DVD recorder system or use the
source keys on the remote control to select the VCR,
satellite receiver or game console.
➜ AVAILABLE and YES or NO are displayed.
4 If the appliance is not connected to the
DVD recorder system:
Press 4 repeatedly to select NO, then press OK.
➜ STORED is displayed.
If the appliance is connected to the DVD recorder
system:
Press 4 repeatedly to select YES, then press OK.
➜ VIDEO -> is displayed.
Press 4 repeatedly to select
➜ EXT1 if you connected the appliance to EXT 1,
➜ EXT2 if you connected the appliance to EXT 2,
➜ NONE if you did not connect the appliance to EXT 1 or
EXT 2 on the DVD recorder system.
Press OK to confirm.
➜ AUDIO -> is displayed.
Press 4 repeatedly to select either
➜ EXT1 or EXT2 if you connected the appliance to EXT 1
or EXT 2 only (no digital audio connection between the
appliance and the DVD recorder system),
➜ LIN1 or LIN2 if you connected the audio output of
the appliance to LINE IN 1 or LINE IN 2 (available only if
you selected VIDEO ->NONE),
➜ DIG if you connected the digital coaxial output of the
appliance to DIGITAL IN,
➜ OPT if you connected the digital optical output of the
appliance to OPTICAL IN on the DVD recorder system.
Press OK to store the settings.
➜ STORED is displayed.
5 Press AUDIO MENU to exit the audio menu.
System settings
18
English
TV
CDR/TAPE
CAM 1/2
CD
TUNER
SAT
MENU
VCR/GAME
DVD/MON
REC/OTR
SELECT
AUDIODISC
É
É
0
OK
H
1
3
2
4
6
5
79
8
SYSTEM
2
É
É

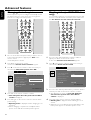
After changing the connections of the
CD recorder p, CD player q or tape deck k
1 Press AUDIO MENU to enter the audio menu.
2 Press 4 repeatedly to select INPUTS, then press 2.
3 Turn SOURCE on the DVD recorder system or use
the source keys on the remote control to select either
the CD recorder, CD player or tape deck.
➜ AVAILABLE and YES or NO are displayed.
4 If the appliance is not connected to the
DVD recorder system:
Press 4 repeatedly to select NO, then press OK.
➜ STORED is displayed.
If the appliance is connected to the DVD recorder
system:
Press 4 repeatedly to select YES, then press OK.
➜ AUDIO -> is displayed.
Press 4 repeatedly to select
➜ LIN1 or LIN2 if you connected the analogue audio
output of the appliance to LINE IN 1 or LINE IN 2,
➜ DIG if you connected the digital coaxial output of the
appliance to DIGITAL IN,
➜ OPT if you connected the digital optical output of the
appliance to OPTICAL IN on the DVD recorder system.
Press OK to store the settings.
➜ STORED is displayed.
5 Press AUDIO MENU to exit the audio menu.
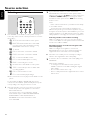
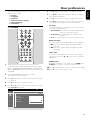
When changing the speaker
setup
If you have connected, disconnected or moved the speakers
after the initial installation, you need to change the speaker
settings.
Setting which speakers are connected
1 Press AUDIO MENU to enter the audio menu.
2 Press 4 repeatedly to select LS SETUP, then press 2.
3 Press 4 repeatedly to select
➜ CNTR LS: the centre speaker or
➜ REAR LS: the rear speakers.
4 Then press 2.
5 Press 4 repeatedly to select
➜ YES if the selected speaker type is connected or
➜ NO if the selected speaker type is not connected.
6 Press OK to store the setting or 1 to exit without storing.
00
If necessary, repeat steps 3–6 for the other speaker type.
7 Press AUDIO MENU to exit the audio menu.
Setting the distance of your listening position to
the speakers
1 Press AUDIO MENU to enter the audio menu.
2 Press 4 repeatedly to select LS DIST, then press 2.
3 Press 4 repeatedly to select
➜ DIST FRNT: distance to the front speakers,
➜ DIST CNTR: distance to the centre speaker or
➜ DIST REAR: distance to the rear speakers.
4 Then press 2.
5 Press 3 or 4 repeatedly to set the distance of your
listening position to the speakers (from 1 to 10 meters).
6 Press OK to store the setting or 1 to exit without storing.
00
To set the distance to another speaker type, repeat steps
3–6.
7 Press AUDIO MENU to exit the audio menu.
System settings
19
English

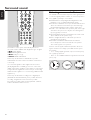
Searching TV channels
1 Switch your TV set on. If necessary set the TV to the
correct audio/video channel for the DVD recorder system.
Such channels may be called AUX or AUXILIARY IN,
AUDIO/VIDEO or A/V IN, EXT1, EXT2 or EXTERNAL IN,
etc.These channels are often near channel 00.
2 Press SYSTEM MENU.
3 Press 1 repeatedly to select A.
4 Press 4 repeatedly to select y Installation, then press 2.
5 Press 4 repeatedly to select either
➜ Autom. Search: to search for TV channels automatically,
➜ Manual search: to add additional or missing TV channels
manually.
Note: If your TV supports EasyLink, please add new TV channels
on your TV first.Then select Autom. Search to transfer the
changes to the DVD recorder system. Some of the menu options
below will not be available with EasyLink.
6 Press 2 to enter the selected menu.
Autom. Search
Select Autom. Search if new TV channels are available
with your antenna or cable TV system. All previously stored
TV channels will be overwritten.
1 Press 2 to start the automatic search.
➜ Searching for TV channels and xx Channels
found appear, where xx indicates the number of
TV channels found.
2 After the search is complete, press SYSTEM MENU to exit.
Note: If your TV supports EasyLink the TV channels will be
stored in the same order as on your TV.
Manual search
If not all available TV channels have been found during the
initial installation, you can search for the missing TV channels
manually.
1 ➜ Channel/freq. is highlighted.
Press 2 repeatedly to select
➜ CH or S-CH if you want to enter the channel number,
➜ Freq. if you want to enter the frequency of the TV
channel.
2 Press 4 to select Entry/search.
3 Press 0–9 repeatedly to enter the channel number or
the frequency of the desired TV channel.
00
If you do not know the channel number or frequency,
press 2 to start automatic search. Repeat this step until
the desired TV channel is found.
4 Press 4 to select Programme number.
5 Press 0–9 or 3 or 4 repeatedly to enter the programme
number where to store the TV channel.
Note: If Programme number already used appears on
the TV screen, select another programme number. Otherwise
the TV channel with the same programme number will be
deleted.
6 Press OK to store the new TV channel or SYSTEM MENU
to exit without storing the changes.
7 Press SYSTEM MENU to exit the system menu.
System settings
20
English
TV
CDR/TAPE
CAM 1/2
CD
TUNER
SAT
MENU
VCR/GAME
DVD/MON
REC/OTR
SELECT
AUDIODISC
É
É
0
OK
H
1
3
2
4
6
5
79
8
SYSTEM
2
É
É
A página está carregando...
A página está carregando...
A página está carregando...
A página está carregando...
A página está carregando...
A página está carregando...
A página está carregando...
A página está carregando...
A página está carregando...
A página está carregando...
A página está carregando...
A página está carregando...
A página está carregando...
A página está carregando...
A página está carregando...
A página está carregando...
A página está carregando...
A página está carregando...
A página está carregando...
A página está carregando...
A página está carregando...
A página está carregando...
A página está carregando...
A página está carregando...
A página está carregando...
A página está carregando...
A página está carregando...
A página está carregando...
A página está carregando...
A página está carregando...
A página está carregando...
A página está carregando...
A página está carregando...
A página está carregando...
A página está carregando...
A página está carregando...
A página está carregando...
A página está carregando...
A página está carregando...
A página está carregando...
A página está carregando...
A página está carregando...
A página está carregando...
A página está carregando...
A página está carregando...
A página está carregando...
A página está carregando...
A página está carregando...
-
 1
1
-
 2
2
-
 3
3
-
 4
4
-
 5
5
-
 6
6
-
 7
7
-
 8
8
-
 9
9
-
 10
10
-
 11
11
-
 12
12
-
 13
13
-
 14
14
-
 15
15
-
 16
16
-
 17
17
-
 18
18
-
 19
19
-
 20
20
-
 21
21
-
 22
22
-
 23
23
-
 24
24
-
 25
25
-
 26
26
-
 27
27
-
 28
28
-
 29
29
-
 30
30
-
 31
31
-
 32
32
-
 33
33
-
 34
34
-
 35
35
-
 36
36
-
 37
37
-
 38
38
-
 39
39
-
 40
40
-
 41
41
-
 42
42
-
 43
43
-
 44
44
-
 45
45
-
 46
46
-
 47
47
-
 48
48
-
 49
49
-
 50
50
-
 51
51
-
 52
52
-
 53
53
-
 54
54
-
 55
55
-
 56
56
-
 57
57
-
 58
58
-
 59
59
-
 60
60
-
 61
61
-
 62
62
-
 63
63
-
 64
64
-
 65
65
-
 66
66
-
 67
67
-
 68
68


Philips LX9000R Manual do usuário
- Categoria
- Leitores de DVD
- Tipo
- Manual do usuário
- Este manual também é adequado para
em outras línguas
- English: Philips LX9000R User manual
Artigos relacionados
Outros documentos
-
Sony SA-N11 Manual do usuário
-
-
NAD 515 Manual do usuário
-
Yamaha DVX-S200 Manual do usuário
-
Yamaha DVXS303 Manual do usuário
-
Yamaha DVX-S100 Manual do usuário
-
-
Yamaha RX-V1500 Manual do proprietário
-
-