
CONVECTION MICROWAVE OVEN
USE AND CARE GUIDE
CLEANING, MAINTENANCE, AND MORE

2
|
Wolf Customer Care 800.222.7820
CONVECTION MICROWAVE OVEN
Contents
4 Safety Precautions
6 Installation
7 Convection Microwave Oven Features
8 Microwave Oven Operation
16 Care Recommendations
17 Troubleshooting
19 Wolf Warranty

wolfappliance.com
|
3
Customer Care
The model and serial number are printed on the enclosed
product registration card. Both numbers are also listed on
the product rating plate. Refer to page 6 for rating plate
location. For warranty purposes, you will also need the date
of installation and name of your authorized Wolf dealer.
Record this information below for future reference.
SERVICE INFORMATION
Model Number
Serial Number
Date of Installation
Certied Service Name
Certied Service Number
Authorized Dealer
Dealer Number
If your product ever needs attention, be sure to use a
Wolf Factory Certied Service provider recommended
by our Customer Care Center, or select one from our list
of providers available at wolfappliance.com/locator. All
Factory Certied Service providers are carefully selected
and thoroughly trained by us.
CONVECTION MICROWAVE OVEN
Important Note
To ensure this product is installed and operated as safely
and efciently as possible, take note of the following types
of highlighted information throughout this guide:
IMPORTANT NOTE highlights information that is especially
important.
CAUTION indicates a situation where minor injury or product
damage may occur if instructions are not followed.
WARNING states a hazard that may cause serious injury or
death if precautions are not followed.
IMPORTANT NOTE: Throughout this guide, dimensions in
parentheses are millimeters unless otherwise specied.

4
|
Wolf Customer Care 800.222.7820
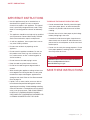
SAFETY PRECAUTIONS
When using electrical appliances, basic safety precau-
tions should be followed, including the following:
WARNING
To reduce the risk of burns, electric shock, re,
injury to persons, or exposure to excessive micro-
wave energy, observe the following:
• Read all instructions before using the appliance.
• Read and follow the specic PRECAUTIONS TO
AVOID POSSIBLE EXPOSURE TO EXCESSIVE
MICROWAVE ENERGY.
• This appliance must be properly grounded. See
GROUNDING INSTRUCTIONS on page 6.
• Install or locate this appliance only in accordance
with installation instructions on page 6.
• Some products such as whole eggs and sealed
containers (e.g. closed glass jars) are able to
explode and should not be heated in this oven.
• Do not operate this appliance if it has a damaged
cord or plug, if it is not working properly, or if it has
been damaged or dropped.
IMPORTANT INSTRUCTIONS
PRECAUTIONS TO AVOID
POSSIBLE EXPOSURE TO
EXCESSIVE MICROWAVE
ENERGY
• Do not attempt to operate this microwave oven
with the door open since open-door operation
can result in harmful exposure to microwave
energy. It is important not to defeat or tamper
with the safety interlocks.
• Do not place any object between the micro-
wave oven front face and the door or allow soil
or cleaner residue to accumulate on the sealing
surfaces.
• Do not operate the microwave oven if it is
damaged. It is particularly important that the
oven door close properly and that there is no
damage to the: (1) door (bent), (2) hinges and
latches (broken or loosened), (3) door seals
and sealing surfaces.
• The microwave oven should not be adjusted or
repaired by anyone except properly qualied
service personnel.

wolfappliance.com
|
5
SAFETY PRECAUTIONS
IMPORTANT INSTRUCTIONS
• Use this appliance only for its intended use as
described in this guide. Do not use corrosive
chemicals or vapors in this appliance. This type of
oven is specically designed to heat, cook, or dry
food. It is not designed for industrial or laboratory
use.
• This appliance should be serviced only by qualied
service personnel. Contact Wolf Factory Certied
Service for examination, repair, or adjustment.
• As with any appliance, close supervision is neces-
sary when used by children.
• Do not cover or block any openings on the
appliance.
• Do not store this appliance outdoors. Do not use
this product near water (e.g. near a kitchen sink,
in a wet basement, or near a swimming pool, or
similar locations).
• Do not immerse the cord or plug in water.
• Keep the cord away from heated surfaces.
• Do not let the cord hang over edge of table or
counter.
• When cleaning the appliance sealing surfaces that
come together on closing the door, use only mild,
nonabrasive soaps or detergents applied with a
sponge or soft cloth. Refer to Care Recommenda-
tions on page 16.
• Liquids, such as water, coffee, or tea are able to
be overheated beyond the boiling point without
appearing to be boiling. Visible bubbling or boiling
when the container is removed from the microwave
oven is not always present. THIS COULD RESULT
IN VERY HOT LIQUIDS SUDDENLY BOILING
OVER WHEN THE CONTAINER IS DISTURBED OR
A UTENSIL IS INSERTED INTO THE LIQUID.
TO REDUCE THE RISK OF FIRE IN THE OVEN
• Do not overcook food. Carefully attend the appli-
ance when paper, plastic, or other combustible
materials are placed inside the oven to facilitate
cooking.
• Remove wire twist ties from paper or plastic bags
before placing bag in the oven.
• If materials inside the oven ignite, keep the oven
door closed, turn the oven off and disconnect the
power cord, or shut off power at the fuse or circuit
breaker panel.
• Do not use the cavity for storage purposes. Do not
leave paper products, cooking utensils, or food in
the cavity when not in use.
WARNING
PROPOSITION 65 FOR CALIFORNIA RESIDENTS
Cancer and Reproductive Harm—
www.P65Warnings.ca.gov
SAVE THESE INSTRUCTIONS

6
|
Wolf Customer Care 800.222.7820
Electrical
Installation must comply with all applicable electrical codes.
Locate the electrical supply within reach of the power cord.
For built-in applications, refer to installation instructions
provided with the trim kit for electrical location.
ELECTRICAL REQUIREMENTS
Electrical Supply grounded, 120 VAC, 60 Hz
Service 15 amp dedicated circuit
Receptacle 3-prong grounding-type
Power Cord 4'
(1.2 m)
GROUNDING INSTRUCTIONS
This appliance must be grounded. The microwave oven
is equipped with a cord having a grounding wire with a
grounding plug. It must be plugged into a wall receptacle
that is properly installed and grounded in accordance with
the National Electrical Code and local codes and ordi-
nances. In the event of an electrical short circuit, grounding
reduces risk of electric shock by providing an escape wire
for the electric current.
WARNING
Improper use of the grounding plug can result in a risk
of electric shock. Do not use an extension cord. If the
power cord is too short, have a qualied electrician or
service technician install an outlet near the appliance.
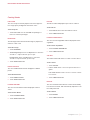
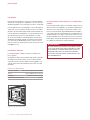
Installation
The convection microwave oven can be installed in a
standard or ush inset application using accessory trim
to match Wolf E Series or L Series Ovens. Trim kits are
avail able through an authorized Wolf dealer. For local
dealer information, visit the nd a showroom section of our
website, wolfappliance.com. Installation instructions are
provided with the trim kit.
The convection microwave oven can also be used free-
standing. For freestanding applications, a minimum 2"
(51)
space is required at the top, rear, and sides of the micro-
wave oven for air circulation.
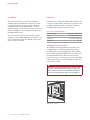
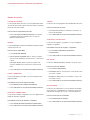
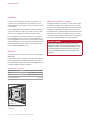
INSTALLATION
Rating plate location
RATING PLATE

wolfappliance.com
|
7
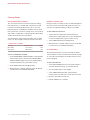
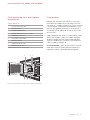
MICROWAVE OVEN FEATURES
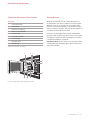
Convection Microwave Oven Features
FEATURES
1
Product Rating Plate
2
Control Panel
3
Interactive Visual Display
4
One-Touch Door Opening
5
Convection Fan
6
Removable Turntable
7
Interior Lighting
8
Waveguide Cover
9
Oven Riser (2)*
*Not used for microwave only cooking.
Getting Started
We know you are eager to start cooking, but before you
do, please take some time to read this use and care guide.
Whether you are an occasional cook or an expert chef, it
will be to your benet to familiarize yourself with the safety
practices, features, operation, and care recommendations of
your Wolf Convection Microwave Oven.
Clean the oven thoroughly with hot water and mild deter-
gent. Rinse and dry with a soft cloth to remove any residual
oil and grease left from the manufacturing process. Refer to
Care Recommendations on page 16.
IMPORTANT NOTE: The microwave oven cannot be used for
cooking without the turntable in place. Never restrict move-
ment of the turntable.
Convection Microwave Oven with E Series Trim
3
4
5 7
2
6 9
8
1

8
|
Wolf Customer Care 800.222.7820
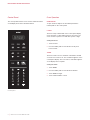
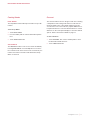
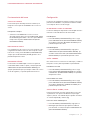
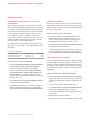
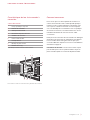
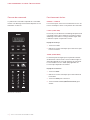
Control Panel
The control panel features touch controls and an interactive
visual display. Refer to the illustration below.
MICROWAVE OVEN OPERATION
Control panel
Oven Operation
OPEN DOOR
To open the door, depress the area directly below the
number pads on the control panel.
CLOCK
The time of day is illuminated on the control panel display
unless the timer or other display functions are active. The
clock must be set prior to use and after a power outage.
Setting the Clock:
1 Touch CLOCK.
2 Use the number pads to enter the time of day, then
touch CLOCK.
TIMER
The timer can be set for a maximum of 99 minutes and 99
seconds. Once a time is set, the countdown appears on the
control panel display. The oven chimes, and “END” appears
on the display when complete.
Setting the Timer:
1 Touch TIMER.
2 Use the number pads to enter the timer duration.
3 Touch TIMER to begin.
4 Touch STOP/CLEAR to cancel.

wolfappliance.com
|
9
MICROWAVE OVEN OPERATION
Oven Operation
TIME ADJUSTMENT
The time adjustment feature increases or decreases the
cook time for sensor cooking modes.
To Adjust the Time:
1 Select the desired sensor cooking mode, then touch
POWER LEVEL once for “MORE” or twice for “LESS”
time before touching START/QUICK ON.
HELP INDICATOR
Gourmet, Auto Defrost, and Sensor Cooking settings offer
a helpful cooking hint. To check the hint, touch SETTINGS
whenever the HELP indicator appears on the control panel
display.
QUICK ON
The Quick On feature cooks continuously at 100% power
by touching and holding START/QUICK ON (e.g. melting
cheese). The maximum cook time is 30 seconds and can be
repeated up to 10 times.
Settings
The Settings feature allows the user to select individual pref-
erences. Preferences must be reset after a power outage.
CONTROL PANEL LOCK
The control panel lock feature prevents unwanted micro-
wave oven operation.
To Lock:
1 Touch SETTINGS, touch 1, then touch START/QUICK
ON. “LOCK ON” appears on the control panel display.
To Unlock:
1 Touch SETTINGS, then touch START/QUICK ON.
“CHILD LOCK OFF” appears on the control panel
display.
AUDIBLE SIGNAL
An audible signal chimes with every touch and upon cook
time and timer completion.
To Eliminate the Signal:
1 Touch SETTINGS, touch 2, then touch STOP/CLEAR.
“SOUND OFF” appears on the control panel display.
To Restore the Signal:
1 Touch SETTINGS, touch 2, then touch START/QUICK
ON. “SOUND ON” appears on the control panel display.
LANGUAGE/WEIGHT SELECTION
This feature allows the user to choose language and weight
preferences. Language options include English, Spanish,
and French. Weight measurements can be displayed in
imperial (lb) or metric (kg).
To Select Language/Weight:
1 Touch SETTINGS, then touch 4.
2 Continue to touch until the desired language/weight is
displayed, then touch START/QUICK ON.

10
|
Wolf Customer Care 800.222.7820
MICROWAVE OVEN OPERATION
Manual Cooking
POWER LEVEL
The microwave oven has ten preset power levels.
To Cook Manually at 100% Power:
1 Use the number pads to enter the desired cook time.
2 Touch START/QUICK ON.
3 The oven chimes, and “END” appears on the control
panel display when complete.
To cook manually at a power level less than 100%, touch
POWER LEVEL, then touch the number pad to select the
desired power level (e.g. 7 for 70% power). To defrost
manually, adjust the power level to 30%.
MULTIPLE SEQUENCE COOKING
The microwave oven can be programmed for up to four
automatic cooking sequences for microwave modes and
two for Convection, Micro Bake, and Micro Roast modes
(e.g. start at 100%, then switch to 50% power).
To Use Multiple Sequence Cooking:
1 Touch POWER LEVEL twice (100% power). Use the
number pads to enter the desired cook time.
2 Touch POWER LEVEL, then touch 5 (50% power). Use
the number pads to enter the desired cook time.
3 Touch START/QUICK ON.
AUTO START
The microwave oven can be programmed to begin cooking
automatically at a designated time of day. The clock must
be set to the correct time for Auto Start to function properly.
To Use Auto Start:
1 Touch SETTINGS, then touch 3 for Auto Start.
2 Use the number pads to enter the start time.
3 Touch CLOCK.
4 Use the number pads to enter the cook time. Adjust the
power level if necessary.
5 Touch START/QUICK ON. The auto start time appears
on the control panel display. Touch CLOCK to view the
time of day.

wolfappliance.com
|
11
MICROWAVE OVEN OPERATION
Cooking Modes
POPCORN
The sensor Popcorn feature prepares microwave popcorn.
Use only popcorn packaged for microwave ovens.
To Use Popcorn:
1 Touch POPCORN once for standard size packages or
twice for snack size packages.
BEVERAGE
The Beverage feature will reheat a beverage or prepare hot
water for coffee or tea.
To Use Beverage:
1 Touch BEVERAGE.
2 To reheat beverage: Touch 1 multiple times to select the
amount in
1
/2 cup increments, up to 2 cups.
For hot water: Touch 2 multiple times to select the
amount in 1 cup increments, up to 6 cups.
3 Touch START/QUICK ON.
BAKED POTATO
The sensor Baked Potato feature will prepare a baked
potato.
To Use Baked Potato:
1 Touch BAKED POTATO.
2 Touch START/QUICK ON.
FROZEN ENTREE
The sensor Frozen Entree feature will prepare a frozen
entree.
To Use Frozen Entree:
1 Touch FROZEN ENTREE.
2 Touch START/QUICK ON.
BACON
The Bacon feature will prepare up to 6 slices of bacon.
To Use Bacon:
1 Touch BACON, then select the number of slices.
2 Touch START/QUICK ON.
FROZEN VEGETABLES
The sensor Frozen Vegetables feature will prepare frozen
vegetables.
To Use Frozen Vegetables:
1 Touch FROZEN VEGETABLES.
2 Touch START/QUICK ON.
SOFTEN
The Soften feature will soften ice cream or cream cheese.
To Use Soften:
1 Touch SOFTEN.
2 For ice cream: Touch 1 once for 1 pint or twice for
1
/2
gallon.
For cream cheese: Touch 2 once for 3 ounces or twice
for 8 ounces.
3 Touch START/QUICK ON.
REHEAT
The sensor Reheat feature detects moisture and humidity
from food as it reheats, and automatically adjusts the cook
time and power level.
To Use Reheat:
1 Touch REHEAT.
2 Touch START/QUICK ON.

12
|
Wolf Customer Care 800.222.7820
MICROWAVE OVEN OPERATION
MANUAL CONVECTION
During convection cooking, hot air is circulated throughout
the oven to brown and crisp foods quickly and evenly. To
view the set temperature during cooking, touch CONV.
To Select Manual Convection:
1 Touch CONV. If a temperature other than preset is
desired, touch CONV again, then use the number pads
to enter the temperature (e.g. 6 for 350°F
(175°C)).
2 Touch START/QUICK ON to begin preheat.
3 When preheat is complete, add food, enter the desired
cook time, then touch START/QUICK ON.
AUTO DEFROST
The Auto Defrost feature uses preset settings to defrost
select food items. Refer to the Auto Defrost Guide on page
15. For foods not listed, defrost manually. Refer to Power
Level on page 10.
To Select Auto Defrost:
1 Touch AUTO DEFROST, then use the number pads to
select the desired food (e.g. 3 for Chicken Pieces).
2 Use the number pads to enter weight.
3 Touch START/QUICK ON. After a period of time,
the microwave oven will stop so food can be checked.
4 Open the door and turn food over.
5 Repeat until defrost is complete.
Cooking Modes
MICRO BAKE/MICRO ROAST
The convection microwave oven has two preset settings
that make it easy to cook with both convection heat and
microwave automatically. Microwave-safe or oven-safe
bakeware may be used. With the exception of those foods
that cook best by convection cooking alone, most foods are
well suited to combination cooking using either Micro Bake
or Micro Roast. Refer to the chart below.
The temperatures, which range from 100°F
(40°C) to 450°F
(230°C)
, can be changed; however, the power level cannot.
COMBINATION COOKING
SETTING TEMPERATURE POWER
Micro Bake 325°F (165°C) 10%
Micro Roast 300°F
(150°C) 30%
To Select Combination Cooking:
1 Touch MICRO BAKE or MICRO ROAST. If a temperature
other than the preset is desired, touch MICRO BAKE
or MICRO ROAST again, then use the number pads to
enter the temperature (e.g. 6 for 350°F
(175°C)).
2 Touch START/QUICK ON to begin preheat.
3 When preheat is complete, add food, enter the desired
cook time, then touch START/QUICK ON.

wolfappliance.com
|
13
MICROWAVE OVEN OPERATION
Cooking Modes
KEEP WARM
The Keep Warm feature will keep food warm for up to 90
minutes.
To Use Keep Warm:
1 Touch KEEP WARM.
2 Use the number pads to enter the desired keep warm
time.
3 Touch START/QUICK ON.
ADD MINUTE
The Add Minute feature cooks for one minute at 100% by
touching ADD MINUTE. Touch multiple times to increase
the cook time. Each touch increases the cook time by one
minute. This feature cannot be used with Defrost, Keep
Warm, or Gourmet.
Gourmet
The Gourmet feature removes the guesswork from selecting
a temperature and cooking mode. Select a food from the
Gourmet Guide on the control panel and the microwave
oven does the rest. Some foods may require additional con-
trol panel interaction to select the desired doneness. Follow
directions on the control panel display to select the desired
options. Refer to the Gourmet Guide on page 14.
To Select Gourmet:
1 Touch GOURMET, then use the number pads to select
the desired food and doneness.
2 Touch START/QUICK ON.

14
|
Wolf Customer Care 800.222.7820
MICROWAVE OVEN OPERATION
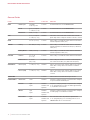
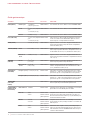
Gourmet Guide
FOOD AMOUNT POSITION METHOD
BEEF 1 Hamburgers 1–8 patties
1
/4 lb (115 g) each
Low rack For desired doneness, touch POWER LEVEL.
2 Steak
3
/4"–1" (19–25) thick
1
/2–2 lb (230 g–.9 kg)
Low rack For desired doneness, touch POWER LEVEL.
3 Roast Beef 2–4 lb
(.9–1.8 kg) Low rack For desired doneness, touch POWER LEVEL.
FISH
3
/4"–1" (19–25) thick
1
/4–2 lb (115 g–.9 kg)
Turntable Place sh in a microwave-safe container and cover with
plastic wrap. After cooking, let stand for 3 minutes, covered.
PORK 2–3
1
/2 lb (.9–1.6 kg) Low rack After cooking, cover with foil and let stand for 5–10 minutes.
Internal temperature 160°F (70°C).
TURKEY 1 Turkey 6
1
/2–16 lb (2.9–7.3 kg) Low rack After cooking, cover with foil and let stand for 10 minutes.
Internal temperature of white meat 170°F (75°C), dark meat
180°F (80°C).
2 Turkey Breast 3–6 lb
(1.4–2.7 kg) Low rack After cooking, cover with foil and let stand for 10 minutes.
Internal temperature 170°F (75°C).
CHICKEN 1 Chicken 2
1
/2–7
1
/2 lb
(1.1–3.4 kg)
Low rack After cooking, cover with foil and let stand for 5–10 minutes.
2 Chicken Pieces
1
/2–3
1
/2 lb
(230 g–1.6 kg)
Low rack After cooking, let stand for 3–5 minutes. Internal tempera-
ture of white meat 170°F (75°C), dark meat 180°F (80°C).
VEGETABLES 1 Frozen (soft)
1
/4–2 lb (115 g–.9 kg) Turntable Place in a microwave-safe container. Add 1–4 tsp (5–20 ml)
water. After cooking, stir, then let stand for 2–5 minutes,
covered.
2 Frozen (hard)
1
/4–2 lb (115 g–.9 kg) Turntable Place in a microwave-safe container. Add 1–4 tsp (5–20 ml)
water. After cooking, stir, then let stand for 2–5 minutes,
covered.
SLOW COOK Low rack Place food in an oven-safe dish for up to 4 hours.
BAKED GOODS 1 Bundt Cake 1 cake Turntable Prepare according to package or recipe directions and place
in a greased and oured Bundt pan.
2 Cookies 1 pan
2 pans
Turntable
Turntable and
high rack
Prepare according to package or recipe directions and place
on 12"
(305) pizza pan(s). Cookies should be approximately
2" (51) diameter for best results.
3 Mufns 1 pan
2 pans
Turntable
Turntable and
high rack
Prepare according to package or recipe directions and place
in mufn pan(s). 6–12 medium size mufns.
4 French Fries 1 pan
2 pans
Low rack
Turntable and
high rack
Use frozen French fries. No preheat is required. Place
on 12"
(305) pizza pan(s). For shoestring potatoes, touch
POWER LEVEL twice to enter less time.

wolfappliance.com
|
15
MICROWAVE OVEN OPERATION
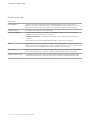
Auto Defrost Guide
NUMBER FOOD AMOUNT METHOD
1 Ground Meat
1
/2–3 lb (230 g–1.4 kg) Remove any thawed pieces after each audible signal. Let stand for 5–10
minutes, covered.
2 Steaks, Chops
1
/2–4 lb (230 g–1.8 kg) After each audible signal, rearrange. If there are warm or thawed portions,
shield with small at pieces of aluminum foil. Remove any meat that is
almost defrosted. Let stand for 10–20 minutes, covered.
3 Chicken Pieces
1
/2–3 lb (230 g–1.4 kg) After each audible signal, rearrange the pieces or remove should they
become warm or thawed. Let stand for 10–20 minutes, covered.

16
|
Wolf Customer Care 800.222.7820
CARE RECOMMENDATIONS
Care Recommendations
CLEANING
Stainless steel Use a nonabrasive stainless steel cleaner and apply with a soft lint-free cloth. To bring out the natural luster,
lightly wipe the surface with a water-dampened microber cloth followed by a dry polishing chamois. Always
follow the grain of stainless steel.
Door front Spray glass cleaner on a cloth to clean.
Control panel Use a spray degreaser to remove ngerprints and food soil. Spray on a cloth before wiping the control panel.
IMPORTANT NOTE: Do not spray cleaners directly on the control panel.
To lock the control panel before cleaning, refer to page 9.
Interior Wipe with a soft damp cloth. Do not use abrasive or harsh cleaners or scouring pads. For heavier soil, use
baking soda or a mild soap; rinse thoroughly with hot water. Do not use chemical oven cleaners.
Turntable Remove for cleaning. Wash in water with mild soap. For stubborn stains, use a mild cleanser and non-abrasive
scouring sponge. The turntable is dishwasher-safe.
Waveguide cover Located on the inside top of the microwave interior. Carefully wipe with a soft damp cloth. Do not remove the
waveguide cover.

wolfappliance.com
|
17
TROUBLESHOOTING
Troubleshooting
Microwave oven does not operate.
• Verify power is on.
• Verify electrical power to the microwave oven and home
circuit breaker is on.
Food in the microwave oven is not heating.
• Check controls to verify the proper setting.
The interior light does not work.
• The light bulb is loose or burned out. Contact Wolf
Factory Certied Service.
The touch controls will not operate.
• The control panel lock is on. Refer to page 9 to unlock.
The display ashes.
• Power outage. Touch STOP/CLEAR and reset the clock.
If the microwave oven was in use, reset the cooking
function.
Radio or TV interference caused by microwave oven.
• Verify the microwave oven is on a different electrical
circuit, relocate the radio or TV as far away from the
microwave oven as possible, or check the position and
signal of antenna.

18
|
Wolf Customer Care 800.222.7820
TROUBLESHOOTING
Service
• Maintain the quality built into your product by contacting
Wolf Factory Certied Service. For the name of the
nearest Wolf Factory Certied Service, check the contact
and support section of our website, wolfappliance.com,
or call Wolf Customer Care at 800-222-7820.
• When contacting service, you will need the model and
serial number of your product. Both numbers are listed
on the product rating plate. Refer to page 6 for rating
plate location.
• For warranty purposes, you will also need the date of
installation and name of your authorized Wolf dealer. This
information should be recorded on page 3 of this guide.
Sub-Zero, Sub-Zero & Design, Sub-Zero & Snowake Design, Dual Refrigeration, The Living Kitchen, Great American Kitchens The Fine Art of Kitchen Design, Wolf, Wolf &
Design, Wolf Gourmet, W & Design, red colored knobs, Cove, and Cove & Design are registered trademarks and service marks of Sub-Zero Group, Inc. and its subsidiaries.
All other trademarks are property of their respective owners in the United States and other countries.

Wolf Appliance Residential Limited Warranty
FOR RESIDENTIAL USE
FULL TWO YEAR WARRANTY*
For two years from the date of original installation, this Wolf Appliance product warranty covers all parts
and labor to repair or replace, under normal residential use, any part of the product that proves to be
defective in materials or workmanship. All service provided by Wolf Appliance under the above warranty
must be performed by Wolf factory certied service, unless otherwise specied by Wolf Appliance, Inc.
Service will be provided during normal business hours.
LIMITED FIVE YEAR WARRANTY
For ve years from the date of original installation, Wolf Appliance will repair or replace the following
parts that prove to be defective in materials or workmanship: gas burners (excludes appearance), electric
heating elements, blower motors (ventilation hoods), electronic control boards, magnetron tubes and
induction generators. If the owner uses Wolf factory certied service, the service provider will repair or
replace these parts with the owner paying for all other costs, including labor. If the owner uses non-certi-
ed service, the owner must contact Wolf Appliance, Inc. (using the information below) to receive repaired
or replacement parts. Wolf Appliance will not reimburse the owner for parts purchased from non-certied
service or other sources.
TERMS APPLICABLE TO EACH WARRANTY
The warranty applies only to products installed for normal residential use. The warranty applies only to
products installed in any one of the fty states of the United States, the District of Columbia or the ten
provinces of Canada. This warranty does not cover any parts or labor to correct any defect caused by
negligence, accident or improper use, maintenance, installation, service or repair.
THE REMEDIES DESCRIBED ABOVE FOR EACH WARRANTY ARE THE ONLY ONES THAT WOLF APPLIANCE,
INC. WILL PROVIDE, EITHER UNDER THIS WARRANTY OR UNDER ANY WARRANTY ARISING BY OPERATION
OF LAW. WOLF APPLIANCE, INC. WILL NOT BE RESPONSIBLE FOR ANY CONSEQUENTIAL OR INCIDEN-
TAL DAMAGES ARISING FROM THE BREACH OF THIS WARRANTY OR ANY OTHER WARRANTY, WHETHER
EXPRESS, IMPLIED OR STATUTORY.
Some states do not allow the exclusion or limitation of incidental or consequential damages, so the above
limitation or exclusion may not apply to you. This warranty gives you specic legal rights and you may also
have other legal rights that vary from state to state.
To receive parts and/or service and the name of Wolf factory certied service nearest you, contact Wolf
Appliance, Inc., P.O. Box 44848, Madison, WI 53744; check the contact & support section of our website,
wolfappliance.com, email us at [email protected] or call 800-222-7820.
*Stainless steel (doors, panels, handles, product frames and interior surfaces) are covered by a limited
60-day parts and labor warranty for cosmetic defects.
*Replacement lters for ventilation hood recirculating kits are not covered by the product warranty.

2
|
Atención al cliente de Wolf 800.222.7820
HORNO DE MICROONDAS DE CONVECCIÓN
Contenido
4 Precauciones de seguridad
6 Instalación
7 Características del horno de microondas de convección
8 Funcionamiento del horno de microondas
16 Recomendaciones sobre el cuidado
17 Resolución de problemas
19 Garantía de Wolf
A página está carregando...
A página está carregando...
A página está carregando...
A página está carregando...
A página está carregando...
A página está carregando...
A página está carregando...
A página está carregando...
A página está carregando...
A página está carregando...
A página está carregando...
A página está carregando...
A página está carregando...
A página está carregando...
A página está carregando...
A página está carregando...
A página está carregando...
A página está carregando...
A página está carregando...
A página está carregando...
A página está carregando...
A página está carregando...
A página está carregando...
A página está carregando...
A página está carregando...
A página está carregando...
A página está carregando...
A página está carregando...
A página está carregando...
A página está carregando...
A página está carregando...
A página está carregando...
A página está carregando...
A página está carregando...
A página está carregando...
A página está carregando...
-
 1
1
-
 2
2
-
 3
3
-
 4
4
-
 5
5
-
 6
6
-
 7
7
-
 8
8
-
 9
9
-
 10
10
-
 11
11
-
 12
12
-
 13
13
-
 14
14
-
 15
15
-
 16
16
-
 17
17
-
 18
18
-
 19
19
-
 20
20
-
 21
21
-
 22
22
-
 23
23
-
 24
24
-
 25
25
-
 26
26
-
 27
27
-
 28
28
-
 29
29
-
 30
30
-
 31
31
-
 32
32
-
 33
33
-
 34
34
-
 35
35
-
 36
36
-
 37
37
-
 38
38
-
 39
39
-
 40
40
-
 41
41
-
 42
42
-
 43
43
-
 44
44
-
 45
45
-
 46
46
-
 47
47
-
 48
48
-
 49
49
-
 50
50
-
 51
51
-
 52
52
-
 53
53
-
 54
54
-
 55
55
-
 56
56


em outras línguas
- español: Sub-Zero MC24 Guía del usuario
- français: Sub-Zero MC24 Mode d'emploi
Artigos relacionados
-
Sub-Zero MDD24TE/S/TH Guia de usuario
-
Sub-Zero MD30PE/S Guia de usuario
-
-
Sub-Zero CSO30CM/B/TH Guia de usuario
-
Wolf SO24TE/S/TH Manual do usuário
-
-
Sub-Zero DO30PM/S/PH Guia de usuario
-
-
Sub-Zero DF606F Guia de usuario
-