StetSom POWER SUPPLY INFINITE BLACK 50A Manual do proprietário
- Tipo
- Manual do proprietário

Modelo / Model:
MANUAL DO USUÁRIO
USER MANUAL • MANUAL DE USUARIO • MANUALE UTENTE
50A

PT-BR
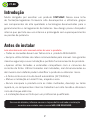
Introdução
Muito obrigado por escolher um produto STETSOM! Nossa nova linha
aos componentes de alta qualidade e tecnologias desenvolvidas para o
gerenciamento e carregamento de baterias. Seu design possui dissipador
interno que permite seu uso intenso e prolongado sem superaquecimento
ou perdas de potencia.
Antes de instalar
Leia atentamente este manual antes de usar o produto.
risco de choque elétricos.
Em caso de dúvidas, informe-se com a loja onde foi realizada a instalação
ou entre em contato com o nosso SAC: 018 2104 9412.
2

BR US - ES
2
3
1
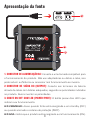
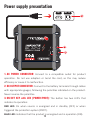
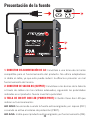
1. CONECTOR DE ALIMENTAÇÃO AC:
2. CONECTOR DE SAÍDA DC (OUTPUT): Conecte aos terminais da bateria
através de cabos com bitolas adequadas
no produto. Nunca inverter as polaridades.
3. CHAVE ON/OFF COM LED (POWER/PROT):
indicam seu funcionamento:
LED VERMELHO:
LED AZUL:
Apresentação da fonte
3

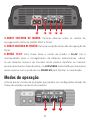
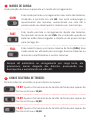
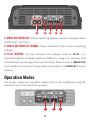
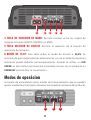
Modos de operação
4. CHAVE SELETORA DE MODOS:
5. CHAVE SELETORA DE TENSÃO:
fonte.
6. BOTÃO 15,4V: 15,4V
LED VERDE
aceso mesmo com o produto em STAND-BY
1 32
2 3 4 5 6
4

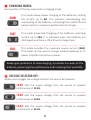
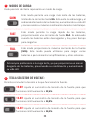
MODOS DE CARGA:
1
Sempre dê preferência ao carregamento por carga lenta, ele
proporciona menor desgaste das baterias, preservando seu
desempenho e aumentando sua vida úl.
limitando a corrente em até 8A
SLOW
FAST
FULL
fornecendo corrente de até 25A
para carrega-las.
(50A)
CHAVE SELETORA DE TENSÃO:
2
12.6V:
12,6V.
13.8V:
13,8V.
14.4V:
14,4V.
5

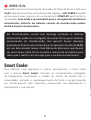
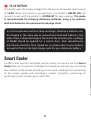
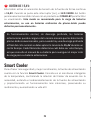
BOTÃO 15.4V:
15,4VLED VERDE
permanecerá aceso mesmo com o produto em STAND-BY para facilitar a
Esse modo é recomendado para o carregamento de baterias
estacionárias, ulizá-lo em baterias comuns de chumbo-ácido podem
danicá-las permanentemente.
Smart Cooler
com o recurso Smart Cooler. Consiste no monitoramento inteligente
3
Em funcionamento normal sem descarga profunda as baterias
estacionárias podem ser carregadas da mesma forma que as baterias
convencionais de chumbo-ácido, mas quando houver descarga
profunda ao nal do ciclo normal deve ser aplicada a tensão de 15,4V
por um determinado tempo. Cada fabricante determina qual deverá
ser esse tempo, desta forma consulte o manual da sua bateria para
saber qual o melhor ciclo de carga para a sua bateria estacionária.
6

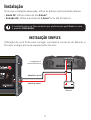
Bateria
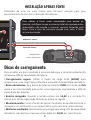
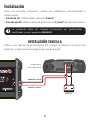
INSTALAÇÃO SIMPLES
fornecer energia para seu equipamento de som:
A instalação deve ser feita somente por prossionais qualicados e com
o produto DESLIGADO.
Amplicador e
outros disposivos
NEGATIVO: 33mm²
POSITIVO: 33mm²
Instalação
Saída DC33mm².
Entrada AC:1,5mm²
7

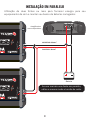
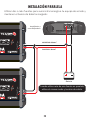
Amplicador e
outros disposivos
NEGATIVO: 33mm²
POSITIVO: 33mm²
Bateria
Ao usar mais de uma fonte em paralelo,
ulize o mesmo modo e tensão de saída.
INSTALAÇÃO EM PARALELO
equipamento de som e manter seu banco de baterias carregados:
8

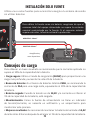
INSTALAÇÃO APENAS FONTE
Para ulizar a fonte como alimentação sem auxilio de
baterias, cerque-se que o consumo total dos equipamentos
alimentados não exceda a corrente nominal fornecida pela
fonte. Caso o pico de consumo exceda esse valor, a fonte
acionará proteção.
Dicas de carregamento
▪ Carregamento seguro: (SLOW) para
proporcionar uma carga mais profunda e aumentar a durabilidade da bateria.
▪ Banco de baterias: 250A25A
capacidade das baterias.
▪ Bateria carregada: 14,4V e a corrente for
▪ Monitoramento: Como a fonte
▪ Melhores resultados:
mantenha as mesmas alimentadas em 14,4V por mais 8 horas.
Amplicador e
outros disposivos
NEGATIVO: 33mm²
POSITIVO: 33mm²
9

Eventuais atualizações feitas neste manual serão disponibilizadas para consulta do consumidor
gratuitamente no site da marca. Recomenda-se que o manual atualizado seja consultado sempre
que necessário.
Imagens condas neste manual são meramente ilustravas, podendo diferenciar do produto real.
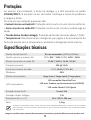
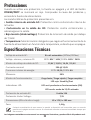
Especicações técnicas
Bi-volt automáco (127Vac/220Vac)
127V: 80V ~ 140V / 220V: 160V ~ 240V
12,6V / 13,8V / 14,4V / 15,4V
50A @ 12,6V
127V: 10,5A / 220V: 6A
90%
Carga lenta / Carga rápida / Carga plena
LED vermelho: Stand By/Prot
LED azul: Produto em funcionamento (LIGADO)
LED verde: Modo 15,4V ligado
Fusível 15A
7,5V
63 x 174,5 x 183 mm
1,4 Kg
Corrente nominal:
Proteções
POWER/PROT
e religue a fonte.
▪ Fusível interno entrada AC:
▪ Curto circuito na saída DC:
▪ Tensão Baixa (Undervoltage):
▪ Temperatura: Monitoramento inteligente que regula o funcionamento da
10

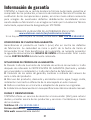
Termo de garantia
necessária para reparos de eventuais defeitos devidamente constatados
STETSOM.
CONSULTE A RELAÇÃO DE POSTOS AUTORIZADOS NO SITE:
www.stetsom.com.br/pt/assistencias-tecnica
conosco: SAC 018 2104 9412
CONDIÇÕES DE PRAZO DA GARANTIA:
de um dos documentos: NOTA DE VENDA
CERTIFICADO DE GARANTIA devidamente preenchido.
CASOS EM QUE SE PERDE A GARANTIA:
1.
2.
ou lote do produto.
3.
4.
5.
DÚVIDAS E ORIENTAÇÕES:
contato conosco através dos canais: Telefone: 018 2104 9412
E-mail: suporte@stetsom.com.br — Site: www.stetsom.com.br
11

12
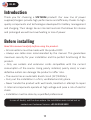
Introduction
STETSOM
Before installing
Read this manual carefully before using the product.
product.
In case of doubt, ask the store where the installaon was carried out or
contact our Customer Service: +55 18 2104 9412.
EN-US

1. AC POWER CONNECTOR:
2. DC OUTPUT CONNECTOR:
3. ON/OFF KEY with LED (POWER/PROT):
RED LED:
BLUE LED:
Power supply presentation
BR US - ES
2
3
1
13

14
Operation Modes
4. MODE SELECTOR KEY:
5. CHAVE SELETORA DE TENSÃO:
voltage.
6. 15.4V BUTTON: 15.4V.
GREEN LED
STAND-BY
1 32
2 3 4 5 6

15
CHARGING MODES:
1
Always give preference to slow-charging, it provides less wear on the
baeries, preserving their performance and increasing their useful life.
the current up to 8A
SLOW
FAST
FULL
current up to 25A.
(50A).
VOLTAGE SELECTOR KEY:
2
12.6V:
12.6V.
13.8V:
13.8V.
14.4V:
14.4V.

16
15.4V BUTTON:
at 15.4V. GREEN LED
STAND-BYThis mode
is recommended for charging staonary baeries, using it on ordinary
lead-acid baeries can permanently damage them.
Smart Cooler
Smart
Cooler
performance and increasing its useful life.
3
In normal operaon without deep discharge, staonary baeries can
be charged in the same way as convenonal lead-acid baeries, but
when there is deep discharge at the end of the normal cycle, a voltage
of 15.4V should be applied for a certain me. Each manufacturer
determines what this me should be, so please refer to your baery
manual to nd out the best charge cycle for your staonary baery.

17
Baery
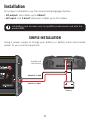
SIMPLE INSTALLATION
Installaon must be done only by qualied professionals and with the
product OFF.
Amplier and
other devices
NEGATIVE: 2 AWG
POSITIVE: 2 AWG
Installation
DC output: Use cables up to 33mm².
AC input: Use 1.5mm²

18
Amplier and
other devices
NEGATIVE: 2 AWG
POSITIVE: 2 AWG
Baery
When using more than one source in parallel,
use the same mode and output voltage.
PARALLEL INSTALLATION

19
INSTALLATION ONLY AS POWER SUPPLY
To use the power supply as a non-baery power supply, make
sure that the total consumpon of the powered equipment
does not exceed the rated current supplied by the power
supply. If the peak consumpon exceeds this value, the power
supply will trigger protecon.
Charging tips
▪ Safe charging: Use the SLOW charge mode to provide a deeper charge and
▪ Baery Bank: 250A 25A
▪ Charged baery: 14.4V
▪ Monitoring:
and an ammeter are needed to monitor this process.
▪ Best results: 14.4V for
Amplier and
other devices
NEGATIVE: 2 AWG
POSITIVE: 2 AWG

20
Any updates made in this manual will be available for consultaon by the consumer free of charge
on the brand' site. It is recommended that the updated manual be consulted whenever necessary.
Images contained in this manual are merely illustrave, and may dier from the real product.
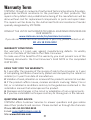
Technical Specications
Automac Bi-volt (127Vac/220Vac)
127V: 80V ~ 140V / 220V: 160V ~ 240V
12.6V / 13.8V / 14.4V / 15.4V
50A @ 12.6V
127V: 10.5A / 220V: 6A
90%
Slow Load / Fast Load / Full Load
Red LED: Stand By/Prot
LED blue: Product in operaon (ON)
LED green: 15.4V mode ON
Fuse 15A
7.5V
2.4" x 6.8" x 7.2"
3 lb
Nominal chain:
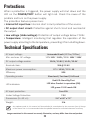
Protections
POWER/PROT
▪ Internal AC input fuse:
▪ DC output short circuit:
the output.
▪ Low voltage (Undervoltage):
▪ Temperature:
A página está carregando...
A página está carregando...
A página está carregando...
A página está carregando...
A página está carregando...
A página está carregando...
A página está carregando...
A página está carregando...
A página está carregando...
A página está carregando...
A página está carregando...
A página está carregando...
-
 1
1
-
 2
2
-
 3
3
-
 4
4
-
 5
5
-
 6
6
-
 7
7
-
 8
8
-
 9
9
-
 10
10
-
 11
11
-
 12
12
-
 13
13
-
 14
14
-
 15
15
-
 16
16
-
 17
17
-
 18
18
-
 19
19
-
 20
20
-
 21
21
-
 22
22
-
 23
23
-
 24
24
-
 25
25
-
 26
26
-
 27
27
-
 28
28
-
 29
29
-
 30
30
-
 31
31
-
 32
32


StetSom POWER SUPPLY INFINITE BLACK 50A Manual do proprietário
- Tipo
- Manual do proprietário
em outras línguas
Artigos relacionados
-
StetSom BRAVO CHAGER 50A Manual do proprietário
-
-
-
-
-
-
StetSom VULCAN 2000 Manual do proprietário
-
-
-