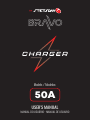
StetSom BRAVO CHAGER 50A Manual do proprietário
- Tipo
- Manual do proprietário

USER'S MANUAL
MANUAL DO USUÁRIO • MANUAL DE USUARIO
Models / Modelos:
50A

2
Introduction
Thank you for choosing a STETSOM product! Our new line of power supplies/chargers
provide high performance and eciency thanks to high-quality components and
technologies developed for battery management and charging. Their design has an
internal heat sink that allows for intense and prolonged use without overheating or loss
of power.
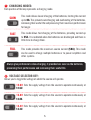
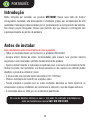
Before installing
Read this manual carefully before using the product.
▪ All connections must be made with the product OFF.
▪ Always use cable sizes recommended by the manual. This guarantees maximum security
for your installation and the perfect functioning of the product.
▪Only use sockets and extension cords compatible with the current consumption of the
source. Using poorly installed, poorly sized, or even defective outlets can damage the
product or oer risks.
▪ The source has an automatic bivolt circuit (127/220Vac).
▪ Carry out the installation in a firm, ventilated and dry place.
▪ Never handle the product with wet hands, barefoot or attempt to repair it. Internal
components operate at high voltage and pose a risk of electric shock.
▪ Installation must be done by a qualified professional.
ENGLISH
In case of doubt, ask the store where the installation was carried out or contact
our Customer Service: +55 18 2104 9412.

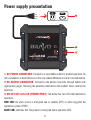
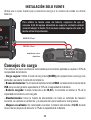
Power supply presentation
50A
POWER SUPPLY
POWER SUPPLY
& CHARGER
& CHARGER
OUTPUT
PROT
POWER
BIVOLT AUTOMATIC
WITH STATIONARY CHARGING
2
3
1
BR
US
3
1. AC POWER CONNECTOR: Connect to a compatible outlet for product operation. Do
not use adapters or bend the cord, as this may reduce eciency or cause it to malfunction.
2. DC OUTPUT CONNECTOR: Connect to the battery terminals through cables with
appropriate gauges, following the polarities indicated on the product. Never reverse the
polarities.
3. ON/OFF KEY with LED (POWER/PROT): The button has two LED's that indicate its
operation:
RED LED: On when source is energized and in standby (OFF) or when triggered the
protection system (PROT).
BLUE LED: Indicates that the product is energized and in operation (ON).

4
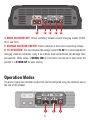
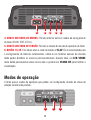
Operation Modes
The power supply has operation modes that can be configured using the selection key on
the side of the product.
4. MODE SELECTOR KEY: Allows switching between source charging modes (SLOW,
FAST, and FULL).
5. VOLTAGE SELECTOR SWITCH: Allows selection of the source's operating voltage.
6. 15.4V BUTTON: This key activates the voltage mode at 15.4V. It is recommended for
charging stationary batteries, using it on ordinary lead acid batteries can damage them
permanently. When active, a GREEN LED on this button will remain lit even when the
product is in STAND-BY for easy viewing.
1 32
2 3 4 5 6

5
CHARGING MODES:
Each position of the key represents a charging mode.
1
Always give preference to slow-charging, it provides less wear on the batteries,
preserving their performance and increasing their useful life.
This mode allows slower charging of the batteries, limiting the current
up to 8A. This prevents overcharging and overheating of the batteries,
increasing their useful life and preserving their maximum performance
for longer.
SLOW
FAST
FULL
This mode allows fast charging of the batteries, providing current up
to 25A. It is indicated when the batteries are discharged and there is
little time to charge them.
This mode provides the maximum source current (50A). This mode
can be used to charge multiple batteries or to power amplifiers and
other systems.
VOLTAGE SELECTOR KEY:
Allows you to toggle the voltage at which the source will operate.
2
12.6V: Sets the supply voltage from the source to operate continuously at
12.6V.
13.8V: Sets the supply voltage from the source to operate continuously at
13.8V.
14.4V: Sets the supply voltage from the source to operate continuously at
14.4V.

6
50A
POWER SUPPLY POWER SUPPLY
& CHARGER& CHARGER
OUTPUT
PROT
POWER
BIVOLT AUTOMATIC
WITH STATIONARY CHARGING
15.4V BUTTON:
This button sets the supply voltage from the source to operate continuously at 15.4V.
When this switch is pressed (on), the button's GREEN LED will remain lit even with
the product in STAND-BY for easy viewing. This mode is recommended for
charging stationary batteries, using it on ordinary lead-acid batteries can
permanently damage them.
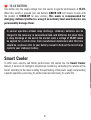
Smart Cooler
To oer more security and better performance, the source has the Smart Cooler
feature. It consists of intelligent temperature monitoring, controlling the rotation of the
Cooler according to the need, avoiding the overheating of the power supply and providing
a quieter operation, preserving its performance and increasing its useful life.
3
In normal operation without deep discharge, stationary batteries can be
charged in the same way as conventional lead-acid batteries, but when there
is deep discharge at the end of the normal cycle, a voltage of 15.4V should
be applied for a certain time. Each manufacturer determines what this time
should be, so please refer to your battery manual to find out the best charge
cycle for your stationary battery.

7
50
A
POWER SUPP
LY
POWER SUPPLY
& CHARGER
& CHARGER
OUTPUT
PROT
POWER
BIVOLT AUTOMATIC
WITH STATIONARY CHARGING
Baery
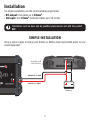
SIMPLE INSTALLATION
Using a power supply to charge your battery or battery bank and provide power to your
sound equipment:
Installation must be done only by qualified professionals and with the product
OFF.
Amplier and
other devices
NEGATIVE: 2 AWG
POSITIVE: 2 AWG
Installation
For proper installation, use the recommended gauges below:
▪ DC output: Use cables up to 33mm².
▪ AC input: Use 1.5mm² extension cables up to 10 meters.

8
Amplifier and other
devices
NEGATIVE: 2 AWG
POSITIVE: 2 AWG
Battery
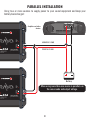
When using more than one source in parallel, use
the same mode and output voltage.
PARALLEL INSTALLATION
Using two or more sources to supply power to your sound equipment and keep your
battery bank charged:
50A
POWER SUPPLY
POWER SUPPLY
& CHARGER
& CHARGER
OUTPUT
PROT
POWER
BIVOLT AUTOMATIC
WITH STATIONARY CHARGING
50A
POWER SUPPLY
POWER SUPPLY
& CHARGER
& CHARGER
OUTPUT
PROT
POWER
BIVOLT AUTOMATIC
WITH STATIONARY CHARGING

9
50A
POWER SUPPLY
POWER SUPPLY
& CHARGER
& CHARGER
OUTPUT
PROT
POWER
BIVOLT AUTOMATIC
WITH STATIONARY CHARGING
INSTALLATION ONLY AS POWER SUPPLY
Using one or more sources to supply power to your sound equipment without using
batteries:
To use the power supply as a non-battery power supply, make sure that
the total consumption of the powered equipment does not exceed the
rated current supplied by the power supply. If the peak consumption
exceeds this value, the power supply will trigger protection.
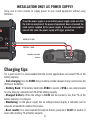
Charging tips
For a good result, it is recommended that the current applied does not exceed 10% of the
battery capacity.
▪ Safe charging: Use the SLOW charge mode to provide a deeper charge and increase the
lifetime of the battery.
▪ Battery Bank: If the battery bank totals 250A, to current of 25A is now recommended
for slow charging, equivalent to 10% of the battery capacity.
▪ Charged battery: When the voltage is 14.4V and the current is less than 1% of the
battery capacity, it is charged.
▪ Monitoring: As the power supply has no voltage/current display, a voltmeter and an
ammeter are needed to monitor this process.
▪ Best results: It is recommended to keep the battery powered at 14.4V for another 8
hours after reaching 1% of battery capacity.
Amplifier and other
devices
NEGATIVE: 2 AWG
POSITIVE: 2 AWG

10
Any updates made in this manual will be available for consultation by the consumer free of charge on the brand'
site. It is recommended that the updated manual be consulted whenever necessary.
Images contained in this manual are merely illustrative, and may dier from the real product.
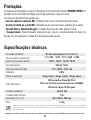
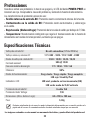
Technical Specications
Automatic Bi-volt (127Vac/220Vac)
127V: 80V ~ 140V / 220V: 160V ~ 240V
12.6V / 13.8V / 14.4V / 15.4V
50A @ 12.6V
127V: 10.5A / 220V: 6A
90%
Slow Load / Fast Load / Full Load
Red LED: Stand By/Prot
LED blue: Product in operation (ON)
LED green: 15.4V mode ON
Fuse 15A
7.5V
2.4" x 6.8" x 7.2"
3 lb
AC input voltage:
Min. and max. AC voltage:
DC output voltage modes:
Nominal chain:
Maximum power consumption:
Eciency:
Operating modes:
LED indicators:
AC input protection:
Under Voltage Protection:
Dimensions (H x W x L):
Weight:
Protections
When a protection is triggered, the power supply will shut down and the LED on the
POWER/PROT button will light red. Check the cause of the problem and turn on the
power supply.
The protection features present are:
▪ Internal AC input fuse: Internal short circuit protection of the source.
▪ DC output short circuit: Protection against short circuit and overload at the output.
▪ Temperature: Intelligent monitoring that regulates the operation of the power supply
according to the temperature, preventing it from shutting down.

11
Warranty Term
STETSOM, through its network of Authorized Technical Assistance Providers, guarantees
technical assistance to the purchaser of their products. The repairs of any defects duly
established as being of the manufacturer will be done without cost for replacement
components or parts and repair labor. The repairs will be done by the Authorized Technical
Assistance Provider specially designated by STETSOM.
CONSULT THE LIST OF AUTHORIZED TECHNICAL ASSISTANCE PROVIDERS ON OUR
WEBSITE: :
www.stetsom.com.br/en/assistencias-tecnica
If you do not locate technical assistance in your city, please contact us at:
BR +55 18 2104-9412
WARRANTY CONDITIONS:
Our warranty is 1 (one) year against manufacturing defects. Its validity starts on the date
of the Sale to the FINAL Consumer.
To make use of the benefits of this warranty, you must present one of the following
documents: the Final Consumer’s SALE NOTE or this completed CERTIFICATE.
CASES THAT VOID THE WARRANTY:
1. 1 year after the issuance of the invoice of sale to the consumer or 1 year of completing
certificate of warranty (dated and stamped by the retailer or installer) or 1 year from date
of manufacture.
2. Violation of seals, alteration or removal of the product’s serial or lot number.
3. If the product suers misuse, careless accidents involving: Water, Fire or Fall, or is
installed in conditions contrary to the guidelines contained in the installation manual that
accompanies the product.
4. Damages and changes in the circuit or adaptation of non-original parts.
5. If you use installation techniques contrary to those given in the manual.
QUESTIONS AND ADVICE:
STETSOM oers Customer Services to answer questions and give advice about their
products and services. Please contact us through the channels:
Phone: BR +55 18 2104-9412.
E-mail: [email protected]
Site: www.stetsom.com

PORTUGUÊS
12
Introdução
Muito obrigado por escolher um produto STETSOM! Nossa nova linha de fontes/
carregadores fornecem alto desempenho e eficiência graças aos componentes de alta
qualidade e tecnologias desenvolvidas para o gerenciamento e carregamento de baterias.
Seu design possui dissipador interno que permite seu uso intenso e prolongado sem
superaquecimento ou perdas de potencia.
Antes de instalar
Leia atentamente este manual antes de usar o produto.
▪ Todas as conexões devem ser feitas com o produto DESLIGADO.
▪ Sempre utilize bitolas de cabos recomendadas pelo manual. Isso garante máxima
segurança a sua instalação e perfeito funcionamento do produto.
▪ Apenas utilize tomadas e extensões compatíveis com o consumo de corrente da fonte.
Utilizar tomadas mal instaladas, mal dimensionadas ou até mesmo com defeito podem
danificar o produto ou oferecer riscos.
▪ A fonte conta com circuito bivolt automático (127/220Vac).
▪ Efetue a instalação em local firme, arejado e seco.
▪ Nunca manipule o produto com as mãos molhadas, descalço ou tente repará-lo, os
componentes internos trabalham em alta tensão e oferecem risco de choque elétricos.
▪ A instalação deve ser feita por um profissional qualificado.
Em caso de dúvidas, informe-se com a loja onde foi realizada a instalação ou
entre em contato com o nosso SAC: 018 2104 9412.

50A
POWER SUPPLY
POWER SUPPLY
& CHARGER
& CHARGER
OUTPUT
PROT
POWER
BIVOLT AUTOMATIC
WITH STATIONARY CHARGING
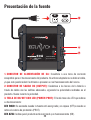
Apresentação da fonte
1
BR
US
2
3
13
1. CONECTOR DE ALIMENTAÇÃO AC: Conecte a uma tomada compatível para o
funcionamento do produto. Não use adaptadores ou dobre o cabo, isso pode reduzir a
eficiência ou ocasionar mal funcionamento ao mesmo.
2. CONECTOR DE SAÍDA DC (OUTPUT): Conecte aos terminais da bateria através
de cabos com bitolas adequadas, seguindo as polaridades indicadas no produto. Nunca
inverter as polaridades.
3. CHAVE ON/OFF COM LED (POWER/PROT): O botão possui dois LED's que indicam
seu funcionamento:
LED VERMELHO: Aceso quando fonte está energizada e em standby (OFF) ou quando
acionado o sistema de proteção (PROT).
LED AZUL: Indica que o produto está energizado e em funcionamento (ON).

1 32
2 3 4 5 6
14
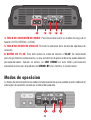
Modos de operação
A fonte possui modos de operação que podem ser configuradas através da chave de
seleção na lateral do produto.
4. CHAVE SELETORA DE MODOS: Permite alternar entre os modos de carregamento
da fonte (SLOW, FAST e FULL).
5. CHAVE SELETORA DE TENSÃO: Permite a seleção da tensão de operação da fonte.
6. BOTÃO 15,4V: Esta chave ativa o modo de tensão a 15,4V. Ele é recomendado para
o carregamento de baterias estacionárias, utilizá-lo em baterias comuns de chumbo
ácido podem danificar as mesmas permanentemente. Quando ativa, um LED VERDE
neste botão permanecerá aceso mesmo com o produto em STAND-BY para facilitar a
visualização.

1
SLOW
FAST
FULL
2
15
MODOS DE CARGA:
Cada posição da chave representa um modo de carregamento.
Sempre dê preferência ao carregamento por carga lenta, ele proporciona
menor desgaste das baterias, preservando seu desempenho e aumentando sua
vida útil.
Este modo permite o carregamento mais lento das baterias, limitando
a corrente em até 8A. Isso evita sobrecargas e aquecimento das
mesmas, aumentando sua vida útil e preservando seu desempenho
máximo por mais tempo.
Este modo permite o carregamento rápido das baterias, fornecendo
corrente de até 25A. Ele é indicado quando as baterias estão
descarregadas e dispõe-se de pouco tempo para carrega-las.
Este modo fornece a corrente máxima da fonte (50A). Esse modo
pode ser utilizado para carregar diversas baterias ou alimentar
amplificadores e outros sistemas.
CHAVE SELETORA DE TENSÃO:
Permite alternar a tensão na qual a fonte vai operar.
12.6V: Ajusta o fornecimento de tensão da fonte para operar de forma
continua a 12,6V.
13.8V: Ajusta o fornecimento de tensão da fonte para operar de forma
continua a 13,8V.
14.4V: Ajusta o fornecimento de tensão da fonte para operar de forma
continua a 14,4V.

50A
POWER SUPPLY POWER SUPPLY
& CHARGER& CHARGER
OUTPUT
PROT
POWER
BIVOLT AUTOMATIC
WITH STATIONARY CHARGING
3
16
BOTÃO 15.4V:
Este botão aciona o fornecimento de tensão da fonte de forma contínua à 15,4V. Quando
essa chave está pressionada (ligada), o LED VERDE do botão permanecerá aceso mesmo
com o produto em STAND-BY para facilitar a visualização. Esse modo é recomendado
para o carregamento de baterias estacionárias, utilizá-lo em baterias
comuns de chumbo-ácido podem danificá-las permanentemente.
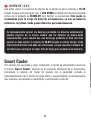
Smart Cooler
Para oferecer mais segurança e melhor desempenho, a fonte conta com o recurso
Smart Cooler. Consiste no monitoramento inteligente da temperatura controlando a
rotação do Cooler de acordo com a necessidade, evitando o superaquecimento da fonte
e proporcionando um funcionamento mais silencioso, preservando seu desempenho e
aumentando a sua vida útil.
Em funcionamento normal sem descarga profunda as baterias estacionárias
podem ser carregadas da mesma forma que as baterias convencionais de
chumbo-ácido, mas quando houver descarga profunda ao final do ciclo
normal deve ser aplicada a tensão de 15,4V por um determinado tempo. Cada
fabricante determina qual deverá ser esse tempo, desta forma consulte o
manual da sua bateria para saber qual o melhor ciclo de carga para a sua
bateria estacionária.

50
A
POWER SUPP
LY
POWER SUPPLY
& CHARGER
& CHARGER
OUTPUT
PROT
POWER
BIVOLT AUTOMATIC
WITH STATIONARY CHARGING
17
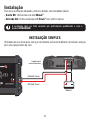
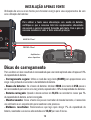
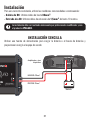
INSTALAÇÃO SIMPLES
Utilização de uma fonte para carregar sua bateria ou banco de baterias e fornecer energia
para seu equipamento de som:
A instalação deve ser feita somente por profissionais qualificados e com o
produto DESLIGADO.
Instalação
Para uma instalação adequada, utilize as bitolas recomendadas abaixo:
▪ Saída DC: Utilize cabos de até 33mm².
▪ Entrada AC: Utilize extensão de 1,5mm² com até 10 metros.
Bateria
Amplificador e
outros dispositivos
NEGATIVO: 33mm²
POSITIVO: 33mm²

Bateria
50A
POWER SUPPLY
POWER SUPPLY
& CHARGER
& CHARGER
OUTPUT
PROT
POWER
BIVOLT AUTOMATIC
WITH STATIONARY CHARGING
50A
POWER SUPPLY
POWER SUPPLY
& CHARGER
& CHARGER
OUTPUT
PROT
POWER
BIVOLT AUTOMATIC
WITH STATIONARY CHARGING
18
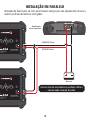
Amplificador e
outros dispositivos
NEGATIVO: 33mm²
POSITIVO: 33mm²
INSTALAÇÃO EM PARALELO
Utilização de duas fontes ou mais para fornecer energia para seu equipamento de som e
manter seu banco de baterias carregados:
Ao usar mais de uma fonte em paralelo, utilize o
mesmo modo e tensão de saída.

50A
POWER SUPPLY
POWER SUPPLY
& CHARGER
& CHARGER
OUTPUT
PROT
POWER
BIVOLT AUTOMATIC
WITH STATIONARY CHARGING
19
INSTALAÇÃO APENAS FONTE
Utilização de uma ou mais fontes para fornecer energia para seus equipamentos de som
sem utilização de baterias:
Para utilizar a fonte como alimentação sem auxilio de baterias,
certifique-se que o consumo total dos equipamentos alimentados
não exceda a corrente nominal fornecida pela fonte. Caso o pico de
consumo exceda esse valor, a fonte acionará proteção.
Dicas de carregamento
Para se obter um bom resultado é recomendado que a corrente aplicada não ultrapasse 10%
da capacidade da bateria.
▪ Carregamento seguro: Utilize o modo de carga lenta (SLOW) para proporcionar uma
carga mais profunda e aumentar a durabilidade da bateria.
▪ Banco de baterias: Se o banco de baterias totalizar 250A à corrente de 25A passa a
ser recomendada para se ter uma carga lenta, equivalendo a 10% da capacidade das baterias.
▪ Bateria carregada: Quando a tensão estiver em 14,4V e a corrente for menor que 1%
da capacidade da bateria, estará carregada.
▪ Monitoramento: Como a fonte não possui mostrador de tensão/corrente, é necessário
um voltímetro e um amperímetro para monitorar este processo.
▪ Melhores resultados: Recomenda-se que logo após atingir 1% da capacidade da
bateria, mantenha as mesmas alimentadas em 14,4V por mais 8 horas.
Amplificador e
outros dispositivos
NEGATIVO: 33mm²
POSITIVO: 33mm²

20
Bi-volt automático (127Vac/220Vac)
127V: 80V ~ 140V / 220V: 160V ~ 240V
12,6V / 13,8V / 14,4V / 15,4V
50A @ 12,6V
127V: 10,5A / 220V: 6A
90%
Carga lenta / Carga rápida / Carga plena
LED vermelho: Stand By/Prot
LED azul: Produto em funcionamento (LIGADO)
LED verde: Modo 15,4V ligado
Fusível 15A
7,5V
63 x 174,5 x 183 mm
1,4 Kg
Tensão de entrada AC:
Tensão mínima e máxima AC:
Modos de tensão da saída DC:
Corrente nominal:
Consumo máximo da rede:
Eficiência:
Modos de operação:
LED's indicadores:
Proteção entrada AC:
Proteção Under Voltage:
Dimensões (A x L x C):
Peso:
Eventuais atualizações feitas neste manual serão disponibilizadas para consulta do consumidor
gratuitamente no site da marca. Recomenda-se que o manual atualizado seja consultado sempre
que necessário.
Imagens condas neste manual são meramente ilustravas, podendo diferenciar do produto real.
Proteções
Ao acionar uma proteção, a fonte irá desligar e o LED presente no botão POWER/PROT irá
acender na cor vermelha. Verifique a causa do problema e religue a fonte.
Os recursos de proteção presentes são:
▪ Fusível interno entrada AC: Proteção contra curto circuito interno da fonte.
▪ Curto circuito na saída DC: Proteção contra curto circuito e sobrecarga na saída.
▪ Tensão Baixa (Undervoltage): Proteção de tensão de saída abaixo 7,5Vdc.
▪ Temperatura: Monitoramento inteligente que regula o funcionamento da fonte de
acordo com a temperatura, evitando o desligamento da mesma.
Especicações técnicas
A página está carregando...
A página está carregando...
A página está carregando...
A página está carregando...
A página está carregando...
A página está carregando...
A página está carregando...
A página está carregando...
A página está carregando...
A página está carregando...
A página está carregando...
A página está carregando...
-
 1
1
-
 2
2
-
 3
3
-
 4
4
-
 5
5
-
 6
6
-
 7
7
-
 8
8
-
 9
9
-
 10
10
-
 11
11
-
 12
12
-
 13
13
-
 14
14
-
 15
15
-
 16
16
-
 17
17
-
 18
18
-
 19
19
-
 20
20
-
 21
21
-
 22
22
-
 23
23
-
 24
24
-
 25
25
-
 26
26
-
 27
27
-
 28
28
-
 29
29
-
 30
30
-
 31
31
-
 32
32


StetSom BRAVO CHAGER 50A Manual do proprietário
- Tipo
- Manual do proprietário
em outras línguas
Artigos relacionados
-
StetSom POWER SUPPLY INFINITE BLACK 50A Manual do proprietário
-
-
-
StetSom 12000 Manual do usuário
-
-
-
-
-